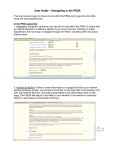
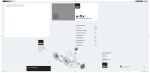
1
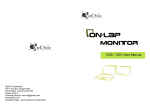
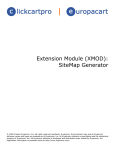
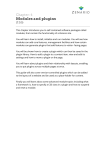
Chapter: 3 Navigation (7.0.5) This chapter describes how to create and manage navigation on your site. You will learn how the hierarchical menu system works in Zenario. You will learn how to create a menu node in the hierarchy, how to define its text, set its position and edit its various properties. You will learn how to create breadcrumb trails that lead from the home page through the hierarchy to the page that the visitor is seeing. Zenario User Manual (7.0.5) Introduction to navigation Zenario offers a range of tools for creating user friendly, manageable navigation for a site. The principal navigation system is via the menu, which is hierarchical, in which "home" and other "top level" pages sit at the top, and imaginary trees of pages lie beneath them in an organised, hierarchical structure. This is supported by navigational tools such as breadcrumb trail navigation, which helps a visitor clearly see their location within the site. A breadcrumb trail helps the visitor easily find his way to pages "above" the current page, and to the home page. There are many variations on the menu hierarchy, with the possibility of various sections to the hierarchy. Menu sections allow you to put several menus on a page, and the make it easy to segregate special areas of a site, such as a password-protected extranet area, that do not have the same navigation as the home page. It is also possible for several menu "nodes" to link to the same web page; these are called secondary menu nodes. First, let's look at the central concept of this Chapter: the menu navigation system. 2 Zenario User Manual (7.0.5) Key Terms Menu node: the basic building block of the menu hierarchy. Menu level: a grouping of menu nodes that are all either at the top level, or that have the same parent. Level 1 nodes have no parent node. Child node: a menu node is a child of another node when it is immediately beneath it in the hierarchy. Parent node: a menu node which has at least one child node beneath it. Sibling: a menu node is a sibling of another node when both have the same parent node. Menu navigation as seen on the front-end The menu system in Zenario is laid out in a hierarchy. In a typical menu hierarchy, each node links to a web page. We call each node of this hierarchy a menu node. What is a menu node? A menu node corresponds to a visible navigational link that a visitor may click on in order to reach a destination web page. In simple terms it is the menu a site visitor uses to move to different pages on a website. Usually, each menu node has its destination link set to an HTML content Item. Note that we are considering only the logical structure here; it doesn't make any difference whether you have "drop-down menus", or a menu that you must click in order to reach a page showing the items beneath it. A menu node may have child nodes beneath it in the hierarchy. It may link to many different types of content item; it may not link to anything at all; or it may link to an external URL. One node may also link to the same destination as another node. 3 Zenario User Manual (7.0.5) Note Menu nodes that are shown with italics represent that the node cannot be seen by a site visitor, as usually it is linked to an unpublished content item. An example of the main menu -‐ desktop A website may have a menu navigation bar, populated with menu nodes, on the front-end of website: Notice the menu nodes: Home, About Us, Products etc. We call these Level 1 or “top-level” menu nodes. Note In the Zenario menu hierarchy, Home is rarely on a level by itself, but is alongside other top-level menu nodes, as the example shows. Menus can have a hover state, so that when a visitor hovers their mouse over a menu node, the node changes style in some way. The hover state can also cause its "child" nodes to appear. For example, if you hover over Products, the background colour changes and its child nodes appear in a sub-menu like this: 4 Zenario User Manual (7.0.5) The child nodes of Products are called Level 2 menu nodes. A site may have Level 3, Level 4 and other levels. There is no limit on the number of levels you can create. An example of the main menu -‐ Responsive There is also a responsive menu on Zenario which means that when your website is viewed on a mobile device, the desktop menu will be hidden and responsive menu will change into a touch screen friendly version. The menu is represented by the three horizontal lines shown below. Once pressed or clicked the top-level menu nodes will appear: 5 Zenario User Manual (7.0.5) Viewing the menu navigation in Organizer The menu navigation showing the nodes and the structure of the menu can be seen and edited in Organizer by clicking on the menu navigation icon. You will then see the menu hierarchy. 6 Zenario User Manual (7.0.5) You may notice that some of the nodes look slightly different to the majority. The node with the icon is secondary node. This links to the same page as another node and is explained in more detail later in this chapter. The icon represents a node that does not link to any content item. The icon tells you that this node links to an external URL. Editing the menu This next section will explain how you can restructure, rename and edit the destination web page of a menu node. Restructure the menu hierarchy It is possible to rearrange the menu nodes to show in a different order on the front-end. To do this go into Organizer. Click on the menu navigation icon. You will then be presented with a screen that shows the “Main” section of the menu. This section is the bulk of your menu structure, more sections can be added if a different menu structure is needed (see advanced navigation topics later on in this chapter). 7 Zenario User Manual (7.0.5) It is possible to rearrange the menu nodes on this screen. In this example “Contact us” will be moved next to Home. Simply click on the dotted area on the extreme left of a menu node box and drag it into a new position. Zenario will ask if you want to apply the changes, click yes and the node will be saved in that position. 8 Zenario User Manual (7.0.5) You can see the change on the front-end of your website as well: Renaming a menu node There may be an instance where you want to change the name of the node to display a different heading for one of your web pages in the menu. To do this this go into the menu navigation area in Organizer: Tick the check box of the node you want to edit and some options will appear. Click on “Menu Node properties”. 9 Zenario User Manual (7.0.5) A pop-up box will appear with various editable settings. Notice the “Menu text” field. Change the text in the menu text field in order to change the menu node text and therefore the front-end menu text. For example this node has been changed to “Get in touch”. On the front-end, the menu now looks like this: 10 Zenario User Manual (7.0.5) Changing the page a menu node links to As well as changing the name of a menu node, you can also change the page that it links to. In order to do this you select the menu node in Organizer, and view its menu properties. In the properties box there is a section named “Content item:” here you can select a different content item to link the menu node to. 11 Zenario User Manual (7.0.5) Creating menu nodes You can create menu nodes in a variety of ways. You can also quickly create a brand new HTML page at the same time. Crea=ng a menu node and HTML content item on the front end To create a new menu node on the front-end of your website, go to the Menu tab in the admin toolbar and you will see a small yellow icon. Click the icon and you will see a quick-create box that will both create an HTML content item and a menu node. 12 Zenario User Manual (7.0.5) Browser title will be the title you choose for the page itself, Zenario will populate the menu node text with the same text. This can be changed if needed. we have chosen to call this page “News”. Click save and you will be taken to your new page, and see it in the menu. Crea=ng a menu node and HTML content item in Organizer You can also easily create a new menu node when in the Menu navigation area in Organizer. We will create the “News” page but in Organizer. Click on the orange button that says ‘Create a menu node’. 13 Zenario User Manual (7.0.5) The quick-create form as seen when creating a node on the front-end will appear. Create your new page, in this case News. The new page “News” has been created and put as a new top-level menu node. Note You can also create a sub-level or ‘Child Menu Node’ by clicking the orange button of the same description. Deleting a menu node You can easily delete a menu node, by going into the menu navigation area in Organizer, highlighting a menu node and clicking “Delete menu node”. 14 Zenario User Manual (7.0.5) Note that this does not delete the page the it is linked to. The page will then become “Orphaned”. WARNING Take care when deleting menu nodes, especially those with child Nodes. If you delete a menu node that has child nodes, all of its child nodes, and any nodes beneath them, will be deleted recursively. When you delete menu nodes, any linked content items will be left intact, but may be made orphans. Orphaned content items An orphaned content item means that the page does not have a place in any menu structure. This means that there is no way for a site visitor to get to this page via the menu. Pages such as “not found” and “no access” will be orphaned pages by default on your site, as they will only be seen due to a special circumstance. ADach an orphaned page to the menu If you want to have a page that is orphaned in your menu you can select that content item in Organizer, go to “Actions” and then ‘Attach to menu”. 15 Zenario User Manual (7.0.5) The next screen will show you the menu sections of the site. Click the “+” next to the section you want the node in and as this is a toplevel menu node, the tick box that is inline with the top-level nodes is ticked. Click “Create menu node”. You will then return to the content item’s screen, where you can see that in the “Menu Node” column, the News page now has a node listed. 16 Zenario User Manual (7.0.5) Breadcrumb trails Breadcrumb trails provide links back to the parent pages of the current page. They provide a "trail" for the site visitor to follow back to the home page, or other important pages. An arrowed sign (>>) is the default symbol used as the hierarchy separator, although designers may use other symbols. Breadcrumb trails show the path from the home page of the site to the current page via the menu hierarchy. Here is an example of a breadcrumb trail: Home > News > New Website Launched 17 Zenario User Manual (7.0.5) The text displayed in the breadcrumb trail is the same text that is used for the menu node. Tip Many websites feature a breadcrumb trail on every page (although it is often omitted from the home page). Having a breadcrumb trail as standard on a site's pages makes the site easier to navigate. A breadcrumb trail is helpful if a visitor arrives at a page as a result of a search, as it shows the visitor which part of the site he's in, and how to navigate up to a higher level. It is usual to put Home at the beginning of the breadcrumb trail, even if the next named node in the breadcrumb trail is not a child node. Advanced navigation topics Primary and Secondary Nodes: crea=ng several menu links to the same page Most web pages only require a single menu node to link to them. However, a content item can potentially have any number of menu nodes linking to it. Why would you want a page to appear in more than one place in the menu? For example, you may have a contact page that you wish to link to from several places in your site's navigation, perhaps even from different sections of the menu (such as the main menu and the footer navigation). This poses a problem: if several menu nodes in the hierarchy link to the same page, what does that page's breadcrumb trail look like? The answer is to have just one of the paths define the breadcrumb trail - the primary menu node. 18 Zenario User Manual (7.0.5) When more than one menu node links to the same content item: ❖ One of the menu nodes is nominated as the primary menu node. ❖ The remainder are secondary menu nodes. Lets look how you can create, for example, a secondary menu node in the footer for the contact page. First navigate to the contact page, switch to the Menu tab, and look at the footer menu. You will see the familiar yellow add menu icon. Click this to create a menu node in the footer. 19 Zenario User Manual (7.0.5) The quick-create box will open but instead of creating a new page click on the radio button that says “Link to an existing content item...” and then click on the “More Menu Options” button. A different screen will then appear. Here you should have the type of link as “Internal” and click on “Select a content item”. A list of your web pages will then appear, select the contact page and click “Choose”. 20 Zenario User Manual (7.0.5) Then enter the menu text you want, it can be the same or different to the primary menu node. We have called it “Contact us”. Click save and you will see the new menu node in the footer. 21 Zenario User Manual (7.0.5) There will now be a number 2 next to the menu tab, this is the admin tab for the secondary menu node you just created. Here you can edit and organize the node. In Organizer, a secondary node will also have a 2 as its icon. Making a secondary node primary Currently on your website the primary node for the contact page uses “Contact” as the primary node, which is represented in the breadcrumb trail. Should you want to make the secondary node of “Contact us” primary then you click on the “2” in the admin toolbar, when on the contact page, and then under “Advanced” click “Make primary”. 22 Zenario User Manual (7.0.5) “Contact us” will now be the primary node. Note Please note that because the now primary node is in the footer, which is a different menu section, it will not display in the current breadcrumb as the default one links to the “main” menu section. Menu sec=ons Menu sections are designed so that you can have more than one menu hierarchy on your website. For example, the footer uses a different menu section from the “main” menu of the site. To access, edit and create new areas go to the Menu navigation area in Organizer and go to the “All menu sections” submenu. Here you can access the Main or Footer sections of menu, by clicking on the folder icon adjacent to each one. 23 Zenario User Manual (7.0.5) Making a menu node invisible Sometimes a situation arises where you may want to hide a menu node from the menu, but still have the breadcrumb trail on the page. A good example of this is a news page that may have hundreds of articles as child nodes. If this was left to show in the menu it would be far too long to read. To make a menu node invisible, go to the front-end of the page, click on the Menu tab and click “Menu Node properties”. On the properties pop-up box tick the “Invisible in menu navigation” checkbox. 24 Zenario User Manual (7.0.5) That page will now be hidden from the menu navigation, but still have its breadcrumb trail. Do this for all of the items under news and your site will looks like this: 25 Zenario User Manual (7.0.5) Summary This chapter has illustrated the workings of the Zenario menu system. As you have seen, menu navigation is the backbone of navigation in a Zenario built website. The menu is in a hierarchical structure, with a link to the home page and a number of other items at the top level. These things are menu nodes, top level nodes can have child nodes, and those nodes can in turn have child nodes; and so on, to any number of levels. Each menu node usually links to a content item (though a node can also be unlinked, or can link to an external URL). You have learned about the tools for working with the menu. These include the functions available on the Menu tab of the Admin Toolbar; and the Menu section of Organizer. You have learned how to create and delete nodes; how to change the text of a node; and how to move a menu node to a different location in the menu tree. Later in the chapter you have learned about the significance of a breadcrumb trail, a useful tool for showing a visitor "where he is" in your site. You have learned about Primary and Secondary menu nodes, and how to have more than one menu node linking to the same content item. The techniques that you have learned in this chapter are indispensable for working with a Zenario site and ensuring that it has user-friendly navigation. 26