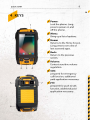
1
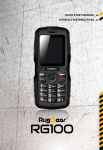
QUICK START MANUAL_ EN
SCHNELLSTARTANLEITUNG_ DE
2
TITEL DES KAPITELS
CONTENT
SAFETY INSTRUCTIONS
1_Introduction
2_Faults and damages
3_Further safety advises
5
6
7
QUICK START
4_Keys
5_First steps
5.1_Battery
5.1.1_Installing and extracting the battery
5.1.2_Charging the battery
5.1.3_Battery use
5.2_Installation of the SIM cards
5.3_Installation of the microSD card
9
10
10
10
11
11
12
12
FIRST USE
6_First use
6.1_Powering on your phone
6.2_Powering off your phone
6.3_Locking and unlocking the phone
6.4_Using the touchscreen
6.5_Connecting the phone with a computer
12
12
13
13
14
15
TITEL DES KAPITELS
3
EN
DISPLAY LAYOUT
7_Display layout
7.1_Status bar
7.1.1_Notification panel
7.2_Quick access panel
7.3_Home screen
7.3.1_Adding a new screen item
7.3.2_Moving a screen item
7.3.3_Removing a screen item
7.3.4_Creating a folder
7.3.5_Renaming a folder
7.3.6_Changing the wallpaper
15
16
17
18
18
18
19
19
19
19
20
INFORMATION
8_Specifications
9_Troubleshooting
10_Maintenance
11_SAR
Service center
20
21
23
24
26
6
SAFETY INSTRUCTIONS
2_FAULTS AND DAMAGES
If there is any reason to suspect that the safety of the phone has
been compromised, it must be withdrawn from use immediately.
Measures must be taken to prevent any accidental restarting
of the phone.
The safety of the phone may be compromised if, for example:
malfunctions occur.
the housing of the phone or the battery shows damage.
the phone has been subjected to excessive loads.
the phone has been stored improperly.
SAFETY INSTRUCTIONS
7
3_FURTHER SAFETY ADVISES
Do not touch the screen of the phone with sharp objects.
Dust particles and dirt may scratch the screen. Please maintain
the screen clean. Remove dust on the screen with a soft cloth
gently and do not scratch the screen.
Charge the phone under indoor conditions only.
Please do not put the phone in environments with excessive
temperatures as this could lead to heating of the battery,
resulting in fire or explosion.
Do not charge the phone near any flammable or explosive
substances.
Do not charge the phone in environments with much
dust, humidity, or excessively high or low temperatures
(the permitted charging temperature range is 0 °C – 45 °C).
Do not use the phone in areas where regulations or legislatives
prohibit the use of a mobile phone.
Do not expose the phone, the battery or the charger to strong
magnetic fields, such as are emitted from induction ovens or
micro-waves.
Do not attempt to open or repair the phone. Improper repair
or opening can lead to the destruction of the phone, fire or
explosion. Only authorized personnel are allowed to repair
the phone.
Only use accessories approved by RugGear Europe GmbH.
Please do not connect the poles of the battery directly, to avoid
short-circuiting the battery.
Power off the phone in hospitals or other places where the use
of mobile phones is prohibited. This phone may affect proper
work of medical equipment, like pacemakers, so always keep a
distance of at least 15 cm between the phone and these devices.
EN
8
SAFETY INSTRUCTIONS
Observe all corresponding laws that are in force in the
respective countries regarding the use of mobile phones
while operating a vehicle.
Please power off the phone and disconnect the charging cable
before cleaning the phone.
Do not use any chemical cleaning agents to clean the phone or
the charger. Use a damp and anti-static soft cloth for cleaning.
Do not discard old and abandoned lithium batteries into
the trash, send them to designated waste disposal locations
or return them to RugGear Europe GmbH.
The user alone is responsible for any and all damages and
liabilities caused by malware downloaded when using the
network or other data-exchange functions of the phone.
RugGear Europe GmbH cannot be held responsible for any
of these claims.
WARNING
RugGear Europe GmbH will not assume any liability for damages
caused by disregarding any of these advices or by any inappropriate use of the phone.
10
QUICK START
5_FIRST STEPS
5.1_BATTERY
The battery is inserted into the back of the phone. The battery
is not fully charged when the phone is purchased, but it contains
enough energy to power on the phone. To obtain best battery
performance and battery life, let the battery discharge completely
before charging it completely for the first three charging cycles.
5.1.1_INSTALLING AND EXTRACTING THE BATTERY
When installing the battery, insert the teeth at the bottom of the
battery into the corresponding notches of the phone, then put
the battery inside and press the battery down. Next, insert the battery cover in the same way and secure it by turning the two screws
with the delivered screw driver. Ensure that both – battery and
battery cover – is safely in place before powering on the phone.
QUICK START
11
EN
5.1.2_CHARGING THE BATTERY
Connect the USB-cable with the phone as
indicated in the picture.
Connect the plug with the socket of the
Power Supply.
After charging, remove the USB-cable from
the charger.
5.1.3_BATTERY USE
In actual use, the standby time and talk time of the phone varies
with the network status, working environment and usage.
When the power of the battery is lower than normal, the phone
will prompt you to charge it. Please charge the battery; otherwise
you may lose any files which have not been saved.
If you do not charge for a long time, the phone will be powered off
automatically.
WARNING
The phone may only be charged at ambient temperatures in
a range from 0 °C – 45 °C. Please do not use charging equipment
if the temperature exceeds this range. Only use the RugGear
approved USB-cable and charger.
12
QUICKSTART / FIRST USE
5.2_ INSTALLATION OF
THE SIM CARDS
The phone features two SIM
card slots (1, 2). If you have
installed two SIM cards, you
can choose your primary card in
SIM management.
Settings
1
5.3_ INSTALLATION OF
THE MICRO-SD CARD
2
Open the microSD card holder,
and insert the microSD card
into the slot (3), then close the
microSD card holder.
WARNING
Do not try to insert or remove any of the SIM cards when any
external power supply is connected, otherwise the SIM cards or
the phone may be damaged.
6_FIRST USE
6.1_POWERING ON YOUR PHONE
Press the Power key until the screen lights up.
Depending on the security settings of your SIM card, the phone
may ask you for your personal identification number (PIN) before
starting up.
3
FIRST USE
13
EN
The first time you power on your phone, you may be prompted
to assign a language, a date and a time zone and to enter your
personal information.
You will also be asked to sign in or set up your Google™ account.
You can do this later but please note that some of the functions
of the phone like the Google Play™ Store depend on a Google™
account.
6.2_POWERING OFF YOUR PHONE
1. Press and hold the Power key to open the Phone options menu.
2. Tap Power off.
3. Tap OK.
6.3_LOCKING AND UNLOCKING THE PHONE
Press the Power key to lock the phone. When the screen is
locked, you can still receive messages and calls.
If you leave your phone undisturbed for a while, the screen
will lock automatically.
To unlock the phone, press the Power key again. After
the screen has lit up, drag the lock icon to the unlock icon
to unlock the phone.
Depending on your security settings, the phone may ask for a PIN
to unlock. Please note that this is NOT the PIN of your SIM card, but
Security
a code that can be assigned under System settings
Screen lock.
14
FIRST USE
6.4_USING THE TOUCHSCREEN
This phone features a capacitive touchscreen. It is not necessary
to press the screen for it to work, a simple touch is enough.
The following gestures can be used with this phone:
Tap
To open an application (app), or to enter a character using
the on-screen keyboard, tap it with a finger.
Tap and hold
Tap and hold your finger to the screen for more than two
seconds to access further options where available.
Drag
Tap an icon and hold your finger to the screen. Then drag it
to where you would like to place it.
Double tap
Perform two taps onto a webpage or image to zoom in.
Double tap again to zoom out.
Flick
Touch the screen and flick your finger left, right, up or down
to scroll through available panels or lists.
Pinch
Touch the screen with two fingers near together. While touching the screen, put your fingers farther apart to zoom into
a webpage or picture. Do the reverse to zoom out again.
15
FIRST USE / DISPLAY LAYOUT
EN
6.5_CONNECTING THE PHONE WITH A COMPUTER
You can access the microSD card of the phone by any compatible
computer via the USB cable. The card will be accessed as a mass
storage device.
1. Connect your phone to the computer with the USB cable.
When connecting the phone to a computer for the first time,
the computer will install the necessary drivers automatically.
2. Tap turn on USB storage in the dialogue box that opens on the
phone and tap OK to confirm your choice. Your computer
will detect the microSD card as a removable disc. You can
now transfer files from and to the microSD card.
NOTE
While USB mass storage function is enabled, some functions
of the phone may not be available.
7_DISPLAY LAYOUT
After you sign in or when you power on the phone, by default the
Home Screen opens:
Status Bar
Home
Screen
Quick
Access Bar
The Home Screen is your
starting point to access
all the features on your
phone. It displays application icons, shortcuts
and other features. You
can customize the Home
Screen and display the
items you need.
16
DISPLAY LAYOUT
7.1_STATUS BAR
The status bar appears at the top of every screen.
On the right side, it displays phone status icons, such as the status
of the battery, GPS, data or mobile connections and the time.
On the left side, it displays notification icons, such as missed calls
or received messages.
STATUS ICONS
SIM1 or SIM2 current signal status, type (E for Edge,
3G for UMTS, H for HSDPA) and strength
Wi-Fi connection status and signal strength
Bluetooth® connection status
Airplane mode (all wireless interfaces are off)
Battery power level indicator
GPS is receiving location data
Vibration alert only
Silent mode (no ringtone, no vibration alert)
17
DISPLAY LAYOUT
EN
NOTIFICATION ICONS
Missed calls
One or several new e-mails
One or several new SMS
Alarm clock active
USB connection established
7.1.1_NOTIFICATION PANEL
Drag the Status Bar down to reveal the notification panel:
Your phone will notify you here when you
receive a new message or when there is an
upcoming event. The notification panel also
informs you about alarms, settings and other
relevant information.
Tap a notification to open a related application.
To remove notifications from the panel,
swipe the notification to the left or to the
right side of the panel.
Use the settings icon in the top right corner of
the notification panel to access system settings.
To close the notification panel, drag the bottom of the panel
to the top of the screen.
18
DISPLAY LAYOUT
7.2_QUICK ACCESS PANEL
Shortcuts to apps placed here are visible on every panel
of the Home Screen.
Tap on the App icon to open up the App Drawer.
Here you can start any App with a tap on its icon.
7.3_HOME SCREEN
Here, you can place shortcuts to apps and widgets.
Widgets are small applications that provide functions and information on your Home Screen, like local weather, stock exchange
information or email previews. To use them, add widgets from
the App drawer in the Quick Access Panel.
NOTE
Some widgets connect to web services which might result
in additional charges.
7.3.1_ADDING A NEW SCREEN ITEM
1. Tap on the App icon to open up the App Drawer.
2. Scroll for the app or widget you would like to add
by flicking the screen left or right.
3. Tap and hold the icon of the item you want to use and
wait until the screen changes to show your Home Screen.
4. Move the item to the desired place and lift your finger.
To change to a different panel of yours Home Screen, move
the item to the right or left border of the screen.
DISPLAY LAYOUT
19
EN
7.3.2_MOVING A SCREEN ITEM
1. Touch and hold an icon on the Home Screen until
the icon enlarges.
2. Without lifting your finger, drag the icon to the desired
position on the screen and release it.
NOTE
There must be enough space for the icon to fit on the current
Home Screen.
7.3.3_REMOVING A SCREEN ITEM
1. Tap and hold an application icon on the Home Screen until
the icon enlarges.
2. Drag the item to the top of the screen towards Remove.
7.3.4_CREATING A FOLDER
Drag the application icon or shortcut and drop it on top of
another app icon. A folder containing both icons will be created.
You can then add other icons into the folder.
7.3.5_RENAMING A FOLDER
1. Tap a folder to open it.
2. Tap the title bar of the folder.
3. Enter the new folder name.
4. Tap Done or press the Back key.
20
DISPLAY LAYOUT / INFORMATION
7.3.6_CHANGING THE WALLPAPER
On the Home Screen, tap and hold the screen to show options
for the Wallpaper.
8_SPECIFICATIONS
Frequencies
Quad band
GSM/GPRS/EDGE
850/900/1800/1900 MHz
WCDMA/HSPA
900/2100 Mhz
Dimension
weight: 206 g,
size: 124 x 68.5 x 24 mm
Screen
3.2" (8.13 cm) RugDisplayGlass, rugged TFT-touchscreen with a resolution of
320 x 480 pixel
Cameras
5 MP rear camera
0.3 MP front camera
Loudspeaker
amplified 1.5 watt, with 100 dB
Wireless technologies
Bluetooth®, Wi-Fi®, GPS, NFC
Battery
2060 mAh, standby 300 hrs.,
talktime 2G/3G:
468 min./210 min.
Memory
internal memory 4 GB ROM,
512 MB RAM, external
memory microSD up to 32 GB
Processor
MT6572 (Dual Core 1.2 GHz)
Temperature
operation range from
-20 °C to 60 °C
IP68
waterproof: 30 min. up
to 2 m, impervious to dust
and microparticles
MIL-STD-810G
2 m drop-protection,
impervious to dust and
microparticles
INFORMATION
9_TROUBLESHOOTING
If problems occur when using the mobile, please try the
following tips. If the problem is not solved, please contact
your vendor or RugGear Europe GmbH directly.
THE PHONE CANNOT BE POWERED ON
The battery voltage is too low.
Please recharge the battery.
The power on key is not pressed long enough.
Please press power on key for more than three seconds.
The connection to the battery is bad.
Please assemble the battery again or clean the contact
points of the battery carefully.
The SIM card has a failure.
Please check or replace the SIM card.
THE PHONE HAS INSUFFICIENT STANDBY TIME
The battery performance is reduced because of the age
of the battery.
Please contact your vendor or RugGear Europe GmbH
for a replacement battery.
Too many programs running.
Please reduce the number of running programme.
21
EN
22
INFORMATION
THE PHONE IS NOT CHARGING
Poor electrical contact.
Please check and replace any dirty or broken plugs.
Input voltage is too low.
Please charge for about one hour first, remove the plug, wait
a minute and then continue charging. During this time it is
possible that the phone cannot be powered on, as the voltage
is too low.
A battery fault has occurred.
Please replace the battery.
FAILURES DURING CALLS OCCUR
SIM Card failures occur.
Please check the contacts of the SIM card or replace the card.
Network error.
Please change to a network provider with a stronger signal.
OTHER PEOPLE ARE ANSWERING MY CALLS
The phone has been set into divert your calls
to another phone number.
Please check and cancel call divert.
THE PHONE POWERS OFF AUTOMATICALLY
The charge of the battery is too low.
Please recharge the battery.
There was an error during operation.
Please restart the phone. If the problem reoccurs, please
contact your vendor or RugGear Europe GmbH directly.
INFORMATION
23
10_MAINTENANCE
Thank you for using the RG500. If there is a problem with the
phone, please contact your vendor or consult the service center.
If your phone is in need of repair, you can either contact the
service center or your vendor.
TRADEMARKS
RugGear (Europe) and the RugGear (Europe) logo
are registered trademarks of RugGear Europe GmbH.
The Android logo, Google™ and Google Play™ Store
are registered trademarks of Google, Inc.
The Android robot is reproduced or modified from work
created and shared by Google™ and used according to terms
described in the Creative Commons 3.0 Attribution License.
Bluetooth® is a registered trademark of Bluetooth SIG,
Inc. worldwide.
Wi-Fi® is a registered trademark of the Wi-Fi Alliance.
All other trademarks and copyrights are the properties
of their respective owners.
RECYCLING
The crossed-out wheeled-bin symbol on your product, battery,
literature, or packaging reminds you that all electrical and electronic products, batteries, and accumulators must be taken to separate collection at the end of their working life. This requirement
applies in the European Union. Do not dispose of these products
as unsorted municipal waste.
EN
24
INFORMATION
Always return your used electronic products, batteries, and
packaging materials to dedicated collection points. This way
you help to prevent uncontrolled waste disposal and to promote
the recycling of materials.
More detailed information is available from the product retailer,
local waste authorities, national producer responsibility organizations, or your local RugGear Europe GmbH representative.
The content of this document is presented as it currently exists.
RugGear Europe GmbH does not provide any explicit or tacit
guarantee for the accuracy or completeness of the content of this
document, including, but not restricted to, the tacit guarantee
of market suitability or fitness for a specific purpose unless applicable laws or court decisions make liability mandatory. RugGear
Europe GmbH reserves the right to make changes to this document
or to withdraw it any time without prior notice.
11_ SPECIFIC ABSORPTION RATE (SAR)
CERTIFICATION INFORMATION
This device meets international guidelines
for exposure to radio waves
Your mobile device is a radio transmitter and receiver. It is
designed not to exceed the limits for exposure to radio waves
(radio frequency electromagnetic fields) recommended by
international guidelines. The guidelines were developed by an
independent scientific organization (ICNIRP) and include
a substantial safety margin designed to assure the safety of all
persons, regardless of age and health.
25
INFORMATION
EN
The radio wave exposure guidelines use a unit of measurement
known as the Specific Absorption, or SAR. The SAR limit for mobile
devices is 2.0 W/kg.
Tests for SAR are conducted using standard operating positions
with the deice transmitting at its highest certified power level in all
tested frequency bands. The highest SAR values under the ICNIRP
guidelines for this device model are:
Maximum SAR for this model and conditions
under which it was recorded
SAR (head)
0.650 W/kg (GSM1800)
SAR (body - worn)
0.807 W/kg (GSM900)
During use, the actual SAR values for this device are usually well
below the values stated above. This is because, for purposes of
system efficiency and to minimize interference on the network,
the operating power of your mobile device is automatically
decreased when full power is not needed for the call. The lower
the power output of the device, the lower its SAR value.
A body-worn SAR test has been performed on this device at
a separation distance of 1.5 cm. To meet RF exposure guidelines
during body-worn operation, the device must be positioned
at least 1.5 cm away from the body.
Organizations such as the World Health Organization and the US
Food and Drug Administration have suggested that if people are
concerned and want to reduce their exposure, they could use
a hands-free accessory to keep the wireless device away from the
head and body during use, or they could reduce the amount of
time spent using the device.