1
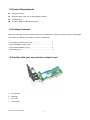
WN-5000PCI 802.11n Wireless LAN PCI Adapter User’s Manual WN-5000 PCI User’s Manual 0 Declaration of Conformity We, Manufacturer/Importer OvisLink Corp. 5F., NO.6, Lane 130, Min-Chuan Rd., Hsin-Tien City, Taipei County, Taiwan Declare that the product 802.11n Wireless PCI Adapter WN-5000PCI is in conformity with In accordance with 89/336 EEC-EMC Directive and 1999/5 EC-R & TTE Directive Clause Description ■ EN Electromagnetic compatibility and Radio spectrum Matters (ERM); Wideband transmission equipment operating in the 2.4GHz ISM band And using spread spectrum modulation techniques; Part 1:technical Characteristics and test conditions Part2:Harmonized EN covering Essential requirements under article 3.2 of the R&TTE Directive ■ EN Electromagnetic compatibility and Radio spectrum Matters (ERM); Electromagnetic compatibility(EMC) standard for radio equipment and Services; Part 17:Specific conditions for wideband data and HIPERLAN equipment 300 328 V1.7.1 (2006-05) 301 489-1 V1.6.1 (2005) ■ EN 301 489-17 V1.2.1 (2002-08) ■ EN 50371:2002 ■ EN 60950-1:2006 ■ CE marking Generic standard to demonstrate the compliance of low power Electronic and electrical apparatus with the basic restrictions related to human exposure to electromagnetic field (10MHz – 300GHz) -General public Safety for information technology equipment including electrical business equipment Manufacturer/Importer Signature: Name : Position/ Title : Albert Yeh Vice President Date: 2007/5/14 (Stamp) WN-5000PCI CE Declaration Statement Country cs Česky [Czech] Declaration OvisLink Corp. tímto prohlašuje, že tento WN5000PCI je ve shodě se základními požadavky a dalšími příslušnými ustanoveními směrnice 1999/5/ES. da Undertegnede OvisLink Corp. erklærer herved, Dansk [Danish] at følgende udstyr WN-5000PCI overholder de væsentlige krav og øvrige relevante krav i direktiv 1999/5/EF. de Hiermit erklärt OvisLink Corp., dass sich das Deutsch Gerät WN-5000PCI in Übereinstimmung mit den [German] grundlegenden Anforderungen und den übrigen einschlägigen Bestimmungen der Richtlinie 1999/5/EG befindet. et Käesolevaga kinnitab OvisLink Corp. seadme Eesti [Estonian] WN-5000PCI vastavust direktiivi 1999/5/EÜ põhinõuetele ja nimetatud direktiivist tulenevatele teistele asjakohastele sätetele. en Hereby, OvisLink Corp., declares that this WNEnglish 5000PCI is in compliance with the essential requirements and other relevant provisions of Directive 1999/5/EC. es Por medio de la presente OvisLink Corp. declara Español que el WN-5000PCI cumple con los requisitos [Spanish] esenciales y cualesquiera otras disposiciones aplicables o exigibles de la Directiva 1999/5/CE. el ΜΕ ΤΗΝ ΠΑΡΟΥΣΑ OvisLink Corp. ΔΗΛΩΝΕΙ Ελληνική [Greek] ΟΤΙ WN-5000PCI ΣΥΜΜΟΡΦΩΝΕΤΑΙ ΠΡΟΣ ΤΙΣ ΟΥΣΙΩΔΕΙΣ ΑΠΑΙΤΗΣΕΙΣ ΚΑΙ ΤΙΣ ΛΟΙΠΕΣ ΣΧΕΤΙΚΕΣ ΔΙΑΤΑΞΕΙΣ ΤΗΣ ΟΔΗΓΙΑΣ 1999/5/ΕΚ. fr Par la présente OvisLink Corp. déclare que Français [French] l'appareil WN-5000PCI est conforme aux exigences essentielles et aux autres dispositions pertinentes de la directive 1999/5/CE it Con la presente OvisLink Corp. dichiara che Italiano [Italian] questo WN-5000PCI è conforme ai requisiti essenziali ed alle altre disposizioni pertinenti stabilite dalla direttiva 1999/5/CE. lv Ar šo OvisLink Corp. deklarē, ka WN-5000PCI Latviski [Latvian] atbilst Direktīvas 1999/5/EK būtiskajām prasībām un citiem ar to saistītajiem noteikumiem. sv Härmed intygar OvisLink Corp. att denna WNSvenska 5000PCI står I överensstämmelse med de [Swedish] väsentliga egenskapskrav och övriga relevanta bestämmelser som framgår av direktiv 1999/5/EG. Country lt Lietuvių [Lithuanian] Declaration Šiuo OvisLink Corp. deklaruoja, kad šis WN-5000PCI atitinka esminius reikalavimus ir kitas 1999/5/EB Direktyvos nuostatas. nl Hierbij verklaart OvisLink Corp. dat het toestel WNNederlands [Dutch 5000PCI in overeenstemming is met de essentiële eisen en de andere relevante bepalingen van richtlijn 1999/5/EG. mt Hawnhekk, OvisLink Corp, jiddikjara li dan WNMalti [Maltese] 5000PCI jikkonforma mal-ħtiġijiet essenzjali u ma provvedimenti oħrajn relevanti li hemm fid-Dirrettiva 1999/5/EC. hu Magyar [Hungarian] pt Português [Portuguese] Alulírott, OvisLink Corp nyilatkozom, hogy a WN5000PCI megfelel a vonatkozó alapvetõ követelményeknek és az 1999/5/EC irányelv egyéb elõírásainak. Niniejszym OvisLink Corp oświadcza, że WN5000PCI jest zgodny z zasadniczymi wymogami oraz pozostałymi stosownymi postanowieniami Dyrektywy 1999/5/EC. OvisLink Corp declara que este WN-5000PCI está conforme com os requisitos essenciais e outras disposições da Directiva 1999/5/CE. sl Slovensko [Slovenian] OvisLink Corp izjavlja, da je ta WN-5000PCI v skladu z bistvenimi zahtevami in ostalimi relevantnimi določili direktive 1999/5/ES. pl Polski [Polish] sk OvisLink Corp týmto vyhlasuje, že WN-5000PCI Slovensky [Slovak] spĺňa základné požiadavky a všetky príslušné ustanovenia Smernice 1999/5/ES. fi Suomi [Finnish] OvisLink Corp vakuuttaa täten että WN-5000PCI tyyppinen laite on direktiivin 1999/5/EY oleellisten vaatimusten ja sitä koskevien direktiivin muiden ehtojen mukainen Hér með lýsir OvisLink Corp yfir því að WN-5000PCI Íslenska [Icelandic] er í samræmi við grunnkröfur og aðrar kröfur, sem gerðar eru í tilskipun 1999/5/EC. no OvisLink Corp erklærer herved at utstyret WNNorsk [Norwegian] 5000PCI er i samsvar med de grunnleggende krav og øvrige relevante krav i direktiv 1999/5/EF. A copy of the full CE report can be obtained from the following address: OvisLink Corp. 5F, No.6 Lane 130, Min-Chuan Rd, Hsin-Tien City, Taipei, Taiwan, R.O.C. This equipment may be used in AT, BE, CY, CZ, DK, EE, FI, FR, DE, GR, HU, IE, IT, LV, LT, LU, MT, NL, PL, PT, SK, SI, ES, SE, GB, IS, LI, NO, CH, BG, RO, TR Federal Communication Commission Interference Statement This equipment has been tested and found to comply with the limits for a Class B digital device, pursuant to Part 15 of FCC Rules. These limits are designed to provide reasonable protection against harmful interference in a residential installation. This equipment generates, uses, and can radiate radio frequency energy and, if not installed and used in accordance with the instructions, may cause harmful interference to radio communications. However, there is no guarantee that interference will not occur in a particular installation. If this equipment does cause harmful interference to radio or television reception, which can be determined by turning the equipment off and on, the user is encouraged to try to correct the interference by one or more of the following measures: 1. Reorient or relocate the receiving antenna. 2. Increase the separation between the equipment and receiver. 3. Connect the equipment into an outlet on a circuit different from that to which the receiver is connected. 4. Consult the dealer or an experienced radio technician for help. FCC Caution This device and its antenna must not be co-located or operating in conjunction with any other antenna or transmitter. This device complies with Part 15 of the FCC Rules. Operation is subject to the following two conditions: (1) this device may not cause harmful interference, and (2) this device must accept any interference received, including interference that may cause undesired operation. Any changes or modifications not expressly approved by the party responsible for compliance could void the authority to operate equipment. Federal Communication Commission (FCC) Radiation Exposure Statement This equipment complies with FCC radiation exposure set forth for an uncontrolled environment. In order to avoid the possibility of exceeding the FCC radio frequency exposure limits, human proximity to the antenna shall not be less than 20cm (8 inches) during normal operation. The antenna(s) used for this transmitter must not be co-located or operating in conjunction with any other antenna or transmitter. WN-5000 PCI User’s Manual 1 R&TTE Compliance Statement This equipment complies with all the requirements of DIRECTIVE 1999/5/EC OF THE EUROPEAN PARLIAMENT AND THE COUNCIL of March 9, 1999 on radio equipment and telecommunication terminal Equipment and the mutual recognition of their conformity (R&TTE) The R&TTE Directive repeals and replaces in the directive 98/13/EEC (Telecommunications Terminal Equipment and Satellite Earth Station Equipment) As of April 8, 2000. Safety This equipment is designed with the utmost care for the safety of those who install and use it. However, special attention must be paid to the dangers of electric shock and static electricity when working with electrical equipment. All guidelines of this and of the computer manufacture must therefore be allowed at all times to ensure the safe use of the equipment. EU Countries Intended for Use The ETSI version of this device is intended for home and office use in Austria, Belgium, Denmark, Finland, France, Germany, Greece, Ireland, Italy, Luxembourg, the Netherlands, Portugal, Spain, Sweden, and the United Kingdom. The ETSI version of this device is also authorized for use in EFTA member states: Iceland, Liechtenstein, Norway, and Switzerland. COPYRIGHT Copyright ©2007 by OvisLink Corp. All rights reserved. No part of this publication may be reproduced, transmitted, transcribed, stored in a retrieval system, or translated into any language or computer language, in any form or by any means, electronic, mechanical, magnetic, optical, chemical, manual or otherwise, without the prior written permission of this company OvisLink Corp. makes no representations or warranties, either expressed or implied, with respect to the contents hereof and specifically disclaims any warranties, merchantability or fitness for any particular purpose. Any software described in this manual is sold or licensed "as is". Should the programs prove defective following their purchase, the buyer (and not this company, its distributor, or its dealer) assumes the entire cost of all necessary servicing, repair, and any incidental or consequential damages resulting from any defect in the software. Further, this company reserves the right to revise this publication and to make changes from time to time in the contents thereof without obligation to notify any person of such revision or changes. WN-5000 PCI User’s Manual 2 Table of Contents Chapter 1: Product Information .....................................................................................4 1-1 Introduction and safety information .................................................................................4 1-2 Safety Information ..............................................................................................................5 1-3 System Requirements .......................................................................................................6 1-4 Package Contents ..............................................................................................................6 1-5 Familiar with your new wireless network card ...............................................................6 Chapter 2: Driver Installation and Configuration..........................................................8 2-1 Network Card Installation ..................................................................................................8 2-2 Connect to Wireless Access Point .................................................................................13 2-2-1 Using AirLive Wireless Utility ...............................................................................13 2-2-2 Using Windows Zero Configuration....................................................................18 2-3 Connection Profile Management....................................................................................22 2-3-1 Make a profile for an access point or wireless device.....................................22 2-4 2-5 2-6 2-7 2-3-2 Using 802.1x – Certification ................................................................................29 2-3-3 Using 802.1x - CA Server ....................................................................................31 View Network Statistics and Link Status ......................................................................32 2-4-1 Network Statistics..................................................................................................32 Advanced Settings ..........................................................................................................36 QoS Setting ......................................................................................................................39 About .................................................................................................................................41 Chapter 3: Appendix .....................................................................................................42 3-1 Hardware Specification....................................................................................................42 3-2 Troubleshooting ................................................................................................................43 3-3 Glossary .............................................................................................................................45 WN-5000 PCI User’s Manual 3 Chapter 1: Product Information 1-1 Introduction and safety information Thank you for purchasing this high-speed 802.11b/g/N wireless network card! Excepting common wireless standards 802.11b/g, this wireless network card is also 802.11 N compatible - data transfer rate is 300Mbps, and that’s six times faster than 802.11g wireless network! 802.11 N also provides wider wireless coverage, so you don’t have to worry if your computer is far from your wireless access point. This wireless network card also supports MIMO (Multi-In, Multi-Out) technology, which uses three different radio channels to enhance data transfer rate and wireless coverage. With easy-to-install PCI interface - a very common expansion slot of desktop computers - and Plug-and-Play technology, even inexperienced computer user can get this wireless network card installed on his or her computer in just few minutes! All you have to do is shutdown the computer and remove the cover, then insert the wireless network card into any empty PCI slot, that’s all! Other features of this router including: High-efficiency antenna, expands the scope of your wireless network. QoS function: control the bandwidth required for different applications. 802.11b/g/N compatible. Supports major encryption methods like WEP, WPA, and WPA2 encryption. PCI interface - you can get it installed on your computer in just few minutes! Wireless access control - prevent unauthorized network access to your network and computer. WN-5000 PCI User’s Manual 4 1-2 Safety Information In order to keep the safety of users and your properties, please follow the following safety instructions: 1. This PCI wireless network card is designed for indoor use only. DO NOT expose this network card to direct sun light or rain, snow. 2. DO NOT put this network card at or near hot or humid places, like kitchen or bathroom. Also, do not left this wireless network card in the car in summer. 3. Shutdown the computer and remove the power cord of your computer when you want to install / remove the network card. If you’re not familiar about interface card installation, ask an experienced technician for help. 4. The antenna of this network card is small enough to put in a child’s mouth, ear, or nose, and it could cause serious injury or could be fatal. If they throw the network card or antenna, cards or antennas will be damaged. PLEASE KEEP THIS NETWORK CARD OUT THE REACH OF CHILDREN! 5. If you found that the network card is not working properly, please contact your dealer of purchase and ask for help. DO NOT try to fix the network card by your self, warranty will be void. 6. If the network card falls into water, DO NOT USE IT AGAIN BEFORE YOU SEND THE CARD TO THE DEALER OF PURCHASE FOR INSPECTION. 7. If you smell something strange or even see some smoke coming out from your computer, switch the computer off immediately, and call dealer of purchase for help. WN-5000 PCI User’s Manual 5 1-3 System Requirements An empty PCI slot Windows 2000, 2003, XP, or Vista operating system CD-ROM drive At least 100MB of available disk space 1-4 Package Contents Before you starting to use this wireless network card, please check if there’s anything missing in the package, and contact your dealer of purchase to claim for missing items: □ PCI wireless network card (1 pcs) ……………………………… 1 □ Quick installation guide (1 pcs) ………………………………… 2 □ User manual CDROM (1 pcs) ………………………………….. 3 □ Antennas (3 pcs) ……………….……………………………….. 4 1-5 Familiar with your new wireless network card 2 1 3, 4 1. PCI Interface 2. Antennas 3. ‘Link’ LED 4. ‘Tx/Rx’ LED WN-5000 PCI User’s Manual 6 LED Name Link Tx/Rx Light Status Description On Linked to a wireless access point Off Not linked to any wireless access point Blinking Off Transferring data currently Not transferring data currently WN-5000 PCI User’s Manual 7 Chapter 2: Driver Installation and Configuration 2-1 Network Card Installation Please follow the following instructions to install your new wireless network card: 1. SWITCH THE COMPUTER OFF, remove the cover and insert the wireless network card into an empty PCI slot of your computer. 2. Switch the computer on and login. The following message will appear on your computer, click ‘Don’t show this message again for this device’. WN-5000 PCI User’s Manual 8 3. Insert device driver CDOM into the CD/DVD ROM drive of your computer, and execute ‘Setup.exe’ program in ‘Driver’ folder. Please select ‘Allow’ if Windows indicates that ‘an unidentified program wants access to your computer’. 4. Please read the end user license agreement and click ‘Yes’ to accept license agreement. WN-5000 PCI User’s Manual 9 5. There are two wireless performance mode you can select here: Optimize for WiFi mode or Optimize for performance mode If you want to enhance wireless performance, please select ‘Optimize for performance mode’. However, wireless compatibility is not guaranteed in this mode. If you want to use this mode, you may not be able to communicate with older wireless devices and wireless access point, such as 802.11b devices, but the data transfer rate will be enhanced in this mode. You can select this mode when you only plan to communicate with 802.11 N devices. If you want to keep compatibility and communicate with older wireless devices, please select ‘Optimize for WiFi Mode’. When you select one mode, please click ‘Next>’ to continue. If you see ‘Found New Hardware’ message again, please ignore it and wait. WN-5000 PCI User’s Manual 10 6. When you see this message, please click ‘Finish’ to complete the driver installation process. 7. A new icon will appear at lower-right corner of your computer desktop, you can put the mouse cursor on the icon, and the status of wireless card will be displayed as a popup balloon. WN-5000 PCI User’s Manual 11 8. When you want to configure your wireless connection, please right click on this icon, and a popup menu will appear. You can click ‘Launch Config Utilities’ to start configuration program. WN-5000 PCI User’s Manual 12 2-2 Connect to Wireless Access Point There are two ways you can configure your wireless network card to connect to wireless access point: using the AirLive Wireless configuration utility which comes with wireless card driver, and using built-in windows zero configuration utility. 2-2-1 Using AirLive Wireless Utility Please follow the following instructions to use AirLive Wireless configuration utility to connect to wireless access point. 1. Right-click the AirLive Wireless configuration utility icon located at lower-right corner of computer desktop, then click ‘Launch Config Utilities’. 2. Configuration utility will scan for all wireless access points automatically. Scan results will be displayed here, please check if the wireless access point with the SSID (the name of wireless access point) you preferred is shown here. If the wireless access point you wish to connect does not show here, please click ‘Rescan’ to try again, until the one you preferred is displayed. You may have to click ‘Rescan’ for more than two times before you can see the access point you wish to use here sometimes. If you still can not see the access point you wish to use after clicking ‘Rescan’ for more than five times, please move your computer closer to the location where the wireless access point is, or see instructions in chapter 3-2 ‘Troubleshooting’. WN-5000 PCI User’s Manual 13 Tips: Wireless access point (Infrastructure) is a network device which acts as a bridge, to let wired and wireless network devices communicate with each other. AdHoc is another connection type. A computer or network device can build a direct wireless link with other computer or network device directly, without the help of wireless access point. OK HELP Here are descriptions of every fields: SSID: The Service Set IDentifier of wireless access point or other network device. You can think it as the name of access point of wireless device. BSSID: The MAC address of wireless access point or other network device. Unlike SSID, BSSID of every access point or network device is unique, and will not be the same with others. So you can identify a single access point or wireless device from others by BSSID, if they all have the same SSID. Signal: Shows the signal strength of access point or wireless device. Larger number means better radio strength, which often means you’re not too far from that access point or wireless device. Channel: Shows the channel number that access point or wireless device uses. Encryption: Shows the encryption method that access point or wireless device uses. If the wireless access point does not enable encryption, you’ll see ‘None’ displayed here. WN-5000 PCI User’s Manual 14 Authentication: Shows the authentication mode that access point or wireless device uses. If the wireless access point does not require authentication, you’ll see ‘Unknown’ displayed here. Network Type: Shows the type of wireless connection. If it’s a wireless access point, ‘Infrastructure’ will be displayed here; if it’s a computer or network device, ‘Ad Hoc’ will be displayed here. 3. Click the wireless access point or network device you wish to connect, it will be highlighted, then click ‘Connect’. If the access point you selected does not enable encryption (The content of ‘Encryption’ field of the access point you selected is ‘None’, you’ll be connected to this wireless access point within one minute. Please jump to step 6. If the access point you selected enables encryption, please proceed to next step. 4. If the wireless access point does not have SSID, you’ll be prompted to input it here. Please ask the owner of wireless access point and input the exact SSID here, then click ‘OK’ when ready. If the SSID you provided here is wrong, you’ll not be able to connect to this access point. If the wireless access point you selected have SSID, please skip this step. WN-5000 PCI User’s Manual 15 5. If the wireless access point uses encryption, you have to input WEP passphrase or WPA preshared key. Please ask the owner of the wireless access point you want to connect, and input the correct passphrase / preshared key here, then click ‘OK’. If the value you inputted here is wrong, you will not be able to connect to this wireless access point. Authentication type is selected automatically, please don’t change it. If the access point you selected does not enable encryption and does not require authentication, please skip this step. 6. You’ll see ‘Connected <-> SSID’ (‘SSID’ is the SSID of the wireless access point or wireless device you connected to) message displayed at lower-left corner of configuration utility, congratulations, you’re successfully connected to the access point or wireless device you selected! WN-5000 PCI User’s Manual 16 7. 8. You can put the mouse cursor over the AirLive Wireless configuration utility icon, and the brief information about link status and signal strength of current wireless connection will be shown as a popup balloon. WN-5000 PCI User’s Manual 17 2-2-2 Using Windows Zero Configuration Windows XP and Vista has a built-in wireless network configuration utility, called as ‘Windows Zero Configuration’ (WZC). You can also use WZC to configure your wireless network parameter: 1. Right-click AirLive Wireless configuration utility icon and select ‘Use Zero Configuration as Configuration utility. 2. Click ‘Start’ button (should be located at the bottom-left corner of windows desktop), click ‘Control Panel’, then click ‘Network and Internet’ in Control Panel. 3. Click ‘Connect to a network’ under ‘Network and Sharing Center’ WN-5000 PCI User’s Manual 18 4. All wireless access points in proximity will be displayed here. If the access point you want to use is not displayed here, please try to move your computer closer to the access point, or you can press refresh ( ) button to rescan access points. Click the access point you want to use if it’s shown, then click ‘Connect’. REFRESH 5. If the wireless access point you selected is an unnamed access point (i.e. the SSID of this wireless access point is hidden), you’ll be prompted input it’s name, and the name must be identical to the SSID WN-5000 PCI User’s Manual 19 setting of the wireless access point you’re connecting to. If the access point you selected has a name already, you’ll not be prompted to give it a name. 6. If the access point is protected by encryption, you have to input its security key or passphrase here. It must match the encryption setting on the access point. If the access point you selected does not use encryption, you’ll not be prompted for security key or passphrase. WN-5000 PCI User’s Manual 20 7. If you can see this message, the connection between your computer and wireless access point is successfully established. Click ‘Close’ to start network connection. If not, please go back to step 4 and recheck everything. Make sure the SSID or security key / passphrase you inputted is correct. WN-5000 PCI User’s Manual 21 2-3 Connection Profile Management If you need to connect to different wireless access points at different time, like of access point of your home, office, cybercafe, or public wireless service, you can store the connection parameters (encryption, passphrase, security etc, etc.) as a profile for every access point, so you don’t have in input these parameters every time you want to connect to a specific wireless access point. 2-3-1 Make a profile for an access point or wireless device 1. Right-click the AirLive Wireless configuration utility icon located at lower-right corner of computer desktop, then click ‘Launch Config Utilities’. 2. There are two ways to add a new connection profile: Create a new profile, or Add a profile from an existing wireless access point or wireless device If you want to click new profile, click ‘Profile’ tab, then click ‘Add’ button: WN-5000 PCI User’s Manual 22 Or, you can add a connected wireless access point or wireless device to a profile by clicking ‘Site Survey’ tab, then click ‘Add to Profile’ button: WN-5000 PCI User’s Manual 23 You can set the parameter for this connection here: WN-5000 PCI User’s Manual 24 Here are descriptions of every setup items: Profile Name Please give this profile a name, up to 32 alphanumerical characters and symbols are allowed, but space is not allowed. SSID The SSID of the wireless access point or wireless device you selected will be displayed here. But if the SSID of access point or wireless device is not available, you have to input it here manually. PSM: Please select CAM (constantly awake mode, keep the wireless radio activity when (Power Saving not transferring data), or PSM (Power saving mode, switches radio off when not Mode) transferring data) It’s recommended to choose ‘PSM’ if you’re using this network card with notebook computer to help the battery live longer. Network Type Select network type (‘Ad Hoc’ or ‘Infrastructure’). If you’re adding a profile from an existing access point or wireless device, it’s automatically selected and you don’t have to change it. TX Power You can select the radio output power of wireless network card. You may not need full radio power if you’re not far from wireless access point, and only use a high setting here if you found that radio reception is bad. If you don’t know which one to use, select ‘Auto’. Preamble This option is only available when the network type is ‘Ad hoc’. You can select ‘Auto’ or ‘Long Preamble’. Please select ‘Auto’ if you don’t know what it is. RTS Threshold Check the box and you can set RTS threshold manually here. Do not modify default setting unless you know what it is. Fragment Check the box and you can set fragment threshold Threshold manually here. Do not modify default setting unless you know what it is. Now click ‘Authentication and Security’ tab, and set the encryption and authentication settings. WN-5000 PCI User’s Manual 25 Here are descriptions of every setup items: Authentication Select the authentication type of the wireless access point or wireless device you wish Type to connect. If you’re adding a profile from an existing access point or wireless device, the value will be selected automatically, and please do not modify it. If you select ‘LEAP’, the following message will be displayed. Please input LEAP identity, password, domain name, and select encryption type. You can check ‘Show Password’ box so the password you inputted will be displayed as you type, but not replace by asterisk. WN-5000 PCI User’s Manual 26 Encryption: Select the encryption type of the wireless access point or wireless device you wish to connect. If you’re adding a profile from an existing access point or wireless device, the value will be selected automatically, and please do not modify it. WPA Input WPA preshared key here. If encryption is not enabled, or you select ‘WEP’ as Preshared Key encryption type, this field will be disabled and grayed out. Wep Key You can select key type (Hex or ASCII) and input WEP key here. If encryption is not enabled, or you select ‘WPA’ as encryption type, this field will be disabled and grayed out. Show Password Check this box and all passphrases or security keys you inputted will be displayed as you type, but not replace your input with asterisk. Use 802.1x Enable 802.1x wireless authentication. Please click ‘802.1x Setting’ button to set 802.1x parameters. (See next section). After you finish all settings, click ‘OK’ to save settings and exit. The profile you just created will be displayed: WN-5000 PCI User’s Manual 27 Select the profile you wish to use, and click ‘Activate’ to use the profile you selected. You can only activate a profile a time, and the profile which is activated currently will have a check ( ) before its name. If you want to change the connection parameters of a specific profile, just select it and click ‘Edit’ button, you’ll be prompted to input the connection parameters, just like you’re creating a new profile. If you no longer need a profile, select the profile then click ‘Delete’. WN-5000 PCI User’s Manual 28 2-3-2 Using 802.1x – Certification After you click ‘802.1x Setting’, a new windows will appear: Here are descriptions of every setup items: Authentication Please select an 802.1x authentication type here. The type you select here must be Type identical to the type of the 802.1x authentication type you’re using. Session You can enable or disable session resumption here. If you don’t know if you should Resumption enable session resumption or not, please ask your 802.1x authentication administrator. Identity Please input 802.1x identity here. Password Please input the password of 802.1x identity here. Domain Name Please input the domain name of 802.1x authentication here. This field will be grayed out when authentication type is not ‘EAP-FAST’. Use Client If the authentication type you use is ‘PEAP’ or ‘TTLS’, you can use the certificate stored WN-5000 PCI User’s Manual 29 on your computer. If the authentication type you use is ‘ TLS/Smart Card’, this box is always checked. More.. After you clicked this button, you’ll be prompted to select a certificate on your computer. Allow This box is always checked and can not be modified. unauthenticated provision mode Use protected If the authentication type you use is ‘EAP-FAST’. authentication credential by check this box. You can use protected authentication credential Remove Import Remove the credential you imported previously. Import the authentication credential file (PAC or al file format), you’ll be prompted to select a credential file from your computer. Protocol You can select the protocol of tunneled authentication here. This pulldown menu is only available when authentication type you use is ‘PEAP’ or ‘TTLS’. When you use ‘EAP-FAST’ as authentication type, the protocol setting is always ‘Generic Token Card’ and can not be changed. Identity Please input the identity of tunneled authentication here. (of tunneled authentication) Password Please input the password of tunneled authentication here. (of tunneled authentication) Password Mode Please select the password mode of ‘EAP-FAST’ authentication mode. This setting is hidden when the authentication type is not ‘EAP-FAST’. After you finish all settings, click ‘OK’ to save settings and exit. WN-5000 PCI User’s Manual 30 2-3-3 Using 802.1x - CA Server If you want to use CA server, please click ‘CA Server’ tab. And the following message will be displayed: Here are descriptions of every setup items: Use certificate Check this box to enable the use of certificate chain. chain Certificate Please select the issuer of certificate from this dropdown menu. Issuer Allow Check this box if you wish to allow intermediate certificates. intermediate certificates Server name Input the server name of CA server here. Server name Check this box and the wireless configuration utility will check if the server name of CA must match server you set here is exactly matched with the CA server connected to. If they don’t exactly match, connection will be dropped. Domain name Check this box and the wireless configuration utility will check the end of domain name. must end If there’s anything wrong, connection will be dropped. in specified name After you finish all settings, click ‘OK’ to save settings and exit. WN-5000 PCI User’s Manual 31 2-4 View Network Statistics and Link Status The configuration utility provides information about network statistics and link status. If you want to know how your wireless network card works, you can use these functions to get detailed information about the wireless connection you’re using. 2-4-1 Network Statistics Please follow the following instructions to check network statistics: 1. Right-click the AirLive Wireless configuration utility icon located at lower-right corner of computer desktop, then click ‘Launch Config Utilities’. 2. Click ‘Statistics’ tab, and the statistics of wireless connection will be displayed: WN-5000 PCI User’s Manual 32 All connection-related statistics is displayed here. You can click ‘Reset Counter’ to reset the statistics of all items back to 0. Click ‘OK’ to close the window. WN-5000 PCI User’s Manual 33 2-4-2 Link Status Please follow the following instructions to check network statistics: 1. Right-click the AirLive Wireless configuration utility icon located at lower-right corner of computer desktop, then click ‘Launch Config Utilities’. 2. Click ‘Link Status’ tab, and information about current wireless connection will be displayed: These information displayed here are updated every second, and here are descriptions of every item: Status Display the SSID and BSSID of connected wireless access point or wireless device (displayed as SSID <-> BSSID as shown in above picture. If there’s no active connection currently, ‘Disconnected’ will be displayed here. Extra Info Displays the link status (‘Link is up’ or Link is down’, and the radio transmitting WN-5000 PCI User’s Manual 34 power of your network card. Channel Displays the radio channel being used now. Link Speed Displays the link speed of data transmitting (Tx, in Mbps) and receiving (Rx, in Mbps). Link speed is the maximum available data transfer speed of the wireless connection, and depends on the radio signal quality of wireless connection. Throughput Displays the rate of data transmitting (Tx, in Kbps) and receiving (Rx, in Kbps). Link Quality Displays link quality (radio signal quality). When the link quality is better, the wireless link speed will be better, too. Link quality is displayed by percentage and a descriptive word (Good, normal, weak, and low). Signal Strength 1 Displays radio signal strength 1 Signal Strength 2 Displays radio signal strength 2. Noise Level Displays the percentage or level of noise (unusable) signal. If the value of this item is high, data transfer rate will drop. dBm Check this box and the value of signal strength and noise level will be displayed in dBm level instead of percentage. There are several wireless statuses available at the bottom of this window. For their explanations, please see chapter 4-3 ‘Glossary’. WN-5000 PCI User’s Manual 35 2-5 Advanced Settings This wireless network card provides several advanced settings for experienced wireless users. You can change these settings to increase data transfer performance, or change operation mode. Please follow the following instructions to set advanced wireless settings: 1. Right-click the AirLive Wireless configuration utility icon located at lower-right corner of computer desktop, then click ‘Launch Config Utilities’. Click ‘Advanced’ tab, and the following settings will appear: Here are descriptions of every setup items: Wireless mode Select wireless operation mode, available options are 802.11 B/G mix, 802.11 B only, and 802.11 B/G/N mix. You can select 802.11 B/G/N mix to maximize wireless compatibility with wireless access points and other wireless devices. WN-5000 PCI User’s Manual 36 Anyway, you can set this setting to ‘802.11 B only’ when you’re going to communicate with old 802.11b wireless devices and you got problem using other two modes. Wireless This setting helps your network card to avoid interference with other wireless Protection devices when there are both 802.11b and 802.11g wireless devices in the same place. It’s recommended to set this setting to ‘Auto’ , since enabling this setting will slightly reduce the data transfer performance. TX Rate Normally, the wireless network card will adjust transfer rate automatically according to wireless signal quality. However, you can fix the data transfer rate to a lower fixed rate if you think there’s some problem about data transfer, or you’re too far from wireless access point. It’s recommended to set this setting to ‘Auto’, unless you really know the meaning of this setting. Tx BURST Check this box to accelerate the data transmit rate. It may not work with all wireless access point and wireless devices. Enable TCP Check this box and the configuration utility will adjust TCP window size Window Size automatically, to get better performance. It should be safe for most of wireless environments, but if you found some problem on data transfer, uncheck this box. Fast Roaming at Check this box and you can adjust the threshold of when this wireless network card should switch to another wireless access point with better signal quality. Only adjust value when you understand what it means. Turn off RF Click this button to switch wireless radio off, click it again switch wireless radio on. Select Your Select the country / region code of the place you’re living. Country Region Different country / region has different regulations on wireless devices, and it’s Code forbidden to use certain channel (radio frequency) in some countries or regions. Please select the country and region code according to the place you live. Show When your computer is being authenticated by wireless authentication server, a Authentication dialog window with the process of authentication will appear. Status Dialog This function is helpful to find out the problem when you can not be authenticated, and you can provide this information to authentication server’s administrator for debugging purpose. Enable CCX Enable Cisco Compatible eXtensions. CCX is a wireless feature developed by WN-5000 PCI User’s Manual 37 Cisco used to improve the wireless performance with CCX compatible wireless devices. Check this box if you need to connect to CCX-compatible wireless devices. Turn on CCKM Check this box to enable CCKM (Cisco Centralized Key Management), which enables wireless clients to roam between CCKM-enabled access points in very short time. Enable Radio When you’re connecting to CCX-compatible access point, check this box to Measurement enable radio measurement function to improve wireless connectivity. Non-Serving When you’re connecting to CCX-compatible access point, check this box to Channel enable measurement on unused radio channels to improve wireless connectivity. Measurements Limit --- Limit the time used for said measurement to a certain time. Default value is 250. milliseconds After you finish the settings, click ‘Apply’ to apply new settings, and click ‘OK’ to close configuration utility. WN-5000 PCI User’s Manual 38 2-6 QoS Setting This wireless network card provides QoS (Quality of Service) function, which can improve the performance of certain network applications, like audio / video streaming, network telephony (VoIP), and others. When you enable WMM (Wi-Fi MultiMedia) function of this network card, you can define the priority of different kinds of data, to give higher priority to applications which require instant responding. Therefore you can improve the performance of such network applications. Please follow the following instructions to set advanced wireless settings: 1. Right-click the AirLive Wireless configuration utility icon located at lower-right corner of computer desktop, then click ‘Launch Config Utilities’. Click ‘Advanced’ tab, and the following settings will appear: Here are descriptions of every setup items: WMM Enable Check this box to enable WMM function. Please click ‘Apply’ button on the right of this check box after you check or uncheck this box, so corresponding settings in WN-5000 PCI User’s Manual 39 this window will be activated or deactivated respectively. WMM - Power Enable WMM power saving mode to save energy and lets your battery live longer. Save Enable Setting... Click this button to select the WMM data type which will suppress the function of power saving. When this kind of data is transferring, power saving function will be disabled. Available data types are AC_BK (Background / Low Priority), AC_BE (Best Effort), AC_VI (Video First), and AC_VO (Voice First). Direct Link Enable or disable direct link setup (DLS) function. Setup Enable This function will greatly improve the data transfer rate between WMM-enabled wireless devices. Please click ‘Apply’ button on the right of this check box after you check or uncheck this box, so corresponding settings in this window will be activated or deactivated respectively. MAC Address Input the MAC address of another WMM-enabled wireless device you wish to establish a direct link here, then click ‘Apply’ to add this MAC address to DLS address table. Timeout Value Input the timeout value of this WMM-enabled direct link wireless device. If the wireless device is not responding after this time, it will be removed from DLS table. Tear Down If you want to remove a specific wireless device from DLS table, select the device and click this button to remove it. After you finish the settings, click ‘OK’ to close configuration utility. WN-5000 PCI User’s Manual 40 2-7 About The ‘About’ tab provides you the information about version numbers of configuration utility, firmware, and other important information about your wireless network card. Please follow the following instructions to see these information: 1. Right-click the AirLive Wireless configuration utility icon located at lower-right corner of computer desktop, then click ‘Launch Config Utilities’. 2. Click ‘About’ tab, and the following settings will appear: If you need assistance about network problem, you’ll need these values. You can also click ‘WWW.AIRLIVE.COM’ button to go to the web site of network card driver manufacturer and get more information about your wireless network card. Please click ‘OK’ to close configuration utility. WN-5000 PCI User’s Manual 41 Chapter 3: Appendix 3-1 Hardware Specification Standards: IEEE 802.11b/g/N Interface: 32-bit PCI Frequency Band: 2.4000 ~ 2.4835GHz (Industrial Scientific Medical Band) Data Rate: 11b: 1/2/5.5/11Mbps 11g: 6/9/12/24/36/48/54Mbps 11n (20MHz): MCS0-15, 32 with Half Guard Interval Support (up to 144Mbps) 11n (40MHz): MCS0-15, 32 with Half Guard Interval Support (up to 300Mbps) Securities: WEP 64/128, WPA, WPA2 Cisco CCX V1.0, V2.0 & V3.0 Compliance Antenna: External 3 Antennas with Two TX and Three RX (Connector: RP-SMA) Drivers: Windows 2000/XP/2003/Vista Server LEDs: Link, TX/RX Transmit Power: 16dBm ± 2dBm Temperature: 32~131°F (0 ~ 55°C) Humidity: 10-95% (NonCondensing) Certification: FCC, CE WN-5000 PCI User’s Manual 42 3-2 Troubleshooting If you encounter any problem when you’re using this wireless network card, don’t panic! Before you call your dealer of purchase for help, please check this troubleshooting table, the solution of your problem could be very simple, and you can solve the problem by yourself! Scenario Solution I can’t find any wireless access point / 1. Click ‘Rescan’ for few more times and see if you can find wireless device in ‘Site Survey’ function. any wireless access point or wireless device. 2. Please move closer to any known wireless access point. 3. ‘Ad hoc’ function must be enabled for the wireless device you wish to establish a direct wireless link. 4. Please adjust the position of network card (you may have to move your computer if you’re using a notebook computer) and click ‘Rescan’ button for few more times. If you can find the wireless access point or wireless device you want to connect by doing this, try to move closer to the place where the wireless access point or wireless device is located. Nothing happens when I click ‘Launch config utilities’ 1. Please make sure the wireless network card is firmly inserted into your computer’s PCI slot. If the AirLive Wireless configuration utility’s icon is black, the network card is not detected by your computer. Switch the computer off and insert the card again. If this doesn’t work, contact the dealer of purchase for help. 2. Reboot the computer and try again. 3. Remove the driver and re-install. 4. Contact the dealer of purchase for help. I can not establish connection with a 1. Click ‘Connect’ for few more times. certain wireless access point 2. If the SSID of access point you wish to connect is hidden (nothing displayed in ‘SSID’ field in ‘Site Survey’ function), you have to input correct SSID of the access point you wish to connect. Please contact the owner of access point to ask for correct SSID. 3. You have to input correct passphrase / security key to connect an access point with encryption. Please contact the owner of access point to ask for correct passphrase / security key. 4. The access point you wish to connect only allows network WN-5000 PCI User’s Manual 43 cards with specific MAC address to establish connection. Please go to ‘About’ tab and write the value of ‘Phy_Addess’ down, then present this value to the owner of access point so he / she can add the MAC address of your network card to his / her access point’s list. The network is slow / having problem 1. Move closer to the place where access point is located. when transferring large files 2. Enable ‘Wireless Protection’ in ‘Advanced’ tab. 3. Try a lower TX Rate in ‘Advanced’ tab. 4. Disable ‘Tx Burst’ in ‘Advanced’ tab. 5. Enable ‘WMM’ in ‘QoS’ tab if you need to use multimedia / telephony related applications. 6. Disable ‘WMM – Power Save Enable’ in ‘QoS’ tab. 7. There could be too much people using the same radio channel. Ask the owner of the access point to change the channel number. Please try one or more solutions listed above. WN-5000 PCI User’s Manual 44 3-3 Glossary 1. What is the IEEE 802.11g standard? 802.11g is the new IEEE standard for high-speed wireless LAN communications that provides for up to 54 Mbps data rate in the 2.4 GHz band. 802.11g is quickly becoming the next mainstream wireless LAN technology for the home, office and public networks. 802.11g defines the use of the same OFDM modulation technique specified in IEEE 802.11a for the 5 GHz frequency band and applies it in the same 2.4 GHz frequency band as IEEE 802.11b. The 802.11g standard requires backward compatibility with 802.11b. The standard specifically calls for: A. A new physical layer for the 802.11 Medium Access Control (MAC) in the 2.4 GHz frequency band, known as the extended rate PHY (ERP). The ERP adds OFDM as a mandatory new coding scheme for 6, 12 and 24 Mbps (mandatory speeds), and 18, 36, 48 and 54 Mbps (optional speeds). The ERP includes the modulation schemes found in 802.11b including CCK for 11 and 5.5 Mbps and Barker code modulation for 2 and 1 Mbps. B. A protection mechanism called RTS/CTS that governs how 802.11g devices and 802.11b devices interoperate. 2. What is the IEEE 802.11b standard? The IEEE 802.11b Wireless LAN standard subcommittee, which formulates the standard for the industry. The objective is to enable wireless LAN hardware from different manufactures to communicate. 3. What does IEEE 802.11 feature support? The product supports the following IEEE 802.11 functions: z CSMA/CA plus Acknowledge Protocol z Multi-Channel Roaming Automatic Rate Selection RTS/CTS Feature Fragmentation Power Management z z z z 4. What is Ad-hoc? An Ad-hoc integrated wireless LAN is a group of computers, each has a Wireless LAN card, Connected as an independent wireless LAN. Ad hoc wireless LAN is applicable at a departmental scale for a branch or SOHO operation. 5. What is Infrastructure? An integrated wireless and wireless and wired LAN is called an Infrastructure configuration. Infrastructure is applicable to enterprise scale for wireless access to central database, or wireless application for mobile workers. 6. What is BSS ID? A specific Ad hoc LAN is called a Basic Service Set (BSS). Computers in a BSS must be configured with the same BSS ID. WN-5000 PCI User’s Manual 45 7. What is WEP? WEP is Wired Equivalent Privacy, a data privacy mechanism based on a 40 bit shared key algorithm, as described in the IEEE 802 .11 standard. 8. What is TKIP? TKIP is a quick-fix method to quickly overcome the inherent weaknesses in WEP security, especially the reuse of encryption keys. TKIP is involved in the IEEE 802.11i WLAN security standard, and the specification might be officially released by early 2003. 9. What is AES? AES (Advanced Encryption Standard), a chip-based security, has been developed to ensure the highest degree of security and authenticity for digital information, wherever and however communicated or stored, while making more efficient use of hardware and/or software than previous encryption standards. It is also included in IEEE 802.11i standard. Compare with AES, TKIP is a temporary protocol for replacing WEP security until manufacturers implement AES at the hardware level. 10. Can Wireless products support printer sharing? Wireless products perform the same function as LAN products. Therefore, Wireless products can work with Netware, Windows 2000, or other LAN operating systems to support printer or file sharing. 11. Would the information be intercepted while transmitting on air? WLAN features two-fold protection in security. On the hardware side, as with Direct Sequence Spread Spectrum technology, it has the inherent security feature of scrambling. On the software side, WLAN series offer the encryption function (WEP) to enhance security and Access Control. Users can set it up depending upon their needs. 12. What is DSSS?What is FHSS?And what are their differences? Frequency-hopping spread-spectrum (FHSS) uses a narrowband carrier that changes frequency in a pattern that is known to both transmitter and receiver. Properly synchronized, the net effect is to maintain a single logical channel. To an unintended receiver, FHSS appears to be short-duration impulse noise. Direct-sequence spread-spectrum (DSSS) generates a redundant bit pattern for each bit to be transmitted. This bit pattern is called a chip (or chipping code). The longer the chip is, the greater the probability that the original data can be recovered. Even if one or more bits in the chip are damaged during transmission, statistical techniques embedded in the radio can recover the original data without-the need for retransmission. To an unintended receiver, DSSS appears as low power wideband noise and is rejected (ignored) by most narrowband receivers. 13. What is Spread Spectrum? Spread Spectrum technology is a wideband radio frequency technique developed by the military for use in reliable, secure, mission-critical communication systems. It is designed to trade off bandwidth efficiency for reliability, integrity, and security. In other words, more bandwidth is consumed than in the case of narrowband transmission, but the trade off produces a signal that is, in effect, louder and thus easier to detect, provided that the receiver knows the parameters of the spread-spectrum signal being WN-5000 PCI User’s Manual 46 broadcast. If a receiver is not tuned to the right frequency, a spread –spectrum signal looks like background noise. There are two main alternatives, Direct Sequence Spread Spectrum (DSSS) and Frequency Hopping Spread Spectrum (FHSS). 14. What is WMM? Wi-Fi Multimedia (WMM), a group of features for wireless networks that improve the user experience for audio, video and voice applications. WMM is based on a subset of the IEEE 802.11e WLAN QoS draft standard. WMM adds prioritized capabilities to Wi-Fi networks and optimizes their performance when multiple concurring applications, each with different latency and throughput requirements, compete for network resources. By using WMM, end-user satisfaction is maintained in a wider variety of environments and traffic conditions. WMM makes it possible for home network users and enterprise network managers to decide which data streams are most important and assign them a higher traffic priority. 15. What is WMM Power Save? WMM Power Save is a set of features for Wi-Fi networks that increase the efficiency and flexibility of data transmission in order to conserve power. WMM Power Save has been optimized for mobile devices running latency-sensitive applications such as voice, audio, or video, but can benefit any Wi-Fi device. WMM Power Save uses mechanisms included in the IEEE 802.11e standard and is an enhancement of IEEE 802.11 legacy power save. With WMM Power Save, the same amount of data can be transmitted in a shorter time while allowing the Wi-Fi device to remain longer in a low-power “dozing” state. 16. What is GI? GI stands for Guard Interval. It’s a measure to protect wireless devices from cross- interference. If there are two wireless devices using the same or near channel, and they are close enough, radio interference will occur and reduce the radio resource usability. 17. What is STBC? STBC stands for Space-Time Block Coding, which is a technique used to transfer multiple copies of data by multiple antenna, to improve data transfer performance. By using multiple antennas, not only data transfer rate is improved, but also the wireless stability. WN-5000 PCI User’s Manual 47