1
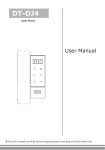
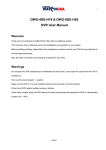
DT-DJ4S Audio Handset en or Do User Manual 8888 on try 1 2 td eL lin Read this manual carefully before using the product, and keep it safe for future use. 1. Parts and Functions 97.1 33.2 Do 7 segment LED 187 or 150 8888 Handset 2 1 Up button Menu button Down button Cancel button Unlock 2nd button Unlock button en Speaker on try Handset line Key functions Display setting information lin 7 segment LED Side View Pick up to communicate with visitor Handset cord Connect handset with monitor Unlock button Press to release the door Unlock 2nd button Press to release the second door td eL Handset Up button Press to move up or increase the value Down button Press to move down or decrease the value Menu button Press and hold for 2s to open the setting menu shortcuts Cancel button Press to cancel the operation Speaker Send out voice from the visitor 2. Operation Instructions on try en or Do 1) Door opening function: When a visitor calls from the door panel, the handset rings, pick up handset to talk with the visitor, then press the Unlock button to open the door. If the system is connected with 2 locks, press Unlock 2nd button to open the second door. 2) Monitoring & calling menu: Pick up handset in standby mode, the LED display will show a scroll information “Intr Call”, pressing the Up button or Down button can stop the scroll. To quit this menu, please tap Cancel button. 3) Entrance monitoring: In monitoring & calling menu page, the LED display shows "ds-x"(x=1-4, refer to part 3-Numbers of door panel), it means that the monitor selects "x" door panel to monitor. Press the Up / Down button to increase/decrease the value, then press the Menu button to activate the monitoring. 4) Inner call: In monitoring & calling menu page, use the Up / Down button to select "-ALL" item on the LED display, then press Menu button to activate the inner call, all handset/monitors connected to the system will ring at the same time. Pick up any monitor and the others will stop ringing immediately. (note that the user code must be the same for all monitors to activate the inner call function) 5) Intercom call: In monitoring & calling menu page, use the Up / Down button to select "C-xx" (xx=00-31, refer to part 3-Numbers of indoor monitor) item on the LED display, then press the Up / Down button to increase/decrease the value and press Menu button to confirm the intercom calling. (note that the user code must be different for all monitors to activate the intercom call function) 3. Setup Instructions Door panel call tone Intercom call tone LED state Description 1-xx Set the ring tone calling from the door panel. Total of 12 ring tones can be selected (xx=01-12), press Up button or Down button to increase/decrease the value for the ring tone you require 02 2-xx Set the ring tone calling for intercom call or inner call. Total of 12 ring tones can be selected (xx=01~12), press Up / Down button to increase/ decrease the value for the ring tone you require 12 Default td eL Setting Item lin Press Menu button and hold for 2 seconds in standby mode, the LED display will show a scroll information "User Set-", press the Up button or Down button to stop the scroll and the LED display will show the setting items. Press the Menu button to select the next setting items. To quit this setting menu, please tap the Cancel button. Setting Item Description Default Door bell call tone 3-xx Set the ring tone calling from a door bell. Total of 12 ring tones can be selected (xx=01-12), press Up button or Down button to increase/decrease the value for the ring tone you rquire 02 Ring volume 4-rx Set the ring volume for call tone, range from 0-9 6 or Do LED state 5-0x Maximum of 4 door panels can be selected, this item is used to set the number of door panels that can be surveilled by indoor monitor. Refer to part 2 ->Entrance Monitoring 1 Maximum of 32 indoor monitors can be selected, this item is used to set the number of indoor monitor that can be selected to intercom. Refer to part 2 ->Intercom call. 04 Range from 0-3,"0"=master monitor,"1-3"=slave monitor 0 The restore to default function allows the user to recover the settings to factory setting. Select "8-FS" item on the LED display ,then press Up button,"YES-"will be asked, press Up button again, the LED display will show "SUCC", this means the settings are restored to default - Numbers of indoor monitor 6-xx Slave address setting for monitor 7-dx 8-FS ●● ●● ●● ●● ●● Power Supply: Power Consumption: 7 segment LED: Wiring: Dimension: td eL 4. Specification lin Restore to default setting on try en Numbers of door panels DC 24V standby 25mA, working 110mA 4 digits dynamic 2 wires, non-polarity 187(H) X 97(W) X 33(D)mm The design and specifications can be changed without notice to the user. Right to interpret and copyright of this manual are preserved.