1
Lakmus manual
i
Lakmus manual
Lakmus manual
ii
COLLABORATORS
TITLE :
Lakmus manual
ACTION
NAME
DATE
SIGNATURE
WRITTEN BY
Vojtěch Horký
September 22, 2009
REVISION HISTORY
NUMBER
DATE
DESCRIPTION
NAME
Lakmus manual
iii
Contents
I
User’s manual
1
1
What is Lakmus
2
1.1
Web application . . . . . . . . . . . . . . . . . . . . . . . . . . . . . . . . . . . . . . . . . . . . . . . . . . . .
2
1.2
Simple interface, grouping . . . . . . . . . . . . . . . . . . . . . . . . . . . . . . . . . . . . . . . . . . . . . .
2
1.3
Extensibility . . . . . . . . . . . . . . . . . . . . . . . . . . . . . . . . . . . . . . . . . . . . . . . . . . . . . .
2
1.4
Labels – way to find information . . . . . . . . . . . . . . . . . . . . . . . . . . . . . . . . . . . . . . . . . . .
3
1.5
Provided applications . . . . . . . . . . . . . . . . . . . . . . . . . . . . . . . . . . . . . . . . . . . . . . . . .
3
1.6
Is Lakmus for you? . . . . . . . . . . . . . . . . . . . . . . . . . . . . . . . . . . . . . . . . . . . . . . . . . .
3
2
Installation guide
4
2.1
Prerequisites . . . . . . . . . . . . . . . . . . . . . . . . . . . . . . . . . . . . . . . . . . . . . . . . . . . . . .
4
2.2
Start the installation . . . . . . . . . . . . . . . . . . . . . . . . . . . . . . . . . . . . . . . . . . . . . . . . . .
4
2.2.1
Unpacking the tarball . . . . . . . . . . . . . . . . . . . . . . . . . . . . . . . . . . . . . . . . . . . . .
4
2.2.2
Adding URL alias for Lakmus . . . . . . . . . . . . . . . . . . . . . . . . . . . . . . . . . . . . . . . .
4
2.2.3
Setting up database . . . . . . . . . . . . . . . . . . . . . . . . . . . . . . . . . . . . . . . . . . . . . .
5
2.2.4
Configuring Lakmus . . . . . . . . . . . . . . . . . . . . . . . . . . . . . . . . . . . . . . . . . . . . .
5
2.2.5
Changing the password salt . . . . . . . . . . . . . . . . . . . . . . . . . . . . . . . . . . . . . . . . .
6
2.2.6
Setting text on the index page . . . . . . . . . . . . . . . . . . . . . . . . . . . . . . . . . . . . . . . .
6
Verifying installation . . . . . . . . . . . . . . . . . . . . . . . . . . . . . . . . . . . . . . . . . . . . . . . . .
7
2.3
3
4
First steps with Lakmus
8
3.1
Log in! . . . . . . . . . . . . . . . . . . . . . . . . . . . . . . . . . . . . . . . . . . . . . . . . . . . . . . . .
8
3.2
Logging out . . . . . . . . . . . . . . . . . . . . . . . . . . . . . . . . . . . . . . . . . . . . . . . . . . . . . .
8
3.3
Changing your password . . . . . . . . . . . . . . . . . . . . . . . . . . . . . . . . . . . . . . . . . . . . . . .
8
3.4
Navigating through Lakmus . . . . . . . . . . . . . . . . . . . . . . . . . . . . . . . . . . . . . . . . . . . . .
9
Labels – the Lakmus way
4.1
Creating, sticking and removing labels . . . . . . . . . . . . . . . . . . . . . . . . . . . . . . . . . . . . . . . . 10
4.1.1
4.2
10
Quick labeling widget . . . . . . . . . . . . . . . . . . . . . . . . . . . . . . . . . . . . . . . . . . . . 10
Filtering object listings using labels . . . . . . . . . . . . . . . . . . . . . . . . . . . . . . . . . . . . . . . . . 10
Lakmus manual
iv
5
6
Using Lakmus
5.1
Actions within the scope of the group . . . . . . . . . . . . . . . . . . . . . . . . . . . . . . . . . . . . . . . . 12
5.2
Managing your own group . . . . . . . . . . . . . . . . . . . . . . . . . . . . . . . . . . . . . . . . . . . . . . 12
Administrating Lakmus
6.1
6.2
6.3
6.4
6.5
7
6.1.1
Adding a new account . . . . . . . . . . . . . . . . . . . . . . . . . . . . . . . . . . . . . . . . . . . . 14
6.1.2
Changing details of existing account . . . . . . . . . . . . . . . . . . . . . . . . . . . . . . . . . . . . . 14
6.1.3
Password recovery . . . . . . . . . . . . . . . . . . . . . . . . . . . . . . . . . . . . . . . . . . . . . . 14
Groups . . . . . . . . . . . . . . . . . . . . . . . . . . . . . . . . . . . . . . . . . . . . . . . . . . . . . . . . . 15
Changing group administrator . . . . . . . . . . . . . . . . . . . . . . . . . . . . . . . . . . . . . . . . 15
Roles . . . . . . . . . . . . . . . . . . . . . . . . . . . . . . . . . . . . . . . . . . . . . . . . . . . . . . . . . 15
6.3.1
Managing roles . . . . . . . . . . . . . . . . . . . . . . . . . . . . . . . . . . . . . . . . . . . . . . . . 15
6.3.2
Assigning roles . . . . . . . . . . . . . . . . . . . . . . . . . . . . . . . . . . . . . . . . . . . . . . . . 15
6.3.3
Privilege clash . . . . . . . . . . . . . . . . . . . . . . . . . . . . . . . . . . . . . . . . . . . . . . . . 16
Applications . . . . . . . . . . . . . . . . . . . . . . . . . . . . . . . . . . . . . . . . . . . . . . . . . . . . . . 16
6.4.1
Installing new application . . . . . . . . . . . . . . . . . . . . . . . . . . . . . . . . . . . . . . . . . . 16
6.4.2
Installation troubleshooting . . . . . . . . . . . . . . . . . . . . . . . . . . . . . . . . . . . . . . . . . 16
6.4.3
Changing application details . . . . . . . . . . . . . . . . . . . . . . . . . . . . . . . . . . . . . . . . . 17
Backup & clean-up . . . . . . . . . . . . . . . . . . . . . . . . . . . . . . . . . . . . . . . . . . . . . . . . . . 17
Lakmus applications
Homework application
18
19
7.1
Introduction . . . . . . . . . . . . . . . . . . . . . . . . . . . . . . . . . . . . . . . . . . . . . . . . . . . . . . 19
7.2
From user point of view . . . . . . . . . . . . . . . . . . . . . . . . . . . . . . . . . . . . . . . . . . . . . . . . 19
7.3
8
14
Users . . . . . . . . . . . . . . . . . . . . . . . . . . . . . . . . . . . . . . . . . . . . . . . . . . . . . . . . . 14
6.2.1
II
12
7.2.1
Uploading your solutions . . . . . . . . . . . . . . . . . . . . . . . . . . . . . . . . . . . . . . . . . . . 20
7.2.2
I uploaded the solution, what comes next? . . . . . . . . . . . . . . . . . . . . . . . . . . . . . . . . . . 20
Administrating . . . . . . . . . . . . . . . . . . . . . . . . . . . . . . . . . . . . . . . . . . . . . . . . . . . . 20
7.3.1
Creating and editing tasks . . . . . . . . . . . . . . . . . . . . . . . . . . . . . . . . . . . . . . . . . . 20
7.3.2
Viewing and scoring uploaded solutions . . . . . . . . . . . . . . . . . . . . . . . . . . . . . . . . . . . 21
7.3.3
Label bonuses . . . . . . . . . . . . . . . . . . . . . . . . . . . . . . . . . . . . . . . . . . . . . . . . . 21
7.3.4
Commit table . . . . . . . . . . . . . . . . . . . . . . . . . . . . . . . . . . . . . . . . . . . . . . . . . 21
Scoreboard application
22
8.1
Introduction . . . . . . . . . . . . . . . . . . . . . . . . . . . . . . . . . . . . . . . . . . . . . . . . . . . . . . 22
8.2
Special features . . . . . . . . . . . . . . . . . . . . . . . . . . . . . . . . . . . . . . . . . . . . . . . . . . . . 22
8.3
From the user point of view . . . . . . . . . . . . . . . . . . . . . . . . . . . . . . . . . . . . . . . . . . . . . . 22
8.4
Administrating . . . . . . . . . . . . . . . . . . . . . . . . . . . . . . . . . . . . . . . . . . . . . . . . . . . . 23
Lakmus manual
v
9
Phorum application
24
10 Mailer application
25
III
26
Extending Lakmus
11 Introduction to Lakmus internals
27
11.1 Used software . . . . . . . . . . . . . . . . . . . . . . . . . . . . . . . . . . . . . . . . . . . . . . . . . . . . . 27
11.2 Before reading on . . . . . . . . . . . . . . . . . . . . . . . . . . . . . . . . . . . . . . . . . . . . . . . . . . . 27
11.3 Skeleton implementation . . . . . . . . . . . . . . . . . . . . . . . . . . . . . . . . . . . . . . . . . . . . . . . 27
11.4 Accessing data . . . . . . . . . . . . . . . . . . . . . . . . . . . . . . . . . . . . . . . . . . . . . . . . . . . . 28
11.4.1 Layered structure . . . . . . . . . . . . . . . . . . . . . . . . . . . . . . . . . . . . . . . . . . . . . . . 28
12 Coding conventions & co.
29
12.1 Class, methods etc. naming . . . . . . . . . . . . . . . . . . . . . . . . . . . . . . . . . . . . . . . . . . . . . . 29
13 Creating your own applications
30
13.1 Getting ready . . . . . . . . . . . . . . . . . . . . . . . . . . . . . . . . . . . . . . . . . . . . . . . . . . . . . 30
13.2 Format of the application package . . . . . . . . . . . . . . . . . . . . . . . . . . . . . . . . . . . . . . . . . . 31
13.3 Command-line application installation . . . . . . . . . . . . . . . . . . . . . . . . . . . . . . . . . . . . . . . . 31
13.4 First steps of development . . . . . . . . . . . . . . . . . . . . . . . . . . . . . . . . . . . . . . . . . . . . . . 31
13.4.1 Constructor & initialization . . . . . . . . . . . . . . . . . . . . . . . . . . . . . . . . . . . . . . . . . 32
13.5 Engage! . . . . . . . . . . . . . . . . . . . . . . . . . . . . . . . . . . . . . . . . . . . . . . . . . . . . . . . . 32
13.5.1 doAction – heart of your application . . . . . . . . . . . . . . . . . . . . . . . . . . . . . . . . . . . 32
13.5.2 Creating content . . . . . . . . . . . . . . . . . . . . . . . . . . . . . . . . . . . . . . . . . . . . . . . 33
13.5.3 Setting page heading, creating breadcrumb navigation etc. . . . . . . . . . . . . . . . . . . . . . . . . . 33
13.5.4 Modifying the installer . . . . . . . . . . . . . . . . . . . . . . . . . . . . . . . . . . . . . . . . . . . . 33
13.6 Several notes at the end . . . . . . . . . . . . . . . . . . . . . . . . . . . . . . . . . . . . . . . . . . . . . . . . 34
14 Adding core functionality
35
14.1 Kernel components . . . . . . . . . . . . . . . . . . . . . . . . . . . . . . . . . . . . . . . . . . . . . . . . . . 35
14.2 Smaller changes . . . . . . . . . . . . . . . . . . . . . . . . . . . . . . . . . . . . . . . . . . . . . . . . . . . . 35
14.3 Bigger changes . . . . . . . . . . . . . . . . . . . . . . . . . . . . . . . . . . . . . . . . . . . . . . . . . . . . 36
14.3.1 Incorporating your new module to Lakmus . . . . . . . . . . . . . . . . . . . . . . . . . . . . . . . . . 37
15 Using standard Lakmus components
38
15.1 Informative and error message . . . . . . . . . . . . . . . . . . . . . . . . . . . . . . . . . . . . . . . . . . . . 38
15.1.1 Redirect-persistent messages . . . . . . . . . . . . . . . . . . . . . . . . . . . . . . . . . . . . . . . . . 38
15.2 Label widgets . . . . . . . . . . . . . . . . . . . . . . . . . . . . . . . . . . . . . . . . . . . . . . . . . . . . . 39
15.2.1 Attaching labels . . . . . . . . . . . . . . . . . . . . . . . . . . . . . . . . . . . . . . . . . . . . . . . 39
15.2.2 Filtering objects . . . . . . . . . . . . . . . . . . . . . . . . . . . . . . . . . . . . . . . . . . . . . . . 39
Lakmus manual
vi
15.3 Forms . . . . . . . . . . . . . . . . . . . . . . . . . . . . . . . . . . . . . . . . . . . . . . . . . . . . . . . . . 39
15.3.1 Simple form . . . . . . . . . . . . . . . . . . . . . . . . . . . . . . . . . . . . . . . . . . . . . . . . . 39
15.3.2 Adding hints . . . . . . . . . . . . . . . . . . . . . . . . . . . . . . . . . . . . . . . . . . . . . . . . . 40
15.3.3 Adding grouped fields . . . . . . . . . . . . . . . . . . . . . . . . . . . . . . . . . . . . . . . . . . . . 41
15.3.4 Other kinds of input fields . . . . . . . . . . . . . . . . . . . . . . . . . . . . . . . . . . . . . . . . . . 41
15.3.5 Modifying the layout of the fields . . . . . . . . . . . . . . . . . . . . . . . . . . . . . . . . . . . . . . 41
15.4 Various listings . . . . . . . . . . . . . . . . . . . . . . . . . . . . . . . . . . . . . . . . . . . . . . . . . . . . 42
15.5 Tabbed content . . . . . . . . . . . . . . . . . . . . . . . . . . . . . . . . . . . . . . . . . . . . . . . . . . . . 42
Lakmus manual
1 / 42
Part I
User’s manual
Lakmus manual
2 / 42
Chapter 1
What is Lakmus
Lakmus is an application targeted at simplifying on-line communication between teachers and their students. In following
paragraphs you will learn what this short how-do-you-do means in detail.
1.1
Web application
First of all, Lakmus is a web based application which means that an Internet connection and web browsers are the only two things
you need in order to use it with your computer (for hosting it, you will need a web and database server only). Although Lakmus
provides some eye-candy, it is possible to use Lakmus with almost any decent web browser (the only necessity is to have cookies
turned on).
1.2
Simple interface, grouping
Next, Lakmus provides very simple interface designed with simple rule in mind – users do not like to be flooded with information.
The drawback of such approach is that sometimes you may need two "clicks" instead of one because some links may not be
available directly. However, such obstacle usually comes from the logic of the thing and will scarcely limit you.
As the intended audience of Lakmus are people with slightly different needs, it is possible to divide users into separate groups.
There is no limitation on number of members in a group or number of memberships a single user may have. As the targeted
group are students and teachers, the group organization is not so democratic as in social networks: in Lakmus each group has a
single leader who has a superior power over things related to the group (but it is possible that user may be a "normal" user in one
group and leader – administrator – of another one).
1.3
Extensibility
Very important feature of Lakmus is its extensibility. Lakmus itself is only a bare (though able) skeleton and the functionality is
provided in form of so called applications.
Applications are installed globally (i.e. once application is installed anyone in Lakmus may be able to use it) but it is up to the
group leader which applications he will activate in his group (i.e. some groups may use all applications available while others
may use only some of them1 ).
The installation of application is very simple as the whole process could be done from a web browser (a ZIP package is uploaded
to the server, this package is then unpacked on the server and the files are automatically copied to their proper locations without
any manual intervention).
1 Typically,
each group would activate at least one application because without applications group is only board with members’ names on it.
Lakmus manual
3 / 42
1.4
Labels – way to find information
As mentioned above, Lakmus is a framework and the functionality is delivered through the applications. Nevertheless, this
skeleton provides a lot of services and one of them are labels.
Actually, labels are a key feature of Lakmus. You can think of labels as virtual yellow sticky notes. However, unlike traditional
post-it notes, these can be used in reversed way as well. That means that you can label almost any object (e.g. whole group, user,
application, column in a table, homework solution etc.) and you can display only objects having specific label attached to them.
However, these filtered listings are always limited for displaying objects of the same kind (i.e. it is not possible to display all
objects with certain label attached on the same page).
Labels in Lakmus are everywhere indeed. Almost all applications use labels to allow you to filter data (whatever the word "data"
would refer to in context of the application).
On the other hand, you are not forced to use them and you can use Lakmus even if you ignore all label-related widgets that
appears almost on any page (please, refer to Chapter 4 for detailed information about widgets for editing labels). However,
adding labels and filtering with them is very cheap (just a "single click away") and when dealing with larger lists of objects (such
as list of users or list of groups you are member of) you will find Lakmus labels very helpful.
Another good point is that labels are private and thus you do not need to worry much how to name them. As long as you
understand the name, you can use anything because no one else would see it.
1.5
Provided applications
As already repeated several times, Lakmus as-is is a bare skeleton and applications are the heart of it. In following paragraphs,
applications’ offer will be presented.
First, a very simple application (but maybe the most important) is provided for sending e-mails to group members. And because
labels are everywhere, you can specify the list of recipients by telling that only users with selected label shall receive your e-mail.
Next, a simple forum is available. It does not provide all the functionality we know from huge projects such as phpBB or Phorum
but it may be sufficient (anyway, Lakmus is intended for people who regularly meet "en vivo" and if you need more powerful
forum, then the problem may not be in the software but in the inter-human communication).
Some people like, some do not, but the truth is that tables with numbers are everywhere. In Lakmus, Scoreboard application
exists to keep track of points of each member of the group. Although it miss functions known from full-fledged spreadsheets it
still covers most of the needs a lecturer need to keep track of test results and absentees.
And finally, the most complicated but also the most powerful application – application for uploading homework solutions. Even
if you think that you can handle solution correcting on e-mail basis, you shall give this application a try. First, you can specify
how many files each task has and what are their maximum sizes. Next, students may upload more solutions (though only one of
them is considered as "to be marked") with their notes why they uploaded another one. Another great thing is that you may mark
solution as public to allow all group members to see different approach to the same task. Finally, this application is connected
with the Scoreboard and your scoring of each task could be transferred to a table to be used in various sums.
1.6
Is Lakmus for you?
If you think that Lakmus is the software you need, consult the Chapter 2 to see how to install Lakmus on your server.
Even if you are not 100% sure you may want to give it a try. Especially, if you know a bit of PHP programming it is worth trying.
Maybe it won’t fit your needs absolutely but maybe a simple application you write on your own will do the job. For tempted
about Lakmus extending, do not hesitate to consult Part III to learn more about developing applications for Lakmus.
Lakmus manual
4 / 42
Chapter 2
Installation guide
2.1
Prerequisites
Before moving on to the "real" installation of Lakmus, check that you have all the necessary software installed.
Before going on the the program prerequisites, there is a need to mention that Lakmus was tested on Unix based operating system.
And although the recommended Apache-PHP-MySQL trio runs on Windows as well, there are no guarantees that Lakmus will
run there (especially due to different handling of file access permission model in Windows). So, this guide will expect that you
are willing to install Lakmus on a Linux machine.
First, you need a working web server with possibility of URL rewriting1 – in the chapter the Apache web server will be used for
all examples (and in the example, we would assume that the web server is running under the user www).
Secondly, you need a database on SQL server with administrator privileges for that database. Current version of Lakmus uses
MySQL for the database back-end. If you wish to use another database, it is possible but you have to do some changes in the
code to use API of your database (please, refer to the documentation of SqlConnection class in the API reference manual).
The third prerequisite is a PHP interpreter running on the web server. Although you can use probably any version of MySQL
that you consider safe, you have to use PHP5 in order to operate Lakmus.
2.2
2.2.1
Start the installation
Unpacking the tarball
The very first you need to decide is the location of the root directory of Lakmus. This location (so far, we mean the physical
location, not the URL under which Lakmus would be accessible) would depend on the type of system you use. As an example,
we would use the /srv/ directory.
So, first you have to unpack the lakmus-version.tar.gz into that directory. A single new directory – the lakmus/ –
will appear.
2.2.2
Adding URL alias for Lakmus
Next we have to do is to tell the web server how it shall process requests for Lakmus. Basically, we have to options. We can
set-up a virtual host or only dedicate directory alias.
If you wish to run Lakmus under a virtual host, please, refer to manual of your web server for instructions on how to do that.
1 By rewriting is meant that the server is able to internally redirect requests to certain pages as a request to another one. However, such redirection must not
be visible from the outside and the user will still operate (e.g. see in the location bar of his browser) on the original – untouched – URL.
Lakmus manual
5 / 42
If you will be satisfied with a simple directory prefix (i.e. Lakmus will be accessible through such URL as http://your-host/lakmus/), all you need to do with Apache is to add the following lines to your httpd.conf. If you have a conf.d/
directory ready, you could create a standalone file lakmus.conf in it and place the code there.
Alias /lakmus /srv/lakmus
<Directory "/srv/lakmus/">
Options ExecCGI SymLinksIfOwnerMatch
AllowOverride All
Order Deny,Allow
Allow from all
</Directory>
Note that this is very benevolent settings that will allow everybody to access that location. If you want restrict the access, consult
the Apache manual for details.
Do not forget to restart your web server – until you restart it, the changes will not take effect.
2.2.3
Setting up database
First, you need to create a new database (named e.g. lakmus). You may use your graphical tools if you like them or execute as
administrator the
CREATE DATABASE lakmus;
command in the console.
Next, you have to create a user (here, named lakmus) and grant him all privileges on lakmus. The following commands will do
the job:
CREATE USER lakmus IDENTIFIED BY ’passw’;
GRANT ALL PRIVILEGES ON lakmus.* TO lakmus@localhost
IDENTIFIED BY ’passw’;
If you are running web and SQL server on different machines, you will need to change the at-clause when granting the privileges.
Finally, you need to create the tables – commands (together with those mentioned above) are all stored in the create.sql file.
After you execute them, the database part of the installation is done.
The commands in create.sql also create single user account for user root with password toor. You will need this account
to set-up other accounts. After you finish the installation, do not forget to change the default password of this user.
2.2.4
Configuring Lakmus
Go to the directory with Lakmus and open the config/config.php file. This is the main configuration file of Lakmus and
before you run Lakmus you need to set several variables here. All these variables are stored in global array $LAKMUS_CONFIG
and all the options are commented in the config.php as well.
Some of the options have their predefined values that you may use. However, when dealing with directories, do not forget to
check that the directory has correct permission set (the flags are mentioned above each option in the config.php).
$LAKMUS_CONFIG[’webroot’] Here put the full path to the root directory of Lakmus. In our example it is "/srv/lakmus/". Do not forget the trailing slash.
$LAKMUS_CONFIG[’url’][’root’] This is the alias directory you have chosen. In our example, it would be "/lakmus/", when using virtual hosts, only slash would be present (again, don’t forget the trailing slash).
$LAKMUS_CONFIG[’upload-temp-dir’] This is full path to directory where temporary files could be stored. This
directory has to be writable by www user.
Lakmus manual
6 / 42
$LAKMUS_CONFIG[’apps’][’class-dir’] This is full path to directory where implementation of application would
be stored. Again, this directory has to be writable by www.
$LAKMUS_CONFIG[’apps’][’lib-dir’] Directory for application libraries. Permissions has to be the same as for $LAKMUS_CONFIG[’apps’][’class-dir’].
$LAKMUS_CONFIG[’apps’][’phys-web-dir’] Path to directory with extra elements of web pages (e.g. images). This
directory has to be writable by web server but also accessible via a web browser (see $LAKMUS_CONFIG[’apps’][’web-dir’]).
$LAKMUS_CONFIG[’apps’][’web-dir’] Location of extra web page elements as seen in the web browser.
$LAKMUS_CONFIG[’database’][’server’] Name of the database server.
$LAKMUS_CONFIG[’database’][’user’] Username Lakmus will use when accessing the database – lakmus in our
example.
$LAKMUS_CONFIG[’database’][’password’] Password for $LAKMUS_CONFIG[’database’][’user’] user.
passw in our example.
$LAKMUS_CONFIG[’database’][’database’] Database name we use to store data. lakmus in our example.
$LAKMUS_CONFIG[’starting-hash’] Initial hash (salt) for passwords. Please see below for details.
$LAKMUS_CONFIG[’server’][’name’] Software name we use on the web server. This option is currently not used and
may be left empty.
$LAKMUS_CONFIG[’server’][’user’] Name of the user web server is running under (in our example, it is www). This
option is currently not used and may be left empty.
Next thing that has to be done is to set-up the URL rewriting. There is a file htaccess.template that contains a sample
configuration for Apache. To use it, rename it to .htaccess (do not forget the leading dot) and open it in text editor.
If you decided to use the default paths for storing extra files, all you need to change is the RewriteBase directive to point to the
actual alias you are using.
2.2.5
Changing the password salt
Passwords of user accounts are stored as SHA1 hash of salted password. The salt is stored in the configuration file and is used as
starting point for hashing. If you do not want to use the default one, change it in the configuration file to a new one.
But, before doing so, located the get_passw_sum.sh script in the development archive and verify you are able to run it2 .
Running it with arguments root toor shall write on the console the same string that stored as password in the database. Also
verify you have a write access to the database.
Next, change the salt. Then, run again the get_passw_sum.sh script giving username as first argument and password as the
second. Copy then the printed value to the table and you are done. You can now login again.
Before changing the hash, be sure that you have a running installation of Lakmus already (generally, it is a bad idea to do such
thing before verifying that Lakmus is working okay on your server).
A word of warning at the end – if you change salt after you created user accounts, you will effectively disable them and you
would need to recreate their passwords. Simplest way is to ask users to send recovery requests.
2.2.6
Setting text on the index page
If you want to change the text that appears on the index page of Lakmus, edit the welc.htm in the root directory of your
Lakmus installation. It shall contain HTML formatted text. As this text will appear inside the body of the page, you shall not
create a full-fledged HTML document but rather only the contents of the BODY element.
2 If
the run fails, you need to adjust some paths settings inside the script. They are located at the first lines of the script and their change is an easy task.
Lakmus manual
7 / 42
2.3
Verifying installation
After you have finished the steps above, point your web browser to the index page of your installation of Lakmus (in our example,
it is http://your-host/lakmus/). If you see an introduction page of Lakmus, you are on a good way. If you got a page
with error about database connection error, review your database settings (especially correct host settings and passwords). If you
see a completely blank page, you probably have PHP errors turned off and there is a error in the PHP script. Most likely, you
forget to close some quotes inside your configuration file – after you fixed the problem, reload the page (you can test the syntax
correctness of a PHP file by running php -l filename.php).
Next, try to login and install applications you want to use. If the installation fails, most likely, you forgot to set correct permissions
on some directory. The installer page will display which file failed to be copied, thus pointing you to the directory that has bad
permissions set. After that, install the application again (forcing a page reload may work as well) and see if everything went fine
that time. You can find some hints also in the Chapter 6
Well, and that’s it. Go and explore Lakmus now!
Lakmus manual
8 / 42
Chapter 3
First steps with Lakmus
3.1
Log in!
In order to log in, open Lakmus homepage in your web browser. If you use a modern browser1 , under the Lakmus logo is
positioned the main navigation. One of the first links points to log-in page. By activating the link, you will be redirected to page
with form for logging in Lakmus.
On the page with log-in form, fill in your username (which you shall received from your site admin or your group leader) and
your password2 and activate the submit button. If you provided valid credentials, you will be logged in and redirected to your
profile page.
If you have forgotten your password, you can ask for generating a new one. Click the Forgotten password link and insert
your e-mail on the form that will appear. Your request would be sent to the Lakmus administrator who will later send you a
newly generated password over e-mail. It is recommended to change the password after you log-in as the password is sent in
unencrypted mail as plain text.
3.2
Logging out
There are several ways you can log out from Lakmus.
1. By closing your browser (this is because cookies used to track your session are set to expire on browser exit).
2. By going into your profile (link My Lakmus) and selecting link Log out myself.
3. By activating link Logout that is positioned in the main menu (at the top of the page).
3.3
Changing your password
Go to your profile page (My Lakmus link) and select Change password.
Fill in the form your current password and your new password. New password is filled in twice to prevent typos. After submitting
the form, your password will be changed.
If you fill in invalid current password or the new passwords do not match, warning message is displayed and your are asked to
fill-in the form again3 .
1 In most parts of the manual, layout of each page is described as seen by most of users in modern graphics browser. If you use obsolete or text-based browser
or some kind of auxiliary software (such as screen readers), the layout of the page may seem different to you. Because of wide variety of such programs, it is
impossible to describe usage of web based application in software independent manner, sorry.
Thus, the term `modern browser’ will be used for any browser with CSS2 capabilities and `text browser’ will be used as a shortcut for really text-browsers,
obsolete browsers and screen readers as well.
2 If you are using Lakmus for the first time, your password is probably not set and you shall act as if you have forgotten your password (see below).
3 Please, note, that when the form is displayed again with requests for some corrections, all fields are blanked – that is done on purpose (to prevent sending
passwords over the Internet in plain text) and it is not an error or reason to be worried.
Lakmus manual
9 / 42
3.4
Navigating through Lakmus
This section gives an overview what are the possibilities how to navigate when in Lakmus. Although the navigation itself depends
what part of Lakmus you use (whether you administrate your group, use some application etc.), there are several things all these
parts have in common.
Top of the page contains four top-level links. The first one My Lakmus that points to your profile page. The link is followed by
My groups one pointing to page with list of all groups you are member or administrator (leader) of. Next link (My labels) points
to list of all your labels. Activating the last link will log you out of Lakmus.
Under these links is a bar with so-called breadcrumb navigation (read "Hansel and Gretel" fairy-tale to learn why it is called that
way) that shows where in the hierarchy of the pages you are.
On several pages also appears another navigation (so-called context) that is positioned on the left of the page. Links listed
there depends on the part of Lakmus you are in. When you are browsing a group, this is the navigation that contains links to
applications available in the group.
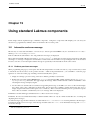
1. Top navigation displays links to the most general actions
2. Context navigation could display links to active applications in the group.
3. Breadcrumb navigation allows you to easily retrace to page at (logically) higher level.
4. Almost all pages contains the Quick labeling widget.
5. Most actions are triggered using buttons with icons representing the actions (here: applications).
Lakmus manual
10 / 42
Chapter 4
Labels – the Lakmus way
Labels1 are key feature of Lakmus. Any object can be labeled with any number of labels and label could be stuck to almost any
entity in the system. And, of course, object listings could be filtered using these labels.
4.1
Creating, sticking and removing labels
There are two ways label could be created. You can either create them explicitly (and in advance) using the My labels page or
when labeling an object. Label name could be any text you like.
As stated before, you can attach label to almost anything. However, when displaying objects with certain label(s) attached, only
objects of the same kind are displayed. Thus, it is not possible to display all objects having the same label at once.
What remains to be explained is how you stick the label to an object. Usually you would use a unified looking widget, often
referred to as Quick labeling widget that is described below.
Sometimes, different widgets might be used, e.g. allowing you to label more objects at once (this approach is used, for example,
for labeling group members).
4.1.1
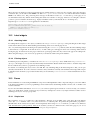
Quick labeling widget
The Quick labeling widget displays current labels and has a field to create new label to be stuck to the object or to select from
existing labels. Each label is followed by a remove link (either by the word remove or by simple minus sign) which would
remove the bond of label with current object (i.e. the label itself is left untouched).
If you are using browser with JavaScript support2 , you will be able to edit labels assignments without reloading the page. That
means that you can safely edit data in some form on the page and then edit the labels without losing any changes (as would
normally happen if you activate a hyper-link).
4.2
Filtering object listings using labels
As in previous section, a word of warning beforehand – you may come across different widgets used for filtering, the one
described here is the most common (and if you are planning to develop your own applications, you shall use this one) and could
be considered as "standard".
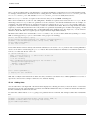
The standardized widget for filtering labels is actually pretty simple. It is a simple label list, where each label acts as link for
page where the listing is narrowed down to objects having selected label only. Activating another label will narrow down the list
only to those having all selected labels attached. Clicking a selected label will deselect it (thus widening the result set).
1 Some
2 If
applications prefers the term tags or cards
the word JavaScript means nothing to you, don’t worry. You will not miss any feature, furthermore you probably have browser with its support.
Lakmus manual
11 / 42
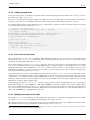
Sometimes, there might be more filters available. To determine what kind of objects each of them filters (usually, each one would
filter the objects using their attributes), a caption at the beginning of each listing is provided. In most cases, you can combine the
filters (i.e. they are not mutually exclusive).
Lakmus manual
12 / 42
Chapter 5
Using Lakmus
This chapter is about using Lakmus as a normal (i.e. not administrator) user.
Actually, there is not much to talk about. After you log in, you are redirected to your homepage (in Lakmus, obviously), where
you can see a list of actions you can do. Most of them are related to administrator-ship tasks and you probably won’t see them
(see Chapter 6 for more information). The links that you will see always are links to list of your groups (View my groups) and
already mentioned links for changing your password and logging out. Also, link for changing your e-mail (Personal details) is
present.
Following the link to list of your groups will bring you to the page where is – surprisingly – list of groups you are member or
admin of. Groups are sorted alphabetically and you can filter them using labels. Of course, when you first log in, no labels would
be available and the list would be pretty short. But as the time would pass, the list may get longer and the filtering may be become
a very useful feature. To display this page, you can also use the My groups link in the top menu displayed at each page.
Choosing one of the groups will bring you to the intro page of the group. On this page you can add and remove labels associated
with the group using the Quick labeling widget or open application of the group whose list is below.
5.1
Actions within the scope of the group
In the local navigation (which is usually situated at the left of the page) is a list of links that points to operations (actions) available
on this group.
First, there is always link to the intro page of the group. The intro page is useful only only for editing labels associated with
current group.
This link is followed by list of applications currently active in this group. Activating the link will bring up the application –
consult Part II to learn what applications are available and how they can be handled.
Below this group of links is a link Members labeling. As the title implies, on that page you can label members of the group. The
labeling is pretty straightforward – choose users and fill-in the name of the label and submit the form. There is only single tricky
part – editing existing label. If you change name of the label and at the same time change the users associated with it, new label
would be created instead of modifying existing one. Although it sounds a bit confusing at first sight (maybe even on the second
one), it is actually logic and this behaviour is pretty handy.
If you are administrator of the group, this link is followed by a link pointing to group administration.
And that’s all. There is nothing difficult in handling the group skeleton. Problems might arise when dealing with applications
because the handles more complex tasks. If such thing would occur, see Part II for more details.
5.2
Managing your own group
This section will show you what to do when it happens that you are administrator of a group. The group administration is
displayed if you follow the Administrate link in the local navigation.
Lakmus manual
13 / 42
There are three types of actions you can do when administrating a group (plus, of course, actions related to administrating the
applications’ content – this topic is covered in chapters describing corresponding application).
First one is renaming a group. By following the link you will be presented with a form that allows you to rename current group.
Submitting the form will immediately rename current group. Please, note, that renaming a group is generally not a very good
idea as may confuse other users if the same groups holds each day different name.
Second option is to administrate group members. On the page are two simple forms (if applicable) that allows you to add a group
member and to remove a group member. Again, the best way is to set the group members at the beginning of the term and avoid
any changes later (that does not mean that it is not possible but be aware that any unexpected change would confuse other users).
The third option allows you to activate applications for the group. In the form you select which application you want to activate
and you also fill-in the name under which it will appear in the menu. After that, the application shall be ready for use. Clicking
application from the list will allow you to rename the application and also to deactivate it (currently, deactivation is done by
setting application name to blank string – simply delete all text in the input field). However, when the application is deactivated,
it’s data are not lost, they are merely hidden. Effectively, that means that when you later re-activate the application the data would
re-appear. If you really want to delete the data, you will have to consult the documentation of corresponding application and
remove them manually (choosing such approach was motivated by fact that unintentional data deletion costs much more than a
disk-space).
Lakmus manual
14 / 42
Chapter 6
Administrating Lakmus
This chapter will guide you through the administration part of Lakmus.
6.1
Users
You bring up users’ accounts management pages by following the Administrate user accounts link at your homepage. The page
that will be displayed afterwards consists of list of users and a link for adding a new one.
6.1.1
Adding a new account
To add a new account, follow the New account link. On the next page, form with several fields would be displayed. After you fill
in the fields, you can submit the form and create the account.
There is nothing incomprehensible in what you have to fill-in. The only tricky thing is user’s login. You have to choose a name
that is not used by any other existing user of Lakmus and this name has to consist of alphanumeric characters only (i.e. no
spaces). If the name is already taken, the form would be displayed again and you would be asked to fill-in the form again. After
you submit the form, account will be created and you will be redirected to page where you fill-in remaining details (including
photo).
When filling the e-mail, do not cripple in any way the address (as you probably do when posting your e-mail in plain text
somewhere) – the address will be never shown to anonymous users and, moreover, this address is used for automated e-mail
sending.
When the account is created, it has no password set and you have to e-mail newly generated password the same way when
recovering a forgotten one.
6.1.2
Changing details of existing account
When you want to change existing account, follow the link from the listing and change whatever you want in the form. After
submitting, the changes will immediately take effect.
Although you can change anything you want, you shall avoid changing the login – reason being that user is usually accustomed
to it and it would be frustrating for him to learn a new one (and additionally, you may clash with existing one). Also, changing
the e-mail is a bad practice as the user might fill-in his preferred one instead of the default.
6.1.3
Password recovery
This section also contains the Password recovery link pointing to page for recovering forgotten passwords. If you see a reasonable
request you can generate a new password (that will be sent over e-mail). Untrustworthy requests could discarded without
changing current passwords.
Lakmus manual
15 / 42
6.2
Groups
This section will show how to administrate groups "from the outside". If you are looking for instructions how to administrate
group you are admin of, please, refer to Chapter 5.
To administrate the groups, follow the Administrate groups link from your homepage. On the displayed page, you choose what
you want to do. The first link serves for creating a new group, the second one allows you to change group admin of any group.
6.2.1
Changing group administrator
When you active the Change group admin link, you will be redirected to listing of all groups. After you select one of the groups,
a very simple form will appear.
The form has only single field – a drop down list with possible administrator. Make your selection and after submitting the form,
group has a new leader.
Please, bear in mind, that changing group administrator is rather a strange operation and you shall consult it first with the one you
are relieving of command. This is because he may want to download some data to which he would not have access afterward.
6.3
Roles
So far, we expected that you (as a Lakmus user) have the privileges for all operations. However, that would be rarely true. Each
user could have assigned several roles that defines his privileges. This section will show you how to create roles and how to grant
them to users.
If you are wondering how would you know that you have privilege to do some operation, the answer is very simple. Whatever
you can do, you have a link to. If you can’t do something, you won’t simple have a link to it (and, of course, when you still try
to do something that is forbidden, you will be redirected to page informing you about insufficient privileges).
So, follow the white rabbit – click the Administrate roles link on your homepage. The page has only two links – they point to
two different tasks. The first one is managing the roles themselves (i.e. deciding what privileges would the role have) – Edit roles
–, the second one is assigning the roles to individual users – Assign roles.
6.3.1
Managing roles
The page displays a list of existing roles and a link for creating a new one. Clicking role in the list will bring-up a form where
you can change the privileges of the selected role.
The form consists of text field where you specify the role name and a list of check-boxes that determines which privilege shall
be active. Submitting the form will store the changes that takes effect immediately (i.e. when you strip off some privilege from a
role and user with this role is currently logged in, this change will take effect as soon as he reloads the page).
The same form (but with all fields blank) will appear when you follow the Create a new role link. Submitting this form will
create a new role.
There is no limitation how you could name your roles but it is good practice to name your roles according to their purpose
(although it might be fun to have role named Tomato, it is better to use more formal names as you may not be the only one
responsible for role management).
6.3.2
Assigning roles
When assigning roles, you choose a user from the list and the page that is loaded afterwards has a form where you can choose
which roles are assigned to this user. You can choose as many roles as possible, but bear in mind that the best security practice
to follow is by giving each user only minimal privileges – just enough to be able to complete his job but nothing more.
Another good practice is to use the Unix approach – never use the root account for anything else than high-level administrating.
Rather create another user and log-in as "super-admin" only when really needed.
Submit the form, changes will take effect immediately (see previous section what means immediately in this context).
Lakmus manual
16 / 42
6.3.3
Privilege clash
When single user has more roles assigned, a natural question arises: which role takes precedence?
In Lakmus, the simplest and most tolerant model is used. The privileges exists only in positive way and each role tells what user
can do – the "can’ts" are implicit from the rest. That means that once a role gives a user certain privilege, adding other roles will
not remove it.
You can think of it as giving users keys to certain rooms. Once the user has the key, giving him other keyring will not alter that
(plainly, assigning a role will never reduce his privileges). If such behaviour is unsatisfactory, you are encouraged to create a new
role with only desired privileges set.
6.4
Applications
Applications are administrated on two levels. First, there is the global level where you install new applications and enable them
for usage. Next, there is the group level on which you activate the application for selected group. This section will cover the
global level – here you will learn how to install new application and how to enable users to use it.
To administrate applications, select the Administrate applications link on your homepage. The displayed page has a link for
installing a new application and a list of currently installed applications.
6.4.1
Installing new application
The process of installing new application is very simple but before we go on, there is one thing that needs to be pointed out.
Never ever install application you do not trust on your production server. And, before installing new application you are not sure
about, review its source code and when in doubts, do not install. All this is because after installing, the application would have
access to almost all data in your installation of Lakmus and may cause their damage.
If you are scared enough not to install any let’s-try-and-see application, please, move on. Obviously, the applications shipped
with Lakmus shall be treated as safe to install.
Applications for Lakmus are shipped as ZIP packages. To install them, activate the Install new application link and choose the
ZIP file for upload. After submitting the form, page with installation progress will appear.
When there was no problem, message about successful installation would appear at the top of the page. When something went
wrong, message with details of the failure would appear instead. In both cases, below the message would be displayed a log
of executed operations. This log shows what the installer did – typically there would be information about installing the main
application class, about installing some images and about creating tables in the database.
If something went wrong, please, consult the next section.
If the installation finished without errors, follow the View application details link to enable this application for usage and then
continue to section Section 6.4.3.
6.4.2
Installation troubleshooting
There are many things that may go wrong during application installation. Luckily, most of them are very rare and you would
encounter them only once (typically, you need to re-set directory permissions only once). However, if developing, you may meet
them pretty regularly.
First, the installer may be broken. If the installation fails on loading installer, review the install.php file inside the ZIP
package.
The same may happen with any PHP file in the package. If there is a parse error in the file, the installation would be aborted.
If the installation fails on directory creation, there is probably invalid mode on your application web directory. This directory
location is set in your main configuration file and the directory itself must be writable (and readable) by web server and must be
accessible through a web URL.
Lakmus manual
17 / 42
Other directories that must have write mode set are directories for storing main class of the application and for storing library
files. Paths to both these directories are in your main configuration file. However, these directories do not need to be accessible
from outside via a web URL.
There is another error that may occur and that must be mentioned. If you see an empty page (i.e. the page has no content at all)
it means that the installer caused so-called fatal error that interrupted the execution of the script. As such error is unrecoverable,
the result is the blank page. When this happens, you shall be alerted at once because it means that someone did a bad job writing
the application. Continue with great care.
You can learn more about reviewing existing applications by reading the Chapter 13 which explains how to write your own
applications and what are the things that shall be avoided when doing so.
6.4.3
Changing application details
If you just installed your application you probably want to enable it. If the application is already installed, you may want to
change some of it’s details. In both cases, the page that will be displayed is the same and is described in this section.
On the top of the page is the Quick labeling widget that allows you to label the application.
Below is the application status information and form for changing this status. If the status is set to enabled, it means that the
application could be used in groups. When the application is disabled, the application is installed but is hidden from normal users
– it does not appear in the list of applications of a group (but existing data are untouched).
Sometimes, you may encounter a third option – application is just being installed. First, this is very rare as the installation is a
process that occupies very little amount of time, thus, if you see such status, wait a few seconds and reload the page and see if
the status changed. If not it means that the installation stalled: installation was interrupted and (probably) due to errors could not
be finished. If you are the one that is responsible for this application, you shall reinstall it (and, if the installation fails, correct
the errors and try again). If you are not responsible for this application, then rather do nothing because probably someone else is
working on it... Generally, seeing such status means a problem that has to be solved – the sooner the better.
You can also uninstall application from here, but uninstalling here means only removing the PHP sources – never the data as
there might be shared by other applications.
6.5
Backup & clean-up
As Lakmus uses database to store all data1 , the best way to backup Lakmus is to do a backup of the used database using tools
provided with the database.
Because Lakmus configuration is merely a single file that is set-up during installation without changes through the live of the
application, the best approach is to copy this file to a save location once you verify that Lakmus is running without problems.
On the other hand, some applications may provide their own way for backing data up or for their export. For example, the
Scoreboard allows you to export table data to Excel while Homework lets you download uploaded solutions as a ZIP archive or
export/import task definitions as a XML file.
When the semester is over and you are planning to clean-up unused data, you have two option. First, you may create a new
database or selectively delete unused groups and users.
If the users for the new semester are not the same as already existing ones and also the groups would be different, you may want
to use the first approach and start with a clean database. On the other hand, when users remain you may want to only make more
space by deleting old groups in groups administration2 .
1 Except
for application implementation, but these could be restored from installation media.
you are familiar with SQL databases, you may try a combined approach: if you want to remove all groups but want to preserve users and other settings,
you can simple truncate the groups table (which will delete depending data using cascade) and leave other tables untouched.
2 If
Lakmus manual
18 / 42
Part II
Lakmus applications
Lakmus manual
19 / 42
Chapter 7
Homework application
7.1
Introduction
The purpose of the Homework application is to allow users to upload solutions of their homework tasks to the server which can
be later examined by group leader. The group leader can then view these solutions, assign points to them and even publish those
that are – in some way – remarkable.
Following section will describe how to use these features in the application. But here is a good place to say more about the
overall behavior of the application.
The group leader announces the task by filling necessary information about it (that includes name, description and optionally a
deadline and maximum points). Students (i.e. group members) uploads their solution (each student may upload more solutions
to a single task) and the group leader later correct them. After corrections, he can assign points to them.
Points assigning is done in two ways. First, leader specifies percentage of the maximum points for given solution. However,
as leader may also label each solution there is a possibility to score the solutions through labels as well. First, you may give any
label a bonus value that will be added to the base score (i.e. the percentage of maximum points). Just to be clear: the bonus is
always added to the score and always holds an absolute value (i.e. is not adjusted according to the maximum points). Next, you
may use labels to degrade a solution.
Imagine you are very tough on deadlines and everyone sending the task after the deadline will got only 50% of original score.
However, someone prefer to subtract a fixed amount of points (which could be done easily by bonus label with negative number
of points). To satisfy both these approaches, points assigned to tasks are counted even for solutions submitted after deadline.
But for these cases you can use the degradation labels. To these label you attach a factor of how much you want to degrade the
solution. By this factor, number of maximum points is lowered. Again, bonus points are never affected by this. Please note that
to the user, only the total score (i.e. sum) for the task is displayed and he won’t know how the score was formed (e.g. how much
was for the labels1 etc.). If you feel you need to do that, you can always use the comment field for this.
7.2
From user point of view
When you display the "welcome" page of Homework application, you will see a list of tasks that have their deadline close to
today. To see full list of tasks, click the All tasks link in the tab-like navigation. Clicking on the task (either on the first page or
on the page with all tasks displayed) will bring a page displaying it’s details.
The details include task name, annotation and a long description if available. However, the most important part of that page is
form that allows you to upload files to the task.
1 That
is simply because labels has to remain private.
Lakmus manual
20 / 42
7.2.1
Uploading your solutions
As you have read in previous section, you can upload to each task more than one solution. So, when you are uploading your
solution, you must first create one on the server. That is done by clicking the Add a solution link. When the page reloads, you
will see an empty form where you can upload your files and also add your comment.
To actually upload the solution, fill-in the form and submit it. When the page is loaded, the name of the file becomes a link
that would allow you to download the file (if you have unstable Internet connection, it is recommended to download the file and
check that it was uploaded correctly). If you want to upload a new version, simply re-submit the form with new file (if you are
re-uploading your files, you do not need to specify all of them – the ones that you left empty will be left intact – you do not need
to worry that they would be deleted).
If you are uploading more than one solution, remember that only one of them could be the default one – the one you get points for
(there is a checkbox that allows you to choose which solution will be the default). And when you are uploading your alternative
solutions, do not forget to update the note why is there another solution and how it differs from the other ones.
When uploading the files, please note, that each of your solution has a separate form and files could be uploaded to only one
solution at a time.
7.2.2
I uploaded the solution, what comes next?
Well, that depends how often and when your group leader decides to correct them. However, once they are corrected you can see
the points you get and also the published solutions.
The points can be assigned to each solution (please note that once your group leader assigned the points to the solution, you can
only create a new solution but you can not re-upload files to the scored one nor make other solution a default one) but only points
at the default one will be used for your total score.
Published solutions are solutions that the group leader found worth showing to everybody. They are displayed below your
solutions.
Depending on your leader, you may also find your points copied to the scoreboard table.
7.3
Administrating
Administration of homework tasks is divided into two branches. First, there is the branch where you edit task specifications (e.g.
name, annotation and deadline) and then is the branch where you view and score uploaded solutions.
7.3.1
Creating and editing tasks
On the first page is displayed list of tasks and button for creating a new one. Clicking on existing link will bring-up a page
with form where you can edit its properties. As this form does not differ from the one used for creating a new one, they will be
described together.
In the form you specify task name, its annotation and description (annotation is displayed on all task listings while the description
only on page with task details). Below is a list of files that form the task. There are always displayed two blank fields for new
files – if you want to add more files, you have to first save the task and then return and fill-in the rest.
If you want to remove a file from the task, leave its name and maximum size empty.
When editing existing tasks, bear in mind that some users may already upload some solutions, thus it is not the best idea to
remove files and also any huge-scale renaming may cause confusion.
You can also back-up task specifications by exporting them to XML. Obviously, it is also possible to import them back using the
links on the first page.
Lakmus manual
21 / 42
7.3.2
Viewing and scoring uploaded solutions
This part of the application is under the Browse solutions tab.
On the first page you only decide whether you want to browse uploaded solution by task or by user. The first way is the more
intuitive one: you announce a task and after the deadline passes, you start correcting the solutions. Effectively, you select the
task and you view a list of users that uploaded solution to it. The other way may be more useful at the end of the period when
you want to see how well some student worked through the semester.
No matter which way you choose, you could always narrow down the list by filtering using labels and you can also download
currently displayed list as a ZIP archive with all the solutions, each in a separate directory.
Nevertheless, using either way you will end on a page displaying solutions of a single task by a single user. On that page you can
view all the solutions user uploaded, you can write your note there and, of course, download the files. You can mark solution as
public here too so that any member of the group can see it (however, author of the solution is undisclosed). You can also specify
a reason why you have published it.
On that page you also fill-in the score percentage and optionally you may also edit tasks assigned to the solution.
Once you are finished, do not forget to store the changes (the submit button is located at the bottom of the form).
As Homework application has a built-in integration with the Scoreboard application it is possible to send points from Homework
to Scoreboard. However, this is a one-way communication and a write-only one2 . Also, to the table is sent only the sum (any
other option would lead to publishing of labels which is something that has to be avoided).
7.3.3
Label bonuses
These settings are activated through the Label rating item. The form available is quite intuitive as you only select a label and next
to it you fill in the bonus points or the degradation factor. Although it is possible to have labels with both options set, it is a bit
tricky and puzzling.
As you may sometimes lead two similar groups, these label-points bondage are global across whole Lakmus. If this behaviour is
not acceptable, you can always use labels prefixed with the group name.
7.3.4
Commit table
Under this rather unusual title is hidden a simple table for displaying summary information about uploaded solutions.
You can choose from two instances of this table. The first one simply displays whether user uploaded solution or not, the second
one displays amount of points assigned (as percentage and sum of the bonuses).
These tables might be handy if you want to see that you are not evaluating the solutions too strictly.
2 Just a short explanation: allowing the Scoreboard application to write data back to the Homework would make it very tightly bounded to it, thus breaking
the desired independence between applications. And reading data back from the table is something very difficult to define (as the points are actually a sum).
Lakmus manual
22 / 42
Chapter 8
Scoreboard application
8.1
Introduction
Scoreboard application gives group leader a way to easily manage points or grading of group members. And it gives group
members immediate answer how well they passed the last test or how many points they scored on the last homework. For
administrating is ready simplified spreadsheet-like editor directly in the browser (please, see below for further explanation).
8.2
Special features
As the application purpose is to keep track of points for each user, the Scoreboard cannot be viewed as another on-line spreadsheet
tool.
First, as each student (group member) has to be treated equally, functions are set for whole column and not for individual cells
(each group member has his data in a single row).
Next, the number of functions available is limited and offers only a basic functionality (which usually would be sufficient as most
of the time you are interested only in total sums). Unlike traditional spreadsheets where columns are marked by alphabet letters
(that are referenced in formulas), the columns are marked by their titles and by list of labels assigned to them. Functions then
do not operate on defined columns but on all columns in the table with selected label attached. Actually, this approach is much
more universal than the traditional alphabetized columns one.
Another interesting feature is column referencing. You can say that a specific column is only a reference to another one and shall
display the same data (for those familiar with the soft-link term from the Unix world, this is a soft-link on columns). This is very
useful as you may want to have more tables (e.g. one with test results and the other one with homework score) and a summary
one (the summary table would be then formed only by references to sum columns in other tables).
These are the features offered but a bit of explanation is needed to add. First, as there are more tables, the functions always run
only on columns in the same table. Thus, if you mark all data columns with flag "To sum", the summing by this label would use
only data in one table. Next, the referencing is read-only because usually you want to copy only sums to an overview table and
you can’t modify function result. Moreover, it is much simpler for editing that one column is the original and another one is a
copy. And a word of warning at the end: function results and references are cached and they are recounted on-demand only. That
means that if you delete a source column for a reference, you won’t be warned and the referencing column will keep the cached
data and will be silently converted to a normal data column.
8.3
From the user point of view
When you activate the Score application, you see a list of tables available in current group. Clicking one of them will bring-up
page with the table. If you want to post-process the data, you may use the Export link that will download the data as Excel
spreadsheet.
Lakmus manual
23 / 42
8.4
Administrating
If you are familiar with some kind of spreadsheet software you probably won’t have problems working with Score application.
However, there are some minor differences.
First, there are three types of columns – first there are the integer columns where you can enter any integer. Secondly, there are
the yes/no columns (they might be useful for recording presence) and finally there is sum function. The function column is bound
with single label and the function is evaluated only on columns with that label attached. Although this may seem as a drawback
on first sight, it actually provides pretty powerful options and shall be sufficient for almost all needs.
Actually, after you know this, there is nothing much to explain.
• You assign labels to columns by activating the edit link in the column header.
• To add a new column, click the green plus icon located in the column header.
• The small red cross serves for column removal.
• Each group can have as many tables as possible, to create a new one use the Add table link.
After you finished your editing, do not forget to save the changes by submitting them to server. The send button is located at the
bottom of the table.
Please note that for editing the scoreboard you will need a browser with JavaScript support. In browsers without JavaScript
support, only basic editing will be available and definitely is not very pleasant to use.
Lakmus manual
24 / 42
Chapter 9
Phorum application
Phorum is a lightweight application for e-discussion. Its usage is very straightforward and anyone familiar with any software of
similar purpose shall not have any problems operating it. Because of this, this chapter merely lists what are the features available
and how it differs from other tools of same kind.
First, only group members (and group leader, of course) may start a new topic (thread). Once the topic is started, anyone can
post replies to it and the number of replies is not limited1 . However, group leader may decide to close the topic to avoid having
too long discussions (usually, it is preferable to have more shorter threads than a one huge).
Group leader may also mark topic as sticky to force this topic to the top of the listing. Normal threads are sorted by date of last
post.
1 Please
note that Phorum uses a flat structure and does not remember a tree-like listing to record individual order of replies.
Lakmus manual
25 / 42
Chapter 10
Mailer application
Mailer is the simplest application with sole objective. Allow group members send e-mail to their group-mates.
The usage is really simple – after you activate the application and display its page, you only fill-in the subject, select recipients
(either all group members or members with certain label attached) and write the e-mail text. You can also choose whether e-mail
shall be send to group leader as well.
After you submit the form, e-mail will be created and then delivered to the SMTP server. Please note that even a message about
successful sending does not mean that the e-mail was really delivered to the sender. Thus, before using Mailer for last-minute
updates, verify that the sending really works (that means not only the configuration in Lakmus but maybe even a configuration
of your web server and firewall).
Lakmus manual
26 / 42
Part III
Extending Lakmus
Lakmus manual
27 / 42
Chapter 11
Introduction to Lakmus internals
11.1
Used software
If you are reading this chapter you have been probably using Lakmus for some time already and thus there is no need to tell that
it is a web application using PHP. However, there is a need to state that Lakmus uses several features of PHP5 and will not work
with PHP4 engine.
Lakmus is developed and tested on Apache web server and requires mod_rewrite in order to work. However, as only a fraction
of features of mod_rewrite are used, there is not principally any obstacle to use another web server that supports some kind of
URL rewriting (not redirecting!).
For database back-end is used MySQL as it covers all needs of Lakmus. Additionally, most distributions have the ApacheMySQL-PHP trio as pre-compiled packages in their repositories.
On client side XHTML is used, eye-candy is brought by CSS and JQuery. JQuery was chosen because it supports wide variety
of browsers and provides a rich set of functions (including AJAX).
11.2
Before reading on
If you are planning to extend Lakmus in any way, it is highly recommended to install a fresh copy on your server and never do
changes on your production server directly. This time, use the lakmus-devel-version.tar.gz archive that contains also
several helper scripts and a standalone web directory.
In this part the reference (or API) manual is referred to on many occasions. This manual is generated from source codes with
Doxygen, thus to create it just run make docs from root directory of Lakmus (alternatively, you may run doxygen directly but
you may need to specify which configuration file shall be used).
11.3
Skeleton implementation
Lakmus can be – internally – divided into several parts based on the functionality they provide. There is the login module, the
user’s homepage one or the part that takes care of the group applications etc. Each of these parts is implemented as an individual
class with common ancestor (the LakmusKernelBase).
Then there is the engine that decides which of these parts would be running when user requests some page. This is done in the
index.php which contains the "main()" of Lakmus. index.php takes care of following:
1. Stores the URL of current page (as got by the URL rewrite) and unsets it from the $_GET array.
2. Includes necessary files (class implementations).
Lakmus manual
28 / 42
3. Initializes connection with SQL server (and when it cannot be established, displays error message and terminates).
4. Initializes authorization to check whether user is logged in (this information is used later, at this moment no decisions
about access permissions are taken).
5. In a series of if checks current URL is checked against existing paths and on match corresponding class is instantiated and
initialized (this initialization usually includes passing in the initialized SQL wrapper and authorization information) – the
action handler is created. On no match a 404 error is displayed.
6. The handler is ran (by a call to doAction) in a try block to catch fatal-error1 exceptions. As doAction may cause a
page redirect, script execution may be terminated before reaching end of this function.
7. Template (Lakmus uses the PowerTemplate) is created and generated content is inserted into it.
8. Template is printed.
11.4
Accessing data
As mentioned before, Lakmus uses MySQL database to store all data. Due to various reasons, you never access the database
directly (i.e. by call to mysql_(something ) function). Instead, you use high-level methods that hides the implementation of
the data storage used. To make things a bit more complicated, there are indeed two levels of abstraction for data access (plus the
level where data are displayed).
11.4.1
Layered structure
Layered structure of data access is used because of two reasons. First, it provides an abstraction to used data storage. Secondly,
it hides the actual implementation of data access.
The bottom layer (hidden inside the SqlConnection class) abstracts the access to any SQL database. It provides functions for
selecting and updating data. While you have to manually write the SELECT queries (as they are usually complex), the INSERT
and DELETE queries can be built automatically (please, see reference manual on SqlConnection for more detailed info).
The top layer then uses the bottom one to built more sophisticated queries and to provide another level of abstraction. For
example, the top layer can check that some record really exists or that provided identification is valid.
When creating (or extending) your own data access classes and functions, keep this dual-layer structure – although it is sometimes
quicker to write the code directly, in long term it will cause problems.
Available wrappers include the LakmusLabelMate for dealing with labels, the LakmusCoreDataHelper for accessing
the base data (information about groups or users) or LakmusAuthorizator for verifying user’s privileges.
1 Such
as database connection failure.
Lakmus manual
29 / 42
Chapter 12
Coding conventions & co.
12.1
Class, methods etc. naming
Because there isn’t any strictly set convention for naming objects in PHP, for Lakmus was chosen the one used in Java. The
differences between categories are described below, in general you shall use CamelCase (not camel_case) and when naming
object with well known acronym (such as URL), lowercase it (e.g. name the class UrlDwarf, not URLDwarf).
Class names Use CamelCase (e.g. UrlDwarf).
For parts of the kernel part of Lakmus (e.g. for group listing, for privilege editing) prefix the class name with Lakmus
(e.g. LakmusIndexPage).
For applications prefix the class name with LakmusApplication_ (e.g. LakmusApplication_Upload). Although in most cases, these are only recommendations, always prefix your applications like this because the base class
expects this kind of name and extract the suffix from your class name (the rigid name format is not used in any way now,
but might be in the future, though).
Functions (member as well as static) Use camelCase (e.g. addBreadcrumb).
The name itself shall represent the action that would occur when called (thus addRow is better than rowAdding if we
have object representing a table).
Variables (including member ones) Use camelCase (e.g. $cssClass). Because in PHP you need to access member variables
with $this->, there is no need to distinguish between local and member variables by adding underscore or similar at the
end of member variable name (as in C++ convention).
Lakmus manual
30 / 42
Chapter 13
Creating your own applications
Group applications are the best way to enhance Lakmus – the best way to add new functionality to it and they are the highlight
of Lakmus. This chapter will show you how to write your own application.
If you are reading this chapter it shall be safe to assume that your are familiar with Lakmus not only from the user point of view
but you shall also know something about its administration. Also, reading only this chapter will not be enough – you shall at
least skim all chapters in this part of the manual.
As the opening speech about applications and your knowledge has been made, there is no need for any delay – let’s go and learn
how to create our very own application.
13.1
Getting ready
As you learned earlier, the applications itself are distributed in form of a ZIP package that contains all files needed for running
the application. In this chapter we will explore format of this package in greater detail and also we will build our own.
There are several shell scripts in the development version of Lakmus to simplify building your own application. We will use
them to generate the initial application skeleton and also to install it without using the web interface (to speed things up).
To start a new application, execute the generate_application_skeleton.sh script (if you run it without arguments,
it will print out a short help of its usage). It requires a single argument – the identification of the newly created application.
Generally, you could choice as identification (please, note, that this is not application name – which could be duplicate with other
application – but its unique identification) any name that would be a valid identifier in PHP. However, best practice is to use only
letters of English alphabet (as a matter of fact, with national characters involved you are risking that the application would not
work on all systems due to localization differences).
Although you can the script with only single argument, it is worth mentioning other options you may use.
• The -v turns on verbose messages about tasks the script is executing.
• With the -n you can specify the application name (contrary to application identification, here you are not limited to certain set
of characters). This it the "human-readable" version that will be displayed in application listings.
• With -d option you can specify directory where the skeleton would be created. By default, this option has the value of
application identification.
• Finally, to display list of these options, run the script with -h.
The script will create a new directory and will populate it with files that are vital for writing a new application. Below is a list of
created files and their purpose.
IDF This file contains only the identification of the application.
Makefile Prepared Makefile for most common tasks (see below for more information).
Lakmus manual
31 / 42
install.php Installation PHP script (basically it tells which files from the ZIP package shall be installed).
main.php Application implementation (this is the file you will edit most of the time).
Makefile.template Template for the Makefile. You will use this file if you use some kind of version control system (such
as Subversion) as some of the changes of Makefile are local only. If you do not use VCS, you may delete this file.
.ignore Prepared list of files that shall be ignored by VCS1 . You can delete this file when the directory is not versioncontrolled.
13.2
Format of the application package
As stated above, applications are distributed in the form of a ZIP package. In this section will be described their format.
First, the package is packed as common ZIP and do not use any proprietary extensions (such as password protection or encryption). Also, it stores all the files in root directory (although this is generally a very bad practice it does not matter in this case
because this package would be rarely unpacked by human user).
The package has to always contain two files. First, it is the IDF file that contains the identification of the application and nothing
else (in plain text format). Secondly, there has to be a install.php file that contains PHP code for installing the application.
Other files in the package may be named as you like but it is good practice to use only letters of English alphabet for naming files
due to localization incompatibility on some older systems.
If you have used the script for generating application skeleton, running make will create package with this format for you
(however, when adding your own files, do not forget to add them to the list in the Makefile).
13.3
Command-line application installation
Typically, you would install new application by uploading its package to the server using the web interface. However, when
developing this approach is very slow. Thus, a small shell script was created to simplify this task.
The install_application.sh script expects single parameter – filename with the package. It will try to install the
application and report whether the installation was successful.
Because the script writes to directories owned by web server, it needs to be run with correct privileges. Best approach is to run
it as the user under which is running web server (typically, one of www, http or nobody). You can use sudo command for that
easily by adding following lines to your sudoers file.
# Lakmus
Cmnd_Alias LAKMUSINSTALLAPPCMD = /full/path/to/install_application.sh
User_Alias LAKMUSGRP = your-login
LAKMUSGRP ALL=(http) NOPASSWD : LAKMUSINSTALLAPPCMD
However, running the script with package name only will leave the application in disabled state. To enable it automatically, add
the --enable option. Also, you may consider using the -v option to turn on verbose messages.
When using the prepared Makefile, the target install is prepared to run the script with sudo.
13.4
First steps of development
In the following text, we will assume that you have used the script for generating the skeleton, thus you do not start with
completely blank files.
1 However, only presence of this file will not be usually enough and you would have to tell the revision control software to use it as source of list of ignored
files (in Subversion by running svn propset svn:ignore -F .ignore .).
Lakmus manual
32 / 42
If you open the main.php, you will see that it contains single class – LakmusApplication_your-identification.
Please, do not change the name as the Lakmus kernel relies that all application classes starts with the same prefix.
This class holds the implementation of your application as only code inside this class is executed. Please, do not place any code
outside the class (and if you encounter application with such code, treat it with great care as it may indicate malfunction or even
a sabotage).
As you have noticed, the class is derived from LakmusApplicationBase. The ancestor class takes care of some initializations and also it defines names of methods for common tasks.
13.4.1
Constructor & initialization
In the template, the constructor (note, that – as in all Lakmus classes – the new type of constructor is used) only calls the parent
one and nothing else. The parameter of the parent constructor is the name (here, a human readable version) of your application2
– this name may never be used anywhere because it appears only in error messages. Moreover, these messages would appear
only if you have not caught some exception and that would get propagated (which is a bad idea and when such thing happens
you shall check your code which case your forgot to take care of).
In your application you may want to do other initialization routines in the constructor but some of them may need to wait to the
onInit method. If you are wondering why all the initialization could not be done in the constructor, where it logically belongs,
the short answer is data helpers. The long answer is following. There are several helpers that wraps the access to data in Lakmus.
These helpers has to be passed to the application so it can use them but the problem is that passing them as parameters to the
constructor makes it very difficult for future changes (such as adding a new helper). Because of this, helpers are set through call
to initialize and after that the onInit is called.
After the flow returns from the onInit the kernel (i.e. the "code" that owns your application) may do some other actions and
then it calls the doAction method where the logic of your application happens.
13.5
Engage!
13.5.1 doAction – heart of your application
The title of this section is by no means exaggerated. In this method decision what shall be done takes place and all data
manipulation takes place here as well.
In Lakmus, the decision what page shall be displayed is based on URL of current page and from certain point of view is a
kind of event driven programming. The key component is the url attribute of the base class3 which represents current URL.
This attribute is an instance of the UrlDwarf class which is a powerful tool to handle URLs (refer to API manual for more
information about this class). For us now, the most important method of url is the getFirstSuffix that tells the first virtual
directory of current URL not yet processed. As an example, look at URL of any existing application – it would have form of
something /app/app-name/aaa/bbb/and-so-on and everything up to the app-name would have been processed by the
kernel of Lakmus – the remaining part would thus start with aaa/bbb/and-so-on and the getFirstSuffix would return
the aaa part.
That is wonderful because if we switch on this string we could easily determine which part of our application will run. Then
we can use the shift method to mark another part of the URL as processed and use the getFirstSuffix again to get next
part (in our example, the bbb). With this approach, the control part of the application would be a series of switches depending on
the URL. Of course, that would work only if our application’s logic could be described by hierarchical URLs. However, even if
your application does not use such hierarchical structure, you will have to use url to determine what action shall be taken (simply
because there is no other choice). Furthermore, if you are not able to find any hierarchical structure in your application you have
a problem anyway...
2 If
you have run the skeleton generator with the -n, you will not need to make any changes to the constructor at all.
this chapter, the conjunction base class would refer to the LakmusApplicationBase, while the phrase our class would refer to the class we are
extending.
3 In
Lakmus manual
33 / 42
13.5.2
Creating content
Creating the content is ... well ... up to you and this manual cannot help you much. However, if you want to know how to notify
the kernel that you created some content, carry on reading.
Once you created your content of the page, call the setPageContent to pass it up the food chain. This content will be,
however, displayed after you return from the doAction method. You can also use the appendPageContent to append new
content to already existing one.
Although Lakmus tries to be as flexible as possible, there is no other option how to display the content of the page4 . Never ever
use direct printing (e.g. through echo) as it will spoil the formatting; moreover it will effectively disable possibility to cleanly
redirect the page. Even if you know what you are doing, do not do this. Period.
As for the actual content – try to use Phenolphthalein components where ever possible. They provide a fair level of abstraction
and also a unified look-and-feel of the application. Refer to chapter Chapter 15 for list of Phenolphthalein components.
13.5.3
Setting page heading, creating breadcrumb navigation etc.
To set page heading, use the setPageHeading method. This method takes only single parameter – the title of the page. The
text passed to it will be used both in the main heading of the page (technically, in the H1) as well as in the title of the page (the
one that is displayed in the browser window header). As a bonus, it is safe to use in-line formatting in it (this may be useful if
you want to point out some word in the heading) as tags are removed in the title.
If you want to create a breadcrumb navigation (which is thoroughly recommended) use the addBreadcrumb method. Its
parameters are URL of the page and text to be displayed (please, note, this text will be – unlike when setting page title – run
through htmlspecialchars so you shall not do it by yourself).
If you need a JavaScript script to be loaded, use the addExternalJavascript method. If you are using JQuery, you may
want to explore the addDomReadyHook method to see how to add code that would be launched after page is loaded.
13.5.4
Modifying the installer
Of course, once you abandon the experimental "Hullo, World!" applications, you will need to add your own CSS style-sheets,
images etc. to your application. That is actually very simple.
Open the install.php and scroll to the onInstall method (please, leave alone the class header and constructor – except
for changing application name – otherwise, you may end with non-installable application).
This method calls the installMainClass that installs the application main class (the parameter is the name of the file as
stored in the package).
There are other method calls commented out. These are used for installing extra files – choose from the list below to determine
which method you want to call. All of them takes two parameters – first is the filename in the package and the second one is the
destination file name (while you may use directories in the package, the destination structure is flat and using directory names
will cause the installer to terminate with failure).
installStylesheetFile Installs a CSS style-sheet.
installImageFile Installs file with image. This file will be stored in the same directory as style-sheet.
installJavaScriptFile Installs external JavaScript file. Also this file will be stored in the same directory as style-sheet.
installLibraryFile Installs a PHP library file. To include them, use require_once
tion:: getPathToApplicationLibrary("your-filename");.
LakmusConfigura-
If you need to create your own SQL table, prefix their names with lkma_ and use the createSqlTable method. Please, refer
to the API reference for format of the parameters to this function.
4 Except
adding local links through addContextLink that will add a link above the main heading.
Lakmus manual
34 / 42
13.6
Several notes at the end
Please, take this chapter as a very brief introduction into writing your own application. You shall consult the chapter Chapter 15
about components available in Lakmus. Also, the API reference may be a good source of information. And if you are really
planning writing your own application, go through the code of already existing ones (especially, the Phorum application is a very
good starting point: it is simple enough yet it contains almost everything that is unique to Lakmus).
Lakmus manual
35 / 42
Chapter 14
Adding core functionality
This chapter will show you have to add some core functionality to Lakmus (by core functionality is meant something that effects
whole Lakmus). If you are planning to introduce another mechanism for logging in or extend information held about each user,
this chapter is what you are looking for.
14.1
Kernel components
Before we go on it is vital that you have an overall idea what is the task of each class in Lakmus. Take the following list as a
summary of the targeted tasks of each kernel classes, for details consult the reference manual and source code.
LakmusIndexPage Very small class that takes care of displaying the index page (i.e. the one that user sees when he accesses
the root directory).
LakmusLoginPage This class takes care of displaying the login form and also verifies that user provided valid credentials.
LakmusUserHomepage This class displays user’s homepage with links to various actions and also lists groups user is member
(or administrator) of.
LakmusUserAdministration This class handles administration of user accounts (i.e. adding and editing).
LakmusGroupActions This is pretty huge class as it takes care of all actions associated with a group. That includes displaying group applications as well as managing group members.
LakmusGroupsAdministration This class is used for administrating groups – e.g. adding a group or changing group
admin.
LakmusHiddenActions This is a bit tricky class as it takes care of many actions silently. It can execute various operations
and after their execution the page redirects back to original page. It also takes care of displaying label editing dialog.
LakmusPrivilegeAdministration This class displays page for editing and assigning roles.
LakmusErrorPages Various error handlers.
14.2
Smaller changes
If you want to make only minor changes, probably the best way would be to directly edit existing source code. Find in the lists
of core classes at the beginning of this chapter the one that would fit the most your needs and improve it.
If you are planning adding a whole new function to Lakmus, carry on reading – following section will show you how.
Lakmus manual
36 / 42
14.3
Bigger changes
If you want to add something to Lakmus and editing existing source code is not an option, you shall create a new class – derived
from LakmusKernelBase – and place your code in it. In following text, the word module will be used as a reference to the
class and its functionality.
The following code is a template to start with – adjust the class name to your needs and you are (almost) ready to go:
<?php
/**
* Short description. Some long description.
*
*/
class LakmusYourClassNameHere extends LakmusKernelBase {
/**
* Constructor.
*
*/
public function __construct() {
parent::__construct();
}
/**
* After constructor.
*
* @return void
*
*/
public function init() {
}
/**
* Handles all actions.
*
* @return void
*
*/
public function doAction() {
$this->setPageContent("This is the content of the page.");
$this->setPageHeading("My heading");
$this->addBreadcrumb("This page", $this->url->get("/"));
}
} // class LakmusYourClassNameHere
// intentionally omitting closing PHP tag
Because deriving new class for the kernel does not differ much when creating your own application, there is no need for any
prolonged introduction. So, just briefly:
• The constructor shall only call a parent one. As the helpers are not initialized yet, there is not much that could happen here.
• The init is called after helpers have been set and shall be used for any initialization that needs access to the database or
information about current user.
• The doAction is the heart of the module that decides what shall be done. As with applications, you shall use the url attribute
to decide what action shall be taken.
Lakmus manual
37 / 42
• Use the setPageContent and appendPageContent methods to set and add a page content respectively.
• For setting a page heading and a title use the setPageHeading.
You shall consult the reference documentation of LakmusKernelBase to see what methods and attributes are available to
your needs.
14.3.1
Incorporating your new module to Lakmus
When adding your module to Lakmus, there are several steps you need to follow in order to have your module working. Follow
the instructions below in this order and you shall not run into any troubles.
1. Decide what would be the base URL for your module. This URL has to be unused and shall describe well the functionality.
If you are in situation when you need to create whole new class and still have it (in some way) under already existing one,
you would probably end with hacking the existing one as such solution is not possible with Lakmus directly.
2. Add your path to the paths.php in your configuration directory. That means you extend the existing associative array
$PATHS with a new item. The index must be a unique identifier and the value is expected to be a two-member array.
The index 0 holds a regular expression that matches the URL of your module. The index 1 than holds string for reconstructing the URL as regular expression can not be used for that.
See the group path information on how to use parameters in the URL.
3. Name your source code file as class.YourClassName.php and place it in include/ directory.
4. Add a require "path" line to index.php to include your class. There is already a huge section with similar lines,
yours shall go right below other kernel classes.
5. Register your module in index.php by adding another if branch that matches your URL. In the body of the block you
instantiate your class and then you initialize it by call to initHandler.
6. Point your browser to the URL you have chosen and if you have not made any mistake, your module shall show up.
If it does not show up, review the changes you just made. Common mistakes are switched parameters in the ereg function
or invalid regular expression. Also, on some systems (e.g. on Linux with SELinux enabled) you may need to set special
permissions on your file with source code to be accessible by your server.
7. You shall add link to your module to navigation. To do this, you would probably need to add a link in the displayIndexPage method of LakmusUserHomepage class.
Otherwise, the layout/ is the directory to look in and maybe also the LakmusMainTemplate would be worth looking
into.
Lakmus manual
38 / 42
Chapter 15
Using standard Lakmus components
In this chapter will be explained usage of Lakmus components. Using these components will simplify your code and your
extensions (e.g. applications) will have same look-and-feel as the rest of the portal.
15.1
Informative and error message
The best way to create static informative or error boxes (i.e. that are part of the HTML code) is to use methods of Phnl class –
namely getErrorBox and getInfoBox.
Both are called in the same manner – the only parameter is message to be displayed.
These methods internally calls the same method – getMessageBox1 – to unify the look of the message. In browsers with CSS
and images on, message is displayed in an indented box with solid border and with icon representing the action. In text based
browsers, users also see text description and the message is separated by horizontal rules from the other content.
15.1.1
Redirect-persistent messages
When programming web pages you face quite often the following situation: user did some action, you processed it and you want
to inform the user about success of the operation and also – which is the problematic bit – you would like to secure the page
against re-do of the action after page reloading. You have basically three options:
1. Simply do nothing to prevent re-doing of the action. That is generally a very bad idea.
2. Redirect the page with standard HTTP header Location and add extra URL variable with the message (e.g. page.php?msg=saveokay) and let the other page display the message. That is much better but it still has a small flaw – after
reloading the message is displayed again.
3. Do the redirect as described above but instead of appending the message to the URL, store it in a cookie and the display
the content of the cookie. Although it looks the same, here we have the possibility to display the message just once (or
display it again if time between the request was too small etc.). This is even better than the previous option, but it expects
that cookies are enabled – and when they are not, no message will ever be displayed!
In Lakmus is used the third approach but instead of cookies is used session storage2 .
In Lakmus, the above described functionality is called newsflash. There are only two functions that take care of sending and
displaying these messages.
To send a message to appear after redirection, use static method Phnl::sendNewsflash. It’s first parameter is the message to
be displayed and the second one is type of the message. Possible values are ’info’ for an informative message and ’error’
for an error message.
1 However,
2 The
this method is protected
one accessible via $_SESSION.
Lakmus manual
39 / 42
These messages are displayed on the next page that appears, usually near the top of the page. If you want to place these messages
somewhere else, you can ask for their HTML code with Phnl::getFormattedNewsflash method that returns formatted
HTML code. Please, note, that positioning these messages in alternative location (i.e. not near the top of the page) is not
recommended because they shall be the first thing that attracts user attention on the page. However, it is all right to alter this
position to preserve natural look-and-feel (e.g. display newsflashes under your menus but above some listings etc.).
Typical usage of sendNewsflash in application looks like this3 :
$this->data->store($formData);
Phnl::sendNewsflash(sprintf(_("Record %s was stored."),
LkmPhnl::eemp($formData[’name’])));
$this->url->redirect("/");
15.2
Label widgets
15.2.1
Attaching labels
For editing labels assigned to some object you shall use the LkmQuickLabelingWidget. The great thing about this widget
is that with modern browser the label attaching (and detaching) can be done without page reload.
Also, very interesting feature is the dialog mode (activated using the runAsDialog method) where the whole labeling widget
is transformed to a single link. In modern browsers, on click a dialog box will appear where user can change labels without
leaving the page. In older browsers, the page is redirected to special page where the only content of the page is the editing form.
When using this widget, you do not need to program any code related to label storing in the database.
15.2.2
Filtering objects
For filtering objects using labels, you shall use the LkmLabelFilteringWidget class. Unlike with LkmQuickLabelingWidget, this widget does not provide any functionality related with the database back-end. You have to feed this widget with
the list of labels and you have to program the object filtering as well.
For details of constructing this object, refer to the API. The only remaining thing worth mentioning here is that you can pass
currently selected labels’ ids to the constructor. Or better, what you think are currently selected labels. The widget will compare
it with label ids from the list you provided and after that you can ask with getCurrentLabels method whether the ids were
correct.
15.3
Forms
Forms in Lakmus are created using the PhnlForm component of Phenolphthalein. This component will give your forms unified
look-and-feel and will free you from programming low-level stuff such as determining whether form was sent or whether form
contains valid data.
If you look at the API documentation of PhnlForm you would see quite long list of method – however, mostly you would use
only a very small subset of them. As the best way to learn is by example, let’s create a very simple form that could be used for
renaming some object – let say a group name.
15.3.1
Simple form
The constructor of PhnlForm takes up to three arguments. The first one is the URL of the script where the form shall be
sent to (the action attribute of the form). The second one is so called id prefix. If specified, this prefix will be prepended to
all field names in the form (however, that is done transparently and if using PhnlForm methods, you will not see difference
with and without this prefix specified). This can be useful if you have two different forms on the same page (as you do not
3 The
LkmPhnl::eemp escapes special HTML characters in the given string and emphasises it.
Lakmus manual
40 / 42
have to care about adding prefix to each field name) or for unique identification of the field (as for a special formatting by CSS,
for example). The third one is the method used for sending the form. Allowed values are PhnlForm::METHOD_GET and
PhnlForm::METHOD_POST. The default is PhnlForm::METHOD_POST as it is usually the best choice.
Method setCaption is used to set caption of the form. Note, that you can use HTML formatting here.
This is all for initialization, we can now start adding fields. All fields are separate classes derived from PhnlInput. Worth
mentioning is that PhnlInput takes two parameters to in the constructor – the field id and field label. In our example, we
would have only single field and as we want mere text input, we could use the PhnlTextInput. Its constructor takes up to
5 arguments – first two are obvious and mandatory: it is the id of the field and its label. Third one is flag whether this field is
required (i.e. must be filled in when the form is sent). Fourth one specifies the way blank spaces would be treated (giving 0 would
leave the data intact, 1 would trim them and 2 would additionally merge multiple spaces into single one) – see the reference
manual for details. The fifth one is regular expression against which the input shall be checked.
The field is then added to the form with call to addField. Thus, so far, our code would look like this (assuming $url holds
URL of current page and $groupName current name of the group we are renaming):
$form = new PhnlForm($url, "gn");
$form->setCaption(sprintf("Rename %s", LkmPhnl::eemp($groupName)));
$newName = new PhnlTextInput("name", "Group name", TRUE, 2);
$form->addField($newName);
// more code to come
To determine whether form was already sent and holds valid data, we can use the isReady method. After receiving affirmative
answer, we can ask for sent data using the getData method. The returned structure has members for each field we added to our
form. So, we could write the rest of the code:
if ($form->isReady()) {
$data = $form->getData(); // $data holds a struct now
$newName = $data[’name’];
// do the renaming
Phnl::sendNewsflash(sprintf("Group %s was renamed to %s",
htmlspecialchars($groupname),
LkmPhnl::eemp($newName)));
// do some redirect
}
}
$out = $form->getAsHtml();
// display the $out somewhere
Well, that’s it. Maybe other frameworks would do the same job with less code but the motto of Phenolphthalein is not to have a
super-short code but to have a simple code that does not obfuscate anything.
15.3.2
Adding hints
You can add a hint to each input field – this hint would be displayed as a floating box when you hover the mouse over the field.
In text browsers, the text of the hint will be appended to the field label. That means that you could be sure that the information in
the hint would always be delivered to the user.
To set the hint, call the method setHint, giving it as a parameter the text of the hint. Out example could be thus extended like
this:
...
$newName = new PhnlTextInput("name", "Group name", TRUE, 2);
$newName->setHint("Enter the new group name here");
$form->addField($newName);
...
Lakmus manual
41 / 42
15.3.3
Adding grouped fields
If you need a form, where several fields are repeated (such as forms allowing uploading more than one file at once), you can use
the "field group" feature of PhnlForm.
The process of creating grouped fields is actually very simple. You create your fields and you inserts them into an array (using
references to allow take-over of the fields by the form). And you then pass this array with group caption to the form.
Our example with more files could look like this (we also added input for comments on each of the files). Notice how the data
are positioned in the structure returned by getData.
... // here we create the form
$fieldUpload = new PhnlFileInput("upl", "File to upload",
500, array(), FALSE);
$fieldComment = new PhnlTextInput("comment", "Comment", FALSE, 2);
$form->addRepeatedFieldGroup("uploads", "File upload #%s",
array(&fieldUpload, &fieldComment));
...
// more logic to come
...
$data = $form->getData();
forech ($data[’uploads’] $idx => as $u) {
printf("File #%d has comment <i>%s</i><br />",
$idx + 1, $u[’comment’]);
}
15.3.4
Other kinds of input fields
The text-input field is not the only one available in Phenolphthalein but before going on, there is one method that shall be
mentioned. It is the setMultiline method that creates a text input field with more lines. This is very handy for longer
descriptions. The tag hidden behind this is textarea.
If you want a checkbox, use the PhnlBoolInput component. It’s usage is obvious, there is only thing that needs to be taken
care of – the way checkbox fields are passed during HTTP requests is – plainly speaking – weird and there has to be a special
handling for that (that is why each field has a isCheckbox method). However, unless you are planning to create your own
fields based on checkboxes, you do not need to worry about this – you can set the data as a boolean or empty/non-empty string.
Data of this field are always returned as a boolean.
To get a field where use can choose from multiple (exclusive) options, use the PhnlChoiceInput class. The usage is pretty
straightforward, only thing that is tricky a little is setting the list of options. The list passed to the constructor has to be an array
of structures (i.e. two dimensional array in strictly PHP terminology) and you specify with another array which items of the
structure would be used for the option id (which is sent to the server) and which for the name (that is displayed to the user). The
API reference contains a simple example of this.
To allow file upload, use the PhnlFileInput component. This component is able to check that file size does not exceed given
limit and that the file is of correct MIME type. Although the MIME type of the file is checked on the server, it shall be always
treated as an unreliable information4 . The getData always returned a structure. If the file was not uploaded, uploaded item is
set to FALSE and no other item values are defined. When the file was uploaded, uploaded is set to TRUE and other items are set
(these holds file MIME type, original filename or file-size).
15.3.5
Modifying the layout of the fields
By default, PhnlForm uses a simple layout of the fields where each field is on a separate line. Changing this layout is actually
very simple as PhnlForm uses a templating system that makes such changes very easy.
The templates themselves are of two kinds. First, there is the MAIN template that is used for the overall layout of the whole form.
The other kind are layout of the grouped fields you added using the addFieldGroup.
4 That is because this determination is done by reading only first bytes of the file. To say that file is of some type for sure always means reading the whole
file and often processing it as well (such as check-sum verification).
Lakmus manual
42 / 42
If you want to create your own template, you simply pass your own layout via call to the setLayoutTemplate. As a
placeholders for the actual fields (form caption etc.) you use the syntax of ${varible-name}. Each template has list of
variables it expands. To see details how the variables are named, please, refer to the API documentation.
15.4
Various listings
There are two different components for displaying lists.
First there is the PhnlSimpleList that serves as a mere wrapper around unordered list. Though, it has pretty interesting
feature built inside – you can specify a so-called URL template that would allow to shorten your code and make it easier to read
as well. After all, compare:
$list = new PhnlSimpleList();
foreach ($arr as $a) {
$list->add(
sprintf("/view?id=%s&subid=%s", $a[’id’], $a[’subid’]),
$a[’name’]);
}
....
with
$list = new PhnlSimpleList();
$list->setUrlTemplate("/view?id=%s&subid=%s");
foreach ($arr as $a) {
$list->add(array($a[’id’], $a[’subid’]), $a[’name’]);
}
....
Second is the PhnlActionList that creates unordered list as well but in moder browser it turns itself into button-like list of
links with icons (this component is used, for example, on your Lakmus homepage). The icons are specified in CSS thus it has
very small footprint on the size of the HTML content itself.
For details, please, refer to the API documentation and search CSS stylesheets for phnl-actions class.
15.5
Tabbed content
There are two components that could create an illusion of tabbed content. It is very important to speak of illusion as it creates
only formatting seen with modern browser and the underlying code is bare list and content (each page of the tab requires a page
reload, there is no client-side switching implemented).
The first component is PhnlNotebook where you have to set the content of the current tab using it’s method and the other
one is PhnlNotebookBar which creates only the tab-switching navigation bar (the look of the component is that everything
below it belongs to current tab). Only PhnlNotebookBar allows you to use icons in the tabs (it uses similar styling as the
PhnlActionList).