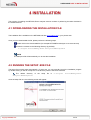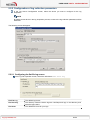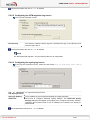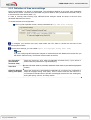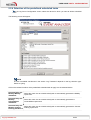
1
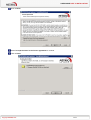
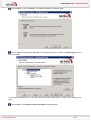
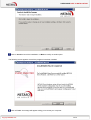
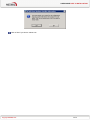
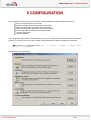
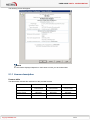
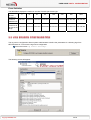
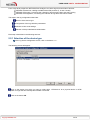
USER GUIDE
NETASQ EVENT ANALYZER V. 1.0
INSTALLATION AND CONFIGURATION MANUAL Date
May 2010
Version
V1.0
Reference : naengde_nea-install-configuration-v1.0
Author
NETASQ
Details
Creation
USER GUIDE
Copyright © NETASQ 2010. All rights reserved.
Any reproduction, adaptation or translation of this current document without prior written permission is
prohibited, except where expressly allowed by copyright laws.
NETASQ applies a method of continual development and as such reserves the right to modify and improve
any product described in the document without prior notice.
Under no circumstances shall NETASQ be held liable for any loss of data or revenue, or any special damage
or incident, resulting from or indirectly caused by the use of the product and its associated documentation.
The contents of this document relate to the developments in NETASQ’s technology at the time of its writing.
With the exception of the mandatory applicable laws, no guarantee shall be made in any form whatsoever,
expressly or implied, including but not limited to implied warranties as to the merchantability or fitness for a
particular purpose, as to the accuracy, reliability or the contents of the document. NETASQ reserves the
right to revise this document, to remove sections or to remove this whole document at any moment without
prior notice.
To ensure the availability of products, which may vary according to your geographical locations, contact your
nearest NETASQ distributor.
Products concerned
U30, U70, U120, U250, U450, U1100, U1500 and U6000
NG1000, NG5000
VS5, VS10, V50, V100, V200, V500, VU.
Copyright NETASQ 2010
2/2
USER GUIDE : FOREWORD
FOREWORD
Copyright
© Copyright NETASQ 2010. All rights reserved. Under copyright law, any form of reproduction
whatsoever of this user manual without NETASQ's prior written approval is prohibited. NETASQ
rejects all liability arising from the use of the information contained in these works.
Liability
This manual has undergone several revisions to ensure that the information in it is as accurate as
possible. The descriptions and procedures herein are correct where NETASQ firewalls are
concerned. NETASQ rejects all liability directly or indirectly caused by errors or omissions in the
manual as well as for inconsistencies between the product and the manual.
Notice
WEEE Directive
All NETASQ products that are subject to the WEEE directive will be marked with the mandated
"crossed-out wheeled bin" symbol (as shown above) for items shipped on or after August 13,
2005. This symbol means that the product meets the requirements laid down by the WEEE
directive with regards to the destruction and reuse of waste electrical and electronic equipment.
For further details, please refer
http://www.netasq.com/recycling.html
Copyright NETASQ 2010
to
NETASQ's
website
at
this
3/3
address:
USER GUIDE: INTRODUCTION
INTRODUCTION
1.1 WHO SHOULD READ THIS?
This manual is intended for system administrators with some basic IP knowledge.
In order to install and configure your NETASQ Event Analyzer solution in the most efficient manner, you
must be familiar with the Windows operating system, SQL databases, NETASQ products, IP operations and
their specific features:
IP (Internet Protocol)
TCP (Transmission Control Protocol)
UDP (User Datagram Protocol)
syslog
1.2 TYPOGRAPHICAL CONVENTIONS
This document uses several different typographical conventions.
1.2.1 Abbreviations
For the sake of clarity, the usual abbreviations have been kept. For example, VPN (Virtual Private Network).
Other acronyms will be defined in the Glossary.
1.2.2 Display
Names of windows, menus, sub-menus, buttons and options in the application will be represented in the
following fonts:
Example
Menu Interfaces
1.2.3 Indications
Indications in this manual provide important information and are intended to attract your attention. Among
these, you will find:
NOTE/REMARKS
These messages provide a more detailed explanation on a particular point.
Copyright NETASQ 2010
4/4
USER GUIDE: INTRODUCTION
WARNING/RECOMMENDATION
These messages warn you about the risks involved in performing a certain manipulation or about
how not to use your appliance.
TIP
This message gives you ingenious ideas on using the options on your product.
DEFINITION
Describes technical terms relating to NETASQ or networking. These terms will also be covered in
the glossary.
1.2.4 Messages
Messages that appear in the application are indicated in double quotes.
Example
"Delete this entry?"
1.2.5 Examples
Example
This allows you to have an example of a procedure explained earlier.
1.2.6 Command lines
Command lines
Indicates a command line (for example, an entry in the DOS command window).
1.2.7 Reminders
Reminders are indicated as follows:
Reminder.
1.2.8 Access to features
Access paths to features are indicated as follows:
Access the menu File\Firewall.
Copyright NETASQ 2010
5/5
USER GUIDE: INTRODUCTION
1.3 GETTING HELP
To obtain help regarding your product and the different applications in it:
website: www.netasq.com. Your secure-access area allows you to access a wide range of
documentation and other information.
user manuals: NETASQ UNIFIED MANAGER, NETASQ REAL-TIME MONITOR and NETASQ
EVENT REPORTER.
1.4 TECHNICAL ASSISTANCE CENTRE
NETASQ provides several means and tools for resolving technical problems on your firewall.
A knowledge base.
A certified distribution network. As such, you will be able to call on your distributor.
Documents: these can be accessed from your client or partner area. You will need a client account in
order to access these documents.
For further information regarding technical assistance, please refer to the document "Standard NETASQ
support".
Copyright NETASQ 2010
6/6
USER GUIDE PART 2. HARDWARE REQUIREMENTS
2 HARDWARE REQUIREMENTS
When deploying the NETASQ Event Analyzer solution, the dimensions of the server are very important. The
hardware requirements depend essentially on the number of events the solution has to treat per day.
4 hardware architectures are presented below according to the volume of data to be treated.
NOTE
The storage capacity is provided for information only. It depends on the configuration of the report
generation, aggregation and archiving processes.
NETASQ guarantees the architecture parameters based on the default configuration values. Under
no circumstances shall NETASQ be held liable for any dysfunction, loss of data or revenue arising
from these processes once the NETASQ Event Analyzer administrator has customized the
predefined value.
2.1 LOW ARCHITECTURE: UP TO 5 MILLION EVENTS PER
DAY
Processor: Xeon dual processor
RAM: 3 GB
Storage space: 160 GB
Hard drive: SCSI disk – RAID5 configuration – 10 KTPM
NOTE
The storage space indicated includes the use of the archiving process. The value depends on the
volume of data the client needs to store.
2.2 MIDDLE ARCHITECTURE: FROM 5 TO 10 MILLION EVENTS
PER DAY
Processor: dual core bi-processor
RAM: 4 GB
Storage space: 300 GB
Hard drive: SCSI disk – RAID5 configuration – 15 KTPM
NOTE
The storage space indicated includes the use of the archiving process. The value depends on the
volume of data the client needs to store.
Copyright NETASQ 2010
7/7
USER GUIDE PART 2. HARDWARE REQUIREMENTS
2.3 HIGH ARCHITECTURE: FROM 10 TO 36 MILLION EVENTS
PER DAY
Processor: quad core bi-processor
RAM: 6 GB
Storage space: 600 GB
Hard drive: SCSI disk – RAID5 configuration – 15 KTPM
NOTE
The storage space indicated includes the use of the archiving process. The value depends on the
volume of data the client needs to store.
2.4 SPECIFIC ARCHITECTURE: MORE THAN 36 MILLION
EVENTS PER DAY
Managing a huge number of events per day requires specific hardware architectures according to the
treatments the NETASQ Event Analyzer solution has to perform. Such architectures may require several
servers, whereby each of them is responsible for a dedicated purpose as described in the example below:
Server 1 collects the logs
Server 2 runs the database engine and performs aggregation processes
Server 3 builds the automatic reports
Server 4 runs the web portal solution
The architecture presented above is just an example. Depending on the number of events to be treated,
some processes may run on the same server.
Copyright NETASQ 2010
8/8
USER GUIDE PART 3. SYSTEM REQUIREMENTS
3 SYSTEM REQUIREMENTS
The NETASQ Event Analyzer solution requires a specific software environment. These requirements are
described in the related section.
3.1 OPERATING SYSTEMS
The NETASQ Event Analyzer solution runs on the following operating systems:
Windows 2003 SP2 or greater (32 bits)
Windows 2008 SP2 or greater (32 and 64 bits)
3.2 SOFTWARE REQUIREMENTS
The NETASQ Event Analyzer setup program will first check if the required software program is already
installed on your computer and will suggest installing it if necessary. The system requirements are as follows:
Microsoft Web Components 11 (version12)
SQL Server Native Client 2005
SQL Server 2005 SP3 or greater (Express, Standard and Enterprise Editions)
Microsoft .NET Framework 3.5 SP1
NOTE
If you have installed Microsoft IIS (Internet Information Services) after installing the Microsoft .NET
Framework 3.5 SP1, don’t forget to enable the Microsoft.NET framework in IIS as below:
Select the program Start\All Programs\Accessories\Command Prompt.
Go to the following directory where the Microsoft framework was installed:
C:\Windows\Microsoft.NET\Framework\v2.0.50727 (by default).
Run the following command: aspnet_regiis –i
Copyright NETASQ 2010
9/9
USER GUIDE PART 4. INSTALLATION
4 INSTALLATION
The process of installing the NETASQ Event Analyzer solution consists of performing the tasks decribed in
the related sections.
4.1 DOWNLOADING THE INSTALLATION FILE
The installation file is available on the NETASQ web site www.netasq.com in your private area.
Once you have downloaded the file, please perform the following steps:
Double-click on the downloaded file (for example NETASQEventAnalyzer.10.01.02.3750.exe)
Extract the contents to the following directory (by default):
C:\Program Files\NETASQ\Event Analyzer\NEASetupFiles
NOTE
The Setup.exe file will automatically run to start the installation.
4.2 RUNNING THE SETUP .EXE FILE
The setup file normally starts automatically. If it does not, you can manually launch the installation program
by double-clicking on the file “setup.exe” in the directory where it has been extracted.
The default directory
Analyzer\NEASetupFiles
of
the
setup
file
is
C:\Program
Files\NETASQ\Event
Once the setup file runs, the following screen will appear:
Copyright NETASQ 2010
10/10
USER GUIDE PART 4. INSTALLATION
Click on Next>
Select I accept the terms in the license agreement to continue.
Click on Next>.
Copyright NETASQ 2010
11/11
USER GUIDE PART 4. INSTALLATION
Click on Next>, or click on Change… to install the software in a different folder.
Click on Next> to install all the NETASQ Event Analyzer products or select the Setup Type that best
suits your needs.
In a distributed architecture, you can either choose to install “Filter Engine” or “Web Portal” regarding your
plans.
Click on Next>. The Ready to Install the Program message appears:
Copyright NETASQ 2010
12/12
USER GUIDE PART 4. INSTALLATION
Click on Install to launch the installation or <Back to modify an earlier option.
The following screen appears once all the programs have been installed.
Click on Finish. A message will appear asking you to restart your computer.
Copyright NETASQ 2010
13/13
USER GUIDE PART 4. INSTALLATION
Click on Yes if you wish to reboot now.
Copyright NETASQ 2010
14/14
USER GUIDE PART 5. CONFIGURATION
5 CONFIGURATION
The configuration wizard consists of the definition of NETASQ Event Analyzer parameters such as:
Source of logs the solution has to treat
Network naming to facilitate identification of the traffic
Database configuration (localization and credentials)
Task scheduling (report generation and other processes)
Email configuration to transfer the generated reports
Log archiving process
License installation
The configuration will normally start automatically once your computer has restarted after the installation
process. You can launch it at any time to modify the NETASQ Event Analyzer configuration parameters.
To launch the configuration wizard Start -> Program -> NETASQ -> NETASQ Event
Analyzer -> Configurator
The following screen will appear:
Copyright NETASQ 2010
15/15
USER GUIDE PART 5. CONFIGURATION
5.1 LICENSE CERTIFICATE
NOTE
This step in the configuration should be performed just after the installation process and prior to any
other configuration operation.
Click on the button License Certificate\Settings …
The first time you launch the application, the following screen will appear:
Click on Change… and browse to the directory where you stored your license certificate.
Select your licence certificate
Copyright NETASQ 2010
16/16
USER GUIDE PART 5. CONFIGURATION
The following screen will appear:
NOTE
The information displayed depends on the license to which you have subscribed.
5.1.1 License description
Licence table
The table below indicates the restrictions of the provided licenses
Modules
Restricted
Standard
Evaluation
0 CAL
1 Concurrent
No
0 CAL
5 Concurrent
Yes
0 CAL
5 Concurrent
Yes
Project Types
NETASQ
NETASQ
NETASQ
Maintenance
date
Date
Date
WebPortal
Scheduled Tasks
Copyright NETASQ 2010
17/17
USER GUIDE PART 5. CONFIGURATION
Event limitation
The table below displays the maximum number of events per license type
Number of
devices
Number of
events for
SMB devices
5
10
25
50
100
250
900 000 1 800 000 4 500 000 9 000 000 18 000 000 45 000 000
500
1000
90 000 000
180 000 000
Number of
events for all
1 800 000 3 600 000 9 000 000 18 000 000 36 000 000 90 000 000 180 000 000 360 000 000
devices in the
range
5.2 LOG SOURCE CONFIGURATION
The log source configuration allows system administrators to define the parameters for collecting logs from
NETASQ devices. To access the log source configuration
Click on the button Log Source \Settings …
The following screen will appear:
Copyright NETASQ 2010
18/18
USER GUIDE PART 5. CONFIGURATION
From a high-level perspective, NETASQ Event Analyzer can collect logs from two kinds of devices:
NETASQ UTM devices, relating to all NETASQ UTM products (F, U and V series)
NETASQ UTM syslog, concerning the collection of logs that have been sent using syslog
NETASQ UTM migrations, concerning the collection of logs that have been archived
The steps in the log configuration wizard are:
Selection of the device type
Configuration of the log collection parameters
Definition of time zone settings
Selection of the pre-defined scheduled tasks
Each step is described in the following sections:
5.2.1 Selection of the device type
In the Log Souce Configuration screen, click on the button Add…
The following screen will appear:
Click on the device from which you want to collect logs: “UTM device” for a physical device or UTM
migration for logs that have already been treated or archived.
Click on the button OK.
Copyright NETASQ 2010
19/19
USER GUIDE PART 5. CONFIGURATION
5.2.2 Configuration of log collection parameters
In the Log Source Configuration screen, select the device you want to configure for the log
acquisition.
NOTE
By adding a new device in the log acquisition process, access to the log collection parameters will be
automatic.
The following screen will appear:
5.2.2.1 Configuring the flat file log source
In the Log File acquisition screen, select the radio button Flat File Log
Flat File Log
The default log format.
File Directory
The directory where the device logs are. Net Report will spy on this directory and
treat the logs inside it.
File Name
The default file name for your logs.
Copyright NETASQ 2010
20/20
USER GUIDE PART 5. CONFIGURATION
Set the parameters and click on “OK” to validate.
5.2.2.2 Configuring the UTM migration log source
In the Log File acquisition screen
File Directory
The directory where the device logs are. Net Report will spy on this directory and
treat the logs inside it.
Set the parameters and click on “OK” to validate.
NOTE
For “NETASQ UTM migration”, only the listening directory is configurable.
5.2.2.3 Configuring the syslog log source
In the Log File acquisition screen, select the radio button Log in Real-Time with Syslog
Protocol
Log in Real-Time
with Syslog Protocol
For logs with Syslog Protocol.
Syslog IP Address
The IP address of the machine transmitting the Syslog message.
Advanced...
Click here to configure advanced Syslog settings. The Advanced Syslog
Settings dialog box will appear and enables you to configure the Facility, Severity,
Hostname and Process name for the IP Address you entered in the Syslog IP
Address field.
Set the parameters and click on “OK” to validate.
Copyright NETASQ 2010
21/21
USER GUIDE PART 5. CONFIGURATION
5.2.3 Definition of time zone settings
Each log generated by a device is timestamped. This timestamp depends on the time zone parameters
defined for the device. The time zone parameter may be set either to UCT (Coordinated Universal Time) or
to the local time of the device (GMT + n).
In order to correctly treat incoming logs, NETASQ Event Analyzer should be aware of the time zone
parameter defined for the device.
To access the time zone configuration:
In the Log File acquisition screen, use the parameters for Log Time Zone Settings
To configure your device’s time zone, either select the UTC offset or choose the time zone of the
device’s physical location.
For time zone settings, you can enable Adjust for Daylight Saving Time (DST)
NOTE
If you are configuring NETASQ Event Analyzer for several devices with different time zones then you
will need to select as many Time Zones as the number of devices.
Use UTC offset
(Coordinated
Universal Time)
Select the check box “UTC offset (Coordinated Universal Time)” if your device is
defined with this parameter for log timestamping.
Time Zone
If the UTC time zone is not used, select the time zone of your device’s physical
location.
Adjust for Daylight
Saving Time (DST)
Select this check box if the Date/Time parameters of your device are configured to
adjust for Daylight Saving Time (DST). That is, where clocks are set one hour or
more ahead of standard time to provide more daylight at the end of the working day
during late spring, summer, and early autumn.
Copyright NETASQ 2010
22/22
USER GUIDE PART 5. CONFIGURATION
5.2.4 Selection of the predefined scheduled tasks
In the Log Souce Configuration screen, select the device for which you want to define scheduled
tasks.
The following screen will appear:
NOTE
The list of available checkboxes in the section “Log Treatment” depends on the log collection type:
flat file or syslog.
Click on the related checkbox of the predefined scheduled task to apply it to the selected device.
Generate Daily and
Monthly Mobility
dashboard
Select this check box to schedule a daily task to automatically generate the Mobility
report book.
Generate Daily and
Monthly
Vulnerabilities
dashboard
Select this check box to schedule a daily task to automatically generate the
Vulnerabilities report book.
Generate Daily and
Monthly Content
Filtering dashboard
Select this check box to schedule a daily task to automatically generate the Content
Filtering report book.
Copyright NETASQ 2010
23/23
USER GUIDE PART 5. CONFIGURATION
Generate Daily and
Monthly Intrusion
Prevention System
dashboard
Select this check box to schedule a daily task to automatically generate the Intrusion
Prevention System report book.
Generate Daily and
Monthly Proxy
dashboard
Select this check box to schedule a daily task to automatically generate the Proxy
report book.
Generate Daily and
Monthly Firewall
dashboard
Select this check box to schedule a daily task to automatically generate the Firewall
report book.
Archive logs in
Enriched CSV
Format
Select this checkbox to schedule a daily task to automatically create enriched log
files.
Enriched files are log files with the same events as the logs generated from a device
but where NETASQ Event Analyzer has consolidated certain dedicated information
(e.g Internal / external traffic network or named network). This feature is useful for
rebuilding a report with old logs but with the same environment variable.
For instance when you apply old logs, the network name might have changed
between the date of the old logs and the current date. By using the enriched CSV
format, you retain the environment and the same report as the one that has been
generated.
Aggregate Spam
Information
Archive logs in
Native format (for
legal and
regulatory
purposes)
Select this check box to automatically aggregate sender and recipient mailboxes.
Select this checkbox to schedule a daily task to automatically create log files from
events sent through syslog. This entry appears only for syslog configured devices.
The created log files may then be used for long storage and legal compliancy.
5.2.5 Definition of domain names
Content filtering reports require the definition of domain names. The NETASQ Event Analyzer will use it to
determine incoming and outgoing e-mail traffic.
To access domain name definition
In the Log Souce Configuration screen, click on the button Next …
Copyright NETASQ 2010
24/24
USER GUIDE PART 5. CONFIGURATION
The following screen will appear:
Add the domain names used for determining incoming and outgoing e-mail traffic.
Click on the button "Finish" to terminate the log source configuration
5.3 NETWORK CONFIGURATION
The network configuration allows system administrators to name the network. It will provide easy network
identification in the generated reports. To access the network configuration
Click on the button Network \Settings …
Copyright NETASQ 2010
25/25
USER GUIDE PART 5. CONFIGURATION
The following screen will appear:
From
An IP Address or Mask.
To/Mask
To an IP Address or Mask.
Name
Enter a Name for the range of addresses in the Name column. This name will allow
you to distinguish between two zones of the same type but with different attributes
(engineering department, sales department and so on) or two zones that are located
in different places (Paris, London and so on).
Internal: Addresses that are part of your network.
External: Addresses that are outside your network.
Broadcast: The broadcast address is the address to which network
broadcasts are sent. It is the "255" (255 being the total of an 8 bit binary
number of all 1's, given a subnet it would be a smaller number, depending on
how many bits were given to it) of the network range. Using the /28 above,
and using the same method to determine that our address range is .160-.175,
we know that our broadcast address is .175 - because .175 is the LAST
address in our range.
DMZ: Addresses that are part of your demilitarized zone.
Add: inserts a new row in the table via the Network Change dialog box.
Change: modifies the row you selected via the Network Change dialog box.
Remove: removes the row from the table.
Move Up: moves the row up a row.
Move Down: moves the row down a row.
Enable Global Reverse DNS: selecting this option may affect the NETASQ Event Analyzer Engine’s
performance and cause a network traffic overload.
5.4 DATABASE CONFIGURATION
The database configuration allows system administrators to define the parameters for accessing the
database where NETASQ Centralized Manager will store logs and related information.
Copyright NETASQ 2010
26/26
USER GUIDE PART 5. CONFIGURATION
To access the database configuration
Click on the button Database \Settings …
The following screen will appear:
IMPORTANT
NETASQ Event Analyzer does not support case-sensitive settings for Microsoft SQL Server 2005.
Architecture: Your database server can either be local or remote.
Copyright NETASQ 2010
27/27
USER GUIDE PART 5. CONFIGURATION
5.4.1 Database update settings
Update database
The first time you launch the Configurator, the NETASQ Event Analyzer
database will be fully updated. The second time you launch the Configurator,
it will not. You must select the Update Database check box under Database
Update Settings in the Database Settings dialog box each time you set
parameters via the Configurator in order for the NETASQ Event Analyzer
database to be updated.
NOTE
You must run the Configurator update at least once for the Database Update
Settings to be freely configurable. The first time you install NETASQ Event
Analyzer, the Configurator will select the Update Database check box by
default, since the database must be updated in order for NETASQ Event
Analyzer to be used.
Do not execute SQL
Scripts now (only
generate) Manually
execute your SQL
scripts later
Selecting the Check Box: This check box automatically generates the SQL
scripts in a specific directory once the NETASQ Event Analyzer Configuration
Wizard has completed. The SQL script generation feature is intended for
Database Administrators (DBAs) wishing to modify certain parameters before
creating the various objects in the database. This enables DBAs to view,
modify and manually execute SQL scripts later. The SQL scripts generated
by the NETASQ Event Analyzer Configuration Wizard are in the following
directory:
C:\Program Files (x86)\NETASQ\NETASQ Event Analyzer\database sql
scripts\SQL Server\20100303-1028
Please note that the SQL scripts are in a format compatible with SQL Server
management tools.
NOTE
The pathname of the SQL script location depends on the parameters set
during the installation procees.
Leaving the Check Box Clear: by default the “Do not execute SQL scripts
now (only generate)” check box is unselected. It means the SQL scripts will
be automatically executed once the NETASQ Event Analyzer Configuration
Wizard has completed and you will not need to manually execute them later.
Delete existing data
This will create (and destroy) Database tables for the devices you select in
your database (if it is the first time you have installed NETASQ Event
Analyzer). If you have previously configured several devices, enabling this
option means that existing data will be destroyed and the tables will be
created again.
WARNING
If you select the checkbox “Delete existing data”, it is recommended that you
save the data in the database tables. The data in these tables will be
destroyed and the tables will be created automatically when you reconfigure
NETASQ Event Analyzer either with the same devices selected or with
different devices.
Copyright NETASQ 2010
28/28
USER GUIDE PART 5. CONFIGURATION
5.4.2 Database time zone settings
The database time zone parameters indicate the timestamping format used for storing log information.
Regardless of the time zone that has been defined for the devices, NETASQ Event Analyzer will convert
them into the format defined for the storage. The database time zone parameter may be set either to UCT
(Coordinated Universal Time) or to the local time of the database (GMT + n).
To access the time zone configuration:
NOTE
The database time zone settings indicate the time format that will be used in the generated reports
and the log analysis.
Use UTC offset
(Coordinated
Universal Time)
To use UTC time zone in the reports and the log analysis, select the checkbox
“Use UTC offset (Coordinated Universal Time)”.
Time Zone
To use a specific time zone in the reports and the log analysis, leave the
checkbox “Use UTC offset (Coordinated Universal Time)” unselected and choose
a time zone in the drop down list “TimeZone”.
Regardless of the time zone parameters of the devices, all generated events will
be stored and displayed with a UTC timestamp.
Regardless of the time zone parameters of the devices, all generated events will
be stored and displayed with the selected time zone.
Adjust for Daylight
Saving Time (DST)
In the event a specific time zone is used, select the checkbox “Adjust for Daylight
Saving Time” to adjust the time to the so-called "Summer Time” in many
countries.
5.5 SCHEDULED TASKS
Task scheduling allows system administrators to configure automatic treatments from a high-level
perspective.
To access task scheduling
Click on the button Scheduled tasks \Settings …
Copyright NETASQ 2010
29/29
USER GUIDE PART 5. CONFIGURATION
The following screen will appear:
5.5.1 Scheduling
Run the
Consolidation,
Aggregation, Purge
and Report Tasks
everyday at
Define the time at which the Consolidation, Aggregation, Purge and Report Task
will be performed.
NOTE
These processes will be launched everyday at the defined time.
5.5.2 Purge settings
The purge parameters are used for deleting old data stored for the purpose of maintaining a fully operational
database. NETASQ Event Analyzer performs treatments on 3 kinds of data:
Detailed data concerning the information that has just been received. Such data may be used for
log analysis and should be aggregated before building the reports
Daily aggregated data are calculated from detailed data during the nightly aggregation process.
During this process, the detailed information of each specific event is consolidated hour by hour.
The daily data are used in building daily reports.
Monthly aggregated data are calculated from daily data during the nightly aggregation process.
During this process, the daily information of each specific event is consolidated day by day. The
monthly data are used in building monthly reports
Copyright NETASQ 2010
30/30
USER GUIDE PART 5. CONFIGURATION
Note the settings configured for the task you selected under Scheduled Tasks.
Detailed Data
Define the number of days detailed data should be kept inside the database.
Delete all data after treatment: purges the detailed data from the
detailed data table once they have been aggregated.
Keep last n days: selects the number of days of detailed data you want
to keep in your database. The data recorded before the period of days
you selected will be purged.
NOTE
The number of days begins from the date of the last data, not necessarily from the
current day (i.e. today).
Keep last n Days of Data: keeps the last n days of data in the database
tables that contain data aggregated by day. The data before the last days
selected will be purged from these tables.
Aggregated Data
Keep last n Days of Data: keeps the last n days of data in the database
tables that contain data aggregated by month. The data before the last
days selected will be purged from these tables.
NOTE
The number of days begins from the date of the last data, not necessarily from the
current day (i.e. today).
5.6 MAIL SERVER
The mail server configuration allows system administrators to define the mail server NETASQ Event
Analyzer will use to send e-mail.
To access the mail server configuration
Click on the button Mail Server \Settings …
The following screen will appear:
Copyright NETASQ 2010
31/31
USER GUIDE PART 5. CONFIGURATION
Mail Server (SMTP)
Enter the name of the SMTP server for the company in the Mail Server
(SMTP) field.
NETASQ Event Analyzer will use it to send the reports automatically
generated by the Report Scheduler.
Click on Test to check that the name of the SMTP Server has been correctly
entered.
5.7 LOG ARCHIVING
The Log archive configuration allows system administrators to define the log archiving process to be set up.
NETASQ Event Analyzer uses two components where its behavior depends on the format of received logs
(syslog or flatfile):
Log Storage provides 2 main features:
- Stores generated files in enriched CSV format. This storage is used for both received log
types (syslog and flatfile). An enriched CSV log file contains event information with additional
data that NETASQ Event Analyzer has added following the consolidation process. This
process consists of indicating some specific information such as IP addresses or networks.
- Stores files in native format for incoming syslog events. It allows archiving such events in
native file format.
NOTE
For flatfile events, the log archiving without legal compliancy is done by transferring log files
from the device to the spied directory. You can also use other archiving features to perform
advanced archiving operations.
Log Vault: provides features like data integrity, compression and encryption for long-term
archival and legal compliancy. The process of treating incoming logs depends on the format of
the received logs (syslog or flatfile):
- For flatfile format, the logs to archive are transferred from the spied directory.
- For syslog format, the logs to archive are transferred from the directory of the Log Storage
component.
To access the log archive configuration
Click on the button Log Archive \Settings …
Copyright NETASQ 2010
32/32
USER GUIDE PART 5. CONFIGURATION
The following screen will appear:
To fully define log archiving processes, the system administrator should configure the following settings:
5.7.1 Log storage settings
The log storage settings consist of defining the directory that will store files in native and/or enriched CSV
format.
Copyright NETASQ 2010
33/33
USER GUIDE PART 5. CONFIGURATION
NOTE
This value is only used if the checkboxes “Archive logs in Enriched CSV Format” and/or “Archive
logs in Native format (for legal and regulatory purposes)” have been selected.
WARNING/RECOMMENDATION
The Log vault component uses this value to get the generated log files from the incoming syslog to
perform legal storage.
5.7.2 Log vault settings
The log vault settings allow a system administrator to configure the long term archiving storage for legal and
compliancy purposes.
Archive directory
Select the directory where NETASQ Event Analyzer archives your files for
legal and compliancy purposes.
Archive Files from
%NETREPORT_STORAGE%
Directory Older than
Select the frequency (in hours, days or weeks) at which you want the Log
Vault component to archive your files.
For example, if you select 2 Days (default value), then all files that are older
than 2 days will be archived in the Archive Directory you specified.
NOTE
This parameter is used for the log files stored in the Log Storage directory.
Archive Other Flat File Logs
from Elsewhere Older than
Select the frequency (in days or weeks) you want the Log Vault component
to archive your files.
For example, if you select 2 Days (default value), then all files that are older
than 2 days will be archived in the Archive Directory you specified.
NOTE
This parameter is used for the log files stored in the directory you define in
the section "Device Log File Archive Settings".
Allow real-time archival
Enable this checkbox to permit the Log Vault component to archive the log
files once every minute.
Archive everyday at
Enable this checkbox to permit the Log Vault component to archive the log
files everyday at the time you select in the dropdown list.
Copyright NETASQ 2010
34/34
USER GUIDE PART 5. CONFIGURATION
Purge Archives Older than
Enable this checkbox to permit the Log Vault component to purge log files
from the archived directory at the frequency set. So, NETASQ Event
Analyzer will purge archived log files that are older than the value you
defined in the related field.
NOTE
The right settings to purge archived log files depend on the number of
treated events and storage capacity.
WARNING/RECOMMENDATION
By configuring this action, you may lose your archived log files. Besides
setting the purge parameters, we strongly recommend configuring the
feature “Transfer Archive File“.
Allow
User
Archives
to
Delete
Encryption Passphrase
Enable this checkbox to allow end users to delete log files from the archived
directory. By default this check box is left unselected.
Enter the passphrase or password that would be used to encrypt the log
files stored in the archived directory. This passphrase will be required for
retrieving the archived log files.
WARNING/RECOMMENDATION
We recommend using a strong passphrase that will be much harder to
guess.
5.7.3 Device log file archive settings
The device log file archive settings allow a system administrator to configure the behavior of the archiving
process for each device configured in the “Log Source” section.
To add a device log file in the Log vault archive process:
Click on the button Add…
Copyright NETASQ 2010
35/35
USER GUIDE PART 5. CONFIGURATION
The following screen will appear:
Define each part of the device log file archive settings:
5.7.3.1 General
Configuration name
Set the name that will enable identifying the device log file archive. This
name will appear in the column “Device” of the table listed in “Device logs
file archive settings”.
Spied Directory
This is the directory where the component “Log vault” will retrieve log files to
archive.
NOTE
This parameter depends on the log treatment parameter:
For syslog, you have to use the environment variable
%NETREPORT_STORAGE%
For flatfile, set the directory configured in the Log Source settings for
this device
File Name
Copyright NETASQ 2010
Define the file type to archive. The use of this field depends on your
configuration:
To archive log in native format, set the value to *.log
To archive log in enriched format, set the value to *.csv
36/36
USER GUIDE PART 5. CONFIGURATION
5.7.3.2 Security
Verify Data Integrity
By enabling the checkbox, NETASQ Event Analyzer will calculate the hash
code for the archived log files. This hash code will be used to check the
integrity of the archive during the archive retrieving process.
Encrypt Data
Enable this checkbox to permit NETASQ Event Analyzer to encrypt the
archive by using the security passphrase set in the “Log Vault settings”.
5.7.3.3 FTP archive file transfer settings
The FTP archive file transfer allows system administrators to copy archived log files either to another
directory or to another server (e.g to a storage area network - SAN).
To access the FTP archive file transfer settings:
In the section “Transfer Archive File” of the screen “Device Logs File Archive Settings”, click on the
button Settings…
The following screen will appear:
Enable Archive File
Transfer
Select the checkbox to enable the archived files transfer feature
Passive Mode FTP
Connection
In the event of an FTP transfer, select the checkbox to enable a Passive FTP
connection. Otherwise leave the checkbox unselected for an Active Mode FTP
Connection.
Transfer Type
Choose the kind of transfer to perform: FTP or local
Destination
Target directory of the archived log files.
Copyright NETASQ 2010
37/37
USER GUIDE PART 5. CONFIGURATION
Hostname
In the event of an FTP transfer, set the FTP server hostname.
User
In the event of an FTP transfer, set the username to use for the FTP connection.
Password
In the event of an FTP transfer, set the password to use for the FTP connection.
IMPORTANT
Check network credentials for this target directory regarding the “Click and DECiDE Log Vault”
service.
5.8 END OF SETUP
Once the NETASQ Event Analyzer parameters have been set, you can close the Configuration screen in
order to validate the configuration.
In the main screen “NETASQ Event Analyzer Configuration”, click on the button OK…
Copyright NETASQ 2010
38/38
USER GUIDE PART 5. CONFIGURATION
The following screen will appear:
Click on Yes to continue.
Click on Close to exit the configuration.
Copyright NETASQ 2010
39/39