1
Getting Started with uMon-M on the LPC1769
Last update: 7/16/2013 16:22 a7/p7
The purpose of this document is to walk you through installation of MicroMonitor-M
(uMon-M: http://www.umonfw.com) on the LPC1769-based SimpleCortex
(http://www.brc-electronics.nl/) board. uMon-M is a slimmed down version of uMon for
use on MCUs with limited memory footprint. While this is specific to the SimpleCortex
board and the environment that comes with it (CoIDE); it should provide a basis for any
LPC1769 (or similar) based system.
A good introduction to MicroMonitor can be found here:
http://www.umonfw.com/docs/white_paper.pdf; just be aware that uMon-M is a subset of
the functionality in uMon.
Table of Contents:
SimpleCortex Setup.............................................................................................................2
Hardware..........................................................................................................................2
Software...........................................................................................................................2
Initial uMon-M Configuration.....................................................................................3
Console Connection.........................................................................................................4
SimpleCortex Running uMon-M.........................................................................................5
Flash & TFS.....................................................................................................................5
flash:.............................................................................................................................6
tfs:................................................................................................................................7
edit:..............................................................................................................................8
Ethernet Setup..................................................................................................................9
Installing an Application....................................................................................................10
"hello world" application:..............................................................................................11
"http server" application:...............................................................................................11
More to come.....................................................................................................................12
SimpleCortex Setup
Hardware
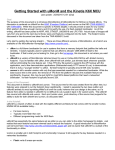
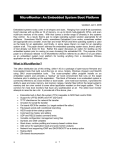
For this demo, the SimpleCortex board requires two USB cables: one for the flash loader
(and power) and one for the UART0 connection, and Ethernet...
Figure 1: SimpleCortex Board with cables
Software
Referring to the "Getting Started" instructions on the SimpleCortex pages, we assume
here that you have installed the tools (minimally: cross-compiler and CoIDE), and a
Cygwin (http://www.cygwin.com/) environment (with bash shell) is on the PC. There are
also a few tools that normally come with the standard uMon distribution that you can
grab here: http://www.umonfw.com/releases/umontools.tgz. Download this file and
extract using "tar -xzvf umontools.tgz". Put these win-executables (ttftp.exe,
moncmd.exe, title.exe & elf.exe) in your PATH1.
Download the uMon-M tar ball from here: http://www.umonfw.com/releases/umonm.tgz;
and place the umonm.tgz file under a new directory (i.e. C:/umonm) on your PC.
Running with a bash shell (part of Cygwin), untar the file at this point with the command:
"tar -xzvf umonm.tgz". This will install the source tree for uMon-M and an LWIP-based
HTTP server application that demonstrates the hookup between an application and the
underlying uMon-M platform. At the top level there are three directories...
1
If you prefer to build these tools from source, then you need to download the full uMon tar ball from
http:.//www.umonfw.com and follow those instructions.
•
•
•
umon_main: this is the bulk of the monitor code most of which is core uMon but
also some contributed functionality (i.e. zlib)
umon_ports: each directory below this contains code specific to one port; currently
the only directory below this point is simplecortex.
umon_apps: each directory below this is a demo application that can be installed on
a system running uMon-M; as of this writing, the only app is the "lwip" app;
however, the apps that come with standard uMon should be easily adjusted to run on
this platform.
Initial uMon-M Configuration
Under the umon_ports/simplecortex directory is a file config.h. This file is responsible
for establishing what features are to be enabled within the uMon-M build. By default, I
usually have most features enabled; but just in case they are not; for now, we will
essentially enable most of the basic stuff, so open that file and make sure that the section
with the INCLUDE_XXX macros look something like this:
...
#define
#define
#define
#define
#define
#define
#define
#define
#define
#define
#define
#define
#define
#define
#define
#define
#define
#define
#define
#define
#define
#define
#define
...
#define
#define
#define
#define
...
INCLUDE_MALLOC
INCLUDE_MEMCMDS
INCLUDE_DM
INCLUDE_PM
INCLUDE_SHELLVARS
INCLUDE_XMODEM
INCLUDE_EDIT
INCLUDE_UNZIP
INCLUDE_ETHERNET
INCLUDE_ICMP
INCLUDE_TFTP
INCLUDE_FLASH
INCLUDE_TFS
INCLUDE_TFSAPI
INCLUDE_TFSSCRIPT
INCLUDE_TFSCLI
INCLUDE_LINEEDIT
INCLUDE_DHCPBOOT
INCLUDE_EE
INCLUDE_STOREMAC
INCLUDE_VERBOSEHELP
INCLUDE_HWTMR
INCLUDE_BLINKLED
1
0
1
1
1
1
1
0
1
INCLUDE_ETHERNET
INCLUDE_ETHERNET
1
1
1
1
INCLUDE_TFS
1
INCLUDE_ETHERNET
1
0
1
1
1
INCLUDE_TFTPSRVR
INCLUDE_ETHERVERBOSE
INCLUDE_MONCMD
INCLUDE_READ
INCLUDE_ETHERNET
1
INCLUDE_ETHERNET
0
Listing 1: INCLUDE_XXX macros in config.h
This is a relatively "loaded" configuration with most features enabled for the sake of
demonstration; however in a real setup it is likely that several of these features will be
disabled to reduce the size of the memory footprint. The key here is that we want both
XMODEM and Ethernet enabled initially. We also enable the on-board editor
(INCLUDE_EDIT), UDP-based command interface (INCLUDE_MONCMD), the TFTP
server (INCLUDE_TFTPSRVR) and command line editing/history
(INCLUDE_LINEEDIT). Later, when you get used to the environment, you can mix and
match these features as you see fit.
To build the monitor, change directory to umon_ports/simplecortex. There is a bashrc
file there that sets up some environment variables, so run ". ./bashrc". Paths may need to
be adjusted in the make file, so when you get them right you should be able to type
"make rebuild" to build the monitor image destined for the SimpleCortex board.
Console Connection
With the UART0 USB cable plugged in, your system should have recognized it as a
USB-Serial cable; thus allowing you to run some console program. This documentation
uses uCon (http://www.umonfw.com/releases/ucon_install.exe) because it has additional
tools built in that hook to uMon (TFTP client/server, DHCP/BOOTP server, UDP
command interface, Xmodem, etc...). If you use something else, you'll have to adapt the
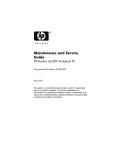
instructions appropriately. The configuration is 19200-8-N-1...
uCon Startup: 19200-8-N-1
uCon Console View
Figure 2: uCon Startup and Console
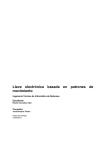
With the console application now running and connected to the correct COM port, you
can now type "make flash" in the bash window under umon_ports/simplecortex directory
to use the CooCox tools (coflash.exe) to install the image into the LPC1769's flash. This
steps through an Erase/Program/Verify of the affected flash, and when that completes
(about 30 seconds), uMon-M will boot and look something like this at the console:
Figure 3: Startup Header from uMon-M
SimpleCortex Running uMon-M
If everything is golden, then at this point, uMon-M is installed on the SimpleCortex board
and you've got the output as shown in Figure 3. At the uMON> prompt type 'help' to see
a list of about 24 commands which (if you've configured the board based on the setup of
Listing 1) include 'xmodem', 'dhcp', 'tftp', and 'edit' (among others). If you don't see these
in the help output, then rebuild referring to the section titled "Initial uMon-M
Configuration" above.
Most of the commands are either a duplicate or subset of the standard uMon command so
it is beyond the scope of this documentation to go into all that detail. Refer to the uMon
user manual (http://www.umonfw.com/docs/umon_user_manual.pdf) for the full set of
manpages. Several of the chapters of that manual still apply; particularly chapters 3-7;
just be aware that some features in uMon are not in uMon-M.
Flash & TFS
The core feature of uMon is TFS. This is a wrapper around NOR based flash that allows
the user at the command line as well as the application (through the API) to access flash
as named files rather than raw memory. The three commands that show this off best are:
'flash', 'tfs' and 'edit'.
flash:
For uMon-M the two main features of this command are the ability to display the status
of the entire flash block (flash info) and to erase sectors as needed (flash erase {range}).
The output of "flash info" is as follows:
uMON>flash info
Current flash bank: 0
Device = LPC1769
Sctr TFS?
Begin
End
0
0x00000000 0x00000fff
1
0x00001000 0x00001fff
2
0x00002000 0x00002fff
3
0x00003000 0x00003fff
4
0x00004000 0x00004fff
5
0x00005000 0x00005fff
6
0x00006000 0x00006fff
7
0x00007000 0x00007fff
8
0x00008000 0x00008fff
9
0x00009000 0x00009fff
10
0x0000a000 0x0000afff
11
0x0000b000 0x0000bfff
12
0x0000c000 0x0000cfff
13
0x0000d000 0x0000dfff
14
0x0000e000 0x0000efff
15
0x0000f000 0x0000ffff
16
0x00010000 0x00017fff
17
0x00018000 0x0001ffff
18
0x00020000 0x00027fff
19
0x00028000 0x0002ffff
20
0x00030000 0x00037fff
21
0x00038000 0x0003ffff
22
0x00040000 0x00047fff
23
0x00048000 0x0004ffff
24
*
0x00050000 0x00057fff
25
*
0x00058000 0x0005ffff
26
*
0x00060000 0x00067fff
27
*
0x00068000 0x0006ffff
28
*
0x00070000 0x00077fff
29
*
0x00078000 0x0007ffff
uMON>
Listing 2: Output for 'flash info' on LPC1769
Size
0x001000
0x001000
0x001000
0x001000
0x001000
0x001000
0x001000
0x001000
0x001000
0x001000
0x001000
0x001000
0x001000
0x001000
0x001000
0x001000
0x008000
0x008000
0x008000
0x008000
0x008000
0x008000
0x008000
0x008000
0x008000
0x008000
0x008000
0x008000
0x008000
0x008000
SWProt?
yes
yes
yes
yes
yes
yes
yes
yes
yes
yes
yes
yes
yes
yes
yes
yes
yes
yes
yes
yes
no
no
no
no
no
no
no
no
no
no
Erased?
no
no
no
no
no
no
no
no
no
no
no
no
no
no
no
no
no
no
no
yes
yes
yes
yes
yes
yes
yes
yes
yes
yes
yes
If your board is "clean", and built based on the configuration above, then you should have
a similar output. Sectors 0-19 contain uMon-M, sectors 24-29 support TFS and sectors
20-23 are available for executables. This allocation can be adjusted as needed with
parameters in the config.h file.
For now, if the TFS sectors (24-29) are not erased (refer to the 'Erased?' column of the
output); then erase them now using the command "flash erase N" where 'N' can be a
single sector number or a range of sectors.
tfs:
TFS is basically a wrapper around the NOR flash to allow the user to store named files
rather than binary images at fixed locations. In addition to that basic capability, TFS
supports scripting and auto booting so that a system can be configured based on the
content of one or two ASCII files. The "startup" script (similar to autoexec.bat or .bashrc
or .profile on other systems) is called "monrc" (monitor run-control). If present, then it is
automatically run as a script; so it can be used to initially configure the personality of the
board (typically this is the IP network information). uMon uses environment variables to
do this, so for example IPADD is the shell variable that uMon looks to for the IP address
of the board. GIPADD & NETMASK are the gateway IP and network mask
respectively. So, a typical monrc file may contain the following lines:
set IPADD 192.168.1.200
set NETMASK 255.255.255.0
set GIPADD 192.168.1.1
set ETHERADD 00:11:22:33:44:55
echo "hello world!"
Listing 3: Example monrc file
With this being the content of the monrc file, the system would automatically boot up
with that configuration and would output "hello world!" as well. Some of the common
uses of the "tfs" command itself would be to list all the files "tfs ls", remove a file "tfs rm
{filename}" or defragment the flash "tfs clean" to eliminate "dead" space in the flash.
There are basically four ways to add files to TFS: Xmodem, TFTP, the 'edit' command
and the "tfs add" command. How you do it will depend on what features you have
installed in your configuration. For this text, we assume all features are installed so over
the course of this text, we'll walk through a few examples. The simplest method (and the
method that requires the least amount of overhead) is to simply build a string up in RAM
and the add that as a file to TFS. For example, lets create a file that has two lines:
echo hello
echo there
To do this, we need to first put that text into ram....
uMON>pm -s $APPRAMBASE "echo hello\necho there\n"
Verify that we put it there:
uMON>dm $APPRAMBASE 22
Transfer it to a file in TFS, and verify that it is there:
uMON>tfs -fe add test $APPRAMBASE 22
uMON>tfs ls
Name
Size
Location
test
22 0x00050050
Flags
e
Info
Total: 1 item listed (22 bytes).
uMON>
The output (above) shows that the file 'test' exists in TFS and has the 'e' flag, which
means that it is an executable script. Now if you simply type "test" at the uMON>
prompt you'll see the output..
uMON>test
hello
there
uMON>
You've just installed and executed a basic script on your board!
edit:
The 'edit' command is a very basic (but quite handy) file editor built right into the
monitor. It "feels" like the old "ed" command for those of you familiar with that. For the
sake of this demo we'll create the above monrc file using edit. The following instructions
are a bit condensed; for more details refer to the uMon user manual:
At the uMON> prompt type "edit -fe monrc" and hit -ENTER-. The monitor will
respond with something like:
Edit buffer = 0x2007c000
Type '?' for help
There are several options here, but just type the letter 'i' (for 'insert') and hit -ENTER-. At
this point you are in "insert" mode so that whatever you type will end up in the file. For
this example, type each of the lines as shown in Listing 3 above. After typing the last
line followed by -ENTER-, then as the first character on the next line type '.' (dot) and hit
-ENTER- and again as the first character on the next line type 'q' and hit -ENTER- again.
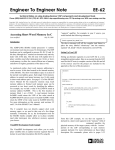
This will return you to the uMON> prompt, and you should not be able to type "tfs ls" to
see that the monrc file has been created. You can also type "tfs cat monrc" to see the
content of the file. Now, if you reset your board, you'll see that it comes up with the
configuration as specified in the monrc file, and you also see "hello world!"...
Figure 4: Console output: tfs ls & tfs cat monrc
At this point you have a system that is ready to connect to the network (assuming of
course that you entered valid IP information in the monrc file). There is a lot more
information on "auto-bootable" files, so refer to chapter 5 "Application Startup" of the
uMon user manual.
Ethernet Setup
Notice that the board now comes up with the MAC and IP addresses as specified in the
monrc file. You're good to go at this point, but if the monrc file was not present, then the
defaults from the make file would still be used. You can also override that by simply
setting the IPADD shell variable and restarting the Ethernet driver. So at the uMON>
prompt (within the console program) you could type:
set IPADD 192.168.1.200; ether on
to restart the board's Ethernet interface using the specified IP address. Once this
completes you should be able to ping that IP address from your PC and get a valid
response.
As yet another alternative, the 'dhcp' command could be used to kick off a DHCP request;
but that assumes you have a server configured; so we'll skip that for now (keep in mind
that uCon can run a DHCP server, but that's too much detail for this text).
At this point you have a network-ready device that you can communicate with by
ARP/ICMP (ping), TFTP and UDP (using uMon's moncmd2 facility). Any TFTP client
can be used to talk to the TFTP server that runs in uMon-M; or you can use the TFTP
client on uMon-M to download files to the target.
Let's try issuing a command to the board over Ethernet using the moncmd.exe tool that
came with the umontools.tgz file you downloaded earlier. Assuming the moncmd.exe
tool is in your path, you can simply type: <moncmd 192.168.1.200 "tfs ls">3 to send the
string "tfs ls" to your board over UDP and get the response. You'll see the response on
your host computer and also an echo of the response will be shown on the uMon-M
console...
Figure 5: Console output from moncmd
Notice that the console shows the IP address of the host system that issued the moncmd.
The same output (without the MONCMD tag) is seen at the host.
Installing an Application
As of this writing (July 2013); there are two example applications that come with the
uMon-M distribution. One is a simple "hello world" and the other is a complete LWIPbased HTTP server that uses files in TFS as the basis for the pages displayed to the
browser.
2
3
For more information on moncmd, refer to uMon manual section 18.17 'moncmd'.
The command string (in this case "tfs ls") must be in double quotes.
"hello world" application:
This application is part of the umon_ports/simplecortex directory. It demonstrates how
an application can start up on the LPC1769 and hook to the API that is already in flash as
part of the uMon environment. So, to build it, simply type "make demo" at the bash shell
under the umon_ports/simplecortex directory. It consists of three files: demo_crt0.S,
demo_main.c and demo_monlib.c. This is a bare-bones basic example of an application
that is installed along-side of uMon in flash.
Once this is built, it can be installed onto the target using tftp. The file to be installed to
flash is "demo.bin", and it needs to be placed at address 0x38000; so the tftp client must
push demo.bin to a destination file that is simply named 0x38000. This MUST be done
in binary mode.
Notice that this executable is NOT installed within TFS space. That's because it will run
as an "execute-in-place" image; hence, it is pushed into flash at the exact address from
which it will run in memory. Once installed, you can simply type "call 0x38000" to see it
run.
"http server" application:
This application is found under umon_apps/lwip. You should be able to do the following
steps when in that directory:
1. type 'make' to build the application
2. type 'make TARGET_IP=192.168.1.200 html' to install the html files
3. type 'make TARGET_IP=192.168.1.200 dld' to install the application
The output at the console will show the reception of each of the web files over TFTP and
the final step that burns the application executable into flash at 0x38000. At this point
everything is in place to start up the application, so you can type "call 0x38000" at the
console and you should see this accumulated output:
The HTTP server application is running, so using a browser you can attach to the target
by simply using the target's IP address as the URL. The browser will show a simple
example that allows you to enter uMon-M commands and get the response.
More to come...
This document is a work-in-progress. If you're here and you have questions, shoot me an
email.