1
•
•
•
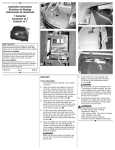
Do not exceed 8” maximum extension for this gooseneck coupler.
Measure the coupler extension as the difference between fully
retracted and fully extended positions. Couplers with properly
installed load bearing pins and square adjustable gooseneck
couplers only extend within this range.
Keep the ball pocket, latch, and handle clean.
All welding must be performed by an AWS certified welder.
This product rated according to SAE J2638.
Before Towing:
• Check vehicle, hitch, ball and coupler for signs of wear or damage.
Ensure that the coupler opens, closes, and the handle springs closed
when released.
• Replace bent, broken, or worn parts before using this product.
• Ensure that the hitch ball is fully seated in the coupler ball pocket and
the latch is closed.
• Make sure that the trailer safety chains are properly connected to the
towing vehicle and trailer.
• Make sure that all trailer lighting is hooked up and working properly.
Installation Instructions
WARNING
Failure to follow all installation instructions could result in
coupler failure.
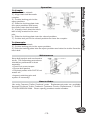
Before mounting the coupler confirm that there will be no interferences
from the tow vehicle, tongue, ground, and any other mounted accessories
while stationary or in motion. The set screw(s) must be facing the towing
vehicle. Before installing, check for interference in extended and retracted
positions. Check for interference again after installation is complete. Weld
size, gusseting requirements, coupler height, and orientation are dependent
on trailer design and customer requirements, however, the outer tube must
be supported completely by attaching gussets as low as possible to the outer
tube. Avoid heat damage to coupler during welding, and do not weld over
or near any holes or hardware on the coupler. All welding must be performed by an AWS certified welder. The outer tube must be rigidly attached
to the trailer in order for the coupler to support its maximum rated load
according to SAE J2638. Coupler must remain vertical after installation to
ensure proper pivoting. After installation, check to make sure that coupler
operation has not been impaired in any way. Do not use coupler if its operation has been impaired. After assembly and painting, but prior to being
used, any enclosed labels must be affixed to the coupler and
premask removed.
- 71 -
Bulldog Gooseneck Coupler
•