1
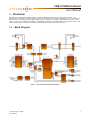
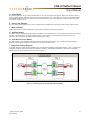
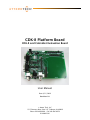
CDK-8 Platform Board
CDK-8 and CobraNet Evaluation Board
User Manual
Date 9/11/2008
Revision 1.0
© Attero Tech, LLC
1315 Directors Row, Suite 107, Ft Wayne, IN 46808
Phone 260-496-9668 • Fax 260-496-9879
614-00003-01
CDK-8 Platform Board
User Manual
IMPORTANT SAFETY INSTRUCTIONS
The symbols below are internationally accepted symbols that warn of potential hazards with electrical products.
This symbol, wherever it appears, alerts you to the presence of uninsulated dangerous voltage inside the
enclosure -- voltage that may be sufficient to constitute a risk of shock.
This symbol, wherever it appears, alerts you to important operating and maintenance instructions in the
accompanying literature. Please read the manual.
1)
2)
3)
4)
5)
6)
7)
8)
9)
10)
11)
12)
13)
14)
Read these instructions.
Keep these instructions.
Heed all warnings.
Follow all instructions.
Do not use this apparatus near water.
Clean only with a dry cloth.
Do not block any ventilation openings. Install in accordance with the manufacturer's instructions.
Do not install near any heat sources such as radiators, heat registers, stoves, or other apparatus (including
amplifiers) that produce heat.
Protect the power cord from being walked on or pinched particularly at plugs, convenience receptacles, and the
point where they exit from the apparatus.
Only use attachments/accessories specified by Attero Tech
Unplug this apparatus during lightning storms or when unused for long periods of time.
Refer all servicing to qualified service personnel. Servicing is required when the apparatus has been damaged in
any way, such as power-supply cord or plug is damaged, liquid has been spilled or objects have fallen into the
apparatus, the apparatus has been exposed to rain or moisture, does not operate normally, or has been dropped.
This apparatus shall be connected to a mains socket outlet with a protective earthing connection.
When permanently connected, on all-pole mains switch with a contact separation of at least 3mm in each pole shall
be incorporated in the electrical installation of the building.
WARNING -- TO REDUCE THE RISK OF FIRE OR ELECTRIC SHOCK, DO NOT EXPOSE THIS APPARATUS TO RAIN OR MOISTURE.
© Attero Tech LLC 2008
614-00003-01
1
CDK-8 Platform Board
User Manual
Contents
1 – Overview .....................................................................................................................................................................................................................................3
1.1 – Block Diagram .......................................................................................................................................................... 3
2 – Hardware.....................................................................................................................................................................................................................................4
2.1 – Setup........................................................................................................................................................................ 4
2.2 – I/O Headers.............................................................................................................................................................. 4
J1: CDK-8 Module Digital Audio I/O Header .................................................................................................................. 4
J2: CDK-8 Module HMI & UART Header ......................................................................................................................... 6
J3: User Digital I/O Header ........................................................................................................................................... 7
J4: User HMI Header ..................................................................................................................................................... 8
J7: Logic Level CobraNet Serial Bridge Header .............................................................................................................. 9
J8: Logic Level CDK-8DUART Control Header ................................................................................................................ 9
2.3 – Configuration Headers ........................................................................................................................................... 10
J14: +3.3V Header ...................................................................................................................................................... 10
J15: WDI Header ......................................................................................................................................................... 10
J17: CobraNet Serial Bridge RS-232/Logic Level Select Header .................................................................................... 10
J18: CDK-8DUART Control RS-232/Logic Level Select Header...................................................................................... 10
J19: CobraNet Serial Bridge Normal/Loopback Mode Select Header ............................................................................ 10
J20: Muting Select Header .......................................................................................................................................... 10
J21: DAC Clocks & Data Header.................................................................................................................................. 10
J22: ADC Clocks & Data Header.................................................................................................................................. 10
2.4 – Connectors............................................................................................................................................................. 11
J5: RS-232 CobraNet Serial Bridge............................................................................................................................... 11
J6: RS-232 CDK-8DUART Control ................................................................................................................................ 11
J10: RCA Stereo Audio Input ....................................................................................................................................... 11
J11-A (bottom): 1/8” (3.5mm) Stereo Audio Input ....................................................................................................... 11
J11-B (top): 1/8” (3.5mm) Stereo Audio Output........................................................................................................... 11
J12: RCA Stereo Audio Output .................................................................................................................................... 11
J13: +9VDC Input ....................................................................................................................................................... 11
2.5 – LEDs....................................................................................................................................................................... 12
2.6 – Reset Switch ........................................................................................................................................................... 12
3 – Software....................................................................................................................................................................................................................................13
3.1 – Requirements ......................................................................................................................................................... 13
3.2 – Installation ............................................................................................................................................................. 13
3.3 – Setup...................................................................................................................................................................... 13
3.4 – Software Interface .................................................................................................................................................. 13
3.4.1 – Audio Signal Routing ...................................................................................................................................... 14
3.4.2 –Bundle Routing ................................................................................................................................................ 16
3.4.3 – Serial Bridge ................................................................................................................................................... 18
3.4.4 – Discovery Options .......................................................................................................................................... 19
4 – Appendix ..................................................................................................................................................................................................................................20
4.1 – Schematic............................................................................................................................................................... 20
4.2 – Bill of Materials ...................................................................................................................................................... 23
4.3 – PCB ........................................................................................................................................................................ 25
4.3.1 – Top Silkscreen ................................................................................................................................................ 25
4.3.2 – Top Copper .................................................................................................................................................... 26
4.3.3 – Bottom Copper ............................................................................................................................................... 27
APPENDIX A – Introduction to CobraNet...................................................................................................................................................................... A-1
APPENDIX B – Reference Documents ..............................................................................................................................................................................B-1
© Attero Tech LLC 2008
614-00003-01
2
CDK-8 Platform Board
User Manual
1 – Overview
The Attero Tech CDK-8 Platform Board allows for evaluation board of the Attero Tech family of CDK-8 modules. This
platform board incorporates a switching power regulator, a stereo DAC, a stereo ADC, a watchdog timer, and an RS-232 line
driver/receiver. It provides power to a CDK-8 module as well as audio jacks, serial ports and headers for access to critical
signals. An Attero Tech CDK-8D, CDK-8DHMI, or CDK-8DUART module is required for operation of the Platform Board. With
a CDK module properly installed, the assembly resembles the functionality of the Attero Tech CO2.
1.1 – Block Diagram
Figure 1 - CDK-8 Platform Board Block Diagram
© Attero Tech LLC 2008
614-00003-01
3
CDK-8 Platform Board
User Manual
2 – Hardware
Refer to the PCB silkscreen in section 4.2.1 to locate the various headers and connectors. The schematic in section
4.1provides the pin arrangement for all headers.
2.1 – Setup
First make sure a CDK-8D, CDK-8DHMI or CDK-8DUART module is properly installed. To install a CDK-8 module on the
platform board, first power off the board, line up the pin 1 indicators (indicated by a triangle, dot, or indentation) for J1 and
J2 (if applicable), and then push it down straight and firmly. Next, refer to section 2.3 and install the appropriate jumpers
depending on your desired configuration. Finally, connect your audio jacks and power up the board using the provided
power supply.
Use caution when removing the module so as to not bend the pins on J1 or J2.
2.2 – I/O Headers
All I/O headers on the platform board are spaced on 0.1” centers, and are standard square pin headers. Signal directions
are relative to the CDK-8 module.
J1: CDK-8 Module Digital Audio I/O Header
This header is utilized by all CDK-8 modules.
Pin
Signal Name
1
CDK_MCLK
2
GND
3
CDK_SCLK
4
GND
5
CDK_LRCLK
6
Direction
Out
Function
Master Audio Clock
-
Digital Ground
Out
Audio Bit Clock
-
Digital Ground
Out
Sample Clock
GND
-
Digital Ground
7
DAI1_DATA0
In
Digital Audio Input Data 0
8
GND
-
Digital Ground
9
DAO1_DATA0
Out
10
GND
11
BRIDGE_UART_TXD
Out
CobraNet Serial Bridge Asynchronous Transmit Data
12
BRIDGE_UART_TX_OE
Out
CobraNet Serial Bridge Transmit Drive Enable
13
BRIDGE_UART_RXD
In
CobraNet Serial Bridge Asynchronous Receive Data
14
+3.3V
In
+3.3V for CDK-8 Module
15
\MUTE
Out
Interface Ready
16
\RESET_OUT
Out
Reset Out
17
\RESET_IN
18
WATCHDOG
Out
Watchdog
19
EXT_PWR-
Out
External Power –
20
EXT_PWR+
Out
External Power +
21
DAI1_DATA1
© Attero Tech LLC 2008
614-00003-01
-
Digital Audio Output Data 0
In
In
Digital Ground
External Reset In
Digital Audio Input Data 1
4
CDK-8 Platform Board
User Manual
22
DAO1_DATA1
Out
23
DAI1_DATA2
In
24
DAO1_DATA2
Out
25
DAI1_DATA3
In
26
DAO1_DATA3
Out
Digital Audio Output Data 1
Digital Audio Input Data 2
Digital Audio Output Data 2
Digital Audio Input Data 3
Digital Output Data 3
Table 1 – CDK-8 Module Digital I/O Header Pin-Out
© Attero Tech LLC 2008
614-00003-01
5
CDK-8 Platform Board
User Manual
J2: CDK-8 Module HMI & UART Header
This header is not used with a CDK-8D module installed. Pins 1-26 are utilized for a CDK-8DHMI module, whereas pins 1-4
and 27-30 are utilized for the CDK-8DUART module.
Pin
Signal Name
Direction
Function
1
MCLK_IN
In
Master Audio Clock Input
2
GND
-
Digital Ground
3
GND
-
Digital Ground
4
GND
-
Digital Ground
5
HDATA0
In/Out
6
HADDR0
In
7
HDATA1
In/Out
8
HADDR1
In
9
HDATA2
In/Out
10
HADDR2
In
11
HDATA3
In/Out
12
HADDR3
In
13
HDATA4
In/Out
14
Host Port Data bit 0
Host Port Address bit 0
Host Port Data bit 1
Host Port Address bit 1
Host Port Data bit 2
Host Port Address bit 2
Host Port Data bit 3
Host Port Address bit 3
Host Port Data bit 4
HR\W
In
Host Port Transfer Direction (Motorola)
\HRD
In
Host Read (Intel)
15
HDATA5
16
\HREQ
17
HDATA6
18
\HACK
19
HDATA7
In/Out
Out
In/Out
Out
In/Out
Host Port Data bit 5
Host Port Data Request
Host Port Data bit 6
Host Port Interrupt Request
Host Port Data bit 7
\HDS
In
Host Strobe (Motorola)
\HWR
In
Host Write (Intel)
GND
-
Digital Ground
\HEN
In
Host Enable (Motorola)
\HCS
In
Host Select (Intel)
23
GND
-
Digital Ground
24
GND
-
Digital Ground
25
GND
-
Digital Ground
26
REFCLK_IN
In
Reference Clock
27
CTRL_UART_RXD
In
CDK-8DUART Control Asynchronous Receive Data
28
CTRL_UART_TXD
Out
29
GND
-
Digital Ground
30
GND
-
Digital Ground
20
21
22
CDK-8DUART Control Asynchronous Transmit Data
Table 2 – CDK-8 Module HMI & UART Header Pin-out
© Attero Tech LLC 2008
614-00003-01
6
CDK-8 Platform Board
User Manual
J3: User Digital I/O Header
This header has an identical pin-out to J1 and allows the user to access the signals in Table 3 below.
Pin
Signal Name
1
CDK_MCLK
2
GND
3
CDK_SCLK
4
GND
5
CDK_LRCLK
6
Direction
Out
Function
Master Audio Clock
-
Digital Ground
Out
Audio Bit Clock
-
Digital Ground
Out
Sample Clock
GND
-
Digital Ground
7
DAI1_DATA0
In
Digital Audio Input Data 0
8
GND
-
Digital Ground
9
DAO1_DATA0
Out
-
Digital Audio Output Data 0
10
GND
11
BRIDGE_UART_TXD
Out
Asynchronous Transmit Data
12
BRIDGE_UART_TX_OE
Out
Transmit Drive Enable
13
BRIDGE_UART_RXD
In
Asynchronous Receive Data
14
+3.3V
In
+3.3V for CDK-8 Module
15
\MUTE
Out
Interface Ready
16
\RESET_OUT
Out
Reset Out
17
\RESET_IN
18
WATCHDOG
Out
Watchdog
19
EXT_PWR-
Out
External Power –
20
EXT_PWR+
Out
External Power +
21
DAI1_DATA1
In
22
DAO1_DATA1
Out
23
DAI1_DATA2
In
24
DAO1_DATA2
Out
25
DAI1_DATA3
In
26
DAO1_DATA3
Out
In
Digital Ground
External Reset In
Digital Audio Input Data 1
Digital Audio Output Data 1
Digital Audio Input Data 2
Digital Audio Output Data 2
Digital Audio Input Data 3
Digital Audio Output Data 3
Table 3 – User Digital I/O Header Pin-out
© Attero Tech LLC 2008
614-00003-01
7
CDK-8 Platform Board
User Manual
J4: User HMI Header
This header has an identical pin-out to J1 for pins 1-26 and allows the user to access the signals in Table 4 below.
Pin
Signal Name
Direction
Function
1
MCLK_IN
In
Master Audio Clock Input
2
GND
-
Digital Ground
3
GND
-
Digital Ground
4
GND
-
Digital Ground
5
HDATA0
In/Out
6
HADDR0
In
7
HDATA1
In/Out
8
HADDR1
In
9
HDATA2
In/Out
10
HADDR2
In
11
HDATA3
In/Out
12
HADDR3
In
13
HDATA4
In/Out
14
Host Port Data bit 0
Host Port Address bit 0
Host Port Data bit 1
Host Port Address bit 1
Host Port Data bit 2
Host Port Address bit 2
Host Port Data bit 3
Host Port Address bit 3
Host Port Data bit 4
HR\W
In
Host Port Transfer Direction (Motorola)
\HRD
In
Host Read (Intel)
15
HDATA5
16
\HREQ
17
HDATA6
18
\HACK
19
HDATA7
In/Out
Out
In/Out
Out
In/Out
Host Port Data bit 5
Host Port Data Request
Host Port Data bit 6
Host Port Interrupt Request
Host Port Data bit 7
\HDS
In
Host Strobe (Motorola)
\HWR
In
Host Write (Intel)
GND
-
Digital Ground
\HEN
In
Host Enable (Motorola)
\HCS
In
Host Select (Intel)
23
GND
-
Digital Ground
24
GND
-
Digital Ground
25
GND
-
Digital Ground
26
REFCLK_IN
In
Reference Clock
20
21
22
Table 4 – User HMI Header Pin-out
© Attero Tech LLC 2008
614-00003-01
8
CDK-8 Platform Board
User Manual
J7: Logic Level CobraNet Serial Bridge Header
This header is only functional when J17 is configured for logic level operation.
Pin
Signal Name
Direction
Function
1
BRIDGE_UART_RXD
In
CobraNet Serial Bridge Asynchronous Receive Data
2
BRIDGE_UART_TXD
Out
3
GND
-
Digital Ground
4
GND
-
Digital Ground
CobraNet Serial Bridge Asynchronous Transmit Data
Table 5 – Logic Level CobraNet Serial Bridge Header Pin-out
J8: Logic Level CDK-8DUART Control Header
This header is only functional when J18 is configured for logic level operation.
Pin
Signal Name
Direction
Function
1
CTRL_UART_RXD
In
CDK-8DUART Control Asynchronous Receive Data
2
CTRL_UART_TXD
Out
3
GND
-
Digital Ground
4
GND
-
Digital Ground
CDK-8DUART Control Asynchronous Transmit Data
Table 6 – Logic Level CDK-8DUART Control Header Pin-out
© Attero Tech LLC 2008
614-00003-01
9
CDK-8 Platform Board
User Manual
2.3 – Configuration Headers
All configuration headers on the platform board are spaced on 0.1” centers, and are standard square pin headers and shunts
are supplied.
J14: +3.3V Header
With a shunt installed on J14 the switching power supply is connected to the +3.3V net on the platform board.
Uninstalling this shunt allows the connection of an ammeter for current measurements or a third party power supply. If
using a third party power supply and bypassing the switching regulator, connect ‘–’ to the pin labeled GND1 and connect ‘+’
to the right-most pin of this header. This shunt is normally installed.
J15: WDI Header
With a shunt installed on J15, the WATCHDOG signal of the CDK-8 module is connected to the WDI pin of the watchdog
circuitry on the platform board. Uninstalling this shunt disables the watchdog functionality and, if required, the module will
have to be reset manually by pressing S1. This shunt is normally installed.
J17: CobraNet Serial Bridge RS-232/Logic Level Select Header
This header selects between RS-232 or logic level CobraNet Serial Bridge operation. Follow the PCB silkscreen directions to
route signals to either J5 or J7. These shunts are normally in RS-232 mode.
J18: CDK-8DUART Control RS-232/Logic Level Select Header
This header selects between RS-232 or logic level CDK-8DUART Control operation. Follow the PCB silkscreen directions to
route signals to either J6 or J8. These shunts are normally in RS-232 mode.
J19: CobraNet Serial Bridge Normal/Loopback Mode Select Header
With the shunt in normal mode, the CobraNet Serial Bridge operates unaltered. Normal mode allows full-duplex serial data
communication from one CobraNet device to another. With the shunt in loopback mode, the signals BRIDGE_UART_TXD and
BRIDGE_UART_RXD are connected together. Placing one CobraNet device in loopback mode allows data transmitted by
another CobraNet device in normal mode to travel over the network and subsequently be echoed back, thus verifying serial
bridge connectivity. Follow the PCB silkscreen directions for desired shunt placement. This shunt is normally in Normal
mode.
J20: Muting Select Header
With the shunt in automatic mode, the DAC outputs will be muted when the \MUTE signal is asserted. With the shunt in off
mode, the DAC outputs are never muted. Follow the PCB silkscreen directions for desired shunt placement. This shunt is
normally in Auto mode.
J21: DAC Clocks & Data Header
With all four shunts installed vertically, the master clock, bit clock, frame clock and serial data input are connected directly
to the DAC for normal operation. The top row of header pins are signals from the CDK-8 module whereas the bottom row
connects to the DAC. These four shunts are normally installed.
J22: ADC Clocks & Data Header
With all four shunts installed vertically, the master clock, bit clock, frame clock and serial data output are connected directly
to the ADC for normal operation. The top row of header pins are signals from the CDK-8 module whereas the bottom row
connects to the ADC. These four shunts are normally installed.
© Attero Tech LLC 2008
614-00003-01
10
CDK-8 Platform Board
User Manual
2.4 – Connectors
These connectors provide connectivity to external components.
J5: RS-232 CobraNet Serial Bridge
This DB9F connector allows a user’s computer to connect to the CobraNet Serial Bridge using a standard 9-pin serial cable.
J5 is only active when J17 is configured for RS-232 operation.
J6: RS-232 CDK-8DUART Control
This DB9F connector allows a user’s computer to connect to the CDK-8DUART Control using a standard 9-pin serial cable. J6
is only active when J18 is configured for RS-232 operation and a CDK-8DUART module is installed.
J10: RCA Stereo Audio Input
This connects to the stereo ADC. J10 is only functional when J16 configured for RCA input.
White: Left Audio Channel Input
Red:
Right Audio Channel Input
J11-A (bottom): 1/8” (3.5mm) Stereo Audio Input
This connects to the stereo ADC. J11-A is only functional when J16 is configured for 1/8” input.
Tip:
Left Audio Channel Input
Ring:
Right Audio Channel Input
Sleeve: Audio Ground
J11-B (top): 1/8” (3.5mm) Stereo Audio Output
This connects to the stereo DAC.
Tip:
Left Audio Channel Output
Ring:
Right Audio Channel Output
Sleeve: Audio Ground
J12: RCA Stereo Audio Output
This connects to the stereo DAC.
White: Left Audio Channel Output
Red:
Right Audio Channel Output
J13: +9VDC Input
Unregulated
2.1mm plug with center pin positive
500 mA (recommended)
© Attero Tech LLC 2008
614-00003-01
11
CDK-8 Platform Board
User Manual
2.5 – LEDs
These LEDs provide a visual status of various signals.
Ref.
Connected to
Color
Function
D1
+3.3V
Green
Indicates that the platform board power supply is operational.
D2
\MUTE
Red
Indicates that the installed CDK-8 module interface is not ready.
D3
\RESET_IN
Red
Indicates that a reset signal has been asserted by either pressing the reset
switch or by the watchdog circuitry if the WDI shunt is installed.
D4
\RESET_OUT
Red
Indicates that the installed CDK-8 module is resetting.
Table 7 – CDK-8 Platform Board LEDs
2.6 – Reset Switch
This switch forces a reset of the installed CDK-8 module. Pressing it asserts the \RESET_IN signal and illuminates D3. If the
CDK module is correct installed, the module is reset and as a consequence asserts the \RESET_OUT signal causing D4 to
illuminate. If D4 does not illuminate, make certain that the CDK has been installed properly.
© Attero Tech LLC 2008
614-00003-01
12
CDK-8 Platform Board
User Manual
3 – Software
3.1 – Requirements
Microsoft Windows 2000 or newer
SNMP services installed and running
3.2 – Installation
All installation files are included on the CD packaged with the system. To install the software on your machine simply run
the setup.exe file located on the CD-ROM.
The installation will create a program group and a shortcut to the program. This is located under: Start Menu—All
Programs—CobraNet CO2—CO2 Demonstration Utility.
3.3 – Setup
The software requires the presence of at least one CobraNet device on the network to operate and at least two to have
meaningful CobraNet functionality. It is recommended that an independent isolated network be used for demonstrating
CobraNet devices to eliminate network traffic issues.
First, connect your computer to a 10/100 Fast Ethernet switch and assign your network adapter a static IP address. This is
done by right-clicking the network adapter in the Network Connections control panel and editing its TCP/IP properties.
Next, power up each CobraNet device and connect them to the same switch using Cat5 Ethernet patch cables. Launch the
CO2 Demonstration Utility and verify that the network adapter connected to the CobraNet network is selected. The software
will now automatically detect and assign IP addresses for each CobraNet device. Select a unique CobraNet device for “Device
1” and “Device 2” through the “IP Address” drop-down box and press the corresponding “Find” button. The device names
and attributes will appear and the software utility can now be used to control each device.
3.4 – Software Interface
The CO2 Demonstration Utility is divided into four pages selected by the tabs on top:
Audio Signal Routing
Bundle Routing
Serial Bridge
Discovery Options
© Attero Tech LLC 2008
614-00003-01
13
CDK-8 Platform Board
User Manual
3.4.1 – Audio Signal Routing
This page handles the majority of the CobraNet device monitoring and control. This page is divided vertically into two
sections of identical controls for each device. This allows the user to monitor and control each CobraNet device
simultaneously. Figure 2 labels each control and control section with a letter and each one is described in this section.
Figure 2 - Audio Signal Routing page of the CO2 Demonstration Utility
A – IP Address Drop Down Box & Find Button
CobraNet devices are automatically discovered and assigned IP addresses by the application. Once a device has been
discovered it is added to the list for each drop down box. By selecting a device from the list and pressing the corresponding
“Find” button, the device information is gathered and populates the controls. It is important to note that most of the
controls in the application are disabled until a valid CobraNet device is loaded.
B – Description Box
This is a read only field that displays the device name.
C – MAC Address Box
This displays the MAC address for the currently selected device.
© Attero Tech LLC 2008
614-00003-01
14
CDK-8 Platform Board
User Manual
D – Select Mode
This section allows the user to specify how the device is currently connected in the system. When in RX mode the device is
receiving audio from the network and connected to an audio output source. In TX mode, the device is transmitting audio to
the CobraNet network and an audio source is connected to the device. The System Diagram is helpful in determining how
your system should be set up.
E – Swap L and R Button
This is an audio routing function and issues a command to the CobraNet device to swap the left and right audio channels.
F – Mute Selection
Audio channels can be muted individually by checking each channel’s corresponding checkbox.
G – Defaults Button
This button loads in the default factory settings preloaded in each CobraNet device. This is useful if your device has become
unstable. This function also resets the software interface, if for example, the connection to the device was lost and
parameters were changed in the software without updating the device.
H – View Device Errors Button
This button opens a new window that displays the error count and last error code. This is useful for troubleshooting a
device or monitoring the performance of a device on the current network setup.
I – Hide/Show System Diagram
A graphical depiction of the current CobraNet system is displayed and updated in the System Diagram. This is a helpful tool
in demonstrating the relationship between the software, hardware, and CobraNet capabilities. Pressing the Show/Hide
button allows the user to display or hide the picture in Figure 3.
Figure 3 - System Diagram of the CO2 Demonstration Utility
© Attero Tech LLC 2008
614-00003-01
15
CDK-8 Platform Board
User Manual
3.4.2 –Bundle Routing
The previous page dealt with routing audio signals on the CobraNet network. This cannot be accomplished without first
designating bundle assignments. Each CobraNet device transmits audio channels in bundles over the network. Each bundle
is capable of transmitting up to 8 channels. The CobraNet processor used in the device determines the total number of
channels. In order for transmission to occur a transmitter must have a matching receiver. In the case of the CO2, the
devices are capable of only stereo audio therefore audio is only transmitted in the first TX / RX bundle, TX1/RX1.
Figure 4 - Bundle Routing page of the CO2 Demonstration Utility
Bundles can be assigned numbers from 0 through 65535. However there are designations for certain ranges shown in Table
8 below.
Bundle #
Type
Usage
0
Null
1 to 255
Multicast
256 to 65279
Unicast
Typical mode for transmission, 1 receiver for each transmitter
65280 to 65535
Private
Unique to a transmitter’s MAC address
Disables transmission
One to many transmission, not recommended for most applications as it
will add high network traffic
Table 8 – CobraNet Bundle Types
© Attero Tech LLC 2008
614-00003-01
16
CDK-8 Platform Board
User Manual
A – IP Address Boxes
Displays the current IP address of the device being monitored.
B – Bundle Assignment Edit Boxes
Bundles numbers are assigned in these edit boxes. The numbers indicate the current bundle assignments for the labeled
box.
C – Copy Buttons
These buttons provide an easy way to populate each bundle assignment box by copying the bundle assignments of one
device into the assignment boxes for the other device.
D – Set Button
Changing a bundle assignment does not take effect until the Set button is pressed. When pressed it assigns the value of
each box to the corresponding device.
E – Advanced Checkbox
As discussed earlier, the CO2 only contains audio signal in the first transmitter. However, other devices can have up to 4
transmitters and receivers. By clicking on the advanced checkbox the other bundle assignment edit boxes are enabled in
the event that the software is controlling a device other than a CO2.
F – Refresh Button
This is used to read the current status of each bundle for both devices. Use this button if the bundles assignment boxes
were edited but not assigned by pressing the Set button.
© Attero Tech LLC 2008
614-00003-01
17
CDK-8 Platform Board
User Manual
3.4.3 – Serial Bridge
This page is used to demonstrate the serial bridging capability of the CobraNet technology. Users must connect the DB9
serial cable to the serial port of their computer and to the DB9 connector on one CDK-8 Platform Board or CO2. On the
opposite CobraNet device, place an appropriate shunt to enable loopback.
Figure 5 – Serial Bridge page of the CO2 Demonstration utility
A – Serial Port Selection
Users select the serial COM port for their machine by clicking the appropriate selection
B – Serial Bridge
By checking the Enable checkboxes in this section the user is enabling the serial bridge capabilities of each CobraNet device.
Both enable checkboxes must be checked for the demonstration to function properly. The loopback checkbox is useful for
testing the serial transmission between the computer and the CobraNet device directly connected to the computer.
C – Transmit Serial Data
When the user types characters into this box the data is transmitted from the computer’s serial port through the connected
device and to the network. The serial information is then received by the other CobraNet device and echoed back provided
that this device is set to loopback operation. The looped back data is then displayed in the Received Serial Data box. By
configuring both devices for normal operation, the user can demonstrate the ability to send serial data over the CobraNet
network by means of the serial packet bridge feature.
D – Received Serial Data
Characters received on the serial port are displayed in this box.
© Attero Tech LLC 2008
614-00003-01
18
CDK-8 Platform Board
User Manual
E – Refresh Serial State Button
Updates the user interface to reflect the current state of the serial mode on the device, this feature is much like the “Refresh
feature on the Bundle Routing page and should only be necessary if a device has inadvertently been disconnected and
reconnected to the network.
3.4.4 – Discovery Options
Devices are automatically discovered by the application; however, the appropriate network adapter must be selected for this
to work properly. The software defaults to the first network adapter found. If this is not the appropriate Ethernet adapter
then no devices will be found. For example, many laptops have both wired and wireless network adapters. If the first
adapter enumerated on the system is the wireless adapter, the adapter will not see the CobraNet devices.
Figure 6 - Discovery Options page of the CO2 Demonstration Utility
A – Network Adapter Settings
Select the appropriate Ethernet adapter from this list. Selection is not active until the Select Adapter button is pressed. If
the wrong adapter is selected, CobraNet devices cannot be discovered.
B – Enable Discovery Checkbox
This checkbox allows the user to stop the discovery of devices in the software. This is only for troubleshooting and should
remain enabled. By disabling this feature devices are not added or removed from the drop down lists.
C – Static IP Address Assignment
If there is an instance where a unique IP address needs to be assigned to a device, the user can do this here. This is useful if
there are other devices on your network using static IP addresses within the range of addresses allowed by auto-assignment.
Enter the desired IP address (within the subnet of your network adapter and other CobraNet devices) and click Assign IP.
© Attero Tech LLC 2008
614-00003-01
19
CDK-8 Platform Board
User Manual
4 – Appendix
4.1 – Schematic
© Attero Tech LLC 2008
614-00003-01
20
CDK-8 Platform Board
User Manual
© Attero Tech LLC 2008
614-00003-01
21
CDK-8 Platform Board
User Manual
© Attero Tech LLC 2008
614-00003-01
22
CDK-8 Platform Board
User Manual
4.2 – Bill of Materials
Qty
Reference
Manufacturer
Description
Part Number
8
C3 C7 C21 C22 C23
C24 C25 C35
PANASONIC
CAP, 1000PF, 50V, 0603, 10%
ECJ-1VB1H102K
1
C5
PANASONIC
CAP, 10UF, 25V, 1206, 20%
ECJ-3YB1E106M
2
C11 C12
PANASONIC
CAP, 180PF, 50V, 5%, 0603
ECJ-1VC1H181J
6
C10 C13 C14 C28
C29 C33
PANASONIC
CAP, 1UF, 16V, 10%, 0603
ECJ-1VB1C105K
1
C100
PANASONIC
CAP, 22UF, 35V, 20%, SMT C
EEE-1VA220WR
1
C102
PANASONIC
CAP, 33UF, 25V, ELECT, SMD C
EEE-1EA330WR
1
C6
PANASONIC
CAP, 3.3UF,10V, 10%, 1206
ECJ-3YB1A335K
2
C2 C15
PANASONIC
CAP, 3.3UF, 35V, 20%, SMT A
EEE-1VS3R3SR
2
C1 C4
PANASONIC
CAP, 3300PF, 50V, 10%, 0603
ECJ-1VB1H332K
1
C101
PANASONIC
CAP, 4.7UF, 25V, 20%, 0805
ECJ-2FB1E475M
5
C8 C16 C17 C18 C19
PANASONIC
CAP, .1UF, 25V, 10%, 0603
ECJ-1VB1E104K
7
C9 C20 C26 C27 C30
C31 C68
PANASONIC
CAP, .1UF, 25V, +80%/-20%, 0603
ECJ-1VF1E104Z
1
C103
PANASONIC
CAP, .22UF, 25V, 10%, 0805
ECJ-2YB1E224K
1
C32
1
D102
DIODES INC
1
D101
1
D104
1
D1
3
D2 D3 D4
4
AGND1 GND1 GND2
PGND1
1
J11
2
J5 J6
1
J13
2
CAP, NOT INSTALLED, 0603
DIODE, SWT, 100V, 300MA, SOD123
1N4148W-7-F
ON SEMI
DIODE, SCHOTTKY, 40V, 1A,
POWERMITE
MBRM140T1G
ON SEMI
DIODE, SCHOTTKY, 40V, 1A, SMB
MBRS140T3G
PANASONIC
LED, SMT, 3216, GREEN
LN1351CTR
PANASONIC
LED, SMT, 3216, RED, 2.8V
LN1251CTR
SAMTEC
HEADER, 1X1, .1 GROUND POINT
TSW-101-07-G-S
CUI INC
CON, AUDIO JACK 3.5MM
PCBMT,DUAL VERT
SJD-3510-33
CON, DB9, FEMALE, RA, W/BD-LOCK,
S-LOCK
5747844-6
CUI STACK
CON, PWR JACK, 2.1MM PCB
PJ-202A
J10 J12
KOBICONN
CON, RCA, 1X2, VERT, RED/WHITE
161-4219-E
2
J14 J15
SAMTEC
HEADER, 1X2 PIN, .1"
TSW-102-07-G-S
2
J19 J20
SAMTEC
HEADER, 1X3, 0.1 THRU
TSW-103-07-G-S
3
J1 J3 J4
SAMTEC
HEADER, 2X13, .1, THRU
TSW-113-07-G-D
1
J2
SAMTEC
HEADER, 2X15, 0.1", THRU, MALE
TSW-115-07-G-D
2
J7 J8
SAMTEC
HEADER, 2X2, 0.1", THRU, MALE
TSW-102-07-G-D
3
J16 J17 J18
SAMTEC
HEADER, 2X3, .1, THRU, MALE
TSW-103-07-G-D
2
J21 J22
SAMTEC
HEADER, 2X4, 0.1", THRU, MALE
TSW-104-07-G-D
© Attero Tech LLC 2008
614-00003-01
AMP
23
CDK-8 Platform Board
User Manual
1
L101
SUMIDA
INDUCTOR, POWER, 10UH, 2.0A,
SMD
CDRH6D38NP-100NC
L1 L2 L3 L4 L5 L6 L7
L8 L9 L10 L11 L12
L13 L14 L15 L16 L17
L18 L19
STEWARD
FERRITE, 68_OHM, 1A, 0603
MI0603J680R-10
2
Q5 Q6
TOSHIBA
TRAN, SIG, NPN, 20 V, SOT23
2SC3326A(T5LFT)
4
Q1 Q2 Q3 Q4
ON SEMI
TRAN, SIG, PNP, 60V, SOT-23
MMBT2907ALT1G
2
R5 R6
PANASONIC
RES, 0 OHM, 1/10W, 5%, 0603
ERJ-3GEY0R00V
2
R42 R43
PANASONIC
RES, 1.0K, 1/10W, 5%, 0603
ERJ-3GEYJ102V
4
R8 R13 R16 R23
PANASONIC
RES, 100 OHM, 1/10W, 5%, 0603
ERJ-3GEYJ101V
3
R15 R19 R102
PANASONIC
RES, 10K, 1/10W, 1%, 0603
ERJ-3EKF1002V
8
R7 R22 R24 R26 R31
R36 R44 R100
PANASONIC
RES, 10K, 1/10W, 5%, 0603
ERJ-3GEYJ103V
1
R101
PANASONIC
RES, 17.4K, 1/10W, 1%, 0603
ERJ-3EKF1742V
4
R1 R2 R3 R4
PANASONIC
RES, 182 OHM, 1/8W, 1%, 0805
ERJ-6ENF1820V
2
R14 R18
ROHM
RES, 470, 1/10W, 0603, 1%
MCR03EZPFX4700
4
R9 R10 R11 R12
PANASONIC
RES, 4.99K, 1/10W, 1%, 0603
ERJ-3EKF4991V
3
R17 R20 R21
ROHM
RES, 51 OHM, 1/10W, 1%, 0603
MCR03EZPFX51R0
1
S1
PANASONIC
SWITCH, TACT, 2LEAD 3X6MM
EVQ-PJS04K
1
U2
CIRRUS LOGIC
IC MXS, STEREO DAC, TSSOP10
CS4344-CZZ
1
U3
CIRRUS LOGIC
IC MXS, A/D CONVERT, 10 TSSOP
CS5343-CZZ
1
U1
LINEAR TECH
IC LNR, REG, SW, 1.4A, 8-MSOP
LT1936EMS8E#PBF
1
U5
SIPEX
IC DIG, DUAL RS232, 3.3V, WSOIC16
SP3232ECT-L
ST MICRO
IC DIG, MPU SUPERVISR 2.930V,
SOT23-5
STM6822SWY6F
20
KOBICONN
SHORTING JUMPER, BLACK
151-8000
1
ATTERO TECH
PCB, CDK-8 Platform Board
240-00050-02
1
ATTERO TECH
SCHEMATIC, CDK-8 Platform Board
600-00050-02
19
1
U14
© Attero Tech LLC 2008
614-00003-01
24
CDK-8 Platform Board
User Manual
4.3 – PCB
4.3.1 – Top Silkscreen
© Attero Tech LLC 2008
614-00003-01
25
CDK-8 Platform Board
User Manual
4.3.2 – Top Copper
© Attero Tech LLC 2008
614-00003-01
26
CDK-8 Platform Board
User Manual
4.3.3 – Bottom Copper
© Attero Tech LLC 2008
614-00003-01
27
CDK-8 Platform Board
User Manual
APPENDIX A – Introduction to CobraNet
CobraNet is an audio networking technology for delivery and distribution of real-time, high quality uncompressed digital
audio using a standard Ethernet network. It is implemented using a combination of hardware, firmware and the CobraNet
protocol.
Unlike other audio networking or distribution technologies, CobraNet is a true network and exists on standard Ethernet
networks using standard Ethernet hardware. Since it is a true network, audio routing is highly flexible between network
nodes and can be used in a variety of audio distribution applications.
In addition to the high degree of routing flexibility that CobraNet provides, the technology also incorporates the ability to
monitor and control CobraNet devices remotely. This is a key feature that is highly important in fixed installation
applications where the audio distribution equipment may not be readily accessible. All CobraNet devices on the network can
be controlled and monitored from a central location by sending control commands and monitoring device specific
parameters.
CobraNet provides this capability by implementing Simple Network Management Protocol (SNMP). SNMP is a standard
protocol typically used for monitoring network devices such as Ethernet switches. In the case of CobraNet, it allows users to
communicate with any CobraNet device using standard SNMP tools or a customized user interface designed specifically for
CobraNet, such as Attero Tech’s Control Center application.
The figure above represents the types of data that coexist on a CobraNet network.
Before a CobraNet system can be configured, it is important to first understand how CobraNet distributes audio between
devices.
Audio is sent in "bundles" on a CobraNet system. Each bundle is capable of holding up to 8 logical audio channels. Every
CobraNet device has a number of bundle transmitters and bundle receivers. These transmitters and receivers are the
mechanism used to send and receive bundles between devices.
For a transmitted bundle, audio may be sourced from either the local audio inputs of the device or internal audio from the
on-board DSP1, but not both simultaneously. Combinations of the local or internal audio may exist within a bundle in any
order. Additionally, a single source in a device may be used multiple times in a single transmitter bundle or across multiple
transmitter bundles. For a received bundle, the received network audio may be routed to the device’s local outputs or the
internal DSP1 or simply ignored.
Once the contents of a bundle have been decided, the next step is to pass to another CobraNet device. To do this, every
CobraNet device has up to 4 bundle transmitters. Each bundle transmitter has a transmit mode that must first be selected.
This affects how many devices may receive that particular bundle at a time. The modes are as follows:
o
Unicast – Used for one to one connections. In this mode, only one receiver at a time can receive this bundle. Once
a link is established from this transmitted bundle to a receiver, any future requests for that bundle will fail.
o
1
Multicast – Used for one to many connections. This mode broadcasts its contents over the entire network. There
is no restriction on the number of receivers. However, the downside is the network bandwidth required.
Not available on all devices – CS49xxx devices only
© Attero Tech LLC 2008
614-00003-01
Page A-1
CDK-8 Platform Board
User Manual
o
Multi-unicasts – Another one to many mode. Whilst this is the most efficient method for getting a bundle to
multiple receivers in terms of network bandwidth, it requires more processing power on the CobraNet device so in
this mode there is a maximum limit of 4 receiver connections (this can be reduced if required). If more
connections are required than the limit, the node automatically switches to multicast.
Note: When a bundle must be transmitted to multiple receivers, multi-unicast transmissions should be used where possible.
Once the mode is selected, to enable a device to transmit the bundle, simply allocate the particular transmitter bundle a
non-zero number. Since this number identifies all the network packets sent out by that transmitter, each transmit bundle
number must be unique on a network2.
Now the transmitter is setup, it’s time to setup the receivers. In order to receive bundles, each CobraNet device has up to 8
bundle receivers. To enable a device to receive a bundle, simply allocate one of that device’s bundle receivers the same
bundle number as a transmitted bundle. By doing so, a virtual link is created and audio should now be passed from one
device to the other. It should be noted that no knowledge of a device’s network topology or connection is thus required in
order to configure audio connections. The only restriction to this is that a device cannot be setup to receive a bundle it is
also transmitting.
The above case creates a simple, one to one unidirectional link. If more devices are required to receive that bundle then
allocate the same transmitted bundle number to a bundle receiver on the other CobraNet devices.
It is also important to note that CobraNet also supports simultaneous bidirectional audio distribution in each device as well.
Not only could audio be sent from device A to device B but at the same time, should it be needed, audio could also be sent
from device B to device A.
The exact bundle and routing configuration will be determined by the needs of each individual installation. An installation
may have multiple units transmitting multiple bundles. The only restriction is the bandwidth available on the network to
transfer the audio.
CobraNet does more than just transfer audio data. It can be used to pass serial information too. A feature called serial
bridging has been incorporated that allows the passage of serial data between nodes. Each node can pass serial data to a
specific node or multicast the data to multiple nodes. A node can also receive data from either a single source or multiple
sources. Baud rates, data bits, stop bits, parity and so on are all configurable. There is also support for multi-drop serial
buses as well.
Finally, CobraNet has the capability to alter all of the above options in real time making the whole system completely
dynamic. By use of control software, all of the bundle assignment parameters can be configured with no need to change
cables, switch out connectors or pull new wiring. Most importantly, this control capability can be implemented from a single
location!
2
Bundle numbers range from 1 through 65535. A value of 0 represents an inactive bundle. Numbers 1 -255 are also
reserved for multicast mode transmissions.
© Attero Tech LLC 2008
614-00003-01
Page A-2
CDK-8 Platform Board
User Manual
APPENDIX B – Reference Documents
The following table lists the relevant reference documents.
Document Title
CDK-8 Platform Board Quick Start Guide
CDK-8 Datasheet
CobraNet Programmer’s Reference (Cirrus Logic)
© Attero Tech LLC 2008
614-00003-01
Page B-1