1
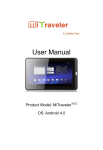
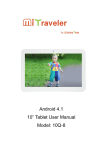
User Manual
Product Model: MiTraveler7D-8B
OS: Android 4.1
Tablet of Contents
Specifications………………………………………………………………….1
What‟s inside the box…………………………………………………………2
Tablet Parts……………………………………………………………………2
Getting started………………………………………………………………...2
Connection to Internet………………………………………………………..6
Task Bar………………………………………………………………………..8
Install and Uninstall……………………………………………………………9
Trouble Shooting……………………………………………………………11
Specifications
Display: 7 inch Capacitive screen
800X480 Resolution G+G
CPU: Dual Core, 1.5GHz, AML8726-M6
RAM: 1G DDR
Internal Storage: 8GB
Expansion Storage: TF card, 32GB Max.
Built-In Wireless: 802.11b/g/n
AC Adapter: DC 5V-1.5A
Operating System: Android 4.1
Battery: 2800mAh
What’s Inside The box
Tablet – 1pc
Power Adapter -1pc
User manual -1pc
1
Tablet Parts
1
2
32
24
52
62
27
2
1 Power ON/OFF button
2 Headset Port
3 micro USB Port
4 DC Jack
5 Volume +
6 Volume 7 TF card (Micro SD card) port
Getting Started
Battery Charging
The tablet has a built-in rechargeable Li-polymer battery.
1. To charge connect the AC power adapter to the DC jack on the right
side of the tablet.
2. The LED indicator will illuminate to show the battery is charging. The
LED indicator will turn “OFF” when it‟s fully charged.
3. The tablet can be used even if the battery is being charged.
2
Power ON/OFF
ON:
1. Press and hold the power button until the tablet turns “ON”.
OFF:
1. Press and hold the power button until device optional
2. Select power off
3. Select OK to power off the tablet
Screen Lock/Unlock:
This feature locks the screen, at the same time turn OFF the screen‟s
backlight after a few seconds.
Screen locks when:
1. System is idle.
2. Manually activated by pressing the Power button once.
User can change the time for the screen lock.
Select „Setting‟---„Display‟---„Sleep‟. Then choose the sleep time. The
tablet will „sleep‟ if the device is idle for such time (e.g. 2 min or 5 min).
How to Use TF card (micro SD card)
Note: TF card is not included in the package. You need the TF
card only when you need extra storage space or plan to transfer
files into the tablet. The tablet has built-in 4G storage space.
1. Insert the TF card into the TF card slot. Gently push TF card into slot
until it clicks into place.
2. A prompt will be seen on the screen saying “ Preparing SD card “
Removing TF card
1. Close all applications and documents which have been opened from
the TF card.
2. Select “Setting” and find “ Storage” then click “Unmount SD card”.
3. A prompt will be seen on the screen saying “ SD card safe to remove”
4. Gently press the TF card to remove and pull out the TF card.
3
Note: Insert the TF card in correct position. Otherwise it will damage the
card and the slot.
Software Keyboard
The tablet has a software keyboard which automatically show up
when you tap the place on screen where text or number are to be
entered.
Touch Screen
The touch screen responds to finger touch
Note: don‟t place any object on the touch screen for it may damage or
crush the screen.
Single Click: single click one icon to choose the icon or option you want.
Long Press: press and hold one icon to choose the icon and you can drag
it to the bottom shortcut bar.
Drag: drag on the screen and you can move between magic cube sides or
drag the application icons into the shortcut bar.
4
Connecting to Internet
Wireless:
1. Select “ Settings”
2. Select “Wi-Fi” and slide OFF to ON status.
3. All detected wireless networks in the area will be listed on the right.
Click to select desired wireless connection.
4. Enter WEP key or network key, i.e. password for the router, if
necessary.
5. Once connected to a wireless network, settings will be saved
Note: when the tablet detects the same wireless network in the future, a
pop-up notification with the name of the wireless network will appear.
Click “Forget” if you want to remove the network from the list.
Web Browsing
Connect to the internet via wireless and launch the browser.
5
Task Bar
The Task Bar will show the following: SD card, Battery, Time,
Return/Back, Desktop, Menu and Wireless
SD card
Battery
Time
Return/Back
Destktop
Menu
Wifi network
Install and Uninstall
Install from memory card or USB drive
Please go to APK Manager,Select “Install” and then select the file
with the extension name .apk in the memory card. Select “Install” to install
the software.
Install application from internet
You can use Play Store to search any application you want, after
download finish it will automatic install
After installation, you can run the software right away or run the
software on the subcategory interface.
6
Uninstall
If you want to uninstall the software from a third party, please go to
APK Manager, Select the software that you want to uninstall. You will see
the following options: run, extract, uninstall and search. Click “uninstall” to
uninstall the software.
Trouble Shooting
Close Application
All running applications take up system memory and will slow down
system response. Please shut down all idle applications to release
memory and get the system speed back to normal.
To close the application, click the icon
on the shortcut bar to
enter the system configuration interface. Select the Application →
Running services and the interface is shown as follows:
7
Tap the application you want to close. A pop-up window will be displayed.
Tap “Stop” to close that application.
Mandatory Power off
1. Press and hold the power button for 7 seconds and the device will be
powered off.
2. Press the reset button on the right and the device will be forced to be
powered off.
Restore Default Setting
If you want to reset the factory setting and erase all materials, please
press Settings → Backup & Reset (scroll up the left part of screen, you
will see this option)
** Warning: Backup & Reset setting will delete your Google account,
personal data and configuration of system and applications and
applications from downloading.
**Please use this function carefully.
8
530 Showers Dr., Suite #7-204
Mountain View, CA 94040
Tel. 1-888-33-Tivax (1-888-338-4829)
(9a,-5pm PST, Mon-Fri)
Fax. 1-650-963-3585
Website: www.tivax.com