1
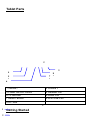
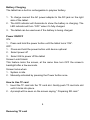
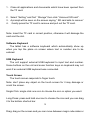
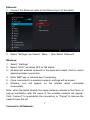
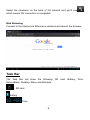
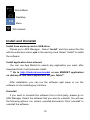
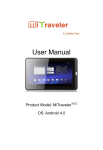
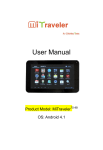
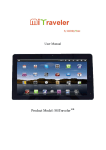
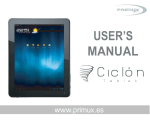
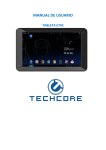
Tablet PC
Andriod 4.0
7” User Manual
Tablet of Contents
Specifications………………………………………………………………….1
What’s inside the box…………………………………………………………1
Tablet Parts……………………………………………………………………2
Getting started………………………………………………………………...4
Connection to Internet………………………………………………………..7
Task Bar………………………………………………………………………..9
Install and Uninstall…………………………………………………………..10
Camera……………………………………………………………………….11
HDMI………………………………………………………………………….12
Trouble Shooting…………………………………………………………….12
Specifications
Display: 7 inch 800X480 Resolution Capacitive screen
CPU: Boxchip A10
RAM: 1GB DDR
Internal Storage: 4GB
Expansion Memory: USB & TF card, 32GB Max.
Built-In Wireless: 802.11b/g Adapter
AC Adapter: DC 5V-2A
Operating System: Andriod 4.0
What’s Inside The box
Tablet – 1pc
Power Adapter -1pc
User manual -1pc
USB Cable -1pc
Earphone -1pc
USB charger Cable -1pc
RESET needel – 1pc
1
Tablet Parts
2
9
4
6
2
5
2
7
2
1 Volume -
2 Volume +
3 Power ON/OFF button
4 Headset Port
5 TF card slot
6 HDMI Port
7 RESET Button
8 5Pin USB Port
9 DC Jack
3
1
2
8
2
Getting Started
Battery Charging
The tablet has a built-in rechargeable Li-polymer battery.
1. To charge connect the AC power adapter to the DC jack on the right
side of the tablet.
2. The LED indicator will illuminate to show the battery is charging. The
LED indicator will turn “OFF” when it’s fully charged.
3. The tablet can be used even if the battery is being charged.
Power ON/OFF
ON:
1. Press and hold the power button until the tablet turns “ON”.
OFF:
1. Press and hold the power button until device optional
2. Select power off
3. Select OK to power off the tablet
Screen Lock/Unlock:
This feature locks the screen, at the same time turn OFF the screen’s
backlight after a few seconds.
Screen locks when:
1. System is idle.
2. Manually activated by pressing the Power button once.
How to Use TF card
1. Insert the TF card into the TF card slot. Gently push TF card into slot
until it clicks into place.
2. A prompt will be seen on the screen saying “ Preparing SD card “
4
Removing TF card
1. Close all applications and documents which have been opened from
the TF card.
2. Select “Setting” and find “ Storage” then click “Unmount SD card”.
3. A prompt will be seen on the screen saying “ SD card safe to remove”
4. Gently press the TF card to remove and pull out the TF card.
Note: Insert the TF card in correct position, otherwise it will damage the
card and the slot.
Software Keyboard
The tablet has a software keyboard which automatically show up
when you tap the place on screen where text or number are to be
entered.
USB Keyboard
The unit support external USB keyboard to input text and number.
Some buttons on the unit and some function keys on keyboard may not
work if an external USB keyboard was connected.
Touch Screen
The touch screen responds to finger touch.
Note: don’t place any object on the touch screen for it may damage or
crush the screen.
Single Click: single click one icon to choose the icon or option you want.
Long Press: press and hold one icon to choose the icon and you can drag
it to the bottom shortcut bar.
5
Drag: drag on the screen and you can move between magic cube sides or
drag the application icons into the shortcut bar.
How to connect with computer
Note: first should put the switch to Device status,
Before transporting documents, firstly you must set store mode for your
MID.
1. Use USB cable to connect MID with computer. Notice bar will appear
notice cue.
2. Press Menu button to pop up Menu option, and click on Notice.
3. In the notification panel, click on the USB connection, then click
Loading USB Storage Device.
4. Then the USB connection has been successfully.
6
Connection to Internet
Ethernet:
1. Connect the Ethernet cable to the Ethernet port of the tablet.
2. Select “Settings” and Select “ More…” then Select “Ethernet”
Wireless:
1. Select “ Settings”
2. Select “Wi-Fi” and slide OFF to ON status.
3. All detected wireless networks in the area will e listed, Click to select
desired wireless connection.
4. Enter WEP key or network key if necessary.
5. Once connected to a wireless network, settings will be saved
6. Wireless icon will appear on the taskbar when connected
successfully.
Note: when the tablet detects the same wireless network in the future, a
pop-up notification with the name of the wireless network will appear.
Click “connect” to re-establish the connection or “Forget” to remove the
network from the list.
7
Connect to 3G Network:
First, you need to buy a 3G wireless card from your 3G service provider.
The equipment at present supports: Huawei
EVDO:
EC122
EC169C
WCDMA:
E1750
E1752
K3765
Since our company is continuously committed to improving product
quality and the software edition is always updating which will support
more models in the future, please refer to the finished products.
You have to buy above mentioned model to get access to 3G network.
Insert your SIM card into the 3G card and then insert the 3G card into the
USB port. The signal light of the 3G card will be light which means you’re
ready for 3G network surfing.
8
Click Settings -> Wireless & Networks -> Mobile networks to enter:
Select the checkbox on the back of 3G network and you’ll see
which means 3G connection is completed.
Web Browsing
Connect to the internet via Ethernet or wireless and launch the browser.
Task Bar
The Task Bar will show the following: SD card, Battery, Time,
Return/Back, Desktop, Menu and Wireless
SD card
Battery
Time
9
Return/Back
Destktop
Menu
Wifi network
Install and Uninstall
Install from memory card or USB drive
Please go to APK Manager,Select “Install” and then select the file
with the extension name .apk in the memory card. Select “Install” to install
the software.
Install application from internet
You can use App Market to search any application you want, after
download finish it will automatic install
** Go to http://Android.com/market or use MARKET application
on disktop to find more application for you Teblet**
After installation, you can run the software right away or run the
software on the subcategory interface.
Uninstall
If you want to uninstall the software from a third party, please go to
APK Manager, Select the software that you want to uninstall. You will see
the following options: run, extract, uninstall and search. Click “uninstall” to
uninstall the software.
10
Camera
Touch the icon
to enter camera mode and the interface is shown
as follows:
1.Touch the icon
at the bottom right and you can save your photos
in DCIM/Camera directory in TF card.
2. Move the icon
film mode.
on the right and you can switch camera mode to
3. touch the icon
on the top right to see the previous picture and
you can also delete, share, set it as the wallpaper or contact profile. Click
finish button to exit camera interface.
11
Note: this tablet supports video talking function
HDMI
You can switch the video to play it on the HDMI display equipment
(such as TV with a HDMI interface) by HDMI. The maximum output
resolution is 2160p and its method is shown as follows:
1. Open the Tablet;
2. Connect the Tablet to TV by a HDMI cable. Open the TV;
3. Play video on the Tablet;
4. The video will be switched on the TV. Wait for more than 5 seconds;
5. You can switch by 3 methods:
a) When the video play is finished, the video will be switched
automatically back on the Tablet.
b) You can also press Home button or Return button in the process of
video, the video will be switched back on the Tablet.
c) If you don't want to switch to TV, please disconnect the Tablet from
TV. You can go on watch movie on Tablet.
Trouble Shooting
Close Application
All running applications take up system memory and will slow down
system response. Please shut down all idle applications to release
memory and get the system speed back to normal.
To close the application, click the icon
on the shortcut bar to
enter the system configuration interface. Select the Application →
Running services and the interface is shown as follows:
12
Tap the application you want to close. A pop-up window will be displayed.
Tap “Stop” to close that application.
Mandatory Power off
1. Press and hold the power button for 7 seconds and the device will be
powered off.
2. Press the reset button on the right and the device will be forced to be
powered off.
Restore Default Setting
If you want to reset the factory setting and erase all materials, please
press Settings → Privacy → Factory data reset.
** Warning: Factory data reset setting will delete your Google
account, data and configuration of system and applications and
applications from downloading.
**Please use this function carefully.
13
Tablet PC