1
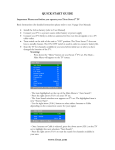
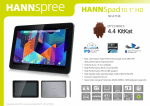
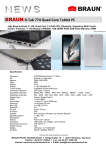
Android 4.1
10” Tablet User Manual
Model: 10Q-8
Tablet of Contents
Specifications………………………………………………………………….1
What‟s inside the box…………………………………………………………2
Tablet Parts………………………………………………………………….…3
Getting started………………………………………………………………...4
Connect/disconnect the device with/from the computer……………….16
Install Applications(.apk file) into the device …………………………….16
Trouble Shooting……………………………………………………………...17
Specifications
Action ATM7029 Quad Core ARM Cortex A9 family
CPU
[email protected] (up to 1.5GHz),
Customized GC1000+
Quad Core 3D GPU
Ram
DDR3, 1GB
Flash
8GB
Storage Extend
4GB-32GB SD/TF Support
10.1inch IPS LCD
Display Screen
1280X800 pixels
Multi-touch capacitive screen
Operation System
Android4.1
Language
Multi-Language
WiFi
802.11 b/g/n
Camera
Front 0.3MP/Rear 2MP
G-Sensor
All gravity induction
battery
3.7V 6000mAH Li-Poly
HDMI
Support
1*DC port
I/O interface
1*Micro USB
1*TF card port
1*3.5mm stereo headphone,
1*HDMI
Formats support
MP3,WMA,APE,OGG,AAC,AAC3,MA4,FLAC,WAV
Mpeg1,Mpeg2,Mpeg4 SP/ASP GMC,XVID,H.263, H.264
Formats support
BP/MP/HP,WMV7/8,WMV9/VC1
BP/MP/AP,VP6/8,AVS,JPEG/MJPEG
Wifi
802.11 b/g/n
3G
Support External 3G
Browser
Opera,UCWeb,SkyFire,Dolphin
1
online entertainment
Support
Online
video,online
Tv,online
Music,Online Radio.
Office software
WORD, EXCEL, POWERPOINT, PDF, TXT,
Games
3D Game can be supported by internal
Extend
Movie,Online
There are more than 200 thousands kind of free software
in google market
Charging
INPUT:AC100-240V.50-60HZ,OUTPUT: DC5V/3A
Battery
3.7V 6000mAH Li-Poly
Gift box
29*21*7.5cm
Carton
10pcs/Carton
43.5*39*31cm
Power Adapter
Micro USB Cable
Accessory
USB OTG
User manual
What’s Inside The box
10.1” Tablet – 1pc
User manual -1pc
Power adapter -1pc
USB cable – 1pc
2
Tablet Parts
Important Notice
- If the device is freezing or stuck, press the reset button(a small hole) or
long press power button for 7 seconds.
- When the performance is slow after using some applications, it is
recommended to close running application in setting menu.
Caution:
- For charging, be sure to use the power adapter (DC5V) that is provided in
the package, otherwise, the device may not work.
-The device is equipped with high performance processor. It may heat in case
of using long or while charging.
3
Getting Started
Battery Charging
The tablet has a built-in rechargeable Li-polymer battery.
1. To charge connect the AC power adapter to the DC jack on the right
side of the tablet.
2. When you see “
” in the tablet, it show the battery is charging.
3. The tablet can be used even if the battery is being charged.
Power ON/OFF
ON:
1. Press and hold the power button until the tablet turns “ON”.
OFF:
1. Press and hold the power button until device optional
2. Select power off
3. Select OK to power off the tablet
Screen Lock/Unlock:
Press the lock on the screen and slide to the right. The screen will be
unlocked.
Screen locks when:
1. System is idle.
2. Manually activated by pressing the Power button once.
How to Use TF card (Micro SD card)
Insert the TF card into the TF card slot. Gently push TF card into slot until
it clicks into place.
Removing TF card
1. Close all applications and documents which have been opened from
the TF card.
2. Select “Setting” and find “ Storage” then click “Unmount SD card”.
4
3. A prompt will be seen on the screen saying “ SD card safe to remove”
4. Gently press the TF card to remove and pull out the TF card.
Note: 1) TF card is not included in the package. It is available in electronic
stores.
2)Insert the TF card in correct position, otherwise it will damage the card
and the slot.
Soft Keyboard
The tablet has a soft keyboard which automatically shows up when
you tap the place on screen where text or numbers are to be entered.
Touch Screen
The touch screen responds to finger touch.
Note: don‟t place any hard object on the touch screen. Otherwise it may
damage or crush the screen.
Single Click: single click one icon to choose the icon or option you want.
Long Press: press and hold one icon to choose the icon and you can drag
it to the bottom shortcut bar.
Drag: Drag on the screen and you can move between magic cube sides
or drag the application icons into the shortcut bar.
1. Power On/Off
Long press power button to turn on/off the device. It may take a minute to
boot the device.
Short press power button to turn on/off the screen (Standby mode, refer to
3. below)
2. Desktop
After turning on the device, desktop displays with shortcut icons and
arrow icon at the right side
5
3. Standby mode(Screen off )/Unlock the screen
Short press the power button to turn on/off the screen (Standby mode
on/off)
After standby mode , slide the lock icon in order to unlock the screen.
4. Wallpaper Settings
On the desktop,long press desktop and select one of categories the
wallpaper, then choose one picture as wallpaper.
6
5. Desktop Shortcuts Icon Settings:
Press the menu button on the desktop enter into Apps, then Long press
your desired APK icon and put it on the desktop.
6. Widgets:
Press widgets and press the icon you like and put it on the desktop
7
7. System Settings:
Press menu icon on the desktop to go into app, then select “Settings”.
◆ Wifi: slide on/off button to connect or disconnect
Slide Wi-Fi to on, then the device will automatically search the available
Wi-Fi signals. Select the network you want to connect with. Enter the
password (if there is any) and click „Connect‟.
◆Data Usage: Display the device data usage
8
◆ More: you can set whether need airplane mode or not
◆Sound: Set Volumes, vibrate when ringing, default notification,
Touch sounds, screen lock sound, vibrate on touch
9
◆ Display: you can set Brightness, wallpaper, sleep time, font
and TV out ( HDMI & output screen size )
◆ Storage: you can check used storage and available storage
10
size
◆ Battery: Shows the battery usage status
◆ App: All installed applications are listed.
Manage downloaded or running applications.
View and control currently running services.
11
Press Uninstall to uninstall the selected application.
◆Location services: Google‟s location service, location& google search
Allow apps use data from sources such as WiFi and mobile networks to
determine your approximate location.
◆Security
Screen lock: None, slide, face unlock, pattern, pin, password
Owner info
Make password visible
Device administrators
Unknown sources: allow installation of apps from unknown sources
12
Trusted credentials: display trusted CA certificates
Install from SD card – Install certificates from SD card.
◆Language & input: choose language you like and input
Keyboard & input method – Change keyboard & keyboard settings.
Default input is English Android keyboard ( AOSP )
13
◆Backup & reset : backup data and factory data reset
◆Date & time: You can set date and time
◆ Accessibility: Large text, auto-rotate screen, speak password, test-to
-speech output, touch & hold delay, enhance web accessibility, enable
quick boot, system performance
14
◆Developer options: Set options for application development
◆About tablet : status, legal information, model No.,
Android Version.,kernel version and build number .etc
15
How to connect/disconnect the device with/from the
computer
On main desktop, connect the device with the PC, The device will entry
USB storage interface
select “Turn on USB storage”. Pop-up a window and Press “OK” The
device is recognized at Explorer of the computer. Now you can use it as
an external storage.
How to install Applications(.apk file) into the device
Method 1.
1. Connect the device with internet. See above [1.Wireless & networks] in
order to connect internet.
2. Run “play store” and search the applications you want to install.
3. Follow the instruction on the screen for installation.
Method 2.
1. Search applications file(.apk)that you want to install into the device on your
computer.
2. Download the file(.apk) on the computer
3. Connect the device with your computer.
4. Copy the apk files from computer to the device:
See above [How to connect/disconnect the device with/from the computer.
5. Open “File explorer” and choose the apk file that was copied into the device,
then install it & follow the instruction on the screen.
16
Trouble Shooting
Close Application
All running applications take up system memory and will slow down
system response. Please shut down all idle applications to release
memory and get the system speed back to normal.
To close the application, click the icon
on the shortcut bar to enter
the system configuration interface. Select the Application → Running
services.
Tap the application you want to close. A pop-up window will be displayed.
Tap “Stop” to close that application.
Mandatory Power off
1. Press and hold the power button for 7 seconds and the device will be
powered off.
2. Press the reset button on the right and the device will be forced to be
powered off.
Restore Default Setting
If you want to reset the factory setting and erase all materials, please
press Settings → Backup & Reset → Factory data reset.
** Warning: Factory data reset setting will delete your Google
account information, data and configuration of system and
applications from downloading.
**Please use this function carefully.
17
530 Showers Dr., Suite #7-204
Mountain View, CA 94040
Tel. 1-888-33-Tivax (1-888-338-4829)
Fax. 1-650-963-3585
Website: www.tivax.com
18