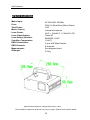
1
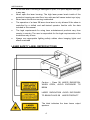
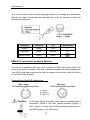
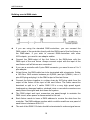
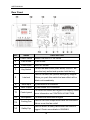
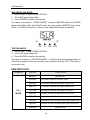
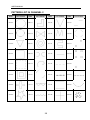
Version: 4.0
This manual contains important laser system safety and operation
information. Read and understand all instructions prior to powering on
laser unit the first time, to avoid laser eye injury and to avoid breaking
the law. Keep this manual in a safe place for future reference.
USER MANUAL
WARNING DATA
Lasers can be hazardous and have unique safety considerations.
Permanent eye injury and blindness is possible if lasers are used
incorrectly.
Pay close attention to each safety REMARK and
WARNING statement in the user manual. Read all instructions
carefully BEFORE operating this device.
Attention!
Indicates a skill or other useful information for special
situations.
Important!
Indicates important information to protect personnel from
laser incident or injury.
Caution!
Prevent damage or injury from incorrect operation.
Laser!
Laser safety warming labels.
Recycle
To protect the environment, recycle packing material
wherever possible.
Indoor
The projector is for indoor use only, IP20. Use only in dry
locations. Keep this device away from rain and moisture,
excessive heat, humidity and dust. Do not allow contact with
water or other fluids.
Disposal
Don’t throw this product away just as general trash, please
dispose of this product following the abandon electronic
product regulations in your area.
Location
The projector must be installed in a location with adequate
ventilation, at least 50cm (20 inches) from adjacent surfaces.
Be sure that no ventilation slots are blocked.
LASER SAFETY WARNINGS
Potential laser injury hazard exists with this product! Read these
instructions carefully, which includes important information about
installation, safe use and service!
1
USER MANUAL
Caution
Avoid direct eye contact with laser light. Never
intentionally expose your eyes or others to direct laser
light.
Caution
This laser product can potentially cause instant eye
injury or blindness if laser light directly strikes the
eyes.
Caution
It is illegal and dangerous to shine this laser into
audience areas, where the audience or other personnel
could get direct laser beams or bright reflections into
their eyes.
Caution
It is a US Federal offense to shine any laser at aircraft.
Caution
There are no user serviceable parts inside the unit. Do
not open the housing or attempt any repairs yourself.
In the unlikely event your unit may require service,
please contact the dealer nearest to you..
Caution
Use of controls or adjustments or performance of
procedures other than those specified herein may
result in hazardous radiation exposure
NON-INTERLOCKED HOUSING WARNING
This unit contains high power laser devices internally.
Do not open the
laser housing, due to potential exposure to unsafe levels of laser radiation.
The laser power levels accessible if the unit is opened can cause instant
blindness, skin burns and fires.
LASER SAFETY AND OPERATING INSTRUCTIONS
STOP AND READ ALL LASER SAFETY DATA
Laser Light is different from any other light source with which you may be familiar. The light
from this product can potentially cause eye injury if not set up and used properly.
2
USER MANUAL
Laser light is thousands of times more concentrated than light from any other kind of light
source.
This concentration of light power can cause instant eye injuries, primarily by
burning the retina (the light sensitive portion at the back of the eye).
Even if you cannot
feel “heat” from a laser beam, it can still potentially injure or blind you or your audience.
Even very small amounts of laser light are potentially hazardous even at long distances.
Laser eye injuries can happen quicker than you can blink.
It is incorrect to think that because these laser entertainment products split the laser into
hundreds of beams or laser beam is scanned out in high speed, that an individual laser
beam is safe for eye exposure. This laser product uses dozens of milliwatt of laser power
(Class 3B levels internally). Many of the individual beams are potentially hazardous to the
eyes.
It is also incorrect to assume that because the laser light is moving, it is safe. This is not true.
Nor, do the laser beams always move.
Since eye injuries can occur instantly, it is critical to
prevent the possibility of any direct eye exposure. In the laser safety regulation, it is not
legal to aim Class 3B lasers in areas which people can get exposed. This is true even if it is
aimed below people’s faces, such as on a dance floor.
z
z
z
z
z
z
z
z
z
z
z
Do not operate laser without first reading and understanding all safety and
technical data in this manual
Always set up and install all laser effects so that all laser light is at least 3
meters (9.8 feet) above the floor on which people can stand. See “Proper
Laser Set-up & Usage” section later in this manual
After set up, and prior to public use test laser to ensure proper function. Do
not use if any defect is detected. Do not use if laser emits only one or two
laser beams rather than dozens/hundreds, as this could indicate damage to
the diffraction grating optic, and could allow emission of higher laser levels.
Do not point lasers at people or animals
Never look into the laser aperture or laser beams
Do not point lasers in areas in which people can potentially get exposed,
such as uncontrolled balconies, etc.
Do not point lasers at highly reflective surfaces such as windows, mirrors
and shiny metal. Even laser reflections can be hazardous.
Never point a laser at aircraft, this is a federal offense
Never point un-terminated laser beams into the sky
Do not expose the output optic (aperture) to cleaning chemicals
Do not use laser if the laser appears to be emitting only one or two beams
3
USER MANUAL
z
z
z
z
z
z
Do not use laser if housing is damaged or open, or if optics appear damaged
in any way.
Never open the laser housing. The high laser power levels inside of the
protective housing can start fires, burn skin and will cause instant eye injury.
Never leave this device running unattended.
The operation of a class 3B laser show laser is only allowed if the show is
controlled by a skilled and well-trained operator familiar with the data
included in this manual.
The legal requirements for using laser entertainment products vary from
country to country. The user is responsible for the legal requirements at the
location/country of use.
Always use appropriate lighting safety cables when hanging lights and
effects overhead
LASER SAFETY LABEL REPRODUCTIONS
Caution – Class 3B LASER RADIATION,
WHEN OPEN, AVOID EXPOSURE TO
BEAM
LASER RADIOATION AVOID EXPOSURE
TO BEAM CLASS 3B LASER PRODUCT.
The label indicates the laser beam output
aperture.
4
USER MANUAL
LASER EXPOSURE WARNING
LASER LIGHT
AVOID DIRECT EYE EXPOSURE
Further guidelines and safety programs for safe use of lasers can be found in the
ANSI Z136.1 Standard “For Safe Use of Lasers”, available from
“www.laserinstitute.org”. Many local governments, corporations, agencies,
military and others, require all lasers to be used under the guidelines of ANSI
Z136.1. Laser Display guidance can be obtained via the International Laser
Display Association, www.laserist.org.
LASER EMISSION DATA
Laser Classification
Class 3B
Green Laser Medium
DPSS Nd:YVO4, 532nm
Violet Laser Medium
LD GaAlAs 405nm, typical
Beam Diameter
<5mm at aperture
Pulse Data
All pulses < 4Hz (>0.25sec)
Divergence (each beam)
<2 mrad`
Divergence (total light)
<160 degrees
Laser Power
Green>40mW, Violet>150mW
As measured under IEC measurement conditions for classification.
Note: The laser diode is exposed to extreme conditions due to the
high output power and therefore only has a limited life. Like all
wear parts, the laser diode is not subject to any guarantee claims.
LASER COMPLIANCE STATEMENT
This laser product complies with EN/IEC 60825-1 Ed 2, 2007-03, and US
FDA/CDRH FLPPS via the terms of Laser Notice No. 50 dated June 24, 2007.
5
USER MANUAL
GENERAL SAFETY INSTRUCTIONS
Every person involved with installation and maintenance of this device have to:
z
Be qualified
z
Follow the instructions of this manual
CAUTION!
Be careful with your operations. With a high voltage you
can suffer a dangerous electric shock when touching the
wires!
This device has left out premises in absolutely perfect condition. In order to
maintain this condition and to ensure a safe operation, it is necessary for the user
to follow the safety instructions and warning notes written in this manual.
Important!
The manufacturer will not accept liability for any resulting
damages caused by the non-observance of this manual or
any unauthorized modification to the device.
z
Please consider that damages caused by manual modifications to the
devise are not subject to warranty.
z
Never let the power-cord come into contact with other cables! Handle the
power-cord and all connections with the mains with particular caution!
z
Make sure that the available voltage is not higher than stated on the rear
panel.
z
Always plug in the power plug least. Make sure that the power-switch is set
to off-position before you connect the device to the mains. The power-plug
has to be accessed after installing the device.
z
Make sure that the power-cord is never crimped or damaged by sharp edges.
Check the device and the power-cord from time to time.
z
Always disconnect from the mains, when the devise is not in use or before
cleaning it. Only handle the power-cord by the plug. Never pull out the plug
by tugging the power-cord.
z
It is essential to connect the yellow/green conductor to earth.
6
USER MANUAL
z
The electric connection, repairs and servicing must be carried out by a
qualified employee.
z
Do not switch the fixture on and off in short intervals as this would reduce
the laser diode life.
z
For replacement, please use fuses of same type and rating only.
z
If the device has been exposed to drastic temperature fluctuation, do not
switch it on immediately. The arising condensation water might damage your
device. Leave the device switched off until it has reached room temperature.
z
Do not shake the device. Avoid brute force when installing or operating the
device.
z
When choosing the installation-spot, please make sure that the device is not
exposed to extreme heat, moisture or dust. There should not be any cables
lying around. You endanger your own and the safety of others!
z
The minimum distance between the fixture and surrounding walls must be
more than 50cm.
z
Always fix the fixture with an appropriate safety-rope. Fix the safety-rope at
the safety-rope only.
z
The ambient temperature must be between 10℃ to 40℃.
z
Please use the original packaging if the device is to be transported.
z
Please consider that unauthorized modifications on the device are forbidden
due to safety reasons!
CAUTION!
Operate the device only after having familiarized with its
functions. Do not permit operation by persons not
qualified for operating the device. Most damages are the
result of unprofessional operation!
CAUTION!
If this device will be operated in any way different to the
one described in this manual, the product may suffer
damages and the warranty void.
7
USER MANUAL
BEFORE OPERATION
Unpacking Instructions
CAUTION!
Immediately upon receiving a fixture, carefully unpack the
carton, check the contents to ensure that all parts are present,
and have been received in good condition. Notify the shipper
immediately and retain packing material for inspection if any
parts appear damage from shipping or the package itself
shows signs of mishandling. Save the package and all
packing materials. In the event that a fixture must be returned
to the factory, it is important that the fixture be returned in the
original factory box and packing.
What is included
The carton or flight case contain following items:
NAME
QTY
Laser Light
1 PCS
KEYS (for key switch)
2 PCS
Interlock Connector
1 PCS
Mains Cable
1 PCS
USER MANUAL
1 PCS
Power Supply
To determine the power requirements for a particular fixture, see the label affixed
to the back plate of the fixture of refer to the fixture’s specifications chart. A
fixture’s listed current rating is its average current draw under normal conditions.
All fixtures must be powered directly off a switched circuit and cannot be run off a
rheostat (variable resistor) or dimmer circuit, even if the rheostat or dimmer
channel is used solely for a 0% to 100% switch. Before applying power to a fixture,
check that the source voltage matches the fixture’s requirement.
8
USER MANUAL
The unit is supplied with a power plug appropriate to its voltage and destination.
Should any other connections be required they must be carried out with the
following configuration.
Cable(EU)
Cable(US)
Pin
International
Brown
Black
Live
L
Light blue
White
Neutral
N
Yellow/Green
Green
Earth
DMX-512 connection between fixtures
The fixture is equipped with 3-pin XLR sockets for DMX input and output. The
sockets are wired in parallel. Only use a shielded twisted-pair cable designed for
3-pin XLR-plugs and connectors in order to connect the controller with the fixture
or one fixture with another.
Occupation of the XLR-connection
Caution:
At the laser fixture, the DMX-cable has to terminated with a
terminator. Solder a 120 Ohm resistor between Signal (-)
and Signal (+) into a 3-pin XLR-plug and plug and plug it in
the DMX-output of the last fixture.
9
USER MANUAL
Building a serial DMX-chain
z
z
z
z
z
z
z
z
If you are using the standard DMX-controllers, you can connect the
DMX-output of the controller directly with the DMX-input of the first fixture in
the DMX-chain. If you wish to connect DMX-controllers with other
XLR-outputs, you need to use adapter cables.
Connect the DMX-output of the first fixture in the DMX-chain with the
DMX-input of the next fixture. Always connect output with the input of the
next fixture until all fixtures are connected.
If you use a controller with 5 pins DMX connector, you need to use a 5 to 3
pins adepter.
At last fixture, the DMX cable has to be terminated with a terminator. Solder
a 120 Ohm 1/4W resistor between pin 2(DMX-) and pin 3(DMX+) into a 3
pins XLR-plug and plug it in the DMX-output of the last fixture.
Connect the fixture together in a daisy chain by XLR plug cable from the
output of the fixture to the input of the next fixture. The cable cannot be
branched or split to a Y cable. DMX 512 is a very high speed signal.
Inadequate or damaged cables, soldered joints or corroded connectors can
easily distort the signal and shut down the system.
The DXM output and input connectors are pass-through to maintain the
DMX circuit, when power is disconnected to the unit.
Each fixture needs to have a DMX address to receive the data from the
controller. The DMX address number which could be read from rear panel of
each fixture is between 000~511.
The end of the DMX 512 chain should be terminated to reduce signal errors.
10
USER MANUAL
Proper Laser Set Up & Usage
This fixture has been designed to be hung. It is recommended for safety purposes,
your lighting effect are properly mounted using a suitable hanging clamp and
safety cable. Items appropriate for safe and effective mounting are easily
sourced from your lighting vendor.
International laser safety regulations require that lasers must be operated in the
fashion illustrated below, with a minimum of 3 meters (9.8 ft) of vertical separation
between the floor and the lowest laser light vertically. Additionally, 2.5 meters of
horizontal separation is required between laser light and audience or other public
spaces.
CAUTION:
Use of controls, adjustments, or performance
of procedures other than what is specified
herein may result in hazardous radiation
exposure
Rigging the Fixture
CAUTION:
Please consider the respective national norms during
the installation! The installation must only be carried out
by an authorized employee or dealers!
11
USER MANUAL
z
The installation of the fixture has to be built and constructed in a way that it
can hold 10 times the weight for 1 hour without any harming deformation.
z
The installation must always be secured with a secondary safety attachment,
e.g. an appropriate catch net. This secondary safety attachment must be
constructed in a way that no part of the installation can fall down if the main
attachment fails.
z
Make sure the area below the installation place is free from unwanted
persons during rigging, de-rigging and servicing.
z
The operator has to make sure that safety-relating and machine-technical
installations are approved by an expert before taking into operation for the
first time and after changes before taking into operation another time.
z
The operator has to make sure that safety-relating and machine-technical
installations are approved by a skilled person once a year.
z
The fixture should be installed in the position where persons cannot reach
and where persons may walk by or be seated.
CAUTION:
When installing the device, make sure there is no highly
in inflammable material (decoration articles, etc.) in
between a distance of min o.5 meter.
12
USER MANUAL
PRODUCT OVERVIEW
z
This device has left out premises in absolutely perfect condition. In order to
maintain this condition and to ensure a safe operation, it is necessary for the
user to follow the safety instructions and warning notes written in this
manual.
z
The manufacturer will not accept liability for any resulting damages caused
by the non-observance of this manual or any unauthorized modification to
the device.
Front Panel
NO.
NAME
DESCRIPTION
1
Power LED
Indicates the fixture is switched on
2
Music LED
Synchronize to detected music signal
The laser effect output aperture. NEVER LOOK
3
Laser Aperture
INSIDE THE FIXTURE THROUGH THIS
APERTURE WHILE FIXTURE IS OPERATING.
13
USER MANUAL
Rear Panel
NO.
NAME
DESCRIPTION
4
Power Switch
5
Fuse Holder
Fuse Holder
6
Power Input
With IEC socket
7
Key Switch
Switch ON and OFF the fixture
To turn the laser effect (laser diode) ON/OFF. Be
sure that only authorized operator hold the key
Used to connect the optional emergency stopper.
8
Interlock
When you push this switch the laser effect will be
blank-out immediately.
9
DMX Input
10
DMX Output
11
Control panel
12
Microphone
13
Cooling Fan
14
Safety Eye
3 pins male XLR connector
3 pins female XLR connector
To control the fixture with digital LED display, check
more information on CONTROL & FUNCTION
To detect the music/sound signal
Used to cool the components inside the enclosure.
Never cover this fan outlet!
Used to attach a safety cable when the fixture is
rigged. Check more details in RIGGING
14
USER MANUAL
IMPORTANT
For your own safely and full laser safety
regulation, we do strongly recommend
you to take this optional switch!
CONTROL & FUNCTION
z
z
z
z
Regular breaks during operation are essential to maximize the life of this
device as it is not designed for continual use.
Do not switch the unit on and off in short time intervals
Always unplug the unit when it is not used for a longer time. Or before
replacing the bulb or start servicing.
In the event of serious operation problems, stop using the fixture and
contact your dealer immediately.
ATTENTION:
Laser will be output from laser aperture in 5 seconds
after the unit is powered on.
Operating Mode
When laser is powered on, LED monitor on rear panel shows the current
operating standalone mode or DMX address of DMX mode. With help of LED
control panel, it is very easy to set and change the operating mode of laser. After
every resetting and saved, the new mode information will be shown on LED
monitor at next power on.
Mode/Function Option, to choose the operating mode of laser.
Confirmation, to confirm all setting or change of LED control panel.
UP/DOWN, to change operating mode, parameter or DMX address.
15
USER MANUAL
Operation
Stand Alone Preprogram Laser Show
z
z
Press FUNC to enter MODE OPTION.
Till to LED panel shows either one of Aut, Au1, Au2, Au3, Sou, So1, So2,
So3.
z
Press UP or DOWN to select your favorite Stand Alone mode as above.
z
Press ENTER to confirm the setting.
The laser is working in stand alone. Each time when you turn on your laser, you
will have this confirmed laser show.
In the MODE OPTION setting, the stand alone laser show that you are going to
choose is flashing. Press UP or DOWN to change stand alone laser show, you will
have 8 different stand alone preprogrammed laser show. Their DISPLAY and
EFFECT are listed below:
16
USER MANUAL
DISPLAY
STAND ALONE MODE LASER EFFECT
Aut
AUTOMATIC SHOW with GVC colors
Au1
AUTOMATIC SHOW with single VIOLET color
Au2
AUTOMATIC SHOW with single GREEN color
Au3
AUTOMATIC SHOW with single CYAN color
Sou
SOUND ACTIVATED SHOW with GVC colors
So1
SOUND ACTIVATED SHOW with single VIOLET color
So2
SOUND ACTIVATED SHOW with single GREEN color
So3
SOUND ACTIVATED SHOW with single CYAN color
SOUND ACTIVATED MODE sensitivity setting
z
Press FUNC till to see S 6
z
Press UP/DOWN to set microphone sensitivity. S 0 is no sound activated,
from S 1 to S 9, the sensitivity level is going more sensitive.
z
Press ENTER to confirm and save the setting.
DMX MODE
z
Press FUNC to enter MODE OPTION
z
Till to LED panel shows 001.
z
Press ENTER to confirm the setting.
The laser is working in “DMX MODE”. With help of UP/DOWN button, it could be
easily change the DMX address of the laser.
17
USER MANUAL
MASTER/SLAVE MODE
z
Press FUNC to enter MODE OPTION
z
Till to LED panel shows SLA
z
Press ENTER to confirm the setting.
The laser is working in “SLAVE MODE”. Connect MASTER laser and SLAVE
lasers with DMX cable, the SLAVE lasers do what exactly MASTER laser does.
Check “5.2 DMX connection” to have more details about laser connection.
TESTING MODE
z
Press FUNC to enter MODE OPTION
z
Till to LED panel shows tSt
z
Press ENTER to confirm the setting.
The laser is working in “TESTING MODE”. In this mode a fixed testing pattern is
done which people could see how the laser projector working. PS: This mode is
for service only.
DMX PROTOCOL
CHANNEL
VALUE
FUNCTION
000-027
LASER OFF
028-055
AUTOMATIC SHOW with GVC colors
056-083
AUTOMATIC SHOW with single VIOLET color
084-111
AUTOMATIC SHOW with single GREEN color
CH 1
112-139
AUTOMATIC SHOW with single CYAN color
MODE
140-167
SOUND ACTIVATED SHOW with GVC colors
168-195
SOUND ACTIVATED SHOW with single VIOLET color
196-223
SOUND ACTIVATED SHOW with single GREEN color
224-251
SOUND ACTIVATED SHOW with single CYAN color
252-255
DMX MODE
18
USER MANUAL
CH 2
PATTERN
000-255
0-127
32 Patterns as shown in PATTERN LIST
100%-5% Size
CH 3
128-169
Zooming In
ZOOMING
170-209
Zooming Out
210-255
Zooming In & Out
000-127
0 -359 degree fixed Y axis rolled
128-191
Clockwise rolling
192-255
Anticlockwise rolling
000-127
0 -359 degree fixed X axis rolled
X AXIS
ROLLING
128-191
Clockwise rolling
192-255
Anticlockwise rolling
CH 6
000-127
0 -359 degree fixed Z axis rotate
Z AXIS
128-191
Clockwise rotating
ROTATING
128-255
Anticlockwise rotating
CH 7
000-127
128 different fixed position on X
X AXIS
128-191
Clockwise moving
MOVING
128-255
Anticlockwise moving
CH 8
000-127
128 different fixed position on Y
Y AXIS
128-191
Clockwise moving
MOVING
128-255
Anticlockwise moving
000-015
Original Color
016-031
VIOLET
032-047
Green
048-063
CYAN
064-160
ALTERNATE VIOLET & Green & CYAN
161-255
Color Rolling
CH 4
Y AXIS
ROLLING
CH 5
CH 9
COLOR
19
USER MANUAL
PATTERN LIST IN CHANNEL 2
DMX
PATTERNS
DMX
PATTERNS
DMX
PATTERNS
DMX
000-007
064-071
128-135
190-197
008-015
072-079
136-143
198-205
016-023
080-087
144-151
206-213
024-031
088-095
152-159
214-221
032-039
096-103
160-167
222-229
040-047
104-111
168-175
230-237
048-055
112-119
176-181
238-245
056-063
120-127
182-189
246-255
20
PATTERNS
USER MANUAL
MAINTENANCE
z
z
z
z
z
z
z
Make sure the area below the installation place is free from unwanted persons
during servicing
Switch off the fixture, unplug the mains cable and wait until the unit has been
cooled down.
Housings, fixations and installations spots( ceiling, truss, suspensions) should
be totally free from any deformation
The mains cables must be in impeccable condition and should be replaced
immediately when even a small problem is detected
In order to protect the fixture from overheat the cooling fans (if any) and
ventilation openings should be cleaned monthly.
The cleaning of aperture glass and scanner mirrors must be carried out
periodically to optimize light output. Cleaning frequency depends on the
environment in which the fixture operates: damp. smoky or particularly dirty
surroundings can cause greater accumulation of dirt on the unit’s optics
1) Clean with a soft cloth using normal glass cleaning products.
2) Always dry the parts carefully.
3) Clean the Aperture glass at least once every 30 days
The interior of the fixture should be cleaned annually using a vacuum cleaner
or air-jet.
ATTENTION:
We strongly recommend internal cleaning to be carried
out by qualified worker!
TROUBLE SHOOTING
Following are a few common problems that may occur during operation. Here are
some suggestions for easy troubleshooting:
z
The fixture does not work, no laser and the fan does not work.
1)
Check the connect power and main fuse.
2)
Measure the mains voltage on the main connector.
3)
Check the power on indicated LED.
21
USER MANUAL
z
The fixture is power on, but no laser coming out from aperture.
1)
Check the laser aperture cover.
2)
Check the key switch.
3)
Check the remote interlock or interlock connector.
4)
Wait for at least 30 minutes to warm up in low temperature.
5)
Check whether it is in music mode without sound signal.
6)
Check whether it is in Slave mode.
7)
Check whether it is in DMX without DMX signal.
z
The laser effect power is very weak.
1)
Wait for at least 30 minutes to warm up in low temperature.
2)
Clean the scanner mirror with alcohol.
3)
Clean the aperture glass with alcohol.
4)
Check whether it is in DMX with high strobe frequency.
z
The laser is on, but the pattern is not moving.
1)
Check to see whether it is in Music/Sound mode without detecting sound
signal.
2)
Check to see whether it is in DMX mode with further DMX control.
3)
Try to change the fixture to another stand alone mode.
4)
Try to control the fixture with DMX to see the laser effect system.
z
Not responding to DMX controller
1)
Check the DMX address settings and DMX polarity
2)
If you have intermittent DMX signal problems, check the pins on connectors
of the fixture or the previous one.
3)
Try to use another DMX controller.
4)
Check to see if the DMX cables run near or run alongside to high voltage
cables that may cause damage or interference to DMX interface circuit.
22
USER MANUAL
SPECIFICATIONS
Mains Input:
Fuse:
Total Power:
Music Control:
Laser Power:
Laser Classification:
Laser Safety Standard:
Condition Temperature:
DMX Connections:
DMX Channels
Measurement:
N Weight:
AC100-240V, 50/60Hz
250V 1A Slow Blow (20mm Glass)
15W
Internal microphone
40-G + 190mW-C + 150mW-V CW
Class 3B
EN60825-1 2007
10~40℃
3 pins XLR Male/Female
9 channels
See diagram below
2.6 Kg
Specifications subject to change without prior notice.
The availability of particular products may vary by region. Please check with the dealer.
23
Laser-Effektgerät
Laser Effect Unit
D
A
CH
GB
B
CH
I
NL
B
Wichtige Sicherheitshinweise
Important Safety Notes
Conseils importants de sécurité
Importanti avvertenze di sicurezza
Belangrijke veiligheidsinstructies
Dieses Gerät ist der Laserklasse 3B
zugeordnet.
This unit is classified as a class 3B
laser product.
Cet appareil est classé comme produit
répondant à la classe laser 3B.
Questo apparecchio è assegnato alla
classe laser 3B.
Dit apparaat is ingedeeld in de laserklasse 3B.
WARNUNG Die zugängliche Laserstrahlung ist gefährlich
für das Auge, häufig auch
für die Haut. Das direkte
Blicken in den Strahl bei
Lasern der Klasse 3B ist
gefährlich. Ein Strahlbündel kann unter Umständen sicher über
einen diffusen Reflektor
betrachtet werden.
WARNING The accessible laser
radiation is hazardous to
the eye, also frequently
to the skin. It is hazardous to look directly
into the beam of class 3B
lasers. It may be possible to view a beam safely
via a diffusing reflector.
AVERTISSEMENT Le rayonnement laser
accessible est dangereux pour les yeux,
souvent aussi pour la
peau. Regarder directement dans le faisceau de lasers de
classe 3B est dangereux. Eventuellement,
il nʼest pas dangereux
de regarder un faisceau via un réflecteur
diffuseur.
AVVERTIMENTO La radiazione accessibile del laser è pericolosa per lʼocchio,
spesso anche per la
pelle. Guardare direttamente nel raggio è
pericoloso nel caso
dei laser della classe
3B. Un fascio di raggi
può essere guardato
eventualmente con sicurezza per mezzo di
un riflettore diffuso.
WAARSCHUWING De toegankelijke laserstraling is heel gevaarlijk voor het oog
en vaak ook voor de
huid. Rechtstreeks in
de straal kijken van
klasse 3B-lasers is
gevaarlijk. Een stralenbundel kan eventueel veilig via een
diffuse reflector worden bekeken.
G
Für den Betrieb eines Lasers der
Klasse 3B muss ein Laserschutzbeauftragter vom Unternehmer schriftlich bestellt werden und während
des Betriebs anwesend sein
(Berufsgenossenschaftliche
Vorschrift BGV B2).
Laserschutzbeauftragte
müssen
ausreichende Fachkunde besitzen!
G
w w w.imgstageline.com
F
Für Laser der Klasse 3B ist eine Abnahme erforderlich!
G
G
When using a class 3B laser, the employer has to appoint a laser safety
officer in writing who has to be present during operation (BGV B2 = German Accident Prevention & Insurance Association regulation B2).
G
Laser safety officers must have the
requisite qualification!
Pour le fonctionnement dʼun laser de
classe 3B, un responsable pour la
sécurité laser doit être désigné par
écrit par lʼemployeur, il doit être présent pendant le fonctionnement du
produit (réglementation allemande
de la prévention des accidents et association dʼassurances BGV B2).
An approval is required for class 3B
lasers!
Le responsable de la sécurité laser
doit avoir les qualifications requises !
G
Pour des lasers de classe 3B, une
autorisation est nécessaire !
G
Per lʼimpiego di un laser della classe 3B, lʼimprenditore deve nominare
per iscritto un tecnico di sicurezza
laser che deve essere presente durante lʼuso (norma della Cassa previdenza contro gli infortuni sul lavoro
BGV B2).
G
I tecnici di sicurezza laser devono
possedere delle conoscenze sufficienti della materia!
G
Per i laser della classe 3B è obbligatorio un collaudo!
Voor het gebruik van laserapparatuur klasse 3B moet er een laserveiligheidsverantwoordelijke schriftelijk
worden aangesteld door de onderneming, en moet hij of zij tijdens het
bedrijf aanwezig zijn (voorschrift
BGV B2 van de Duitse beroepsvereniging).
Laserveiligheidsverantwoordelijken
moeten over voldoende deskundigheid beschikken!
G
Voor lasterapparatuur klasse 3B is
een keuring vereist!
Laserstrahlung
Laser Radiation
Rayonnement laser
Radiazione laser
Laserstraling
Nicht dem Strahl aussetzen
Avoid exposure to the beam
Eviter toute exposition au faisceau
Non esporsi al raggio
Vermijd blootstelling aan de straal
Laser Klasse 3B
Class 3B laser
Laser Classe 3B
Laser classe 3B
Laserklasse 3B
Nach DIN EN 60825-1: 2007
According to DIN EN 60825-1: 2007
Selon DIN EN 60825-1: 2007
Secondo DIN EN 60825-1: 2007
Conform DIN EN 60825-1: 2007
®
MONACOR INTERNATIONAL GmbH & Co. KG • Zum Falsch 36 • 28307 Bremen • Germany
Copyright © by MONACOR INTERNATIONAL. All rights reserved. A-1333.99.01.04.2012
Laser-Effektgerät
Laser Effect Unit
E
PL
S
FIN
Notas de Seguridad Importantes
Środki bezpieczeństwa
Vigtige sikkerhedsanvisninger
Viktig säkerhetsinformation
Turvallisuudesta
Este producto está clasificado como
láser de clase 3B.
Urządzenie należy do 3B klasy laserów.
Denne enhed er klassificeret som en
class 3B laser.
Denna enhet är klassad som en
klass 3B laser produkt.
Tuote on luokiteltu 3B-luokan laserlaitteeksi.
ADVERTENCIA La radiación láser a la
que se puede acceder
es peligrosa para el ojo
humano y a menudo
también para la piel. Es
peligroso mirar directamente hacia el haz de
un láser de la clase 3B.
Existe la posibilidad de
ver un haz con seguridad mediante un reflector de difusión.
UWAGA Wiązka laserowa jest bardzo szkodliwa dla ludzkiego oka, a czasem również skóry. Patrzenie bezpośrednio na wiązkę lasera klasy 3B może być
niebezpieczne. W razie
konieczności wykorzystać reflektory rozpraszające.
ADVARSEL Laserstråling er skadelig
for øjne og hud. Det er
skadeligt, at kigge direkte ind i laserstrålen, på
en class 3B laser. Stråler
er ikke skadelige, hvis
der er monteret en reflekterende diffuser.
VARNING Den åtkomliga laserstrålningen är farligt för ögat,
och även ofta
för huden.
Det är farligt att titta direkt in i strålen av klass
3B lasrar. Det kan vara
möjligt att titta på en laserstråle på ett säkert
sätt via en diffunderande
reflektor.
G
Cuando se utiliza un láser de la clase
3B, el dueño tiene que designar por
escrito un encargado para la seguridad del láser que deberá estar presente siempre durante el funcionamiento (BGV B2 = Regulación B2 de
la Asociación de Aseguradoras y
Prevención de Accidentes Alemana).
¡Los encargados de la seguridad
láser deben tener la cualificación necesaria!
G
w w w.imgstageline.com
DK
G
Podczas wykorzystywania laserów
klasy 3B, należy zapoznać się z obowiązującymi dyrektywami (w Niemczech: BGV B2 = German Accident
Prevention & Insurance Association
regulation B2).
Osoby obsługujące urządzenia laserowe muszą posiadać odpowiednie
kwalifikacje!
G
Stosowanie laserów klasy 3B wymaga zezwolenia!
G
Når en class 3B laser benyttes, skal
en sikkerhedsansvarlig person skriftligt være udpeget og denne skal altid
være tilstede under brugen af laseren. (BGV B2).
G
Den sikkerhedsansvarlige person
skal have den nødvendige uddannelse!
G
En class 3B laser kræver særlig godkendelse fra myndighederne!
När du använder en klass 3B laser,
ska arbetsgivaren skriftligen utse en
tjänsteman för lasersäkerhet som
måste vara närvarande under drift
(BGV B2 = German Accident Prevention & Insurance Association regulation B2).
Laserskyddsombud ska ha erforderlig kompetens!
G
Ett godkännande krävs för klass 3B
laser!
HUOMIO
G
Lasersäteilylle altistuminen on haitallista silmille
ja usein toistettuna myös
iholle. On haitallista katsoa suoraan 3B-luokan
lasersäteeseen. Saattaa
olla mahdollista katsoa
sädettä turvallisesti tummennetun lasin kautta.
3B-luokan laserin turvallisesta käytöstä vastaava henkilö on nimettävä
kirjallisesti, ja hänen on oltava paikalla laitetta käytettäessä (vakuutusyhtiöiden vastuuvakuutussäännös
BGV B2).
Laserin käytöstä vastaavalla henkilöllä on oltava tarvittava pätevyys!
G
3B-luokan lasereille vaaditaan hyväksyntä!
¡Se necesita una autorización para
un láser de la clase 3B!
Radiación Láser
Promieniowanie laserowe
Laserstråling
Laserstrålning
Lasersäteily
Evite la exposición al haz
Unikać kontaktu z promieniami
Undgå kontakt med laserstrålerne
Undvik exponering från laserstrålen
Vältä altistumista säteelle
Láser de la clase 3B
Klasa lasera: 3B
Class 3B laser
Klass 3B laser
3B-luokan laser
Según la DIN EN 60825-1: 2007
Zgodnie z DIN EN 60825-1: 2007
DIN EN 60825-1: 2007
Enligt DIN EN 60825-1: 2007
DIN EN 60825-1: 2007 mukaan
®
MONACOR INTERNATIONAL GmbH & Co. KG • Zum Falsch 36 • 28307 Bremen • Germany
Copyright © by MONACOR INTERNATIONAL. All rights reserved. A-1333.99.01.04.2012