1
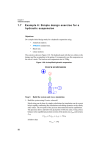
User Manual
Airport Runway Optimization Database
(AROD)
Version 1.0
June 2009
Introduction The Airport Runway Optimization Database (AROD) aims to simplify organizing, searching, and finding documents and corresponding notes related to airport runway optimization research. AROD was developed using Microsoft Office Access 2003 and the database is in Access 2003 format. How to Use the Program Step 1: Run the Airport Runway Optimization Database (AROD) The AROD is distributed on a CD. To run the program on your PC, open the “AROD‐V1.mdb” file from CD‐Drive. After double clicking on the file, one or some of the security warnings below may appear. a) Click “No” in this case (Figure 1). Figure 1: Security Warning 1 b) Click “Yes” in this case (Figure 2). Figure 2: Security Warning 2 2 out of 6 c) Click “Open” in this case (Figure 3) to open the database. Figure 3: Security Waning 3 In the next step, the following window (Figure 4) appears showing the main panel form. It includes four options: All Records, Add New Document, Search, and Quit. Figure 4: Main Panel Form By selecting “All Records” option, all documents will be displayed (Figure 5). If the “Add New Records” option is selected, user can add a new document into the database (Figure 6). “Search” option enables user to search on the database based on different search criteria (Figure 7). Finally, “Quit” option will close the AROD program. 3 out of 6 Step 2: Browse All the Document If the user clicks on button “All Records”, he/she will transfer to an all documents form (Figure 5) which displays all the documents page by page. The user can switch between the documents by navigation buttons on top of the screen. Moreover, documents can be edited or deleted. There is a link between each record and the softcopy of the document. Depending on the copyright, the first page or the whole document is accessible. In addition, a Note file is attached to each document which includes a brief information and highlighted points. The softcopy of the document and the Note files can be displayed by clicking on button “Open Document” and button “Open Comment”, respectively.
Figure 5: All Records Form Step 3: Add a New Document “Add New Records” form (Figure 6) enables the user to add a new document to the database. 4 out of 6 Figure 6: َAdd New Document Form Step 4: Search The user can search in the database by defining search keywords in the search form (Figure 7). If the user leaves any field blank, it means that there is no preference regarding to the specified search criteria. Figure 7: Search Form 5 out of 6 The search results will be displayed on the search result form (Figure 8). Button “Preview” and Button “Print” enable user to view and print out the summary of the search results, respectively.
Figure 8: Search Result Form Step 5: Exit If the user wants to quit the program, he/she have to click on the button “Quit”. The user can return to the main panel form by clicking on button “Back”. 6 out of 6