1
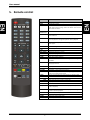
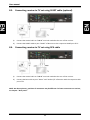
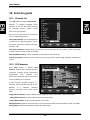
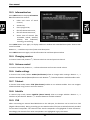
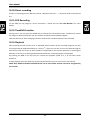
Contents
1.
2.
3.
Safety precautions ........................................................................................................................ 1
Environment protection ................................................................................................................ 3
Operating notes ............................................................................................................................ 4
3.1.
Automatic Power Down ......................................................................................................... 4
3.2.
Working with external USB drive (only for receivers with USB connector) ............................ 4
3.3.
Battery installation ................................................................................................................. 5
4.
Features ........................................................................................................................................ 6
5.
Remote control ............................................................................................................................. 7
6.
Front panel ................................................................................................................................... 8
7.
Rear panel ..................................................................................................................................... 9
8.
Connecting.................................................................................................................................. 10
8.1.
Connecting receiver to TV set using HDMI cable ................................................................. 10
8.2.
Connecting receiver to TV set using component cable (optional) ........................................ 10
8.3.
Connecting receiver to TV set using SCART cable (optional) ................................................ 11
8.4.
Connecting receiver to TV set using RCA cable .................................................................... 11
9.
Menu operations ........................................................................................................................ 12
9.1.
Menu „Edit Channels” .......................................................................................................... 12
9.2.
Menu „Installation” .............................................................................................................. 14
9.3.
Menu „User Setup” .............................................................................................................. 15
9.4.
Menu „Multimedia” ............................................................................................................. 17
9.5.
Menu „Common Interface”.................................................................................................. 18
9.6.
Menu „Conax CA” ................................................................................................................ 18
9.7.
Menu „System” .................................................................................................................... 19
10.
Function guide....................................................................................................................... 20
10.1. Channel list .......................................................................................................................... 20
10.2. EPG browser......................................................................................................................... 20
10.3. Information bar .................................................................................................................... 21
10.4. Changing services ................................................................................................................. 21
10.5. Volume control .................................................................................................................... 21
10.6. Audio settings ...................................................................................................................... 21
10.7. Teletext ................................................................................................................................ 21
10.8. Subtitle ................................................................................................................................. 21
10.9. PVR....................................................................................................................................... 21
10.10. Direct recording ................................................................................................................... 22
10.11. EPG Recording ...................................................................................................................... 22
10.12. TimeShift-Function ............................................................................................................... 22
10.13. Playback ............................................................................................................................... 22
11.
Technical specification ........................................................................................................... 23
User manual
1. Safety precautions
CAUTION:
The
lightning
flash
with Warning:
The exclamation point within an
arrowhead symbol, within an To reduce the risk of electric shock,
equilateral
triangle,
is don't open the cabinet. Refer
intended to alert the user to servicing to qualified personnel only.
"dangerous voltage" and to
prevent from a risk of electric
shock.
equilateral triangle is intended to
alert the user to important
operating and maintenance
(servicing).
WARNING: Do not use this STB where contact with or immersion in water is a possibility. Do not use
near flower vase, washbowls, kitchen sinks, laundry tubs, swimming pools, etc.
WARNING: Do not put the candle or lamp stand on the cabinet; otherwise, there is the danger of fire.
WARNING: The unit should be connected to a power supply only of the type described in the
operating instructions or as marked on the unit. If you are not sure of the type of power supply (for
example, 120 or 230 V) to your home, consult your local dealer or local power company.
WARNING: This product install diodes. Do not open the cabinet or touch any parts in the inner
mechanism. Consult your local dealer for technical service if the opening is required.
Note: To ensure proper use of this product, please read this User manual carefully and retain for
further reference.
Note: This product install diodes. Do not open the cabinet to avoid the unit direct exposure to
radiation.
Unit Cleaning: After the unit power is turned off, you can clean the cabinet, panel and remote control
with a soft cloth lightly moistened with a mild detergent solution.
1
User manual
Attachments: Never add any attachments and/or equipment without the manufacturer consent; as
such additions may result in the risk of fire, electric shock, or other personal injury.
Locating: Slots and openings in the cabinet are provided for ventilation to protect it from overheating.
Do not block these openings or allow them to be blocked by placing the STB on a bed, sofa, or other
similar surface, nor should it be placed over a radiator or heat register.
Power-Cord Protection: Place the power-supply cord out of the way, where it will not be walked on.
Please take special attentions to cords at plugs, convenience receptacles, and the point where they
exit from the unit.
Object and Liquid Entry: Never put objects of any kind into this STB through openings, as they may
touch dangerous voltage points or short-out parts that could result in a fire or electric shock. Never
spill any liquid on the STB.
Note: Moisture may be formed on the lens In the following conditions:
when the unit is suddenly moved from a cold environment or an air-condition room to a warm place.
immediately after a heater has been turned on.
in a steamy or very humid room.
If the moisture forms inside the unit, it may not operate properly. To correct this problem, turn on the
power and wait about two hours for the moisture to evaporate.
Parts Replacement: When the unit parts need to be replaced, user should make sure the service
technician use the replacement parts specified by the manufacturer or having the same characteristics
as the original part. Unauthorized replacement may put the unit In the risk of fire, electric shock or
other hazards.
Safety Check: After all the maintenances and repairs are done, user is required to request the service
technician to conduct the overall safety check to ensure the machine is In the proper condition.
2
User manual
2. Environment protection
Attention!
Your product Is marked with this symbol. It means that used electrical and electronic products should
not be mixed with general household waste. There is a separate collection system for these products.
Information on Disposal for Users (private households) in the European Union
Used electrical and electronic equipment must be treated separately and In accordance with
legislation that requires proper treatment, recovery and recycling of used electrical and electronic
equipment.
Following the implementation by member states, private households within the EU states may return
their used electrical and electronic equipment to designated collection facilities free of charge*. In
some countries* your local retailer may also take back your old product free of charge if you purchase
a similar new one. *) Please contact your local authority for further details.
If your used electrical or electronic equipment has batteries or accumulators, please dispose of these
separately beforehand according to local requirements.
By disposing of this product correctly you will help ensure that the waste undergoes the necessary
treatment, recovery and recycling and thus prevent potential negative effects on the environment and
human health which could otherwise arise due to inappropriate waste handling.
Information on Disposal for Business Users
In the European Union
If the product is used for business purposes and you want to discard It:
Please contact your dealer who will inform you about the take-back of the product. You might be
charged for the costs arising from take-back and recycling Small products (and small amounts) might
be taken back by your local collection facilities,
In other Countries outside the EU
If you wish to discard of this product, please contact your local authorities and ask for the correct
method of disposal.
3
User manual
3. Operating notes
NOTE!
3.1.
Automatic Power Down
In accordance with actual European Union requirements, Your receiver is equipped with function
"Automatic Power Off". It works by switching the receiver into standby mode after a period of 3 hours
after the last active use. In practice this means that if during this time the receiver will not be given
any command by using the remote control or keypad on the front panel, the receiver turns off.
Turning off the receiver will be preceded (2 minutes previous) by a relevant message appears on the
TV screen. Please also note that this feature is enabled by default, but at Your own request, You can
disable it using the appropriate functions in the receiver menu.
3.2.
Working with external USB drive (only for receivers with USB
connector)
•
During the selection and operation with USB drive (hard drive, flash memory), user should
pay attention on:
•
Drive is compliant with USB 2.0 and have the appropriate parameters of read and write
speed,
•
Drive contain single partition, formatted in a supported format,
•
If necessary (especially for USB hard drives, which are characterized by a high power
consumption), drive should be supplied from an external power supply,
•
Do not disconnect during a write/read data operation,
•
Do not use very full or fragmented drive,
Mismatch above recommendations may result in incorrect operation of the devices and in extreme
cases can cause damage.
The manufacturer takes no responsibility for any damages directly or indirectly caused by loss of
recorded or edited data stored on an external USB drive which was connected to the receiver, and
gives no warranty for any other data on the USB drive when case of abnormal function receiver will
happened.
4
User manual
3.3.
Battery installation
To install the batteries in the remote control,
remove the flap protecting the battery
compartment (see Fig.: A – slider type - push and
slide, B – latch type - lever the latch and pull the
fold). If inside the chamber there are used
batteries, they must be removed. Then put new
batteries inside. When installing the battery, pay
special attention on the polarity - the direction of
insertion of both batteries. The correct polarity of
batteries is drawn on a description inside the
battery compartment in the remote control. After
installing the batteries, place protecting flap on its
original position.
Service life of batteries
•
The batteries normally last for about
one year despite that it depends on
how often and in what way the remote
control is operated.
•
If the remote control fails to work even when operated near the DVB receiver, replace the
batteries.
•
Use size 7 (AAA) batteries (2 pieces).
WARNING!
•
Do not use rechargeable (Ni-Cd) batteries.
•
Do not attempt to recharge, short circuit, disassemble, heat the batteries or throw them
into the fire.
•
Do not drop, tramp or impact the remote control. This may damage the parts and lead to
malfunction.
•
Do not mix used battery with new one ever when using.
•
If the remote control shall be spared for a long time, remove the batteries. Otherwise,
electrolyte may leak, which may lead to malfunction, even fire accident when some
substance contacts with the electrolyte.
•
Wipe away the electrolyte having leaked inside the remote control, and replace with new
batteries.
•
If any electrolyte happens to touch some parts of your skin, wash it off thoroughly with
clean water immediately.
5
User manual
4. Features
•
SD / HD support (MPEG4 AVC/H.264)
•
Common Interface Slot (optionally 2)
•
Card Reader (optionally 2)
•
High Definition Video output: HDMI and YPbPr (optionally)
•
Front panel display – VFD or LED
•
Channel sorting by Satellite, Alphabetic order & Network FTA, CAS
•
EPG: Now, Next events and 7 days schedule
•
Subtitle support: OSD & VBI insertion for TV
•
Variable Input Symbol Rate (1-45 Msps)
•
Video output resolution: 576p, 720p, 1080i, 1080p
•
Multi language OSD
•
Fast Channel Change
•
8 Favorite List & Unlimited Programs per each
•
Channel Edit Function: Move, Delete, Favorite, Lock, Rename, Skip
•
S/PDIF (Digital Audio or AC3 stream out)
•
Unicable, DiSEqC 1.0, 1.1, 1.2 and USALS Compatible
•
Software Upgrade via RS-232C & USB
6
User manual
5. Remote control
BUTTON
FUNCTION
POWER
HELP
TV format
Switch receiver between Operation and Standby mode.
(Optional function)
Switch the TV Standard of the Screen. If you have problem
with video format setting, switch this button until set the
best video resolution
Numeric
buttons 0-9
Select the TV or Radio services and menu options.
MENU
Display the Menu on screen or return to previous menu
from submenu.
REW
Fast rewind when the progress bar is displayed. Start
reverse playback. Change the speed of reverse playback.
STOP
Stop time shift, playback or recording. Stop the MP3 or
JPEG player.
REC
↑,↓
←,→
OK / ENTER
INFO
FILE LIST
SLOW
AUDIO
Start recording.
Switch to previous / next channel.
Decrase / incrase sound volume.
Display Service List on screen.
Display the program information box on the screen.
Display file list.
Start slow motion playback.
Select Sound Track and the multilingual if multilingual is
available.
SUBTITLE
Activate the subtitle selection Window. Select the subtitle
language in the list.
FAV
STATUS
OPTION
FIND
Display the favorite service list.
Display window with information about actual channel.
Multifeed – Option (Optional function)
Find service by name in service list, organizing services, EPG
menu and normal picture mode.
Set time of automatic turning receiver into standby mode..
Enable the teletext.
Slide channel list to next 10 channels
Slide channel list to previous 10 channels
Display the EPG on screen when available.
Return to the screen.
Stop playing video. Enable continue play video. (USB drive
mount required)
SLEEP
TEXT
NEXT
PREV
EPG
EXIT
PLAY/PAUSE
FF
Start fast forward or fast motion playback. Change the
speed of forward playback.
RECALL
TV/RADIO
MODE
MUTE
Select the previously viewed service.
Select the TV/ Radio mode.
Select the screen aspect ratio
Enable / Disable the Audio.
7
User manual
6. Front panel
A:
B:
1.Power button:
2.MENU button:
3.OK button:
4.VOL-/VOL + buttons:
5.CH-/CH+ buttons:
6.Remote sensor:
7.Display:
8.Card slot:
Switch receiver between standby and working mode.
Display menu on screen or return to previous menu.
Display channel list on screen, select item in menu.
Decrease / increase sound volume.
Switch to previous / next channel.
Detects infrared signal from remote control unit.
Indicates operating status of receiver (VFD/LED type).
One (optionally 2) CA interface slots for Conax.
Insert the smart card chip side down!
9.Common interface:
10.USB Slot:
One (optionally 2) socket for Conditional Access Module CAM.
Enables connection of external USB hard disk or flash disk.
8
User manual
7. Rear panel
Please refer to the diagram above for all possible connections of your receiver. Do not connect the unit
to the mains socket until all other connections have been made and checked. Your configuration can
vary depending on model
A:
B:
LNB IN:
LNB OUT:
ANT IN:
ANT OUT:
TV SCART:
VIDEO:
12V OUT:
AUDIO L/R:
S/PDIF coaxial:
S/PDIF optical:
HDMI:
USB:
RS 232C:
Ethernet:
POWER SWITCH:
YPbPr:
Ext.IR:
AC power cord cable:
DC 12V:
Connector to coaxial cable from LNB of dish - 500mA max.
Enables connection of another satellite receiver. (optional)
Connector to coaxial cable from terrestrial antenna. (optional)
Enables connection of another terrestrial receiver. (optional)
Enables connection of TV Set through SCART cable. (optional)
Enables video connection of TV Set through CVBS cable.
Additional power source output for additional devices - 12V DC / 50mA max.
Enables connection of external analog audio amplifier or system.
Enables connection of digital AV amplifier through RCA cable. (optional)
Enables connection of digital AV amp. through optical fiber cable.
Enables digital connection of TV Set through HDMI cable.
Enables connection of external USB hard disk or flash disk.
Enables connection of personal computer through a serial cable.
Enables connection of Ethernet network.
Switch ON/OFF the receiver power supply.
Enables connection of TV Set through 3xRCA cable. (optional)
Enables connection of external infrared detector for remote controller.
Supports receiver in power supply. (optional)
Enables connection of external power supply. (optional)
9
User manual
8. Connecting
8.1.
Connecting receiver to TV set using HDMI cable
a)
Connect the coaxial cable to “LNB IN” terminal marked at the rear of the receiver.
b)
Connect HDMI cable to HDMI ports of TV and receiver.
8.2.
Connecting receiver to TV set using component cable (optional)
a)
Connect the coaxial cable to “LNB IN” terminal marked at the rear of the receiver.
b)
Connect the Component cable to port “YpPbPr” and “Audio L/R” of the Receiver with the
respective RCA ports of your TV Set.
c)
Select Component in Menu “AV Setting”
10
User manual
8.3.
Connecting receiver to TV set using SCART cable (optional)
a)
Connect the coaxial cable to “LNB IN” terminal marked at the rear of the receiver.
b)
Connect the SCART cable to port “SCART” of Receiver to the respective SCART port of TV
8.4.
Connecting receiver to TV set using RCA cable
a)
Connect the coaxial cable to “LNB IN” terminal marked at the rear of the receiver.
b)
Connect the RCA cable to port “Video” and “Audio L/R” of Receiver with the respective RCA
port of TV.
NOTE: On above pictures, positions of connectors may be different. To locate connectors on receiver,
see chapter “Rear panel”.
11
User manual
9. Menu operations
This chapter assumes that the HD Receiver system has been installed correctly, meaning:
•
The antenna for the receiver is installed and connected to the receiver.
•
The receiver is connected to the TV.
•
Batteries are installed in remote controller unit (RCU) and RCU is ready to control the
receiver.
If the HD Receiver has not been installed or connected properly, please refer to the “Connecting” on
this manual.
Many of the functions of the HD Receiver are available from the Main Menu. Press “ MENU ” button to
open it.
Buttons ↑,↓ changes currently selected submenu.
Buttons ←,→ changes level of submenu – switches between left and right list of menu functions.
Button OK pressed on marked function from right submenu, calls settings of this function.
MENU button pressed in menu, returns cursor to previous submenu level or quits from menu.
EXIT button pressed in menu, quits from menu.
9.1.
Menu „Edit Channels”
Menu „Edit Channels” includes 2 submenu
items:
•
Edit Channels
•
Edit Favorite Channels
9.1.1. Edit Channels
This menu can be used to modify channels
parameters by delete, lock, skip, move, and
rename functions. For better and faster
management of list, functions select and
find are also available. Edit channels screen
consist channel list, preview window, signal and quality bar and functions bar. Functions can be
selected by color buttons listed on functions bar. Press one of color button on remote to call
corresponding function:
Delete (Red button): Marks channel name on red color. After quit from menu, selected channels will
be erased from channel list.
Lock (Green button): Marks channel by lock symbol. After quit from menu, user will have to enter
receiver’s pin code to watch those channels.
Skip (Yellow button): Marks channel by skip symbol. After quit from menu, channel will disappear
from channel list.
Move (Blue button): Marks channel by skip symbol and enable to change this channel position on
12
User manual
channel list by ↑,↓ buttons. Another press of Move button accepts actual, new channel position.
Rename (Black button): Enables channel name changing by screen keyboard. User can choose letter
from keyboard by cursor buttons and accept it by OK button. When using keyboard, functions of color
buttons are different. Back (Green button) erases last character in channel name. Clear (Yellow button)
erases whole name. Toggle (Blue button) changes page of available characters. Save (Red button) quits
from keyboard module and saves modified channel name.
Select (White button): Enables select of more than one channel on list and use one from above
functions on this group. This function is helpful in mass edition of channels.
Find (Grey button): Enables find of specific channel by name, using intelligent keyboard system. This
function is helpful when user needs to quick find channel with specific name.
9.1.2. Edit Favorite Channels
This menu is helpful in adding, changing position and deleting services to and from the favorite group.
Edit favorite channels screen consist channel list (left) and favorite list (right). Buttons ←,→ switch
cursor between both lists.
•
When cursor is on channel list (left) below functions are available:
Add (Red button): Adds channel currently marked by cursor channel to actual favorite list (right)
A_Z (Green button): Sorts Channel list in alphabetical order.
Select (White button): Enables select of more than one channel on list and use one from above
functions on this group. This function is helpful in mass edition of channels.
Find (Grey button): Enables find of specific channel by name, using intelligent keyboard system. This
function is helpful when user needs to quick find channel with specific name.
•
When cursor is on favorite list (right) below functions are available:
Delete (Red button):.Erases channel from favorite list. Channel will not be erased from channel list.
Next FAV (Green button): Changes actual listed favorite list to next. There’s 8 favorite lists available.
Rename FAV (Yellow button): Enables favorite list name changing by screen keyboard. User can
choose letter from keyboard by cursor buttons and accept it by OK button. When using keyboard,
functions of color buttons are different. Back (Green button) erases last character in list name. Clear
(Yellow button) erases whole name. Toggle (Blue button) changes page of available characters. Save
(Red button) quits from keyboard module and saves modified list name.
Move (Blue button): Marks channel by skip symbol and enable to change this channel position on
channel list by ↑,↓ buttons. Another press of Move button accepts actual, new channel position.
Select (White button): Enables select of more than one channel on list and use one from above
functions on this group. This function is helpful in mass edition of channels.
13
User manual
9.2.
Menu „Installation”
Menu „Installation” includes 5 submenu
items:
•
Automatic search satellite
•
Manual search satellite
•
Automatic search terrestrial
(optional)
•
Manual search
(optional)
•
Default Setting
terrestrial
9.2.1. Automatic search satellite
This function enables quick way to scan satellite channels. Automatic search satellite screen consist at
beginning only satellite list. Using ↑,↓ buttons, user can select satellite from list. OK button pressed on
specified satellite, marks it on list and displays simplified parameters of installation, where user can
choose used in installation hardware DiSEqC equipment and change DiSEqC switch settings. Another
press of OK button leave settings window and returns to satellites list.
After selecting all needed satellites, Scan (Red button) starts scanning of channels.
9.2.2. Manual search satellite
This function enables more expanded way to scan channels. Manual search satellite screen consist at
beginning only satellite list. Using ↑,↓ buttons, user can select satellite from list. OK button pressed on
specified satellite displays satellite parameters. Another press of OK button leave settings window and
returns to satellites list.
After selecting all needed satellites, Scan (Red button) starts scanning of channels. Press one of color
button on remote to call corresponding function:
Scan (Red button): Starts scanning of channels on current satellite.
Edit (Green button): Enables edition of all satellite parameters. In this window, functions of color
buttons are different: Scan (Red button): starts scanning of channels on current satellite, TP Search
(Green button): enables scanning of only one transponder from whole satellite, Rename (Yellow
button): enables changing name of satellite, Motor (Blue button): enables settings of additional
positioner hardware.
Motor (Blue button): Enables settings of additional positioner hardware.
TP (Yellow button): Displays lists of satellites and transponders. In list of satellites (left) user can
choose satellite. In this window, functions of color buttons are different: Add TP (Green button) can
add new transponder to transponder list of satellite. In transponders list (right) user can manage
transponders using: TP Search (Red button): enables scanning of selected transponder, Delete (Yellow
button): enables erasing transponder from list, TP Edit (Blue button): enables modifying actual
parameters of transponder on list.
9.2.3. Automatic search terrestrial (optional)
14
User manual
This function enables quick way to scan terrestrial channels. User can define here:
Region: Depending on region, some parameters of broadcast are different. User should use specific
setting according to localization.
RF channel: Defines reference channel – signal strength and quality of this channel will be showed on
bars on right side of window.
Search range: Defines which channels will be scanned (All channels, Free channels, Scrambled
channels)
Logical channel: Enables automatic channel sorting mode. Channels will be sorted in order given by
broadcaster.
Start search (Red button): Starts scanning of all frequencies defined in region.
9.2.4. Manual search terrestrial (optional)
Settings available in this menu are similar to settings in “Automatic search terrestrial” menu. Only one
difference is way of search function working.
Start search (Red button): Starts scanning of only one frequency defined in RF channel setting.
9.2.5. Default Setting
In this menu, user can delete channels for TV or radio, and also do factory reset of channels,
configuration and default setting.
9.3.
Menu „User Setup”
Menu „Installation” includes 5 submenu
items:
•
Language Setting
•
Time Setting
•
Parental Control
•
A/V Control
•
OSD Setting
•
Automatic Power Down
9.3.1. Language Setting
Menu language: Defines preferred
language for the system menus.
Audio Language (first/second): Some TV programs send multiple audio tracks, for example in two
different languages. If there are no audio tracks available that match your settings, another language
may be used instead.
Subtitle Language (first/second): Defines preferred languages for the subtitling and channels
information.
EPG Language: Defines preferred language for the Electronic Program Guide.
9.3.2. Time Setting
15
User manual
This menu contains:
Time Setting: Defines time mode. If user choose “Auto”, time will be taken from broadcast. Then user
also must define time offset accordingly to localization. If user choose “Manual”, also must define date
and time manually using below functions:
Summer Time: In auto mode, enables additional time offset for summer time.
Time zone: In auto mode, defines time difference of the local time zone from the GMT.
Date: In manual mode enables defining of date manually.
Time: In manual mode enables defining of time manually.
9.3.3. Parental Control
To use the Parental Control function you will be asked to enter your access PIN code. All parental
control features work on a locking concept with the PIN code as your entrance key.
The PIN code is set to 0000 at the factory!
Age Control: Toggle the age rating control with ←,→ buttons, specify a suitable age level.
Change PIN code: Use this function to change your PIN code to other four digit number.
−
New PIN: Enter a new four digit PIN code by pressing OK key and the number keys on the
remote control.
−
Verify new PIN code: Re-enter the same new four digit PIN code once again to verify that
you got it right.
Menu Lock: After turning ON this, the whole menu could not be changed at will but you enter the PIN
code required
9.3.4. A/V Control
In the Audio/video menu, you can modify the properties of the audio and video signals to suit your TV
and audio equipment.
TV Type: (Pal / Secam) User can select the video format consistent with your TV
TV Scart (optional): (COMP(HD)/CVBS; COMP(SD)/CVBS; RGB) User can select the video format of the
TV SCART output (and also RCA-YPbPr).
Aspect ratio: User can inform the receiver about the display aspect ratio of the TV that is connected to
the receiver. Possible choices are: Auto, 4:3 and 16:9 (wide screen).
Display Format: If the user select display aspect ratio of TV set as “4:3”, then it is possible to select
the preferred aspect ratio conversion scheme where the transmitted program is in “16:9” mode.
The possible choices are:
•
Pan & Scan: The receiver interprets pan & scan vectors encoded in the program and crops
the 16:9 input signal for display on 4:3 TV.
•
Letterbox: In this mode the original aspect ratio of the 16:9 input video signal is preserved,
thus there are vertical black bars on the top and bottom of the screen.
•
Ignore: Use this, if your TV set handles the aspect ratio conversion.
Video Format: With available resolution of 1080i/720p/576p/ Auto, user can select the desired
settings
16
User manual
AC3: Enables AC3 sound tracks.
9.3.5. OSD Setting
The user can adjust the display time (time of the appearing of the info bar) and the OSD transparency
(in %) on top of video signal of the receiver.
9.3.6. Automatic Power Down
This function enables to set time which after receiver without user intervention will automatically go
to standby mode, or enables to switch off Automatic Power Down mode.
9.4.
Menu „Multimedia”
Menu „Multimedia” includes 5 submenu
items:
•
Record List
•
PVR Setting
•
HDD Properties
•
Networking
•
Twee Setup
9.4.1. Record List
This list content files with all recorded TV
programs.
9.4.2. PVR Setting
You can select the default duration for direct recordings. For direct recordings a window appears which
displays the default setting. This can be adjusted at any time.
9.4.3. HDD Properties
In this menu user can see all information about connected hard disk drive as well as an option to
format the HDD.
HDD Information: Displays the file system, the total and the used capacity.
HDD Speed: Enables speed test benchmark of connected HDD.
Format: After confirming with the OK key the HDD is formatted.
All files on the Hard-Disk-Drive will be deleted when formatting!
9.4.4. Networking
In this menu user can set network parameters. User can set automatic mode (using DHCP server) or
configure settings manually.
9.4.5. Twee Setup (optional)
Download messages from popular social network service.
17
User manual
9.5.
Menu „Common
Interface”
Menu „Common Interface” includes 1
(optional 2) submenu item:
•
Common Interface (Up)
•
Common Interface
(optional)
Down
Receiver is equipped with one (optional
two) slot for Common Interface (CI)
modules.
To install CI set:
−
Open the flap on the front panel of the product.
−
Insert the smartcard into the CI module, and the CI module into the slot.
In menu “Common Interface”, user can check the information of CI module.
9.6.
Menu „Conax CA”
Menu „Conax CA” includes 1 (optional 2)
submenu item:
•
Card Reader (Up)
•
Card Reader Down (optional)
Receiver is equipped with two Smartcard
Readers for CONAX CA.
To install CA card:
−
Open the flap on the front
panel of the product.
−
Insert the smartcard into the smartcard slot with the chip facing downwards.
In menu “Conax CA”, user can check the information of CA card.
NOTE: All information showed in this menu is abstract from CAM & card. In case something is
wrong, it may be the problem of CAM or card.
When you insert the CAM correctly at any time, a message will show in the screen to tell you that
which CAM has been detected by the receiver and is available now.
18
User manual
9.7.
Menu „System”
Menu „System” includes 4 submenu
items:
•
Information
•
Software Upgrade
•
Default Setting
•
OTA
9.7.1. Information
This menu is used to get information
about the receiver and its hardware,
software and loader.
9.7.2. Software Upgrade
This menu is used to update actual receiver’s software. Color buttons filter files according to content
(Firmware, Channel Data, All) and enables to make channel list backup. To make software update,
please visit producer www site, download file with update dedicated to receiver, save is on USB drive
and connect drive to receiver. Enter to Software Upgrade menu, choose downloaded file and confirm.
NOTE: During update do not remove USB drive from USB socket and do not turn off power supply.
9.7.3. Default Setting
In this menu, user can delete channels for TV or radio, and also do factory reset of channels,
configuration and default setting.
9.7.4. OTA (optional)
In this menu, user can call “On the air” procedure which makes possible to upload from satellite latest
software update for receiver. To manually trigger this function, user must define source of data
(Transponder) and press Download start (Red button).
It is possible to automate this procedure by turning on Auto OTA function and defining hour of
automatic checking availability of latest software.
19
User manual
10. Function guide
10.1. Channel list
Press OK button to display Channel list.
Buttons ↑,↓ enables changing cursor
position on the list. OK button pressed
on selected channel, switch actual
channel to selected one.
Press one of color button on remote to
call corresponding function:
Group (Red button): Limits displayed list
of channels to specified groups: All TV,
Terrestrial (optional), Satellite, Favorite,
Provider, CAS.
Sort (Green button): Changes order of channels on list. Channels can be sorted in order of channel
number, channel name or free/scrambled.
Favorite (White button): Limits displayed list of channels to favorites list.
Find (Grey button): Enables to find channel, by entering channel name using keyboard displayed on
screen.
10.2. EPG browser
Press EPG button to display EPG
browser EPG browser enables to watch
electronic program guide information
broadcasted
with
channels
This
information describes actual and future
events available in TV channels.
In EPG browser window, buttons ↑,↓
switches actual selected channel on list.
Buttons ←,→ switches between
previous and next event in EPG events
table.
Toogle (Green button): switches between two modes of events visualization: daily and weekly.
-1 Day (Yellow button): In daily mode switches to previous day.
+1 Day (Blue button): In daily mode switches to next day.
REC (Red button): Exports selected event to record list and enables to automatically record it on HDD.
INFO (Detail): Displays detailed description of marked event.
20
User manual
10.3. Information bar
Press INFO button to display Information
bar. Information bar content:
•
Index and name of actual
channel,
•
Actual time,
•
Event progress bar,
•
EPG info about Now event,
•
EPG info about Next event,
•
Status icons of channel (HD,
scrambled, locked, subtitles,
teletext, AC3 audiotrack,
recording, timeshifting,
Press INFO button once again, to display additional window with extended description about actual
event from EPG.
Buttons ←,→ switches to previous/next event description.
Press INFO button once again, to hide Information bar and description window.
10.4. Changing services
In channel view mode, buttons ↑,↓ allow to switch to next and previous channel.
10.5. Volume control
In channel view mode, buttons ←,→ allow to decrease and increase sound volume.
10.6. Audio settings
In channel view mode, button AUDIO (Red button) allow to change audio settings. Buttons ←,→
switches between MonoL/MonoR/Stereo mode. Buttons ↑,↓ switches between available audio tracks.
10.7. Teletext
In channel view mode, button TEXT (Blue button) enables to run teletext module. User can navigate
teletext module using numeric and color buttons.
10.8. Subtitle
In channel view mode, button SUBTITLE (Green button) allow to manage subtitles. Buttons ←,→
switches on/off subtitles. Buttons ↑,↓ switches between available subtitles.
10.9. PVR
When connecting an external Hard-Disk-Drive to the USB port, the Receiver can be used as a PVR
(Digital Videorecorder). During recording you can watch another FTA (not scrambled) channel provided
on the same Transponder. The channels from actual transponder are highlighted in white characters.
Accordingly, the channels from other transponders are highlighted in grey characters.
21
User manual
10.10.Direct recording
To start a recording press the REC key, choose a duration with the ←,→ keys and confirm with the OK
key.
10.11.EPG Recording
Via the EPG you can program a Timer reservation – Please also see “9.2. EPG Browser” for more
details.
10.12.TimeShift-Function
During Live TV you can press the PAUSE key to activate the TimeShift function. The Receiver pauses
the program. With the PLAY key you can continue to watch the timeshifted program.
With the EXIT key or after changing to another channel the TimeShift function is de-activated.
10.13.Playback
After pressing the FILE LIST key a list is displayed which contains all the recorded programs on your
connected external USB Hard-Disk-Drive. Use the ↑,↓ keys to move the cursor to the desired program
and confirm with the OK key to start playback. If supported by the Channel operator, by pressing the
INFO key in the file list or during playback details about the recorded program are displayed.
By pressing the REW or FF keys you can increase the playback speed to 2, 4, 8 and 16x in both
directions.
To stop playback press the STOP key. By pressing the EXIT key you can return to the live channel.
NOTE: Only FAT32 formatted Hard-Disk-Drives can be used. Other formats cannot be recognized by
the receiver.
22
User manual
11. Technical specification
CPU
Processor:
Flash memory:
RAM memory:
Satellite tuner / lnb
Input Connector:
IF Input Frequency:
IF Loop Throughout
Input Level:
LNB Power:
DiSEqC Control:
Band Switch:
Modulation method:
Symbol Rate:
Decoding Rate
Bandwidth:
LDPC/BCH:
Terrestrial Tuner (optional**)
Input Frequency:
Band:
Input Level:
Input Connector:
Input Impedance:
MPEG transport Stream A/V Decoding
Demultiplex
Input stream
Aspect Ratio
Video Decoding
STi7105* or STi7111
8 MB
256 MB
F-type, IEC 169-24
950MHz to 2150MHz
-65 dBm~-25 dBm
13 /18VDC / 500mA Max
Unicable, 1.0, 1.2 & USALS compatible
22KHz Tone(22 +/- 4KHz,Amplitude :0.6 +/- 0.2V)
LDPC/BCH(DVB-S2) 8PSK/QPSK, DVB-S QPSK
LDPC/BCH(DVB-S2) 8PSK/QPSK :10~30Msps
DVB-S QPSK : 1~45Msps
1/2,2/3,3/4,5/6 and 7/8
36MHz
Punctured Code ,1/2,2/3,3/4,3/5,4/5,5/6,8/9,9/10 in DVB-S2
174-230, 470-862MHz (VHF i UHF)
7 or 8MHz
-75 to -20dBm
IEC 169-2, Female
75Ω
According to ISO/IEC 13818-1(MPEG-2 system)
Max. 90Mbit/s
4:3(default), 16:9 letterbox
ISO/IEC 13818-2(MPEG2 video) MP@HL,
ISO/IEC 14496-10 HP@L4
576p,720p or 1080i, 1080p
ISO/IEC13818-3(MPEG2 audio/MUSICAM), AC-3
Single Channel / Dual Channel, Stereo, Joint Stereo
Video Resolution
Audio Decoding
Audio Mode
Front PCB
Display
VFD or 7-Segment LED
Common Interface
1 (optionally 2)
Smartcard Reader
1 (optionally 2)
USB
USB host (optional*)
Rear panel
RCA
Video, Audio L, Audio R, YPbPr (optional*)
SCART
TV (optional*)
S/PDIF
Optical (optional Coaxial*)
HDMI
1.2
USB, IR Connector for external IR Sensor, RS232, Ethernet
Power supply
Input Voltage
Free Voltage (100~250V AC, 50/60Hz) – version with internal power supply
DC 12V, 3A – version with external power supply
Power Consumption
17 W max.
< 1W in standby mode
Physical specification
Size[W*D*H]
280mm x 260mm x 60mm* or
195mm x 135mm x 40mm
Net Weight
< 1.70 kg* or
< 1.50 kg
Operation Temperature
5℃~+45℃
Storage Temperature
-10℃~+70℃
Storage Humidity
5%~95% RH (Non-Condensing)
*
- Applies to HD 9600 Prima receiver
** - Applies to HD TS 9600 Prima receiver
Weight and dimensions are not absolutely exact values.
Specifications are subject to change (by manufacturer) without notice.
23