1
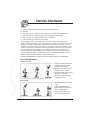
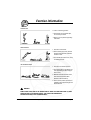
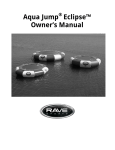
12' / 14' Family Trampoline
GE030 / 31
Assembly & User Manual
Contents
Section
Page
General Information . . . . . . 4
Before you start . . . . . . . . .
5
Safety . . . . . . . . . . . . . . . . .
6
Exercise Information . . . . . . 9
Assembly . . . . . . . . . . . . . .
17
General Information
Quality
Guarantee
This V-fit product has been designed and
manufactured to comply with the latest (BS EN 13219)
British and European Safety Standards.
Beny Sports Co. UK Ltd. guarantee's its V-fit product
range for DOMESTIC USE only for a period of 2 years
from certified date of purchase. During this period we
have the right to: a). provide parts for the purchaser to effect repair.
Questions
Should you encounter any difficulty with the assembly,
operation or use of your V-fit exercise product or if you
think that you may have parts missing, please DO NOT
return it to your retailer but contact us first for help and
advice, asking for CUSTOMER SUPPORT, by any of the
following means.
c). replace the product if it is deemed economical to
do so.
This guarantee applies to the original purchaser only
and is not transferable.
This guarantee does not cover wear and tear on
upholstery or consumables.
Tel:- 0871 222 0881 or
Fax:- 01535 637722 or
Email:- [email protected]
CUSTOMER SUPPORT is open from 9.00am to 5.00pm
from Monday to Friday
Beny Sports Co. UK Ltd.
Unit 8, Riparian Way,
The Crossings, Cross Hills,
West Yorkshire.
BD20 7BW
This guarantee does not cover abuse or defects
caused by storage or use outside those intended.
If you need to advise us of a defect with your
product, we may ask for proof of purchase. To enable
us to service your requirement for replacement parts,
you must return the enclosed Guarantee Registration
Card within 14 days of purchase. Failure to do so
may result in any claim for replacement parts or
repairs being refused.
This does not affect your statutory rights as a
consumer.
Queries
If you do have any queries, please ensure that you have
the following information ready for our Customer Support
Staff:
YOUR NAME
YOUR ADDRESS
YOUR PHONE NUMBER
PRODUCT MAKE OR BRAND
PRODUCT MODEL
PRODUCT SERIAL NUMBER
DATE OF PURCHASE
NAME OF RETAILER
PART NUMBERS REQUIRED
Page 4
b). repair the product returned (at the purchaser's
cost) to our warehouse.
Customer Support
Tel:- 0871 222 0881 or
Fax:- 01535 637722 or
Email:- [email protected]
CUSTOMER SUPPORT is open from 9.00am to
5.00pm from Monday to Friday
Beny Sports Co. UK Ltd.
Unit 8, Riparian Way,
The Crossings, Cross Hills,
West Yorkshire.
BD20 7BW
Family Trampoline
Before you Start
Tools
If reguired, all of our products are supplied with basic tools, which will
enable you to successfully assemble your product. However, you may
find it beneficial to have a soft-headed hammer and perhaps an
adjustable spanner handy as this may help.
Prepare the Work Area
It is important that you assemble your product in a clean, clear,
uncluttered area. This will enable you to move around the product
while you are fitting components and will reduce the possibility of
injury during assembly.
Work with a Friend
You may find it quicker, safer and easier to assemble this product with
the help of a friend as some of the components may be large, heavy
or awkward to handle alone.
Open the Carton.
Carefully open the carton that contains your product, taking note of
the warnings printed on the carton to ensure that the risk of injury is
reduced. Be aware of sharp staples that may be used to fasten the
flaps as these may cause injury. Be sure to open the carton the right
way up, as this will be the easiest and safest way to remove all the
components.
Unpack the Components
Carefully unpack each component, checking against the parts list that
you have all the necessary parts to complete the assembly of your
product.
Please note that some of the parts may be pre-fitted to major
components, so please check carefully before contacting our
CUSTOMER SUPPORT team.
In any event, please do not return the product to your retailer before
contacting us first.
Family Trampoline
Page 5
Safety-General
Please read this manual carefully before commencing assembly of
your trampoline or starting to use it.
* For your own safety, always ensure that there is at least 1 Metre
of free space in all directions around your product while using
your trampoline.
* Regularly check to see that all nuts, bolts and fittings are
securely tightened. Periodically checking all moving parts for
obvious signs of wear or damage.
* Clean only with a damp cloth, do not use solvent cleaners. If you
are in any doubt, do not use your V-fit product, but contact
CUSTOMER SUPPORT by any of the means listed on the
opposite page.
* Before use, always ensure that your V-fit product is positioned
on a solid, flat surface.
* Always wear appropriate clothing and footwear when exercising.
Do not wear loose clothing that could become caught or trapped
during exercise.
Storage and Use
Your V-fit product is intended for use in clean dry conditions. You
should avoid storage in excessively cold or damp places if possible
as this may lead to corrosion and other related problems that are
outside our control.
Weight Limit
Your V-fit product is suitable for users weighing:
220LBS / 15.7 Stones / 100KG or less.
Conformity
This V-fit product conforms to:
(BS EN 13219) - Class (H) - HOME USE - Class (C).
It is NOT suitable for therapeutic purposes.
Liability
Beny Sports Co. UK Ltd. Its agents or employees can not be held
responsible for any damage or injury occurred or sustained by the
users or owners of this trampoline. Use and storage of this
trampoline is entirely the responsibility of the users and owners.
Page 6
Family Trampoline
Safety-Trampoline Specific
INTRODUCTION
Before you begin use of this trampoline, be sure to carefully read all the information provided to
you in this manual. Just like any other type of physical recreational activity, participants can be injured.
To reduce the risk of injury, be sure to follow appropriate safety rules and tips.
Ø
Ø
Ø
Ø
Misuse and abuse of this trampoline is dangerous and can cause serious injury!
Trampolines, being rebounding devices, propel the performer to unaccustomed heights and into a
variety of body movements.
Always inspect the trampoline before each use for worn-out mat, loose or missing parts.
Proper assembly, care and maintenance of product, safety tips, warnings, and proper techniques
in jumping and bouncing are all included in this manual. All users and supervisors must read and
familiarize themselves with these instructions. Anybody who chooses to use this trampoline must
be aware of their own limitations in regards to performing various jumps and bounces with this
trampoline.
warning
NO MORE THAN ONE
PERSON AT A TIME ON
THE TRAMPOLINE!
MULTIPLE JUMPERS
INCRASE THE RISK OF
INJURY SUCH BROKEN
HEAD, NECK, LEG, OR
BACK
PARALYSIS OR DEATH CAN
RESULT IF YOU LAND ON
YOUR HEAD OR NECK!
DO NOT PERFORM
SOMERSUALTS (FLIPS) AS
THIS WILL INCREASE YOUR
CHANCES OF LANDING ON
YOUR HEAD OR NECK!
ALWAYS CONSULT A DOCTOR BEFORE PERFORMING ANY KIND OF PHYSICAL ACTIVITY
Ø
Ø
Ø
Ø
Ø
Ø
Ø
Ø
Ø
Adequate overhead clearance is essential. A minimum of 24 ft from ground level is recommended.
Provide clearance for wires, tree limbs, and other possible hazards.
Lateral clearance is essential. Place the trampoline away from walls, structures, fences, and other
play areas. Maintain a clear space on all sides of the trampoline.
Place the trampoline on a level surface before use, illumination may be required for shady areas.
Secure the trampoline against unauthorized and unsupervised use.
Remove any obstructions from beneath the trampoline.
The owner and supervisors of the trampoline are responsible to make all users aware of practices
specified in the use instructions.
Do not attempt or allow somersaults. Landing on the head or neck can cause serious injury,
paralysis or death, even when landing in the middle of the bed.
Do not allow more than one person on the trampoline. Use by more than one person at the same
time can result in serious injury.
Use trampoline only with mature, knowledgeable supervision.
Family Trampoline
Page 7
Safety-Trampoline Specific (continued)
WARNING
Ø
Ø
Ø
Ø
Ø
Ø
Ø
Ø
Ø
Trampolines over 20in (51 cm) tall are not recommended for use by children under 6 years of age.
Inspect the trampoline before each use. Make sure the frame padding is correctly and securely
positioned. Replace any worn, defective, or missing parts.
Climb on and off the trampoline, it is a dangerous practice to jump from the trampoline to the
floor or ground when dismounting, or to jump onto the trampoline when mounting. Do not use
the trampoline as a springboard to other objects.
Stop bounce by flexing knees as feet come in contact with the trampoline bed. Learn this skill
before attempting others.
Learn fundamental bounces and body positions thoroughly before trying more advanced skills.
A variety of trampoline activities can be carried out by performing the basic fundamentals in various
series and combinations, performing and fundamental after another, with or without feet bounces
between them.
Avoid bouncing too high. Stay low until bounce control and repeated landing in the center of the
trampoline can be accomplished. Control is more important than height.
Focus eyes on the trampoline. This will help control bounce.
Avoid bouncing when tired. Keep turns short.
Properly secure the trampoline when not in use. Protect it against unauthorized use. If a
trampoline ladder is used, the supervisor should remove it from the trampoline when leaving the
area to prevent unsupervised access by children under 6 years of age.
Ø
Ø
Trampolines are not for children under 6 years of age.
Supervise the activities of all children who use this trampoline.
Ø
Keep objects away which could interfere with the performer. Maintain a clear area around the
trampoline.
Do not use the trampoline while under the influence of alcohol or drugs.
For information concerning skill training, contact a certified trampoline instructor.
Ø
Ø
Ø
Ø
Ø
Bounce only when the surface of the bed is dry. Wind or air movement should be calm to gentle.
Do not use the trampoline in wet weather. The trampoline must not be used in gusty or severe winds.
Always start your jump at the broken circle printed on the trampoline mat. When you land more
than 1ft away from the edge of the broken circle, stop your jump immediately!!
Restart your jump at the broken circle.
Ø
Read all instructions before using the trampoline, warnings and instructions for the care,
maintenance, and use of this trampoline are included to promote safe, enjoyable use of this
equipment.
Page 8
Family Trampoline
Safety-Trampoline Specific (continued)
WARNING
TRAMPOLINE PLACEMENT
The minimum overhead clearance required is 24 feet (7.3 meters). In terms of horizontal clearance, please
ensure that no hazardous objects are near the trampoline such as tree limbs, other recreational objects (i.e.
swing sets, swimming pools), electrical power wiring, walls, fences, etc. For safe use of the trampoline,
please be aware of the following when selecting a place for your trampoline:
Make sure it is placed on a level surface
The area is well – lighted
There are no obstructions beneath the trampoline
When not in use, the trampoline shall be secured against unauthorized use.
Do not place trampoline on concrete floor, hard ground surface (i.e. rock) or slippery surface.
Do not use indoors.
If you do not follow these guidelines, you increase the risk of someone getting injured.
This trampoline was designed and manufactured with quality materials and craftsmanship. If proper
care and maintenance is provided, it will provide all jumpers with years of exercise, fun, and enjoyment
as well as reduce the risk of injury. Please follow the guidelines listed below:
This trampoline is designed to withhold a certain amount of weight and use. Please make sure that only
one person at any one time uses the trampoline. Also, the person should weigh less than 220 pounds,
jumpers should either wear socks, gymnastics shoes, or be barefoot when using the trampoline. Please
be aware that street shoes or tennis shoes should NOT be worn while using the trampoline. In order to
prevent the trampoline mat from getting cut or damaged please do not allow any pets onto the mat.
Also, jumpers should remove all sharp objects from their person prior to using the trampoline.
Any type of sharp or pointed objects should be kept off the trampoline mat at all times.
Always inspect the trampoline before each use for worn, abused or missing parts. A number of
conditions could arise that may increase your chances of getting injured. Please be aware of:
Ø Punctures, holes, or tears in the trampoline mat
Ø Sagging trampoline mat
Ø Loose stitching or any kind of deterioration of the mat
Ø Bent or broken frame parts, such as the legs
Ø Broken, missing, or damaged springs
Ø Damaged, missing, or insecurely attached frame pad
Ø Protrusions of any types (especially sharp type) on the frame, springs ,or mat
IF YOUR FIND ANY OF THE PREVIOUS CONDITIONS, OR ANYTHING ELSE THAT YOU FEEL COULD
CAUSE HARM TO ANY USER. THE TRAMPOLINE SHOULD BE DISASSEMBLED OR SECURED FROM USE
UNTIL THE CONDITION(S) HAS BEEN RESOLVED.
WINDY CONDITIONS
In severe wind situations, the trampoline can be blown about. If you expect windy weather conditions,
the trampoline should be moved to a sheltered area or disassembled. Another option is to tie the
round, outside portion (top frame) of the trampoline to the ground using ropes security, at least three
(3) tie downs should be used. Do not just secure the legs of the trampoline to the ground because
they can pull out the frame and stakes. To ensure security, at least three (3) tie downs should be used.
Do not just secure the legs of the trampoline to the ground because they can pull out the frame sockets.
TRAMPOLINES OVER 20 IN. (51CM) TALL ARE NOT RECOMMENDED FOR USE BY CHILDREN
UNDER 6 YEARS OF AGE.
DO NOT USE INDOORS.
Family Trampoline
Page 9
Exercise Information
INFORMATION ON USE OF THE TRAMPOLINE
Initially, you should get accustomed to the feel and bounce of the trampoline. The focus must be
on the fundamentals of your body position and you should practice each bounce (the basic
bounces) until you can do each skill with ease and control.
To brake a bounce, all you need to do is flex your knees sharply before they come in contact
with the mat of the trampoline. This technique should practiced while you are learning each of
the basic bounces. The skill of braking should be used whenever you lose balance or control of
your jump.
Always learn the simplest bounce first and be consistent with the control of your bounce before
moving on to more difficult and advanced bounces. A controlled bounce is one when your take
off point and landing point is the same spot on the mat. If you move up to the next bounce
without first mastering the previous, you increase your chances of getting injured
Do not bounce on the trampoline for extended periods of time because fatigue can increase your
chances of becoming injured. Bounce for a brief period of time and then allow others to join in on
the fun! Never have more than one person bouncing on the trampoline.
Jumpers should wear T-shirt, shorts or sweats, and regulation gymnastics shoes, heavy socks, or
be barefoot. If you are just beginning, you may want to wear long sleeve shirts and pants to protect
against scrapes and abrasions until you master correct landing positions and form. Do not wear
hard sole shoes, such as tennis shoes on the trampoline, as this will cause excessive wear on the
mat material. You should always mount and dismount properly in order to avoid injury. To mount
properly, you should PLACE your hand on the frame and either step or roll up onto the frame, over
the springs, and onto the trampoline mat. You should always remember to place your hands onto
the frame while mounting or dismounting. Do not step directly onto the frame pad or grasp the
frame pad. To dismount properly, move over to the side of the trampoline and place your hand onto
the frame as a support and step from the mat to the ground. Smaller children should be assisted
when mounting and dismounting the trampoline.
Do not bounce recklessly on the trampoline since this will increase your chances of getting injured.
The key to safety and having fun on the trampoline is control and mastering the various bounces.
Never try to out-bounce another bouncer in terms of height! Never use the tramp oline alone
without supervision.
Page 10
Family Trampoline
Exercise Information
Multiple Jumpers: If you have multiple jumpers (more than on person on the trampoline at any
one time), you increase the chance of getting injured. Injuries could occur when you fly off the
tram poline, lose control, collide with the other jumper(s), or land on the springs. Generally, the
lightest person on the trampoline will get injured.
Striking the Frame or Springs: When playing on the trampoline, STAY in the center of the mat. This
will reduce your risk of getting injured by landing on the frame or springs. Always keep the frame
pad covering the frame of the trampoline. DO NOT jump or step onto the frame pad directly since
it was not intended to support the weight of a person.
Loss of Control: DO NOT try difficult maneuvers, or any maneuver until you have mastered the
previous maneuver, or if you are just learning how to jump on a trampoline. If you do, you will
increase your risk of getting injured by landing on the frame, springs, or off the trampoline
completely because you might lose control of your jump. A controlled jump is considered landing
on the same spot that you took off from. If you do lose control when you are jumping on the
trampoline, bend your knees sharply when you land and this will allow you to regain control and
stop your jump.
Somersaults (Flips): DO NOT PERFORM somersaults of any type (backwards or forwards) on this
trampoline, if you make a mistake when trying to perform a somersault, you could land on your
head or neck. This will increase your chances of getting your neck or back broken, which will
result in death or paralysis.
Foreign Objects: DO NOT use the trampoline if there are pet, other people, or any objects
underneath the trampoline. This will increase the chances of an injury occurring. DO NOT hold any
foreign objects in your hand and DO NOT place any objects on the trampoline while anyone is
playing on it. Please be aware of what is overhead when you are playing on the trampoline.
Tree limbs, wires, of other objects located over the trampoline will increase your chances of
getting injured.
Poor Maintenance of Trampoline: A trampoline in poor condition will increase your risk of getting
injured. Please inspect the trampoline before each use for bent steel tubes, torn mat, loose or
broken springs, and overall stability of the trampoline.
Weather Conditions: Please be aware of the weather conditions when using the trampoline. If the
mat of the trampoline is wet, the jumper could slip and injure him or herself. If it is too windy,
jumpers could lose control.
Limiting Access: When the trampoline is not in use, always store any access ladder in a secure
place so that unsupervised children cannot play on the trampoline.
Family Trampoline
Page 11
Exercise Information
TIPS TO REDUCE THE RISK OF ACCIDENTS
Jumper’s role in accident prevention. The key here is to stay in control of your jumps. DO NOT move
onto more complicated, more difficult maneuvers until you have mastered the basic, fundamental
bounce.
Education is also key to safety and very important. Read, understand, and practice all safety
precautions and warnings prior to using the trampoline. A controlled jump is when you land and take
off from the same location. For additional safety tips and instructions, contact a certified trampoline
instructor.
Supervisor’s Role in Accident Prevention. Supervisors need to understand and enforce all safety rules
and guidelines. It is the responsibility of the supervisor to provide knowledgeable advice and guidance
to all jumpers of the trampoline. If supervision is unavailable or inadequate, the trampoline could be
stored in a secure place, disassembled to prevent unauthorized use, or covered with a heavy tarp
that can be locked or secured with lock or chains. The supervisor is also responsible to ensure that
the safety placard is placed on the trampoline and that jumpers are informed of these warnings and
instructions.
TRAMPOLINE SAFETY INSTRUCTIONS
JUMPERS:
Ø
Do not use trampoline if you have consumed alcohol or drugs
Ø
Remove all hard and sharp objects from person before using trampoline
Ø
You should climb on and off in a controlled and careful manner. Never jump on or off the
trampoline and never use the trampoline as a device to bounce onto or into another object.
Ø
Always learn the basic bounce and master each type of bounce before trying more difficult types
of bounces. Review the Basic Skills Section to learn how to do the basics
Ø
To stop your bounce, flex your knees when you land on the mat with your feet
Ø
Always be in control when you are bouncing on the trampoline. A controlled jump is when you
land at the same spot that you took off from. If at any time you feel out of control, try to stop
your bouncing
Ø
Do not jump or bounce for prolonged periods of time or too high for a number of jumps
Ø
Keep your eyes in the mat to maintain control. If you do not, you could lose balance or control
Ø
Never have more than 1 person on the trampoline at any one time
Ø
Always have a supervisor watching you when you are on the trampoline
Page 12
Family Trampoline
Exercise Information
SUPERVISORS
Educate yourself with the basic jumps and safety rules. To prevent and reduce the risk of injuries,
enforce all safety rules and ensure that new jumpers learn the basic bounces before trying more
difficult and advanced jumps.
Ø
All jumpers need to be supervised, regardless of skill level or age.
Ø
Never use the trampoline when it is wet, damaged, dirty, or worn out. The trampoline should be
inspected before any jumpers start bouncing on it.
Ø
Keep all objects that could interfere with the jumper away from the trampoline. Be aware of
what is overhead, underneath, and around the trampoline.
Ø
To prevent unsupervised and unauthorized use, the trampoline should be secured when not
in use.
LESSON PLAN
The following lessons are suggested in order to learn basic steps and bounces before moving onto
more difficult, complicated bounces. Before actually getting on and using the trampoline, you
should read and understand all safety instructions. A complete discussion and demonstration of
body mechanics and trampoline guidelines should occur between the supervisor and student
as well..
Lesson 1
A Mounting and Dismounting-Demonstration of proper techniques
B
The Basic Bounce-Demonstration and practice
C
Braking (Check the Bounce-Demonstration) and practice. Learn to brake on command
D
Hands and knees-Demonstration and practice. Stress should be on four-point landing and
alignment
Lesson 2
A
Review and practice of techniques learned in Lesson1
B
Knees Bounce-Demonstration and practice. Learn the basic down to knee and back up
before trying half twist to left and right
C
Seat Bounce-Demonstration and practice. Learn basic seat bounce then add a knee bounce,
hands and knees; repeat.
Lesson 3
A
Review and practice skills and techniques learned in previous lessons
B
Front Drop-To avoid mat burns and teach the front bounce position, all students should be
requested to assume the prone position (face down on the ground) while the instructor
checks for faulty positions that could cause injury.
C
Start with a hands and knees bounce and then extend body into prone position, and on the
mat and return to feet
D
Practice Routine-Hands and knees Bounce, Front Bounce, back to feet, seat bounce, back to
feet, seat bounce, back to feet
Family Trampoline
Page 13
Exercise Information
Lesson 4
A
B
Review and practice skills and techniques learned in previous lessons
Half-Turn
i
ii
Start from front drop position and as you make contact with mat, push off with arms in
either the right or left direction and turn head and shoulders in same direction.
During turn, be sure to keep back parallel to mat and head up.
iii
After completing turn, land in front drop position
After completing this lesson, the student now has a basic foundation of trampoline bounces.
Jumpers should be encouraged to try and develop their own routines with the emphasis on control
and form.. A game that can be played in order to encourage students to try develop routines is
“BOUNCE”. In this game, players count off from 1 to X. Player one starts with a maneuver. Player
two has to do Player one’s maneuver and add on another. Player cannot do the routine properly in
the correct sequence. The first person to miss, receives the letter “B”. This continues until
someone spells out the word “BOUNCE”. The last remaining contestant is deemed the winner!
Even when playing this game, it is important to perform your routines under control and not try
difficult or highly skilled bounces that you have not yet mastered.
A certified trampoline instructor should be contacted to further develop your trampoline skills.
BASIC TRAMPOLINE BOUNCES
THE BASIC BOUNCE
1. Start from standing position, feet
shoulder width apart and with
head up and eyes on mat.
2. Swing arms forward and up and
around in a circular motion.
3. Bring feet together while in mid-air
and point toes downward.
4. Keep feet shoulder width apart
when landing on mat.
KNEE BOUNCE
1. Start with basic bounce and keep
it low.
2. Land on knees keeping back
straight, body erect and use your
arms to maintain balance.
3. Bounce back to basic bounce
position by swinging arms up.
Page 14
Family Trampoline
Exercise Information
SEAT BOUNCE
1. Land in a flat sitting position.
2. Place hands on mat besides hips,
do not lock your elbow.
3. Return to erect position by pushing
with hands.
FRONT BOUNCE
1. Start with a low bounce.
2. Land in prone (face down) position
and keep hand and arms extended
forward on mat.
3. Push off the mat with arms to return
to standing position.
180 DEGREE BOUNCE
1. Start with front bounce position.
2. Push off with left or right hands and
.. on which way you
arms (depending
wish to turn).
3. Maintain head and shoulders in the
same direction and keep back
parallel to mat and head up.
4. Land in prone position and return to
standing position by pushing up with
hands and arms
WARNING:
ALWAYS START YOUR JUMP AT THE BROKEN CIRCLE. WHEN YOU LAND MORE THAN 1FT AWAY
FROM THE EDGE OF THE BROKEN CIRCLE, STOP YOUR JUMP IMMEDIATELY!!
RESTART YOUR JUMP AT THE OF BROKEN CIRCLE.
Family Trampoline
Page 15
Exercise Information
TRAMPOLINE PLACEMENT
The minimum overhead clearance required is 24 feet (7.3 meters). In terms of horizontal clearance,
please ensure that no hazardous objects are near the trampoline such as tree limbs, other
recreational objects (i.e. swing sets, swimming pools), electrical power wiring, walls, fences, etc.
For safe use of the trampoline, please be aware of the following when selecting a place for
your trampoline:
Ø
Make sure it is placed on a level surface
Ø
The area is well-lighted
Ø
There are no obstructions beneath the trampoline
If you do not follow these guidelines, you increase the risk of someone getting injured.
ASSEMBLY INSTRUCTIONS
To assemble this trampoline all you need is our special spring loading tool provided with this
product. During periods of non-use, this trampoline can be easily disassembled and stored.
Please read the assembly instructions before beginning to assemble the product.
PRIOR TO ASSEMBLING
Please refer to the following page for parts descriptions and numbers. The assembly steps use these
descriptions and numbers as reference for your convenience.
Make sure that you have all parts listed. If you are missing any parts, please refer to the back page
for instructions on how to obtain any parts.
To prevent any injuries to your hands from pinch points during assembly, please use gloves to
protect your hands.
Page 16
Family Trampoline
Assembly
REMEMBER TO USE GLOVES DURING ASSEMBLY TO AVOID PINCHING AND IT WILL TAKE
AT LEAST TWO PEOPLE TO ASSEMBLE THE TRAMPOLINE
STEP 1 - Frame layout
There are a total of 20 pieces of steel tubing parts that is needed to assemble the frame. All parts
with the same part # are interchangeable and have no “right” or “left” orientation, To connect the
parts, simply slide a section tubing that is smaller on one end into the adjacent section that has a
larger opening. These joints are called “connector points”.
..A. Lay out all frame sections in a
circle as shown (see figure 1)
B. You should have the following
parts:
I. Top Rail (# 4) 4 pieces
II. Top Rail with Leg Sockets
(# 3) 4 pieces
III. Leg Base (# 5) 4 pieces
IV. Vertical Leg Extensions
(#6) 8 pieces
STEP 2 - Support Assembly
A. Slide all Vertical Leg Extensions (6) onto the
Leg Base (5) as shown.
Family Trampoline
Page 17
Assembly
STEP 3 - Top Rail Assembly
A. Two people will be necessary at this point to assemble the trampoline. One person lifts the
Support Assembly from step 2 to a standing (vertical) position and inserts one of the sockets of the
Top Rail with Sockets (3) into the Vertical Leg Extension portion of Support Assembly. The other
person holds the other end and inserts that portion into the other Support Assembly as shown.
You should now have 2 Support Assemblies held together by 1Top Rail with Socket.
B. Now, install the other Top Rails (4) into the gaps between the Vertical Leg Extensions (6) by
inserting them into the slots as shown.
Page 18
Family Trampoline
Assembly
STEP 4 - Trampoline Mat Assembly
When attaching springs to the trampoline mat, please be careful. You will need another person to
help you with this portion of the assembly. CAREFUL - When attaching the springs, the Connector
Points can become pinch points since the trampoline is tightening up.
A. Lay out the Trampoline Mat (1) inside the frame
ZERO
Trampoline Mat
Mat
B. There are 72 Springs, 72 V-Rings and 72 Holes in the Top Rail on a 12 ft Trampoline and 88
Springs, 88 V-Rings and 88 Holes in the Top Rail on a 14ft Trampoline.
None are numbered so please follow the instructions carefully and ensure correct line up.
C. Select an arbitrary point on the Top Rail Frame (call it ZERO). First, attach the spring(7) in the
direction and angle as shown to the main frame. After inserting the hook of the spring into the
main frame, turn the spring around in the dir ection towards the trampoline mat as shown below.
Use the special tool connect spring and mat by pulling them together and inserting other hook
through the V rings. Keep the ZERO point in mind as you will use this point later to attach the
Frame Pad.
SPRING LOADING INSTRUCTION
(1) Wear heavy duty working gloves to protect your hand.
(2) Use the special spring loading tool included.
(3) Hold and align spring so the hook of the spring lines
up with hole on the steel frame.
(4) Hold spring loading tool overhand and pull spring hook
towards steel frame as shown; drop hook into frame hole
until it latches on completely, tap it down if hook is not
completely in the hole.
Family Trampoline
Page 19
Assembly
D. From your Zero point, count to Hole and V-Ring 18 (12ft) or 22 (14ft) and attach a Spring at this point.
E. Now count to Hole and V-Ring 36 (12ft) or 44 (14ft) and attach another Spring at this point.
F. Then count to Hole and V-Ring 54 (12ft) or 66 (14ft) and attach another Spring at this point.
At this stage you should have 4 equally spaced attachments in the Mat and Frame.
The equal distribution of tension is critical to the safe fitting of the remaining Mat Springs.
ZERO
for 12FT
54
for 14FT
66
Trampoline Mat
for 12FT
36
for 14FT
44
G. To attach the remaining Springs, simply follow this order.
1 Spring at Hole and V-Ring 9, 27, 45 and 63 (12ft) or
1 Spring at Hole and V-Ring 11, 33, 55 and 77 (14ft)
H. Then 1 Spring at Hole and V-Ring 4, 13, 22, 31, 40, 49, 58 and 67 (12ft) or
1 Spring at Hole and V-Ring 5, 16, 27, 38, 49, 60, 71 and 82 (14ft)
Page 20
Family Trampoline
for 12FT
18
for 14FT
22
Assembly
nd
I. Finish fitting the remaining Springs by fitting 1 Spring at every 2 Hole (12ft) and 1
rd
Spring at every 3 Hole (14ft)
for 12 FT 2 6 10 14 18 22 26 30 34 38 42 46 50 54 58 62 66 70
for 14 FT 3 8 14 19 25 30 36 41 47 52 58 63 69 74 80 85
J. Complete and check the fitment of ALL remaining Springs.
K. If you notice that you have slipped a hole and V Rings connection, recount and remove or attach any
springs required to maintain the count of springs.
STEP 5 - Safety Placard Attachment
Using the tie wrap, attach the Safety Instruction Placard (8) to the trampoline. The tie wrap should go
around the Vertical Frame Joint and the Top Rail to ensure that is doesn’t slide off the trampoline.
Safety
Placard
STEP 6 - Frame Pad Assembly
!
WARNING
Never use the trampoline without attaching the frame pad, properly tie down the frame pad before
each use!!
A. Lay the Frame Pad (2) over the trampoline so that the springs and the steel frame is covered.
Please ensure that the Frame Pad covers all metal parts. Line up the elastic tie straps as shown below,
aligning alternate straps over leg socket.
Family Trampoline
Page 21
Assembly
B. First tie straps over leg socket as shown below.
Trampoline Pad
(In lift-up position)
Elastic Strap
Leg Socket
C. For the elastic straps not located over leg socket, pull tight to make sure pad covers the frame,
in sert one of strap over the metal triangle, then tie a knot with another as shown.
Trampoline Pad
(In lift-up position)
Elastic Strap
Page 22
Family Trampoline
Maintenance
!
WARNING
CARE AND MAINTENANCE
This trampoline was designed and manufactured with quality materials and craftsmanship. If proper
care and maintenance is provided, it will provide all jumpers with years of exercise, fun, and
enjoyment as well as reduce the risk of injury. Please follow the guidelines listed below:
This trampoline is designed to withhold a certain amount of weight and use. Please make sure that
only one person at any one time uses the trampoline, Also, the person should weigh less than 220
pounds. Jumpers should either wear socks, gymnastics shoes, or be barefoot when using the
trampoline. Please be aware that street shoes or tennis shoes should NOT be worn while using the
trampoline. In order to prevent the trampoline mat from getting cut or damaged please do not
allow any pets onto the mat. Also, jumpers should remove all sharp objects from their person prior
to using the trampoline. Any type of sharp or pointed objects should be kept off the trampoline mat
at all times.
Always inspect the trampoline before each use for worn, abused or missing parts. A number of
conditions could arise that may increase your chances of getting injured. Please be aware of:
Ø
Ø
Ø
Ø
Ø
Ø
Ø
Punctures, holes, or tears in the trampoline mat
Sagging trampoline mat
Loose stitching or any kind of deterioration of the mat
Bent or broken frame parts, such as the legs
Broken, missing, or damaged springs
Damaged, missing, or insecurely attached frame pad
Protrusions of any types (especially sharp types) on the frame, springs, or mat
IF YOU FIND ANY OF THE PREVIOUS CONDITIONS, OR ANYTHING ELSE THAT YOU FEEL COULD
CAUSE HARM TO ANY USER, THE TRAMPOLINE SHOULD BE DISASSEMBLED OR SECURED FROM
USE UNTIL THE CONDITION (S) HAS BEEN RESOLVED.
WINDY CONDITIONS
In severe wind situations, the trampoline can be blown about. If you expect windy weather
conditions, the trampoline should be moved to a sheltered area or disassembled. Another option is
to tie the round, outside portion (top frame) of the trampoline to the ground using ropes and
stakes. To ensure security, at least three (3) tie downs should be used. Do not just secure the legs
of the trampoline to the ground because they can pull out the frame sockets.
MOVING THE TRAMPOLINE
If you need to move the trampoline, two people should be used. All connector points should be
wrapped and secured with weather resistant tape, such as duct tape. This will keep the frame intact
during the move and prevent the connector points from dislocating and separating. When moving,
lift the trampoline slightly off the ground and keep it horizontal to the ground. For any type of other
move, you should disassemble the trampoline.
Family Trampoline
Page 23
Beny Sports Co. UK Ltd.
Unit 8, Riparian Way,
The Crossings, Cross Hills,
West Yorkshire.
BD20 7BW
CUSTOMER SUPPORT
is open from 9.00am to 5.00pm from Monday to Friday
Tel: 0871 222 0881
Fax: 01535 637722
E-mail: [email protected]
Copyright Beny Sports Ltd. 2004
Printed April/2004