1
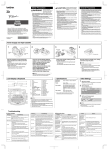
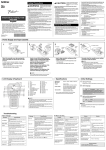
User’s Guide
General Description
Operating Procedures
Appendix, etc.
MW-120
Mobile Printer
! Before using this printer, be sure to read this User’s Guide.
! We suggest that you keep this manual in a handy place for future
reference.
Introduction
Introduction
Thank you for purchasing the MPrint MW-120 (hereafter referred
to as “the printer”).
This monochrome thermal mobile printer is ultra-portable and
can be connected to a Pocket PC (PDA running Pocket PC) or a
computer to make quick printouts.
This User’s Guide contains operating precautions and instructions. Before using this printer, be sure to read this manual for
information on its correct operation.
In addition, we suggest that you keep this manual in a handy
place for future reference.
Declaration of Conformity
We
BROTHER INDUSTRIES, LTD.
1-1-1, Kawagishi, Mizuho-ku,
Nagoya 467-8562, Japan
declare that the MPrint MW-120 conforms with the following normative documents:
EMC:
EN 55022:1998 Class B
EN 55024:1998
EN 61000-3-2:1995
EN 61000-3-3:1995
and follows the provisions of the Electromagnetic Compatibility
Directive 89/336/EEC (as amended by 91/263/EEC and 92/31/
EEC). The optional AC adapter also conforms with EN 60950
and follows the provisions of the Low Voltage Directive 73/23/
EEC.
Issued by:
BROTHER INDUSTRIES, LTD.
P & H company
Development DIV.
i
! The contents of this manual are subject to change without
notice.
! The contents of this manual may not be duplicated or repro-
duced, partially or in full, without permission.
! Please note that we assume no responsibility for damages
arising from earthquakes, fire, other disasters, actions of third
parties, the user’s intentional or negligent operation, misuse or
operation under other special conditions.
! Please note that we assume no responsibility for damage
(such as losses, loss of business profits, lost profits, business
disruptions or a lost means of communication) that may result
from the use or inability to use this printer.
! If this printer should be defective due to faulty manufacturing,
we shall replace it during the warranty period.
! We assume no responsibility for damages that may result from
incorrect operation of this printer by connecting incompatible
equipment or using incompatible software.
!Microsoft® and Windows® are registered trademarks of Microsoft
Corporation in the United States and other countries.
!This printer is installed with IrFront from ACCESS CO., LTD. Copy-
right (C) 1996–2003 ACCESS CO., LTD.
!All other software and product names mentioned are trademarks
or registered trademarks of their respective companies.
ii
Precautions
Precautions
Precautions indicated as shown below contain important safety
information and should be strictly observed.
If the printer malfunctions, immediately stop using it, and then
contact the sales representative where it was purchased.
The meanings for marks used in this manual are described below.
Warning
Failure to observe instructions marked with this symbol
may result in death or serious injuries.
Failure to observe instructions marked with this symbol
Caution may result in injuries or property damage.
Meanings for symbols used in this manual
Indicates danger
Indicates danger of fire under certain circumstances
Indicates danger of electric shock under certain circumstances
Indicates danger of burns under certain circumstances
Indicates an action that must not be performed
Indicates danger of combustion if fire is nearby
Indicates danger of sustaining injuries if the indicated part of the
printer is touched
Indicates danger of injuries, such as electric shock, if the indicated part if the printer is disassembled
Indicates danger of electric shock if the operation is performed
with wet hands
Indicates danger of electric shock if the printer is exposed to
water
iii
Indicates an action that must be performed
Indicates that the power supply cord must be unplugged from the
electrical outlet
iv
Precautions
Concerning this printer (including the built-in lithium ion battery)
Warning
! Do not use this printer wherever it is prohibited, for example, on an airplane, otherwise it may affect equipment,
resulting in an accident.
! If this printer is to be used in special environments, for
example, near medical equipment, make sure in advance
that there would be no harmful effects from electromagnetic waves. Please note that we assume no responsibility
for injuries resulting from interference from electromagnetic
waves.
! Do not insert foreign objects into the printer or its connectors and ports, otherwise a fire, an electric shock or damage may result.
! If foreign objects are dropped into the printer, immediately
turn it off, unplug the AC adapter from the electrical outlet,
and then contact the sales representative where it was purchased. If you continue to operate the printer, a fire, an
electric shock or damage may result.
! Do not operate, recharge or store the printer in the following locations, otherwise it may leak or fire, electric shock or
damage may result.
!Near water, such as in a bathroom or near a water
heater, or in an extremely humid location
!In a location where it is exposed to rain or moisture
!In an extremely dusty location
!In an extremely hot location, such as naked flames, or
heaters or direct sunlight
!In a closed car under a hot sun
!In a location where condensation may form
v
Warning
! Liquid leaking from the printer may indicate that the built-in
battery is damaged. Immediately move the printer away
from flames, otherwise a fire may result.
In addition, do not touch the leaking liquid. This liquid may
damage your eyes or skin if brought in contact with them. If
the liquid makes contact with your eyes, immediately rinse
them with water and consult a medical professional. If the
liquid makes contact with your skin or clothing, immediately
rinse them with water.
! Do not try to disassemble or alter this printer, otherwise
fire, electric shock or damage may result. For servicing,
adjustments or repairs, contact the sales representative
where it was purchased. (The warranty does not cover
repairs for damage resulting from disassembly or alterations performed by the user.)
! The printer may be damaged if it is dropped or subjected to
strong shocks, for example, from being stepped on. If you
continue to operate a damaged printer, a fire or an electric
shock may result. If the printer is damaged, immediately
turn it off, unplug the AC adapter from the electrical outlet,
and then contact the sales representative where it was purchased.
! If the printer operates abnormally, for example, if it produces smoke, an unusual odor or an unusual noise, stop
using it, otherwise fire, electric shock or damage may
result. Immediately turn off the printer, unplug the AC
adapter from the electrical outlet, and then contact the
sales representative where it was purchased for repairs.
! Do not charge the printer with a charger other than that
specified.
vi
Precautions
Warning
! If the printer is not fully charged after the specified amount
of time has passed, stop charging it, otherwise fire, electric
shock or damage may result.
Caution
! Keep the printer out of the reach of children, particularly
infants, otherwise injuries may result.
! Stop operating the printer if it leaks or becomes discolored,
deformed or otherwise defective.
Others
! The built-in lithium ion battery is slightly charged so that the
operation of the printer can be verified; however, the battery should be fully charged with the AC adapter before the
printer is used.
! Do not leave the printer in a closed car under a hot sun,
otherwise it may be damaged.
! If the printer is not to be used for a long period of time, be
sure to charge the lithium ion battery at least once every
six months in order to prevent a reduction in the efficiency
and life of the battery.
! This printer is powered with a built-in lithium
ion battery. If this printer can only be used
for a short period of time, even though it is
fully charged, the battery may have reached
the end of its service life. Replace the lithium
ion battery with a new one.
Li-ion
Contact the sales representative where the
printer was purchased to have the built-in
lithium ion battery replaced.
vii
Concerning the AC adapter
Warning
! Only use the AC adapter designed specifically for this
printer, otherwise fire, electric shock or damage may result.
! Do not plug the printer into an electrical outlet other than a
household outlet (AC 220 V – 240 V), otherwise fire, electric shock or damage may result.
! Do not touch the AC adapter or the power supply plug with
wet hands, otherwise electric shock may occur.
! Do not try to disassemble, alter or repair the AC adapter,
otherwise fire, electric shock or injuries may result.
For servicing, adjustments or repairs, contact the sales
representative where the printer was purchased.
! Do not spill water or drinks, such as coffee or juice, on the
AC adapter. In addition, do not use the adapter in a location where it may get wet, otherwise combustion or electric
shock may result.
! If the power supply plug becomes dirty, for example, with
dust, unplug it from the electrical outlet, and then wipe it
with a dry cloth. If you continue to use a dirty power supply
plug, a fire may result.
viii
Precautions
Warning
! When unplugging the power supply cord, do not pull on the
cord, otherwise fire or electric shock may result.
! Do not insert foreign objects into the terminals of the AC
adapter, otherwise burns or electric shock may result.
! Incorrectly using the AC adapter may result in fire or
electric shock. Therefore, observe the following precautions.
! Do not damage it.
! Do not modify it.
! Do not twist it.
! Do not severely bend it.
! Do not pull on it.
! Do not place objects on it.
! Do not subject it to heat.
! Do not bind it.
! Do not allow it to be
pinched.
! If the AC adapter is damaged, request a new one from the
sales representative where the printer was purchased.
! Keep the AC adapter out of the reach of children, particularly infants, otherwise injuries may result.
! Do not use the AC adapter near microwave ovens, otherwise damage may result.
! Do not use the AC adapter near flames or heaters. If the
covering of the AC adapter cord melts, fire or electric shock
may result.
! Before maintaining the printer, for example, when cleaning
it, unplug the AC adapter from the electrical outlet, otherwise electric shock may result.
ix
Warning
! If the printer is not to be used for a long period of time, be
sure to unplug the AC adapter from the unit and the electrical outlet for safety reasons.
! Do not wind the AC adapter cable around the adapter or
bend the cable, otherwise the cable may be damaged.
x
Precautions
Operating precautions
" Operate this printer in an environment that meets the following requirements.
! Temperature: 0 – 40 °C
! Humidity: 20 – 80 % (Maximum wet-bulb temperature: 27 °C)
! Do not operate or store this printer in a location exposed to
extremely high or extremely low temperatures, extreme
humidity, extreme dust, or extreme vibrations, otherwise
the printer may be damaged or malfunction.
! Do not use the printer in a location exposed to extreme temperature fluctuations, otherwise condensation may occur,
resulting in the printer being damaged or malfunctioning.
! If condensation occurs, allow it to dry naturally before
operating the printer.
" The AC adapter case and the printer may become hot while
the printer is charging or printing. This does not indicate a
malfunction.
" When the printer is not used, unplug the power supply plug
from the electrical outlet.
" Do not block the paper output slot.
" If the AC adapter connector or USB port becomes dirty, incorrect connection or incorrect charging may result. Periodically
clean the connector and port with a dry cotton swab.
" When cleaning the printer, use a soft, dry cloth. Do not use
benzene or paint thinners, otherwise the printer may become
discolored or deformed. (→ Refer to page 13.)
" When using optional accessories, use them as described in
their instruction manuals.
" Use thermal paper with this printer. If printed text is written
over or stamped, the text may disappear or become discolored. In addition, it may take some time for the ink to dry.
" Do not touch the printer with wet hands.
" Do not leave paper cassette cover open when storing as this
may cause paper misfeeding or a paper sensor error.
xi
" Concerning the paper cassette and the handling of the paper
! Store the paper cassette away from extremely hot,
extremely humid or extremely dusty locations and out of
direct sunlight, otherwise the paper may become discolored or a malfunction may result.
! Be sure to close the lid of the paper cassette before storing
it, otherwise the paper may become discolored.
! Do not leave paper cassettes in a closed car under a hot
sun, otherwise they may become discolored.
! After opening the package of paper cassettes, close it
again as soon as possible, otherwise the paper may
become discolored.
! Do not use paper that has been exposed to condensation.
! Do not try to use paper transferred from one paper cassette to another, otherwise a malfunction may result.
! Do not try to reuse paper that has already passed through
the printer, otherwise a malfunction may result.
! Do not open the paper cassette cover or pull out or push in
the paper while the printer is printing, otherwise a malfunction may result.
! Do not use folded, curled, cut, wet or damp paper, otherwise a paper misfeed or a malfunction may result.
! Do not touch paper cassettes or paper with wet hands,
otherwise a malfunction may result.
! Do not prepare or replace the paper cassette in an
extremely humid location, otherwise a malfunction may
result.
xii
Precautions
! Depending on the environmental conditions of the location
and the quality of the material that the adhesive-backed
paper is attached to, the adhesive-backed paper may
become discolored, peel off, be difficult to remove, leave
adhesive behind or damage the surface that it was affixed
to. Before using the adhesive-backed paper, test it by affixing a small piece to an inconspicuous area of the intended
surface.
! Do not affix the adhesive-backed paper to people, animals
or plants. Also, do not affix it to public property or other
peoples possessions without permission.
xiii
xiv
CONTENTS
CONTENTS
Introduction .......................................................... i
Precautions ......................................................... iii
Operating precautions .............................................. xi
1 General Description ........................................ 2
2 Operating Procedures .................................... 3
Charging ....................................................................3
Turning on the printer ................................................5
Preparing the paper ...................................................6
Installing the paper cassette ......................................8
Sending data from a Pocket PC or computer ..........10
Feeding paper .........................................................12
Maintenance ............................................................13
Disposing of this printer ...........................................15
3 Appendix ........................................................ 16
Product specifications .............................................16
Troubleshooting .......................................................17
Indicator lights .........................................................20
1
1 General Description
Right side
Paper cassette cover
Paper check window
IrDA infrared port
Paper output slot
Left side
Status
indicator light
Charging
indicator light
Power button
Serial port
USB port
AC adapter connector
2
Operating Procedures
2 Operating Procedures
Charging
This printer is equipped with a built-in lithium ion battery. Use the
AC adapter designed specifically for this printer to charge the
battery.
After purchasing this printer, be sure to charge the battery fully
before using it.
1 Plug the AC adapter
cable into the AC adapter
connector on the printer.
2 Plug the AC adapter plug
into a household electrical outlet (AC 220 V –
240 V).
Charging of the built-in lithium
ion battery automatically
begins.
→ The charging indicator light comes on in
orange.
→ When charging is finished, the charging
indicator light goes off.
3 After charging is finished, disconnect the AC
adapter.
3
• In order to protect the circuitry, the battery cannot
be charged if the unit is in a location exposed to
extremely high or extremely low temperatures.
• Do not wind the AC adapter cable around the adapter
or bend the cable, otherwise the cable may be damaged.
• It takes approximately three hours for the battery
to be recharged from completely empty to fully
charged (with the printer turned off).
4
Operating Procedures
Turning on the printer
1 Press and hold the power
button for a short while,
until the green status indicator light illuminates.
If the power button is pressed again, the
printer is turned off.
• In order to prevent this printer from accidentally
being turned on, it will not come on if the power
button is lightly pressed. Therefore, if the printer
does not come on, hold the power button pressed
for a little while.
• In order to conserve the built-in lithium ion battery,
the printer automatically goes off if no operation is
performed or if no data is sent to it for five minutes
(except when the battery is being charged with
the AC adapter).
5
Preparing the paper
Use only the paper cassette designed exclusively for this printer.
Use of any other paper will result in damage.
To prepare the paper cassette
Prepare the paper cassette before installing it into the printer.
• Be careful not to drop any paper while the paper cassette is being
prepared.
1 Open the lid of the
Lid
paper cassette, and
then tear off the two
pieces (1) on the
sides.
Paper cassette
2 Firmly fold the lid back
along the fold (2).
Front
Back
3 Insert the tab on the lid
into the slit (3) at the back of the cassette.
6
Operating Procedures
" Handling the paper cassette
! This printer determines the paper type depending
on the installed paper cassette, then automatically selects the settings appropriate for that type
of paper. Do not transfer paper to a different
paper cassette.
! Do not try to reuse paper that has already passed
through the printer.
! The paper cassette is made of cardboard. After
all of the paper is used, dispose of the cassette
according to local regulations.
! Do not use a torn or deformed paper cassette,
otherwise damage may result.
! Do not prepare the paper cassette in an
extremely humid location, otherwise a malfunction may result.
! Do not touch paper cassettes or paper with wet
hands, otherwise a malfunction may result.
! Store the paper cassette out of extremely hot,
extremely humid or extremely dusty locations and
out of direct sunlight.
! When storing the paper cassette, be sure to close
its lid.
! Do not leave paper cassettes in a closed car
under a hot sun.
! Use the paper as quickly as possible, otherwise it
may become discolored.
7
Installing the paper cassette
1 Slide the paper cassette
cover (on the top of the
printer) in direction 1.
→ The paper cassette cover
will open in the direction
indicated by 2.
2 Insert the paper cassette.
Paper type indication
The paper type indication on the
paper cassette should face up.
The end of the paper should
point toward you.
• When loading the paper cassette, make sure that
it is correctly aligned and that the end of the
paper is not folded, otherwise a paper misfeed
may result.
8
Operating Procedures
3 Close the paper cassette
cover in direction 3.
4 Slide the paper cassette
Paper check window
cover in direction 4.
If the paper cassette is correctly
loaded, the paper type indication
on the cassette can be seen
through the paper check window, and the paper cassette
cover will be locked.
Paper type indication
• Do not remove the paper from the paper cassette
and load it directly into the printer.
• To change the paper type, install a different paper
cassette.
• While the printer is printing, do not apply pressure
to the paper output slot or place anything on the
printer.
Paper output slot
9
Sending data from a Pocket PC or computer
In order use this printer to print data from a Pocket PC (PDA running Pocket PC) or computer, the software must first be installed
onto the Pocket PC or computer as described in the ‘software
guide’ supplied with the printer.
Sending data through an IrDA connection
A Pocket PC can communicate with this printer through its IrDA
infrared port.
1 Position this printer and
the Pocket PC so that
their IrDA infrared ports
are facing each other and
are positioned not more
than 20 cm apart.
2 Start printing from the Pocket PC.
→ While data is being transmitted through the IrDA infrared port, the status indicator light flashes in green.
• During transmission, do not move this printer or
the Pocket PC.
• Make sure that there are no obstacles between
this printer and the Pocket PC.
• If this printer is connected with a USB cable or if
the Pocket PC is connected through a serial connection, the infrared transmission cannot be
used.
• IrDA infrared transmission is not possible with
computers
• For more details, refer to the instruction manual
for the Pocket PC.
10
Operating Procedures
Sending data through a USB
connection
Using the enclosed USB cable, this
printer can be connected to a computer or a Pocket PC supporting a
USB host interface.
Enclosed USB cable
11
Feeding paper
If a paper misfeed occurs, remove the paper according to the following procedure.
If the paper has fed out of the paper output slot:
1 Pull the paper out from the
paper output slot.
• When pulling out the paper, be sure not to tear it.
If the paper has not fed out of the paper output slot:
1 Open the paper cassette cover.
2 Remove the paper cassette.
3 Pull out the misfed paper.
• When pulling out the paper, be sure not to tear it.
• Pulling out the paper will not affect the operation
of the printer.
12
Operating Procedures
Maintenance
! Be sure to turn off the printer before cleaning it.
Cleaning the printer
Clean the front of the printer.
1 Clean off any dust or other dirt from the printer by
wiping it with a soft, dry cloth.
If the printer is extremely dirty, wipe it with a slightly damp
cloth.
! Do not use benzene or paint thinners, otherwise
the printer may become discolored or deformed.
Cleaning the paper cassette sensor
If the paper cassette sensor is dirty, it will not be able to correctly
detect the paper cassette, and a malfunction may result.
1 Clean the paper cassette sensor with a dry cotton
swab.
Paper cassette sensor
13
Cleaning the pick-up roller
If the pick-up roller is dirty, paper may not be fed correctly.
1 Affix a piece of cellophane
Pick-up roller
tape to the pick-up roller.
2 Remove the cellophane
tape from the pick-up
roller.
Cellophane tape
→ Any dirt on the pick-up roller is removed with the tape.
Rotate the pick-up roller and repeat the procedure to clean
the entire surface of the roller.
14
Operating Procedures
Disposing of this printer
Before disposing of this printer, be sure to remove the built-in
lithium ion battery.
Removing the lithium ion battery
1 Turn off the printer, and
then disconnect the AC
adapter.
2 Using a screwdriver,
loosen the four screws at
the back of the printer,
and then remove the back
cover.
Lithium ion
battery
Connector
3 Disconnect the connector, and then remove the
lithium ion battery.
• Removing the back cover will void the warranty.
Do not remove the back cover unless the printer
is to be disposed of.
• The lithium ion battery is attached to the printer
with adhesive tape. When removing the lithium
ion battery, grasp it, and then pull it off of the
printer. Be careful not to pull on the cable.
• When unplugging the connector, do not pull on
the cable.
• Risk of explosion if battery is replaced by incorrect type.
Dispose of used batteries according to local regulations concerning special waste.
15
3 Appendix
Product specifications
Printer specifications
Status indicator light (red/green)
Charging indicator light (orange)
Direct thermal printing with a line thermal
Method
print head
Resolution 300 dpi × 300 dpi
15 seconds/sheet
Print speed (standard text on thermal paper with 7 % coverage at an ambient temperature of 25 °C)
Approximately 100 pages can be printed
No. of
pages that continuously if the battery is fully charged
can be
(standard text on thermal paper with 7 % covprinted
erage at an ambient temperature of 25 °C)
Paper supply
Brother paper cassette, automatic paper
method
feed mechanism
Paper
Brother A7 cut paper (74 mm × 105 mm)
Compact switching AC adapter for charging,
Power supply
lithium ion battery (built in) 7.4 V
Serial Interface (RS-232C)
Interface
Complies with USB Ver. 1.1 and an infrared
port compliant with IrDA 1.2
Dimensions
100 mm (W) × 160 mm (D) × 17.5 mm (H)
300 g (including the built-in lithium ion batWeight
tery and a paper cassette containing 50
sheets of plain thermal paper)
Printing
Indicators
16
Appendix
Paper sizes (print area)
Normal type
Label sheets
(four down)
Label sheets
(two down)
A7 size: 74 mm × 105 mm (69 mm × 100 mm)
74 mm × 26.25 mm (69 mm × 21.25 mm)
74 mm × 52.5 mm (69 mm × 47.5 mm)
Troubleshooting
Symptoms & remedies
Symptom: The printer
Remedy: Press and hold the power button
cannot be turned on.
for a short while. (→ Refer to page 5.)
Remedy: The built-in lithium ion battery
needs recharging. (→ Refer to page 3.)
Symptom: Although the With an IrDA connection:
print command was Remedy: Make sure that there is no
obstacle between this printer and the
issued, the printer
PDA, and check that they are within 20
does not print.
cm of each other. (→ Refer page 10.)
Remedy: Disconnect the USB cable. (→
Refer to page 10.)
With a USB connection:
Remedy: Check that this printer is
securely connected to the computer
with the USB cable. (→ Refer to page
11.)
Symptom: There is a
paper misfeed.
Remedy: Remove the paper. (→ Refer to
page 12.)
Symptom: Even though Remedy: Some torn paper may still
remain in the printer. Contact the sales
the misfed paper was
representative where the printer was
removed, the error
purchased.
cannot be cancelled.
Symptom: An indicator Remedy: Refer to the explanation in “Indilight is lit or flashing.
cator lights” on page 20.
17
Symptom: The paper
does not feed.
Remedy: Make sure that the lid of the
paper cassette is firmly folded along
the fold (2). (→ Refer to page 6.)
Remedy: Make sure that the paper cassette cover is securely closed. (→
Refer to page 9.)
Remedy: The paper may be dirty. Pull out
the first sheet from the back of the
paper cassette, and then install the
paper cassette again. (→ Refer to
pages 6 and 8.)
Remedy: Clean the pick-up roller. (→
Refer to page 14.)
Symptom: The print is
faint (light).
Remedy: Make sure that the paper cassette cover is securely closed. (→
Refer to page 9.)
18
Appendix
Symptom: The paper
cassette cover cannot be closed.
Remedy: The parts indicated by “A” in the
illustration below have locked up.
Refer to the illustration and use the tip of
a ball-point pen to slide the indicated part
in the direction of the arrow to free it.
Paper cassette
cover
A
Push with the tip of a ball-point pen to slide it.
Free the part on the opposite side
using the same method
19
Indicator lights
" Status indicator light
A green light indicates the printer is operating
correctly, while red indicates an error has
occurred.
Indicator
light color
Green
Red
Indicator light
status
Constantly lit
Flashing
Flashing
Constantly lit
Printer status
Waiting to receive data
Receiving data
An error has occurred.
A system error has occurred.
If an error has occurred, check for the following causes.
Error description
Remedy
There is no paper cassette
installed.
The paper cassette is
installed facing the wrong
direction.
There is no more paper.
A paper misfeed occurred.
A transmission error occurred.
An overheat error occurred.
Correctly install a paper cassette containing paper.
Remove the misfed paper.
Check the transmission status.
The inside of the printer has
started to overheat. Wait until it
cools down
If a system error has occurred:
The printer may be damaged. Contact the sales representative where it was purchased.
20
Appendix
" Charging indicator light
With the charging indicator light, the status of
the power supply can be checked. The charging indicator light has two functions.
1 Checking the charging status (when the AC
adapter is connected)
Indicator
Indicator light
Printer status
light color
status
Orange
Constantly lit
Off
Flashing
Charging
Finished charging
Malfunctioning built-in battery
2 Checking the battery level (while running off the built-in lithium ion battery)
Indicator light status
Battery level
Off
Flashes once
Flashes twice
Continues to flash 3 times
More than 60% charged
Less than 60% charged
Less than 30% charged
Almost empty
• When the battery level is less than 60% charged,
recharge the battery.
• If the charging indicator light flashes while the
printer is printing, immediately connect the AC
adapter and charge the battery. The printer may
stop printing.
21
MW-120 Accessories
Stock No.
Description
C-11
A7 Thermal paper (105 mm x 74 mm)
C-21
A7 Label (105 mm x 74 mm)
C-41
A7 Cut label sheet (4/sheet) (26.25 mm x 74 mm)
C-42
A7 Cut label sheet (2/sheet) (52.5 mm x 74 mm)
Count:
50 sheets/cassette (thermal paper)
30 sheets/cassette (all others)
22