1
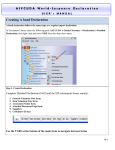
Customer Interface Technology
ExpressShipper
Installation Guide
ExpressShipper
Version: 1.2
Installation guide
Date: July 15, 2011
Revision History
Date
Version
Description
Author
July 15, 2011
1.2
Final version
FW
External
1
ExpressShipper
Version: 1.2
Installation guide
Date: July 15, 2011
Table of content
1.
2.
3.
4.
Introduction
1.1 Technical specifications
1.2 Support
Installation
2.1 Downloading
2.2 Installation
2.3 Registration
Configuration
3.1 Metric or imperial values
3.2 Make or restore a backup
3.3 Connection settings
3.4 Transfer data
Updates
External
3
3
Error! Bookmark not defined.
5
5
6
10
12
12
Error! Bookmark not defined.
13
16
17
2
ExpressShipper
Version: 1.2
Installation guide
Date: July 15, 2011
1. Introduction
You chose for the ExpressShipper application to book your TNT Express shipments. ExpressShipper
however is so much more than just a booking tool. You can also request tariffs, check the status of a
shipment, export shipment and address details etc.
This manual is a guide to install ExpressShipper. For more information on the ExpressShipper
functionalities, we refer you to the user manual.
1.1 Technical specifications
Minimum system requirements:
local administrator rights to install ExpressShipper;
operating system: XP / Vista / Windows 7;
HP compatible laser jet printer;
Internet Explorer version 4 or higher for the connectivity module;
Internet connection;
minimum hardware specifications:
o
Pentium II 233 Mhz processor;
o
512 MB RAM;
o
16 MB free hard disk space;
o
Screen resolution: minimum 800 x 600;
1.2 Support
Should you require more support after reading this installation guide, you have several options:
Frequently asked questions (FAQ). You will most likely find an answer in this section of our
website. Go to www.tnt.com | Shipping tools.
Should you still have technical questions or incur problems, then our Service Desk is ready to
help.
External
3
ExpressShipper
Version: 1.2
Installation guide
Date: July 15, 2011
Contact details:
Country
Telephone number
The Netherlands
+ 31 (0) 30 639 83 33
Belgium / Luxemburg
+ 32 (0) 2 754 47 73
Table 1: contact details Service Desk.
External
4
ExpressShipper
Version: 1.2
Installation guide
Date: July 15, 2011
2. Installation
In this chapter the start-up procedure of ExpressShipper is explained. Apart from the download and
registering procedure, the different installation modes are also detailed.
2.1 Downloading
You can download ExpressShipper from our website.
Screenshot 1: downloading and registration.
Save the ExpressShipper software to start with the installation. You also need to register as an
ExpressShipper user, by filling out the registration form on our website. For more details, please go to
paragraph 2.3.
External
5
ExpressShipper
Version: 1.2
Installation guide
Date: July 15, 2011
2.2 Installation
ExpressShipper can be installed in 2 ways:
1. Single user;
2. Multi user.
Single user
Double-click on the downloaded file, and the wizard will take you through the installation process.
Screenshot 2: Installation wizard start-up screen
Click on ‘next’ to continue to the next screen.
External
6
ExpressShipper
Version: 1.2
Installation guide
Date: July 15, 2011
Screenshot 3: accepting the licence agreement.
Tick the ‘I accept’ box and click ‘next’. Then select ‘single user’, after which you click ‘next’ again.
Screenshot 4: single user installation.
Now you can choose where you want the program and the data to be saved. There are 2 options:
1. Standard. The program and the data are saved at the default location on your computer
(c:\program files\tnt\expressshipper).
External
7
ExpressShipper
Version: 1.2
Installation guide
Date: July 15, 2011
2. Custom. You choose yourself where the program file and the data are installed.
After you ticked your choice, click ‘next’.
Screenshot 5: choosing installation location.
You can now start the installation.
Screenshot 6: start the installation.
External
8
ExpressShipper
Version: 1.2
Installation guide
Date: July 15, 2011
Multi user
Double-click on the downloaded file and the wizard will guide you through the installation procedure.
Confirm the questions until you reach the screen below:
Screenshot 7: multi user installation.
You now have several setup types, applicable for installing on a server, work station or terminal.
Screenshot 8: selecting the setup type
Choose one of the types, in accordance with the usage of the application. Then, just follow the wizard.
External
9
ExpressShipper
Version: 1.2
Installation guide
Date: July 15, 2011
1. Server
Install data files on the server: only the data files are stored on the server.
Install program and data files on the server: the program files and the data are stored on
the server, with the data being stored in a shared folder on the server.
Server – Standard: both the program and data files are stored on the default location on
the server (c:\program files\tnt\expressshipper).
2. Workstation
Connect Workstation to existing data files. The program files are stored locally on the
computer, for the data files you must refer to a server location. Using this option allows
you to link multiple users to the server.
3. Terminal Server
Install program and data files on the server. The program files are stored locally; the data
files are to be saved in a shared folder on the file-server. In case you work with multiple
terminal servers, then you need to add these as a work station.
Make sure all users have access rights to the shared folder on the server. To install the program,
administrator rights are obligatory.
2.3 Registration
As mentioned in paragraph 2.1, you need to register as an ExpressShipper user. In case you already
have a TNT Express account number, you can register directly (see screenshot 1). After you
confirmed the registration by clicking on ‘next’, you will receive a registration number. Your application
will be treated by the Service Desk and they will send you an e-mail with (a link to) a registration file.
Screenshot 9: example of a registration file.
Save this file on your computer, and then run the file execution by double-clicking. For a multi-user
installation, you only need to execute the file once on any work station. Once you have received the
alert shown below, your registration was executed successfully.
External
10
ExpressShipper
Version: 1.2
Installation guide
Date: July 15, 2011
Screenshot 10: Executing the registration.
Before installing the registration file, you need to install ExpressShipper. If not, you will receive an
alert.
External
11
ExpressShipper
Version: 1.2
Installation guide
Date: July 15, 2011
3. Configuration
In this chapter several settings of the ExpressShipper configuration menu are detailed.
3.1 Metric or imperial values
By default ExpressShipper is set to use metric values. If you want to switch to imperial values, you
can do so in the ExpressShipper configuration menu.
3.2 Make or restore a backup
You have 3 options:
Backup;
Restore;
Repair.
Backup
This option allows you to make a backup of the ExpressShipper database. When you click on
‘backup’, you will see the screen as shown below. Select the location where you want to save your
backup files and click ‘save’.
Screenshot 11: Backing up the database
External
12
ExpressShipper
Version: 1.2
Installation guide
Date: July 15, 2011
Restore
This option allows you to restore a backup. It is important ExpressShipper is shut down first. In case
of a multi-user installation, ExpressShipper needs to be shut down on all work stations. Click on
‘restore’ and select the backup file. The consignment numbers are not restored.
Screenshot 12: restore.
We advise you to consult the IT contact in your company before using the restore functionality.
Repair
This repair functionality re-indexes the database. You can use this option when you receive error
messages when the database tries to access data. By clicking ‘repair’, new index files are generated.
It is however very important to shut down ExpressShipper, on all work stations in case of a multi user
installation.
3.3 Connection settings
The connectivity module enables the internet connection, so that for example you can request a tariff
or shipment status in real time. In the registration e-mail you received after registering for
ExpressShipper, you will find a link to this module, or you can download it from the ‘Downloads’
section on our website.
To install, you require administrator rights and port 80 and 443 to be open in order to successfully
connect. We advise you to activate this module on each work station, since it offers you many
advantages, described in the user manual.
External
13
ExpressShipper
Version: 1.2
Installation guide
Date: July 15, 2011
In the ExpressShipper ‘Configuration’ menu, you can select the ‘connection settings’: in which
currency you want to request a tariff, whether you would like to receive an advanced shipping
notification (ASN) per e-mail or enter specific proxy settings.
Pricing
Indicate here the currency in which you would like to request your tariff.
Screenshot 13: Indicating currency.
Shipping
You can tick in this screen which address types will receive an advanced shipping notification via email. The e-mail address needs to be stored in the address book.
If you want to forward your data to TNT at the end of the day, you need to agree to the General Terms
and Conditions.
External
14
ExpressShipper
Version: 1.2
Installation guide
Date: July 15, 2011
Screenshot 14: Setting up ASN e-mail addresses.
An advanced shipping notification (ASN) is only sent after forwarding the data to TNT.
Proxy
In case you want to set up your proxy server, choose ‘maintain proxies’ to add, change or remove a
proxy server.
Screenshot 15: managing proxy servers.
External
15
ExpressShipper
Version: 1.2
Installation guide
Date: July 15, 2011
3.4 Transfer data
Over the course of the day, ExpressShipper users have booked shipments and printed the required
documents. Before handing over the shipments to the driver, the manifest needs to be printed. The
manifest contains information on which documents have been printed that day, or a selection of these
documents. Apart from printing the manifest, we also advise you to forward the data to TNT.
Screenshot 16: sending data.
To do so, you need to tick the option ‘send data for manifested consignments’. This option is ticked as
default when you have indicated you agree to the General Terms and Conditions (
Screenshot 14).
External
16
ExpressShipper
Version: 1.2
Installation guide
Date: July 15, 2011
4. Updates
Our applications are continuously being updated, and new versions of ExpressShipper released.
Once you installed ExpressShipper on your computer, there are 2 ways in which you can check
whether new software versions are available.
Automatic checks
Is your computer connected to the internet, an automatic check once a month will look for available
updates. If updates are available, a wizard will take you through the update installation.
Checking manually
Go to the ExpressShipper Update file that is saved in the same folder as the ExpressShipper
software. Once you started the program, it will search for updates. The wizard will guide you through
the installation steps.
If an update was found, you will for instance see this screen:
Screenshot 17: found updates
You can select the required update, after which you install this update immediately or you download
and then install the update. The wizard will take you through the process, so that you can install
successfully.
External
17
ExpressShipper
Version: 1.2
Installation guide
Date: July 15, 2011
Screenshot 18: updated successfully
In case the update is installed on a network, the first person to install the software on his or her work
station, will also update the database automatically. Afterwards, the software will need to be installed
on the other work stations.
Shut down ExpressShipper before installing an update and consult your IT contact if required.
I
External
18