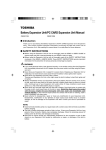
1
Aquaflex Wi-Fi Adapter
User Manual
IR R IG ATION MANAG EMENT MAD E EAS Y
Aq u a f l e x N Z , a d i vi s i o n o f S tre a t I n s tru m e n ts Li m i te d
4a Exp o Pl a ce • PO B o x 24071 • Ch ri s tch u rch • N e w Z e a l a n d
Ph o n e +64 3 384 8900 • i nfo@a qua fl ex.co.nz • w w w .a q u a f l e x.co .n z
This document may not in whole or part, be reproduced, copied, altered, or passed on to
any third party without prior express written consent from Streat Instruments Ltd.
Aquaflex NZ, a division of Streat Instruments Limited
© Copyright Streat Instruments Ltd, 1998 - 2015
4a Expo Place, Christchurch 8062, New Zealand
Ph (+64) 3 384 8900
[email protected]
Fax (+64) 3 384 8901
www.streatsahead.co m
Conditions of Use
AQUAFLEX must be installed and operated as specified in the AQUAFLEX User Manuals.
In particular, AQUAFLEX user's attention is drawn to the following warnings:
AQUAFLEX, and AQUAFLEX components, only provide data on soil moisture and
temperature. Use of this data is entirely at the discretion of the user. The use of data
generated by AQUAFLEX should therefore be subject to current best practic e principles of
soil moisture management and agronomic management. These must include regular
checks on the integrity of AQUAFLEX and the data it is producing plus regular visual
inspections of crops, plants or other materials being monitored by AQUAFLEX.
The AQUAFLEX system may have other sensors connected to it (e.g. air temperature , rain
gauge information etc). Use of the data from these sensors is entirely at the discretion of
the user. The use of data generated by AQUAFLEX should therefore be subject to current
best practice principles of agronomic management for these sensors. These must include
regular checks on the integrity of the sensors and the data it is producing plus regular
visual inspections of crops, plants or other materials being monitored by the sensors.
Neither Streat Instruments nor its Distributors shall be liable (whether in contract, tort or
otherwise) for any loss (including but not limited to loss of profits and consequential loss)
of any kind whatever arising out of any published material or in connection with the
performance or use of AQUAFLEX.
Streat Instruments Limited makes no warranty of any kind with regard to the material
contained in or the products referred to in this manual, including, but not limited to,
implied warranties or fitness for a particular purpose.
Streat Instruments Limited shall not be liable for errors contained herein or for incidental
or consequential damages in connection with the performance or use of this manual or
the products referred to in this manual.
Apple iOS and Google Android are either registered trademarks or trademarks of Apple Inc. or
Google Inc. in the United States and/or other countries.
Manual:
Revision date:
AF188-07
29 June 2015
IRRIGATION MANAGEMENT MADE EASY
Contents
1
Overview of Aquaflex.............................................................. 1
2
Installing Aquaflex Mobile ....................................................... 2
2.1
2.2
3
Install guide for Apple iOS devices ....................................................... 2
Install guide for Android devices .......................................................... 3
Using Aquaflex Mobile ............................................................ 4
3.1
3.2
3.3
3.4
3.5
3.6
3.7
Connecting to an Aquaflex Logging Sensor ........................................ 4
Downloading data ................................................................................ 5
Using charts ........................................................................................... 6
Creating and editing charts ............................................................... 7
Renaming sensors ............................................................................... 8
Removing sensors ............................................................................... 8
Clearing all data .................................................................................... 8
4
Aquaflex Data Manager and AquacomSync .............................. 9
5
Making the best use of your Aquaflex data............................. 11
6
Troubleshooting ................................................................... 12
IRRIGATION MANAGEMENT MADE EASY
1 Overview of Aquaflex
Soil Moisture and Temperature are the biggest factors that influence
plant growth. In Spring and Autumn, soil temperature is the main
limiting factor to growth. In the peak of the season, soil moisture
becomes the dominant factor.
By measuring both parameters Aquaflex provides the information to
ensure both soil moisture and temperature are maintained at the
correct levels to maximise plant production.
Aquaflex is an important irrigation tool that helps optimise plant
growth and quality. The grower can make informed irrigation
decisions by using the data trends provided by Aquaflex.
Aquaflex Wi-Fi Adapter
The Aquaflex Wi-Fi Adapter and Aquaflex Mobile software are tools
to get you started with monitoring the soil environment quickly and
easily. Using the tools you can configure an Aquaflex Logging Sensor
and download data from it to a Smartphone or Tablet.
This manual will detail the installation of the various components and
provide a guide on making use of the data.
IRRIGATION MANAGEMENT MADE EASY
1
2 Installing Aquaflex Mobile
This section details the installation of the Aquaflex Mobile software.
2.1 Install guide for Apple iOS devices
1. Tap on the AppStore Store icon to open the Apple
AppStore.
2. When the AppStore has opened tap the Search box in the upper
right hand corner of the screen. Type in AquaflexMobile and tap
the Search button on the on screen keyboard.
3. When the search is complete there should be a
listing called AquaflexMobile. Tap on the listing to
display the details.
4. From the AquaflexMobile details view tap the Get button under
the application title. The button will change to Install and should
be tapped again to confirm the installation. You may be
prompted to enter your iTunes password after which the
installation will begin.
5. AquaflexMobile can be started by tapping its icon
from the application list screen when it has
finished installing.
IRRIGATION MANAGEMENT MADE EASY
2
2.2 Install guide for Android devices
1. Tap on the Play Store icon to open the Google
Application Store.
2. When the Play Store has opened tap the Search icon on the
upper right hand corner of the screen. Type in AquaflexMobile
and tap the Search button on the on screen keyboard.
3. When the search is complete there should be a
listing called Aquaflex Mobile. Tap on the listing
to
display the details.
4. From the Aquaflex Mobile details view tap the Install button
under the application title. You will be prompted to agree with
the application permissions. When you are ready tap accept to
confirm the installation.
5. Aquaflex Mobile can be started by tapping its icon
from the application list screen when it has
finished installing.
IRRIGATION MANAGEMENT MADE EASY
3
3 Using Aquaflex Mobile
Aquaflex Mobile software allows connection of Smartphones or
Tablets to an Aquaflex Logging Sensor for configuration and
downloading of data.
Using Aquaflex Mobile to regularly download the data from the
Aquaflex Logging Sensor will prevent data from being lost due to its
memory becoming full. The data will be most useful to you if it is kept
up to date.
3.1 Connecting to an Aquaflex Logging Sensor
Aquaflex Mobile can configure and download the data from an
Aquaflex Logging Sensor when it is connected to it.
1. Power on the Wi-Fi Adapter by pressing the
red button in centre of the adapter.
The Green LED will flash slowly.
2. Insert the Wi-Fi Adapter into the front of
the Aquaflex Logging Sensor battery box (it may
need a hard push to get it fully in). Check that
the switch points towards the sensor connector
you want to connect with (left or right).
3. If your device is an iPad or iPhone use the
device’s Wi-Fi settings to connect to the Wi-Fi
network called Aquaflex-xxxx.
Note: xxxx is the serial number of the Wi-Fi Adapter.
4. Start the Aquaflex Mobile app. Tap the
blue Connect icon either at the
bottom of the screen for Smart Phones
or the top of the screen for Tablets.
IRRIGATION MANAGEMENT MADE EASY
4
5. The Connect screen shows a list of
Aquaflex Wifi Adapters that are in
range. If you do not see your unit then
you may be out of range. Tap Scan to
attempt to discover the unit. Note: If you are using an iPhone or
iPad, it may take some time before your unit appears on the
screen.
6. If your unit is listed then tap its Connect button to open a
connection.
7. When the screen changes you are connected. The display will
now show the configuration options and current measurements
for the unit.
8. To return to the Connect screen tap the Disconnect button at the
top of the screen.
3.2
Downloading data
1. Use the steps in Connecting to an Aquaflex Logging Sensor to
establish a connection and display the unit details.
2. Check that the switch on the bottom of the adapter is pointing
towards the sensor connector you wish to connect with.
3. Tap the Download button at the top of the screen. The text in
the button will show the progress of the download.
4. When the download is complete you will be prompted to
disconnect. The data can be viewed from the Chart screen.
Aqua flex Sensors ca n
be s elected using this
s wi tch for Battery
Boxes with two
s ensors connected
IRRIGATION MANAGEMENT MADE EASY
5
3.3
Using charts
Charts are used to view the sensor data from your Aquaflex system.
Charts can be customised to display any combination of sensors.
Scaling axis
The chart can be scaled by pinch zooming anywhere on the chart
area. It can also be scrolled by swiping left or right on the chart area.
Alternatively the axes can be scaled or scrolled individually by
pinching zooming or swiping on its axis near the side of the screen.
Changing the time range
Aquaflex Mobile has several buttons on the chart display for quickly
navigating the data. Tapping the green Latest button scrolls the chart
to the most recent data point. The blue buttons will scale the time
axis to the range they indicate.
Changing to a different chart
From the Charts screen tap either the Charts icon or the chart list
icon which will open the Chart List screen. Then tap on the chart of
interest and the Charts screen will appear with the selected chart.
IRRIGATION MANAGEMENT MADE EASY
6
3.4
Creating and editing charts
Charts can have any combination and number of sensors. Beware
that too many sensors on one chart may slow down the device.
To create a chart you first must open the Charts screen. Tap the
Create icon to show the Create screen. Enter in a name for the
chart at the top of the screen. Tap the Add button for each sensor
you want to display on the chart. Tap the back arrow to save the new
chart. Note that if you do not add any sensors to a new chart, the
chart itself will not be saved.
To edit a chart you must first have the chart you want to edit
selected in the Charts screen. Tap the Edit icon to show the Edit
screen. Tap the back arrow to save the changes.
Add or remove sensors
Open either the Create or Edit screen. To add a sensor tap the Add
button for the sensor that is in the Available sensors to add section.
The sensor will be moved to the Sensors on this chart section. Tap
the back button to save the changes.
To remove a sensor tap the Remove button for the sensor that is in
the Sensors on this chart section. The sensor will be moved to the
Available sensors to add section. Tap the back button to save the
changes.
Setting Field Capacity and Refill Point
The Field Capacity, Refill Point or any other limit lines you wish to add
can be added as a Static line in the Create or Edit Chart screen.
Open either the Create or Edit screen. Under the section called Static
lines on this chart tap in the name field and type a name for the line,
IRRIGATION MANAGEMENT MADE EASY
7
enter a moisture value and tap the Add button. Note: Static lines are
always shown on the moisture axis.
Removing charts
Open the chart you want to remove. Tap Remove icon and you
will be prompted to confirm deleting the chart. The sensor data does
not get deleted.
3.5
Renaming sensors
Open the Settings screen by tapping the Settings icon and tap the
Edit button for the sensor you want to rename. The sensor label will
become editable. Tap the Done button when finished.
3.6
Removing sensors
Removing a sensor will clear all its data from your device and cannot
be undone.
Open the Settings screen by tapping the Settings icon and tap the
Delete button for the sensor you want to remove. You will be
prompted to confirm.
3.7
Clearing all data
Clearing the data from your device will remove all sensor data, charts
and other settings. This cannot be undone.
Open the Settings screen by tapping the Settings icon
Clear button. You will be prompted to confirm.
IRRIGATION MANAGEMENT MADE EASY
and tap the
8
4 Aquaflex Data Manager and AquacomSync
To transfer the Aquaflex data from the Smartphone to your Aquaflex
Data Manager on your PC you need the AquacomSync Software.
The latest installer can be downloaded from the Streat Instruments
website Downloads page http://www.streatsahead.com/downloads/
and by clicking on the Download button for AquacomSync.
Click on the file and it will download automatically. Then double click
on the downloaded file to run the installer and follow the steps
below:
When starting the installer a security warning may show. Click Run.
1. Click Next to view the License Agreement and then I Agree to
choose the install components.
2. In the Choose Components screen make sure the all the options
are ticked and then click Next.
3. The Install Location will be set to your computers default install
location, click Install.
4. If during installation a ‘Error opening file for Writing’ appears
then make sure the AquacomSync software is not running and if
it is then close it and click Retry.
5. Once complete click Finish.
Note: If this is the first time the software has been installed then
you will need to run Aquaflex Data Manager before
AquacomSync so that a database is set up. Start the Aquaflex
Data Manager from the “Aquaflex” desktop icon.
6. Start AquacomSync by selecting the Start Menu (bottom left of
screen) as below:
Start Menu > All Programs > Streat Instruments >AquacomSync >
AquacomSync
IRRIGATION MANAGEMENT MADE EASY
9
Configuring AquacomSync
AquacomSync will keep Aquaflex sensor data up to date on the
computer automatically whenever the Smartphone is plugged in.
Note for iPhone and iPad users: You must have iTunes installed on
your computer in order for the data transfer to take place via
AquacomSync.
When a Smartphone is inserted into one of the computer’s USB
ports, AquacomSync will scan the phone and update Aquaflex Data
Manager with any new data.
No configuration of Aquacom Sync is required if all you want is to
transfer data from your Smartphone.
To open the settings, right click
on the Aquacom Sync icon in the
Notification area of the Task Bar
(normal bottom right).
The settings window has a list of
synchronisation sources on the
left side, while the right hand
side shows the settings for the
selected source.
IRRIGATION MANAGEMENT MADE EASY
10
5 Making the best use of your Aquaflex data
The soil moisture and temperature data trends can help you make
decisions around when to irrigate and for how long. For example, if
the soil moisture is trending downwards and no rain is forecast then
you can use the trends to measure rate of moisture loss and then
irrigate to compensate.
Optimal irrigation is achieved when applying enough water to keep
the plant in maximum growth mode and by not applying too much
water that it drains through the soil before it is retained. There are
three key parameters to monitor when irrigating, Field Capacity,
Refill Point and soil temperature.
Field Capacity (FC) is defined as the maximum amount of water the
soil can hold against the forces of gravity.
Refill Point (RP), sometimes called Stress Point, is the minimum
amount of water in the soil before a plant becomes stressed.
Soil temperature is the temperature of the soil at the depth of the
plant roots. Plants have an optimal growth temperature range.
The area between the Field Capacity and Refill Point is referred to as
Readily Available Water (RAW). RAW is the water that is easy for the
plants to extract from the soil and where you will get maximum
production. Set a Field Capacity and Refill Point on your Aquaflex
sensor chart and use your irrigation system to keep the moisture
trace within the RAW area.
Look up the application note Setting Field Capacity and Refill Point
on www.aquaflex.co.nz for details.
IRRIGATION MANAGEMENT MADE EASY
11
6 Troubleshooting
Troubleshooting
Symptom
Resolution
Aqua flex Mobile does not a ppear
a fter s earching the Store
The operating s ystem of your device may
not be compatible. To i nstall Aquaflex
mobi le your device version must be
Androi d 4.1 or i OS 6 or hi gher.
The Aquaflex Mobile scan does not
fi nd the Aquaflex Wi -Fi Adapter
The Aquaflex Wi-Fi Adapter communicates
us i ng your devices Wi-Fi radio. The Wi-Fi
mus t be enabled on your device.
Di s able and then enable the Wi-Fi on your
devi ce or restart i t.
Check the Green LED flashes slowly a fter
bei ng powered on. If the Red LED flashes
qui ckly then the batteries in the Adapter
need to be replaced.
Aqua flex Mobile connects but
s ensors readings a re not s hown
Check the Port s elector s witch on the
Aqua flex Wi-Fi Adapter is pointing towards
the s ensor to be connected.
Check tha t the sensors are connected to
the Aquaflex Logging Box correctly.
Check the batteries inside the Logging Box
a re i nserted correctly a nd produce at l east
8 vol ts .
IRRIGATION MANAGEMENT MADE EASY
12