1
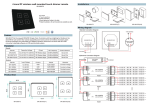
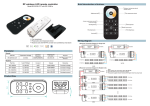
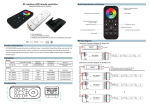
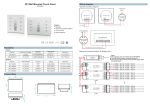
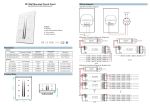
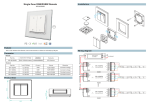
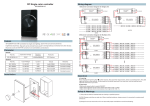
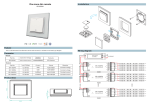
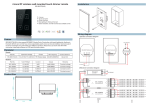
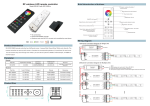
4.Button introduction
RF RGB(W) Remote controller User
Manual
R
“R”button and indicator
G
“G”button and indicator
B
“B”button and indicator
W
“W”button and indicator
Working status indicator, the sender is in dormant status when the indicator is off. The sender
is under working when the indicator is flashing rapidly. If the indicator continues flashing at the
frequency of 1 second, it indicates that the sender batteries low and needs to replace new
batteries.
S-
Slow down the speed when color is changing
W+
With this button it shall be getting three shades of white color (cold white, neutral white and
warm white; a mixture of RGB colors), and to get white color while using the controller in
RGB-mode.
This function needs to be available in RGBW-mode as well to get a versatile white color
range
B-
Brightness down
SR-2819T
Easy RGB(W) remote controller is a wireless color controlling system that consists of a sender
S+
B+
Speed up when color is changing
Brightness up
Turn ON/OFF
and a receiver or several receivers. By selecting switch status, you can set the system as RGB 3channel output, or RGBW 4-channel output. Using Easy RGB(W) remote controller, you can get
whatever color you want; you can choose any color from RGB(W) to adjust so as to mix more than
100 mi l l ion kinds of colors.
Z1
Z2
:2 zones
P1 P2 P3 P4 :4 programs.
Each program shall be speed selectable from 20 seconds (most fast) to 15 minutes (slowest).
With built-in 10 kinds of color changing modes, you can easily switch color changing modes and
adjust speed and brightness. “Function Pause” enables RGBW LED to stay at your favorite color
under the situation of color changing modes, which operation is simple but functional.
When you press the button first, the program starts, after a second press, it pauses, then after
pressing again, the program continues.
The programs shall include the following:
2.Performance Parameter
- smooth color change (red, yellow, green, turquoise, blue, pink, white)
Remote
- smooth change of warm color range (red, yellow, pink, hot pink and mixed warm colors)
Part No.
Operation Voltage
Operation
Frequency
DIMENSIONS
ø/h (mm)
Remarks
SR-2819T
4.5VDC
434MHz/868MHz
43.8x131.6x24.5
load 3pcs 7 AAA (1.5V)
batteries
Part No.
Iuput Voltage
Current
Output
Remarks
- smooth change of cold color range ( blue, green, turquoise, light blue, white,mixed cold colors)
- hard color change (red, orange, yellow, green, light blue, dark blue, pink)
Receiver
1
2
3
4
:4 buttons for storable colors. The user can chose his 4 favorite colors by
SR-1009FA
12-36VDC
4x5A
4x(60-180)W
Constant voltage
using the color-wheel or the color change programs and can save each one by
SR-1009EA
12-36VDC
4x8A
4x(96-288)W
Constant voltage
pressing the particular button for 3 seconds.
SR-1009FA3
12-36VDC
4x350mA
4x(4.2-12.6)W
Constant current
SR-1009FA7
12-36VDC
4x700mA
4x(8.4-25.2)W
Constant current
5.Operation
5.1 Do wiring according to connection diagram and install battery into remote control.
3.Product Size
5.2 How to learn&delete ID process?
a. Wake up the remote by any button except touch color wheel.
b. Press at learning button on receiver.
43.8
c. Press any zone button(which you desire to control) on remote.
d.Then touch color wheel.
24.5
e.Connected LED light will blink to confirm zone designation.
131.6
f.Press learning button on receiver for over 5 seconds until connected LED light flash off,
then delete the learned ID. If you want to learn receiver into another zone, please follow
learning ID process operation 2.
6.Wiring diagram
1)Receiver Connection Diagram for Single Unit
N
Power Supply
12-36VDC
100V-240VAC
1
L
2
SR-1009FA
4
3
LED CONTROLLER
white
Learning Key
2)Receiver Connection Diagram for Multiple Units
N
Power Supply
12-36VDC
100V-240VAC
1
L
2
SR-1009FA
1
4
3
LED CONTROLLER
white
Learning Key
2
SR-1009FA
white
4
1
4
3
LED CONTROLLER
white
Learning Key
2
SR-1009FA
LED CONTROLLER
3
Learning Key
Note:
One receiver can work with 1-8pcs SR-2819S
One SR-2819S control multiple receivers
The power supply chosen must be 20% higher than the actual load