1
DATiX ThinServer User Manual
Enter the netmask
255.255.255.0
and conclude with the enter key.
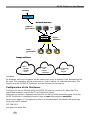
Now login on one of the PCs or workstations, for example on the PC with the IP address
192.168.100.5 and start a Firefox or IE or any other standard browser. Point the browser to
URL address
http://192.168.100.1:8081
A login screen will be presented where you need to login as user root with password
smartflex. Follow the instructions described in section “Startup“. Select “Server1” as the
system name and set the server IP address to 192.168.100.1.
From now on, when we refer to configuration Server1, we are in fact refering to
the browser connection to Server1.
Configuring the DHCP-Server
Select the menu option [ dhcp] and enter 192.168.100.50 as the start address and
192.168.100.100 as the end address. This setup allows up to 50 client computers to receive
their IP addresses from this DHCP server.
Enter “test.net” as a domain name and use the DNS Server address provided by your ADSL
provider as the DNS Server IP address. The IP address of your (ADSL) router is provided as
the gateway address.
To finish the setup click "start dhcp service" and save the settings by clicking "set dhcp".
Configuring the user accounts
On Server1 select the menu option [ group management ] . Create three (3) user groups:
•
Sales
•
Design
•
Accounting
On Server1 select the menu option [ user management ].
Create the user "thomas":
1. Select "add new user"
2. Type the login name "thomas"
3. Type "Thomas Smith" as the full name
4. Type “thomas” as a Password and Password retry (the password can be changed later by
user thomas)
5. As a group assign "Sales"
Create the new user by clicking the “create user” menu option.
Repeat this procedure for th ]e following user accounts:
13