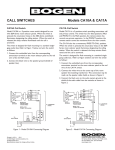
1
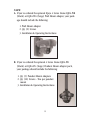
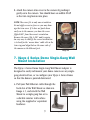
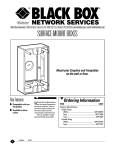
IQeye 4 Series Dome
™
Part of the IQeye Basic Line of Network Surveillance Products
Installation & Operating
Instructions
IQinVision
®
When you can’t afford to miss a thing.
Contents
1 SERVICE . . . . . . . . . . . . . . . . . . . . . . . . . . . 3
2 UNPACKING . . . . . . . . . . . . . . . . . . . . . . . . . . 3
3 DESCRIPTION . . . . . . . . . . . . . . . . . . . . . . 5
4
5
6
7
INSTALLATION . . . . . . . . . . . . . . . .
MOUNTING OPTIONS . . . . . . . . . . . .
SURFACE WALL MOUNT . . . . . . . . . . .
SINGLE-GANG WALL MOUNT . . . . . . . .
.
.
.
.
.
.
.
.
.
.
.
.
.
.
.
.
.
.
.
.
.
.
.
.
.
.
.
.
.
.
.
.
5
6
7
9
8 PENDANT MOUNT . . . . . . . . . . . . . . . . . . . . . 10
9 PC CONFIGURATION . . . . . . . . . . . . . . . . . . . . 11
10 WARRANTY INFORMATION . . . . . . . . . . . . . . . . 14
2
1. Service
If the unit needs repair service or parts, the customer should contact
IQinVision for authorization to return, as well as shipping instructions.
IQinVision
33122 Valle Road
San Juan Capistrano, CA 92675-4853
Phone: +1-949-369-8100
+1-877-850-0805 (toll-free in U.S.)
Fax: +1-949-369-8105
2. Unpacking
Your IQeye 4 Series Dome should include the following:
1. IQeye 4 Series Dome Camera with black trim ring
2. Additional trim ring in beige
3. IQeye 4 Series Dome Installation and Operating
Instructions
4. Mini-CD with IQeye PC Tools
5. Mounting Hardware
6. Trim cover removal tool
3
NOTE:
A. If you’ve ordered the optional IQeye 4 Series Dome IQD4-WB
(black) or IQD4-WG (beige) Wall Mount Adapter, your package should include the following:
1. Wall Mount Adapter
2. Qty (2) Screws
3. Installation & Operating Instructions
B. If you’ve ordered the optional 4 Series Dome IQD4-PB
(black) or IQD4-PG (beige) Pendant Mount Adapter pack,
your package should include the following:
1. Qty (5) Pendant Mount Adapters
2. Qty (10) Screws - Two per pendant
mount
3. Installation & Operating Instructions
4
3. Description
IQeye 4 Series Dome
The IQeye 4 Series Dome is a compact high-resolution minidome camera system suitable for indoor installation via wallmount or ceiling-mount, with optional adapters that allow for
single-gang box wall-mounting as well as pendant-mounting.
The IQeye 4 Series Dome comes with a black trim plate
installed, and also includes an extra trim ring in beige so that
your camera will look attractive in any décor.
4. Installation
This manual describes how to install the IQeye 4 Series Dome,
including installation with the optional single-gang box wall
mount, as well as the optional pendant mount. Installations
should be performed by qualified service personnel only in
accordance with local, state and national code(s).
5
5. Mounting Options
The IQeye 4 Series Dome is designed to be used in one of the
following configurations:
a. Surface mounted to any interior durable surface wall.
b. Surface mounted to a plenum or other durable
ceiling surface.
c. Mounted to the IQeye 4 Series single-gang box Wall
Mount Adapter (P/N IQD4-WB or IQD4-WG).
d. Used in conjunction with a ¾" NPT threaded pipe
(not included) as part of a pendant mount solution
with the use of the IQeye 4 Series Pendant Mount
Adapter multi-pack (P/N IQD4-PB or IQD4-PG).
Note: The first section of this guide covers installation of an IQeye 4
Series Dome without the optional mounting adapters. The subsequent
sections briefly discuss how to mount your dome camera with the
optional adapters.
6
6. Mounting on to an Interior Durable
Surface Wall
a. Remove the camera trim cover by pressing the mounting
clips with the supplied trim cover removal tool. Then pivot
the trim cover up and away from the camera base as shown
in Image 4.1
Image 4.1
b. If using a PoE Ethernet cable coming through the wall, be
sure to run this cable through the cable pass-through in the
camera base plate and connect it to the Ethernet port on the
camera as shown in Image 4.2
Image 4.2
7
c. Mount the IQeye 4 Series Dome camera base to the desired
wall or ceiling surface using the supplied or equivalent mounting hardware.
d. Remove the camera shroud by placing your palm over the top of the
shroud, then gently squeezing the
two tabs toward the front of the
shroud toward the center of the
camera. Pivot these tabs away from
the camera then pull the shroud off
the camera as shown in Image 4.3.
Image 4.3
e. Set the field-of-view using the IQeye 4 Series Dome’s 3-axis
gimbal.
f. Focus the camera by twisting the fixed-focal length lens clockwise or counter-clockwise to achieve the desired focus.
g. Replace the camera shroud by first positioning the shroud
against the rear shroud tab then pivoting the shroud down
toward the front two mounting tabs. Squeeze the shroud gently
and push it down to engage the front two mounting tabs.
8
h. Attach the camera trim cover to the camera by pushing it
gently on to the camera. You should hear an audible SNAP
as the trim ring fastens into place.
NOTE: The cover fits in only one orientation.
Do not apply excessive force or you may damage the trim cover. If it does not push down
easily on to the camera, you have the cover
flipped 180° from the correct orientation.
Remove the cover, flip it 180° and try again.
An easy way to identify the correct orientation
is to look for the “mouse door” cable slot in the
trim ring and align that on the same side of
the camera as the Ethernet port.
Image 4.4
7. IQeye 4 Series Dome Single-Gang Wall
Mount Installation
The IQeye 4 Series Dome Single-Gang Wall Mount Adapter is
designed to easily wall-mount your dome camera on any singlegang electrical box, or to configure your IQeye 4 Series Dome
so that the dome is pointed downward.
A. Pull your PoE Ethernet cable through the
back slot of the Wall Mount as shown in
Image 4.5, and attach the Wall
Mount to a single-gang box or to
a durable interior wall surface
using the supplied or equivalent
hardware
9
Image 4.5
B. Pull the PoE Ethernet cable through the cable pass-through in
the camera base plate and connect it to the camera’s Ethernet
port.
C. Attach the camera base plate to the wall mount using the supplied qty. (2) machine screws.
D. Setup the camera as described in step 6.
8. IQeye 4 Series Dome Pendant Mount
Installation
The IQeye 4 Series Dome Single-Gang Pendant Mount Adapter is
designed to easily mount your 4 Series Dome via a ¾" NPT conduit (not supplied).
A. Pull your PoE Ethernet cable
through the top of the Pendant
Mount and attach the Pendant
Mount to the conduit by threading the pendant
cover to the conduit as shown in Image 4.6.
B. Pull the PoE Ethernet cable through the cable
pass-through in the camera base plate and
connect it to the camera’s Ethernet port.
Image 4.6
C. Attach the camera base plate to the Pendant mount using the
supplied qty. (2) machine screws.
10
D. Setup the camera as described in steps D-H in section #6.
NOTE: The IQeye 4 Series Dome Pendant Mount does not provide a
weather seal to the camera. The IQeye 4 Series Dome in all of its mounting configurations is still an interior camera.
9. PC Configuration of the IQeye 4 Series
Dome
1. Plug the IQeye camera into the network.
2. The IQeye D40S, D41S and D42S cameras are powered via
the Ethernet using an IEEE 802.3af power source.
Power Source Warning:
Note that your IQeye 4 Series camera can only be powered with a
standard IEEE 802.3af PoE injector or PoE switch. It CANNOT BE
TM
POWERED with DC, AC or with the IQinVision proprietary IQpoet
injector.
3. IQeye 4 Series field of view and focus adjustment must be performed using a browser to view the camera image.
Insert the IQtools CD into the CD drive of the PC. Once the CD
auto-starts, you can either run
IQfinder right off the CD by clicking
the “Scan for IQeye cameras on my
network” option or you can install
IQfinder on your local machine by
selecting the “Install IQfinder” option.
11
4. Click the “Scan for IQeye
cameras on my network”
button to find IQeye cameras.
The detected cameras will be
displayed in the IQfinder window. Highlight a camera from
the list and click the “Edit”
button to edit the selected camera’s IP settings.
5. The Edit window allows
the Name, IP address,
Subnet, and Gateway of the
camera to be changed. It
also allows the camera to
be configured for DHCP.
Click the “Apply” button
after making the desired
changes.
Note: Changing between a static IP address and DHCP will
require the camera to be rebooted.
12
To view a camera “Double click” on a camera entry in the list
or click the “Open” button. The “Live” page will be displayed.
Note: It’s also possible to
open Internet Explorer, and
enter the IP address of the
IQeye device in the address
field of the browser.
6. To perform further configuration of the camera click on the
“Setup” tab.
Note: The default username is “root” and the default password is “system”.
For further information see the IQeye documentation on
the installation CD or at http://www.iqeye.com.
IQinVision, Inc.
33122 Valle Road
San Juan Capistrano, CA 92675-4853 USA
Part Number: 901-0093 Rev A
13
IQinVision 2 Year Limited Hardware Warranty
Warranty Coverage
IQinVision, Inc. (“IQinVision”) warranty obligations are limited to the terms set forth below: IQinVision warrants the
original purchaser that the IQINVISION Network Video product enclosed with this limited hardware warranty will in
respect of the hardware be free from defects in design, workmanship and materials under normal use for a period of
two (2) years from the date of the original end-user purchase (“Warranty Period”). The original purchaser shall without undue delay notify IQinVision of any defect which appears according to IQinVision’s RMA Handling procedure, failure to which shall mean that the purchaser loses its right to have the defect remedied. A valid form of a bill of sale or
receipt from an authorized retailer/distributor with the date of the original purchase must be presented to obtain warranty service. If a valid claim is received within the Warranty Period, the sole remedy of the original purchaser and
IQinVision’s sole and exclusive liability shall be limited to, at IQinVision’s sole discretion, IQinVision will repair or
replace defective parts of the IQeye camera with new parts, or with serviceable used parts that are superior or equivalent in performance to new parts, without charge. Repaired or replacement hardware will be warranted for the remainder of the original Warranty Period or ninety (90) days, whichever is longer. When a product or part is exchanged the
replacement hardware becomes the property of the original purchaser and all hardware or part thereof that is
replaced shall become the property of IQinVision. This Limited Warranty is applicable in all countries and may be
enforced by contacting IQinVision support worldwide, for more information please visit our web site www.iqeye.com
Exclusions and Limitations
This warranty does not apply (a) to faulty and improper installation, maintenance, service, repair and/or alteration in
any way that is not contemplated in the documentation for the product or carried out with IQinVision’s consent in writing, operational adjustments covered in the operating manual for the product or normal maintenance, (b) to cosmetic
damages, (c) if the product is modified or tampered with, (d) if the product is damaged by acts of God, accident, normal wear and tear and deterioration, improper environmental conditions (including, but not limited to, electrical
surges, water damage, chemical exposure, and/or heat/cold exposure) or lack of responsible care, (e) if the product
has had the model or serial number altered, defaced or removed, (f) to consumables (such as storage media or batteries) (g) to products that have been purchased “as is” and IQinVision, the seller or the liquidator expressly disclaim
their warranty obligation pertaining to the product, misuse, abuse, negligence, (h) to any non-IQinVision hardware
product or any software (irrespective of packaged or sold with an IQinVision hardware product) and IQinVision products purchased from an unauthorized distributor/reseller,(i) to damage that occurs in shipment or (j) to damages by
any other causes not related to defective design, workmanship and/or materials.
All Inquiries for RMA and Warranty Repair should be directed to [email protected] or to the following:
IQinVision
33122 Valle Road
San Juan Capistrano, CA 92675-4853 USA
Phone: +1-949-369-8100 or 1-877-850-0805 (toll-free in U.S.)
Fax: +1-949-369-8105
NOTE:
• If the product is to be used outdoors or in dusty, humid, or other hostile environments, it must be suitably protected.
• For camera products supplied without a lens, extreme care should be used when mounting a lens on these products.
Damage to the product due to incorrectly mounted lenses will invalidate this limited hardware warranty.
• Failure to comply with any of the aforementioned requirements will invalidate this Limited Hardware Warranty.
THE WARRANTY AND REMEDIES PROVIDED ABOVE ARE EXCLUSIVE AND IN LIEU OF ALL OTHER EXPRESS OR IMPLIED
WARRANTIES INCLUDING, BUT NOT LIMITED TO, THE IMPLIED WARRANTIES OF MERCHANTABILITY OR FITNESS FOR
A PARTICULAR PURPOSE. CERTAIN JURISDICTIONS DO NOT ALLOW THE EXCLUSION OF IMPLIED WARRANTIES. IF
LAWS UNDER SUCH JURISDICTIONS APPLY, THEN ALL EXPRESS AND IMPLIED WARRANTIES ARE LIMITED TO THE WARRANTY PERIOD IDENTIFIED ABOVE. UNLESS PROVIDED HEREIN, ANY STATEMENTS OR REPRESENTATIONS MADE BY
ANY OTHER PERSON OR FIRM ARE VOID. EXCEPT AS PROVIDED IN THIS WRITTEN WARRANTY AND TO THE EXTENT
PERMITTED BY LAW, NEITHER IQINVISION NOR ANY AFFILIATES SHALL BE LIABLE FOR ANY LOSS, (INCLUDING LOSS
OF DATA AND INFORMATION), INCONVENIENCE, OR DAMAGE, INCLUDING, BUT NOT LIMITED TO, DIRECT, SPECIAL,
INCIDENTAL OR CONSEQUENTIAL DAMAGES, RESULTING FROM THE USE OR INABILITY TO USE THE IQINVISION
PRODUCT, WHETHER RESULTING FROM BREACH OF WARRANTY OR ANY OTHER LEGAL THEORY. NOTWITHSTANDING
THE FOREGOING, IQINVISION’ TOTAL LIABILITY FOR ALL CLAIMS UNDER THIS WARRANTY SHALL NOT EXCEED THE
PRICE PAID FOR THE PRODUCT. THESE LIMITATIONS ON POTENTIAL LIABILITIES HAVE BEEN AN ESSENTIAL CONDITION IN SETTING THE PRODUCT.
14