1
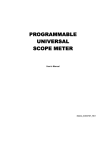
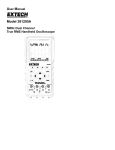
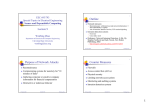
by Introduction Welcome to VERVE and Physical Computing inXus interactive™ is proud to present VERVE™, the easiest and most fun way to control your computer with the physical world. Since the 1970’s, we’ve primarily controlled computers using a mouse and a keyboard. It’s been over 40 years, and things haven’t changed much since then. With VERVE™, you now have the power to control your computer, any computer, with the world around you. Once you get started, you’ll be surprised at how creative you can be. You’ll be controlling apps and making things happen by touching, jumping, singing, shaking. Soon, you’ll wonder why we haven’t been doing this all along! Connecting the physical world to the computing world is called physical computing, and it’s about to revolutionize the way we use computers and interact with technology. We at inXus interactive™ are committed to empowering every creative person to participate in this exciting endeavor. Sensors The key to making the physical world accessible to the digital world (e.g., your computer) is through the use of small electronic devices called “sensors”. The job of a sensor is to convert a state of the environment into an electrical signal, so that the environment can be monitored. For example, a motion sensor converts movement into an electrical signal; a temperature sensor converts heat into an electrical signal; a light sensor converts light into an electrical signal. There are sensors for monitoring almost everything you can imagine, and new sensors are being invented every day. Voltage Environmental state Sensor A sensor converts an environmental state into an electrical signal, often a voltage. 1 Most sensors are designed to convert the environmental state into a voltage. Usually a sensor needs special electronics to “condition” the electrical output so that it is suitable for reading into a computer. That means the sensor’s electrical signal must usually be amplified, filtered, and adjusted by so that its range of voltage is reasonable for the electronics that will convert it into digital information. This is not a trivial task, and this is usually a significant barrier to people who want to use sensors in their electronic projects. Fortunately, inXus interactive™ has taken care of all that for you. We have prepared a variety of sensors so that they are ready to go. The sensors have been pre-selected to be appropriate for most people’s needs, have conditioning electronics on board, are designed to accept a single power source, produce a reasonable electrical signal, can be easily mounted in your project, and have a simple, familiar connector. This allows you to focus on the creative aspect of your project without getting bogged down with the details of each sensor. Computer hardware interface The electrical voltage coming from the sensor electronics is not yet ready to be put into your computer. This is because the voltage is an analog signal; your computer requires information to be in digital form. To read a voltage into your computer you need special interface electronics that has an analog-to-digital converter, or ADC. The ADC is part of an electronic system called the hardware interface. The purpose of the hardware interface is to measure the electrical signal on the ADC’s input on a regular basis, then send a number to the computer that is proportional to the measured voltage. This way, the computer knows the sensor’s value because it has a number that was sent to it by the hardware interface. Many popular electronic kits, such as Arduino™ and Basic Stamp™ have ADCs built into them so that people can use sensors in their projects. The hardware interface must communicate with the computer using a standard method called a communication protocol. There are many different communication protocols; some of the protocols we use today were invented in the 1950’s! One of the most common protocols is called Universal Serial Bus, or USB. Many computers, tablets, and cell phones support this protocol. USB is fast, robust, and a popular standard. Unfortunately, to get a number from the ADC into your computer by USB is not trivial. It requires special USB driver electronics that takes care of all the communication and electronic requirements between the computer and the interface electronics. In fact USB is so difficult that most beginners cannot design a project with USB. Fortunately, many commercial hardware interfaces (sometimes called “data acquisition devices”) and hobby kits such as Arduino™ take care of this. The VERVE™ has 7 ADCs and a USB driver built in, so you don’t have to worry about getting your sensor information into your computer. Computer software interface Once the sensor’s electrical signal has been converted into a digital number and passed to the computer, you will need software to do something with the signal. Most commercial hardware interfaces require you to write custom software to use this information. Unfortunately, this means that (1) you must learn to write custom code, and (2) you cannot easily use your sensors to control software that you didn’t write yourself. Writing your own code can be fun and rewarding, but it slows down the creative process. Accessing the USB’s serial port usually results in debugging headaches, even for experienced programmers. Also, not all software development environments are supported by 2 by all commercial hardware interfaces. So even if you have a commercial data acquisition device or hobby device, you may find that you are stumped by having to write the code to make use of the sensor information. That’s a fast way to kill a project. The exciting feature of the VERVE™ is that the software interface is not needed! You can use the sensor information coming out of the VERVE™ without knowing a thing about serial communications, and without writing a single line of code. The VERVE™ allows you to control applications that you wrote yourself, as well as applications that you didn’t write. This includes applications such as video games, media players, slide shows, web pages, etc. Summary As you can see, there’s a lot involved when getting information from the physical world into your computer. The process is as follows: (1) environmental status must be converted to an electrical signal by a sensor, (2) the sensor’s electrical signal must be conditioned to make it appropriate for downstream electronics, (3) the incoming electrical signal must be digitized by an ADC and converted into a digital number, (4) the digital number must be passed to a computer using a communication protocol, (5) the numbers must be captured and processed by interface software that uses this information in a meaningful way. There is so much technical work involved that, until now, non-experts had no way of doing creative things with their computers, no way to explore the possibilities of better ways to interact with technology. It’s no wonder we’re still using a mouse and keyboard! Environmental state Sensor Sensor and front-‐end electronics The path from the physical world to the digital world system (computing system). Information must be collected by front end sensors and electronics, the signals must be conditioned, then digitized and prepared for communication to a computer. Once in the computer, software is needed to capture the information and do something useful with it. The VERVE™ system takes care of all of this. ADC USB Driver Hardware interface So2ware interface 3 by How VERVE works Overview The VERVE™ system, by inXus interactive™ simplifies the entire process of connecting sensors to your computer and using them to do something interesting. The sensors provided by inXus interactive™ are easy to use in your project, and work without the need for any additional electronics. The VERVE™ unit acts as (1) a sensor driver, (2) a hardware interface, and (3) a software interface. You will configure your VERVE™ using a Mac or Windows PC, but once configured the VERVE™ unit can be used with almost any computer, including Linux™, Raspberry Pi™, Surface™, and many portable devices. Everything has been designed to allow you to get going on your project quickly, without getting slowed down by hardware or software details. The standard VERVE™ starter kit comes with the VERVE™ unit, several sensors, a USB cable, and attractive cables to connect the sensors to your VERVE™ unit. The VERVE™ connects to your computer via a standard USB cable, and gets its power from the 5 v USB. Up to seven sensors connect to the VERVE using input jacks on the side of the unit, and sensor cables that have 3.5 mm audio jacks on their ends. When connected, the VERVE™ provides 3.3 v power to the sensors, and accepts a signal from the sensors that ranges from 0 to 3.3 v. It takes only a few seconds to connect a sensor or swap out with another sensor. Sensors can be “hot swapped” at any time. The 3.5 mm jacks make secure connections that are clean and tidy—no soldering is required, there are no loose wires, and there is no messy nest of electronics. Standard VERVE™ starter kit comes with everything needed to get started, including cables. 4 by VERVE™ is a Human Interface Device Almost all hardware interfaces convert electrical signals into digital numbers and send those numbers to the computer which must then capture the data stream and do something with the information. Usually this means you must write custom software to do anything useful with your sensors. VERVE™ operates in two modes. In its first mode (“inactive”), it behaves the same as other hardware interfaces, sending numbers to the computer. However, in its second mode (“active”), VERVE™ does not send a typical data stream. Instead, it sends keyboard and mouse events. Almost every modern computer understands keyboard and mouse events, and almost every computer app is designed to respond to keyboard and mouse events. Thus, the VERVE™ can control almost every app on almost every computer without anyone having to produce a single line of computer code! Keyboard and mouse devices are classified as “Human Interface Devices” or HIDs. Other HIDs include joysticks and some game controllers. When VERVE™ is connected to your computer and turned on to active mode, it looks like a standard HID device. If your app uses the mouse or keyboard, it will be controlled by VERVE™. Your app has no way of knowing if VERVE™ sent a keyboard event or if you pressed a button on your keyboard. This powerful feature makes VERVE™ extremely easy to use, and makes it work with many apps and computers. Mapping sensors to events What makes VERVE™ useful is its internal mapping system. If you want to control your favorite app using a sensor, you will need to know which keyboard or mouse events you want to send, and when to send them. Since VERVE™ accepts seven sensor inputs, it can send seven keyboard/mouse events. In fact, as we will see, VERVE™ can send 70 separate keyboard/mouse events to your computer. That is a lot of control! But it is also very difficult to keep track of things. Fortunately, VERVE™ makes this easy for you. On board each VERVE™ unit is a small amount of dedicated memory that stores a small text file that contains a table of numbers. This important text file acts as the VERVE™ configuration file, and maps each sensor channel to actions, namely send keyboard/ mouse events. These numbers are the mapping values for each of the seven sensors, and 3.3 v 0 v Sensor value 1 2 3 4 5 6 7 8 9 10 Ac#on zones for each sensor channel 100 % 0 % VERVE™ maps sensor values to specific actions, usually sending keyboard/mouse events to the computer. Each action is identified as a numerical code in the map file, and each zone has an action associated with it. 5 by each number represents a code for an action. There are ten mapping values per sensor, effectively dividing each sensor into ten action zones. When a sensor value is in a particular zone, the VERVE™ unit will execute an action, typically sending a keyboard/mouse event to the computer. The action is based on the mapping value for that zone. Most of the zone mapping values are null, meaning that most zones are mapped to do nothing. When sensor data is received into the VERVE™ unit, it is first digitized by the ADC (10 bit) which converts the voltage into a number from 0 to 1023. The number is then scaled and converted to a value from 1-10, representing zones 1 through 10. If the value falls within zone 1, then the action corresponding to zone one for that sensor channel is executed (e.g., a particular keyboard/mouse event sent to the computer). If the value falls in zone 2, then a different keyboard/mouse event may be sent, and so on for each zone. The configuration file contains everything VERVE™ needs to know to scale the sensor value, map it, and perform a specific action. You can copy this file and use it with other VERVE™ units, and they will map their sensors exactly the same way as your first VERVE™. You can also edit this file by hand if you want. Even though the VERVE™ configuration file can be edited by hand, we do not recommend doing this. It would be too cumbersome to edit maps, try sensors out, then re-map again until you get things working the way you like. Instead, we have created a very useful, easy-to-use application that makes mapping sensors a snap. A VERVE™ system in action. User connects a sensor to VERVE™ unit using standard 3.5 mm jacks and attractive cables. VERVE™ unit accepts up to seven sensors and connects to PC by USB connector. Once connected, the VERVE™ appears to be a keyboard and mouse, and sends events as determined by its sensor/action map. 6 by Mapping VERVE Getting started The VERVE™ ships with a VERVE™ mapper application that runs on Mac OS and Windows computers. It is provided on a USB memory stick (or SD card), and is also available on the inXus interactive™ VERVE™ website. This application is used to produce the action map that is at the heart of your VERVE™ unit. It is very intuitive and easy to use, and allows you to play around with your sensors to determine the best map for your project. (Note: the mapper application is not available for Linux; however, once the VERVE™ is mapped, it may be disconnected from the Mac or Windows PC and connected to any Linux computer to control apps on the Linux unit.) To get started, drag the installer file to your desktop and double-click to install the app on your computer. The app does not need to be placed in your system folder and does not need administrator privileges to install or run. However, if you want to install the app in a protected location, such as your system level apps folder, you may need administrator privileges. Once the app is installed, you can connect your VERVE™ unit to your computer (make sure the mode switch is in “disabled” or “off ” mode), then click on the VERVE™ mapper app to get started. Sensor mapping Once the VERVE™ mapper app has started, you should see a screen similar to the figure below. In the default view of VERVE™ mapper, you will see all seven sensor channels at once. You can connect a sensor to the VERVE™ and play with it. You should see the sensor bar respond on the VERVE™ mapper screen. (Note: if the sensor bar is not responding, make sure that the mode switch on the VERVE™ unit is set to “disabled” or “off ”.) If you can see the sensor bar responding to your sensor, you are ready to go. This image shows the default view of the VERVE™ mapper. All seven sensor channels can be viewed simultaneously, and each sensor’s value is displayed in real time. Each channel is divided into two zone regions. A third region can be identified by dragging up the small oval handle at the bottom of the sensor bar. 7 by Each sensor bar on the mapper app graphically shows the value that VERVE™ is reading from your sensor in real time. Up to seven sensors can be simultaneously viewed by the mapper app. This allows you to see what is going on while you play with the sensors. This is important because you will usually not know how the sensors are going to respond until you try them. While playing with your sensors, you can easily determine where each sensor should trigger an action, which is usually a keyboard/mouse event. VERVE™ allows for up to ten actions per sensor, each corresponding to a fixed zone on the sensor scale. However, most projects will need only two or three actions per sensor. Thus, in the default view, the VERVE™ mapper allows you to divide each sensor scale into up to three zone regions. To do this, grab the left triangle control handle on the sensor you want to map. Drag the handle up or down to identify the part of the scale that represents the sensor region of interest. Then click in that region. A callout box will appear that allows you to select the action associated with that range of sensor zones: a keyboard event (by clicking on the keyboard) or mouse event (by selecting from a mouse diagram). Once you have selected your action, a code will appear in the selected region that represents that action. You may repeat this activity as often as you like for different sensor zones, or to change zone actions. When clicking on a zone region, a callout box allows you to select the action that you want for that region. Each region can be mapped by this method. Each keyboard/mouse event has a modifier that indicates how often that event should be sent while the sensor is in the zone. For example, some projects might want a single keyboard event when a sensor enters a zone (perhaps to start a song or video on a media player). Other projects may want the keyboard to be continually triggered while the sensor is in the zone (perhaps to adjust the volume on the media player). Still other projects might want the keyboard to be repeatedly triggered on and off at a given rate while the sensor is in the zone (perhaps scrubbing through a media sequence). You can adjust this value from the callout box when selecting your action. In some projects, you may want fine level control over the actions associated with the sensors. VERVE™ allows for up to ten actions per sensor, corresponding to ten zones per sensor. To set each action separately, click on the toggle button below the sensor bar. Each 8 by of the ten zones will appear on the bar. You may map each zone separately in the same manner as before. If you wish to return to three regions, you may click the toggle button back. Warning: if you return to the three regions state, you will lose the information that you entered for the ten individual zones. All ten zones may be viewed and mapped individually if desired. This gives very fine level of control, but is more time consuming. Sensor scaling Sometimes a sensor’s range of values will not be convenient for the mapping you wish to perform. Once you have tried the sensor out, you may see that the effective range of the sensor is not enough for you to make meaningful maps to actions. In this case, you may want to scale the sensor value before mapping. Scaling allows you to “zoom in” to a part of the sensor range that is of interest to you before defining the actions map. To scale a sensor, you will want to click on the tab that corresponds to the specific sensor channel of interest. The VERVE™ mapper now displays a graph that represents the transformation from raw ADC values to zone values. The horizontal scale (red bar) represents the raw values from the sensor; the vertical scale (purple bar) represents the zone values. The sensor mapping bar is on the right and works the same way as before. You can zoom into a smaller region of the raw values by dragging the small control circles on the chart to the left or right. This effectively changes the transformation so that only the region you want will be mapped into zones, and everything else will be below or above the zones region. Since the sensor values are being displayed in real time, it is easy to experiment to find the range of sensing values that work for your project. Once you have changed the scaling in this way, you can continue to map actions as before. The scaling values will continue to be in use even if you are no longer viewing this screen. Thus, you may adjust each of the seven sensor channels as you see fit. 9 by The sensor value may be scaled prior to mapping. This allows you to adjust the sensitivity of the sensor input to be more appropriate to your project. Each sensor has its own scaling and can be adjusted individually. Saving your map After mapping your sensors you should save the map to the VERVE™. If you do not save the map, the VERVE™ will not be updated with this map. To do this, select “Save” from the button at the bottom of the screen. Once you have saved the map, the VERVE™ unit will use this map to generate the appropriate keyboard/mouse events when it is enabled. You may also export the map to save it for future use or to share with friends, and you may store multiple maps on the VERVE™ for convenience. When using the VERVE™ mapper app, you have the option of loading in a previously saved map at any time. Each map that is saved or loaded is referred to as a “profile”. The map must be saved to the VERVE™ before using the VERVE™. Multiple maps, or “profiles” can be saved. 10 by Using VERVE Making it go Once the VERVE™ has been mapped with the VERVE™ mapper app (profile was saved in the app), you are ready to go. Most people will use the same computer to map the VERVE™ and to use in their project. However, it is not necessary to use the same computer. You are free to disconnect the VERVE™ and use it with any other computer, including Linux computers, Raspberry Pi, and any device that accepts standard keyboard/ mouse events on a USB. To use the VERVE™, first connect it to your target computer, then move the switch to “enable” mode. A green light should turn on indicating that the VERVE™ is now operating as a keyboard/mouse device. You may connect sensors to your VERVE™ at any time. The VERVE™ will monitor the sensors and send keyboard/mouse events to the computer according to the map stored in the unit. Controlling apps Any app that can be controlled by a keyboard or mouse can be controlled by the VERVE™, however, some apps are easier to control that others. Apps that use mostly mouse actions at specific locations on the screen (such as selecting menus) are unlikely to be good candidates for controlling with VERVE™. However, apps where mouse actions are simple and much control is provided by keystrokes are likely to be good candidates. Most video games, such as flying or racing games, are usually very easy to control with the VERVE™ system. Other examples are media players, sound players, and the like. Even slide shows like Powerpoint™ are easy to control with VERVE™ (imagine advancing slides by waving your arm). If you want to write your own app, you can specify specific “secret” keystrokes to control your app and map these for your project. Playing with your project One of the wonderful things about the VERVE™ system is that it allows explorative play with your project. It’s unlikely that you will break anything, so go ahead and be creative. The sensors are rugged and designed to be simply plugged in and used. We encourage you to try things out, quickly adjust mappings, then flip the switch to try out your project. Once you get things working the way you like, you can then optimize and make your project more permanent. 11 by What’s next? Learn, discover, create Our goal at inXus interactive™ is to empower everyday people to use technology to do amazing and interesting things that delight, inform, and make the human condition better. We believe the best way to do this is to dive in and do hands on activities. We learn best by doing, we discover best by exploring, and we create best by trying. We think the VERVE™ system will allow you to do exactly that with physical computing. This is especially true for children, who are natural explorers and do not have preconceived ideas about technology. We encourage you to use the VERVE™ system with children, at home, at school, and at play. (Note: since some parts are small, we do not recommend this product for children under the age of 7.) Who will be the next Steve Jobs? Share The creative process is enhanced when we share our creations and learn from others. If you’ve made a great project, why not share it with others? Make a video of your project and post on YouTube™ or other video sharing website. Send us a link. If we like it, we’ll add it to our home page. We also think workshops and hackathons are a great way to collaborate. Change the world Maybe you’ll think we’re pretentious, but we think we’re in the midst of a technology revolution. For the first time, technology is cheap, ubiquitous, and available to everyone. But technology still needs to become human-centric, our experiences with technology should be natural and meaningful. Who’s going to change that? This innovative work doesn’t have to be relegated to elite researchers in ivory towers and engineers in milliondollar research labs. We can all play a role. Perhaps the greatest contributions will come from everyday people, because we all have unique experiences and perspectives, and because creativity is in all of us. We just need the right tools. You’ve got the VERVE™, let’s get started! We can’t wait to see what you’ll make! 12 by