1
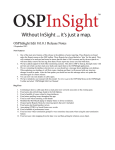
SHORT INSTRUCTIONS FOR OPERATING Deco1 (Leica DM6000B)
AT CIAN
Version 2, July 2014
General reminders for Deco1
•
Obey 10min/10min rule, i.e. system has to be on for at least 10min and off for at least 10min.
•
Avoid bumping into equipment, leaning on table while acquiring
•
Move data off microscope computer after acquisition
Useful abbreviations and terms
BF = bright field
WFF = wide field fluorescence
PH = Phase Contrast
TL = transmitted light
IL = incident (fluorescent) light
FD = field diaphragm
AP = aperture diaphragm, also FA = field aperture
Light sources: halogen lamp (for TL), Exfo mercury lamp (for WFF)
More information
The Leica DM6000B manual is found on the Deco1 computer, and in the ‘Shared’ folder of the CIAN
server.
1 - Equipment Setup
Fig. 1: Basic setup of Deco1
1: EM-CCD camera
2: slider, eyepiece-camera toggle
3: fluorescent filter turret
4: objective turret
5: stage with slide holder
6: condenser
7: condenser height adjustment
8: focus knob
9: fixed function buttons, FD, AP, IL/TL, intensity
10: touchscreen
Fig 2: control boxes
1: microscope
2: Exfo fluorescence
lamp
3: camera
CIAN Deco1 – short instructions, version 2, July 2014
page 2 of 6
2 - Starting up Deco1
1. Take the dust cover off the microscope, put on hook/table/chair, not the floor
2. Turn on Leica electronics box (Fig 2-1, microscope control), Exfo lamp (Fig 2-2), and camera (Fig
2-3)
3. Turn on computer, log in to your account, launch Volocity program, log into license server
4. Visually inspect objectives, clean as needed (see section 2.2)
5. Adjust Köhler illumination (see 2.1)
2.1 - Adjusting Köhler Illumination
1. Insert test slide, adjust light intensity, focus on specimen in bright field
using 10x objective
2. Close Field Diaphragm (Fig 1-9, ‘FD’) to see edge, focus it by adjusting the
condenser height (Fig 1-7), center if needed, open FD just enough to
illuminate field of view (see images on the left)
3. To adjust Field Aperture, remove one eyepiece, use buttons (Fig 1-9, ‘AP’)
to adjust aperture to 80% of back of objective
4. In case of poor images, clean objective (see section 2.2), repeat procedure;
if unsuccessful, notify facility personel
5. Repeat for every objective to be used (or at least do it for objectives used in
image acquisition)
2.2 - Cleaning objectives
Clean immersion objectives before and after use as follows:
•
Take a lens paper and fold it in three into a long rectangle.
•
Wipe the lens gently by holding both ends of the lens paper, dragging it gently across the
objective lens in a line. Repeat with a fresh area of the tissue three times
• Repeat as needed to remove excess of immersion oil.
If needed, clean the objective more thoroughly:
•
As above, but with a drop or two of lens cleaner (the blue fluid) on the lens paper, then water.
3 – Operating the microscope
3.1 Manual operation
The microscope can be controlled from the buttons and/or
touchscreen alone, if only eyepiece observations are
needed. Here we describe the main icons on the
touchscreen, and the functions of the buttons on either side
of the microscope. Please refer to the Leica user manual for
usage details.
buttons on left
PH: phase contrast (TL)
CHANGE TL: switch through all TL processes
COMBI: combination mode (phase plus
fluorescence
buttons on right
FLUO: fluorescence (last filter cube)
CHANGE CUBE: switch through filter cubes,
clockwise
SHUTTER FLUO: open/close fluorescence shutter
CIAN Deco1 – short instructions, version 2, July 2014
page 3 of 6
3.2 – Image acquisition with Volocity
1. Start Volocity by clicking the desktop icon. Select ‘3DM acquisition’, and enter your user name
and password
2. Select “Video Preview” to start an acquisition session, or “Open Library” to view existing images
3. Select a light path using the colored icons
4. To switch between eyepieces and camera, use slider (Fig 1-2); toggle between three positions:
100% eyepiece, 50%/50% (will reduce the signal strength by 50% for either one), 100% camera
5. Adjust camera sensitivity (EM gain), exposure time to optimize signal, noise, bleaching; save
settings for each light path by clicking little switch icon
6. Open or create a library in order to acquire images
7. Take single images with camera icon, or set up multi-dimensional acquisition protocol (section
3.2.2).
8. To view images, click on image icons in left screen panel.
Fig 3: Volocity main screen, device control elements
< Time, absolute, or time of acquisition
< Pixel intensity, click to toggle for display options
< Acquisition rate/frequency, pull down to select
< Acquisition setup (green rectangle, double-click)
< Light path manager
< Button to save changes in current light path
< Fluorescence shutter
< Exposure time
< Auto exposure (use with caution)
< Binning (use with caution)
< Auto Contrast (use recommended)
< Camera sensitivity (EM gain)
< Low/high light setting
< contrast mode (do not use to switch)
< filter cube (do not use to switch)
< objective (do not use to switch)
< Leica focus control, use to set up z stack (3.2.1),
click button to open focus control window
CIAN Deco1 – short instructions, version 2, July 2014
page 4 of 6
3.2.1. Z-stack setup
1. focus on the sample
2. click on the focus control button to open control window; slider arrow on the
right can be used to control stage Z position
3. choose <Set Zero> to set current position as 0µm
4. find the top/bottom of the sample, click <Set Top>/<Set Bottom> for
absolute stack definition
5. alternatively, enter relative distances from current position in the up/down
arrow fields for relative stack definition, e.g. ‘5’ and ‘-5’ for a 10µm stack
3.2.2. Acquisition protocol setup
1. Open Acquisition Setup window by double-clicking green rectangle in device control interface (Fig
3)
2. Select the channel(s) for acquisition, e.g.
several fluorescent colors, or BF and
fluorescence
3. For Z-stack acquisition, select Leica stage
control, then choose one:
• Capture using Z spacing
• Capture this many slices
4. Specify the order for channels and Z stacks
5. Shutter management – “balanced” usually
works well
6. Time: Setup the duration and frequency of
capture; note that the frequency can be set in
the device controls
7. Other tabs: not used on this microscope
Click OK to use immediately, or save acquisition settings using a descriptive name (‘save as – export’ to
Desktop) for future use with “Restore”.
CIAN Deco1 – short instructions, version 2, July 2014
page 5 of 6
4 – Handling and saving data
Acquisition should always be to your folder. After closing Volocity, move data off the microscope computer
onto a USB drive, an optical disk, or to the CIAN server. To avoid data corruption, DO NOT open Volocity
files over a network. Always make a copy on your local computer to view and analyze.
Volocity libraries
Data is saved into a library. A library contains individual images, or image sequences, i.e. images that
belong to multidimensional image stacks. The image sequences are also referred to as items.
The name of the Volocity library has no extension. In your file structure, you will see it as a
folder/directory. It contains a data folder, and a file that has the library name with the extension .mvd2 (and
possibly two files named desktop.ini and Folder.ico). All of these elements need to stay together to
maintain the integrity of the data.
To open an existing library in Volocity, you open the library folder and select the .mvd2 file within the folder.
To delete individual image sequences/items within a library, open the library in Volocity, select the item,
right-click on it, and select “Remove Item”.
To import data, also of other file types, create or open a Volocity library, then drag-and-drop the files, or
use File/Import.
Export of individual image sequences within Volocity
To extract individual image sequences/items from a library with multiple items, they can be exported as
Volocity library clippings. They can then be inserted into another (or a new) library.
-
Select the image sequence(s)/item(s) in the library view on the left side of the screen
-
File/Export, or right click item/Export:
o
Define name, location
o
Format: Item as Library Clipping
-
The library clipping will show up as a file with the extension .acff
-
To view and manipulate the data, open or create a library, then import the clipping into the library
by drag-and-drop, or File/Import
Export into other file formats
Image sequences (items) or the display of image sequences (views) can be exported into a number of
scientific and presentation formats in the same way as described above by then selecting a different
format.
Use of Volocity libraries in post-acquisition software other than Volocity
ImageJ/Fiji
Libraries can be opened if the LOCI Bio-Formats plugin is present. The plugin is part of Fiji. If you donʼt
have the plugin in your ImageJ installation, you can get information and download instructions here:
http://loci.wisc.edu/bio-formats/imagej
Drag and drop the .mvd2 file on the ImageJ/Fiji icon, or use File/Open…, which will open a dialog window
with display options. Can open one or more items from a library with multiple items.
CIAN Deco1 – short instructions, version 2, July 2014
page 6 of 6
5 - Shutting down Deco1
1.
2.
3.
4.
5.
Turn off Exfo lamp and the camera on their control boxes (Fig 2-2 and 2-3)
Exit the Volocity software, log off or shut down computer
Turn off power to Deco1 on the Leica electronics box (Fig 2-1).
Clean immersion objectives according to general instructions
Carefully replace the dust cover on the microscope
Appendix: Technical data for Deco1
Microscope Base:
Leica DM6000B upright microscope, motorized stage in z, motorized optics, Hamamatsu ORCA-EM EMCCD camera, acquisition software Volocity (Improvision/Perkin Elmer)
Objectives:
Position
Objective
1
10x/0.3 dry
2
3
4
40x/1.25 oil
5
63x/1.4 – 0.60* oil
6
100x/1.4-0.7 oil
* variable NA; make sure to check that the aperture is all the way open before imaging
Wide-field fluorescence:
Light source: Exfo metal halide lamp (Lumen Dynamics)
Filter set/cube
Excitation
filter
Beam
splitter
Emission
filter
Typical fluorophore
Filter Set A4
BP 360/40
400
BP 470/40
DAPI
Filter Set L5
BP 480/40
505
BP 527/30
GFP, AF488, FITC
Filter Set Y3
BP 545/40
565
BP 610/75
AF546, 555, Cy5
Filter Set YFP
BP 500/20
515
BP 535/30
YFP
Filter Set CFP
BP 436/20
455
BP 480/40
CFP