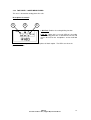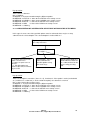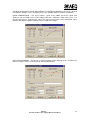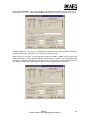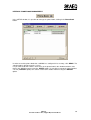
1
Portable Audio Codec, Digital Hybrid
and Mixer
MPEG Layer III
USER’S MANUAL
ED. 04/05
Firmware versions: Mcu 1.30 / Dsp 2.00 / Tav 6.99 or higher.
Software versions: FU 1.61.001 / RTC 1.61.002 / Server 1.61.010 or higher.
1
A.E.Q., S.A., the manufacturer of this equipment, is a “Registered
Company” by AENOR with reg. no: ER-080/1/96, in accordance with UNE standard EN - ISO 9001
CONTENTS
1.
EQUIPMENT DESCRIPTION
1.1. GENERAL DESCRIPTION
1.2. BLOCK DIAGRAM
2.
EQUIPMENT POWER SUPPLY
2.1. GENERAL
2.1.1. EQUIPMENT POWER SUPPLY
2.1.2. TURNING ON THE EQUIPMENT
3.
INSTALLATION AND CABLING
3.1. DESCRIPTION OF FRONT PANEL AND CONNECTION
3.2. DESCRIPTION OF BACK PANEL AND CONNECTION
3.3 DESCRIPTION OF TOP PANEL
3.3.1 TOP PANEL – LEFT AREA
3.3.2 TOP PANEL – RIGHT AREA
3.3.3 TOP PANEL – UPPER MIDDLE AREA
3.3.4 TOP PANEL – CENTRAL MIDDLE AREA
3.3.5 TOP PANEL – LOWER MIDDLE AREA
4.
OPERATION AND USER INTERFACE
4.1 USER INTERFACE MENUS
4.2 STATUS MENU
4.2.1 STATUS: CONNECTION STATUS SCREEN
4.2.2 CODING: CODING MODE IN USE SCREEN
4.2.3 NETWORK: NETWORK ACCESS MODE SCREEN
4.2.4 ISDN PROTOCOL: ISDN PROTOCOL USED SCREEN
4.3 CODING MENU
4.3.1 DESCRIPTION OF CODING MENU SCREENS
4.3.2 CODING MENU TREE
4.3.2.1 CODING MENU TREE IN USA MODE WITH BASIC CODING
SELECTED
4.3.2.2 CODING MENU TREE IN USA MODE WITH EXPANDED TREE
4.3.2.3 CODING MENU TREE IN EUROPE MODE WITH BASIC CODING
SELECTED
4.3.2.4 CODING MENU TREE IN EUROPE MODE WITH EXPANDED
TREE
4.3.2.5 CODING MENU TREE IN V.35 64KBIT CONNECTION WITH
BASIC CODING SELECTED
4.3.2.6 CODING MENU TREE IN V.35 64KBIT CONNECTION WITH
EXPANDED TREE
4.3.2.7 CODING MENU TREE IN V.35 128KBIT CONNECTION
4.4 SETUP MENU
4.4 .1 DESCRIPTION OF SETUP MENU SCREENS
4. 4 .1.1 DESCRIPTION OF STARTUP MENU SCREENS IN THE SETUP
MENU
4. 4 .1.2 DESCRIPTION OF SCREENS WITH SELECTABLE OPTION IN
THE SETUP MENU
4. 4 .1.3 DESCRIPTION OF SUBMENU SELECTION SCREENS IN THE
SETUP MENU
4. 4 .1. 4 DESCRIPTION OF ALPHANUMERIC INPUT SCREENS IN THE
SETUP MENU
4. 4 .1.5 DESCRIPTION OF PHONE BOOK ENTRY SELECTION
SCREENS IN THE SETUP MENU
4.4.2 SETUP MENU TREE
4.5 ISDN MENU
4.5.1. DESCRIPTION OF THE ISDN MENU STARTUP SCREEN
4.5.2 DESCRIPTION OF THE KEYPAD DIALING SUBMENU SCREEN IN THE
ISDN MENU
SWING
Portable Audio Codec, Digital Hybrid and Mixer
2
4.5.3 DESCRIPTION OF THE PHONE BOOK ENTRY DIALING SUBMENU
SCREEN IN THE ISDN MENU
4.5.4 DESCRIPTION OF THE MESSAGES SCREEN IN THE ISDN MENU
4.6 ANALOG DIAL MENU
4.6.1 DESCRIPTION OF THE KEYPAD DIALING SCREEN IN THE ANALOG
DIAL MENU
4.6.2 DESCRIPTION OF THE PHONE BOOK DIALLING SCREEN IN THE
ANALOG DIAL MENU
5.
ANCILLARY DATA CHANNEL
5.1. INTRODUCTION.
5.2. PORT CONFIGURATION
5.3. SOFTWARE CONFIGURATION
5.4. EXAMPLES
6.
USING THE EQUIPMENT. CONDENSED INSTRUCTIONS
6.1. CONNECT THE EQUIPMENT
6.2. CHECK THE CONTROLS
6.3. CHECK THE REST OF THE EQUIPMENT THROUGH THE MENUS
6.4 THE FIRST TIME (AND IN OTHER CASES), CHECK THE SETUP/ADVANCED
MENU
6.5 ESTABLISHING A V35 CONNECTION
6.6 ESTABLISHING AN ISDN CALL – DIALING THE NUMBER
6.7 ESTABLISHING AN ANALOG CALL – DIALING THE NUMBER
7.
E@sy OPERATION AND CONTROL SOFTWARE (Technicians/Advanced users)
7.1.SYSTEM DESCRIPTION
7.1.1. E@sy SYSTEM APPLICATIONS
7.2.PACKAGE DESCRIPTION
7.2.1.CONTENTS OF THE SOFTWARE PACKAGE
7.2.2.HARDWARE AND SOFTWARE REQUIREMENTS
7.3.REMOTE CONTROL SYSTEM
7.3.1 SYSTEM CONNECTIONS
7.3.2 SERVER PROGRAM
7.3.2.1 INSTALLATION
7.3.2.2 OPERATION
7.3.3 CLIENT PROGRAM
7.3.3.1 INSTALLATION
7.3.3.2 OPERATION
8.
FIRMWARE UPDATES (Technicians/Advanced users)
8.1.SYSTEM CONNECTIONS
8.2. INSTALLATION
8.3.OPERATION
9.
TECHNICAL SPECIFICATIONS (Technicians/Advanced users)
10.
A.E.Q. GUARANTEE
ANNEX:
A.1. IP CONNECTIONS (Technicians/Advanced users)
A.2. TA CONFIGURATION
SWING
Portable Audio Codec, Digital Hybrid and Mixer
3
1. EQUIPMENT DESCRIPTION
1.1. GENERAL DESCRIPTION.
The SWING is a portable mono audio codec, with a built-in ISDN terminal adapter, with a dualport (S and U) interface, ETSI (Euro ISDN) and ANSI (National-1) compatible at 64 Kbps using
one B channel, or at 128 Kbps using both ISDN B channels, selectable from the menu and at no
additional cost.
It offers a simultaneous-use digital hybrid, with echo cancellation and frequency extension, for
use on STN analog phone lines. It is ideal as a backup circuit or for transmitting from places
where there is no ISDN. It also includes a pre-mixer, two headphone outputs with separate
level control and four-wire connection.
FUNCTIONAL SPECIFICATIONS:
•
•
•
•
•
•
•
•
•
•
•
•
Inputs: Two microphone channels and one microphone-line channel.
Outputs: Two headphone channels and one auxiliary channel.
Auxiliary 4-wire Input/Output
Member of the E@sy family: A set of SWING and other E@sy equipment can be
controlled from a multi-station network, forming a high-performance system with
powerful functionality.
Additional V35/X21 interface at 64 Kbps/128 Kbps
Analog phone line interface.
12 VDC external power supply with universal input, 90 VAC <> 250 VAC, 50/60 Hz,
equipped with self-charging battery working as a UPS.
Automatic elimination of send signal on the return; adaptive cancellation of local echo
for STN lines and remote echo in G711 by means of algorithmic wideband LMS, with
double-talk detection.
Anti-clipper limiter at the transmission mixer output. Ta < 10 ms, Tr > 2,000 ms, prior to
A/D conversion.
Digital dynamics processor, after A/D conversion. Control and configuration from E@sy
client software.
Data channel, with separately configurable audio-data bandwidth in TX and RX.
Programmable automatic startup configurations associated with microswitches, which
enables equipment startup in specific environments for non-advanced users.
AVAILABLE CODING ALGORITHMS
BASIC
• G.711: When this coding mode is used, the SWING can generate and receive voice
calls through an ISDN line with other ISDN or STN numbers.
•
G.722 STATISTICAL: This mode is accepted worldwide for two-way communications
because of its low delay, so it is the most widely used in commentator and sports
broadcasting applications.
ADVANCED
• G.722 H221/H242: G722 coding mode with H221/H242 framing, used by some
manufacturers, also with low delay. It allows an ancillary data channel.
•
MPEG LII: Very well known and accepted coding mode, used when delay doesn’t
matter, as MPEG modes always have higher delay than G.722 modes. There are
64kbps coding modes with sampling rates of 48, 32 or 24 KHz and a 128kbps mode
with a 48KHz sampling rate.
SWING
Portable Audio Codec, Digital Hybrid and Mixer
4
MPEG Layer III: very well-known and accepted algorithm that presents better Audio
bandwidth at lower bit rates but at the cost of a longer encoding and decoding delay. The
EAGLE includes MPEG LIII for transmission in mono or stereo.
MPEG Layer-3 audio coding technology licensed from Fraunhofer IIS and Thomson
•
AEQ LD-2: AEQ proprietary mode combining the low delay of the G.722 with the
greater bandwidth obtained by using both ISDN B channels, thus reaching 15 kHz of
bandwidth. It can only be used if there is equipment with the same coding mode at the
other end, i.e., another SWING, an SWING or a COURSE.
In the SPLIT modes, the transmission (encoding) is independent of the reception (decoding).
This system allows you to receive a high quality Program Audio Signal from an event with a
relatively low quality Return Audio Signal with low delay.
•
SPLIT MODE: Allows to transmit in MPEG L3 64 MONO 48kHz and 32kHz (high
quality) and to receive in G722 STAT (low delay) using only a single B-channel
of the line ISDN line. The second B-channel of the ISDN line cannot be used.
Evidently, the Audio Codec that receives the signal will have to carry out the inverse
operation, to receive in MPEG L3 64 MONO 48kHz /32kHz and to transmit in G722.
To set up an SWING for this mode, “MP3 SPLIT” should be selected and the
remote Audio Codec should be set to “cG722 dMP3”.
When using the MPEG Layer III or MP3 SPLIT is selected, DTMF tones generation and
analog line are disabled.
AVAILABLE FRAMING:
•
IMUX: Framing for 128 kbps MPEG modes, implemented for compatibility with other
equipment available on the market.
SUMMARY OF CODING MODES AND THEIR CHARACTERISTICS:
Coding mode
G.711 A-law (Europe, …)
G.711 µ -law (USA, Japan, ...)
G.722 statistical
G.722 H.221/H.242
LD-2
ISO/MPEG LII mono 24 kHz
ISO/MPEG LII mono 32 kHz
ISO/MPEG LII mono 48 kHz
ISO/MPEG LII mono 48 kHz IMUX
SPLIT MP3 64 32KHz/G722 STAT
SPLIT MP3 64 48KHz/G722 STAT
ISO/MPEG LIII mono 64 32kHz
ISO/MPEG LIII mono 64 48kHz
Baud rate
(Kbps)
64
64
64
64
128
64
64
64
128
64
64
64
64
Bandwidth
(KHz)
3.5
3.5
7
7
15
11
10.5
10
20
15/7.5
15/7.5
13.5
15
Delay
Data Channel
Low
Low
Low
Low
Low
High
High
High
High
High/Low
High/Low
High
High
Not available
Not available
Not available
Available
Not available
Available
Available
Available
Available
Not available
Not available
Not available
Not available
• In the AEQ SWING, once communication has been established in any coding mode, that
mode may be changed with no need to break the connection.
SWING
Portable Audio Codec, Digital Hybrid and Mixer
5
1.2. BLOCK DIAGRAM.
SWING
Portable Audio Codec, Digital Hybrid and Mixer
6
2. EQUIPMENT POWER SUPPLY
2.1. GENERAL
The power connector and switch are located on the unit’s back panel.
2.1.1. EQUIPMENT POWER SUPPLY
The AEQ SWING may be powered through an external power supply through the specific 12V
DC-INPUT connector.
The unit should be powered using the power supply provided for that purpose, or another one
able to supply the proper voltage and current.
The power cable for connection to the unit has a standard threaded connector to prevent
accidental disconnection.
The power supply provided automatically allows voltages of between 90 and 240 v. It has selfcharging batteries, acting as a UPS.
2.1.2. TURNING ON THE EQUIPMENT
Before connecting the equipment, make sure the power switch is in the OFF position.
Once the power supply’s threaded connector is properly connected to the equipment, the power
supply can be connected to the electrical power grid.
Activate the power switch (ON position). If all instructions have been correctly followed, the LCD
screen will light up, indicating that the equipment is receiving power.
SWING
Portable Audio Codec, Digital Hybrid and Mixer
7
3. INSTALLATION AND CABLING
To clarify the cabling and installation process, it is necessary to become familiar with the
connectors and configurable elements on the front and back panels.
3.1 DESCRIPTION OF FRONT PANEL AND CONNECTION.
1
2
3
4
5
6
1. Headphone output 1 ( Head -1)
Has standard TRS ¼” jack format.
2. XLR Male Mic 1 Input. ( Mic 1)
3. XLR Male Auxiliary Input with selectable Mic or Line level. ( Mic / Lin)
4. Mic/Line selection switch. ( Mic / Lin)
5. XLR Male Mic 2 Input. ( Mic 2)
6. Headphone output 2 ( Head -2)
Has standard TRS ¼” jack format.
CONNECTION ARRANGEMENT
TRS ¼” jack connectors
Tip: Left headphone earpiece
Ring: Right headphone earpiece
Sleeve: Common ground
XLR connectors
Pin 1: ground
Pin 2: V+ microphone
Pin 3: V- microphone
SWING
Portable Audio Codec, Digital Hybrid and Mixer
8
3.2. DESCRIPTION OF BACK PANEL AND CONNECTION.
1
6
2
3
7
4
5
8
9
10
1. RJ11 connector for ISDN line U interface (ANSI ISDN)
Usually used for National-1 (USA and other countries)
The RJ11 connector joins the terminal adapter included in the equipment to the ISDN network
access point (network termination). Use the cable supplied with the
equipment to connect it to the ISDN line ‘U’ interface jack.
This connector’s pin arrangement is standard, and is shown as follows.
Cable number
Connections
1
2
--------- Lin V+
3
--------- Lin V4
In this interface, the SWING includes the Network Terminal (NT1).
2. RJ45 connector for ISDN line S interface (ETSI ISDN)
Usually used for Euro ISDN (Europe and other countries)
The RJ45 connector joins the terminal adapter included in the equipment to the ISDN network
access point (network termination). Use the cable supplied with the equipment to connect it to
the ISDN line ‘S’ interface jack.
follows.
Front View
This connector’s pin arrangement is standard, and is shown as
Cable Number
1
2
3
4
5
6
7
8
Connections
-------------------------------------
Tx
Rx
Rx
Tx
SWING
Portable Audio Codec, Digital Hybrid and Mixer
V+
VV+
V-
9
3. V35 / X21 Interface. Female DB15 connector ( V35/x21)
Allows the connection of an external TA or an interface for point-to-point lines or radio links at
speeds of 64 or 128 kpbs (2 types):
- V35 (V11) interface: Uses unbalanced asynchronous control signals, with balanced
synchronous clock and data signals.
- Physical level interface, compatible with X.21 / RS422 protocol levels.
The pin-out detail and the signals available in the female DB-15 connector are as follows:
Physical Level
RS 422 Bal
RS 422 Bal
RS 422 Bal
RS 422 Bal
RS 422 Bal
RS 422 Bal
RS232Unbal
RS232Unbal
RS232Unbal
Signal
Clock (RCX) V+
Clock (RCX) V TX V+
TX VRX V+
RX VDTR ( Data Terminal Ready)
DCD (Data Carrier Detect)
GND
Pin
12
4
3
10
9
1
5
14
7 and 15
The AEQ SWING may be configured through the control software to define whether the DCD
signal will manage communication (DCD CONTROLLED) or whether, in the opposite case, it is
a connection with no DCD management (PERMANENT). In the latter case, it will only be
necessary to connect the six shaded signals above to establish the connection to the interface.
(And GND)
To connect the AEQ SWING to a v35 interface, it will be necessary to find the exact pin-out
correspondence in the user’s manual for the interface.
There are a great variety of connectors used in TA equipment and other v35 interfaces found on
the market; therefore, AEQ cannot provide details about all possible connections.
As an example, the connection to a terminal adapter with ISO standard 2593 using an MRAC34 connector is shown below.
DESCRIPTIÓN
DTE
DB15
GND
TXD A
TXD B
RXD A
RXD B
SCR A
SCR B
7
3
10
9
1
12
4
CCITT
102 SIGNAL GROUND
103 TRANSMITTED DATA A
TRANSMITTED DATA B
104 RECEIVED DATA A
RECEIVED DATA B
115 RX. CLOCK V+
RX. CLOCK V-
→
→
→
→
→
→
→
Terminal Adapter
MRAC-34 Connector
DCE
B
P
S
R
T
V
X
GND
TXD A
TXD B
RXD A
RXD B
SCR A
SCR B
Some external interfaces and terminal adapters are configurable. In that case, it is necessary to
make sure that they have these parameters:
- 64kbps/128kbps
- Synchronous
- CD Forced (ON)
- Ignore DTR
SWING
Portable Audio Codec, Digital Hybrid and Mixer
10
4. DIP configuration microswitches (Startup Config).
These are numbered from 1 to 8, and are accessible on the back panel. Each microswitch’s
functionality is the following:
Microswitch
1
2 and 3
4 to 8
Functionality
USA/Europe preconfiguration.
None.
Automatic startup configurations.
The position of the microswitches should be set before turning on the equipment. Any
modification to the microswitches once the equipment is started up will not take effect until
the next time it is turned on.
Microswitch no. 1 selects between (BASIC ISDN CONFIGURATION) USA/EUROPE modes
(ON => USA , OFF => EUROPE), to facilitate use in the respective geographic area.
Automatic startup configurations allow the equipment to be started up with certain programmed
parameters (coding, numbers to be dialed, etc.). There are two configurations that are preprogrammed by the software (C00 configuration – Test mode and C01 configuration – Manual
Startup mode ), which cannot be modified. The remaining 30 configurations (C02 – C31) are
available and at the user’s disposal.
The table below shows the correspondence between the microswitches and the configuration
number. Configuration of microswitches 4 – 8 (automatic startup configurations):
0 = Switch down, 1 = Switch up.
Conf. no. 4
C00 *
C01 *
C02
C03
C04
C05
C06
C07
C08
C09
C10
C11
C12
C13
C14
C15
0
0
0
0
0
0
0
0
0
0
0
0
0
0
0
0
Microswitch
5
6
7
8
0
0
0
0
0
0
0
0
1
1
1
1
1
1
1
1
0
0
1
1
0
0
1
1
0
0
1
1
0
0
1
1
0
1
0
1
0
1
0
1
0
1
0
1
0
1
0
1
0
0
0
0
1
1
1
1
0
0
0
0
1
1
1
1
Conf. no. 4
C
C16
C17
C18
C19
C20
C21
C22
C23
C24
C25
C26
C27
C28
C29
C30
C31
1
1
1
1
1
1
1
1
1
1
1
1
1
1
1
1
SWING
Portable Audio Codec, Digital Hybrid and Mixer
Microswitch
5
6
7
8
0
0
0
0
0
0
0
0
1
1
1
1
1
1
1
1
0
0
1
1
0
0
1
1
0
0
1
1
0
0
1
1
0
1
0
1
0
1
0
1
0
1
0
1
0
1
0
1
0
0
0
0
1
1
1
1
0
0
0
0
1
1
1
1
11
5. Control port (E@sy Port).
Through the E@sy RS 422 Control Port, the unit can be connected to a computer from which it
can be remotely controlled and updated by means of software.
E@sy is integration technology for digital audio and communications equipment that expands the
equipment’s control capabilities. In the client computers, software applications run that, together
with the equipment, make up a high-performance system with powerful functionality.
The RS-422 control port has a four-contact connector, two for transmitting and two for receiving.
The connection is:
TxTx+
RxRx+
To use the E@sy port, you must have an RS-232/RS-422 E@sy adapter, which is supplied with
the stationary E@sy equipment: Impact, Eagle and Course. If you do not have this adapter,
you can request it from any AEQ distributor as an accessory.
6. Power supply connector. (DC-12v)
7. Power on switch. (Power On)
8. RS232 Port for Ancillary data and control channel. (Ancillary Data & Control Port)
Through this female DB9 connector, it is possible to control the equipment from a PC through
the E@sy software with no need to connect it to the E@sy port; transmitting and receiving
RS232 ancillary data on an established communication is also possible. A Male-Female DB9
cable should be used to connect it to a PC’s serial port.
The active contacts are:
SWING
PC (SEEN FROM PC)
TX
2
----2
TX (RX)
RX
3
----3
RX (TX)
GND
5
----5
GND
RTS
8
-----
8
CTS
To use the Ancillary Data Port, the RTS-CTS connection is essential.
9. RJ-11 connector for connection to an analog phone line.
Through this connector, communication can be established through a two-wire analog line. This
communication is independent from the ISDN, so the SWING allows an ISDN communication
and another analog communication to be established simultaneously. Pulse or tone dialing can
be selected.
10. Four-wire connector for auxiliary analog audio input and output.
The transformer-balanced audio input is marked IN and is routed to the headphones.
The transformer-balanced audio output is marked OUT and can receive the decoded signal
through the DSP and/or the analog line (Rx), the program signal (Tx) or a mix of both.
SWING
Portable Audio Codec, Digital Hybrid and Mixer
12
Aux. Source
3.3. DESCRIPTION OF TOP PANEL.
Mic / Line
Rx
Aux. Out
Tx
ABC
DEF
GHI
JKL
MNO
PQRS
TUV
WXYZ
Source 2
Source 1
On
Tx
Rx
Mic - Gain 2
Mic - Gain 1
Head Phone 2
Head - Phone 1
Rx
On
On
The following functional areas can be pointed out on the top panel:
Left: Includes mic 1 audio control and four-wire auxiliary circuit control.
Right: Includes mic 2 audio control and mic / line circuit control.
Upper Middle: Includes the alphanumeric display and the four multifunction keys: Yes ← → No
Central Middle: Includes the TX and RX audio level meters (VU-METERS) (Level), and the
alphanumeric keypad
Lower middle: Analog phone line control
To understand the function of each control, the block diagram in point 1.3 should be kept
in mind.
SWING
Portable Audio Codec, Digital Hybrid and Mixer
13
3.3.1 TOP PANEL. LEFT AREA.
Description of controls
1
1. Aux Source Tx Rx. Allows the sound from the Tx mix (MIC1,
MIC2, MIC/LIN) or from the Rx mix (ISDN/V35, ANALOG PHONE
LINE, AUX-4W IN) to be selected (or mixed) to send it to the
AUX-4W OUT connector.
2
2. Aux Out. Regulates the audio output level through the AUX4W OUT connector.
3
3. Source 1 Tx Rx. Allows the sound from the Tx mix or from the
Rx mix to be selected (or mixed) to send it to headphone 1
connector (Headphone 1).
4
4. Headphone 1. Regulates the audio output level through
headphone 1 connector (Headphone 1).
5
6
5. Mic Gain 1. Regulates the volume of the audio coming in
through Mic 1.
6. Mic 1 ON. When this is pressed, the audio from Mic 1 is sent
to the Tx mix. When the LED is on, it indicates that the audio
channel is open.
SWING
Portable Audio Codec, Digital Hybrid and Mixer
14
3.3.2 TOP PANEL. RIGHT AREA.
Description of controls
1. Mic-Line. Regulates the volume of the audio coming in
through Mic/Line.
1
2. Mic Line ON. When this is pressed, the audio from Mic is sent
to the Tx mix. When the LED is on, it indicates that the audio
channel is open.
2
3. Source 2 Tx Rx. Allows the sound from the Tx mix or from the
Rx mix to be selected (or mixed) to send it to headphone 2
connector (Headphone 2).
3
4. Headphone 2. Regulates the audio output level through
headphone 2 connector (Headphone 2).
4
5. Mic Gain 2. Regulates the volume of the audio coming in
through Mic 2.
5
6. Mic 2 ON. When this is pressed, the audio from Mic 2 is sent
to the Tx mix. When the LED is on, it indicates that the audio
channel is open.
6
SWING
Portable Audio Codec, Digital Hybrid and Mixer
15
3.3.3 TOP PANEL. UPPER MIDDLE AREA.
Description of controls
2
1
Multi-function buttons
Alphanumeric
Display
To
navigate
the
menus described in
chapter 4.
Their
operation depends on
the context.
3.3.4 TOP PANEL. CENTRAL MIDDLE AREA
Description of controls
2
Tx Meter
1
Multi-function
keys
3
Rx Meter
1. Multi-function keys.
•
•
•
In direct dialing, they act as a numerical keypad.
In searching for or editing phone book entries, or editing labels, they act as an
alphanumeric keypad
In all other cases:
- The 3 key takes you to the start of the Status menu.
- The 6 key takes you to the start of the Coding menu
- The 9 key takes you to the start of the Setup menu
- The # key takes you to the start of the ISDN menu
2. Tx Meter. Measures the Tx mix signal level (MIC1, MIC2, MIC/LIN). Red led indicates 0dBu.
Each green led indicates –3dB.
3. Rx Meter. Measures the Rx mix signal level (ISDN/V35, ANALOG PHONE LINE, AUX-4W
IN).
SWING
Portable Audio Codec, Digital Hybrid and Mixer
16
3.3.5 TOP PANEL. LOWER MIDDLE AREA.
This area is devoted to analog phone line calls.
Description of controls
1
2
3
1. Dial Pad. Enables the analog dialing function.
2. Rx On. When this is pressed (LED on), the audio
from the analog phone line is routed to the Rx mix and
can be directed to the headphones and to AUX-4W
Out.
3. On/off hook. Key to enable the “take phone off hook” option. The LED is on when the
phone is off hook.
SWING
Portable Audio Codec, Digital Hybrid and Mixer
17
4. OPERATION AND USER INTERFACE
4.1 USER INTERFACE MENUS
The Swing’s user interface has five menus:
-
STATUS
CODING
SETUP
ISDN
ANALOG DIAL
Displays general information about the unit’s status.
Configuration of the audio coding to be used.
General unit setup
ISDN dialing and line status
Analog line dialing.
-
The first four menus are accessible through the alphanumeric keypad shortcuts.
STATUS (3 key)
CODING (6 key)
SETUP
(9 key)
ISDN
(# Key)
The change in functionality of these associated keys will take place
automatically, so that they will act as shortcut keys to the different menus as
long as you are not in a submenu in which alphanumeric input is requested (this
will be identified by the appearance of a cursor on the display), or in statuses
with phone book entry lists (the numerical keypad is used for a quick search of
the entries).
- ANALOG DIAL To access this menu, the analog line must first be taken off hook (Tel.
Line key), and then the dialing key must be pressed (Dial Pad key). To exit the
ANALOG DIAL menu, press the dialing key once again (Dial Pad key), or hang up the
analog line (Tel. Line key).
Within these menus, the everyday (basic) functions are directly accessible, with the more
specialized options or those that are used less grouped in a submenu labeled ADVANCED.
To facilitate use in the respective geographic area, two operating modes are provided:
USA/Europe. These can be selected with the DIP 1 microswitch.
-
ON-> USA
OFF-> EUROPE
USA MODE
EUROPE MODE
G711 CODING
ISDN CONFIGURATION
BASIC CODING: µ LAW
ADVANCED CODING: A LAW
BASIC CODING: A LAW
ADVANCED CODING: µ LAW
U interface
NATIONAL-1 protocol
S interface
EUROISDN protocol
The remaining parameters are the same.
NOTE: In order for the selection to take effect after each change in microswitch position, the unit
must be turned off and then turned on again.
4.2 STATUS MENU
The STATUS menu is informative. It sequentially shows different screens on the display,
indicating: the connection status, coding mode selected, network access mode and ISDN
protocol.
SWING
Portable Audio Codec, Digital Hybrid and Mixer
18
The unit goes into this menu when it is started up or when no activity is detected on the keypad
when it is in another menu (65 seconds if in an alphanumeric input mode, or 20 seconds in all
other cases). This prevents you from getting lost in the menus, as once that amount of time has
passed, the unit goes back into idle status, from which any menu can be entered by pressing
the respective key.
Key operation in the Status menu:
YES
DOWN CURSOR
UP CURSOR
NO
NUMERICAL 3 STATUS
NUMERICAL 6 CODING
NUMERICAL 9 SETUP
NUMERICAL # ISDN
REMAINING NUMERICAL
=> Nothing
=> Forces an advance to the next one, an information screen
(Status).
=> Nothing
=> Nothing
=> Goes to the STATUS menu startup screen.
=> Goes to the CODING menu startup screen.
=> Goes to the SETUP menu startup screen.
=> Goes to the ISDN menu startup screen.
=> Nothing
The different information screens that are shown on the display are described below.
4.2.1 STATUS: CONNECTION STATUS SCREEN
CHANNEL STATUS
READY
Top of the STATUS screen
Status.
The following possible ISDN connection statuses are presented:
READY => No connection is established.
CONNECTED NOSYNC => A connection is established but sync status has not been reached
CONNECTED SYNC => The connection is synchronized.
Note: When IDSN is being used with 128Kbps coding, two screens will be displayed (C1
STATUS and C2 STATUS) showing the status of each of the connection’s two 64Kbps
channels.
4.2.2 CODING: CODING MODE IN USE SCREEN
CODING
G722 STAT
Top of the CODING screen (coding mode used)
Coding
4.2.3 NETWORK: NETWORK ACCESS MODE SCREEN
NETWORK
ISDN INTERFACE S
Top of the NETWORK screen.
Type of access used.
The possible types of access are:
ISDN S INTERFACE => Access is via the internal ISDN terminal adapter and the physical S
interface (RJ-45 connector).
ISDN U INTERFACE => Access is via the internal ISDN terminal adapter and the physical U
interface (RJ-11 connector).
V35/X21 64Kbps => Access is via V35 and an external terminal adapter at a speed of 64Kbps.
SWING
Portable Audio Codec, Digital Hybrid and Mixer
19
V35/X21 128Kbps => Access is via V35 and an external terminal adapter at a speed of
128Kbps.
4.2.4 ISDN PROTOCOL: ISDN PROTOCOL USED SCREEN
This screen will only be displayed if you are using the internal ISDN terminal adapter.
ISDN PROTOCOL
NATIONAL-1
Top of the ISDN protocol used screen.
Type of protocol used.
The possible protocols are:
NATIONAL-1 => ANSI protocol, more widely used in the USA
EUROISDN => ETSI standard, more widely used in Europe
4.3 CODING MENU
This is the menu in which the coding mode used in a connection or coding change in an established
connection is selected.
In the CODING menu, the possible coding modes are shown. The Basic coding modes are
explicitly shown, and the rest of the coding modes possible in the current connection are shown
in the ADVANCED submenu.
Depending on the current coding, when the CODING menu is entered, the possible coding
modes will be presented in a different way:
- If Basic coding is selected, the only options that will be displayed when the CODING
menu is entered are the list of Basic coding modes and the ADVANCED option. If
ADVANCED is entered, the advanced submenu will be accessed, where all coding
modes available in the current connection will be displayed.
-
If an ADVANCED coding mode is selected, all coding modes available in the current
connection will be displayed when the menu is entered.
The lists of Basic and ADVANCED coding modes differ depending on the connection and on the
configuration of the DIP 1 microswitch.
In the ISDN 64Kbits mode, G711 and G722 STAT coding modes are considered Basic and the
rest ADVANCED.
-
In USA mode (DIP1 microswitch ON), G711 µ-Law coding is Basic and G711 A-Law
coding is in the ADVANCED submenu.
In the EUROPE mode (DIP1 microswitch OFF) G711 A-Law coding is Basic and
G711 µ-Law coding is in the ADVANCED submenu.
In V.35 64Kbits mode, G722 STAT coding is considered Basic and the rest ADVANCED.
NOTE: it is not possible to use G711 coding in V.35.
SWING
Portable Audio Codec, Digital Hybrid and Mixer
20
4.3.1 DESCRIPTION OF THE CODING MENU SCREENS
Top line with position indicator within the
coding menu tree.
CODING
<*> MPEG LII 64K ->
<*> Marks the coding mode
active at this time.
<?> Possible coding not
active at this time; to
activate it, press OK.
Coding: To move around
among the different
possibilities, use the UP and
DOWN cursor keys.
For the active coding mode,
the arrow indicates that there
is a configuration submenu
for that coding, which can be
accessed by pressing OK.
CODING
> ADVANCED
When a basic coding mode is selected, this option will appear, among others.
When OK is pressed, the menu is expanded to the advanced mode, in which all
available coding modes will be displayed.
4.3.2 CODING MENU TREE
Legend
Position identifier within the tree in bold type.
<?> Indicates selectable coding option
<*> Indicates active coding option
Options in the same level are mutually exclusive.
Key operation:
YES => If the option is not active ( marked with ?), it activates it. If the option is active (marked
with an *) and there is a submenu (-> at the end of the option), the submenu is entered.
NO => Goes back to the previous menu.
CURSORS => To move around among the different options
NUMERICAL 3 STATUS => Goes to the STATUS menu startup screen.
NUMERICAL 6 CODING => Goes to the CODING menu startup screen.
NUMERICAL 9 SETUP => Goes to the SETUP menu startup screen.
NUMERICAL # ISDN
=> Goes to the ISDN menu startup screen.
NUMERICAL => Nothing.
SWING
Portable Audio Codec, Digital Hybrid and Mixer
21
4.3.2.1 CODING MENU TREE IN USA MODE FOR ISDN WITH BASIC CODING SELECTED
CODING
<* > G711 µ-Law -> G711 MODE
<*> NORMAL
<? > EXTENDED
<?> G722 STAT
<?> MP3 SPLIT64
> ADVANCED (This option allows the tree to be expanded to advanced mode)
4.3.2.2 CODING MENU TREE IN USA MODE FOR ISDN WITH EXPANDED TREE (an
advanced option is selected or the tree has been expanded with the ADVANCED option):
CODING
<* > G711 µ-Law -> G711 MODE
<*> NORMAL
<? > EXTENDED
<?> G722 STAT
<?> G722 H221/242
<?> MPEG LII 64 -> MPEG LII 64Kb
<*> 24KHz
<?> 32KHz
<?> 48KHz
<?> MPEG LII 128
<?> MP3 SPLIT64
<?> 32KHz
<?> 48KHz
<?> MP3 64
<?> 32KHz
<?> 48KHz
<?> AEQ-LD 2
<?> G711 A-law -> G711 MODE
<*> NORMAL
<?> EXTENDED
(Default)
4.3.2.3 CODING MENU TREE IN EUROPE MODE FOR ISDN WITH BASIC CODING
SELECTED
CODING
<* > G711 A-law -> G711 MODE
<*> NORMAL
<? > EXTENDED
<?> G722 STAT
<?> MP3 SPLIT64
> ADVANCED (This option allows the tree to be expanded to advanced mode)
SWING
Portable Audio Codec, Digital Hybrid and Mixer
22
4.3.2.4 CODING MENU TREE IN EUROPE MODE FOR ISDN WITH EXPANDED TREE (an
advanced option is selected or the tree has been expanded with the ADVANCED option):
CODING
<* > G711 A-law-> G711 MODE
<*> NORMAL
<? > EXTENDED
<?> G722 STAT
<?> G722 H221/242
<?> MPEG LII 64 -> MPEG LII 64Kb
<*> 24KHz
<?> 32KHz
<?> 48KHz
<?> MPEG LII 128
<?> MP3 SPLIT64
<?> 32KHz
<?> 48KHz
<?> MP3 64
<?> 32KHz
<?> 48KHz
<?> AEQ-LD 2
<?> G711 µ-Law -> G711 MODE
<*> NORMAL
<?> EXTENDED
(Default)
4.3.2.5 CODING MENU TREE IN V.35 64KBIT CONNECTION WITH BASIC CODING
SELECTED
CODING
<*> G722 STAT
<?> MP3 SPLIT64
> ADVANCED (This option allows the tree to be expanded to advanced mode)
4.3.2.6 CODING MENU TREE IN V.35 64KBIT CONNECTION WITH EXPANDED TREE
(an advanced option is selected or the tree has been expanded with the ADVANCED option):
CODING
<*> G722 STAT
<?> G722 H221/242
<?> MPEG LII 64 -> MPEG LII 64Kb
<*> 24KHz
<?> 32KHz
<?> 48KHz
<?> MP3 SPLIT64
<?> 32KHz
<?> 48KHz
<?> MP3 64
<?> 32KHz
<?> 48KHz
4.3.2.7 CODING MENU TREE IN V.35 128KBIT CONNECTION
CODING
<*> AEQ-LD 2
<?> MPEG LII 128
SWING
Portable Audio Codec, Digital Hybrid and Mixer
23
4.4 SETUP MENU
General setup menu.
The basic options of this menu are:
1. ISDN LINE:
Configuration of the numbers of the ISDN lines through which the
network is accessed
2. ANALOG LIN:
The work mode of the analog phone line.
3. PHONE BOOK:
The entries of the internal phone book.
4. ADVANCED
Less frequent setup functions are performed from the options grouped together under submenu
4, ADVANCED:
•
•
•
•
•
•
•
•
•
•
•
COMM SETUP: Allows network connection characteristics to be selected, whether with the
U, S or V35 interface.
AUTOSYNC: Enables the automatic synchronization function with the remote equipment.
ANCILLARY DATA: Activates and configures the ancillary data channel associated with
some coding modes.
FB AUDIO: Selects the origin of return audio, from among ISDN audio, auxiliary audio or
both.
STARTUP: Allows the unit’s automatic startup configurations associated with the
microswitches to be implemented.
CONTROL PORT: Selects the RS 422 or RS 232 control port.
EASY PORT NODE: Configuration of the port node number for control of the equipment on
an E@sy network.
LOOP: Access LOOP mode (ON/OFF), to check the transmission.
FIRMWARE: Allows the firmware version installed in the unit to be checked.
DLP ISDN/V35: Allows to activate the Digital Level Processor for the main connection.
DLP ANALOG LIN: Allows to activate the Digital Level Processor for the analog connection.
4.4.1 DESCRIPTION OF SETUP MODE SCREENS
The appearance of the screen depends on the type of selection that is made in the menu tree
position where you are. Possible appearances are:
4. 4.1.1 DESCRIPTION OF MAIN MENU SCREENS IN SETUP MODE
Top line with position indicator within
the setup menu tree.
SETUP
1. ISDN LINE ->
N. Indicates submenu
number from the main menu.
Menu option.
SWING
Portable Audio Codec, Digital Hybrid and Mixer
24
Key operation:
YES => Enters submenu.
NO => Nothing.
CURSORS => To move around among the different options
NUMERICAL 3 STATUS => Goes to the STATUS menu startup screen.
NUMERICAL 6 CODING => Goes to the CODING menu startup screen.
NUMERICAL 9 SETUP => Goes to the SETUP menu startup screen.
NUMERICAL # ISDN
=> Goes to the ISDN menu startup screen.
NUMERICAL => Nothing
4. 4.1.2 DESCRIPTION OF SCREENS WITH SELECTABLE OPTION IN THE SETUP MENU
In this type of screen, one of the possible options must be activated; there may be a setup
submenu for the selected option. The selected option is marked with an *.
Top line with position indicator within
the setup menu tree.
COMM SETUP
<*> ISDN ->
< > Indicates that you are in an
option-selection menu.
<*> Marks the option active at
this time.
<?> Possible option not
Setup option. You can
move around in the
possible options using
the cursor keys.
active at this time; to activate
it, press OK.
For the active option, the
arrow indicates that there
is a submenu that can be
accessed by pressing
OK.
Key operation:
YES => If the option is not active ( there is a ?), it activates it. If the option is active (marked with
an *) and there is a submenu (-> at the end of the option), the submenu is entered.
NO => Goes back to the previous menu.
CURSORS => To move around among the different options
NUMERICAL 3 STATUS => Goes to the STATUS menu startup screen.
NUMERICAL 6 CODING => Goes to the CODING menu startup screen.
NUMERICAL 9 SETUP => Goes to the SETUP menu startup screen.
NUMERICAL # ISDN
=> Goes to the ISDN menu startup screen.
NUMERICAL => Nothing
SWING
Portable Audio Codec, Digital Hybrid and Mixer
25
4. 4.1.3 DESCRIPTION OF SUBMENU SELECTION SCREENS IN THE SETUP MENU
Top line indicates position within
setup menu tree.
ANCILLARY DATA
> BAUD RATE ->
> Indicates that you are in a
submenu selection menu.
Submenu identifier
Key operation:
YES => Goes into submenu.
NO => Goes back to the previous menu.
CURSORS => To move around among the different options
NUMERICAL 3 STATUS => Goes to the STATUS menu startup screen.
NUMERICAL 6 CODING => Goes to the CODING menu startup screen.
NUMERICAL 9 SETUP => Goes to the SETUP menu startup screen.
NUMERICAL # ISDN
=> Goes to the ISDN menu startup screen.
NUMERICAL => Nothing
4. 4 .1. 4 DESCRIPTION OF ALPHANUMERIC INPUT SCREENS IN THE SETUP MENU
Top line indicating parameter to be
entered.
_
L1 NUMBER
_ The cursor indicates that you are
in an alphanumeric input mode.
Key operation:
YES => Stores input and goes back to the previous menu.
NO => Goes back to the previous menu without storing the value entered.
DOWN CURSOR => Deletes the previous character.
NUMERICAL KEYS => Inputs character (even 3, 6, 9 and # mode keys enter the respective
character).
SWING
Portable Audio Codec, Digital Hybrid and Mixer
26
4. 4 .1.5 DESCRIPTION OF PHONE BOOK ENTRY SELECTION SCREENS IN THE SETUP
MENU
This type of screen is displayed when the phone book edit and delete options are entered, and
requests that an entry be selected.
Top line indicates edit or delete
mode
PH. BOOK EDIT
> "Entry Name"
Name of entry in alphabetical order. Select the entry with the
cursors. The alphanumeric keys let you go directly to the first
entry that begins with the character on the key that is pressed.
Key operation:
YES => Goes in to act on the entry selected at that time.
NO => Goes back to the previous menu.
CURSORS => Changes entry selection in alphabetical order.
NUMERICAL => Shortcut to the first entry beginning with the first letter associated with the key
pressed: A, D, G, J, M, P, T, W (even 3, 6, 9 and # mode keys enter the respective character).
SWING
Portable Audio Codec, Digital Hybrid and Mixer
27
4.4.2 SETUP MENU TREE
Legend
Position identifier within the tree in bold type.
<?> Indicates selectable option (options in the same level are mutually exclusive)
> Indicates submenu branch.
SETUP
1. ISDN > NUMBER LINE 1-> MSN L1 NUMBER
"Input number"
> NUMBER LINE 2 -> MSN L2 NUMBER
"Input number"
Note: Number line 2 allows the second B channel to be used, necessary for 128 KB modes
The following SPID configuration options will only be displayed if the protocol is in National-1 mode (default in USA mode).
> SPID LINE 1 -> L1 SPID NUMBER
"Input number"
> SPID LINE 2 -> L2 SPID NUMBER
"Input number"
SETUP
2.ANALOG TEL.> ANALOG LINE CONF.
> MODE -> ANALOG LINE MODE
<*> NORMAL
<?> EXTENDED
> DIALING MODE-> DIALING MODE
<?> PULSE
SETUP
<*> TONE
3.PHONE. BOOK-> PHONE. BOOK
> NEW-> LABEL?
"Input entry name"
NUMBER?
"Input number"
> EDIT -> PH. BOOK EDIT
> "Phone book entries listed in alphabetical order. The numerical keys directly access the entry whose first character coincides"
LABEL?
"Edit entry name"
NUMBER?
"Edit number"
> DELETE-> PH. BOOK DELETE
> " Phone book entries listed in alphabetical order. The numerical keys directly access the entry whose first character coincides"
DELETE? YES NO
SWING
Portable Audio Codec, Digital Hybrid and Mixer
28
SETUP (Cont)
4. ADVANCED -> ADVANCED MENU
> NETWORK -> COMM SETUP
<> ISDN -> ISDN CONFIG
> INTERFACE -> ISDN INTERFACE
< > S/T
<>U
> PROTOCOL -> PROTOCOL
< > NATIONAL 1
< > EURO ISDN
> TEI MODE -> TEI MODE
<*> DYNAMIC
< > FIXED (0)
> OFF HOOK -> ISDN OFF HOOK
<*> MANUAL
<> AUTOMATIC-> AUTO OFF HOOK
>NUMBER L1 -> L1 HOOK NUMBER
"Input number"
>NUMBER L2 -> L2 HOOK NUMBER
"Input number"
> RETRYNG-> CALL REDIAL
<*> OFF
<> ON
> ECHO CANC.> ISDN ECHO CANC.
<*> OFF
<> ON
<> V35 -> V35 CONFIG
> CONNECTION -> V35 CONFIG
<*> PERMANENT
<> DCD CONTROL
> DEFAULT RATE -> V35 DEF. RATE
<*> 64Kbps
<> 128Kbps
SETUP
4. ADVANCED -> ADVANCED MENU
> AUTOSYNC-> AUTOSYNC
<*> OFF
<> ON
SWING
Portable Audio Codec, Digital Hybrid and Mixer
29
SETUP (Cont)
4. ADVANCED -> ADVANCED MENU
> ANCILL. DATA->ANCILLARY DATA
> BAUD RATE->BAUD RATE
<> MAXIMUM
<> CUSTOM
<> MINIMUM
> ENABLE-> ANCILLARY ENABLE
<> ENABLE
<*> DISABLE
SETUP
4. ADVANCED -> ADVANCED MENU
> FB AUDIO-> FB AUDIO CONF.
<*> ISDN
<> AUXILIARY
<> ISDN+AUX.
SETUP
4. ADVANCED -> ADVANCED MENU
> STARTUP-> STARTUP CONF.( Menu to configure the first startup, no. 2. The same is done for nos. 3 to 31.)
> 02 "Entry name." -> START UP 02
> LABEL-> START UP 02 LABEL
"Input label"
> CODE-> CODING
<> G711 A-law -> G711 MODE
<> NORMAL
<> EXTENDED
<> G711 µ-Law -> G711 MODE
<> NORMAL
<> EXTENDED
<> G722 STAT
<> G722 H221/242
<> MPEG LII 64 ->MPEG LII 64Kb
<> 24KHz
<> 32KHz
<> 48KHz
<> MPEG LII 128
<> AEQ-LD 2
SWING
Portable Audio Codec, Digital Hybrid and Mixer
30
SETUP (Cont.)
4. ADVANCED -> ADVANCED MENU(Cont.)
> STARTUP-> STARTUP CONF. (Cont.)
> 02 "Entry name." -> START UP 02(Cont.)
> ISDN NUMBER L1->
02 L1 NUMBER
"Input number"
> ISDN NUMBER L2->
02 L2 NUMBER
"Input number"
> ISDN AUTOCALL->
02 ISDN AUTOCALL
<> OFF
<> ON
> FB AUDIO-> STR 02 FB AUDIO
<> ISDN
<> AUXILIARY
<> ISDN+AUX.
> MUTE MIC 1-> 02 MUTE MIC 1
<> OFF
<> ON
> MUTE MIC 2- > 02 MUTE MIC 2
<> OFF
<> ON
> MUTE MIC/LINE 2->
02 MUTE MIC/LINE
<> OFF
<> ON
SETUP
4. ADVANCED -> ADVANCED MENU
> CONTROL PORT->CONTROL PORT
<> ANCILL. RS232
<> EASY (RS422)
SETUP
4. ADVANCED -> ADVANCED MENU
> EASY PORT NODE-> ENTER NODE
"Numerical input"
SETUP
4. ADVANCED -> ADVANCED MENU
> LOOP-> LOOP
<> OFF
<> ON
SWING
Portable Audio Codec, Digital Hybrid and Mixer
31
SETUP (Cont)
4. ADVANCED -> ADVANCED MENU
FIRMWARE ->FIRMWARE
> CPU-> CPU FIRMWARE
"Show CPU firmware version"
> INT. TA -> TA FIRMWARE
"Show TA firmware version"
> DSP -> DSP FIRMWARE
"Show DSP firmware version"
SETUP
4.ADVANCED -> ADVANCED MENU
DLP ISDN/V35 -> DLP ISDN/V35
<*> ON “Actives the Digital Level Processor”
< > OFF
SETUP
4.ADVANCED -> ADVANCED MENU
DLP ANALOG LIN -> DLP ANALOG LINE
<*> ON “Actives the Digital Level Processor”
< > OFF
SWING
Portable Audio Codec, Digital Hybrid and Mixer
32
4.5 ISDN MENU
ISDN line dialing menu.
This menu is entered because the user has pressed the IDSN key (# key), or because of
Terminal Adapter events (Example: disconnection of a call by the network).
The appearance of the screen depends on line status, and where the call is being dialed from
(keypad or phone book).
4.5.1. DESCRIPTION OF THE ISDN MENU STARTUP SCREEN
> L1: CONNECTED
L2: Ready
> Indicates the line that will be
affected by pressing keys.
Indicates current line status.
Possible line statuses are:
Inactive (only National 1): No line presence is detected
SPID Pending (only National 1): The line is active and SPID confirmation is pending
SPID Error (only National 1): SPID error (line not operational)
Ready: Line operational in idle status.
CONNECTED: Call connected
Call Incoming: Incoming call
Calling: Making outgoing call
Disabled: Line not available (in 64K coding modes, L2 is disabled).
Key operation:
Key operation takes place on the selected line (marked with >), and their function depends on
line status.
YES => If line is Ready:
Goes into the keypad dialing submenu.
If incoming call:
Takes call off-hook.
NO => IF line Connected:
Disconnects call.
CURSORS => Change selected line
NUMERICAL 3 STATUS => Goes to the STATUS menu startup screen.
NUMERICAL 6 CODING => Goes to the CODING menu startup screen.
NUMERICAL 9 SETUP => Goes to the SETUP menu startup screen.
NUMERICAL # ISDN
=> Goes to the ISDN menu startup screen.
NUMERICAL => Nothing
SWING
Portable Audio Codec, Digital Hybrid and Mixer
33
4.5.2 DESCRIPTION OF THE KEYPAD DIALING SUBMENU SCREEN IN THE ISDN MENU
If an alphanumeric key is pressed in the dialing submenu, dialing takes place from the keypad.
_
L2: Ready
_ Indicates dialing status
through line 1
Key operation:
YES => If the cursor is at the beginning of the display (there is no number on the screen):
Accesses last number dialed.
If the cursor is not at the beginning of the display (there is a number): Makes the call
using the number on the screen .
NO => If the cursor is at the beginning of the display (there is no number on the screen): Exits
the dialing submenu and returns to the ISDN menu startup screen.
If the cursor is not at the beginning of the display (there is a number): Deletes the entire
number (cursor to the beginning).
DOWN CURSOR => If the cursor is at the beginning of the display (there is no number
on the screen): Enters the phone book dialing submenu.
If the cursor is not at the beginning of the display (there is a number): Deletes the last
digit.
UP CURSOR => If the cursor is at the beginning (no number on the screen): Enters the phone
book dialing submenu.
NUMERICAL KEYS => Inputs number (even 3, 6, 9 and # mode keys enter the respective
character).
4.5.3 DESCRIPTION OF THE PHONE BOOK ENTRY DIALING SUBMENU SCREEN IN THE
ISDN MENU
In the keypad dialing submenu, if any of the cursors are pressed, the phone book dialing
submenu is entered. The different phone book entries are accessed using the cursors. The
alphanumeric keys are redefined as search keys.
Entry names in alphabetical order. Select entry using the cursors. The
alphanumeric keys let you go directly to the first entry that begins with the
character on the key pressed.
> JOHN
L2: Ready
Key operation:
YES => Makes a call with the phone book entry selected.
NO => Goes to the keypad dialing submenu
CURSORS => Select phone book entry, moving in alphabetical order.
NUMERICAL => Shortcut to the first entry beginning with the first letter associated with the key
pressed: A, D, G, J, M, P, T, W (even 3, 6, 9 and # mode keys access the respective entry).
SWING
Portable Audio Codec, Digital Hybrid and Mixer
34
4.5.4 DESCRIPTION OF THE MESSAGES SCREEN IN THE ISDN MENU
ISDN LINK
ERROR
Message
Possible messages:
ISDN LINK ERROR
CALL REJECTED BY NETWORK
CALL REJECTED BY USER
USER BUSY
USER DOES NOT RESPOND
IN 128K FIRST CONNECT L1
L2 DISABLED IN 64K MODES
Key operation:
YES => Goes to the ISDN menu startup screen
NO => Goes to the ISDN menu startup screen
NUMERICAL 3 STATUS => Goes to the STATUS menu startup screen.
NUMERICAL 6 CODING => Goes to the CODING menu startup screen.
NUMERICAL 9 SETUP => Goes to the SETUP menu startup screen.
NUMERICAL # ISDN
=> Goes to the ISDN menu startup screen.
NUMERICAL => Nothing
Note: If the user is not in the ISDN Menu, and an event occurs in the communication, the
message would be displayed on the screen for a time, after which the unit would recover its
status.
SWING
Portable Audio Codec, Digital Hybrid and Mixer
35
4.6 ANALOG DIAL MENU
Analog line dialing menu (backup circuit).
To enter this menu, you must go off-hook (Tel. Line key) and press the “Dial Pad” key.
THIS MENU IS NOT AVAILABLE IF MP3 64 OR MP3 64 SPLIT IS SELECTED.
To exit this menu, hang up the line (Tel. Line key); without hanging up the line, you must once
again press the “Dial Pad” key.
The appearance of the possible screens is:
4.6.1 DESCRIPTION OF THE KEYPAD DIALING SCREEN IN THE ANALOG DIAL MENU
If an alphanumeric key is pressed in the ANALOG DIAL MENU, dialing takes place from the
keypad.
ANALOG TEL. DIAL
_
Indicates dialing status.
Note: The same as with an analog phone, the numbers are dialed at the same time as they are
pressed, with no need to press YES when the number is completed.
Key operation:
YES => If the cursor is at the beginning (no number on the screen): Inputs the last number
dialed from memory.
NO => If the cursor is not at the beginning (there is a number): Deletes the entire number
(NOTE: the number has already been dialed.)
DOWN CURSOR => If the cursor is at the beginning (no number on the screen): Goes into the
phone book
UP CURSOR => If the cursor is at the beginning (no number on the screen): Goes into the
phone book
NUMERICAL KEYS => Inputs number (even 3, 6, 9 and # mode keys enter the respective
character).
Pulse or tone dialing will take place according to the option selected in the SETUP->ANALOG
TEL.-> ANALOG LINE CONF.-> DIALING MODE menu.
4.6.2 DESCRIPTION OF THE PHONE BOOK DIALING SCREEN IN THE ANALOG DIAL
MENU
In the ANALOG DIAL submenu, if any of the cursors are pressed, the phone book dialing
submenu is entered. The different phone book entries are accessed using the cursors. The
alphanumeric keys are redefined as shortcut keys to the entry that begins with the associated
letter.
SWING
Portable Audio Codec, Digital Hybrid and Mixer
36
ANALOG TEL. DIAL
> JOHN
Entry names in alphabetical order. Select entry using the cursors.
The alphanumeric keys let you go directly to the first entry that begins
with the character on the key pressed.
Key operation:
YES => Makes a call with the phone book entry selected.
NO => Goes to normal dialing status.
CURSORS => Select phone book entry, moving in alphabetical order.
NUMERICAL => Shortcut to the first entry beginning with the first letter associated with the key
pressed: A, D, G, J, M, P, T, W (even 3, 6, 9 and # mode keys access the respective entry).
SWING
Portable Audio Codec, Digital Hybrid and Mixer
37
5. DATA CHANNEL
5.1. INTRODUCTION
The SWING unit has the capability of inserting a configurable, two-way, transparent end-to-end
auxiliary data channel in communications that have been established.
The link used by the unit on which the data channel is defined may be ISDN (64 Kbps or 128
Kbps), or using the V35/X21 interface (64 Kbps, 128 Kbps) connected to modems or external
terminal adapters.
SWING uses the capacity of the channel available for the transmission of audio circuits, and is
also able to model a transparent data channel, as represented in the following diagram:
A – Represents the channel capacity or bandwidth available in the link. It may be 64 kbps or
128 kbps.
B – Represents the effective bit rate of the data channel or the part of the bandwidth available in
the link used for inserting the data channel (configurable by the user).
C – Represents the bit rate available for transmitting audio. The audio codec transmits the
audio, compressing it according to the available bit rate.
If data channels with reduced binary rates are used, there is no perceptible degradation of
quality in the audio signal transmitted.
5.2. PORT CONFIGURATION
The external device that transmits and/or receives data through the data channel will be
connected to the audio codec using the RS232 ANCILLARY PORTS; a standard pin-to-pin
RS232 cable will be used for this.
The serial data port of the external equipment must be configured in the following way:
- 115200 bits per second. (Note that this speed is fixed and independent of the bit rate
of the (A) channel and of the effective transmission bit rate of the data channel (B).)
- 8 data bits
- 1 stop bit
- No parity
- Flow control: Hardware
When a PC is used as a data terminal, the audio codec can be connected directly to a COM
serial port. If another type of device that has a configuration other than the one specified is
used, it will be necessary to place an RS232 BAUD RATE CONVERTER between the audio
codec and the device. This device can be easily found in the market.
SWING
Portable Audio Codec, Digital Hybrid and Mixer
38
5.3. SOFTWARE CONFIGURATION
The software configuration of the SWING’s data channel is performed by selecting
- The effective bit rate
- Enabling the data channel: tx or rx direction, or both.
To select the effective bit rate, there are three possible modes, accessible in the SETUP menu:
Minimum, Maximum and Custom. The latter is programmed from the control software in real
time, and is a value between the minimum value and the maximum value defined for each case.
Enabling or disabling the data channel is also available in the SETUP menu of the audio
codecs.
In summary:
The external equipment will be connected with a fixed baud rate of 115200 bps to the
ANCILLARY port of the audio codec.
The audio codec will establish a permanent link at 128 Kbps or 64 Kbps with the remote
audio codec, selecting an operating mode that allows the use of the data channel.
Configuration of the data channel. Selecting the effective bit rate, and enabling tx, rx or
both.
SWING
The SWING portable audio codec has a SINGLE ancillary port, and is available in the following
modes:
-
MPEG128,
MPEG64, G722/H221
In G711, G722 STAT and AEQ LD 2 audio coding modes, the ancillary data channel is not
available.
CONFIGURATION OF THE EFFECTIVE BIT RATE IN THE DIFFERENT MODES
To select the effective bit rate, there are three possible modes:
Minimum: The data channel has an effective bit rate of 1200 bauds. In this mode, compatibility
is maintained with earlier models of audio codecs (ACD5001 and MPAC02) in MPEG 64 Kbps
and 128 Kbps modes.
Maximum: The bandwidth for the data channel occupies nearly all of the link’s capacity, so the
audio transmitted is very low quality or non-existent.
Custom: The effective bit rate in the data channel is programmed by the user through REAL
TIME CONTROL software. According to the type of coding chosen, a menu is displayed with the
effective bit rate values that can be selected. The greater the capacity of the data channel, the
smaller the channel capacity for the audio circuits, and the lower the audio quality.
In H221-H242 mode, compatibility with the ACD5001, MPAC-02 and TLE-02D is achieved by
using CUSTOM programming with a value of 0.
In G722 and H221-H242 modes, it is important to select the same effective bit rate at both ends.
SWING
Portable Audio Codec, Digital Hybrid and Mixer
39
5.4. EXAMPLES
A) When you want to transmit a data channel at 19200 between two PC’s through a
communication between two SWINGs, you must:
Configure the serial port on both PC’s at 115200.
Program the next higher effective bit rate after 19200 (for example, 20000 on a 64K
circuit using MPEG48MONO) with the REAL TIME CONTROL software.
Select CUSTOM
Select ENABLE on both SWINGs (Enable Tx, and Rx)
B) When you want to communicate two pieces of data equipment that use a hardware serial
port at 2400 bauds through a communication between two SWINGs,
Place a bit rate converter with an output of 115200 bps between the equipment and
the SWINGs
Program the next higher effective bit rate after 2400 (for example, 2917 bps on an
MPEG128 MONO connection) with the REAL TIME CONTROL software.
Select CUSTOM
Select ENABLE on both SWINGs (Enable Tx, and Rx)
SWING
Portable Audio Codec, Digital Hybrid and Mixer
40
6. USING THE EQUIPMENT. CONDENSED INSTRUCTIONS.
To learn in depth how to use the equipment, you should have carefully read the previous
chapters. Following is a condensed list of instructions for operating the equipment. If you
need further detail, review the information indicated in the previous chapters.
6.1 CONNECT THE EQUIPMENT
Connect the audio equipment
Electric power supply
ISDN or V35 network
Backup telephone network, if it is to be used.
Ancillary Data port, if data is to be received or transmitted
Control port or E@sy Port if the equipment is to be controlled by software.
6.2 CHECK THE CONTROLS
Make sure that Switch Config. No. 1 is ON for USA lines or OFF for European lines.
Make sure that Switch Config. Nos. 3-8 are in the right position if you are going to use
automatic STARTUP.
Turn on the unit. Make sure that the screen comes on in STATUS position (the labels
CHANNEL STATUS-CODING-NETWORK-ISDN PROTOCOL are cyclically displayed on
the first line of the screen).
Open the potentiometers of the TX audio circuits you are going to use (Mic- Gain 1, Mic
Gain 2, or Mic/ Line). Make sure that you have the ON switches pressed (LED lit up) for the
channels used.
Check the position of the Mic/Line switch if you are going to use that input.
Check the level of the outgoing signal on the TX level meter.
Leave open the potentiometers of the RX audio circuits that you are going to use
(Headphone 1, Headphone 2, Aux Out).
If you are going to listen to the Aux-4W IN signal through headphones, open the Aux.
Source potentiometer
Turn the Source 1, Source 2 and Aux Source potentiometers to the left, right or leave them
in the middle according to whether you want to send the signal going out to the line (TX),
the one coming in from the line (RX), or both, to the headphones and the four-wire output.
6.3 CHECK THE REST OF THE EQUIPMENT THROUGH THE MENUS
The unit is idle. Check on the screen that:
CHANNEL STATUS is READY.
CODING indicates the right coding mode.
NETWORK corresponds to the type of line available.
ISDN PROTOCOL corresponds to the protocol available.
If CODING does not show an appropriate mode, press the Coding key and change the
coding mode to be used. If it is not one of the two accessible modes, enter in ADVANCED
to show all modes.
If it is the first time you are using the unit or you have changed its location or line, you will
have to enter in the SETUP/ ISDN LINE option to configure the line numbers (NUMBER
LINE ) and SPID (not necessary in EURO ISDN) for both lines.
If you are going to use the analog line and you need pulse dialing or need to use the
frequency extension, you must activate the respective option in the SETUP/ ANALOG TEL.
option. If you are not going to use them, make sure that they are not still activated from
another use.
If you want to dial from the phone book, you must have entered or edited data in the SETUP
/ PHONE BOOK option beforehand.
SWING
Portable Audio Codec, Digital Hybrid and Mixer
41
6.4 THE FIRST TIME (AND IN OTHER CASES), CHECK THE SETUP/ADVANCED MENU
There are many options in the SETUP / ADVANCED menu that are used sporadically.
You should enter this menu when you need to verify or change the work mode
regarding:
COMM SETUP: Type of network ( ISDN or V35):
In ISDN networks, the following can be configured:
INTERFACE (U or S/T )
PROTOCOL (National 1 or EURO ISDN)
TEI MODE (Dynamic or fixed)
OFF HOOK MODE (Manual, automatic or automatic with fixed number)
RETRYING (Automatic redial)
ECHO CANCELLER (To cancel remote echo in G 711)
In V35 networks, the following can be configured:
CONNECTION: Data flow, DCD-controlled or permanent
DEFAULT RATE: If the channel is 64 or 128 Kb
AUTOSYNC: Automatic synchronization (Inactive by default- Active)
ANCILL. DATA: Ancillary data. The following can be configured:
BAUD RATE: MAXIMUM, MINIMUM or CUSTOM can be set.
CUSTOM characteristics are set by Software.
ENABLE: (Inactive by default- Active)
FB AUDIO: Return audio can be set from the ISDN, the auxiliary or both mixed.
STARTUP: Lets you configure the automatic startups associated with microswitches,
numbers between 2 and 31, setting the following for each of them:
LABEL: A name.
CODE: The coding mode selected
ISDN NUMBER: A number that L1 will call and another for L2 if ISDN AUTOCALL is
active.
ISDN AUTOCALL: Option to enable automatic calling.
FB AUDIO: To set return audio upon startup (ISDN, Aux or both)
MUTE MIC1, MUTE MIC2, MUTE MIC/LINE: Starts up with the selected audio muted.
CONTROL PORT: To select the control port, if we are controlling it by software.
EASY NODE: To select a free E@sy node for software control in the E@sy bus.
LOOP: To make an audio loop for test purposes.
FIRMWARE: To find out the version in use.
SWING
Portable Audio Codec, Digital Hybrid and Mixer
42
6.5 ESTABLISHING A V35 CONNECTION
Make sure once again that in STATUS mode the legend CHANNEL STATUS READY is
cyclically displayed. Verify that the CODING is correct and NETWORK is V35/X21 at the
established speed (64-128).
Upon starting up, the equipment should synchronize. Be careful to have AUTOSYNC active
in only one of the two units if you are using it.
6.6 ESTABLISHING AN ISDN CALL
Make sure once again that in STATUS mode the legend CHANNEL STATUS READY is
cyclically displayed. Verify that CODING, NETWORK and ISDN PROTOCOL are correct.
Press ISDN. >L1: Ready will be displayed. Press YES. Enter the number. Press YES once
again. Communication will be established.
If you want to dial numbers from the phone book: Press ISDN. >L1: Ready will be displayed.
Press YES. Press the arrows so that the phone book entries are displayed. Search for the
name by moving around using the arrows, or use a short cut by pressing the alphanumeric
keys to take you to the first entry of the corresponding letter. When you have the name on
the screen, press YES once again. Communication will be established.
6.7 ESTABLISHING AN ANALOG CALL
Go off-hook by pressing the key that shows a telephone. The LED will light up.
Press Dial. Enter the number. The unit dials instantaneously without waiting for an YES.
If you want to dial numbers from the phone book: Press Dial. Press the arrows so that the
phone book entries are displayed. Search for the name by moving around using the
arrows, or use a short cut by pressing the alphanumeric keys to take you to the first entry of
the corresponding letter. When you have the name on the screen, press YES.
Communication will be established.
To keep incoming audio on hold without having it reach AUX OUT and the headphones,
have Rx-On turned off.
SWING
Portable Audio Codec, Digital Hybrid and Mixer
43
7. CONTROL SOFTWARE
Only some Advanced Users and the station’s technical staff need to read this chapter.
7.1.
SYSTEM DESCRIPTION
7.1.1. E@sy system Applications
This equipment includes a new software technology called E@sy.
E@sy is an audio and communications digital devices integration technology that expands
controlling capacity to a never before reached levels and that includes both equipment and
software applications. Equipment connects to a server computer through a RS-422 bus.
Software applications in client computers form a high performance and powerful system.
The SWING can be controlled remotely through the RS-422 bus. The basic E@sy software
allows controlling from a single PC all the equipment connected to the same bus through a (LAN
o WAN) IP network, setting encoding algorithms, calling, monitoring each line status, activating
‘multiplex’, line cut alarms, etc.
E@sy connection diagram
In all E@sy equipment, a firmware upgrading application for future updating is included. It will
be explained in chapter 8 of this manual.
SWING
Portable Audio Codec, Digital Hybrid and Mixer
44
7.2. PACKAGE DESCRIPTION
7.2.1. CD-ROM CONTENT
In this package, you receive an auto-start up CD-ROM containing Manuals, the latest firmware
files and this applications:
- E@syServer.
- Swing.
- SwingFu.
Server software application.
Client/Controlling application.
Upgrading application.
To install the applications, insert the CD in your PC’s CDROM drive and wait until the
menu appears. In case it does not appear, check that the auto start feature of your
CDROM drive is enabled.
7.2.2. HARDWARE AND SOFTWARE REQUIREMENTS
This system can work over an IP network or in a stand-alone PC.
Software runs on Windows NT, 2000 and Windows XP operating systems. In any case,
minimum requirements are the specified for this operating systems.
When using a remote-control application, PC running remote control application should have an
IP connection with PC acting as E@sy server. This can be through a LAN or a WAN network.
Computer running E@sy Server must have one spare serial port. A standard RS232 cable is
supplied with the equipment. It will be necessary a RS232 to RS422 standard converter in case
of connecting the PC and the SWING through the E@sy bus.
This software requires the TCP/IP extension to be installed in the operating system. This
extension is automatically installed when a network card or a modem is installed. In case of
using a stand-alone PC, it is necessary to install the “MSLoopback” driver which is included in
both operating systems installation disks.
[email protected] program will be installed in the PC connected to the E@sy bus.
Swing.exe will be installed in those remote computers from where equipment is going to
be controlled. In case of a stand-alone computer, both programs should be installed in
the same PC.
SwingFu.exe upgrading application works from a PC with direct connection to the SWING
audio codec.
SWING
Portable Audio Codec, Digital Hybrid and Mixer
45
7.3. REMOTE CONTROL SYSTEM
7.3.1. SYSTEM CONNECTION
The SWING is controlled through the RS-422 or through the RS-232 control port.
The SWING will be connected to the computer where the E@sy Server is installed through a
connection between serial port and the RS-232 control port.
If using an E@sy equipment network with more than one E@sy equipment, connection should
be made in parallel in a RS-422 Bus. In that case, you will need a RS232-to-RS422 adapter.
Converters supplied with other AEQ equipment like the EAGLE, COURSE or IMPACT can be
used.
When all the connections are made, software should be installed as indicated in the following
pages.
If control software is going to be installed in a different PC than the one that acts like server for
the E@sy network, it is necessary to ensure that there is an IP connection between both
computers. To do that, it is necessary to know the network name or IP address of the server PC
inside the network.
Consult ANNEX A-1 at the end of this manual in order to obtain more information about IP
connections.
Once these steps have been done, It is just necessary to install the applications.
SWING
Portable Audio Codec, Digital Hybrid and Mixer
46
7.3.1.2 SERVER APPLICATION
[email protected] application is installed in the PC where the codecs are connected.
This application is the interface between the computer network and the control bus where the
E@sy equipment is.
7.3.1.2.1 INSTALLATION
Run the “[email protected]” application and follow all the steps.
NOTES:
Installing this software in a PC belonging to an intranet requires supervisor rights over the computer. In
that case, consult your system supervisor.
7.3.1.2.2 OPERATION:
Once the installation is finished and executed through the icon created in the desktop, the icon
representing it will appear in the task bar:
Clicking over the icon with the mouse right key, ‘SHOW’ option is showed, allowing to see the
program window:
Select the Setup / Port option and configure in the Communications label the PC port to use.
E@sy equipment have a node number that con be configured for identifying them in a network.
Configure in the Range label the number of nodes that are to be controlled, i.e., how many
E@sy devices are available in the network.
The SWING is configured by default with the node number 001. Use the option:
SETUP > 4.ADVANCED > ADVANCED MENU > EASY PORT NODE > ENTER NODE
for changing this number if necessary.
When RANGE is big, process becomes slow. It is recommended to put the minimum range in
order to obtain the best performance. In that case, both leds should be fixed in green.
SWING
Portable Audio Codec, Digital Hybrid and Mixer
47
Once all steps have been completed and all the connections have been made, program window
will look like this:
In this case, there is an SWING connected to the server PC identified as the 001 node, and then
it is possible to control it.
SWING
Portable Audio Codec, Digital Hybrid and Mixer
48
Setup/Socket Server and Setup/Schedule options are used to control other E@sy equipment.
This server program is resident and always active.
In the File menu, it is possible to search again the network with the Update option and to close
program window with the Close option.
To stop server application execution and exit, it is necessary to click on the icon situated in
the task bar with the right button and select the Exit option.
In order to avoid connection failures produced by accidental mistakes, the PC cannot be turned
off until server application is stopped.
UNINSTALLING:
To uninstall this program, you should do it from the “ADD OR REMOVE PROGRAMS” panel of
windows clicking Start-Configuration-Control Panel.
In this menu, locate “E@sy Server”, click on it and choose the Add or Remove option to
uninstall server software from the PC.
SWING
Portable Audio Codec, Digital Hybrid and Mixer
49
7.3.1.3 CLIENT APPLICATION
7.3.1.3.1 INSTALLATION
Run the “SWING.exe” program which is contained in the CD-ROM and follow all the steps
of the install shield wizard.
NOTES:
Installing this software in a PC that is inside an intranet requires supervisor rights over the computer. In
that case, consult your system supervisor.
7.3.1.3.2 OPERATION
When installation is finished, the SWING Real-time Control program is executed clicking on the
icon created in the desktop.
If the SWING Real Time Control application is installed in a different computer than the
one where the E@sy Server is installed, some IP configuration has to be made before
executing the program:
To configure it, the SWING.INI file has to be edited. This file is in the path:
“C:\Program files\Aeq\ E@sy Suite\” , and will look like this:
[EASY SERVER]
PORT=60304
HOST=127.0.0.1
PROXY=211
In ‘HOST’, the IP address or name of the server PC has to be set. By default, program is
installed in local mode (HOST=127.0.0.1), that is, the SWING is controlled from the same PC it
is connected to. If this PC is not the same as the the one where the E@sy server is, this has to
be changed to the new value.
When IP address can not be reached or when E@sy server is not running, an error message
will be displayed:
This change will be operative the next time the program is started.
SWING
Portable Audio Codec, Digital Hybrid and Mixer
50
Now the program can be started:
When there is IP connection between client PC and the SWING, a message will appear:
CONNECTED:OK
On the contrary, if there is not a connection, it will read:
CONNECTION: REFUSED
In that case, all previous steps have to be checked.
When the SWING Real-time Control application is working, a control panel of the SWING
appears in the screen.
Close option in File menu exits the program.
Phone Book option of the Setup menu shows the software phone book.
NOTE: This phone book is common for all E@sy applications and it is independent of the phone
book stored in the SWING memory. This phone book can be shared by other control
applications as the EAGLE R.T.C., COURSE R.T.C. and Resource Manager.
It is possible to read or write SWING’s memory phone book from Remote Control Software, as
explained in the following chapters.
SWING
Portable Audio Codec, Digital Hybrid and Mixer
51
To introduce a new entry in the phone book, it is possible to write directly in Name and Number
fields. ‘+’ button is used to introduce a new blank entry and ‘-‘ button is used to erase an entry.
In those entries that one wanted to be used in the quick access of the dialing window, the
‘Quick’ option should be clicked. That means it is possible to store hundreds of numbers but
select only a ten of them in a specific situation.
It is possible to change window size of the program in the Setup/Size option. When selecting a
new size, application will automatically exit and the change will be done when starting again the
application.
When Options/Restore Window option is active, program window comes to the foreground when
an event (for example incoming calls) happens. It is neccesary to close and open the program
to activate this change.
When Sirens option is activated, a sound simulating a siren is produced when a kind of failure is
detected in communications. When Ring option is activated, a sound simulating the ring signal
of a telephone is produced whenever an incoming call is received.
To be able to hear those sounds, a multimedia soundcard should be installed in the PC.
CUSTOMICING SOUNDS
It is possible to change default sounds used in the application modifying the SWING.ini file as
showed:
[SOUND]
RING=C:\SOUNDS\RING.WAV
SIRENS=C:\SOUNDS\SIRENS.WAV
In this example, the wav file ‘C:\SOUNDS\RING.WAV’ will sound when a call is received and the
wav file ‘C:\SOUNDS\SIRENS.WAV’ will sound when a warning or error happens.
If the file can not be found, the default sound will work.
Audio files should be linear PCM WAV format.
Sound options should be activated in the application setup menu.
SWING CONTROL PANEL:
The SWING operation is controlled though this ‘virtual’ panel. NUM number indicates node
number and allows identifying the different E@sy equipment connected to the bus.
The ‘micro 1’, ‘micro 2’ and ‘line’ buttons are used to control the ‘mute’ signals. The ‘tel’ button
activates the Rx signal in the analog communication.
SWING
Portable Audio Codec, Digital Hybrid and Mixer
52
The ‘on/off’ button has an added feature, which is the activation of the dialing window:
Number field is used to introduce the number to be called. A quick graphic dialer can be used
clicking in the icon.
In the Quick Access window, all numbers of the phone book with the ‘Quick’ feature activated
are showed.
In the Audio Mode and Info fields, configured settings are showed. If these are not the desired
ones, they have to be changed in the setup windows.
Once we have the number and the configuration, connection is launched clicking the OK button:
SWING
Portable Audio Codec, Digital Hybrid and Mixer
53
In following example, this SWING has no ISDN and shows an error message:
In following picture, there is an established communication, but not synchronized in the first
channel:
Once the codecs are synchronized, the audio channel is ready.
If the EAGLE receives a call, it is showed in Incoming Calls and in STATUS:
To activate the analog line dial window, it is necessary to click in the ‘TEL’ button. The process
is the same except that no audio codification can be selected.
SWING
Portable Audio Codec, Digital Hybrid and Mixer
54
Clicking the setup button on the Swing’s ‘virtual’ front panel will open the Setup window:
In this window all configuration parameters can be set.
The ISDN and V35 sections allow the configuration of the type of connection to be used, and
ISDN line parameters ‘PROTOCOL’, ‘SPID’ and Number Line (‘MSN’).
The Audio Mode portion allows the selection of audio codification.
The Autosync section enables the automatic synchronism feature.
The Data Mode section is used to configure the data channel operating mode. Available modes
in this firmware version are MAXIMUM, MINIMUM and CUSTOM, but other operating modes
such as 1200/2400/4800 and 9600bps will be implemented in future firmware versions. When
the CUSTOM option is selected a new menu will appear allowing the user to define the
baudrate for the data channel.
The Off-Hook section allows the configuration of the off-hook process, off-hook can be done
manually or automatically. If automatic off-hook is selected, a number will be able to be entered
and the SWING will only auto answer calls from this number. If the calling number is different
from what has been established, it will only off-hook manually.
The Retrying window activates the automatic recall feature. With this option activated the
SWING will recall the last number dialed. This option is stored even when the equipment is
turned off, so it will make the call to the last number as soon as it is turned on.
The Loop option when selected makes an audio loop in the established communication.
SWING
Portable Audio Codec, Digital Hybrid and Mixer
55
The G711 section establishes the normal/extended mode and the automatic remote echo
canceller in G711 (called LMS).
The Audio Ouputs section establishes the audio signal that will appear in the headphones the
RX from (ISDN, AUX or ISDN&AUX).
The Tel Dial Mode section establishes if analog dialing is done by tones or pulses.
The Firmware window shows the actual firmware versions loaded in the SWING.
The DLP section permits the activation and configuration of the Digital Level Processor, for the
digital (ISDN/V35) and the analog line.
Clicking over the ‘PhoneBook’ option will open the phone-book stored in the audiocodec’s
internal memory, this process can take a few seconds and is done behind the main Setup
window. After some time the phone-book can be viewed in the Setup/Phone Book option.
The Start Up Configuration is used to manage the automatic start-up configurations.
It is possible to use a remote reset signal from this window. To activate it, the SWING.ini file
has to be edited and a password has to be written next to:
“PASSWORD=”
This password would be asked as a confirmation each time somebody clicks the ‘Reset’ button
that will appear next to ‘PhoneBook’, the next time the program is run.
NOTES:
•
The reset signal places all configurations back to their original factory settings.
•
Only equipment connected directly to the E@sy bus can be reset.
SWING
Portable Audio Codec, Digital Hybrid and Mixer
56
AUTOMATIC STARTUP CONFIGURATION
The Startup Configuration button, will make it is possible to read, modify and write startup
configurations in the audiocodec’s memory.
To enter in a startup configuration, select a startup number and press READ. Pressing the
READ button will allow to choose and edit all the parameters. If any particular configuration is
empty, it will appear empty:
Once the parameters has been modified (name of the configuration, automatic call, mute
configuration, RX audio type, audio mode configuration and numbers to be dialed) press WRITE
to store the settings in the SWING’s memory and CLOSE to exit.
SWING
Portable Audio Codec, Digital Hybrid and Mixer
57
DIGITAL LEVEL PROCESSOR (DLP)
This option will allow the configuration of the DLP, for the audio being transmitted in both the
digital (ISDN/V35) and analog line. Placing the DLP’s levels where desired can result in better
audio quality. Depending on the configuration, the DLP will:
- increase program signal level.
- apply a compression on the program signal.
- apply a limiter to the signal.
- apply a noise reduction effect.
Clicking on ‘Config’ accesses the DLP configuration window:
In the upper region of the window the selected DLP’s curve is shown in a graphical and
numerical manner. In the Name section the selected configuration’s name appears.
Configuration can be selected from the drop down menu.
The next area shows some parameters of this configuration:
- Operation Level. Defines in which part of the level range we are going to operate. It
has no effect over the audio signal.
- Transition Level. This is one key point of the DLP. It separates Upper and Lower
regions. Here we can separate a limiter from a compressor or an expander.
- Lower region: Region below transition level.
- Upper region: Region above transition level.
- Attack time: time between the detection of the peak and the application of the effect.
- Release time: time after the peak in which the effect is still active.
SWING
Portable Audio Codec, Digital Hybrid and Mixer
58
By default, the SWING has been configured with some DLP names ISDN DEFAULT AND
ANALOG DEFAULT. This configuration is stored in non-volatile memory. In order to modify the
actual configuration, select other configuration, or create a new one, click in the text box:
When selected DLP is acted upon, the graph and the parameters in the window will change.
To create a new DLP configuration, press the New button.
To edit an existing DLP configuration, press the Edit button.
In this window it is possible to rename or erase the selected configuration, edit the graphic and
change Attack and Release times.
In order for changes in the DLP to become active it is necessary to exit the DLP edition
and setup windows.
SWING
Portable Audio Codec, Digital Hybrid and Mixer
59
The Graphic configuration window is the following:
In the upper region different points can be edited, by dragging them to the desired position. The
graph represents input signal levels in the horizontal axis and output levels in the vertical axis.
The diagonal line (in white) represents a 1:1 relation, which means that the output level is equal
to input level (bypass operation). The black line defined by the points determines the DLP
operation when it is active. The number table indicates the position of the points and allows its
edition.
In the example, TX audio signal below –31dB will be attenuated, which allows the reduction of
background noise. Between –31dB and –25dB, gain is increased in the way that –25dB at the
input produce –18dB at the output (a gain of 8dB in this point). Between –25 and +2dB, gain
changes from 7dB (at –25dB in the input) to 2dB (at +2dB in the input). Resulting effect is
amplification. Above +2dB in the input, gain is progressively reduced (compression) until +18dB,
where gain is –4dB. The –18dB transition level separates the compression zone as ‘Upper
Zone’ and the rest as ‘Lower Zone’, so different attack and release parameters are applied to
each zone.
The main difference between a compressor and a limiter is in its attack and release time. A
limiter eliminates the occasional short peaks that can saturate the signal. A compressor is used
for ‘holding’ in a constant high-level signal modulation.
A limiter should have short attack and response times to actuate in a quick and efficient way. A
compressor should have a longer attack and release time, in order to obtain a leveled gain all
the time.
SWING
Portable Audio Codec, Digital Hybrid and Mixer
60
Two DLP configurations named ISDN DEFAULT and ANALOG DEFAULT have been stored in
the SWING’s memory. These and other presets are available from the software installation.
HARD COMPRESSION – This preset applies a gain in the middle part of the signal level
(between –28 and -3dB) and a heavy compression from –3dB with a long release time, so a
constant gain effect is applied to the signal. This gives more presence to the transmitted signal,
but does not allow the output signal to exceed +12dB at the output.
NOISY ENVIRONMENT – This preset is useful to amplify signals with high levels, and decrease
low-level signals. Can be useful to get rid of background noises.
SWING
Portable Audio Codec, Digital Hybrid and Mixer
61
QUIET ENVIRONMENT – This preset amplifies signals with levels lower than the last preset. If
the location is less noisy, QUIET ENVIROMENT will enhance the dynamic details of the signal.
PHONE DEFAULT - This preset is configured by default for the communication through the
analog telephone line. Operation level have been changed to –6dB.
When the DLP is not active, a signal coming into the DLP at 0dBu (-10dBu at the line input with
GAIN at maximum) is transmitted through the telephone line at –12dBu, so the gain going to the
telephone line will be 12dB. When this DLP is active, the maximum level that the DLP will enter
at is output (+4dB) will be converted into –8dBm at the analog telephone line output.
SWING
Portable Audio Codec, Digital Hybrid and Mixer
62
DTMF TONE GENERATION
While a communication is established, it is possible to generate DTMF tones from main control
window. To do that, it is necessary to click in L1 or L2. A new window will appear allowing to
insert the DTMF tones in the audio signal:
The same process is applied to the analog line communication.
SWING
Portable Audio Codec, Digital Hybrid and Mixer
63
EQUIPMENT ON SCREEN FILTERING
It is possible to filter which SWING devices will appear in the control screen. This mode is useful
when many users from different studios have to control different SWINGs from the same E@sy
network.
This option is configured in ‘FILTER’ section of the SWING.ini file, in each of the computers
where the SWING Real Time Control application is installed.
In the SWING.ini file will appear this:
[FILTER]
INCLUDE=
EXCLUDE=
If we would like to see on the screen only the SWINGs which node number are 1, 2 and 3, it
would be:
[FILTER]
INCLUDE=1,2,3
EXCLUDE=
If we would like to see all the SWINGs except numbers 4 and 5, it would be:
[FILTER]
INCLUDE=
EXCLUDE=4,5
SWING
Portable Audio Codec, Digital Hybrid and Mixer
64
INTERNAL PHONE BOOK MANAGEMENT
In the SETUP window, it is possible to manage the phone book, clicking in the Phone Book
button.
In order to read the phone book that a SWING has configured in its memory, click ‘READ’. The
stored numbers will appear on the screen.
It is possible to edit the numbers and names of the phone book in this window and then store
them in the SWING memory using the ‘WRITE‘ option. It is possible to export the phone book to
a xls file (‘EXPORT’ option) so it can be recovered in another moment using the ‘IMPORT’
option.
SWING
Portable Audio Codec, Digital Hybrid and Mixer
65
8. FIRMWARE UPDATES
Only some Advanced Users and the station’s technical staff need to read this chapter.
WHEN UPGRADING?
This SWING has the latest firmware version available when it was manufactured. However, it is
possible than in the future, new firmware versions will appear adding new features to this codec.
This software versions will be published on AEQ web site:
http:\\www.aeq.es\
PRECAUTIONS BEFORE UPGRADING:
Firmware upgrade proccess is a delicate process and it is recommended to take some basic
precautions before doing it.
It is strongly recommended to unplug everything except for power cable and PC connection
cable. The PC should be connected to the same electrical ground.
In any case, AEQ offers free upgrade of this equipment in its main offices.
In case of doubt, contact our Technical Assistance Service: [email protected]
8.1. SYSTEM CONNECTION
The SWING has to be connected to a RS232 port of a PC through the RS-232 or through the
RS-422 interface using a RS232/RS422 adapter.
If there is more than one SWING connected to the E@sy bus, this software will show the
different equipment and its software version. Each one has to be upgraded individually but in
some cases it is possible to run an automatic process.
8.2. INSTALLATION
Run the SWINGFu.exe file to install the upgrading application in the computer.
Follow all the steps of the wizard until the process is finished.
SWING
Portable Audio Codec, Digital Hybrid and Mixer
66
8.3. OPERATION
IMPORTANT
In order to run the Upgrading application, the server and remote control software has to be
stopped.
Double click on the icon to start the application:
Program window will open and look like this:
In the File/Setup PC option, communications port of the PC that is going to be used has to be
selected. In the same option, Range window is used for specifying the range of nodes to
search for.
Clicking on the ‘+’ icon, the three SWING modules (Micro, DSP and Terminal Adapter) are
shown:
To upgrade one of the modules, it is necessary to select it and click the right button of the
mouse. Open option appears. When we click this option with the left button, an explorer window
appears for specifying the new upgrading file.
SWING
Portable Audio Codec, Digital Hybrid and Mixer
67
After specifying the path and name of the file, upgrading window opens:
In this picture, 4.09 version of the Terminal Adapter has been detected and it is ready to be
upgraded to the 4.15 version. To continue and upgrade, click Upgrade option. To cancel, click
Close.
When upgrading process is finished, the SWING will restart-up and new version will be active. A
message will appear.
It is recommended to upgrade the three modules (Micro, DSP and Terminal Adapter) in
order.
SWING
Portable Audio Codec, Digital Hybrid and Mixer
68
Some new Microprocessor versions need to erase existing configuration. The
SWING will loose phone-book and start up configurations and node number so it
will loose communication with the software and it will be necessary to set this
number again before continuing upgrading.
A new feature has been inplemented in the software that allows running an automatic upgrading
process when many SWING have to be upgraded. Run File/Automatic.
The following window will appear:
Use the icons in the right part of the screen for selecting the new upgrade files to be loaded on
the SWING and press OK to start.
NOTE: This procedure will work on some specific versions of the firmware that do not
need the non-volatile memory reset. If memory reset is needed, this reset will set node
number to 255 loosing this SWING control until node number is set again. If this is the
case, the upgrade process should be done manually.
SWING
Portable Audio Codec, Digital Hybrid and Mixer
69
9. TECHNICAL SPECIFICATIONS
Communication interfaces.
ISDN.
-"S" interface, 4 wire in RJ-45 format.
-"U" interface, 2 wire in RJ-11 format.
Point-to-Point.
V.35 / X.21 physical interface in DB-15 female format. Transmission rates at 64 or 128kbps.
Analog telephone interface.
Conventional 2-wire, RJ-11 format.
Supported ISDN protocols.
- Euro ISDN (2B+D) Euro ISDN compatible (ETS 300 012, ETS 300 125, ETS 300102)
- NATIONAL-1 (2B1Q) ANSI compatible (ANSI T1.601-1992, T1.602-1996, T1.607-1998).
5ESS, DMS-100 and EWSD formats supported.
Analog inputs and outputs
Main inputs MIC-1, MIC-2 and MIC/LINE.
-Transformer balanced, with built-in RF filters, female XLR-3.
- Input impedance: > 6 kOhms.
- Nominal level (LINE): 0 dBv.
- Maximum level (LINE): + 22 dBv.
- Nominal level (MIC): -60 dBv.
- Maximum level (MIC): - 25 dBv.
- 16-bit Sigma-Delta A/D converters.
Auxiliary 4W input.
-Transformer balanced, with built-in RF filters.
- Input impedance: > 6 kOhms.
- Nominal level (LINE): 0 dBv.
- Maximum level (LINE): + 22 dBv.
- 16-bit Sigma-Delta A/D converters.
Auxiliary 4W output.
- Transformer balanced.
- Output impedance: < 50 Ohms.
- Maximum level: + 22 dBm.
- 16-bit Sigma-Delta D/A converters.
- Absolute noise at nominal gain (22-22kHz filter): -68dBu
Headphone output.
- ¼" jack, with volume control.
- Maximum power: 150 mW.
- Takes headphones higher than 200 Ohms..
Telephone hybrid.
- Digital processing for canceling local echo.
- Nominal transmission level to the analog line: -12dBv
- Nominal reception level from the analog line: -7dBv
- Adaptative remote echo canceller for ISDN calls in voice mode (G711).
Limiter.
- Hardware limiter adjusted to avoid analog signals clipping just before the A/D conversion. This
limiter ensures a nominal THD+N lower than 0.05 in the worst case (maximum input level).
The INPUT-OUTPUT level relation is 1:1 until +15dBu at the input. Above that level, internal
signal is limited to +16dBu. Attack time is lower than 10ms and Release time is higher than
2000ms.
SWING
Portable Audio Codec, Digital Hybrid and Mixer
70
Digital Level Processor.
- SOFTWARE DLP after A/D conversion. Configuration and management through the client
software SWING REAL TIME CONTROL.
Coding, synchronism and bandwidth modes.
- Described in chapter 1.1.
Ancilliary Data Port.
- DB9 female connector, RS323 asynchronous, 8 data bits, no parity, 1 stop bit, 115200 bauds
(accepts hardware flow control selection).
Remote control.
- E@sy interface for remote control. RS422 format in a 4 poles multi-connector. It is possible to
connect the unit to a PC using DB-9 connector as RS-232, asynchronous, 8 data bits, no parity,
1 stop bit, speed 38400 bauds without flow control (In this case Ancilliary Data Channel is
disabled).
Power supply.
- Auto-range supply, from 90 to 250 VAC, 50/60Hz, with automatic power factor correction.
Includes rechargeable batteries with UPS effect, being able to keep the SWING unit working
during 1 hour without AC input*.
- Power consumption: 600mA
* Battery completely charged.
Weight.
Unit:
3.3 Lb. 1,500 grams
Power Supply:
1.5 Lb. 675 grams
Dimensions:
Unit:
Width:
9.45”, 24 cm.
Depth:
8.27”, 21 cm.
Height:
3.15”, 8 cm.
Power Supply:
Width:
3.5”, 9 cm.
Depth:
5”, 13 cm
Height:
2.75”, 7 cm.
Specifications subject to possible changes with no prior notice.
SWING
Portable Audio Codec, Digital Hybrid and Mixer
71
10. A.E.Q. GUARANTEE
AEQ guarantees that this product has been designed and manufactured under a certified Quality
Assurance System and according to the ISO 9001/2002 Standard. AEQ therefore Guarantees that
the necessary test protocols to assure the proper operation and the specified technical
characteristics of the product have been followed and accomplished. This includes that the general
protocols for design and production and the particular ones for this product are conveniently
documented.
1. - The present guarantee does not exclude or limit in any way any legally recognized right of the
client.
2. - The period of guarantee is defined to be twelve natural months starting from the date of
purchase of the product by the first client. To be able to apply to the established in this guarantee, it
is compulsory condition to inform the authorized distributor or –to its effect- an AEQ Sales office or
the Technical Service of AEQ within thirty days of the appearance of the defect and within the period
of guarantee, as well as to facilitate a copy of the purchase invoice and serial number of the product.
It will be equally necessary the previous and expressed conformity from the AEQ Technical Service
for the shipment to AEQ of products for their repair or substitution in application of the present
guarantee. In consequence, return of equipment that does not comply with these conditions will not
be accepted.
3. -AEQ will at its own cost repair the faulty product once returned, including the necessary labour to
carry out such repair, whenever the failure is caused by defects of the materials, design or
workmanship. The repair will be carried out in any of the AEQ authorized Technical Service Center.
This guarantee does not include the freight charges of the product to or from such Authorized
Technical Service Center.
4. – No Extension of the Guarantee Period for repaired product shall be applied. Nor shall a
Substituted Products in application of this Guarantee be subject to Guarantee Period Extension.
5. - The present guarantee will not be applicable in the following situations:
Improper use or Contrary use of the product as per the User or Instruction Manual; violent
manipulation; exhibition to humidity or extreme thermal or environmental conditions or sudden
changes of such conditions; electrical discharges or lightning; oxidation; modifications or not
authorized connections; repairs or non-authorized disassembly of the product; spill of liquids or
chemical products.
6. - Under no circumstances, whether based upon this Limited Guarantee or otherwise, shall AEQ,
S.A. be liable for incidental, special, or consequential damages derived from the use or from the
impossibility of using the product.
AEQ shall not be liable for loss of information in the disks or data support that have been altered or
found to be inexact, neither for any accidental damage caused by the user or other persons
manipulating the product.
SOFTWARE GUARANTEE
AEQ guarantees that this product has been designed and manufactured under a certified Quality
Assurance System and according to the ISO 9001/2002 Standard. AEQ therefore Guarantees that
the necessary test protocols to assure the proper operation and the specified technical
characteristics of the product have been followed and accomplished. This includes that the general
protocols for design and production and the particular ones for this product are conveniently
documented. AEQ guarantees that the delivered software is according with the specified technical
and functional characteristics. AEQ guarantees that the data support upon which this software has
been delivered has been verified, and that the hardware key or hardware Key-lock that allows the
use of the software is working correctly in the foreseen scenarios. AEQ guarantees the delivered
data disks.
SWING
Portable Audio Codec, Digital Hybrid and Mixer
72
1. - The present guarantee does not exclude or limit in any way any legally recognized right of the
client.
2. - The period of guarantee is defined to be twelve natural months starting from the date of
purchase of the product by the first client. To be able to apply to the established in this guarantee, it
is compulsory condition to inform the authorized distributor or –to its effect- an AEQ Sales office or
the Technical Service of AEQ within thirty days of the appearance of the defect and within the period
of guarantee, as well as to facilitate a copy of the purchase invoice and serial number of the product.
It will be equally necessary the previous and expressed conformity from the AEQ Technical Service
for the shipment to AEQ of products for their repair or substitution in application of the present
guarantee. In consequence, return of equipment that does not comply with these conditions will not
be accepted.
3. -AEQ will at its own cost repair or substitute the faulty Hardware Key or Hardware Key-Lock once
returned to AEQ, including the necessary labour to carry out such repair, whenever the failure is
caused by defects of the materials, design or workmanship. The repair will be carried out in any of
the AEQ authorized Technical Service Center. This guarantee does not include the freight charges of
the product to or from such Authorized Technical Service Center.
AEQ will replace the faulty data support or its documentation. In the case of appearance of hidden
defects, unknown at the moment of the delivery of the software, AEQ will provide a software version
that allows solving such defects.
4. - The derived functional defects of the use of a Hardware support that has not been certified by
AEQ are expressly excluded from this guarantee. Equally excluded from this guarantee are the
defects provoked by the use of non-AEQ software that has not been expressly authorized, delivered
and certified by AEQ. This is extensive to both Operating Systems and other Computer Applications
as to versions or releases of such.
5. – No Extension of the Guarantee Period for repaired product shall be applied. Nor shall a
Substituted Products in application of this Guarantee be subject to Guarantee Period Extension.
6. - The present guarantee will not be applicable in the following situations:
Improper use or Contrary use of the product as per the User or Instruction Manual; violent
manipulation; exhibition to humidity or extreme thermal or environmental conditions or sudden
changes of such conditions; electrical discharges or lightning; oxidation; modifications or not
authorized connections; repairs or non-authorized disassembly of the product; spill of liquids or
chemical products.
7. - Under no circumstances, whether based upon this Limited Guarantee or otherwise, shall AEQ,
S.A. be liable for incidental, special, or consequential damages derived from the use or from the
impossibility of using the software.
SWING
Portable Audio Codec, Digital Hybrid and Mixer
73
ANNEX
A.1. IP Connections
Only some Advanced Users and the station’s technical staff need to read this chapter.
•
To know the name of a computer inside a LAN network:
From windows desktop, click with mouse right button in NETWORK NEIGBOURHOOD icon
and choose the Properties option. Computer name can be found in the Identification tab.
Another possibility is to execute the ‘s et co mp u t e rn am e’ command from the MSDOS
command interface.
C:\>set computername
COMPUTERNAME=OFTECNICA05
C:\>
In this example, the name of our computer is OFTECNICA05.
•
To know the IP address of a computer:
Execute the ‘i p co n f i g ’ command from the MSDOS command interface.
C:\>ipconfig
Windows NT IP configuration
Ethernet adapter E100B1:
IP Address . . . . . . . . . : 192.50.11.5
Subnet mask . . . . . . . : 255.255.0.0
In this example, IP address is 192.50.11.5
SWING – ANNEX 2 – IP Connections
Portable Audio Codec, Digital Hybrid and Mixer
74
•
To test IP communication status:
The ‘p in g ’ command is used to know if a remote equipment can be reached via IP, indicating
the name or IP address of the remote equipment. This command sends a contact message. If
remote equipment is reached, it will reply and response time will be shown:
C:\>ping OFTECNICA09
Pinging oftecnica09 [192.50.11.5] with 32 data bytes:
Response from
Response from
Response from
Response from
192.50.11.5: bytes=32 time<10ms TDV=128
192.50.11.5: bytes=32 time<10ms TDV=128
192.50.11.5: bytes=32 time<10ms TDV=128
192.50.11.5: bytes=32 time<10ms TDV=128
In this case, 4 messages have been sent and replied in less than 10 milliseconds to a computer
named ‘OFTECNICA09’ which IP address is the 192.50.11.5
NOTE: Response time depends on many facts. IP distance between them and network traffic are the most
important ones. Therefore, in a remote connection over the INTERNET, response time will be higher than the
one in a LAN connection.
In case that response time is very high or there is no response, contact your systems
administrator to check the network connection.
SWING – ANNEX 2 – IP Connections
Portable Audio Codec, Digital Hybrid and Mixer
75
A.2. USA TA configuration
Practical notes for the configuration of the ISDN TERMINAL ADAPTER (TA) IN THE
UNITED STATES AND OTHER COUNTRIES WITH NATIONAL 1 ISDN PROTOCOL
1. Notes about the ISDN and the peculiarities of the different types of ISDN
1.1. Generalities about the ISDN
The ISDN (Integrated Services Digital Network) is a telephone connection system that permits
the establishment of fully digital end-to-end communications.
There are two types of ISDN links, depending on the number of 64 Kbps channels: Basic links
(BRI – Basic Rate Interface) and Primary links (PRI – Primary Rate Interface).
Basic links allow the simultaneous establishment of two connections or data channels, each
with a capacity of 64Kbps.
Primary links allow 23 - 64 Kbps channels to be established in the USA, and 31 - 64Kbps
channels in Europe.
To access ISDN services, you must subscribe to an ISDN phone line and connect equipment to
it, such as an audio codec, that has an ISDN Terminal Adapter device to perform the tasks of
establishing and maintaining connections through digital ISDN phone lines.
The Swing has an ISDN Terminal Adapter for Basic links (BRI), which gives it a communications
capacity of two independent 64 Kbps data channels. Swing allows these channels to be
grouped into a single 128 Kbps channel, doubling the bandwidth and the communications cost.
1.2. Types of connection to Basic ISDN Links
We can find two types of physical connection to the ISDN: connection to a type U interface, and
connection to a type S/T interface.
The U interface connects the telephone exchange with the subscriber. It has two wires, the
same as in conventional analog telephony, and only allows a point-to-point connection (a single
device connected to the interface).
The S/T interface is obtained from the U interface, passing it through a Network Terminator
(NT1) located at the subscriber’s premises. It has four wires and allows a multipoint connection
of up to 7 devices.
In the USA, phone companies do not supply the NT1, so the user is the one who must install it if
he wants it. The most common situation is for there to be no NT1, and therefore access is
through a U interface.
In summary, in the USA, access via a U interface is most common, unless the subscriber has
asked the phone company to install an NT1 or has installed it himself (the NT1 is usually a box
attached to the wall, with a power supply, and some kind of light indicator, to which the two-wire
external line enters and which has RJ-45 jacks).
The Swing’s universal TA (terminal adapter) allows both types of connections, and thus has two
ISDN connectors, one marked ETSI (RJ-45, 8 pins) for the S/T interface connection, and the
other marked ANSI (RJ-11, 6 pins) for the type U interface connection. The type of connection
used must be configured in the unit’s setup.
SWING – ANNEX 2 – USA TA Configuration
Portable Audio Codec, Digital Hybrid and Mixer
76
1.3. Protocol
Although the ISDN is supposed to be a standard, differences can be found between the
protocols used by different countries.
In the USA, there are several protocols that are incompatible with each other; fortunately,
however, there is one protocol that is fairly standardized (called National-1), which is usually
available at all exchanges.
The Swing’s Universal Terminal Adapter can work with the NATIONAL-1 protocol (the most
widely used in the USA). Selection of the desired protocol, in our case the NATIONAL-1, must
be configured in the unit’s setup.
In Europe and in other geographic areas, there is a protocol called EURO ISDN. There are
minor differences between the EURO ISDN in different countries. These differences do not
affect the Swing.
1.4. Directory Numbers (DN’s)
These are the telephone directory numbers assigned to the line.
In the National-1 protocol, there will be two numbers, each associated with one of the line’s
channels. These numbers must be programmed in the unit for it to work correctly “NUMBER
LINE X” option) and therefore, each channel will only respond to its associated number (Note: In
the USA, the directory number that must be programmed in the terminal should not contain the
area code, in other words, use only the seven-digit local number.)
If the directory numbers are programmed incorrectly in the unit, it will be able to make outgoing
calls but will not respond to incoming calls.
1.5. SPID’s (Service Profile Identification Numbers)
In the case of the NATIONAL-1 protocol, the SPID’s (Service Profile Identification Number) as
well as the directory numbers (DN’s) must be programmed in the terminal. SPID’s are numbers
that the phone company assigns, which are associated with each of the line’s two channels. If
the SPID’s are not configured correctly, the terminal will not work.
1.6. Line characteristics for the USA. Model line request.
In the case of the USA, ISDN lines have many configurable parameters, such as the protocol
used, number of channels, type of call the channels accept (analog and digital, only analog,
etc.), etc.
To ensure that the line’s characteristics are appropriate for use with the Swing, we recommend
you use the following model to request it:
LINE REQUEST MODEL
We request an ISDN Basic Rate Interface (BRI) line for an Audio Codec unit.
We will provide the NT1 and need a U 2B1Q interface on a standard RJ-11 jack.
We support only National ISDN-1 Protocol.
We need clear 64 Kbps access. (56 Kbps is not acceptable)
Long distance prefix (10XXX) must be enabled.
Long distance carriers: MCI, AT&T, Sprint
If you use IOC Capability Packages, please use Bellcore Capability Package M. If you do not
use IOCs, use the following information:
- Two B channels.
- Circuit Switched data (CSD) and Circuit Switched Voice (CSV) on both channels
- Dynamic TEI assignment.
SWING – ANNEX 2 – USA TA Configuration
Portable Audio Codec, Digital Hybrid and Mixer
77
- No features or special services such as packed mode data on D channel, CACH EKTS, call
forwarding, hunt groups, etc..
Please provide:
- Two SPID numbers.
- Two DNs
2. Connecting the Swing to the ISDN line
If the U interface is to be used (more common in the USA), the line will be connected to the RJ11 jack (6 pins) on the back of the equipment marked ISDN-ANSI, using a 6-pin modular
telephone cable (RJ-11 to RJ-11). Note that the connection point to the U interface provided by
the phone company may be a 6-pin RJ-11 type jack or an 8-pin RJ-45 type (the standard allows
both types). If the jack provided is an RJ-45 type, the RJ-11 connector (6 pins) on the cable may
be inserted into the center of the RJ-45 jack (8 pins).
SWING – ANNEX 2 – USA TA Configuration
Portable Audio Codec, Digital Hybrid and Mixer
78