Download WLA532 Access Point Hardware Documentation
Transcript
WLA532 Access Point Hardware Documentation Published: 2012-03-14 Copyright © 2012, Juniper Networks, Inc. Juniper Networks, Inc. 1194 North Mathilda Avenue Sunnyvale, California 94089 USA 408-745-2000 www.juniper.net Copyright © 2012, Juniper Networks, Inc. All rights reserved. Juniper Networks, Junos, Steel-Belted Radius, NetScreen, and ScreenOS are registered trademarks of Juniper Networks, Inc. in the United States and other countries. The Juniper Networks Logo, the Junos logo, and JunosE are trademarks of Juniper Networks, Inc. All other trademarks, service marks, registered trademarks, or registered service marks are the property of their respective owners. Juniper Networks assumes no responsibility for any inaccuracies in this document. Juniper Networks reserves the right to change, modify, transfer, or otherwise revise this publication without notice. Products made or sold by Juniper Networks or components thereof might be covered by one or more of the following patents that are owned by or licensed to Juniper Networks: U.S. Patent Nos. 5,473,599, 5,905,725, 5,909,440, 6,192,051, 6,333,650, 6,359,479, 6,406,312, 6,429,706, 6,459,579, 6,493,347, 6,538,518, 6,538,899, 6,552,918, 6,567,902, 6,578,186, and 6,590,785. WLA532 Access Point Hardware Documentation Copyright © 2012, Juniper Networks, Inc. All rights reserved. The information in this document is current as of the date on the title page. YEAR 2000 NOTICE Juniper Networks hardware and software products are Year 2000 compliant. Junos OS has no known time-related limitations through the year 2038. However, the NTP application is known to have some difficulty in the year 2036. END USER LICENSE AGREEMENT The Juniper Networks product that is the subject of this technical documentation consists of (or is intended for use with) Juniper Networks software. Use of such software is subject to the terms and conditions of the End User License Agreement (“EULA”) posted at http://www.juniper.net/support/eula.html. By downloading, installing or using such software, you agree to the terms and conditions of that EULA. ii Copyright © 2012, Juniper Networks, Inc. Table of Contents About the Documentation . . . . . . . . . . . . . . . . . . . . . . . . . . . . . . . . . . . . . . . . . . . . ix Documentation and Release Notes . . . . . . . . . . . . . . . . . . . . . . . . . . . . . . . . . . ix Supported Platforms . . . . . . . . . . . . . . . . . . . . . . . . . . . . . . . . . . . . . . . . . . . . . ix Documentation Conventions . . . . . . . . . . . . . . . . . . . . . . . . . . . . . . . . . . . . . . . ix Documentation Feedback . . . . . . . . . . . . . . . . . . . . . . . . . . . . . . . . . . . . . . . . . xi Requesting Technical Support . . . . . . . . . . . . . . . . . . . . . . . . . . . . . . . . . . . . . . xi Self-Help Online Tools and Resources . . . . . . . . . . . . . . . . . . . . . . . . . . . . . . . xii Opening a Case with JTAC . . . . . . . . . . . . . . . . . . . . . . . . . . . . . . . . . . . . . . . . . xii Part 1 Overview Chapter 1 Access Point Overview . . . . . . . . . . . . . . . . . . . . . . . . . . . . . . . . . . . . . . . . . . . . . . 3 WLA532 Access Point Hardware Overview . . . . . . . . . . . . . . . . . . . . . . . . . . . . . . . . 3 Features Supported by the WLA532 Access Point . . . . . . . . . . . . . . . . . . . . . . 4 Physical Characteristics of the Access Point . . . . . . . . . . . . . . . . . . . . . . . . . . . 4 Software and Hardware Used with the Access Point . . . . . . . . . . . . . . . . . . . . 4 MAC Address Information for WLA Series Access Points . . . . . . . . . . . . . . . . . . . . . 5 Chapter 2 Ports and Connectors . . . . . . . . . . . . . . . . . . . . . . . . . . . . . . . . . . . . . . . . . . . . . . . 7 Ethernet Connections for WLA532 Access Points . . . . . . . . . . . . . . . . . . . . . . . . . . 7 Status LEDs on WLA532 Access Points . . . . . . . . . . . . . . . . . . . . . . . . . . . . . . . . . . . 7 Chapter 3 Specifications . . . . . . . . . . . . . . . . . . . . . . . . . . . . . . . . . . . . . . . . . . . . . . . . . . . . . 11 PoE Information for WLA532 Access Points . . . . . . . . . . . . . . . . . . . . . . . . . . . . . . . 11 Technical, Physical, and Radio Specifications for WLA532 Access Points . . . . . . . 11 802.11 a/b/g/n Features . . . . . . . . . . . . . . . . . . . . . . . . . . . . . . . . . . . . . . . . . . . 11 Ceiling and Wall Mounting . . . . . . . . . . . . . . . . . . . . . . . . . . . . . . . . . . . . . . . . . 12 Physical and Compliance Specifications . . . . . . . . . . . . . . . . . . . . . . . . . . . . . 12 Radio Specifications . . . . . . . . . . . . . . . . . . . . . . . . . . . . . . . . . . . . . . . . . . . . . 14 Part 2 Planning Chapter 4 Planning Guidelines . . . . . . . . . . . . . . . . . . . . . . . . . . . . . . . . . . . . . . . . . . . . . . . 19 Planning Guidelines for Using RingMaster to Plan a Mobility System . . . . . . . . . . 19 Chapter 5 Radio Requirements & Patterns . . . . . . . . . . . . . . . . . . . . . . . . . . . . . . . . . . . . . 21 Requirements and Specifications for 2.4-GHz Radios on WLA532 Access Points . . . . . . . . . . . . . . . . . . . . . . . . . . . . . . . . . . . . . . . . . . . . . . . . . . . . . . . . . 21 Requirements and Specifications for 5-GHz Radios on WLA532 Access Points . . . . . . . . . . . . . . . . . . . . . . . . . . . . . . . . . . . . . . . . . . . . . . . . . . . . . . . . . 21 Radiation Patterns of Antennas for 2.4-GHz and 5-GHz Radios in the WLA532 Access Point . . . . . . . . . . . . . . . . . . . . . . . . . . . . . . . . . . . . . . . . . . . . . . . . . . . 22 Copyright © 2012, Juniper Networks, Inc. iii WLA532 Access Point Hardware Documentation Chapter 6 Certifications . . . . . . . . . . . . . . . . . . . . . . . . . . . . . . . . . . . . . . . . . . . . . . . . . . . . . 25 EMI and EMC Certifications for the WLA532 Access Point . . . . . . . . . . . . . . . . . . . 25 Radio Certifications for the WLA532 Access Point . . . . . . . . . . . . . . . . . . . . . . . . . 25 Part 3 Safety Chapter 7 General Safety Information . . . . . . . . . . . . . . . . . . . . . . . . . . . . . . . . . . . . . . . . . 29 General Safety Standards and Agencies for Access Points . . . . . . . . . . . . . . . . . . 29 WLA Access Point Radio Frequency Exposure Guidelines . . . . . . . . . . . . . . . . . . . 30 Part 4 Installation Chapter 8 Installing the Access Point . . . . . . . . . . . . . . . . . . . . . . . . . . . . . . . . . . . . . . . . . 35 Installing the WLA532 Access Point on a Suspended Ceiling Rail . . . . . . . . . . . . . 35 Installing the WLA532 Access Point on the Wall Using Hardware Kits . . . . . . . . . 38 WLA-BRKT-WALL Wall-Mount Kit (Faceplate and Wall-Mount Bracket Standard Hardware) . . . . . . . . . . . . . . . . . . . . . . . . . . . . . . . . . . . . . . . . . 39 WLA-GNGWLBX-ADP-EU Kit (European Faceplate Standard Hardware) . . . . . . . . . . . . . . . . . . . . . . . . . . . . . . . . . . . . . . . . . . . . . . . . . 45 WLA-GNGWLBX-ADP-NA Kit (North American Faceplate Standard Hardware) . . . . . . . . . . . . . . . . . . . . . . . . . . . . . . . . . . . . . . . . . . . . . . . . . 46 Connecting the Access Point to Wireless LAN Controllers . . . . . . . . . . . . . . . . . . . 50 Chapter 9 Verification Tasks . . . . . . . . . . . . . . . . . . . . . . . . . . . . . . . . . . . . . . . . . . . . . . . . . . 51 Verifying the Health of WLA Series Access Points Using LEDs . . . . . . . . . . . . . . . . 51 Part 5 Troubleshooting Chapter 10 Customer Support . . . . . . . . . . . . . . . . . . . . . . . . . . . . . . . . . . . . . . . . . . . . . . . . 55 Contacting JTAC Regarding WLA532 Access Point Parts . . . . . . . . . . . . . . . . . . . . 55 Part 6 Index Index . . . . . . . . . . . . . . . . . . . . . . . . . . . . . . . . . . . . . . . . . . . . . . . . . . . . . . . . . 59 iv Copyright © 2012, Juniper Networks, Inc. List of Figures Part 1 Overview Chapter 1 Access Point Overview . . . . . . . . . . . . . . . . . . . . . . . . . . . . . . . . . . . . . . . . . . . . . . 3 Figure 1: WLA532 Access Point . . . . . . . . . . . . . . . . . . . . . . . . . . . . . . . . . . . . . . . . . 3 Chapter 2 Ports and Connectors . . . . . . . . . . . . . . . . . . . . . . . . . . . . . . . . . . . . . . . . . . . . . . . 7 Figure 2: Status LEDs on WLA532 Access Points . . . . . . . . . . . . . . . . . . . . . . . . . . . 8 Part 2 Planning Chapter 5 Radio Requirements & Patterns . . . . . . . . . . . . . . . . . . . . . . . . . . . . . . . . . . . . . 21 Figure 3: Internal Antennas of the WLA532 Access Point . . . . . . . . . . . . . . . . . . . . 22 Figure 4: Horizontal-Plane Radiation Pattern (Omnidirectional) for a Ceiling-Mounted Access Point . . . . . . . . . . . . . . . . . . . . . . . . . . . . . . . . . . . . . 23 Figure 5: Vertical-Plane Radiation Pattern (5-Degree Downtilt) for a Ceiling-Mounted Access Point . . . . . . . . . . . . . . . . . . . . . . . . . . . . . . . . . . . . . 23 Part 4 Installation Chapter 8 Installing the Access Point . . . . . . . . . . . . . . . . . . . . . . . . . . . . . . . . . . . . . . . . . 35 Figure 6: Opening the Ceiling Bracket Clips . . . . . . . . . . . . . . . . . . . . . . . . . . . . . . 36 Figure 7: Opening the Ceiling Bracket Snaps . . . . . . . . . . . . . . . . . . . . . . . . . . . . . . 36 Figure 8: Locking the Bracket Clips Over the Rail . . . . . . . . . . . . . . . . . . . . . . . . . . 37 Figure 9: Aligning the Access Point with the Ceiling Bracket . . . . . . . . . . . . . . . . . 37 Figure 10: Releasing the Access Point . . . . . . . . . . . . . . . . . . . . . . . . . . . . . . . . . . . 38 Figure 11: Locking the Access Point onto the Ceiling Tile . . . . . . . . . . . . . . . . . . . . 38 Figure 12: WLA-BRKT-WALL Kit (Wall-Mount Bracket Kit Hardware) . . . . . . . . . 39 Figure 13: Wall-Mount Bracket Dimensions-–WLA-BRKT-WALL . . . . . . . . . . . . . 40 Figure 14: Use the Provided Template to Install Wall Anchors . . . . . . . . . . . . . . . . 41 Figure 15: Pull the Category 5 Cable Through the Wall Bracket . . . . . . . . . . . . . . . 42 Figure 16: Use M3 or 6-32 Wall Anchors to Secure the Bracket to Anchors . . . . . . 42 Figure 17: Faceplate Secured to the Wall-Mount Bracket . . . . . . . . . . . . . . . . . . . . 43 Figure 18: Align the Access Point with the Bracket and Push Down . . . . . . . . . . . . 43 Figure 19: Release the Access Point . . . . . . . . . . . . . . . . . . . . . . . . . . . . . . . . . . . . . 44 Figure 20: Secure the Access Point with the Security Screw and Tool . . . . . . . . . 44 Figure 21: WLA-GNGWLBX-ADP-EU Kit (EU Faceplate Standard Hardware) . . . 45 Figure 22: EU Faceplate Dimensions . . . . . . . . . . . . . . . . . . . . . . . . . . . . . . . . . . . . 45 Figure 23: Dimensions of the Installed WLA532 Access Point on an EU-Standard Faceplate . . . . . . . . . . . . . . . . . . . . . . . . . . . . . . . . . . . . . . . . . . . . . . . . . . . . . 46 Figure 24: WLA-GNGWLBX-ADP-NA Kit (NA Faceplate Standard Hardware) . . . 47 Figure 25: NA Wall-Mount Bracket Dimensions . . . . . . . . . . . . . . . . . . . . . . . . . . . 47 Figure 26: NA Standard Outlet Box . . . . . . . . . . . . . . . . . . . . . . . . . . . . . . . . . . . . . 48 Copyright © 2012, Juniper Networks, Inc. v WLA532 Access Point Hardware Documentation Figure 27: NA Faceplate Secured to the Outlet Box . . . . . . . . . . . . . . . . . . . . . . . . 49 vi Copyright © 2012, Juniper Networks, Inc. List of Tables About the Documentation . . . . . . . . . . . . . . . . . . . . . . . . . . . . . . . . . . . . . . . . . . ix Table 1: Notice Icons . . . . . . . . . . . . . . . . . . . . . . . . . . . . . . . . . . . . . . . . . . . . . . . . . . x Table 2: Text and Syntax Conventions . . . . . . . . . . . . . . . . . . . . . . . . . . . . . . . . . . . . x Part 1 Overview Chapter 1 Access Point Overview . . . . . . . . . . . . . . . . . . . . . . . . . . . . . . . . . . . . . . . . . . . . . . 3 Table 3: MAC Address Information for WLA Series Access Points . . . . . . . . . . . . . . 5 Chapter 2 Ports and Connectors . . . . . . . . . . . . . . . . . . . . . . . . . . . . . . . . . . . . . . . . . . . . . . . 7 Table 4: Status LEDs on WLA532 Access Points . . . . . . . . . . . . . . . . . . . . . . . . . . . 8 Chapter 3 Specifications . . . . . . . . . . . . . . . . . . . . . . . . . . . . . . . . . . . . . . . . . . . . . . . . . . . . . 11 Table 5: Mechanical and Compliance Specification for WLA532 . Table 6: Radio Specifications for the WLA532 Access Point . . . . Table 7: 2.4-GHz Radio Receive Sensitivities . . . . . . . . . . . . . . . . . Table 8: 5-GHz Radio Receive Sensitivities . . . . . . . . . . . . . . . . . . Copyright © 2012, Juniper Networks, Inc. . . . . . . . . . . . . . . . . . . . . . . . . . . . . . . . . . . . . . . . . . . . . . . . . . . . . 12 15 15 15 vii WLA532 Access Point Hardware Documentation viii Copyright © 2012, Juniper Networks, Inc. About the Documentation • Documentation and Release Notes on page ix • Supported Platforms on page ix • Documentation Conventions on page ix • Documentation Feedback on page xi • Requesting Technical Support on page xi Documentation and Release Notes ® To obtain the most current version of all Juniper Networks technical documentation, see the product documentation page on the Juniper Networks website at http://www.juniper.net/techpubs/. If the information in the latest release notes differs from the information in the documentation, follow the product Release Notes. Juniper Networks Books publishes books by Juniper Networks engineers and subject matter experts. These books go beyond the technical documentation to explore the nuances of network architecture, deployment, and administration. The current list can be viewed at http://www.juniper.net/books. Supported Platforms For the features described in this document, the following platforms are supported: • WLA532 Documentation Conventions Table 1 on page x defines notice icons used in this guide. Copyright © 2012, Juniper Networks, Inc. ix WLA532 Access Point Hardware Documentation Table 1: Notice Icons Icon Meaning Description Informational note Indicates important features or instructions. Caution Indicates a situation that might result in loss of data or hardware damage. Warning Alerts you to the risk of personal injury or death. Laser warning Alerts you to the risk of personal injury from a laser. Table 2 on page x defines the text and syntax conventions used in this guide. Table 2: Text and Syntax Conventions Convention Description Examples Bold text like this Represents text that you type. To enter configuration mode, type the configure command: user@host> configure Fixed-width text like this Italic text like this Italic text like this Text like this < > (angle brackets) x Represents output that appears on the terminal screen. user@host> show chassis alarms • Introduces important new terms. • • Identifies book names. • Identifies RFC and Internet draft titles. A policy term is a named structure that defines match conditions and actions. • Junos OS System Basics Configuration Guide • RFC 1997, BGP Communities Attribute No alarms currently active Represents variables (options for which you substitute a value) in commands or configuration statements. Configure the machine’s domain name: Represents names of configuration statements, commands, files, and directories; interface names; configuration hierarchy levels; or labels on routing platform components. • To configure a stub area, include the stub statement at the [edit protocols ospf area area-id] hierarchy level. • The console port is labeled CONSOLE. Enclose optional keywords or variables. stub <default-metric metric>; [edit] root@# set system domain-name domain-name Copyright © 2012, Juniper Networks, Inc. About the Documentation Table 2: Text and Syntax Conventions (continued) Convention Description Examples | (pipe symbol) Indicates a choice between the mutually exclusive keywords or variables on either side of the symbol. The set of choices is often enclosed in parentheses for clarity. broadcast | multicast # (pound sign) Indicates a comment specified on the same line as the configuration statement to which it applies. rsvp { # Required for dynamic MPLS only [ ] (square brackets) Enclose a variable for which you can substitute one or more values. community name members [ community-ids ] Indention and braces ( { } ) Identify a level in the configuration hierarchy. ; (semicolon) Identifies a leaf statement at a configuration hierarchy level. (string1 | string2 | string3) [edit] routing-options { static { route default { nexthop address; retain; } } } J-Web GUI Conventions Bold text like this Represents J-Web graphical user interface (GUI) items you click or select. > (bold right angle bracket) Separates levels in a hierarchy of J-Web selections. • In the Logical Interfaces box, select All Interfaces. • To cancel the configuration, click Cancel. In the configuration editor hierarchy, select Protocols>Ospf. Documentation Feedback We encourage you to provide feedback, comments, and suggestions so that we can improve the documentation. You can send your comments to [email protected], or fill out the documentation feedback form at https://www.juniper.net/cgi-bin/docbugreport/ . If you are using e-mail, be sure to include the following information with your comments: • Document or topic name • URL or page number • Software release version (if applicable) Requesting Technical Support Technical product support is available through the Juniper Networks Technical Assistance Center (JTAC). If you are a customer with an active J-Care or JNASC support contract, Copyright © 2012, Juniper Networks, Inc. xi WLA532 Access Point Hardware Documentation or are covered under warranty, and need post-sales technical support, you can access our tools and resources online or open a case with JTAC. • JTAC policies—For a complete understanding of our JTAC procedures and policies, review the JTAC User Guide located at http://www.juniper.net/us/en/local/pdf/resource-guides/7100059-en.pdf . • Product warranties—For product warranty information, visit http://www.juniper.net/support/warranty/ . • JTAC hours of operation—The JTAC centers have resources available 24 hours a day, 7 days a week, 365 days a year. Self-Help Online Tools and Resources For quick and easy problem resolution, Juniper Networks has designed an online self-service portal called the Customer Support Center (CSC) that provides you with the following features: • Find CSC offerings: http://www.juniper.net/customers/support/ • Search for known bugs: http://www2.juniper.net/kb/ • Find product documentation: http://www.juniper.net/techpubs/ • Find solutions and answer questions using our Knowledge Base: http://kb.juniper.net/ • Download the latest versions of software and review release notes: http://www.juniper.net/customers/csc/software/ • Search technical bulletins for relevant hardware and software notifications: https://www.juniper.net/alerts/ • Join and participate in the Juniper Networks Community Forum: http://www.juniper.net/company/communities/ • Open a case online in the CSC Case Management tool: http://www.juniper.net/cm/ To verify service entitlement by product serial number, use our Serial Number Entitlement (SNE) Tool: https://tools.juniper.net/SerialNumberEntitlementSearch/ Opening a Case with JTAC You can open a case with JTAC on the Web or by telephone. • Use the Case Management tool in the CSC at http://www.juniper.net/cm/ . • Call 1-888-314-JTAC (1-888-314-5822 toll-free in the USA, Canada, and Mexico). For international or direct-dial options in countries without toll-free numbers, see http://www.juniper.net/support/requesting-support.html . xii Copyright © 2012, Juniper Networks, Inc. 
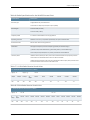
PART 1 Overview • Access Point Overview on page 3 • Ports and Connectors on page 7 • Specifications on page 11 Copyright © 2012, Juniper Networks, Inc. 1 WLA532 Access Point Hardware Documentation 2 Copyright © 2012, Juniper Networks, Inc. CHAPTER 1 Access Point Overview • WLA532 Access Point Hardware Overview on page 3 • MAC Address Information for WLA Series Access Points on page 5 WLA532 Access Point Hardware Overview The Juniper Networks Wireless LAN Access Point, WLA532 is an indoor mobility access point that provides enterprise customers, such as those in business, healthcare and education, with 802.11n based wireless LAN access in high density deployments. The device is a compact, hexagon-shaped access point (see Figure 1 on page 3) with dual radios with multiple input multiple output (MIMO) supporting up to three spatial streams on each radio. Figure 1: WLA532 Access Point NOTE: The WLA532 access point requires only hardware installation. All configurations for the access point are done on the wireless LAN controllers (WLCs). You configure the access point with the Juniper Networks WLC Series Wireless LAN Controllers, through the Juniper Networks RingMaster graphical user interface or the Juniper Networks Mobility System Software (MSS) CLI. Copyright © 2012, Juniper Networks, Inc. 3 WLA532 Access Point Hardware Documentation This topic covers: • Features Supported by the WLA532 Access Point on page 4 • Physical Characteristics of the Access Point on page 4 • Software and Hardware Used with the Access Point on page 4 Features Supported by the WLA532 Access Point Features supported by the access point include: • Up to 450 Mbps transmission—WLA532 3x3 spatial stream access point can support data rates of up to 450-Mbps in a 5-GHz band with 40-MHz channel bonding and a short-guard interval. On a 2.4-GHz band with 20-MHz channel width, the access point supports up to 195-Mbps by default with standard guard-interval and supports up to 216.7-Mbps with short guard-interval. • In-band spectrum monitoring and network spectrum mitigation—The access point supplies in-band RF-detect functionality to include spectrum analysis to detect and classify the non-IEEE 802.11 sources of interference. • Rate adaptation feature with 3 spatial stream (SS) rates, 2 spatial stream rates and 1 spatial stream rates—The access point supports 3 SS, 2 SS and 1 SS rates and provides and full support for rate adaptation with 3 SS clients. Physical Characteristics of the Access Point Physical characteristics of the access point include: • One 2.4 GHz radio—One 2.4-GHz IEEE 802.11ng radio that supports 3x3 spatial streams and is backward compatible with 2 SS and 1 SS radios. • One 5 GHz radio—One 5-GHz IEEE 802.11na radio that supports 3x3 spatial streams and is backward compatible with 2 SS and 1 SS radios. • One 10/100/1000Base-T Gigabit Ethernet port—One 10/100/1000BASE T auto-sensing Gigabit Ethernet port with an RJ 45 connector to connect the access point to a wireless LAN controller or switch. • Power over Ethernet (PoE) on the Gigabit Ethernet port—Power consumption within IEEE standard 802.3af power on the Gigabit Ethernet port. This feature reduces power consumption. Software and Hardware Used with the Access Point Use the following software (from Juniper Networks) to configure and operate the access point: • RingMaster GUI—RingMaster to configure and monitor the access point • Mobility System Software (MSS) CLI—MSS to configure the access point. For more information, see the RingMaster and MSS guides at: RingMaster and MSS Guides. 4 Copyright © 2012, Juniper Networks, Inc. Chapter 1: Access Point Overview Use the following hardware from Juniper Networks to connect the access point and make it operational: • WLC2 Wireless LAN Controller • WLC200 Wireless LAN Controller • WLC216 Wireless LAN Controller • WLC8 Wireless LAN Controller • WLC800 Wireless LAN Controller • WLC880 Wireless LAN Controller • WLC2800 Wireless LAN Controller The WLA532 access point can be powered up and operational within 3 minutes and supports all features of RingMaster and Mobility System Software (MSS). Related Documentation • General Safety Standards and Agencies for Access Points on page 29 • Installing the WLA532 Access Point on a Suspended Ceiling Rail on page 35 • Installing the WLA532 Access Point on the Wall Using Hardware Kits on page 38 MAC Address Information for WLA Series Access Points Each WLA Series access point is assigned a unique block of 64 MAC addresses. Each radio has 32 MAC addresses and supports up to 32 service set identifiers (SSIDs), with one MAC address assigned to each SSID as a basic service set identification (BSSID). The access point MAC address block is listed on a label on the back of the access point. If the access point is already deployed and running on the network, you can display MAC address assignments by using the show ap status command in the Mobility System Software CLI. All MAC addresses for an access point are assigned based on the base MAC address of the access point as described in Table 3 on page 5. Table 3: MAC Address Information for WLA Series Access Points MAC Address Type Description Access point base MAC address The access point has a base MAC address. All other addresses are assigned based on this address Ethernet port MAC addresses • The MAC address of Ethernet port 1 is the same as the access point base MAC address • The MAC address of Ethernet port 2, if there is an Ethernet port 2 on the access point, is the same as the access point base MAC address + 1. (Not applicable to the WLA532 access point) Copyright © 2012, Juniper Networks, Inc. 5 WLA532 Access Point Hardware Documentation Table 3: MAC Address Information for WLA Series Access Points (continued) MAC Address Type Description 5-GHz radio and SSID MAC addresses • The MAC address of the 5-GHz radio is the same as the access point base MAC address +1 • The BSSIDs for the SSIDs configured on the 5-GHz radio end in odd numbers. The first BSSID is equal to the access point base MAC address + 1. The next BSSID is equal to the access point base MAC address + 3, and so on • The MAC address of the 2.4-GHz radio equals the access point base MAC address • The BSSIDs for the SSIDs configured on the 2.4-GHz radio end in even numbers. The first BSSID is equal to the access point base MAC address. The next BSSID is equal to the access point base MAC address + 2, and so on 2.4-GHz radio and SSID MAC addresses Related Documentation 6 • Requirements and Specifications for 2.4-GHz Radios on WLA532 Access Points on page 21 • Requirements and Specifications for 5-GHz Radios on WLA532 Access Points on page 21 Copyright © 2012, Juniper Networks, Inc. CHAPTER 2 Ports and Connectors • Ethernet Connections for WLA532 Access Points on page 7 • Status LEDs on WLA532 Access Points on page 7 Ethernet Connections for WLA532 Access Points You use the RJ-45 network port on the WLA532 access point to connect the access point to a wireless LAN controller (WLC) or to a switch in the network. The access point receives power and data through the RJ-45 port. The port provides a 10/100/1000 autosensing (MDI/MDX) Gigabit Ethernet connection. You configure the connection either as a direct connection or as an indirect connection through an intermediate Layer 2 or Layer 3 network. You use a Category 5 cable with straight-through signaling and standard RJ-45 connectors to connect the access point to a controller or to a Juniper Networks switch in the network. The access point uses only Power over Ethernet (PoE) IEEE 802.3af. It can also receive PoE power from PoE-capables witches or other Juniper Networks switches that support PoE. NOTE: The access points do not support daisy-chain configurations. Do not connect one access point to another access point. Related Documentation • Connecting the Access Point to Wireless LAN Controllers on page 50 • PoE Information for WLA532 Access Points on page 11 Status LEDs on WLA532 Access Points The WLA532 access point has two status LEDs that glow in green and yellow colors to indicate the status of the access point, see Figure 2 on page 8. Copyright © 2012, Juniper Networks, Inc. 7 WLA532 Access Point Hardware Documentation Figure 2: Status LEDs on WLA532 Access Points Table 4 on page 8 describes the status LEDs. Table 4: Status LEDs on WLA532 Access Points 8 Label Color Status and Description STAT Green, solid On steadily when the: • Access point has booted and received a valid configuration • Management link with a wireless LAN controller (WLC) is operational • One or both radios are enabled or are in sentry mode Yellow, solid The access point is waiting to receive boot instructions and a configuration file from a controller or switch Green and yellow, alternating The access point is booting and is receiving a configuration file from a controller, or a switch, or is waiting for a radio to be enabled or placed in sentry mode Copyright © 2012, Juniper Networks, Inc. Chapter 2: Ports and Connectors Table 4: Status LEDs on WLA532 Access Points (continued) Label Color Status and Description Radios (11 AN and 11 BGN) Green, solid A client is associated with the radio Green, flashing Associated client is sending or receiving traffic Yellow, flashing Nonassociated client is sending or receiving traffic Green and yellow, alternating Radio is unable to transmit data; the problem can occur due to any of the following: Related Documentation • Excessive interference is preventing the sending of beacons • The radio has failed Yellow, solid Radio is disabled or is in sentry mode Unlit No radio is present, or if a radio is present and enabled, no clients are associated with the radio and there is no traffic • Ethernet Connections for WLA532 Access Points on page 7 • Requirements and Specifications for 2.4-GHz Radios on WLA532 Access Points on page 21 • Requirements and Specifications for 5-GHz Radios on WLA532 Access Points on page 21 • Installing the WLA532 Access Point on a Suspended Ceiling Rail on page 35 • Installing the WLA532 Access Point on the Wall Using Hardware Kits on page 38 Copyright © 2012, Juniper Networks, Inc. 9 WLA532 Access Point Hardware Documentation 10 Copyright © 2012, Juniper Networks, Inc. CHAPTER 3 Specifications • PoE Information for WLA532 Access Points on page 11 • Technical, Physical, and Radio Specifications for WLA532 Access Points on page 11 PoE Information for WLA532 Access Points The WLA532 access point operates as a powered device within standard IEEE 802.3af Power over Ethernet (PoE) from either mid-span or end-span power source equipment. It also operates on IEEE 802.3af+ (54 V from power source equipment) or IEEE 802.3at (PoE+). It responds to IEEE 802.3at discovery as an IEEE 802.3af class 3 device. The access point operates below IEEE 802.3af standard PoE power. Related Documentation • Ethernet Connections for WLA532 Access Points on page 7 Technical, Physical, and Radio Specifications for WLA532 Access Points This topic lists the technical, mechanical, and compliance specifications for WLA532 access points. NOTE: For detailed compliance information, see the Juniper Networks Regulatory Guide at: http://www.juniper.net/ . WARNING: In the USA, install the access point and any externally attached antennae a minimum of 7.9 in. (20 cm) away from people. This safety warning conforms with FCC radio frequency exposure limits for dipole antennae such as those used in the access point. 802.11 a/b/g/n Features The WLA532 access point supports: Copyright © 2012, Juniper Networks, Inc. 11 WLA532 Access Point Hardware Documentation • High-performance 11-Mbps (802.11b), 54-Mbps (802.11a/g), or 450-Mbps (802.11n) data rates • Wi-Fi, WPA-certificated interoperability • WFA WMM and WMM power-save UAPSD • WPA and WPA2 personal or enterprise with TKIP/AES • EAP methods such as TLS and PEAP • Either 40-bit/104-bit WEP or 64-bit/128-bit WEP • Seamless roaming within the IEEE 802.11 a/b/g/n Juniper Networks WLAN infrastructure • Adjustable output power support • Single autosensing 10/100/1000BASE-T Gigabit Ethernet port, configured as MDI • Compliance with IEEE 802.3, 802.3u, and 802.3ab standards • Gigabit Ethernet Power over Ethernet (PoE) injector support • IEEE 802.3af PoE compatibility Ceiling and Wall Mounting The WLA532 access point can be mounted to a recessed 15/16-in. ceiling-tile rail without disrupting rail or tile alignment. The following mounting adapters are provided with the access point in an auxiliary mounting kit: • 9/16-in. recessed ceiling-tile-rail adapter • Wall-mount bracket for offset wall mounting and for providing cable bend radius for easy installation • North America single junction box adapter (minimum extension from wall, covers wall box and cables) • European single junction box adapter (minimum extension from wall, covers wall box and cables) Physical and Compliance Specifications The mechanical and compliance specifications for the WLA532 access point are listed in Table 5 on page 12. Table 5: Mechanical and Compliance Specification for WLA532 Specification Description Size Length: 5.71 in. (14.5 cm) Width: 5.37 in. (13.65 cm) Height: 2.11 in. (5.35 cm) Weight 12 Without mounting bracket: 13.87 ounces (393.2 grams) Copyright © 2012, Juniper Networks, Inc. Chapter 3: Specifications Table 5: Mechanical and Compliance Specification for WLA532 (continued) Specification Description Volume 631 cm Operating temperature 32° F through +122° F (0° C through 50° C) Storage temperature -40° F through +158° F (-40° C through +70° C) Humidity 5% to 95% noncondensing RoHs/ IEEE Directive 2002/95/EC, 2006/122/EC China RoHS Power over Ethernet (PoE) 40 V to 54 V (optimal operational voltage and current in Power over Ethernet entry) 3 IEEE 802.3af Status indicators Health/status and radio LEDs (For descriptions of the LEDs, see “Status LEDs on WLA532 Access Points” on page 7). Wired network ports One RJ-45 port for 10/100/1000BASE-T Gigabit Ethernet and Power over Ethernet (PoE) with Energy Efficient Ethernet (EEE) feature Standards compliance IEEE 802.11 IEEE 802.11a IEEE 802.11b IEEE 802.11g IEEE 802.3af IEEE 802.11i IEEE 802.11n IEEE 802.3i—10BASE-T Ethernet IEEE 802.3u—100BASE-TX Ethernet IEEE 802.3ab—1000BASE-TX Gigabit Ethernet IEEE 802.3af—Power over Ethernet IEEE 802.3at—Power over Ethernet IEEE 802.3az—Energy Efficient Ethernet Copyright © 2012, Juniper Networks, Inc. 13 WLA532 Access Point Hardware Documentation Table 5: Mechanical and Compliance Specification for WLA532 (continued) Specification Description Safety and electromagnetic compliance CAN/CSA-C22.2 No. 60950-1 Information Technology Equipment UL 60950-1 (2nd Ed.) Information Technology Equipment EN 60950-1 Information Technology Equipment IEC 60950-1 Information Technology Equipment - Safety (All country deviations) EN 60601-1-1 General Safety for medical electrical systems Low Voltage Directive 2006/95/EEC IEEE 802.3at PoE requirements Radio compliance FCC CFR 47, Part 2 Frequency allocations and general treaty matters, General rules FCC CFR 47, Part 15 Radio Frequency Devices EN 300 328 EMC and Radio Spectrum Matters 2.4-GHz ISM band EN 301 489-1 EMC and Radio Spectrum Matters: Common Technical requirements EN 301 489-17 EMC and Radio Spectrum Matters: 2.4-GHz wideband and 5-GHz RLAN EN 301 893 Broadband Radio Access Networks 5-GHz RLAN R&TTE Directive 1995/5/EC Various Country Specific Radio Regulations Encryption Wi-Fi Protected Access (WPA/WPA2) Advanced Encryption Standard (AES) 40-bit/104-bit Wired-Equivalent Privacy (WEP) General Power-save mode supported Transmit power control in 1-dBm increments Supports up to 50 clients per radio NOTE: This number may vary with the state of RF environment and types of clients. Supports Dynamic Frequency Selection Radio Specifications The radio specifications for the WLA532 access point are listed in Table 6 on page 15. Table 7 on page 15 and Table 8 on page 15 shows the receive sensitivity numbers for WLA532 access point. 14 Copyright © 2012, Juniper Networks, Inc. Chapter 3: Specifications Table 6: Radio Specifications for the WLA532 Access Point Specification Description Antenna type Integrated diversity omnidirectional Internal 3X3 multiple input multiple output (MIMO) Antenna gain Internal: 3 dBi (2.4-GHz) Internal: 5 dBi (5-GHz) Frequency band 2.4-GHz to 5-GHz based on country regulations Operating channels Based on the country of operation specified by the system administrator Association rates 802.11n rates: MCS 0 through MCS 23 Modulation Orthogonal Frequency Division Multiplexing (OFDM) for IEEE 802.11a/g/n Quadrature Amplitude Modulation (QAM16 and QAM 64) for IEEE 802.11a/g/n Direct-Sequence Spread Spectrum (DSSS) modulation for IEEE 802.11b Transmit power 18 dBm transmit power per chain (200 mW, combined 3-stream output power) at both HT20 and HT40 MCS0 data rate for both 2.4-GHz and 5-GHz 12 dBm transmit power per chain (50 mW, combined 3-stream output power) at both HT20 and HT40 MCS23 rate for both 2.4-GHz and 5-GHz Table 7: 2.4-GHz Radio Receive Sensitivities 2.4-GHz Radio Receive Sensitivities (in dBm) Legacy "b" Legacy "g" HT-20 1 Mbps 11 Mbps 6 Mbps 54 Mbps MCS0 MCS7 MCS8 MCS15 MCS16 MCS23 -99 -92 -95 -83 -95 -79 -94 -77 -94 -75 Table 8: 5-GHz Radio Receive Sensitivities 5-GHz Radio Receive Sensitivities (in dBm) Legacy "a" HT-20 HT-40 6 Mbps 54 Mbps MCS0 MCS7 MCS8 MCS15 MCS16 MCS23 MCS0 MCS7 MCS8 MCS15 MCS16 MCS23 -96 -83 -96 -79 -95 -77 -94 -74 -92 -75 -91 -74 -91 -72 Copyright © 2012, Juniper Networks, Inc. 15 WLA532 Access Point Hardware Documentation Related Documentation 16 • WLA532 Access Point Hardware Overview on page 3 Copyright © 2012, Juniper Networks, Inc. PART 2 Planning • Planning Guidelines on page 19 • Radio Requirements & Patterns on page 21 • Certifications on page 25 Copyright © 2012, Juniper Networks, Inc. 17 WLA532 Access Point Hardware Documentation 18 Copyright © 2012, Juniper Networks, Inc. CHAPTER 4 Planning Guidelines • Planning Guidelines for Using RingMaster to Plan a Mobility System on page 19 Planning Guidelines for Using RingMaster to Plan a Mobility System The Juniper Networks Mobility System is an enterprise wireless LAN (WLAN) solution that seamlessly integrates with an existing wired enterprise network. The Mobility System provides secure connectivity to both wireless and wired users in large environments such as office buildings, hospitals, and university campuses. If you are using RingMaster software to plan your Mobility System installation, we recommend that you create and verify a network plan for the entire installation and generate a wireless LAN access point (WLA) work order using RingMaster before installing the WLAs. A network plan and the WLA work order generated from RingMaster provide the following information about WLA installation and configuration: • Number of WLAs required for adequate WLAN capacity in each coverage area • Details of installation location for each WLA • Settings for all WLAs in the WLAN After you have created the plan and reviewed it, you can arrange for the WLAN installation. System administrators and anyone involved in the installation of the WLAN system are responsible for its proper setup and operation in accordance with all rules and regulations of the country in which the network equipment operates. Related Documentation • General Safety Standards and Agencies for Access Points on page 29 Copyright © 2012, Juniper Networks, Inc. 19 WLA532 Access Point Hardware Documentation 20 Copyright © 2012, Juniper Networks, Inc. CHAPTER 5 Radio Requirements & Patterns • Requirements and Specifications for 2.4-GHz Radios on WLA532 Access Points on page 21 • Requirements and Specifications for 5-GHz Radios on WLA532 Access Points on page 21 • Radiation Patterns of Antennas for 2.4-GHz and 5-GHz Radios in the WLA532 Access Point on page 22 Requirements and Specifications for 2.4-GHz Radios on WLA532 Access Points The 2.4-GHz band radio is operational from channels 1 through 14 in legacy IEEE standard 802.11bg or in IEEE 802.11n 3x3 from single to three spatial streams of 20 MHz channel modes. At an MCS0 data rate, it provides 18 dBm transmit power per chain (200 mW, combined 3-stream output power) and has a receive sensitivity of -95 dBm. At an MCS23 data rate, it provides 12 dBm transmit power per chain (50 mW, combined 3-stream output power) and has a receive sensitivity of -75 dBm. In the ceiling mount position, the WLA532 access point contains one vertically polarized and two horizontally polarized single band 2.4-GHz antennas with 5-degree down tilt on the antenna patterns with respect to the vertical axis and an omnidirectional pattern with respect to the horizontal axis. These polarity diversity antennas maximize the MIMO performance for the access point mounting positions. Related Documentation • Requirements and Specifications for 5-GHz Radios on WLA532 Access Points on page 21 • Radiation Patterns of Antennas for 2.4-GHz and 5-GHz Radios in the WLA532 Access Point on page 22 Requirements and Specifications for 5-GHz Radios on WLA532 Access Points The 5-GHz band radio is operational from channels 36 through 165 in legacy IEEE standard 802.11a or IEEE 802.11n 3x3 from single to three spatial streams of 20 MHz and 40 MHz channel modes. At an MCS0 data rate, it provides 18 dBm transmit power per chain (200 mW, combined 3-stream output power) and has a receive sensitivity of -96 dBm (for 20 MHz) and -92 dBm (for 40 MHz). At an MCS23 data rate, it provides 12 dBm transmit Copyright © 2012, Juniper Networks, Inc. 21 WLA532 Access Point Hardware Documentation power per chain (50 mW, combined 3-stream output power) and has a receive sensitivity of -74 dBm (for 20 MHz) and -72 dBm (for 40 MHz). In the ceiling mount position, the WLA532 access point contains one vertically polarized and two horizontally polarized single band 5-GHz antennas with 5-degree down tilt on the antenna patterns with respect to the vertical axis and an omnidirectional pattern with respect to the horizontal axis. These polarity diversity antennas maximize the MIMO performance for the access point mounting positions. Related Documentation • Requirements and Specifications for 2.4-GHz Radios on WLA532 Access Points on page 21 • Radiation Patterns of Antennas for 2.4-GHz and 5-GHz Radios in the WLA532 Access Point on page 22 Radiation Patterns of Antennas for 2.4-GHz and 5-GHz Radios in the WLA532 Access Point The WLA532 access point has six internal, multiple input multiple output (MIMO) antennas, with three antennas for each of the access point's two radios. The antennas support spacial, polarity, and pattern diversity as well as cross-chain and cross-band isolations for maximum performance. The antennas provide a maximum gain of 3-dBi at 2.4-GHz throughput and 5-dBi at 5-GHz throughput. This topic provides graphical depictions of radiation patterns for the internal antennas. The graphics display relative field strengths of signals transmitted from or received by the antennas. You can use this radiation pattern information to determine the distance between access point and client and also where to place the access points. Figure 3 on page 22 shows the locations of the six antennas. The antennas are numbered from 1 through 6. Figure 3: Internal Antennas of the WLA532 Access Point Figure 4 on page 23 shows the horizontal-plane radiation pattern for the access point. The pattern provides 360-degree even coverage. 22 Copyright © 2012, Juniper Networks, Inc. Chapter 5: Radio Requirements & Patterns Figure 4: Horizontal-Plane Radiation Pattern (Omnidirectional) for a Ceiling-Mounted Access Point Figure 5 on page 23 shows the vertical-plane radiation pattern for the access point. The pattern provides maximum antenna gains along the outer edges of the access point, with a 5-degree downtilt. Figure 5: Vertical-Plane Radiation Pattern (5-Degree Downtilt) for a Ceiling-Mounted Access Point Related Documentation • Requirements and Specifications for 2.4-GHz Radios on WLA532 Access Points on page 21 • Requirements and Specifications for 5-GHz Radios on WLA532 Access Points on page 21 Copyright © 2012, Juniper Networks, Inc. 23 WLA532 Access Point Hardware Documentation 24 Copyright © 2012, Juniper Networks, Inc. CHAPTER 6 Certifications • EMI and EMC Certifications for the WLA532 Access Point on page 25 • Radio Certifications for the WLA532 Access Point on page 25 EMI and EMC Certifications for the WLA532 Access Point For a complete list of safety warnings and detailed compliance information, see the Juniper Networks Regulatory Guide in the Wireless LAN Services (WLS) documentation at http://www.juniper.net/techpubs/. The following are EMI and EMC certifications for the WLA532 access point-specified standards and agencies: Related Documentation • FCC CFR 47, Part 2 Frequency allocations and general treaty matters, General rules • FCC CFR 47, Part 15 Radio Frequency Devices (Class B) • EN 55022 EMC Radiated Standard (Class B) • EN 55024 EMC Immunity Standard (Class B) • EN 300 386 EMC and Radio Spectrum Matters Telcom • EN 60601-1-2 EMC for medical electrical equipment • EMC Directive 2004/108/EC • Radio Certifications for the WLA532 Access Point on page 25 Radio Certifications for the WLA532 Access Point For a complete list of safety warnings and detailed compliance information, see the Juniper Networks Regulatory Guide in the Wireless LAN Services (WLS) documentation at http://www.juniper.net/techpubs/. The following are radio certifications for the WLA532 access point-specified standards and agencies: • FCC CFR 47, Part 2 Frequency allocations and general treaty matters, General rules • FCC CFR 47, Part 15 Radio Frequency Devices Copyright © 2012, Juniper Networks, Inc. 25 WLA532 Access Point Hardware Documentation Related Documentation 26 • EN 300 328 EMC and Radio Spectrum Matters 2.4-GHz ISM band • EN 301 489-1 EMC and Radio Spectrum Matters: Common Technical requirements • EN 301 489-17 EMC and Radio Spectrum Matters: 2.4-GHz wideband and 5-GHz RLAN • EN 301 893 Broadband Radio Access Networks 5-GHz RLAN • R&TTE Directive 1995/5/EC • Various Country Specific Radio Regulations and World Markings. • General Safety Standards and Agencies for Access Points on page 29 Copyright © 2012, Juniper Networks, Inc. PART 3 Safety • General Safety Information on page 29 Copyright © 2012, Juniper Networks, Inc. 27 WLA532 Access Point Hardware Documentation 28 Copyright © 2012, Juniper Networks, Inc. CHAPTER 7 General Safety Information • General Safety Standards and Agencies for Access Points on page 29 • WLA Access Point Radio Frequency Exposure Guidelines on page 30 General Safety Standards and Agencies for Access Points For a complete list of safety warnings and detailed compliance information, see the Juniper Networks Regulatory Guide in the Wireless LAN Services (WLS) documentation at http://www.juniper.net/techpubs/en_US/release-independent/wireless/information-produ cts/topic-collections/wireless-lan/hardware/regulatory-info.pdf . The following certifications are required for access points to comply with safety standards specified by various agencies: • CAN/CSA-C22.2 No. 60950-1 Information Technology Equipment—Safety • UL 60950-1 (2nd Ed.) Information Technology Equipment—Safety • EN 60950-1 Information Technology Equipment—Safety (All country deviations) • EN 60601-1-1 General Safety for medical electrical systems • Low Voltage Directive 2006/95/EEC • IEEE 802.3at PoE requirements • RoHS—(WLA532-specific) access point product and manufacturing shall comply with EU RoHS 6 (Pb free), EU WEEE, and China RoHS • RoHS— (WLA321 and WLA322-specific)EU RoHs 6 (Pb free), EU WEEE, EU REACH and China RoHS • Orderable Part Numbers for WLA321, WLA322 and WLA532: • WLA321/322-US Intended for USA operation only (United States) • WLA321/322-IL Intended for IL operation only (Israel) • WLA321/322-WW Intended for world-wide operation except in USA and Israel • WLA532-US: Intended for USA operation only (United States) Copyright © 2012, Juniper Networks, Inc. 29 WLA532 Access Point Hardware Documentation Related Documentation • WLA532-IL: Intended for IL operation only (Israel) • WLA532-WW: Intended for world-wide operation except in USA and Israel • EMI and EMC Certifications for the WLA532 Access Point on page 25 • Radio Certifications for the WLA532 Access Point on page 25 WLA Access Point Radio Frequency Exposure Guidelines The following are radio frequency exposure guidelines for the WLA access points: Wireless LAN Access Point (WLA) Radio Safety Advisories: Federal Communications Commission (FCC) Docket 96-8 for Spread Spectrum Transmitters specifies a safety standard for human exposure to radio frequency electromagnetic energy emitted by FCC-certified equipment. When used with the proper antennas (shipped in the product), Juniper Networks WLA Series Access Point products meet the uncontrolled environmental limits found in OET-65 and ANSI C95.1-1991. Proper installation of the access point according to the instructions in this manual will result in user exposure that is below the FCC recommended limits. Article 12—Without permission granted by the NCC, any company, enterprise, or user is not allowed to change frequency, enhance transmitting power or alter original characteristics as well as performance of an approved low power radio-frequency device. Article 14—The low power radio-frequency device shall not influence aircraft security and interfere legal communication; if such influence or interference is found, the user shall cease operating immediately until no interference is achieved. The said legal communications means radio communications are operated in compliance with the Telecommunications Act. The low power radio-frequency devices must be susceptible with the interference from legal communications or ISM radio wave radiated devices. 30 Copyright © 2012, Juniper Networks, Inc. Chapter 7: General Safety Information 4.7.5—Within the 5.25–5.35-GHz band, U-NII devices will be restricted to indoor operations to reduce any potential for harmful interference to co-channel MSS operations. 4.7.6—The operation of the U-NII devices is subject to the condition that no harmful interference be caused. The user must stop operating the device immediately should harmful interference be caused by the operation of authorized communications, or ISM equipment, and shall not resume until the condition causing the harmful interference has been corrected. 4.7.7—Manufacturers of U-NII devices are responsible for ensuring frequency stability such that an emission is maintained within the band of operation under all conditions of normal operation as specified in the user manual. Translation: Class B (Broadcasting Communication Equipment for Home Use) As electromagnetic-wave equipment for home use (Class B), this equipment is intended mainly for home use and may be used in all areas of the home. Changes or modifications to this unit not expressly approved by the party responsible for compliance could void the user’s authority to operate this equipment. This device complies with Part 15 of the Federal Communications Commission (FCC) Rules. Operation is subject to the following two conditions: • This device must not cause harmful interference. • This device must accept any interference received, including interference that may cause undesired operation. This equipment has been tested and found to comply with the limits for a Class B digital device, pursuant to Part 15 of the FCC Rules. This equipment generates, uses and can radiate radio frequency energy and, if not installed and used in accordance with the manufacturer’s instructions, may cause interference harmful to radio communications. Copyright © 2012, Juniper Networks, Inc. 31 WLA532 Access Point Hardware Documentation If this equipment does cause interference, which can be determined by turning the equipment off and on, the user is encouraged to try to correct the interference by one or more of the following measures: • Reorient or relocate the receiving antenna. • Increase the separation between the equipment and receiver. • Connect the equipment to an outlet on a circuit different from that to which the receiver is connected. • Consult the dealer or an experienced radio or TV technician for help. RF Radiation Exposure Statement: This equipment complies with FCC RF radiation exposure limits. This equipment should be installed and operated with a minimum distance of 20 cm between the radiator and your body for 2.4-GHz and 5-GHz operations. This transmitter must not be co-located or operating in conjunction with any other antenna or transmitter. When operated in the 5.15 to 5.25-GHz frequency range, this device is restricted to indoor use to reduce the potential for harmful interference with co-channel mobile satellite systems. Complies with the Class B limits for radio noise emissions as set out in the interference-causing equipment standard entitled “Digital Apparatus,” ICES-003 of Industry Canada. Cet apareil numerique de la classe B respecte toutes les exigencies du Reglement sur le materiel brouilleur du Canada. Radio Safety Standards Related Documentation 32 • FCC CFR 47, Part 2 Frequency allocations and general treaty matters, General rules • FCC CFR 47, Part 15 Radio Frequency Devices • EN 300 328 EMC and Radio Spectrum Matters 2.4GHz ISM band • EN 301 489-1 EMC and Radio Spectrum Matters: Common Technical requirements • EN 301 489-17 EMC and Radio Spectrum Matters: 2.4GHz wideband and 5GHz RLAN • EN 301 893 Broadband Radio Access Networks 5 GHz RLAN • RTTE Directive 1995/5/EC • Various Country Specific Radio Regulations (see Country List in Regulatory Guide) • EMI and EMC Certifications for the WLA532 Access Point on page 25 • • General Safety Standards and Agencies for Access Points on page 29 • Radio Certifications for the WLA532 Access Point on page 25 Copyright © 2012, Juniper Networks, Inc. PART 4 Installation • Installing the Access Point on page 35 • Verification Tasks on page 51 Copyright © 2012, Juniper Networks, Inc. 33 WLA532 Access Point Hardware Documentation 34 Copyright © 2012, Juniper Networks, Inc. CHAPTER 8 Installing the Access Point • Installing the WLA532 Access Point on a Suspended Ceiling Rail on page 35 • Installing the WLA532 Access Point on the Wall Using Hardware Kits on page 38 • Connecting the Access Point to Wireless LAN Controllers on page 50 Installing the WLA532 Access Point on a Suspended Ceiling Rail You can install the WLA532 access point on the ceiling using the provided mounting bracket or on a junction box on a wall. Mounting the device on the ceiling is the primary installation method and ceiling-mount installation steps are provided in this topic. You can purchase a junction box wall-mount kit separately and follow the wall-mounting instructions in the Wireless LAN Services (WLS) documentation at http://www.juniper.net/techpubs/ . The WLA532 access point package includes a bracket for mounting the access point to a recessed, 9/16-inch or 15/16-inch T ceiling-tile rail. Ensure that you have the following parts and tools available to install the access point: • Ceiling-mount bracket (provided) • Category 5 cable, installed (not provided) • Mounting template (provided) • Box cutter or similar tool to cut ceiling tiles (not provided) • (Optional) Security kit, which includes a security tool and a security screw (The kit is not provided; you can order it separately.) To install the access point on a suspended ceiling rail: 1. Select an installation location under a recessed rail in the ceiling. 2. Cut a hole as follows in the ceiling tile for the Category 5 cable: a. Place the mounting template over the area where you will install the access point. b. Use the box cutter or similar tool to cut along the line marking the opening for the port connectors. Copyright © 2012, Juniper Networks, Inc. 35 WLA532 Access Point Hardware Documentation c. Remove the mounting template and the material you cut from the ceiling tile. 3. Run the Category 5 cable from the ceiling through the hole in the ceiling tile. 4. Ensure the snaps on the top of the ceiling-mount bracket are open so that the clips can fully extend to fit around the ceiling rail. The bracket is shipped in an open position so that it is ready to be clipped over a ceiling rail (see Figure 6 on page 36). Figure 6: Opening the Ceiling Bracket Clips 5. If the bracket is closed, open the snaps by pressing in and up with your thumbs on both sides of the snaps on the bottom of the bracket (see Figure 7 on page 36) until it is fully open. Figure 7: Opening the Ceiling Bracket Snaps 6. With the bracket clips fully extended, align the clips with the rail and hook the clips around the top sides of the rail. Push in on the sides of the bracket until the clips lock over the rail (see Figure 8 on page 37). Listen for a click that indicates that the clips 36 Copyright © 2012, Juniper Networks, Inc. Chapter 8: Installing the Access Point have locked. Be sure the bracket has locked securely onto the rail by gently pulling down on the bracket before installing the access point. Figure 8: Locking the Bracket Clips Over the Rail 7. Plug in the Category 5 cable that extends from the ceiling into the access point. 8. Align the access point with the bracket and press forward (see Figure 9 on page 37) until the access point clicks into place. Be sure the access point is seated correctly in the bracket by gently pulling down on the access point. Figure 9: Aligning the Access Point with the Ceiling Bracket 9. If the access point is not properly secured, press on the release button on the top of the bracket to unlock the access point (see Figure 10 on page 38). Realign the access point, making sure the cable is still connected, and push in until the access point clicks securely into place. Copyright © 2012, Juniper Networks, Inc. 37 WLA532 Access Point Hardware Documentation Figure 10: Releasing the Access Point NOTE: We recommend that you use the optional security kit (separately orderable) to secure the access point. The kit includes a special tool and a security screw. Be sure that you retain the tool so that you can unlock and move the access point. Never use a power tool to insert or remove the security screw. 10. To lock the access point into place, secure the security screw in through the release button by using the tool provided with the security kit (see Figure 11 on page 38). Do not overtighten the screw. Figure 11: Locking the Access Point onto the Ceiling Tile Related Documentation • Installing the WLA532 Access Point on the Wall Using Hardware Kits on page 38 Installing the WLA532 Access Point on the Wall Using Hardware Kits The primary method of installing the WLA532 access point is mounting it on the ceiling; however, you can also install the access point on the wall by using one of three separately orderable wall-mount kits that can be purchased at https://www.juniper.net/customers/support/. 38 Copyright © 2012, Juniper Networks, Inc. Chapter 8: Installing the Access Point This topic covers installation of the WLA532 access point on three different wall-mount kits: • WLA-BRKT-WALL Wall-Mount Kit (Faceplate and Wall-Mount Bracket Standard Hardware) on page 39 • WLA-GNGWLBX-ADP-EU Kit (European Faceplate Standard Hardware) on page 45 • WLA-GNGWLBX-ADP-NA Kit (North American Faceplate Standard Hardware) on page 46 WLA-BRKT-WALL Wall-Mount Kit (Faceplate and Wall-Mount Bracket Standard Hardware) You can purchase the wall-mount WLA-BRKT-WALL kit (see Figure 12 on page 39) that includes a wall-mount bracket, a standard faceplate and two flat-tip, flat-head screws at https://www.juniper.net/customers/support/. Figure 12: WLA-BRKT-WALL Kit (Wall-Mount Bracket Kit Hardware) Ensure that you have the following parts and tools available to install the access point using the WLA-BRKT-WALL kit: Copyright © 2012, Juniper Networks, Inc. 39 WLA532 Access Point Hardware Documentation • Wall-mount bracket–See Figure 13 on page 40 and item a in Figure 12 on page 39 (provided in the WLA-BRKT-WALL kit) NOTE: The wall-mount bracket extends the access point 1.5 inches from the wall to accommodate the Ethernet cable bend radius. Figure 13: Wall-Mount Bracket Dimensions-–WLA-BRKT-WALL 72.54mm Wall bracket mount hole diameter: 3.96mm 128.10mm 83.34mm Side cable opening The cable opening can be installed on the top or bottom depending on the mounting orientation of the bracket. 40 27.98mm g060023 15.57mm • Two flat-tip, flat-head screws–See item b in Figure 12 on page 39 (provided in the WLA-BRKT-WALL kit) • Faceplate–See item c in Figure 12 on page 39 (provided in the WLA-BRKT-WALL kit) • Flat-head screwdriver (not provided) • Category 5 cable, installed (not provided) • Two M3 or 6-32 wall anchors (not provided) • Wall-mount template (part number 530-043682, provided in the WLA-BRKT-WALL kit) • (Optional) Security kit, which includes a security tool and a security screw (The kit is not provided; you can order it separately at https://www.juniper.net/customers/support/.) Copyright © 2012, Juniper Networks, Inc. Chapter 8: Installing the Access Point To install the access point on the wall: 1. Use the provided WLA532 wall-mount template to determine your anchor mounting location (see Figure 14 on page 41) and install the wall anchors (not included in the WLA-BRKT-WALL kit). Figure 14: Use the Provided Template to Install Wall Anchors 2. Hold the wall-mount bracket centered over the wall anchors and pull the installed Category 5 cable through the wall-mount bracket (see Figure 15 on page 42). Copyright © 2012, Juniper Networks, Inc. 41 WLA532 Access Point Hardware Documentation Figure 15: Pull the Category 5 Cable Through the Wall Bracket 3. Install the bracket to the anchors using M3 or 6-32 wall anchors (see Figure 16 on page 42). Figure 16: Use M3 or 6-32 Wall Anchors to Secure the Bracket to Anchors 4. Align the faceplate with the installed wall-mount bracket and secure the faceplate using the two provided flat-tip screws and the screwdriver (see Figure 17 on page 43). 42 Copyright © 2012, Juniper Networks, Inc. Chapter 8: Installing the Access Point Figure 17: Faceplate Secured to the Wall-Mount Bracket 5. Plug the Category 5 cable from the wall socket into the access point. 6. Align the access point with the bracket and push down on the access point until you hear it click into place (see Figure 18 on page 43). Be sure the device is seated correctly in the bracket by gently pulling up the access point and then pushing it down. Figure 18: Align the Access Point with the Bracket and Push Down 7. If the access point is not properly secured, press the release button on the bottom of the bracket to release the device (see Figure 19 on page 44). Realign the unit, making sure the cable is still connected, and push down until the access point clicks securely into place. Copyright © 2012, Juniper Networks, Inc. 43 WLA532 Access Point Hardware Documentation Figure 19: Release the Access Point NOTE: We recommend that you use the optional security kit (separately orderable) to secure the access point. The kit includes a special tool and a security screw. Be sure that you retain the tool so that you can unlock and move the access point. Never use a power tool to insert or remove the security screw. 8. To lock the access point into place, secure the security screw in through the release button by using the tool provided with the security kit (see Figure 20 on page 44). Do not overtighten the screw. Figure 20: Secure the Access Point with the Security Screw and Tool 44 Copyright © 2012, Juniper Networks, Inc. Chapter 8: Installing the Access Point WLA-GNGWLBX-ADP-EU Kit (European Faceplate Standard Hardware) You can purchase the wall-mount WLA-GNGWLBX-ADP-EU kit (see Figure 21 on page 45) that includes a European-standard faceplate and two M3 flat-head, flat-tip screws at https://www.juniper.net/customers/support/. The EU faceplate is meant to be installed directly onto an existing wall outlet box. Figure 21: WLA-GNGWLBX-ADP-EU Kit (EU Faceplate Standard Hardware) The EU faceplate included in the kit covers the wall box and cables and has a minimum extension plastic body that conforms to the EU faceplate standard (see Figure 22 on page 45). Figure 22: EU Faceplate Dimensions Figure 22 on page 45 and Figure 23 on page 46 show the dimensions of the installed WLA532 on the EU-standard faceplate in millimeters. Copyright © 2012, Juniper Networks, Inc. 45 WLA532 Access Point Hardware Documentation Figure 23: Dimensions of the Installed WLA532 Access Point on an EU-Standard Faceplate To install the access point on the wall: 1. Hold the faceplate centered over the existing European standard outlet box that has an installed Category 5 cable. 2. Secure the faceplate to the outlet box using the two provided M3 flat-head, flat-tip screws and a screwdriver. 3. Plug the Category 5 cable from the outlet box into the access point. 4. Align the access point with the installed faceplate and push down on the access point until you hear it click into place. Be sure the device is seated correctly in the bracket by gently pulling up the access point and then pushing it down. 5. If the access point is not properly secured, press the release button on the bottom of the bracket to release the device. Realign the unit, making sure the cable is still connected, and push down until the access point clicks securely into place. NOTE: We recommend that you use the optional security kit (separately orderable) to secure the access point. The kit includes a special tool and a security screw. Be sure that you retain the tool so that you can unlock and move the access point. Never use a power tool to insert or remove the security screw. 6. To lock the access point into place, secure the security screw in through the release button by using the tool provided with the security kit (see Figure 20 on page 44). Do not overtighten the screw. WLA-GNGWLBX-ADP-NA Kit (North American Faceplate Standard Hardware) You can purchase the wall-mount WLA-GNGWLBX-ADP-NA kit (see Figure 24 on page 47) that includes a North American (NA) standard faceplate and two 6-32 flat head, flat tip screws at https://www.juniper.net/customers/support/. The faceplate is meant to be installed onto an existing wall outlet box. 46 Copyright © 2012, Juniper Networks, Inc. Chapter 8: Installing the Access Point Figure 24: WLA-GNGWLBX-ADP-NA Kit (NA Faceplate Standard Hardware) The NA faceplate included in the kit covers the wall box and cables and has a minimum extension plastic body that is meant to conform to the NA faceplate standard (see Figure 25 on page 47). Figure 25: NA Wall-Mount Bracket Dimensions Copyright © 2012, Juniper Networks, Inc. 47 WLA532 Access Point Hardware Documentation To install the access point on the wall: 1. Hold the faceplate centered over an existing NA standard outlet box (see Figure 26 on page 48) that has an installed Category 5 cable. Figure 26: NA Standard Outlet Box 2. Secure the faceplate to the outlet box using the two provided 6-32 flat-head, flat-tip screws and a screwdriver (see Figure 27 on page 49). 48 Copyright © 2012, Juniper Networks, Inc. Chapter 8: Installing the Access Point Figure 27: NA Faceplate Secured to the Outlet Box 3. Plug the Category 5 cable from the NA outlet box into the access point. 4. Align the access point with the installed faceplate and push down on the access point until you hear it click into place. Be sure the device is seated correctly in the bracket by gently pulling up the access point and then pushing it down. 5. If the access point is not properly secured, press the release button on the bottom of the bracket to release the device. Realign the unit, making sure the cable is still connected, and push down until the access point clicks securely into place. NOTE: We recommend that you use the optional security kit (separately orderable) to secure the access point. The kit includes a special tool and a security screw. Be sure that you retain the tool so that you can unlock and move the access point. Never use a power tool to insert or remove the security screw. 6. To lock the access point into place, secure the security screw in through the release button by using the tool provided with the security kit (see Figure 20 on page 44). Do not overtighten the screw. Related Documentation • General Safety Standards and Agencies for Access Points on page 29 • Installing the WLA532 Access Point on a Suspended Ceiling Rail on page 35 Copyright © 2012, Juniper Networks, Inc. 49 WLA532 Access Point Hardware Documentation Connecting the Access Point to Wireless LAN Controllers After you install the Wireless LAN Access Point, you can connect the access point to a wireless LAN controller (WLC) directly or indirectly through an intermediate Layer 2 or Layer 3 network. To connect the access point directly to a controller or switch: 1. Insert one end of the installed Category 5 cable with a standard RJ-45 connector to the Ethernet port of the access point and the other end to Ethernet port of the controller. For connection to an access point, use a straight-through signaling cable. 2. Look at the access point LED for the port on the controller and verify that the link is activated. The link is activated if the LED is green and glowing steadily. To configure the access point connection, use the RingMaster GUI or the Mobility System Software CLI. If you are installing the access point in a wireless LAN mesh or wireless bridge configuration, you must configure the access point before deploying the access point in the final location. For more information, see the Mobility System Software Configuration Guide. Related Documentation 50 • WLA532 Access Point Hardware Overview on page 3 • Ethernet Connections for WLA532 Access Points on page 7 • Status LEDs on WLA532 Access Points on page 7 Copyright © 2012, Juniper Networks, Inc. CHAPTER 9 Verification Tasks • Verifying the Health of WLA Series Access Points Using LEDs on page 51 Verifying the Health of WLA Series Access Points Using LEDs After you install the WLA Series access point and enable the Power over Ethernet (PoE) on the Ethernet cable connected to the access point, you can verify the access point status by observing the health LED. The health or STAT LED indicates whether the access point is operational. Related Documentation • If the LED is green and glowing steadily, the access point has booted successfully by the wireless LAN controller (WLC) and is operational. • If the LED is not steadily glowing green, contact the system administrator for the WLC. • Status LEDs on WLA532 Access Points on page 7 Copyright © 2012, Juniper Networks, Inc. 51 WLA532 Access Point Hardware Documentation 52 Copyright © 2012, Juniper Networks, Inc. PART 5 Troubleshooting • Customer Support on page 55 Copyright © 2012, Juniper Networks, Inc. 53 WLA532 Access Point Hardware Documentation 54 Copyright © 2012, Juniper Networks, Inc. CHAPTER 10 Customer Support • Contacting JTAC Regarding WLA532 Access Point Parts on page 55 Contacting JTAC Regarding WLA532 Access Point Parts If you receive your WLA532 access point installation kit with any incorrect or damaged parts or if parts are missing from the kit, contact Juniper Networks at http://www.juniper.net. If possible, retain the carton, including the original packing materials. Use them to repack the product if you need to return it. Refer to the following checklist to ensure you have received a complete installation kit. The WLA532 access point installation kit includes: • One WLA532 access point • One ceiling-mount bracket • Mounting template • WLA532 Access Point Quick Start Guide NOTE: You can order a junction box wall-mount kit separately. Related Documentation • Installing the WLA532 Access Point on a Suspended Ceiling Rail on page 35 • Installing the WLA532 Access Point on the Wall Using Hardware Kits on page 38 Copyright © 2012, Juniper Networks, Inc. 55 WLA532 Access Point Hardware Documentation 56 Copyright © 2012, Juniper Networks, Inc. PART 6 Index • Index on page 59 Copyright © 2012, Juniper Networks, Inc. 57 WLA532 Access Point Hardware Documentation 58 Copyright © 2012, Juniper Networks, Inc. T technical support contacting JTAC................................................................xi Index Symbols #, comments in configuration statements.....................xi ( ), in syntax descriptions.......................................................xi < >, in syntax descriptions......................................................x [ ], in configuration statements...........................................xi { }, in configuration statements..........................................xi | (pipe), in syntax descriptions............................................xi B braces, in configuration statements..................................xi brackets angle, in syntax descriptions.........................................x square, in configuration statements.........................xi C comments, in configuration statements.........................xi conventions text and syntax...................................................................x curly braces, in configuration statements.......................xi customer support.....................................................................xi contacting JTAC................................................................xi D documentation comments on....................................................................xi F font conventions........................................................................x M manuals comments on....................................................................xi P parentheses, in syntax descriptions..................................xi S support, technical See technical support syntax conventions...................................................................x Copyright © 2012, Juniper Networks, Inc. 59 WLA532 Access Point Hardware Documentation 60 Copyright © 2012, Juniper Networks, Inc.