1
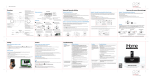
Thermo Recorder
TR-7nw Series Introductory Manual
© Copyright T&D Corporation. All rights reserved.
2015. 06 16504980006 2nd Edition
http://www.tandd.com/
What can the TR-7nw Series devices do?
In the auto-upload, the maximum number of readings which can be stored in
"T&D WebStorage Service" is 80,000. When this limit is exceeded, the oldest data
will be overwritten and deleted.
Graph Display
Auto-upload of Recorded Data
Download Data
11 Connect a LAN cable to the Ethernet port.
Wired LAN Communication
TR-7nw Series
51 Select [Add/Remove Devices] to open the registration page, and
Making Auto-Upload Settings
By making settings for auto-upload, it is possible to automatically
upload recorded data to the online "T&D WebStorage Service".
Via Cloud
*1
Operations via Cloud
Apply Settings
If you wish to use a static IP address instead of DHCP, change the network settings on
our software "TR-7wf/nw for Windows" by connecting the device to a PC via USB. For
details about operations please see the "Help" menu in the software.
Setup
View with a Web Browser
enter the registration code for the TR-7nw Series device to be
added.
The registration code can be found on the supplied Registration
Code Label.
61 After data is sent to the "T&D WebStorage Service", either by
auto-upload or by pressing the <REC/STOP> button on the
device, the added TR-7nw Series device and its measurements
will appear in the [Current Readings] tab page.
21 Click the <INTERVAL> button
*1: To auto upload recorded data to the "T&D WebStorage Service", it is necessary to have Internet access via wired LAN and a T&D WebStorage Service User ID.
The "T&D Data Server" application can be used to auto upload data to your own PC rather than "T&D WebStorage Service". (See
printed on the back of this paper.)
twice to display the current
upload interval.
Via USB
Setup and Data Download
time will change. When the desired interval appears, stop
pressing the button.
USB Communication
TR-7nw Series
PC
Common Operations
Graph Display
31 With each pressing of the <INTERVAL> button the recording
interval time will change. When the desired interval appears, stop
pressing the button.
Within a few seconds, the display will return to measurement
mode to indicate the recording interval is set.
Setting up the Device
11 Connect sensor(s) to the
device.
41 Start recording by pressing
Image of TR-71nw
To ensure a proper connection, make sure that the sensor connector is completely
inserted.
21 Remove the battery cover and insert
batteries.
31 Press the <INTERVAL> button until the display flashes.
41 With each pressing of the <INTERVAL> button the upload interval
If you wish NOT to use the auto-upload feature, select "OFF".
Within a few seconds, the display will return to measurement
mode to indicate the upload interval is set.
Below are some examples of upload intervals and the corresponding estimated
battery life1
In general, the shorter the upload interval, the shorter the battery life.
Upload Interval
1 min.
10 min.
1 hr.
12 hrs.
Battery Life
About 10 days
About 2 months
About 1 year
About 1.5 years
• All estimates are based on operations carried out with a new battery and are in no way a
guarantee of actual battery life.
• The auto-upload interval can also be changed during a recording session.
Installing the Device
Below are some examples of recording intervals and maximum recording times1
1 sec.
30 sec.
5 min.
15 min.
60 min.
About 2 hours
About 2 days
About 27 days
About 83 days
About 333 days
Details about the LCD Display
31 The measurement will be displayed on the LCD screen.
Under Normal Conditions:
During Sensor Error (no sensor connected /
improper connection / damaged):
Other than the measurement display, the following is displayed on
the LCD monitor.
Data Transmission in Progress
Internet Connection Status
ON : Connected to the Internet.
BLINKING : Unable to connect to the Internet.
OFF : Auto-upload is set to "OFF".
Displayed Measurement Channel
LAN or USB Communication in Progress
Starting Recording
• Upon the start of a new recording session all stored data will be deleted from
the device.
• Recording Interval settings cannot be changed while a recording session is in
progress. Stop recording first and then change settings.
• During recording, the power cannot be turned off.
11 Click the <INTERVAL> button to
display the current recording interval.
21 Press the <INTERVAL> button until the display flashes.
• Check the device screen to make sure
is ON. Recorded data will not be uploaded
when recording is not in progress.
• Try sending data to "T&D WebStorage Service" again by pressing the <REC/STOP> button
on the device.
• See "Checking Connection Status" in step 2, and check if the device has a LAN connection.
If the display of measurements is not refreshed:
We recommend making the recording interval shorter than the auto-upload interval. If the
recording interval is set to longer than the upload interval, the same measurement is displayed
until the next recording occurs and the new data is uploaded.
If you cannot find the registration code:
The registration code can also be found by using the software "TR-7wf/nw for Windows" via a
USB cable connected to a PC. See Operations via USB on the back of this paper.
Viewing Data from other than a Web Browser
Recorded data which was sent to the "T&D WebStorage Service"
can also be viewed from "T&D Thermo" and/or "T&D Graph".
and holding the <REC/STOP>
button until the
mark
appears in the display.
Install the device to the actual place it will be used.
Check Internet Connection Status
Recording Status
ON: Recording in progress
BLINKING: Waiting for programmed start
OFF : Recording stopped
Recording Mode
ENDLESS : Upon reaching the logging capacity of 8,000 readings, the oldest data is
overwritten and recording continues.
ONETIME : Upon reaching the logging capacity of 8,000 readings, [FULL] appears on
the LCD display and recording automatically stops.
* Use "TR-7wf/nw for Windows" or "T&D Thermo" to change the recording mode.
(Cannot be changed by buttons on TR-7nw.)
Amount of Recorded Data in Device
Low Battery Level
* Please change the batteries as soon as you see this mark. If not, the device enters
sleep mode ([SLP] appears on LCD) and stops all operations. If the batteries are further
left unchanged, all previously recorded data will be lost.
Indicates Auto-upload Interval when using <INTERVAL> button
Indicates Recording Interval when using <INTERVAL> button
See
T&D Thermo and
of this paper.
T&D Graph printed on the back
Saving Auto-Uploaded Data
Recorded data which has been uploaded to the
"T&D WebStorage Service" can be saved to a PC by using
"T&D Graph" and accessing "T&D WebStorage Service".
In order to stop a recording session, press and hold the <REC/STOP> button until the
mark disappears from the display.
• Make sure not to mistake + / -.
• Always use new batteries.
If measurements are not displayed:
Internet
See
Router / HUB
T&D Graph printed on the back of this paper.
Checking Connection Status
By pressing the <REC/STOP> button, recorded data will be sent to "T&D WebStorage Service".
If the transmission is successful,
will still be ON even after communication is complete
and
turns OFF.
is blinking : Ethernet connection established and data is being transmitted.
is ON : Internet connection is successfully established.
is blinking : Internet connection failed. Please check the network settings.
Checking Recorded Data
11 Access "T&D WebStorage Service" from the web browser on
Changing the Settings
By using the "T&D WebStorage Service", it is possible to change the
following settings.
Device Information:
Device Name, Group Name, Recording Interval, Recording Mode,
Auto-upload Interval, Channel Name, Time Settings, Temperature Unit
Warning Settings:
Lower Limit, Upper Limit, Sensor Warning, Judgement Time
your PC or mobile device.
http://www1webstorage-service1com/
21 Follow the directions as they appear to get a User ID.
If you already have your User ID, go to the next step.
31 Login by entering the registered User ID and Password.
41 Clicking the [Account] button will take you to the Account
The changes in settings will be applied when the device communicates with
the "T&D WebStorage Service". To apply the changes immediately, press the
<REC/STOP> button on the device after settings are completed.
Management page.
Distributed by MicroDAQ.com, Ltd.
www.MicroDAQ.com
(603) 746-5524
Operations via USB
It is possible to make device settings and download recorded data
by using the software "TR-7wf/nw for Windows". Data downloaded can then be viewed in a graph for analysis by using our
software "T&D Graph".
Device Button Operations
T&D WebStorage Service
"Press-and-hold" means to hold the button down for about two
seconds.
Primary features of "TR-7wf/nw for Windows" include :
• Network Settings (static IP
address, etc.), Time Settings
Recorded Data
• Warning Settings
Setting Up
11 Download and install the software "TR-7wf/nw for Windows"
from T&D Website.
Download from :
http://www1tandd1com/support/download/software/
21 Open "TR-7wf/nw for Windows" and connect your device via
USB to the computer.
Power ON/OFF
Press-and-hold the <POWER> button.(Cannot power OFF
when a recording is in progress.)
Start/Stop Recording
Press-and-hold the <REC/STOP> button.
Switch Display Mode
http://www1webstorage-service1com/
Press the <DISPLAY> button.
Each press will change the display mode of the
measurement channels in the following sequence:
Alternating Display (CH1 and CH2) Fixed Display (CH1)
Fixed Display (CH2)
Display Last Used IP Address* Press-and-hold the <POWER> button and the <DISPLAY>
button together.
EX)
When the IP address was 11.22.33.44, each part will
appear for two seconds as follows: 11 22 33 44
When DHCP is ON but failed to obtain an IP address,
--- --- --- --- will appear.
USB Communication Cable
(US-15C)
Ethernet Port LEDs
For details about operations please see the "Help" menu in the software.
31 After the setup is complete, place the device to the desired
measurement location.
11 Open "TR-7wf/nw for Windows" and connect your device via
USB to the computer.
21 Click on the [Download Recorded Data] tab to start the
"T&D Graph" is a software program which enables the viewing of
recorded data in graph form, no matter whether the data is stored on a
local computer or at "T&D WebStorage Service". Even if the data you
wish to view is divided into multiple files, it is possible to merge them
into one graph by specifying the device name and/or time period. It is
also possible to save the graph and data info as displayed in
"T&D Graph".
PoE
The LED turns ON or OFF to indicate the power source.
ON (green): Power supply from PoE or USB bus power
(external power supply*)
Downloading Recorded Data
T&D Graph
OFF:
Website.
Download from :
http://www1tandd1com/support/download/software/
21 Open "T&D Graph" and then access the data you wish to view.
Electrostatic
Capacitance
Measurement Units
°C, °F
°C, °F
%RH
When using an external power supply,
installing batteries will make it possible to
continue recording in the event of a power
outage.
°C, °F
─
─
10 to
95%RH
-30 to 80°C
0 to 99%RH
±0.5°C
±5%RH
[at 25°C,
50%RH]
±0.3°C
[0 to 50°C]
±0.5°C
[all other
temperatures]
±2.5%RH
[at 25°C, 10 to 85%RH]
±4.0%RH [at 25°C, 0 to
10% or 85 to 99%RH]
For temperatures other
than 25°C and between
0°C and 80°C, add
±0.1%RH per degree
difference from 25.
Humidity Hysteresis:
±1.5%RH or lower (*2)
Measurement
Resolution
0.1°C
0.1°C
1%RH
0.1°C
0.1%RH
Responsiveness
Thermal Time
Constant:
Approx. 75 sec.
Response Time
(90%): Approx.
190 sec.
Response Time (90%):
Response Time (90%): Response
Approx. 7 min.
Time (90%): Approx. 20 sec.
Approx. 7 min.
Logging Capacity
8,000 data sets
(One data set consists of readings for all channels in that type of unit.)
Recording Interval
Select from 15 choices: 1, 2, 5, 10, 15, 20, 30 sec. or 1, 2, 5, 10, 15, 20, 30, 60 min.
Recording Mode
Endless (Overwrite oldest data when capacity is full) or One Time (Stop recording
when capacity is full)
Auto-upload Interval
Select from 15 choices: OFF (No auto-upload), 1, 2, 5, 10, 15, 20, 30 min. or 1, 2,
3, 4, 6, 12, 24 hrs.
Communication
Interfaces
Wired LAN Communication
100BASE-TX/10BASE-T (RJ45 Connector)
Protocol: HTTP(*3), DHCP, DNS
USB Communication
USB 2.0 (Mini-B Connector)
Power
AA Alkaline Battery x 2 (AA Ni-MH batteries may also be used), USB Bus Power
(5V 200mA), PoE IEEE 802.3af
Battery Life (*4)
With wired LAN communication: Approx. 10 days to 1.5 years (Ex: Approx. 10
days when Auto-upload Interval is 1 min, 1 yr when 1 hr, 1.5 yrs when 12 hrs or
more)
Without wired LAN communication: Approx. 1.5 years
Dimensions
H 58 mm x W 78 mm x D 26 mm
Weight
Approx. 110 g (including batteries)
Humidity: 90%RH or less (no condensation)
TR-7wf/nw for Windows / T&D Graph / T&D Thermo
Compatible OS (*6)
TR-7wf/nw for Windows / T&D Graph (For PC)
Microsoft Windows 8 32 / 64 bit (*7)
Microsoft Windows 7 32 / 64 bit
Microsoft Windows Vista 32 bit (SP1 or later)
T&D Thermo (For Mobile Devices)
Android OS, iOS (For the compatible versions, please refer to our website.)
Display Languages (*8) English
Download from :
http://www1tandd1com/support/download/software/
*1: When using PoE or USB as the power supply, the data logger itself generates heat and internal sensor will
report a temperature approximately 15°C higher than ambient; we recommend using an external temperature
sensor.
*2: When used in environments where temperature and humidity are over the values of 50°C 75%, 60°C 50%,
70°C 35%, and 80°C 25%, sensor hysteresis may fluctuate by values greater than ±1.5%RH. Under certain
circumstances, it may take some time to return to normal measurement capability.
*3: HTTP client. Proxy supported.
*4: Battery life varies depending upon multiple factors including frequency of communication, LAN environment,
ambient temperature, recording interval, and battery performance. All estimates are based on operations
carried out with a new battery and are in no way a guarantee of actual battery life.
*5: -10 to 45°C when using external power (PoE or USB).
*6: For installation, it is necessary to have Administrator (Computer Administrator) rights.
*7: If you are using Windows 8, please note that our software is designed to be used in "Desktop" mode only.
*8: We recommend using an operating system in the same language as the display language. Operation in
different languages is not guaranteed.
The specifications listed above are subject to change without notice.
LINK
The LED flashes green to indicate the device is communicating
with a hub or another network device.
* For both the device and the hub, the LINK lamp only turns on while in communication.
T&D Thermo
"T&D Thermo" is a mobile app that allows easy access to
"T&D WebStorage Service" from your mobile device, where you can
view data uploaded to the "T&D WebStorage Service" and/or change
settings in the TR-7wf/nw Series devices.
Troubleshooting and Detailed Info
Support information is available on the T&D Website.
Please access the following URL:
http://www1tandd1com/support/
T&D Data Server
FAQs: http://www1tandd1com/m/smartdevice/faq/7wf/
"T&D Data Server" is a program for your PC, which receives and
stores data recorded by TR-7wf/nw Series data loggers to userspecified folders.
When you wish to have recorded data automatically uploaded to your
server rather than "T&D WebStorage Service", please use
"T&D Data Server".
For details about operations please see the "Help" menu in the software.
─
Avg. ±0.3°C
[-20 to 80°C]
Avg. ±0.5°C
[-40 to -20°C /
80 to 110°C]
LINK
When using PoE or USB as the power supply, the data logger itself generates heat
and internal sensor of the TR-71nw will report a higher temperature than actual; we
recommend using an external temperature sensor. Note, that when an external
sensor is used close to the TR-7nw Series, it may be affected by the heat from the
device.
%RH
─
Temperature 1ch, Humidity 1ch
(External)
Accuracy
Power supply from battery only
*Important Notice for Using an External Power Supply
11 Download and install the software "T&D Graph" from T&D
Thermistor Polymer
Platinum
Resistance Resistance
Software
download.
Viewing Recorded Data in Graph
Thermistor
Operating Environment Temperature: -10 to 60°C (*5)
PoE
TR-72nw-H
Sensor
External -40 to 110°C
0 to 55°C
Sensor (Supplied Sensor)
-60 to 155°C
(Optional Sensor:
Fluoropolymer
Coated Type)
View and Change Recording Press the <INTERVAL> button.
and Uploading Intervals
Each press will cycle the interval selection between the
recording interval (
) and the upload interval (
).
To change the interval time, press-and-hold the
<INTERVAL> button for two seconds or more while the
selected interval (
or
) is displayed. Note,
however, that it is not possible to change the recording
interval during recording (while
appears).
Transmit Data and Settings Press the <REC/STOP> button.
to "T&D WebStorage Service"
TR-72nw
Temperature 2ch Temperature 1ch,
(Internal 1ch /
Humidity 1ch
External 2ch)
(External)
<POWER> Button
Group Name, Channel Name),
Temperature Unit Settings
• Downloading and Saving
TR-71nw
Measurement
Channels
Measurement Internal -10 to 60°C (*1)
Range
Sensor
• Start / Stop Recording Settings • Name Settings (Device Name,
• Auto-upload Interval Settings
"T&D WebStorage Service" is a free web-based cloud storage service
provided by T&D Corporation. By uploading recorded data to
"T&D WebStorage Service", it is possible to access your important data
from anyplace in the world at any time you wish.
Specifications
Download from :
http://www1tandd1com/support/download/software/
The "T&D Thermo" app is available for download from the Google Play
Distributed by MicroDAQ.com, Ltd.
or App Store.
www.MicroDAQ.com
(603) 746-5524