1
almostDSLR manual
Version 1.6.1
This manual is for almostDSLR based on iPhone4/4s.
What is almostDSLR
The camera app that comes with the iPhone does not allow users to
change settings like you could on a digital camera. almostDSLR is an
iPhone app that allow users to tweak basic functions such as focus,
exposure, white balance, and more.This app also include functions that
DOF / SLR lens users requested, making it the “must have” app for any
DOF users.
almostDSLR basic functions
Single tap sets focus.
Single tap and then dragging around the finger moves the focus point.
Double tap sets exposure.
Double tap and then dragging around the finger moves the exposure point.
Triple tap resets focus and exposure.
White balance can be set from one of the HUD settings.
Manual for DOF users
User manual for DOF users step by step bases.
This translation
This is a manual for DOF(complex lens) users. You can acquire the basic
manual for almostDSLR from the following site.
http://rainbowsilo.wordpress.com/almost-dslr/
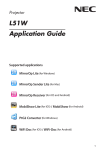
A. MAIN SCREEN
1. Swap : toggles between front and back
cameras. Disabled if there is only one
camera.
2. Video gravity : changes size ratio of the
screen (aspect fit/fill/stretch). It only changes
the preview size and does not affect the
output file.
3. Self Timer : countdown time available from
0, 3, 5, and 9 seconds. When time is 0, it takes
a picture instantly. Otherwise, it takes a
picture after the countdown is over. This only
works with still image capturing.
!
4. Anti-Shake : waits until the device is idle
and takes a picture then. Only used when
taking still images.
5. HUD (Head-up display) : shows/hides
transparent information views. Camera can
still be used even if the information views are
on the screen. They will not be shown on the
pictures and in the movies.
6. Settings : shows the settings page.
7. Review : opens camera roll to view saved photos and movies.
8. Still shot : takes a picture.
9. Record : records/stops recording a movie.
10. HUD
a. Flash
This function is for still camera. Based on shatter button, it flash.
Off : The camera flash is always off.
On : The camera flash is always on.
Auto : The camera flash turns on and off automatically depending on the light levels.
b. Torch
This function is for both movie and still camera. It’s not based on shutterbotton, it just
always on. When it is on, it turns on the light on the back of the device. It is like a flash
light.
Off : The camera torch is always off.
On : The camera torch is always on.
Auto : The camera torch turns on and off automatically depending on the light levels.
c. Mirror (Mirroring)
Specifies whether or not the preview is flipped over a vertical axis.
Off : Mirroring is always off.
On : Mirroring is always on.
Auto : Mirroring is on when the front camera is on.
d. Grids
Off : Grid lines are hidden.
1 : Grid lines are shown: two vertical lines and two horizontal lines.
2 : Display switches to medium format style aspect ratio.
e. Focus
Single tap the screen to change the location where you want to focus. Tap also locks
focus. Triple tap to reset focus and exposure.
Lock : The focus is locked at current position.
Cont : The camera continuously monitors focus and auto focuses when necessary.
f. Exp. (Exposure)
Measures the total amount of light. Double tap the screen to change the location
where you want to measure exposure. Double tap also locks exposure. Triple tap to
reset focus and exposure.
Lock : The exposure setting is locked.
Cont : The camera continuously monitors exposure levels and auto exposes when
necessary.
g. WB (White Balance)
Adjusts intensity of color to balance so that white objects are displayed white in
photos/movies.
Lock : The white balance setting is locked.
Cont : The camera continuously monitors white balance and adjusts when necessary.
11. Indicator View
a. F indicates if the camera is currently focusing. Red light is on when focusing.
b. E indicates if the camera is currently adjusting exposure. Red light is on when
exposure is being adjusted.
c. W indicates if the camera is currently adjusting white balance. Red light is on when
white balance is being adjusted.
12. Information View
a. Audio indicates instantaneous average power level of the audio in decibels.
b. Peak indicates peak/hold level of the audio in decibels.
c. Focus indicates current focus point. {0,0} indicates that the camera
should focus on the bottom left corner, and {1,1} indicates that it should focus
on the top right.
d. Exposure indicates current exposure point. {0,0} indicates that the camera should
adjust exposure based on the bottom left corner, and {1,1} indicates that it should
adjust exposure based on the top right.
e. Device indicates number of currently available media input devices.
Movie Duration indicates the duration of the movie recorded. If recording is in
progress, it is shown on the top right side of the screen (Portrait mode), bottom left
of the screen (Landscape mode)
Movie Size indicates the size of the movie recorded. If recording is in progress, it is
shown on the top right side of the screen (Portrait mode), bottom left of the screen
(Landscape mode)
Available Memory indicates the free space available to save pictures/movies. If
recording is in progress, it is shown on the top right side of the screen (Portrait mode),
bottom left of the screen (Landscape mode)
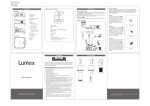
B. GENERAL SETTINGS
1. Settings : Select from General, HUD, and
Advanced settings.
2. Preset (Video Input Presets)
Please note that this description is based on
iPhone 4/4s. Older devices may not support
some of the presets listed below.
Low : low quality output. (Share on 3G)
Med : medium quality output. (Share on Wi-Fi)
High : high quality video and audio output.
Photo : high resolution photo quality output.
480p: 640×480 video output. (VGA quality output)
720p: 1280×720 video output.
1080p: 1920x1080 video output.
3. Show Focus
Turns on/off the focus point box on the screen. Turning this off only prevents drawing
the focus box on the screen. Therefore, focusing is still in effect even when this is
turned off. Displayed as a blue box.
4. Lock Focus when Tapped
If this is on, tapping the screen changes the focus point and locks at that position.
If this is off, tapping the screen only changes the focus point without locking focus.
5. Blink Focus Box
If this is on, focus box is not shown when the camera is not adjusting focus.
If this is off, focus box is always shown.
6. Exposure Box
Turn on/off the exposure point box on the screen. Turning this off only prevents
drawing the exposure box on the screen. Therefore, adjusting exposure is still in effect
even when this is turned off. Displayed as a red box.
7. Lock Exposure when Double Tapped
If this is on, double tapping the screen changes the exposure point and locks at that
position.
If this is off, double tapping the screen only changes the exposure point without
locking focus.
8. Blink Exposure Box
If this is on, exposure box is not shown when the camera is not measuring
exposure.
If this if off, exposure box is always shown.
9. Autosave Movie
If this is on, the movies will be saved in the camera roll automatically. It will still save
them to almost DSLR’s local folder. Saving a large movie in the camera roll takes time
and the process only runs when almost DSLR is on. Keep the movie file in the local
folder until it is properly saved in the camera roll. Removing the file before copying is
completed may cause the movie to be lost.
If this is off, the movies will be saved only to almost DSLR’s local folder.
10. Interface orientation
Turning this option off locks the display orientation of the device.
11. Output Orientation
This option only appears when the interface orientation is turned off. Turning this
option on rotates the output even when the interface orientation is locked.
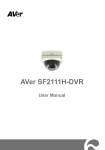
C. HUD Settings
1. Information View turns on/off information
view (A.Main Screen 12).
2. Indicator View turns on/off indicator view
(A.Main Screen 11).
3. Border Line Color changes color of HUD
border lines.
4. Background Color changes color of HUD
backgrounds.
5. Text Color changes color of HUD texts.
6. Sample Result shows what HUD view would
look like.
D. Advanced Settings
This section is for DOF and other SLR lens users
Using Complex Lens
1. Turn on both Turn Off Focus (1) and Flip
Screen (2).
2. Make sure in the Show/Hide Buttons (3)
the followings are on.
• Torch
• Focus
• Exp
• WB
Flip Screen
Rotates the screen so that the orientation is
correct when using a complex (SLR) lens. It
also corrects the orientation of the output
file.
Show/Hide Buttons
All buttons except “A.Main Settings” button
on the main screen can be shown/hidden.
.
D. Setting up your DOF Adapter / SLR Lens Mount
Before setting up make sure the iPhone is in the TurtleJacket and the DOF Adapter
/ SLR Lens Mount is attached to the TurtleJacket already.
STEP 1
STEP 2
STEP 3
For enquiry or more information please visit labo.turtleback.hk
Movie and Photo Output
*iPhone 4S Video
Low: 192 x 144
Med: 480 x 360
High: 1920 x 1080
480p: 640 x 480
720p: 1280 x 720
1080p: 1920 x 1080
*iPhone 4S Still Image
Low: 640 x 480
Med: 640 x 480
High: 1920 x 1080
Photo: 3264 x 2448
480p: 640 x 480
720p: 1280 x 720
1080p: 1920 x 1080
* iPhone 4 Video
Low: 192 x 144
Med: 480 x 360
High: 1280 x 720
480p: 640 x 480
720p: 1280 x 720
* iPhone 4 Still Image
Low: 640 x 480
Med: 640 x 480
High: 1280 x 720 (16:9)
Photo: 2592 x 1936
480p: 640 x 480
720p: 1280 x 720 (16:9)