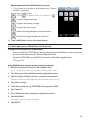
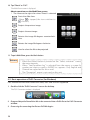
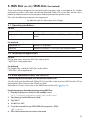
1
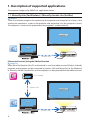
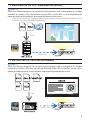
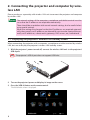
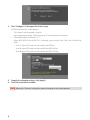
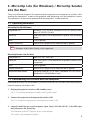
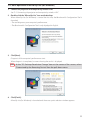
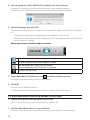
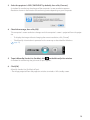
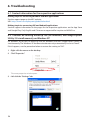
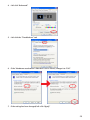
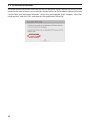
Projector L51W Application Guide Supported applications MirrorOp Lite (for Windows) MirrorOp Sender Lite (for Mac) MirrorOp Receiver (for iOS and Android) MobiShow Lite (for iOS) / MobiShow (for Android) PtG2 Converter (for Windows) WiFi Doc (for iOS) / WiFi-Doc (for Android) 1 Introduction We greatly appreciate your purchase of the L51W projector (hereafter referred to as “the projector”). This guide describes AWIND Inc. applications that can be used connected to the projector by wireless LAN. • Please purchase a separately sold wireless LAN unit (model NP03LM or NP02LM) to connect the projector and computer by wireless LAN. The wireless LAN unit cannot be used in some countries. • The descriptions for the respective applications are for their current versions as of April 2012.Functions and operations may change when the application or OS (operating system) is updated to a newer version. • For operations of the Windows, Mac OS, Android and iOS operating systems, see your terminal's operating instructions. About trademarks • Apple, iPhone, iPad, iPod touch, App Store, iTunes, Mac OS, MacBook and MacBook Air are registered trademarks or trademarks of Apple Inc. of the United States in the United States and other countries. • iOS is a registered trademark or trademark of Cisco Systems, Inc. of the United States in the United States and other countries. • Google and Android are registered trademarks or trademarks of Google Inc. • Microsoft, Windows and PowerPoint are registered trademarks or trademarks of the Microsoft Corporation of the United States in the United States and other countries. • Wi-Fi®, Wi-Fi Alliance® and Wi-Fi Protected Access (WPA and WPA2)® are registered trademarks of the Wi-Fi Alliance. • Other names of manufacturers and products included in these operating instructions are registered trademarks or trademarks of the respective companies. Notes: (1) Unauthorized reprinting of the contents of this guide, in full or in part, is prohibited. (2) The contents of this guide are subject to change without notice. (3) While this guide has been prepared with utmost care, should you have any doubts or notice mistakes or omissions, please contact NEC. (4) Please note that NEC will accept no responsibility whatsoever for damages, claims for lost earnings, etc., resulting from the use of this product, irrespective of the provisions in (3) above. © NEC Display Solutions, Ltd. 2012 May 2012 First Edition Reproduction or alteration without the permission of NEC Display Solutions, Ltd. is prohibited. 2 Contents 1. Description of supported applications....................................................................................4 1-1. MirrorOp Lite (for Windows) / MirrorOp Sender Lite (for Mac)............................................4 1-2. MobiShow Lite (for iOS) / MobiShow (for Android).................................................................5 1-3. WiFi Doc (for iOS) / WiFi-Doc (for Android)..................................................................................5 2. Connecting the projector and computer by wireless LAN. ........................................6 2-1. Displaying the projector’s wireless LAN standby screen.......................................................6 2-2. Connecting the projector and computer by wireless LAN....................................................7 2-3. Changing the projector’s network settings................................................................................7 3. MirrorOp Lite (for Windows) / MirrorOp Sender Lite (for Mac). ...............................9 3-1. Operating conditions..........................................................................................................................9 3-2. Downloading the software onto the computer........................................................................9 3-3. Installing the software on the computer.................................................................................. 10 3-4. Basic operation of MirrorOp Lite (for Windows)..................................................................... 11 3-5. Basic operation of MirrorOp Sender Lite (for Mac)............................................................... 12 3-6. Using the SidePad function (MirrorOp Receiver (for iOS and Android))....................... 14 3-6-1.Operating conditions............................................................................................................... 14 3-6-2. Installing the application....................................................................................................... 14 3-6-3. Basic operation of MirrorOp Receiver (for iOS).............................................................. 14 3-6-4. Basic operation of MirrorOp Receiver (for Android)..................................................... 15 4. MobiShow Lite (for iOS) / MobiShow (for Android)...................................................... 16 4-1. Operating conditions....................................................................................................................... 16 4-2. Installing the application................................................................................................................ 16 4-3. Basic operation of MobiShow Lite (for iOS)............................................................................. 17 4-4. Basic operation of MobiShow (for Android)............................................................................ 19 4-5. Basic operation of PtG2 Converter (for Windows)................................................................. 20 5. WiFi Doc (for iOS) / WiFi-Doc (for Android). ....................................................................... 21 5-1. Operating conditions....................................................................................................................... 21 5-2. Installing the application................................................................................................................ 21 5-3. Basic operation of WiFi Doc (for iOS).......................................................................................... 21 5-4. Basic operation of WiFi-Doc (for Android)................................................................................ 22 6. Troubleshooting.................................................................................................................................. 24 6-1. Contact information for the respective applications........................................................... 24 6-2. Cautions on running MirrorOp Lite (for Windows) and Image Express Utility 2.0 simultaneously on Windows XP..................................................... 24 6-3. Activation Reminder........................................................................................................................ 26 3 1. Description of supported applications The projector supports the AWIND Inc. applications below. 1-1. MirrorOp Lite (for Windows) / MirrorOp Sender Lite (for Mac) ( page 9) These are software programs for connecting the projector and computer by wireless LAN, sending the computer’s screen to the projector and projecting it on the projector’s screen. The computer’s screen can be projected on the projector’s screen wirelessly. (wireless LAN) [Extension Function] Using the SidePad function ( page 14) When MirrorOp Receiver (for iOS and Android) is used, the tablet terminal (iPad or Android), projector and computer can be connected by wireless LAN and MirrorOp Lite (for Windows) or MirrorOp Sender Lite (for Mac) on the computer can be operated from the tablet terminal. iOS / Android (wireless LAN) (wireless LAN) 4 1-2. MobiShow Lite (for iOS) / MobiShow (for Android) ( page 16) These are software programs for connecting the projector with a smartphone (or a tablet terminal) by wireless LAN, then transferring the JPEG or PtG2 files* on the smartphone (or tablet terminal) to the projector and projecting them on the screen. * PtG2 files are exclusive MobiShow files that have been converted from Powerpoint files using PtG2 Converter (a Windows application). (Save) (wireless LAN) 1-3. WiFi Doc (for iOS) / WiFi-Doc (for Android) ( page 21) These are software programs for connecting the projector with a smartphone (or a tablet terminal) by wireless LAN, then transferring Microsoft Office, PDF or text files on the smartphone (or tablet terminal) to the projector and projecting them on the screen. (Save) (wireless LAN) 5 2. Connecting the projector and computer by wireless LAN Please purchase a separately sold wireless LAN unit to connect the projector and computer by wireless LAN. Important The network settings of the computer, smartphone and tablet terminal must be set so that the IP addresses are acquired automatically. There should be no problem with normal network settings, but be careful when using special settings. When the settings are changed so that the IP addresses are acquired automatically, the currently set IP addresses are cleared. Be sure to make a note of the currently set IP addresses, subnet masks, gateways, DNS servers, etc., beforehand. 2-1. Displaying the projector’s wireless LAN standby screen When connecting the projector with a computer, smartphone or tablet terminal by wireless LAN, but sure to display the projector’s wireless LAN standby screen. 1. With the projector’s power turned off, connect the wireless LAN unit to the projector’s USB-A port. Note The projector’s USB-A port does not support USB hubs. 2. Turn on the projector’s power and display its image on the screen. 3. Press the (USB-A) button on the remote control. 6 The Multimedia screen is displayed. 4. Check that “USB” is selected, then press the (ENTER) button on the remote control. The projector’s wireless LAN standby screen is displayed on the screen. • This screen is only displayed in English. • The default setting for Projector Name (SSID) is “NECLEDPJ”. • Server IP is fixed to “192.168.100.10”. • The default setting for “Security” is “None” (not set). To change the Projector Name(SSID), Channel and Security settings, see “2-3. Changing the projector’s network settings” on this page. • Press the (COMP.) button on the remote control to cancel the wireless LAN standby screen. 2-2. Connecting the projector and computer by wireless LAN 1. Display the projector’s wireless LAN standby screen. See “2-1. Displaying the projector’s wireless LAN standby screen”. 2. Display your computer’s wireless network settings screen. For details on operations, see your computer’s operating instructions. 3. At the network selection item, select “NECLEDPJ” (when the projector’s default setting is set). Connect the projector and computer by wireless LAN. 2-3. Changing the projector’s network settings Use a web browser on the computer to change the projector’s network settings. 1. Display the projector’s wireless LAN standby screen. See “2-1. Displaying the projector’s wireless LAN standby screen”. 2. Connect the projector and computer by wireless LAN. See “2-2. Connecting the projector and computer by wireless LAN”. 3. Launch a web browser on the computer, input “http://192.168.100.10/” in the URL input field, then press the (Enter) key. The “Welcome to the NEC Projector Server” screen appears. This screen is only displayed in English. 7 4. Click “Configure” in the upper left of the screen. The “Network Settings” screen appears. • This screen is only displayed in English. • Input the projector name (SSID) using up to 32 one-byte letters or numbers. • The default value for Channel is “11”. • When WEP, WPA-PSK or WPA2-PSK is selected, input the key in the “Key” and “Confirm Key” fields. - 5- or 13-digit ASCII codes can be used for the WEP key. - 8- to 63-digit ASCII codes can be used for the WPA-PSK key. - 8- to 63-digit ASCII codes can be used for the WPA2-PSK key. 5. To apply the changed settings, click [Apply]. 6. Close the web browser window. Note 8 When the “Channel” setting has been changed, restart the projector. 3. MirrorOp Lite (for Windows) / MirrorOp Sender Lite (for Mac) These are software programs for connecting the projector and computer by wireless LAN, sending the computer’s screen to the projector and projecting it on the projector’s screen. The computer’s screen can be projected on the projector’s screen wirelessly. 3-1. Operating conditions MirrorOp Lite (for Windows) Supported OSs Windows 7 (32-/64-bit), Windows Vista (32-/64-bit), Windows XP SP2/SP3 (32-bit) Processor Intel Dual Core 1.8 GHz equivalent or greater (not including Atom) RAM 1 GB or greater Graphic processor NVIDIA or ATI graphic card (VRAM 64 MB or greater) Note Windows 16-bit Color Quality is not supported. MirrorOp Sender Lite (for Mac) Supported OSs Mac OS X 10.7, 10.6, 10.5 Processor Intel Dual Core 1.4 GHz equivalent or greater (PowerPC not supported) RAM 1 GB or greater Graphic processor NVIDIA or ATI graphic card (VRAM 64 MB or greater) Recommended models MacBook(2009/01/21 or later), MacBook Pro (all series), MacBook Air (2010/06/08 or later) 3-2. Downloading the software onto the computer Download MirrorOp Lite (for Windows) or MirrorOp Sender Lite (for Mac) from the projector’s internal memory via wireless LAN. 1. Display the projector’s wireless LAN standby screen. See “2-1. Displaying the projector’s wireless LAN standby screen”. 2. Connect the projector and computer by wireless LAN. See “2-2. Connecting the projector and computer by wireless LAN”. 3. Launch a web browser on the computer, input “http://192.168.100.10/” in the URL input field, then press the (Enter) key. The “Welcome to the NEC Projector Server” screen appears. This screen is only displayed in English. 9 4. Click “Windows OS” or “Mac OS” at the center of the screen. Select “Windows OS” or “Mac OS” according to the computer you are using. When “Windows OS” is clicked Store the “NEC_MirrorOp.exe” file in the desired folder on the computer. When “Mac OS” is clicked The “NEC_Mac.pkg” file is downloaded onto the computer. 5. Once downloading of the software is completed, close the web browser. 3-3. Installing the software on the computer For Windows 1. Double-click “NEC_MirrorOp.exe”. The MirrorOp Lite (for Windows) installer is launched. The installer is only displayed in English. Now operate following the messages on the screen. Once installation is completed normally, the “MirrorOp Lite” shortcut icon is created on the desktop. Note The “Auto Log” application is installed simultaneously, but do not use it. For Mac OS 1. Double-click “NEC_Mac.pkg” in the download folder. The MirrorOp Sender Lite (for Mac) installer is launched. 2. Click [Continue]. Now operate following the messages on the screen. Once installation is completed normally, the “MirrorOp Lite” icon is created in the Dock, Then the MirrorOp Sender Lite (for Mac) is launched automatically. For subsequent operations, see step [3] at “3-5. Basic operation of MirrorOp Sender Lite (for Mac)”. 10 3-4. Basic operation of MirrorOp Lite (for Windows) 1. Connect the projector and computer by wireless LAN. See “2-2. Connecting the projector and computer by wireless LAN”. 2. Double-click the “MirrorOp Lite” icon on the desktop. When MirrorOp Lite (for Windows) is started the first time, the Benchmark & Configuration Tool is launched. • The tool diagnoses your computer’s performance. • The Benchmark & Configuration Tool is only displayed in English. 3. Click [Next]. Diagnosis of the computer’s performance starts. When diagnosis is completed, a screen showing the results is displayed. Note At the “PC Desktop Resolution Change” item at the center of the screen, select “Determined by the Remoting Device” from the pull-down menu. 4. Click [Finish]. MirrorOp Lite (for Windows) is launched and the access point selection window appears. 11 5. Select the projector’s SSID (”NECLEDPJ” by default), then click [Connect]. A window for confirming the change of the computer’s screen resolution appears. Resolution shown in the window for confirming varies depending on your computer. 6. Check the message, then click [OK]. The computer’s screen resolution changes and the computer’s screen is projected from the projector. • To display the image without changing the current resolution, click [Cancel]. • After the first time, the Benchmark & Configuration Tool is no longer launched when MirrorOp Lite (for Windows) is started. About operations on the MirrorOp Lite window Cancels transmission of the computer’s screen. Resumes transmission of the computer’s screen. Sets the computer’s screen to a still picture. When clicked again, the still picture is canceled. Displays the sub-menu. 7. To quit MirrorOp Lite (for Windows), click on the MirrorOp Lite window. A window for confirming that you want to quit appears. 8. Click [OK]. MirrorOp Lite (for Windows) will quit. • The image projected from the projector switches to wireless LAN standby screen. 3-5. Basic operation of MirrorOp Sender Lite (for Mac) 1. Connect the projector and computer by wireless LAN. See “2-2. Connecting the projector and computer by wireless LAN”. 2. Click the “MirrorOp Sender Lite” icon in the Dock. 12 MirrorOp Lite (for Windows) is launched and the access point selection window appears. 3. Select the projector’s SSID (”NECLEDPJ” by default), then click [Connect]. A window for confirming the change of the computer’s screen resolution appears. Resolution shown in the window for confirming varies depending on your computer. 4. Check the message, then click [OK]. The computer’s screen resolution changes and the computer’s screen is projected from the projector. • To display the image without changing the current resolution, click [Cancel]. • The MirrorOp Lite window is operated in the same way as described for Windows. ( page 12) 5. To quit MirrorOp Sender Lite (for Mac), click on the MirrorOp Lite window. A window for confirming that you want to quit appears. 6. Click [OK]. MirrorOp Sender Lite (for Mac) will quit. • The image projected from the projector switches to wireless LAN standby screen. 13 3-6. Using the SidePad function (MirrorOp Receiver (for iOS and Android)) When MirrorOp Receiver (for iOS and Android) is used, the tablet terminal (iPad or Android), projector and computer can be connected by wireless LAN and MirrorOp Lite (for Windows) or MirrorOp Sender Lite (for Mac) on the computer can be operated from the tablet terminal. 3-6-1.Operating conditions For iOS Supported OSs iOS 3.2 or greater Supported models iPad/iPad2/iPhone3G/iPhone3GS/iPhone4/iPhone4S/iPod touch For Android Supported OSs Version 2.2 or greater Processor 600 MHz or greater (1 GHz Dual Core recommended) 3-6-2. Installing the application For iOS Search for “MirrorOp Receiver Free” on the App Store and install it. • MirrorOp Receiver is a free application. For Android Search for “MirrorOp Receiver” on Google Play and install it. • MirrorOp Receiver is a free application. • This projector does not support “MirrorOp Sender” or “MirrorOp Photo Sender Free”. 3-6-3. Basic operation of MirrorOp Receiver (for iOS) 1. Connect the projector and computer using MirrorOp Lite (for Windows) or MirrorOpSender Lite (for Mac). • See “3. MirrorOp Lite (for Windows) / MirrorOp Sender Lite (for Mac)”. ( • MirrorOp Lite (for Windows) can also be operated using MirrorOp Receiver (for iOS). 2. Tap [Settings] on the iPhone (or iPad). 3. Tap “Wi-Fi”. 4. Set Wi-Fi to “ON”. 5. From the network list, tap “NECLEDPJ (this projector’s SSID)”. “ ” is checked. 6. Press the home button to return to the menu. 7. Tap “MirrorOp Receiver”. The MirrorOp Receiver standby screen is displayed. 8. Click “ 14 ” on the computer’s MirrorOp Lite window. page 9) 9. Click “→ MirrorOp Receiver(SidePad)”. The same screen as on the computer appears on the iPhone (or iPad). • The computer can be operated on the iPhone (or iPad) screen. 10. Press the home button to quit MirrorOp Receiver. 3-6-4. Basic operation of MirrorOp Receiver (for Android) 1. Connect the projector and computer using MirrorOp Lite (for Windows) or MirrorOp Sender Lite (for Mac). • See “3. MirrorOp Lite (for Windows) / MirrorOp Sender Lite (for Mac)”. ( • MirrorOp Sender Lite (for Mac) can also be operated using MirrorOp Receiver (for Android). page 9) 2. Tap [Settings] on the Android terminal’s applications menu. 3. Tap the settings related to wireless connection or networks. The item names may differ, depending on the model you are using. 4. Tap “Wi-Fi settings”. 5. From the network list, tap “NECLEDPJ (this projector’s SSID)”. 6. Tap “Connect”. 7. Press the Back button to display the applications menu. 8. Tap “MirrorOp Receiver”. The MirrorOp Receiver standby screen is displayed. 9. Click “ ” on the computer’s MirrorOp Lite window. 10. Click “→ MirrorOp Receiver(SidePad)”. The same screen as on the computer appears on the Android terminal. • The computer can be operated from the Android terminal’s screen. 11. To quit MirrorOp Receiver, press the Back button. Reference • When the (Menu) button is pressed on the MirrorOp Receiver screen, the menu appears. • When“Send problem log”is selected from the menu, a screen for creating an inquiry e-mail to AWIND Inc. appears.Only English and Chinese are supported for this e-mail. • The“Register”menu is not used on this unit. 15 4. MobiShow Lite (for iOS) / MobiShow (for Android) These are software programs for connecting the projector with a smartphone (or a tablet terminal) by wireless LAN, then transferring the JPEG or PtG2 files* on the smartphone (or tablet terminal) to the projector and projecting them on the screen. * PtG2 files are exclusive MobiShow files that have been converted from Powerpoint files using PtG2 Converter (a Windows application). 4-1. Operating conditions MobiShow Lite (for iOS) Supported OSs iOS 3.2 or greater Supported models iPad/iPad2/iPhone3G/iPhone3GS/iPhone4/iPhone4S/iPod touch MobiShow (for Android) Supported OSs Version 2.2 or greater Processor 600 MHz or greater (1 GHz Dual Core recommended) PtG2 Converter (for Windows) Supported OSs Windows 7 (32-/64-bit), Windows Vista (32-/64-bit), Windows XP SP2/SP3 (32-/64-bit) Processor Intel Dual Core 1.8 GHz equivalent or greater (not including Atom) RAM 1 GB or greater 4-2. Installing the application MobiShow Lite (for iOS) On the App store, search for“MobiShow Lite”and install it. • MobiShow Lite is a free application. • This projector does not support“MobiShow-Pro”. MobiShow (for Android) On Google Play, search for“MobiShow”and install it. • MobiShow is a free application. • This projector does not support“MobiShow-Pro”. PtG2 Converter (for Windows) PtG2 Converter is downloaded from the projector's storage area with the projector and computer connected using the included USB cable.For details on this projector's storage area, see“Using the projector as a storage device”in the“User Controls” section of User's Manual. 1. Turn on the power of the projector and computer. 16 2. Use the included USB cable to connect the projector’s USB-B port with a USB port (type A) on the computer. 3. Press the USB-A button on the remote control. The Multimedia menu is displayed. 4. Use the / buttons on the remote control to set the cursor to “Connect PC”, press the button, set the cursor to “Storage Mode”, then press the ENTER button. “Connect PC ... Unplug to stop connection.” is displayed on the screen. 5. On the computer, click “Computer” (”My Computer” for Windows XP) on the Windows start menu. Two removable discs “Removable disc (drive:)” are displayed. 6. Of the two removable discs, display the drive on which “PtG2-setup.exe” is stored. 7. Copy “PtG2-setup.exe” to the computer’s hard disk. 8. Once the file is copied, click the USB icon on the Windows task tray and cancel the USB connection. Once the USB connection is canceled, unplug the USB cable. 9. Double-click on the “PtG2-setup.exe” file copied on the computer. PtG2 Converter installation begins. Now operate following the messages on the screen. Once installation of PtG2 Converter is completed, the “PtG2 Converter” shortcut icon is created on the desktop. 4-3. Basic operation of MobiShow Lite (for iOS) Transferring JPEG and PtG2 files to MobiShow Lite • • Transfer and store the JPEG and PtG2 files to be sent from MobiShow Lite to the projector from iTunes to the iPhone (or iPad). Create the PtG2 files using PtG2 Converter (a Windows application). ( page 20) 1. Connect the iPhone (or iPad) and computer using the USB cable. iTunes is launched and synchronization starts. 17 2. Once synchronization is completed, operate iTunes as shown below. (2) (1) (3) (4) (5) (1) (2) (3) (4) (5) Select the iPhone (or iPad). Select“Apps”. In the file share column, select“MobiShow Lite”. Drag and drop the JPEG or PtG2 files to the MobiShow Lite document column. Click [Sync] or [Apply]. Synchronization starts, and the JPEG or PtG2 files are transferred to the iPhone (or iPad). 3. Once synchronization is completed, disconnect the iPhone (or iPad) from the computer. Using MobiShow Lite to project images from the projector 1. Display the projector’s wireless LAN standby screen. See “2-1. Displaying the projector’s wireless LAN standby screen”. 2. Tap [Settings] on the iPhone (or iPad). 3. Tap “Wi-Fi”. 4. Set Wi-Fi to “ON”. 5. From the network list, tap “NECLEDPJ (this projector’s SSID)”. “ ” is checked. 6. Press the home button to return to the menu. 7. Tap “MobiShow Lite”. 8. Tap “NECPJ”. The list of documents is displayed. 9. Tap “PtG” or “PhotoSender”. 10. Tap the file name. 18 The image is projected from the projector. About operation of the MobiShow Lite screen * The screen at the right is displayed when “PhotoSender” is selected. Starts a slide show. (When is tapped, the icon switches to ) Cancels image projection. Projects the previous image. Projects the next image. Rotates the image 90 degrees counterclockwise. Rotates the image 90 degrees clockwise. 11. To quit MobiShow Lite, press the home button. 4-4. Basic operation of MobiShow (for Android) Storing JPEG and PtG2 files in MobiShow • • Store the JPEG or PtG2 files to be transferred from MobiShow to the projector on your Android terminal's SD card ahead of time. Create the PtG2 files using PtG2 Converter (a Windows application). ( page 20) Using MobiShow to project images from the projector 1. Display the projector’s wireless LAN standby screen. See “2-1. Displaying the projector’s wireless LAN standby screen”. 2. Tap [Settings] on the Android terminal’s applications menu. 3. Tap the settings related to wireless connection or networks. The item names may differ, depending on the model you are using. 4. Tap “Wi-Fi settings”. 5. From the network list, tap “NECLEDPJ (this projector’s SSID)”. 6. Tap “Connect”. 7. Press the Back button to display the applications menu. 8. Tap “MobiShow”. The Select a receiver screen is displayed. 9. Tap “NECPJ”. 19 10. Tap “Photo” or “PtG”. The MobiShow screen is displayed. About operations on the MobiShow screen * The screen at the right is for when “Photo” is selected. Starts the slide show. Play Prev Next (When is tapped, the icon switches to <Pause>) Projects the previous image. Projects the next image. Rotates the image 90 degrees counterclockRotateL wise. RotateR Open Rotates the image 90 degrees clockwise. Used to select the file to be projected. 11. To quit MobiShow, press the Back button. Reference • When the (Menu) button is pressed on the“Select a receiver”screen, the menu appears. • When“Send problem log”is selected from the menu, a screen for creating an inquiry e-mail to AWIND Inc. appears. Only English and Chinese are supported for this e-mail. • The“Deregister”menu is not used on this unit. 4-5. Basic operation of PtG2 Converter (for Windows) Files created with Microsoft PowerPoint 2003, 2007 and 2010 are supported. 1. Double-click the “PtG2 Converter” icon on the desktop. The PtG2 Converter window is displayed. 2. Drag and drop the PowerPoint file to be converted into a PtG2 file to the PtG2 Converter window. 3. Processing for converting the file to a PtG2 file begins. 20 5. WiFi Doc (for iOS) / WiFi-Doc (for Android) These are software programs for connecting the projector with a smartphone (or a tablet terminal) by wireless LAN, then transferring Microsoft Office, PDF or text files on the smartphone (or tablet terminal) to the projector and projecting them on the screen. Files with the following extensions are supported: txt, pdf, doc, ppt, xls, docx, pptx, xlsx and pps 5-1. Operating conditions For iOS Supported OSs iOS 3.2 or greater Supported models iPad/iPad2/iPhone3G/iPhone3GS/iPhone4/iPhone4S/iPod touch For Android Supported OSs Version 2.2 or greater Processor 600 MHz or greater (1 GHz Dual Core recommended) 5-2. Installing the application For iOS On the App store, search for “WiFi Doc” and install it. • WiFi Doc is a free application. For Android On Google Play, search for “WiFi-Doc” and install it. • WiFi-Doc is a free application. 5-3. Basic operation of WiFi Doc (for iOS) Transferring Microsoft Office, PDF or text files to WiFi Doc Transfer and store the Microsoft Office, PDF or text files to be sent from WiFi Doc (for iOS) to the projector from iTunes to the iPhone (or iPad). Operation on iTunes is the same as for MobiShow Lite (for iOS). ( page 18) Projecting images from the projector using WiFi Doc 1. Display the projector’s wireless LAN standby screen. See “2-1. Displaying the projector’s wireless LAN standby screen”. 2. Tap [Settings] on the iPhone (or iPad). 3. Tap “Wi-Fi”. 4. Set Wi-Fi to “ON”. 5. From the network list, tap “NECLEDPJ (this projector’s SSID)”. “ ” is checked. 6. Press the home button to return to the menu. 21 7. Tap “WiFiDoc”. 8. Tap “NECPJ”. The list of documents is displayed. 9. Tap the file name. The image is projected from the projector. About the WiFi Doc screen Projects the previous page. Projects the next page. When the image is tapped, the thumbnail, “../Document” button and “Pause” button are displayed. 10. To quit WiFi Doc, press the home button. 5-4. Basic operation of WiFi-Doc (for Android) Store the Microsoft Office, PDF or text files on WiFi-Doc. Store the Microsoft Office, PDF or text files to be transferred from WiFi-Doc to the projector on your Android terminal’s SD card ahead of time. Projecting images from the projector using WiFi-Doc 1. Display the projector’s wireless LAN standby screen. See “2-1. Displaying the projector’s wireless LAN standby screen”. 2. Tap [Settings] on the Android terminal’s applications menu. 3. Tap the settings related to wireless connection or networks. The item names may differ, depending on the model you are using. 4. Tap “Wi-Fi settings”. 5. From the network list, tap “NECLEDPJ (this projector’s SSID)”. 6. Tap “Connect”. 7. Press the Back button to display the applications menu. 8. Tap “WiFi-Doc”. The “Searching for a receiver” screen appears. 9. Tap “NECPJ”. 22 10. Select the folder in which the image to be projected is stored. 11. Tap the file name. The image is projected from the projector. • Operation of the WiFi-Doc screen is the same as for WiFi-Doc for iOS. 12. To quit WiFi-Doc, press the Back button. Reference • When the (Menu) button is pressed on the“Searching for a receiver” screen, the menu appears. • When“Send problem log”is selected from the menu, a screen for creating an inquiry e-mail to AWIND Inc. appears.Only English and Chinese are supported for this e-mail. • The“Register”menu is not used on this unit. 23 6. Troubleshooting 6-1. Contact information for the respective applications Making inquiries concerning Windows and Mac applications See the support page on the NEC website. URL: http://www.nec-display.com/global/index.html Making inquiries concerning iOS and Android applications See the support information on the pages for the respective applications on the App Store and Google Play. Only English and Chinese are supported for inquiries to AWIND Inc. 6-2. Cautions on running MirrorOp Lite (for Windows) and Image Express Utility 2.0 simultaneously on Windows XP On Windows XP, do not run MirrorOp Lite (for Windows) and NEC Image Express Utility 2.0 simultaneously.The Windows XP hardware accelerator may automatically be set to “None”. If this happens, use the procedure below to restore the setting to “Full”. 1. Right-click the mouse on the desktop. 2. Click “Properties”. The screen properties window opens. 3. Left-click the “Settings” tab. 24 4. Left-click “Advanced”. 5. Left-click the “Troubleshoot” tab. 6. If the “Hardware acceleration” slider bar is set to “None”, change it to “Full”. 7. If the setting has been changed, left-click “Apply”. 25 6-3. Activation Reminder If another access point other than the one for this projector (initial setting: NECLEDPJ) is connected at the time of access point selection for MirrorOp Lite (for Windows)/MirrorOp Sender Lite (for Mac), the “Activation Reminder” screen may be displayed. If this happens, select “Remind me later” and click [OK], and then exit the application “MirrorOp”. 26


![SERVIS Console Drawer [ FD-1000AT ] User`s Manual](http://vs1.manualzilla.com/store/data/005855835_1-b5ddde4919c279623ac643a1427d1fab-150x150.png)