1
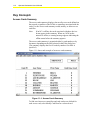
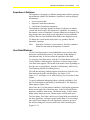
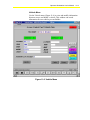
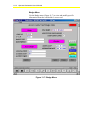
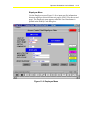
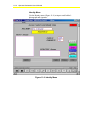
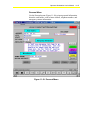
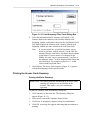
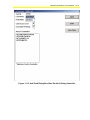
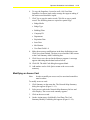
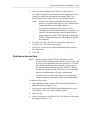
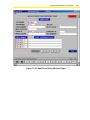
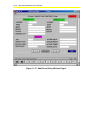
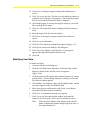
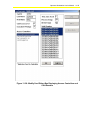
Operator Workstation User’s Manual
11-1
Chapter 11
Defining Access Cards
Introduction
Access cards are used to enter locked areas or buildings. The access
card definition process defines or limits a card holder’s access to the
facility. For example, one person may be able to enter a building at
any time (unlimited access), while another may only be able to enter
between 6:00 a.m. and 5:00 p.m. (restricted access).
This chapter describes how to:
•
display the access cards summary
•
print the access cards summary
•
define an access card
•
modify an access card
•
delete an access card
•
define user data
•
modify user data
•
modify user definable field titles
•
print user data
•
quit Superbase 4 software
•
display access controllers for an access card
© November 1, 2001 Johnson Controls, Inc.
Code No. LIT-120153
www.johnsoncontrols.com
11-2
Operator Workstation User’s Manual
Key Concepts
Access Cards Summary
The access cards summary displays data on all access cards defined on
the network, regardless of the NCMs or controllers associated with the
cards. Use the access cards summary to add, modify, or delete access
card files.
Note:
If an NC is offline, the cards associated with those devices
do not appear in the summary. When any NCM on the
network is offline, a warning message appears indicating the
offline status before the summary appears.
The access cards summary is organized either by card number or by
last name, depending on the filter selected in the Filter dialog box.
(The summary displays the first 30 cards by number if no filter is
specified.)
Figure 11-1 shows and example of an access cards summary.
Figure 11-1: Access Cards Summary
To find out what access controllers and card readers are defined for
each access card, select Modify Card Data for a selected card.
Operator Workstation User’s Manual
11-3
Table 11-1 details the information provided in each of the access cards
summary fields.
Table 11-1: Access Cards Summary Fields
Field Name
Description
Card ID
Unique number encoded on the card.
Last Name
Last name of the card holder.
First Name
First name of the card holder.
Card Issue Level
Number of times the same access card has been issued.
See Access Control System Objects Technical Bulletin
(LIT-636077).
Exec Privilege
Executive privilege status of the card holder. Executive
privilege allows the user to enter any door controlled by the
IAC-600 system, regardless of the time of day. This privilege
is usually issued to top management and security personnel.
Access Card Definition
Defining an access card involves adding it to the access card database
maintained by the Security NCM. If a card exists that contains similar
data to the new card, copy the card to make the process quicker.
Before attempting to define access cards, read the information below.
•
A password level of 3 or higher is required to define access cards,
and the password must give access to the Access Controller
hardware object that will contain the card data.
•
Each card defined on the network is unique, and is maintained in
the databases of each of its associated NCMs and Access
Controllers.
•
A maximum of 65,535 cards can be defined per network.
•
A runtime version of Superbase 4 software can record additional
information about each card holder. The additional data is linked to
the card record during the card definition process.
•
Use the same archive PC for all security NCMs on the network.
Otherwise, access card data may not be synchronized at every
OWS. Refer to the Using Diagnostics chapter (LIT-120159) to find
out how to define an Archive PC.
11-4
Operator Workstation User’s Manual
•
Define the Access Controller (AC) and Card Reader (CR) objects,
as well as the time zones, before defining any access card.
•
To add, modify, or delete an access card the database of the
security NCM, the NCM must be online. If the NCM is offline, its
associated Access Controllers and access cards do not appear. If
any NCM is offline when the access cards summary appears, a
warning message appears indicating that an NCM is offline. (This
NCM may or may not be a security NCM.)
•
Verify that the Access Controller is online before adding an access
card to its database. (If an Access Controller is offline, it is still
listed in the Add Card dialog box; however, access card data added
or modified to an offline controller is not saved.) You cannot
delete an access card from an offline Access Controller. If an
Access Controller is offline when Add Card or Modify Card dialog
box appears, a warning message indicating that an Access
Controller is offline appears.
•
Define at least one Access Controller and one Card Reader for the
card in the Add Card dialog box before adding a card online.
Operator Workstation User’s Manual
11-5
When defining an access card, begin by entering the global
information: Card ID, First Name, Last Name, Card Issue Level,
Executive Privilege, and Time Zone Used. Table 11-2 describes all of
these fields.
Table 11-2: Global Information Fields
Attribute
Description
Entry Values
Card ID
Describes the unique identification number encoded on the card.
1 to 65535
Card Holder’s Last
Name
Self explanatory
10 characters
(optional)
Card Holder’s First
Name
Self explanatory
8 characters
(optional)
Card Issue Level
Specifies the number of times a particular card has been issued.
The first time a card holder receives a card, the issue level is
zero (0). This allows the card to be replaced, should it be lost,
damaged, or stolen, without redefining a new card number. Only
one issue level of a card can be active at a time. A card can have
up to eight issue levels before a new card must be defined.
0-7
Process Group
Number
Specifies the JC-BASIC/GPL process interlock group in which the
card is linked.
See the GPL Programmer’s Manual or JC-BASIC Programmer’s
Manual for more information.
Integer 0 to 64
(optional)
Zero means
that the card is
not linked to a
process group.
Executive Privilege
Specifies whether the card holder possesses executive privilege.
Executive privilege gives a card holder unlimited access to all
operational doors (using that card technology) controlled by the
IAC-600 system. This function is usually enabled for top
management or security personnel.
Y = yes
N = no
Time Zone Used
Specifies the times of the week a card holder has access to
authorized doors.
No. of Time
Zone: Integer
1 to 8.
Card Summary-Add Card Dialog Box
There are four types of information defined for an access card in the
Card Summary-Add Card dialog box:
•
global
•
Access Controller
•
card reader
•
Superbase 4
Figure 11-2 and Table 11-3 show and explain the Add Card dialog
box.
11-6
Operator Workstation User’s Manual
Card Summary - Add card
Card ID
Last Name
First Name
Card Issue Level
Executive Privilege
A
SAVE
0
N
Access Controllers
B
Bldg1/Security1
Bldg1/Security2
Bldg1/Security3
Bldg1/Security4
Bldg2/Security1
Bldg2/Security2
Bldg2/Security3
Bldg2/Security4
Bldg2/Security5
Bldg3/Security1
Bldg3/Security2
Bldg3/Security3
Time Zone
0
Process Group
0
In/Out State
QUIT
N/A
C
Valid Readers
Bldg1.Door1
Bldg1/Door2
Bldg1/Door3
Bldg1/Door4
Bldg1/Door5
Bldg1/LAB
Bldg1/Storage
OK
CANCEL
* Indicates Card in Controller
EXAMPLE
E
D
Figure 11-2: Add Card Dialog Box Example
Table 11-3: Add Card Dialog Box Callouts
Callout
Description
A*
Global card holder information. This Information is the same in all Access Controller databases.
B
Access Controllers list box. It appears when you first open the Add Card dialog box; however, no
controller is selected (highlighted).
C
User Data button. Click this button to use Superbase 4 software to define additional card holder
data.
D
Card Readers list box. Double-click a controller to see this box. Card Readers, Time Zone,
Process Groups, and In/Out State are specific to the controller.
E
OK button. Click to save Card Reader information.
* The Global information for an access card is the same in all databases if you define the access card online;
however, access cards can also be defined using DDL. Since access cards are added to each NCM database
separately in DDL, the global information could potentially be different. For detailed information concerning
access card definition in DDL, refer to the DDL Programmer’s Manual.
Operator Workstation User’s Manual
11-7
Superbase 4 Software
The Superbase 4 program is a database management software package
that maintains certain OWS databases. Superbase 4 software displays
and manages:
• access card user data
• Operator Transaction summaries
• Card Reader Transaction summaries
The Superbase 4 package included in Metasys software is a runtime
version and does not have full Superbase 4 capabilites. For instance,
the runtime version of Superbase 4 can not change screen formats. The
only changes that can be made to any Superbase 4 screen within the
OWS are the four User Definable Data fields in the Employee menu.
To change the screen format in any other way, purchase the full
Superbase 4 package.
Note:
Superbase 4 software is case-sensitive. Develop a standard
format for data entered in Superbase 4 software.
User Data Windows
Use the User Data menus to record additional access card user data
during the card definition process. The data kept in this database is
informational only. It does not affect the operation of the BAS.
To access the User Data menus, click the User Data button in the Add
Card or Modify Card dialog box. Superbase 4 software opens, and a
User Data menu appears. The format of the menus varies depending on
how they are accessed (that is, from the Card Summary-Add Card or
Card Summary-Modify Card dialog boxes).
The Add Record Entry windows appear when the user clicks the User
Data button in the Add Card dialog box. See Figure 11-16,
Figure 11-17, and Figure 11-18 under Defining User Data later in this
chapter.
To specify additional information about a defined card holder, click
the User Data button in the Modify Card dialog box. The Employee
Menu appears (Figure 11-8).
Move from one User Data menu to another by clicking the appropriate
button on the right side of the dialog box. A total of seven different
menus are available: Main menu, Card Reader menu, Vehicle menu,
Badge menu, Employee menu, Identity menu, and Personal menu.
The Last Name, First Name, and Process Group fields are outlined in
red since Superbase 4 software cannot modify them. You can change
the Card ID and Company ID with Superbase 4 software; however,
this will not change the record created in the Add Card dialog box
(Figure 11-2).
11-8
Operator Workstation User’s Manual
Main Menu
The Main Menu (Figure 11-3) allows access to other user data menus,
the query menu, and the report menu. It also allows modification of the
four User Definable fields.
Figure 11-3: Superbase 4 Main Menu
Operator Workstation User’s Manual
11-9
Card Reader Menu
The Card Reader menu lists access controllers and card readers
defined for an access card. A list of up to 32 controllers appears when
the user presses the Card Reader button (see Figure 11-4). Click the
17-32 button to see the second page. Click on any of the controller
buttons in this list to display a list of the access card’s valid card
readers (Figure 11-5).
Figure 11-4: Card Reader Menu-Controller Page
11-10
Operator Workstation User’s Manual
Figure 11-5: Card Reader Menu-Card Reader Page
Operator Workstation User’s Manual 11-11
Vehicle Menu
Use the Vehicle menu (Figure 11-6) to view and modify information
about an access card holder’s vehicle. This window can record
information for two vehicles per card holder.
Figure 11-6: Vehicle Menu
11-12
Operator Workstation User’s Manual
Badge Menu
Use the Badge menu (Figure 11-7) to view and modify specific
information about the card holder’s access card.
Figure 11-7: Badge Menu
Operator Workstation User’s Manual 11-13
Employee Menu
Use the Employee menu (Figure 11-8) to input specific information
about an employee (this menu has two pages; click P-2 for the second
page). The Employee menu appears when the User Data button is
pushed in the Modify Card dialog box.
Figure 11-8: Employee Menu
11-14
Operator Workstation User’s Manual
Identity Menu
Use the Identity menu (Figure 11-9) to input a card holder’s
photograph and signature.
Figure 11-9: Identity Menu
Operator Workstation User’s Manual 11-15
Personal Menu
Use the Personal menu (Figure 11-10) to input personal information
about the card holder, such as home address, telephone number, and
emergency contact information.
Figure 11-10: Personal Menu
11-16
Operator Workstation User’s Manual
Photo and Signature Files
Superbase 4 software stores photos and signatures for card holders in
their User Data files.
To import files for the Photo and Signature fields, scan the images into
an electronic file using any scanner that can save a photograph in a
.PCX or .GIF format and a signature in a .TIF format. When saving the
file, be sure to place it in the C:\FMS\STATIC directory.
Superbase 4 software can import pictures into the User Data Photo and
Signature fields regardless of their size; however, if the photo or
signature has to be enlarged or reduced to fit the field correctly, it may
appear distorted. For the best results, the recommended photograph
size is approximately 1.75 x 2 inches (177 x 187 pixels). The
recommended signature size is approximately 2.5 x 0.75 inches
(200 x 55 pixels).
IMPORTANT: Keep in mind that picture files consume a large
amount of memory.
Emergency Files
Use the Emergency field to record instructions to be followed in the
event of an emergency for each card holder (for example, the name,
address, and phone number of the person that should be contacted
should an emergency arise).
Creating Emergency files requires the full Superbase 4 package; to use
this feature with only the runtime version, simply copy and modify the
example file provided. To access this example file (BLANKENG.SBT),
access the Personal menu in Superbase 4 Modify mode. The file
automatically appears in the Emergency field of the Personal menu.
Displaying Access Controllers for an Access Card
Both the Metasys program and Superbase 4 software can list which
Access Controllers and Card Readers are associated with an access
card.
The Metasys program displays a list of all Access Controllers and
Card Readers on the network. An asterisk (*) appears to the left of
those Access Controllers that are defined for the selected access card.
However, if a security NCM is offline, associated Access Controllers
and Card Readers do not appear.
Superbase 4 only lists the Access Controllers and Card Readers
defined for the selected card, regardless of whether or not the
associated security NCM, Access Controllers, or Card Readers are
online.
Operator Workstation User’s Manual 11-17
User Definable Fields Titles
Four of the field titles in the access card User Data windows can be
modified. These fields, called User Definable Fields, allow for the
specification of information not mentioned elsewhere in access card
records, such as the card holder’s job title. Modifying one of the four
field titles for an access card affects the field title for all access
cards.
The User Definable fields are located on page 1 (P-1) of the User Data
Add record, and page 2 (P-2) of the User Data Employee Modify
record.
11-18
Operator Workstation User’s Manual
Detailed Procedures
Displaying the Access Cards Summary
To display the access cards summary:
1.
Click Summary on the menu bar. The Network Map-Summary
dialog box appears (Figure 11-11).
Figure 11-11: Network Map-Summary Dialog Box
2.
Select access cards in the Network Map-Summary list box.
3.
Click Display. The access cards summary appears.
Use the vertical scroll bar to view up to 30 access cards in the
summary window. Click Next to view the next set of 30. Click
Previous to view the previous set again.
Changing the Display Order of an Access Cards Summary
To change the order of access card data display:
1.
Click Summary on the menu bar. The Network Map-Summary
dialog box appears (Figure 11-11).
2.
Select access cards in the Network Map-Summary list box and
click Display. The access cards summary appears.
3.
On the View menu, click Filter. The Card Summary-Filter Cards
dialog box appears (Figure 11-12).
Operator Workstation User’s Manual 11-19
Figure 11-12: Card Summary-Filter Cards Dialog Box
4.
Select the information that the summary will include. Card
Number displays the summary with currently defined cards
beginning with the card number entered in the Card Number field.
Last Name displays the summary with currently defined cards
beginning with the last name entered in the Last Name field.
Note:
5.
If you are unsure how to spell the last name, type as
much as you know with an asterisk (*) at the end. The
summary lists the cards whose last names begin with the
typed letters. If you are unsure of a character in the
middle of a name, insert a question mark (?) in place of
the unknown letters. Cards are displayed that contain the
specified letters. For example, typing Jo?e* would
retrieve both Joseph and Jones.
Click Display. The access cards summary (Figure 11-1) appears
with the data displayed in the specified order.
Printing the Access Cards Summary
Printing the Entire Summary
IMPORTANT: This option prints the information in the access cards
summary for every access card defined on the
network. This can be a very time-consuming
operation.
To print the summary from the Summary dialog box:
1.
Click Summary on the menu bar. The Summary dialog box
appears (Figure 11-11).
2.
Select access cards in the Summary Name list box.
3.
Click Print. A message box appears asking for confirmation.
4.
Click OK. A message box appears indicating that the summary is
printing.
11-20
Operator Workstation User’s Manual
To print the entire summary from the access cards summary:
1.
On the summary’s Action menu, click Print All Cards Data.
A message box appears asking for confirmation.
2.
Click OK. A message box appears indicating that the data is
printing.
Printing the Currently Displayed Page
To print the summary information for the 30 currently displayed
access cards:
1.
Click Summary on the menu bar. The Network Map-Summary
dialog box appears (Figure 11-11).
2.
Select access cards in the Network Map-Summary list box and
click Display. The access cards summary appears.
3.
On the Item menu, click Print. A message box appears indicating
that the summary is printing.
Defining an Access Card
To define an access card:
1.
Click Summary on the menu bar. The Network Map-Summary
dialog box appears (Figure 11-11).
2.
Select access cards in the Network Map-Summary list box and
click Display. The access cards summary appears.
3.
On the Action menu, click Add Card. The Card Summary-Add
Card dialog box appears (Figure 11-2) listing the names of all the
online Access Controllers defined on the network.
4.
Enter the Global information: Card ID, First Name, Last Name,
Card Issue Level, and Executive Privilege, and Time Zone Used.
See Table 11-2 for a description of these fields.
5.
Double-click the name of an Access Controller to validate it for
the card. The selected controller appears highlighted and a list box
appears containing the Time Zone, Process Group, and all of the
defined Card Readers for the selected controller (Figure 11-13).
Operator Workstation User’s Manual 11-21
Figure 11-13: Add Card Dialog Box After Double-Clicking Controller
11-22
Operator Workstation User’s Manual
6.
Click a Card Reader to validate it for the card holder, and enter
the Time Zone and Process Group for the Controller.
Note:
7.
The In/Out State applies only to access cards used in In
or Out Card Readers. For example, if the user last used
the access card in an In Card Reader, the In/Out State
would display In. The card does not work in another In
Card Reader until the user inserts the card in an Out
Card Reader. When the card is first defined, the In/Out
State is N/A and works in either an In or Out Card
Reader. To change a card holder’s In/Out State back to
N/A after he or she has used it, click on the card holder’s
name in the access cards summary and click Modify
Card Data on the Action menu. Click Save in the Card
Summary-Modify Card dialog box. The In/Out State is
returned to N/A when the card is saved.
Click OK.
To add another controller for the access card, double-click another
controller and repeat Steps 6 and 7.
8.
To define user data, click the User Data button, and refer to
Defining User Data later in this document. Always define user
data using the archive PC defined for the security NCMs on the
network. (All security NCMs must have the same archive PC.)
To skip the process of defining user data, click Save. A message
box appears indicating that the data has been saved. Click OK,
and an empty Add Card dialog box appears.
9.
Add another card or select Quit to return to the access cards
summary.
Shortcut
To copy information for an existing access card similar to the new
card:
1.
Click Summary on the menu bar. The Network Map-Summary
dialog box appears (Figure 11-11).
2.
Select access cards in the Network Map-Summary list box and
click Display. The access cards summary appears.
3.
Select a card to copy.
4.
On the Action menu, click Add Card. The Card Summary-Add
Card dialog box appears (Figure 11-2) defined with the same
Access Controller and Card Reader information as the copied
card.
5.
Fill in the Global information and make any other necessary
changes in the Add Card dialog box.
Operator Workstation User’s Manual 11-23
6.
To copy the Superbase 4 record as well, click User Data.
Superbase 4 software loads, and a message box appears asking if
the entire record should be copied.
7.
Click Yes to copy the entire record. Click No to copy a partial
record. The following items are copied in a partial copy:
• Badge Media
• Badge Type
• Building/Floor
• Company ID
• Department
• Expiration Date
• Issue Date
• Mail Station
• User Data Fields 1-4
8.
Make the necessary modifications in the three definition screens.
Click Save when finished. The data is saved and the OWS returns
to the Card Summary-Add Card dialog box.
9.
Click Save to save the card in the Metasys program. A message
appears indicating that the data has been saved.
10. Click OK. The Add Card dialog box appears blank.
11. Add another card or click Quit to return to the access cards
summary.
Modifying an Access Card
Note:
In order to modify an access card, its associated controllers
must be online.
To modify an access card:
1.
Click Summary on the menu bar. The Network Map-Summary
dialog box appears (Figure 11-11).
2.
Select access cards in the Network Map-Summary list box and
click Display. The access cards summary appears.
3.
Click on the access card.
4.
On the Action menu, click Modify Card Data. The Card
Summary-Modify Card dialog box appears (Figure 11-14).
11-24
Operator Workstation User’s Manual
Figure 11-14: Modify Card Dialog Box
Operator Workstation User’s Manual 11-25
5.
Make any desired changes in the Modify Card dialog box.
To modify Card Reader data, double-click the appropriate Access
Controller. Modify the information that appears in the Card
Reader list box to the right of the Access Controller list box.
Notes:
In the Access Summary-Modify Card dialog box, an
asterisk (*) appears to the left of Access Controllers that
contain the selected card in their databases.
An asterisk could appear to the left of an Access
Controller, but when double-clicked, no card readers are
selected. This means that the card was added with an
empty reader list in DDL. Click OK in the Card Reader
list box, without selecting any Card Readers, to deselect
the controller.
6.
To modify user data, click the User Data button and refer to
Modifying User Data later in this section.
7.
Click Save. A message box appears indicating that the changes
have been saved.
8.
Click OK.
Deleting an Access Card
Notes:
Always use the archive PC that is associated with the
Security NCMs on the network to delete an access card. (All
Security NCMs should have the same archive PC.) If a card
file contains user data and is not deleted using the archive
PC, the user data records remain in the database. This does
not affect the operation of the BAS; however, the User Data
and access card databases will not be synchronized.
To delete an access card, each of the security NCMs and
Access Controllers associated with the card must be online.
To delete an access card:
1.
Click Summary on the menu bar. The Network Map-Summary
dialog box appears (Figure 11-11).
2.
Select access cards in the Network Map-Summary list box and
click Display. The access cards summary appears.
3.
Click the card.
4.
On the Action menu, click Delete Card. The Delete Card message
box appears (Figure 11-15).
11-26
Operator Workstation User’s Manual
Figure 11-15: Delete Card Dialog Box
5.
Click OK.
Note:
When the Security NCM’s archive PC deletes a card with
user data records, Superbase 4 software loads and the user
data is deleted. Superbase 4 software closes, and the screen
returns to the access cards summary.
Defining User Data
To define user data:
1.
Click Summary on the menu bar. The Network Map-Summary
dialog box appears (Figure 11-11).
2.
Select access cards in the Network Map-Summary list box and
click Display. The access cards summary appears (Figure 11-1).
3.
On the Action menu, click Add Card. The Card Summary-Add
Card dialog box appears (Figure 11-2) listing the names of all the
online Access Controllers defined on the network.
Note:
4.
Define the Card ID and Process Group Number fields before
continuing to Step 5. (All fields defined in the Add Card
dialog box carry over to Superbase 4 software when you
click the User Data button.)
Click the User Data button. Superbase 4 software loads and the
first page of the Add Record Entry window appears
(Figure 11-16).
Operator Workstation User’s Manual 11-27
Figure 11-16: Add Record Entry Window-Page 1
11-28
Operator Workstation User’s Manual
Figure 11-17: Add Record Entry Window-Page 2
Operator Workstation User’s Manual 11-29
Figure 11-18: Add Record Entry Window-Page 3
5.
Enter the information for the card into the Add Record Entry
windows. Use the page buttons (P-1, P-2, and P-3) to move
between pages.
Note:
Emergency, Photo, or Signature fields use imported data
from external files. For detailed information on
importing data, refer to Importing Photo and Signature
Files and Importing Emergency Files later in this
section.
6.
After defining all of the information, click Save.
7.
Click Save in the Add Card dialog box. A message appears
indicating that the data has been saved.
8.
Click OK. The Add Card dialog box appears blank.
9.
Add another card, or click Quit to return to the access cards
summary.
11-30
Operator Workstation User’s Manual
Importing Photo and Signature Files
To import Photo and Signature fields:
1.
Place the text cursor in the Photo or Signature field and type in the
name of the file.
2.
Fill in any other user data fields as desired.
3.
Click Save. The data is saved and the OWS returns to the Card
Summary-Add Card dialog box.
4.
Click Save. A message appears indicating that the data has been
saved.
5.
Click OK. The fields in the Card Summary-Add Card dialog box
appear blank.
6.
Add another card, or click Quit to return to the access cards
summary.
Importing Emergency Files
To copy and modify the emergency file for an access card:
1.
Define and save all other fields in the user data record for an
access card as discussed earlier in this section.
2.
In the access cards summary, select the card.
3.
On the Action menu, click Modify Card Data. The Card
Summary-Modify Card dialog box appears (Figure 11-14).
4.
Click User Data. Superbase 4 software loads, and the Employee
menu for the selected card appears (Figure 11-8).
5.
Click Personal to go to the Personal menu, and click Modify to
place the Personal menu in the Modify mode. A message box
appears asking if you would like to modify the file name.
6.
Click No. (This step will be performed later in the definition
procedure.) The Personal menu appears in the Modify mode
(Figure 11-10).
7.
Place the cursor inside the Emergency field. The Text window
appears. If no text was previously defined, instructions for adding
text appear.
8.
Delete the text in the window and type in up to five lines of new
text.
9.
On the File menu, click Save As. The Save As dialog box appears.
10. Type in a file name to save the new text under, and click OK.
11. On the File menu, click Close, or double-click the Control Panel
box in the Text window to close the Text window. (Note that no
text is shown in the Emergency field at this point.)
Operator Workstation User’s Manual 11-31
12. Click Save. A dialog box appears asking if the information is
correct.
13. Click Yes to save the data. The data is saved, and the text that was
originally in the Emergency field appears. (The field only displays
the new text when the external file name is changed.)
14. Click Modify again. A message box appears asking if you would
like to modify the file name.
15. Click Yes. The original file name is displayed in the Emergency
field.
16. Enter the name of the file entered in Step 11.
17. Click Save. A message box appears asking if the entries are
correct.
18. Click Yes to save the entries.
19. Click Exit. The Superbase 4 Main Menu appears (Figure 11-3).
20. Click Quit to return to the Modify Card dialog box.
21. Click Save in the Modify Card dialog box. A message box
appears indicating that the data has been saved.
22. Click OK.
Modifying User Data
To modify user data:
1.
Access the Modify Card dialog box.
2.
Click the User Data button. Superbase 4 software loads, and the
Employee Menu for the selected access card appears
(Figure 11-8).
3.
Click the button for the window that contains the data you want to
modify (that is, Vehicle, Badge, Employee, Identity, or Personal).
The selected window appears.
4.
Click Modify. The database is placed in the Modify mode, and the
text cursor appears in the first definable field.
5.
Make the necessary modifications to the fields. (A red border
surrounds fields that cannot be modified.)
6.
Click Save. A confirmation message box appears.
7.
Click Yes to save the entries in that window and return the
window to its View mode. Click Cancel to modify the entries.
Note:
When you click Modify in the Identity menu, the file
names of photo and signature images appear in place of
the images themselves.
11-32
Operator Workstation User’s Manual
8.
After making all of the necessary changes in each window, click
Exit. The Superbase 4 Main menu appears (Figure 11-3).
9.
Click Quit to return to the Modify Data dialog box.
10. Click Save to save the modified access card. A message box
appears indicating that the data has been saved.
11. Click OK.
Modifying User Definable Field Titles
To modify user definable field titles:
1.
From the Network Map, click the Summary menu option. The
Summary dialog box appears (Figure 11-11).
2.
Double-click access cards in the Summary Name list box. The
access cards summary appears (Figure 11-1).
3.
Select any name from the summary.
Note:
This procedure changes the field title of all of the card holder
records in the database, not just the highlighted card.
4.
Click Modify Card Data. The Modify Card dialog box appears
(Figure 11-14).
5.
Click User Data. Superbase 4 software opens and the User Data
Employee Menu appears (Figure 11-8).
6.
Click Exit. The Superbase 4 Main Menu appears (Figure 11-3).
7.
Click the Mod User button. The User Definable Fields Modify
window appears (Figure 11-19).
Operator Workstation User’s Manual 11-33
Figure 11-19: User Definable Fields Names Window
8.
Change the name of the field and click Save. A message box
appears asking for verification.
9.
Click Yes. The Superbase 4 Main Menu appears (Figure 11-3).
10. Click Quit to return to the Modify Card dialog box.
11. Click Save. A message appears indicating that the changes are
saved.
12. Click OK.
Printing User Data
Click the Print button in a user data window to print the entire user
data record (Vehicle, Badge, Employee, Identity, and Personal) for a
card holder. A message box appears on the screen indicating that the
record is being printed.
11-34
Operator Workstation User’s Manual
Quitting Superbase 4 Software
Click Quit in the Main Menu to exit Superbase 4 software and return
to the Metasys program.
From user data windows, click Exit to go to the Main Menu. Click
Quit.
From transaction menus, click Cancel to go to the Transaction Main
Menu, and click Quit.
IMPORTANT: Never use the Control Menu box in the upper, left
corner of the screen to exit Superbase 4 software.
Using the Control Menu box to exit could cause the
PC to lock up.
Displaying Access Controllers for an Access Card
Using Metasys Software
Note:
All security NCMs must be online to display access
controllers with Metasys.
To display the defined Access Controllers and Card Readers for an
access card:
1.
Click Summary on the menu bar. The Network Map-Summary
dialog box appears (Figure 11-11).
2.
Select access cards in the Network Map-Summary list box and
click Display. The access cards summary appears (Figure 11-1).
3.
Click the access card.
4.
On the Action menu, click Modify Card Data. The Card
Summary-Modify Card dialog box for the selected card appears
(Figure 11-14).
Note:
The Access Controllers list box lists all Access
Controllers on the network. Each Access Controller
defined for the selected card has an asterisk (*) to the
left of its name. Double-click the controller to see the
Card Readers defined for the selected access card.
(Defined Card Readers appear highlighted.)
Operator Workstation User’s Manual 11-35
Figure 11-20: Modify Card Dialog Box Displaying Access Controllers and
Card Readers
11-36
Operator Workstation User’s Manual
Using Superbase 4 Software
To display the defined Access Controllers and Card Readers for an
access card:
1.
Click Summary on the menu bar. The Network Map-Summary
dialog box appears (Figure 11-11).
2.
Select access cards in the Network Map-Summary list box and
click Display. The access cards summary appears (Figure 11-1).
3.
Select the access card.
4.
On the Action menu, click Modify Card Data. The Card
Summary-Modify Card dialog box for the selected card appears
(Figure 11-14).
5.
Click the User Data button. Superbase 4 software loads, and the
Employee menu for the selected card appears.
6.
Click the Card Reader button. The Card Reader menu appears
listing all of the Access Controllers defined for the selected card
(Figure 11-4). There are two pages, each containing 16 Access
Controller buttons. To go to the second page, click the 17-32
button. Click 1-16 to return to page one. (If less than
16 controllers are defined for the card, the buttons appear
dimmed.)
7.
Click each of the Access Controller buttons to see the Card
Readers defined for the access card (Figure 11-5). The number of
Card Readers listed can range from 1 to 16, depending on the
number of card readers defined for the selected access card. If
there are not 16 Card Readers defined, the buttons appear
dimmed.
8.
Click Cancel to view the controllers again.
9.
Click Exit to return to the User Data Main menu.
10. When finished, click Quit. Superbase 4 software closes and the
screen return to the Card Summary-Modify Card dialog box.