1
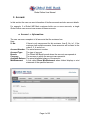
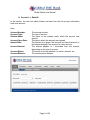
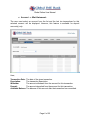
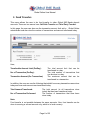
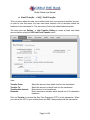
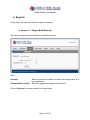
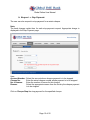
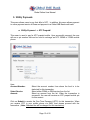
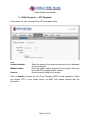
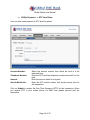
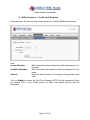
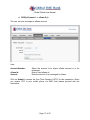
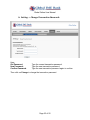
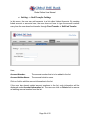
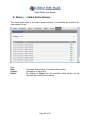
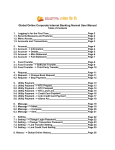
Global Online User Manual Table of Contents 1. Logging In for the First Time: .................................................................................... 2 a. Security Measures and Features: ...................................................................... 2 b. Menu Access:..................................................................................................... 3 c. Accounts and Transactions: .............................................................................. 3 2. Account: .................................................................................................................... 4 a. Account - > Information: ..................................................................................... 4 b. Account - > Details: ............................................................................................ 5 c. Account - > Mini Statement:............................................................................... 6 d. Account - > Full Statement: ................................................................................ 7 3. Fund Transfer: .......................................................................................................... 8 a. Fund Transfer - > Self / Link Transfer: ............................................................... 9 b. Fund Transfer - > Third Party Transfer:............................................................ 10 4. Request: ................................................................................................................. 11 a. Request - > Cheque Book Request:................................................................. 11 b. Request - > Stop Payment: .............................................................................. 12 5. Utility Payment: ....................................................................................................... 13 a. Utility Payment - > NTC Prepaid: ..................................................................... 13 b. Utility Payment - > NTC Postpaid: .................................................................... 14 c. Utility Payment - > NTC Land Line: ................................................................. 15 d. Utility Payment - > Credit Card Payment:......................................................... 16 e. Utility Payment - > eSewa A/c: ......................................................................... 17 f. Utility Payment - > Others: .................................................................................. 18 6. Message: ................................................................................................................ 19 a. Message - > Inbox:........................................................................................... 19 b. Message - > Compose: .................................................................................... 20 c. Message - > Sent: ........................................................................................... 21 7. Setting: ................................................................................................................... 22 a. Setting - > Change Login Password: ................................................................ 22 b. Setting - > Change Transaction Password: ...................................................... 23 c. Setting - > Link Transfer Setting: ..................................................................... 24 8. History - > Global Online History: ........................................................................... 25 Global Online User Manual 1. Logging In for the First Time: (This is only applicable for a new user who receives Global Online username/password via email/SMS and then logs into Global Online for the first time. Users who are already using Global Online do not need to read this section “Logging in for the first Time”). Go to Global Online login page. Type User ID and Login Password and click Login. When the user has logged into Global Online for the first time, the user will be required to accept Terms and Conditions. Click Accept to accept Terms and Conditions. The user will be required to verify his/her mobile number registered with Global Online. The user will then be required to change login password. After login password is successfully changed, the user will be logged out. Now, the user can login to Global Online and begin using available services. a. Security Measures and Features: The following security measures are used by Global Online. HTTPS protocol and VeriSign certificate: Global Online uses HTTPS which is a secured HTTP protocol for online data transmission. In addition, Global Online uses VeriSign® certificate which encrypts the data transmitted during online activity. (VeriSign is a registered trademark of Symantec Inc., USA) Disabling concurrent login: When a user is logged in, the same user cannot log in from another browser or from another computer using the same set of username and login password. User account blocked after three consecutive failed login attempts: In order to prevent unauthorized access to Global Online, a user account will be blocked after three consecutive failed login attempts. The Global Online user must contact Global Online administrator to unblock his/her user account. Inactive session timed out: Inactive sessions of 3 to 5 minutes are timed out. Different passwords for login and transactions: Global Online has two passwords for a user account. The login password is required to login to Global Online. The One Time Password (OTP) or transaction password is required to do transactions. By default, for all Global Online users, transactions must be Page 2 of 25 Global Online User Manual done through OTP option. However, if the user decides to use transaction password instead of OTP, the user must contact Global Online administrator and request the option of transaction password be enabled for transactions. One Time Password (OTP) as an additional security feature: For each transaction initiated by a user, a unique system generated One Time Password (OTP) is sent via SMS to the user’s mobile phone number which is registered with Global Online. Then the user must use this OTP to proceed with the transaction. For another transaction, the user receives another system generated OTP and so on. In addition, as an added security feature, if the OTP is not used within few minutes then it will expire. Periodic login password change requirements: Global Online requires periodic password changes to add more security to online banking. The login password expires once every three months. However, the transaction password never expires. b. Menu Access: These are the menus available to a normal internet banking user. The menus visible to the user will be based on what menu items were selected when the user filled out the Global Online application form. Account Fund Transfer Request Utility Payment Message Setting History c. Accounts and Transactions: In Global IME Bank, one customer can have multiple accounts. For example, a customer has one savings account and one loan account. All accounts that a customer has can be displayed in Global Online. However, transactions are limited to Operative Account(s). An Operative Account in Global Online is a saving or current account opened in local currency, which is in Nepalese Rupees. Page 3 of 25 Global Online User Manual 2. Account: In this section the user can see information of his/her accounts and also account details. For example, if a Global IME Bank customer holds one or more accounts, a single Global Online user account can access all these accounts. a. Account - > Information: The user can see a snapshot of all accounts that the customer has. Here, S. No: If there is only one account for this customer, then S. No. is 1. If the customer has multiple accounts, these accounts will be listed in the order 2, 3, 4, and so on. Account Number: The actual account number. Account Type: The type of account. Branch: The Global IME Bank branch where the account was opened at. Currency: The currency in which the account was opened at. Available Balance: The actual available balance of the account. MiniStatement: A link called Show MiniStatement when clicked displays a mini statement of the specified account. Page 4 of 25 Global Online User Manual b. Account - > Details: In this section, the user can select his/her accounts from the list and get information each such account. Here, Account Number: Account Type: Scheme Name: Account Open Date: Interest Rate: Accured Interest: Account Status: Account Balance: The account number. The type of account. The name of the scheme under which the account was opened. The date in which the account was opened. The interest to be given if the account is a deposit account or the interest charged if the account is a loan account. The interest payable to / receivable from this account depending on the type of account. The status of account whether it is active, dormant, etc. The actual account balance. Page 5 of 25 Global Online User Manual c. Account - > Mini Statement: The user must select an account from the list and the last ten transactions for this selected account will be displayed. However, this feature is available for deposit account(s) only. Here, Transaction Date: The date of the given transaction. Description: The transaction description. Withdraw: The amount withdrawn from the account for this transaction. Deposit: The amount deposited from the account for this transaction. Available Balance: The balance of this account after the transaction has committed. Page 6 of 25 Global Online User Manual d. Account - > Full Statement: The user can see a report of account statement for a particular account by selecting from and to dates. Here, Select Account: From Date: To Date: View: Select an account from the list. Select the date from which the account statement is to be seen. Select the date till which the account statement is to he seen. Click on View to see the account statement. Note: In From Date and To Date, the user can click the calendar icons he user can select a date from the calendar and it will be displayed on From Date or To Date. Page 7 of 25 Global Online User Manual 3. Fund Transfer: This menu allows the user to do fund transfer to other Global IME Banks deposit accounts. There are two menus here: Self/Link Transfer and Third Party Transfer. In this page, the user can also see the transaction amount limit set by Global Online administrator and also view the number of transactions and amount transferred today. Here, Transferable Amount Limit (PerDay): No. of Transaction (PerDay): Transaction Amount (Per Transaction): The total amount limit that can be transferred in a day. The total number of transactions that can be done in a day. The maximum amount that can be transferred in a transaction. In addition, the user can see the following that exhibit how many transactions were done today and how much amount was transferred today. Total Amount Transferred: No. of Transaction Performed: The total amount (in all transactions done today) that has been transferred today. The number of transactions that have been done today. Note: Fund transfer is not possible between the same accounts. Also, fund transfer can be done to a saving or current account only, which is in local currency. Page 8 of 25 Global Online User Manual a. Fund Transfer - > Self / Link Transfer: This is a menu where the user can transfer funds from one account to another account. In order to user this menu, the user must have created a list of accounts where the funds are to be transferred to. The accounts in this list are called linked accounts. The user must use Setting - > Link Transfer Setting to create at least one linked account before using this Self Link Fund Transfer menu. Here, Transfer From: Transfer To: Transferable Amount: Remarks: Select the account from which fund is to be transferred. Select the account to which fund is to be transferred. Enter amount to be transferred. Enter transaction remarks which should be of 25 characters maximum. Click on Transfer to receive the One Time Password (OTP) for this transaction. When you receive the OTP in your mobile phone via SMS, then proceed with the transaction. Page 9 of 25 Global Online User Manual b. Fund Transfer - > Third Party Transfer: Unlike Self Link Transfer, this menu can be used to transfer fund to an account that does not exist in Linked Account list. In this menu, the user can transfer fund to any saving or current account. Like Self Link Fund Transfer, the user cannot transfer funds from the same account to the same account. Here, Transfer From: Transfer To: Transferable Amount: Remarks: Select the account from where the fund is to be transferred. Enter the account number to which the fund is to be transferred. Enter the amount to be transferred. Enter the transaction remarks which should be 25 characters or less. Click on Transfer to receive the One Time Password (OTP) for this transaction. When you receive the OTP in your mobile phone via SMS, then proceed with the transaction. Page 10 of 25 Global Online User Manual 4. Request: In this menu, the user can make two types of requests. a. Request - > Cheque Book Request: The user can request cheque book for a selected account. Here, Account: Select the account number for which the cheque book is to be requested for. Cheque Book Leaf Qty: Select the appropriate quantity from this list. Click on Request to confirm request for cheque book. Page 11 of 25 Global Online User Manual b. Request - > Stop Payment: The user can also request to stop payment for a certain cheque. Note: The bank charges certain fees for each stop payment request. Appropriate charge is displayed in the Stop Payment page. Here, Account Number: Cheque No: No. of Leaves: Reason: Select the account whose cheque payment is to be stopped. Enter the actual cheque number whose payment is to be stopped. Enter the number of leaves for this cheque. Select the appropriate reason from the list why the cheque payment is to be stopped. Click on Cheque Stop the stop payment for the specified cheque. Page 12 of 25 Global Online User Manual 5. Utility Payment: This menu allows users to pay their bills to NTC. In addition, this menu allows payment to online payment service e-Sewa and payment to a Global IME Bank credit card. a. Utility Payment - > NTC Prepaid: This menu is used to pay for NTC prepaid mobile. Upon successful payment, the user will see a pin number that can be used to recharge an NTC GSMA or CDMA mobile phone. Here, Account Number: Select Service: Amount: Select the account number from where the fund is to be deducted for this transaction. Select either CDMA or GSM service from the list. Select an amount from the list. When the transaction is successful, the user will receive an NTC prepaid mobile pin for this amount. Click on Submit to receive the One Time Password (OTP) for this transaction. When you receive OTP in your mobile phone via SMS, then please proceed with the transaction. (Note: Standard fee will be charged for this transaction). Page 13 of 25 Global Online User Manual b. Utility Payment - > NTC Postpaid: In this menu, the user can pay bills to NTC post paid mobile. Here, Account Number: Mobile Number: Amount: Select the account from where the amount is to be deducted for this transaction. Enter the mobile number whose bill is to be paid. This must be a valid NTC postpaid mobile number. Enter the amount which is to be paid. Click on Submit to receive the One Time Password (OTP) for this transaction. When you receive OTP in your mobile phone via SMS, then please proceed with the transaction. Page 14 of 25 Global Online User Manual c. Utility Payment - > NTC Land Line: User can also make payment to NTC land line phone. Account Number: Telephone Number: Amount: Alert to Mobile No.: Select the account number from which the fund is to be deducted from. Enter the NTC land line telephone number whose bill is to be paid. Enter the amount which is to be paid. Enter the NTC mobile number that should receive alert for this transaction. Click on Submit to receive the One Time Password (OTP) for this transaction. When you receive OTP in your mobile phone via SMS, then please proceed with the transaction. Page 15 of 25 Global Online User Manual d. Utility Payment - > Credit Card Payment: Using this menu, the user can also make payment to a Global IME Bank credit card. Here, Account Number: CreditCard Number: Amount: Select the account from where the credit card payment is to be made. Enter the credit card number for which the payment is to be made. Enter the amount which is to be paid to the specified credit card. Click on Submit to receive the One Time Password (OTP) for this transaction. When you receive OTP in your mobile phone via SMS, then please proceed with the transaction. Page 16 of 25 Global Online User Manual e. Utility Payment - > eSewa A/c: The user can also recharge an eSewa account. Here, Account Number: eSewa Id: Amount: Select the account from where eSewa account is to be recharged. Enter a valid eSewa Id. Enter the amount to be recharged to eSewa. Click on Submit to receive the One Time Password (OTP) for this transaction. When you receive OTP in your mobile phone via SMS, then please proceed with the transaction. Page 17 of 25 Global Online User Manual f. Utility Payment - > Others: The user can also select other third party payment services. Here, Account Number: Service: Amount: Remarks: Select the account from where fund is to be deducted. Select the required service. Enter the amount to be used for this service Enter the transaction remarks. Click on Submit to receive the One Time Password (OTP) for the transaction. Once the OTP is received in your mobile phone, enter it to proceed with transaction. Page 18 of 25 Global Online User Manual 6. Message: Under this menu, the user can send/receive messages to/from Global Online administrator. a. Message - > Inbox: In Inbox menu, the user can see a list of message sent to him/her by Global Online administrator. If the user has received messages from Global Online Administrator, such messages can be viewed here. The user can click on “Delete” link next to a message to remove this message from inbox. Page 19 of 25 Global Online User Manual b. Message - > Compose: In Compose menu, the user can compose and send messages to the Global Online administrator. Here, To: Subject: Message: The recipient of this message will always be Bank Admin, which is the Global Online administrator. Please type the subject of the message. In the message box, please type the message. Then click on Send to send the message. Page 20 of 25 Global Online User Manual c. Message - > Sent: In Sent menu, the user can see a list of messages sent to Global Online administrator. If the user has sent messages to Global Online Administrator, such messages can be viewed here. The user can click on “Delete” link next to a message to remove this message from the list of sent messages. Page 21 of 25 Global Online User Manual 7. Setting: There are three items in this menu. The first one is for changing login password. The second one is for changing transaction password. The third one is for setting up linked accounts for fund transfer. a. Setting - > Change Login Password: To change either login or transaction password, click Change Login Password or click Change Transaction Password. Here, Old Password: New Password: Confirm Password: Type the current login password. Type the new login password. Type the new login password again to confirm. Then click on Change to change the login password. Page 22 of 25 Global Online User Manual b. Setting - > Change Transaction Password: Here, Old Password: New Password: Confirm Password: Type the current transaction password. Type the new transaction password. Type the new transaction password again to confirm. Then click on Change to change the transaction password. Page 23 of 25 Global Online User Manual c. Setting - > Link Transfer Setting: In this menu, the user can add accounts to a list called Linked Accounts. By creating linked account or accounts here, the user does not have to type the account number every time the user does fund transfer through Fund Transfer -> Self/Link Transfer. Here, Account Number: Account Holder Name: The account number that is to be added to the list. The account holder’s name. Click on Add to add this account information to the list. If the user has already added account numbers to the list, such information will be displayed under Account Information list. The user can click on Delete link to remove an existing account number from the list. Page 24 of 25 Global Online User Manual 8. History - > Global Online History: This menu keeps track of the user’s recent activities. The activities are sorted in the order newest on top. Here, Date: Activity: Delete: The exact date and time of a certain online activity. Description of the activity. By clicking on Delete link, the specified online activity can be removed from Global Online history. Page 25 of 25


![SunComm - [ [ [ ANSEL ] ] ]](http://vs1.manualzilla.com/store/data/005931174_1-fa9c465279a46401b1c526ee76b28f2f-150x150.png)