Transcript
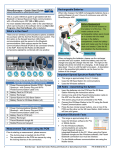
Quick Start Guide
PS110W/210W
HelloDevice Pro Series
www.sena.com
Connection
② Connect Wireless LAN network
① Connect Power Supply
Users must make sure that Wireless
LAN access point(AP) is installed
within working distance.
The factory default "Operation mode"
of “WiFi configuration” is “Connect to
any” SSID if not specified.
Users should enter valid SSID of their
AP for the normal operation of the
PS110W/210W.
When powered up, PS110W/210W
automatically tries to connect to the
AP specified in “Operation mode”.
For more details, refer to the user
manual from CD or Sena web site at
www.sena.com
Serial Device
③ Connect serial device
Installation
Using Terminal emulator such as a Hyper Terminal, users can
configure network setting such as a “IP configuration”. After
configuring network setting, users can remotely configure
details of the PS110W/210W using web interface or HelloDevice
Manager via network.
Step 1 : Connect the PS110W/210W to PC via RS-232 cable and open
Terminal emulator.
Default serial parameters :
9600 Baud rate / 8 Data bits / None Parity / 1 Stop bit / No Hardware flow control
Step 2 : Enter User ID and Password. Default User ID and Password is
“root/root”. Then, enter “editconf” in [#] field.
Step 3 : Set up adequate details of “IP configuration”. Default “IP Mode” and
“IP Address” of the Parani-MSP1000 is "Static IP/192.168.161.5".
Configuration
Users can configure details of the PS110W/210W using Web
Interface or HellowDevice Manager. Below is configuration
using web interface
Step 1 : Connect to web interface of the PS110W/210W using configured
“IP Address”.
Step 2 : Enter User ID and Password. Default User ID and Password is
“root/root”.
Step 3 : Remotely configure properly details of the PS110W/210W using web
interface.
For more information, refer to the user manual.
You may download user manual of the PS110W/210W from CD or Sena
website at http://www.sena.com/support/downloads/
Visit us at www.sena.com
Copyright 1998-2008, Sena Technologies, Inc. All rights reserved.