1
Infinium® HTS Assay
Protocol Guide
FOR RESEARCH USE ONLY
ILLUMINA PROPRIETARY
Part # 15045738 Rev. A
October 2013
This document and its contents are proprietary to Illumina, Inc. and its affiliates ("Illumina"), and are intended solely for the contractual use of
its customer in connection with the use of the product(s) described herein and for no other purpose. This document and its contents shall not
be used or distributed for any other purpose and/or otherwise communicated, disclosed, or reproduced in any way whatsoever without the
prior written consent of Illumina. Illumina does not convey any license under its patent, trademark, copyright, or common-law rights nor
similar rights of any third parties by this document.
The instructions in this document must be strictly and explicitly followed by qualified and properly trained personnel in order to ensure the
proper and safe use of the product(s) described herein. All of the contents of this document must be fully read and understood prior to using
such product(s).
FAILURE TO COMPLETELY READ AND EXPLICITLY FOLLOW ALL OF THE INSTRUCTIONS CONTAINED HEREIN MAY RESULT IN
DAMAGE TO THE PRODUCT(S), INJURY TO PERSONS, INCLUDING TO USERS OR OTHERS, AND DAMAGE TO OTHER PROPERTY.
ILLUMINA DOES NOT ASSUME ANY LIABILITY ARISING OUT OF THE IMPROPER USE OF THE PRODUCT(S) DESCRIBED HEREIN
(INCLUDING PARTS THEREOF OR SOFTWARE) OR ANY USE OF SUCH PRODUCT(S) OUTSIDE THE SCOPE OF THE EXPRESS
WRITTEN LICENSES OR PERMISSIONS GRANTED BY ILLUMINA IN CONNECTION WITH CUSTOMER'S ACQUISITION OF SUCH
PRODUCT(S).
FOR RESEARCH USE ONLY
© 2013 Illumina, Inc. All rights reserved.
Illumina, IlluminaDx, BaseSpace, BeadArray, BeadXpress, cBot, CSPro, DASL, DesignStudio, Eco, GAIIx, Genetic Energy, Genome
Analyzer, GenomeStudio, GoldenGate, HiScan, HiSeq, Infinium, iSelect, MiSeq, Nextera, NuPCR, SeqMonitor, Solexa, TruSeq,
TruSight, VeraCode, the pumpkin orange color, and the Genetic Energy streaming bases design are trademarks or registered trademarks of
Illumina, Inc. All other brands and names contained herein are the property of their respective owners.
Read Before Using this Product
This Product, and its use and disposition, is subject to the following terms and conditions. If Purchaser does not agree to these
terms and conditions then Purchaser is not authorized by Illumina to use this Product and Purchaser must not use this Product.
1
ii
Definitions. "Application Specific IP" means Illumina owned or controlled intellectual property rights that pertain to
this Product (and use thereof) only with regard to specific field(s) or specific application(s). Application Specific IP
excludes all Illumina owned or controlled intellectual property that cover aspects or features of this Product (or use
thereof) that are common to this Product in all possible applications and all possible fields of use (the "Core IP").
Application Specific IP and Core IP are separate, non-overlapping, subsets of all Illumina owned or controlled intellectual
property. By way of non-limiting example, Illumina intellectual property rights for specific diagnostic methods, for
specific forensic methods, or for specific nucleic acid biomarkers, sequences, or combinations of biomarkers or
sequences are examples of Application Specific IP. "Consumable(s)" means Illumina branded reagents and consumable
items that are intended by Illumina for use with, and are to be consumed through the use of, Hardware.
"Documentation" means Illumina's user manual for this Product, including without limitation, package inserts, and any
other documentation that accompany this Product or that are referenced by the Product or in the packaging for the Product
in effect on the date of shipment from Illumina. Documentation includes this document. "Hardware" means Illumina
branded instruments, accessories or peripherals. "Illumina" means Illumina, Inc. or an Illumina affiliate, as applicable.
"Product" means the product that this document accompanies (e.g., Hardware, Consumables, or Software). "Purchaser"
is the person or entity that rightfully and legally acquires this Product from Illumina or an Illumina authorized dealer.
"Software" means Illumina branded software (e.g., Hardware operating software, data analysis software). All Software is
licensed and not sold and may be subject to additional terms found in the Software's end user license agreement.
"Specifications" means Illumina's written specifications for this Product in effect on the date that the Product ships from
Illumina.
Part # 15045738 Rev. A
2
Research Use Only Rights. Subject to these terms and conditions and unless otherwise agreed upon in writing by an
officer of Illumina, Purchaser is granted only a non-exclusive, non-transferable, personal, non-sublicensable right under
Illumina's Core IP, in existence on the date that this Product ships from Illumina, solely to use this Product in Purchaser's
facility for Purchaser's internal research purposes (which includes research services provided to third parties) and solely
in accordance with this Product's Documentation, but specifically excluding any use that (a) would require rights or a
license from Illumina to Application Specific IP, (b) is a re-use of a previously used Consumable, (c) is the disassembling,
reverse-engineering, reverse-compiling, or reverse-assembling of this Product, (d) is the separation, extraction, or
isolation of components of this Product or other unauthorized analysis of this Product, (e) gains access to or determines
the methods of operation of this Product, (f) is the use of non-Illumina reagent/consumables with Illumina's Hardware
(does not apply if the Specifications or Documentation state otherwise), or (g) is the transfer to a third-party of, or sublicensing of, Software or any third-party software. All Software, whether provided separately, installed on, or embedded
in a Product, is licensed to Purchaser and not sold. Except as expressly stated in this Section, no right or license under
any of Illumina's intellectual property rights is or are granted expressly, by implication, or by estoppel.
Purchaser is solely responsible for determining whether Purchaser has all intellectual property rights that are
necessary for Purchaser's intended uses of this Product, including without limitation, any rights from third
parties or rights to Application Specific IP. Illumina makes no guarantee or warranty that purchaser's specific
intended uses will not infringe the intellectual property rights of a third party or Application Specific IP.
3
Regulatory. This Product has not been approved, cleared, or licensed by the United States Food and Drug
Administration or any other regulatory entity whether foreign or domestic for any specific intended use, whether
research, commercial, diagnostic, or otherwise. This Product is labeled For Research Use Only. Purchaser must ensure it
has any regulatory approvals that are necessary for Purchaser's intended uses of this Product.
4
Unauthorized Uses. Purchaser agrees: (a) to use each Consumable only one time, and (b) to use only Illumina
consumables/reagents with Illumina Hardware. The limitations in (a)-(b) do not apply if the Documentation or
Specifications for this Product state otherwise. Purchaser agrees not to, nor authorize any third party to, engage in any of
the following activities: (i) disassemble, reverse-engineer, reverse-compile, or reverse-assemble the Product, (ii) separate,
extract, or isolate components of this Product or subject this Product or components thereof to any analysis not expressly
authorized in this Product's Documentation, (iii) gain access to or attempt to determine the methods of operation of this
Product, or (iv) transfer to a third-party, or grant a sublicense, to any Software or any third-party software. Purchaser
further agrees that the contents of and methods of operation of this Product are proprietary to Illumina and this Product
contains or embodies trade secrets of Illumina. The conditions and restrictions found in these terms and conditions are
bargained for conditions of sale and therefore control the sale of and use of this Product by Purchaser.
5
Limited Liability. TO THE EXTENT PERMITTED BY LAW, IN NO EVENT SHALL ILLUMINA OR ITS
SUPPLIERS BE LIABLE TO PURCHASER OR ANY THIRD PARTY FOR COSTS OF PROCUREMENT OF
SUBSTITUTE PRODUCTS OR SERVICES, LOST PROFITS, DATA OR BUSINESS, OR FOR ANY INDIRECT,
SPECIAL, INCIDENTAL, EXEMPLARY, CONSEQUENTIAL, OR PUNITIVE DAMAGES OF ANY KIND ARISING
OUT OF OR IN CONNECTION WITH, WITHOUT LIMITATION, THE SALE OF THIS PRODUCT, ITS USE,
ILLUMINA'S PERFORMANCE HEREUNDER OR ANY OF THESE TERMS AND CONDITIONS, HOWEVER
ARISING OR CAUSED AND ON ANY THEORY OF LIABILITY (WHETHER IN CONTRACT, TORT
(INCLUDING NEGLIGENCE), STRICT LIABILITY OR OTHERWISE).
6
ILLUMINA'S TOTAL AND CUMULATIVE LIABILITY TO PURCHASER OR ANY THIRD PARTY ARISING OUT
OF OR IN CONNECTION WITH THESE TERMS AND CONDITIONS, INCLUDING WITHOUT LIMITATION,
THIS PRODUCT (INCLUDING USE THEREOF) AND ILLUMINA'S PERFORMANCE HEREUNDER, WHETHER
IN CONTRACT, TORT (INCLUDING NEGLIGENCE), STRICT LIABILITY OR OTHERWISE, SHALL IN NO
EVENT EXCEED THE AMOUNT PAID TO ILLUMINA FOR THIS PRODUCT.
Illumina Infinium HTS Assay Protocol Guide
iii
7
Limitations on Illumina Provided Warranties. TO THE EXTENT PERMITTED BY LAW AND SUBJECT TO THE
EXPRESS PRODUCT WARRANTY MADE HEREIN ILLUMINA MAKES NO (AND EXPRESSLY DISCLAIMS
ALL) WARRANTIES, EXPRESS, IMPLIED OR STATUTORY, WITH RESPECT TO THIS PRODUCT,
INCLUDING WITHOUT LIMITATION, ANY IMPLIED WARRANTY OF MERCHANTABILITY, FITNESS FOR A
PARTICULAR PURPOSE, NONINFRINGEMENT, OR ARISING FROM COURSE OF PERFORMANCE,
DEALING, USAGE OR TRADE. WITHOUT LIMITING THE GENERALITY OF THE FOREGOING, ILLUMINA
MAKES NO CLAIM, REPRESENTATION, OR WARRANTY OF ANY KIND AS TO THE UTILITY OF THIS
PRODUCT FOR PURCHASER'S INTENDED USES.
8
Product Warranty. All warranties are personal to the Purchaser and may not be transferred or assigned to a third-party,
including an affiliate of Purchaser. All warranties are facility specific and do not transfer if the Product is moved to
another facility of Purchaser, unless Illumina conducts such move.
a
Warranty for Consumables. Illumina warrants that Consumables, other than custom Consumables, will conform to
their Specifications until the later of (i) 3 months from the date of shipment from Illumina, and (ii) any expiration
date or the end of the shelf-life pre-printed on such Consumable by Illumina, but in no event later than 12 months
from the date of shipment. With respect to custom Consumables (i.e., Consumables made to specifications or
designs made by Purchaser or provided to Illumina by, or on behalf of, Purchaser), Illumina only warrants that the
custom Consumables will be made and tested in accordance with Illumina's standard manufacturing and quality
control processes. Illumina makes no warranty that custom Consumables will work as intended by Purchaser or for
Purchaser's intended uses.
b
Warranty for Hardware. Illumina warrants that Hardware, other than Upgraded Components, will conform to its
Specifications for a period of 12 months after its shipment date from Illumina unless the Hardware includes Illumina
provided installation in which case the warranty period begins on the date of installation or 30 days after the date it
was delivered, whichever occurs first ("Base Hardware Warranty"). "Upgraded Components" means Illumina
provided components, modifications, or enhancements to Hardware that was previously acquired by Purchaser.
Illumina warrants that Upgraded Components will conform to their Specifications for a period of 90 days from the
date the Upgraded Components are installed. Upgraded Components do not extend the warranty for the Hardware
unless the upgrade was conducted by Illumina at Illumina's facilities in which case the upgraded Hardware shipped
to Purchaser comes with a Base Hardware Warranty.
c
Exclusions from Warranty Coverage. The foregoing warranties do not apply to the extent a non-conformance is
due to (i) abuse, misuse, neglect, negligence, accident, improper storage, or use contrary to the Documentation or
Specifications, (ii) improper handling, installation, maintenance, or repair (other than if performed by Illumina's
personnel), (iii) unauthorized alterations, (iv) Force Majeure events, or (v) use with a third party's good not provided
by Illumina (unless the Product's Documentation or Specifications expressly state such third party's good is for use
with the Product).
d
Procedure for Warranty Coverage. In order to be eligible for repair or replacement under this warranty Purchaser
must (i) promptly contact Illumina's support department to report the non-conformance, (ii) cooperate with Illumina
in confirming or diagnosing the non-conformance, and (iii) return this Product, transportation charges prepaid to
Illumina following Illumina's instructions or, if agreed by Illumina and Purchaser, grant Illumina's authorized repair
personnel access to this Product in order to confirm the non-conformance and make repairs.
e
Sole Remedy under Warranty. Illumina will, at its option, repair or replace non-conforming Product that it
confirms is covered by this warranty. Repaired or replaced Consumables come with a 30-day warranty. Hardware
may be repaired or replaced with functionally equivalent, reconditioned, or new Hardware or components (if only a
component of Hardware is non-conforming). If the Hardware is replaced in its entirety, the warranty period for the
replacement is 90 days from the date of shipment or the remaining period on the original Hardware warranty,
whichever is shorter. If only a component is being repaired or replaced, the warranty period for such component is
90 days from the date of shipment or the remaining period on the original Hardware warranty, whichever ends later.
iv
Part # 15045738 Rev. A
f
9
The preceding states Purchaser's sole remedy and Illumina's sole obligations under the warranty provided
hereunder.
Third-Party Goods and Warranty. Illumina has no warranty obligations with respect to any goods originating
from a third party and supplied to Purchaser hereunder. Third-party goods are those that are labeled or branded
with a third-party's name. The warranty for third-party goods, if any, is provided by the original manufacturer.
Upon written request Illumina will attempt to pass through any such warranty to Purchaser.
Indemnification.
a
Infringement Indemnification by Illumina. Subject to these terms and conditions, including without limitation,
the Exclusions to Illumina's Indemnification Obligations (Section 9(b) below), the Conditions to Indemnification
Obligations (Section 9(d) below), Illumina shall (i) defend, indemnify and hold harmless Purchaser against any
third-party claim or action alleging that this Product when used for research use purposes, in accordance with these
terms and conditions, and in accordance with this Product's Documentation and Specifications infringes the valid
and enforceable intellectual property rights of a third party, and (ii) pay all settlements entered into, and all final
judgments and costs (including reasonable attorneys' fees) awarded against Purchaser in connection with such
infringement claim. If this Product or any part thereof, becomes, or in Illumina's opinion may become, the subject of
an infringement claim, Illumina shall have the right, at its option, to (A) procure for Purchaser the right to continue
using this Product, (B) modify or replace this Product with a substantially equivalent non-infringing substitute, or
(C) require the return of this Product and terminate the rights, license, and any other permissions provided to
Purchaser with respect this Product and refund to Purchaser the depreciated value (as shown in Purchaser's official
records) of the returned Product at the time of such return; provided that, no refund will be given for used-up or
expired Consumables. This Section states the entire liability of Illumina for any infringement of third party
intellectual property rights.
b
Exclusions to Illumina Indemnification Obligations. Illumina has no obligation to defend, indemnify or hold
harmless Purchaser for any Illumina Infringement Claim to the extent such infringement arises from: (i) the use of
this Product in any manner or for any purpose outside the scope of research use purposes, (ii) the use of this Product
in any manner not in accordance with its Specifications, its Documentation, the rights expressly granted to Purchaser
hereunder, or any breach by Purchaser of these terms and conditions, (iii) the use of this Product in combination
with any other products, materials, or services not supplied by Illumina, (iv) the use of this Product to perform any
assay or other process not supplied by Illumina, or (v) Illumina's compliance with specifications or instructions for
this Product furnished by, or on behalf of, Purchaser (each of (i) – (v), is referred to as an "Excluded Claim").
c
Indemnification by Purchaser. Purchaser shall defend, indemnify and hold harmless Illumina, its affiliates, their
non-affiliate collaborators and development partners that contributed to the development of this Product, and their
respective officers, directors, representatives and employees against any claims, liabilities, damages, fines, penalties,
causes of action, and losses of any and every kind, including without limitation, personal injury or death claims, and
infringement of a third party's intellectual property rights, resulting from, relating to, or arising out of (i) Purchaser's
breach of any of these terms and conditions, (ii) Purchaser's use of this Product outside of the scope of research use
purposes, (iii) any use of this Product not in accordance with this Product's Specifications or Documentation, or (iv)
any Excluded Claim.
d
Conditions to Indemnification Obligations. The parties' indemnification obligations are conditioned upon the
party seeking indemnification (i) promptly notifying the other party in writing of such claim or action, (ii) giving the
other party exclusive control and authority over the defense and settlement of such claim or action, (iii) not admitting
infringement of any intellectual property right without prior written consent of the other party, (iv) not entering into
any settlement or compromise of any such claim or action without the other party's prior written consent, and (v)
providing reasonable assistance to the other party in the defense of the claim or action; provided that, the party
reimburses the indemnified party for its reasonable out-of-pocket expenses incurred in providing such assistance.
e
Third-Party Goods and Indemnification. Illumina has no indemnification obligations with respect to any goods
originating from a third party and supplied to Purchaser. Third-party goods are those that are labeled or branded
Illumina Infinium HTS Assay Protocol Guide
v
with a third-party's name. Purchaser's indemnification rights, if any, with respect to third party goods shall be
pursuant to the original manufacturer's or licensor's indemnity. Upon written request Illumina will attempt to pass
through such indemnity, if any, to Purchaser.
vi
Part # 15045738 Rev. A
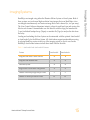
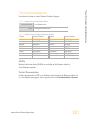
Revision History
Revision History
Part #
Revision
Date
15045738
A
October
2013
Illumina Infinium HTS Assay Protocol Guide
Description of Change
Initial release.
vii
Table of Contents
Revision History
Table of Contents
List of Tables
Chapter 1 Overview
Introduction to Infinium HTS assay
Audience and Purpose
Infinium HTS assay
Illumina Infinium BeadChips
Illumina Lab Protocols
Tracking Tools
Tecan GenePaint
Imaging Systems
GenomeStudio Integrated Informatics Platform
Chapter 2 Manual Protocol
Introduction to Infinium HTS Manual Protocol
Infinium HTS Manual Workflow
Equipment, Materials, and Reagents
Quantitate DNA (Optional) (Pre-Amp)
Amplify DNA (Pre-Amp)
Incubate DNA (Post-Amp)
Fragment DNA (Post-Amp)
Precipitate DNA (Post-Amp)
Resuspend DNA (Post-Amp)
Hybridize to BeadChip (Post-Amp)
Wash BeadChip (Post-Amp)
Extend and Stain (XStain) BeadChip (Post-Amp)
Image BeadChip (Post-Amp)
Illumina GenomeStudio
Chapter 3 Automated Protocol
Introduction to Infinium HTS Automated Protocol
Infinium HTS Automated Workflow
Equipment, Materials, and Reagents
Quantitate DNA (Optional) (Pre-Amp)
Illumina Infinium HTS Assay Protocol Guide
vii
viii
x
1
2
3
4
9
10
11
14
15
16
17
18
19
20
24
32
36
37
39
43
46
62
74
94
95
97
98
99
100
103
viii
Amplify DNA (Pre-Amp)
Incubate DNA (Post-Amp)
Fragment DNA (Post-Amp)
Precipitate DNA (Post-Amp)
Resuspend DNA (Post-Amp)
Hybridize to BeadChip (Post-Amp)
Wash BeadChip (Post-Amp)
Extend and Stain (XStain) BeadChip (Post-Amp)
Image BeadChip (Post-Amp)
Illumina GenomeStudio
113
121
123
128
136
141
160
173
196
197
Index
199
Technical Assistance
201
ix
Part # 15045738 Rev. A
List of Tables
Table 1 Sample Sheet Guidelines
Table 2 AutoLoader2 and AutoLoader2x Features
Table 3 User-Supplied Equipment Infinium HTS Assay, Manual Protocol
Table 4 Illumina-Supplied Equipment Infinium HTS Assay, Manual Protocol
Table 5 User Supplied Materials Infinium HTS Assay, Manual Protocol
Table 6 Illumina-Supplied Reagents, Infinium HTS Assay, Manual Protocol
Table 7 Concentrations of Lambda DNA
Table 8 Volumes for PicoGreen Reagents
Table 9 User-Supplied Equipment Infinium HTS Assay, Automated Protocol
Table 10 Illumina-Supplied Materials Infinium HTS Assay, Automated
Table 11 User-Supplied Materials Infinium HTSAssay, Automated Protocol
Table 12 Illumina-Supplied Reagents Infinium HTS Assay, Automated Protocol
Table 13 Concentrations of Lambda DNA
Table 14 Volumes for PicoGreen Reagents
Table 15 List of Reactions
Table 16 Illumina General Contact Information
Table 17 Illumina Customer Support Telephone Numbers
Illumina Infinium HTS Assay Protocol Guide
11
15
20
20
20
22
26
28
100
101
101
102
105
107
183
201
201
x
xi
Part # 15045738 Rev. A
Chapter 1 Overview
Introduction to Infinium HTS assay
Audience and Purpose
Infinium HTS assay
Illumina Infinium BeadChips
Illumina Lab Protocols
Tracking Tools
Tecan GenePaint
Imaging Systems
GenomeStudio Integrated Informatics Platform
Illumina Infinium HTS Assay Protocol Guide
2
3
4
9
10
11
14
15
16
1
Chapter 1
Overview
Overview
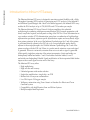
Introduction to Infinium HTS assay
The Illumina Infinium HTS assay is designed to maximize content flexibility with a HighThroughput Screening (HTS) capacity for genotyping and CNV analysis. Using Infinium I
and Infinium II probe designs and a dual color channel approach, the Infinium HTS assay
enables the DNA analysis of up to 750,000 SNPs and CNV markers per sample.
The Illumina Infinium HTS Assay Protocol Guide accomplishes this unlimited
multiplexing by combining whole-genome amplification (WGA) sample preparation with
direct, array-based capture, and enzymatic scoring of the SNP loci. Locus discrimination or
copy number variation (CNV) determination comes from a combination of high beadtype
representation per feature, sequence-specific hybridization capture and array-based, singlebase primer extension. In the case of the Infinium II probe design, the 3' end of the primer
is positioned directly adjacent to the SNP site, or if a non-polymorphic probe, directly
adjacent to the non-polymorphic site. With the Infinium I probe design, the 3' end of the
primer overlaps with the SNP site. If there is a perfect match, extension occurs and signal
is generated. If there is a mismatch, extension does not occur and no signal is generated.
Allele-specific single base extension of the primer incorporates a biotin nucleotide or a
dinitrophenyl labeled nucleotide. C and G nucleotides are biotin labeled; A and T
nucleotides are dinitrophenyl labeled. Signal amplification of the incorporated label further
improves the overall signal-to-noise ratio of the assay.
The Infinium HTS assay offers:
} High multiplexing
} High call rate and accuracy
} Unlimited genome-wide marker selection
} Single tube amplification—single chip—no PCR
} Minimal risk of carryover contamination
} Low DNA input—200 ng per sample.
} Walkaway automation using Tecan Genesis or Freedom Evo Robots and Tecan
GenePaint system
} Compatibility with both Illumina iScan and HiScan Systems
} Multiple-sample BeadChip format
2
Part # 15045738 Rev. A
This guide is for laboratory technicians running the Infinium HTS assay. The guide
documents the laboratory protocols associated with the assay. Follow all of the protocols in
the order shown.
Chapter 2 Manual Protocol explains how to run the assay manually in the lab.
Chapter 3 Automated Protocol explains how to automate the protocol with the aid of the
Tecan eight-tip robot.
Important Note
Before following any of the procedures in this guide, read the Infinium Lab Setup and
Procedures Guide, which explains how to equip and run an Infinium HTS assay laboratory.
The guide includes important information on the following topics:
} Prevention of amplification product contamination
} Safety precautions
} Equipment, materials, and reagents
} Standard lab procedures
} Robot use
} BeadChip imaging
} System maintenance
} GenomeStudio controls
} Troubleshooting
The instructions apply equally to all Infinium BeadChips provided by Illumina. All of the
Infinium HTS documentation assumes that you have already set up the laboratory space
and are familiar with the standard procedures and safety precautions.
Illumina Infinium HTS Assay Protocol Guide
3
Audience and Purpose
Audience and Purpose
Overview
Infinium HTS assay
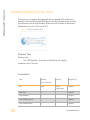
This section describes and illustrates the assay protocol. The assay requires 200 ng of
original DNA sample as input.
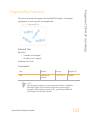
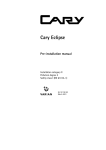
Amplify DNA (Pre-Amp)
The DNA samples are denatured and neutralized to prepare them for amplification.
Figure 1 Denaturing and Neutralizing DNA
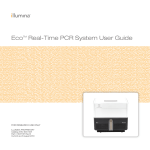
Incubate DNA (Post-Amp)
The denatured DNA is isothermally amplified in an overnight step. The whole-genome
amplification uniformly increases the amount of the DNA sample by several thousand-fold
without significant amplification bias.
Figure 2 Incubating DNA to Amplify
4
Part # 15045738 Rev. A
A controlled enzymatic process fragments the amplified product. The process uses endpoint fragmentation to avoid over-fragmenting the sample.
Figure 3 Fragmenting DNA
Precipitate DNA (Post-Amp)
After an isopropanol precipitation, centrifugation at 4°C collects the fragmented DNA.
Figure 4 Precipitating DNA
Illumina Infinium HTS Assay Protocol Guide
5
Infinium HTS assay
Fragment DNA (Post-Amp)
Overview
Resuspend DNA (Post-Amp)
The precipitated DNA is resuspended in hybridization buffer.
Figure 5 Resuspending DNA
Hybridize to BeadChip (Post-Amp)
Samples are applied to a BeadChip and separated by an IntelliHyb seal (or gasket). The
loaded BeadChip is incubated overnight in the Illumina Hybridization Oven. The
amplified and fragmented DNA samples anneal to locus-specific 50-mers during
hybridization.
Figure 6 Hybridize to BeadChip
6
Part # 15045738 Rev. A
Unhybridized and non-specifically hybridized DNA is washed away and the BeadChip is
prepared for staining and extension.
Figure 7 Washing BeadChip
Extend and Stain (XStain) BeadChip (Post-Amp)
Single-base extension of the oligos on the BeadChip, using the captured DNA as a template,
incorporates detectable labels on the BeadChip and determines the genotype call for the
sample. XStain occurs in a capillary flow-through chamber.
Figure 8 Extending and Staining BeadChip
Illumina Infinium HTS Assay Protocol Guide
7
Infinium HTS assay
Wash BeadChip (Post-Amp)
Overview
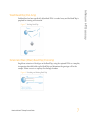
Image BeadChip (Post-Amp)
The Illumina HiScan or iScan System scans the BeadChip, using a laser to excite the
fluorophore of the single-base extension product on the beads. The scanner records highresolution images of the light emitted from the fluorophores.
Figure 9 Imaging BeadChip
8
Part # 15045738 Rev. A
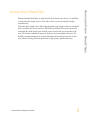
Illumina Infinium BeadChips are sophisticated silicon-based array devices. An IntelliHyb
seal separates the sample sections of the slide so that you can run multiple samples
simultaneously.
Each individual sample section holds oligonucleotide probe sequences that are attached to
beads assembled into the microwells of the BeadChip substrate. Because the microwells
outnumber the distinct bead types, multiple copies of each bead type are present in the
array. This built-in redundancy improves robustness and measurement precision. The
BeadChip manufacturing process includes hybridization-based quality controls of each
array feature, allowing consistent production of high-quality, reproducible arrays.
Illumina Infinium HTS Assay Protocol Guide
9
Illumina Infinium BeadChips
Illumina Infinium BeadChips
Overview
Illumina Lab Protocols
Illumina lab protocols are designed to promote efficiency and minimize the risk of
contamination. The Infinium Lab Setup and Procedures Guide documents standard operating
procedures and tools for an Infinium Assay lab and explains how to set up and maintain
separate pre- and post-amplification areas. Familiarize yourself with this guide before
performing any Infinium assays.
Chapter 2 Manual Protocol and Chapter 3 Automated Protocol show how to perform the
assay protocol with clearly divided pre- and post-amplification processes using a manual
and automated process respectively.
10
Part # 15045738 Rev. A
Illumina provides the following tools for sample tracking and guidance in the lab:
} Experienced User Cards to guide you through the protocols. There are separate sets of
cards for the manual and automated processes.
} Lab Tracking Form to map DNA samples to BeadChips and record the barcode of each
reagent and plate used in the protocol.
} Sample sheet template to record information about your samples for later use in data
analysis.
All of these documents are available for printing and reference at
www.illumina.com/documentation.
Sample Sheet
Illumina recommends that you create a sample sheet to track your samples and assay
effectively. The GenomeStudio application uses the sample sheet later for data analysis. For
instructions on data analysis, see the GenomeStudio User Guide or online help.
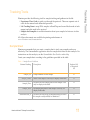
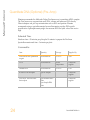
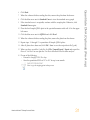
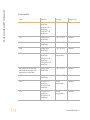
Create your sample sheet according to the guidelines provided in the table.
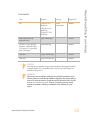
Table 1 Sample Sheet Guidelines
Column Heading
Description
Optional (O)
or Required
(R)
Unique identifier for the sample.
R
Name of the sample. Used only for display in the table.
O
Sample_Plate
The barcode of the sample plate for this sample. Used
only for display in the table.
O
Sample_Well
The sample plate well for this sample. Used only for
display in the table.
O
The barcode of the array product (BeadChip) to which
this sample was hybridized, for Manifest A.
R
Sample_ID
Sample_Name
SentrixBarcode_A
Illumina Infinium HTS Assay Protocol Guide
11
Tracking Tools
Tracking Tools
Overview
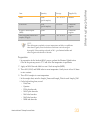
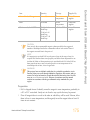
Description
SentrixPostion_A
The position within the array product to which this
sample was hybridized, for the manifests in your
project.
R
Male, Female, or Unknown.
O
A group, if any, to which this sample belongs.
O
The Sample_ID of a replicate to this sample. Used in
reproducibility error calculations.
O
Parent1
The Sample_ID of this sample’s first parent.
O
Parent2
The Sample_ID of this sample’s second parent.
O
Gender
Sample_Group
Replicate
Notes
12
Optional (O)
or Required
(R)
Column Heading
Your sample sheet header can contain whatever information you choose.
Your sample sheet can contain any number of columns you choose.
Your sample sheet must be in a comma-delimited (.csv) file format.
Commas in the sample sheet are not allowed.
Save the sample sheet under any name you wish; for example, the userdefined experiment name.
Part # 15045738 Rev. A
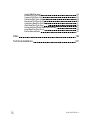
Figure 10 Sample Sheet Example
Illumina Infinium HTS Assay Protocol Guide
13
Tracking Tools
The following figure provides an example of the sample sheet format. Product
documentation includes an electronic, read-only sample sheet template file (Sample Sheet
Template.csv) that you can copy and use from www.illumina.com/documentation.
Overview
Tecan GenePaint
The Infinium HTS assay uses the GenePaint automated slide processor on the Tecan to
process BeadChips. The GenePaint system employs a capillary gap flow-through chamber
to enable reagent entrapment and exchange over the active surface of the BeadChip.
Washing, blocking, extension, and signal amplification are all performed by simple reagent
additions to the flow cell. Addition of a new reagent displaces the entrapped reagent from
the flow cell. For maximum flexibility, these additions can be performed either manually or
via the Tecan Genesis or Tecan Freedom Evo robots. The optional automated robotic
processing and single-use reagent tube barcoding assure maximum consistency from slide
to slide.
CAUTION
Do not run any other programs or applications while using the Tecan robot.
Your computer and the robot can lock up and stop a run.
14
Part # 15045738 Rev. A
BeadChips are imaged using either the Illumina HiScan System or iScan System. Both of
these systems are two-channel high-resolution laser imagers that scan BeadChips at two
wavelengths simultaneously and create an image file for each channel (i.e., two per array).
The iScan Control Software determines intensity values for each bead type and creates data
files for each channel. GenomeStudio uses this data file with the oligo pool manifest file
(*.opa), individual beadpool map (*.bpm), or manifest file (*.bgx) to analyze the data from
the assay.
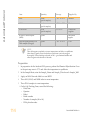
Loading and unloading the iScan System can be automated with the optional AutoLoader2
or AutoLoader 2x for the HiScan System. All AutoLoaders support unattended processing
by placing BeadChip carriers in the tray of the imaging system, so that it can scan the
BeadChips. AutoLoader features include those items listed in the table.
Table 2 AutoLoader2 and AutoLoader2x Features
Feature
AutoLoader2
AutoLoader2x
Integrated with iScan Control Software
●
●
Integrated with Illumina LIMS
●
●
Email alert system
●
●
Single-reader or dual-reader configuration
●
●
Number of BeadChips supported per carrier
4
4
Number of carriers processed at a time
48
48
Illumina Infinium HTS Assay Protocol Guide
15
Imaging Systems
Imaging Systems
Overview
GenomeStudio Integrated Informatics Platform
Illumina GenomeStudio is an integrated data analysis software platform that provides a
common environment for analyzing data obtained from Illumina microarray and
sequencing technologies. Within this common environment, or framework, the Illumina
GenomeStudio software modules allow you to perform application-specific analyses. The
Illumina GenomeStudio Genotyping Module, included with your Illumina Infinium Assay
system, is an application for extracting genotyping data from intensity data files (*.idat
files) collected from systems such as the Illumina HiScan System. For information on the
latest software offerings, including software for applications such as cytogenetics, visit
www.illumina.com.
Data analysis features of the GenomeStudio Genotyping Module include:
} Choice of assay analysis within a single application
} Data tables for information management and manipulation
} Plotting and graphing tools
} Whole-genome display of sample data in the IGV (Illumina Genome Viewer)
} Data visualization of one or more samples in the ICB (Illumina Chromosome Browser)
} Data normalization
} Custom report file formats
} Genotype calling
} Clustering
} Detection of LOH (loss of heterozygosity)
} Analysis of structural variation including CNV (copy number variation)
The GenomeStudio Genotyping Module can be fully integrated with the Illumina LIMS
server.
For feature descriptions and instructions on using the GenomeStudio platform to visualize
and analyze genotyping data, see the GenomeStudio Framework User Guide and the
GenomeStudio User Guide or online help.
16
Part # 15045738 Rev. A
Chapter 2 Manual Protocol
Introduction to Infinium HTS Manual Protocol
Infinium HTS Manual Workflow
Equipment, Materials, and Reagents
Quantitate DNA (Optional) (Pre-Amp)
Amplify DNA (Pre-Amp)
Incubate DNA (Post-Amp)
Fragment DNA (Post-Amp)
Precipitate DNA (Post-Amp)
Resuspend DNA (Post-Amp)
Hybridize to BeadChip (Post-Amp)
Wash BeadChip (Post-Amp)
Extend and Stain (XStain) BeadChip (Post-Amp)
Image BeadChip (Post-Amp)
Illumina GenomeStudio
Illumina Infinium HTS Assay Protocol Guide
18
19
20
24
32
36
37
39
43
46
62
74
94
95
17
Chapter 2
Manual Protocol
Manual Protocol
Introduction to Infinium HTS Manual Protocol
This chapter describes pre- and post-amplification manual laboratory protocols for the
Infinium HTS assay. Follow the protocols in the order shown.
18
Part # 15045738 Rev. A
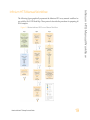
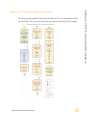
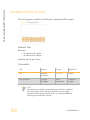
The following figure graphically represents the Infinium HTS assay manual workflow for
use with the 24x1 HTS BeadChip. These protocols describe the procedure for preparing 96
DNA samples.
Figure 11 Illumina Infinium HTS Protocol Manual Workflow
Illumina Infinium HTS Assay Protocol Guide
19
Infinium HTS Manual Workflow
Infinium HTS Manual Workflow
Manual Protocol
Equipment, Materials, and Reagents
These materials are specific to the manual Infinium HTS. For a list of other equipment,
materials, and reagents needed in a lab performing Illumina Infinium assays, see the
Infinium Lab Setup and Procedures Guide.
User-Supplied Equipment
Table 3
User-Supplied Equipment Infinium HTS Assay, Manual Protocol
Item
Catalog #
Auto-desiccator cabinet (Optional—allows
scanning of BeadChips up to three days after
processing)
VWR, catalog # 74950-342
Illumina-Supplied Equipment
Table 4 Illumina-Supplied Equipment Infinium HTS Assay, Manual Protocol
Item
Catalog #
Multi-Sample BeadChip Alignment Fixture
218528
User-Supplied Materials
Table 5 User Supplied Materials Infinium HTS Assay, Manual Protocol
20
Item
Catalog #
Tube vortexer
General lab supplier
Tube rack
VWR
Combination optical tachometer/stroboscope
Cole-Parmer, catalog # A-87700-06
Part # 15045738 Rev. A
Catalog #
Microplate centrifuge with g-force range
8–3000 × g, for dedicated pre- and post-amp
use
General lab supplier
Adapter for centrifuge plates and tubes
General lab supplier
Pipettes (two separate sets)
2 each of P-20, P-200, and P-1000
Eight-channel precision pipette (two separate
sets)
50 μl to 300 μl
Adjustable spacer multichannel pipette
(recommended)
Rainin LA8-50XLS; www.mt.com
Stop watch/timer
General lab supplier
Forceps
VWR, catalog # 25601-008
Powder-free gloves (two separate stocks)
General lab supplier
Lab coats (separate pre-PCR and post-PCR)
General lab supplier
Safety glasses (two separate stocks)
General lab supplier
15 ml conical tubes
General lab supplier
96-well 0.2 ml skirted microplates
MJ Research, catalog # MSP-9601
0.8 ml storage plate (MIDI plate), conical wellbottom
Abgene, catalog # AB-0765
Heat sealing foil sheets, Thermo-Seal
Abgene, catalog # AB-0559
96-well cap mats (pierceable, non-autoclavable)
Abgene, catalog # AB-0566
Absorbent pads
General lab supplier
Kimwipes
General lab supplier
Mild detergent, such as Alconox Powder
VWR, catalog ## 21835-032
Detergent
General lab supplier
Illumina Infinium HTS Assay Protocol Guide
Equipment, Materials, and Reagents
Item
21
Manual Protocol
Item
Catalog #
Aerosol filter pipette tips (two separate stocks)
20 μl, 200 μl, 1000 μl
Disposable pipetting troughs
VWR, catalog # 21007-970
Illumina-Supplied Materials
} WG#-MSA3 barcode labels
} WG#-DNA barcode labels
Illumina-Supplied Reagents
Table 6 Illumina-Supplied Reagents, Infinium HTS Assay, Manual Protocol
22
Item
Part #
ATM—Anti-Stain Two-Color Master Mix
11208317
FMS—Fragmentation solution
11203428
MA1—Multi-Sample Amplification 1 Mix
11202880
MA2—Multi-Sample Amplification 2 Mix
11203401
MSM—Multi-Sample Amplification Master
Mix
11203410
PB1—Reagent used to prepare BeadChips for
hybridization
11191922
PB2—Humidifying buffer used during
hybridization
11191130
PM1—Precipitation solution
11203436
RA1—Resuspension, hybridization, and wash
solution
11222442
SML—Superior Two-Color Master Mix
11288046
Part # 15045738 Rev. A
Part #
EML—Two-Color Extension Master Mix
11208309
LX1—XStain BeadChip solution 1
11208288
LX2—XStain BeadChip solution 2
11208296
XC3—XStain BeadChip solution 3
11208421
XC4—XStain BeadChip solution 4
11208430
Illumina Infinium HTS Assay Protocol Guide
Equipment, Materials, and Reagents
Item
23
Manual Protocol
Quantitate DNA (Optional) (Pre-Amp)
Illumina recommends the Molecular Probes PicoGreen assay to quantitate dsDNA samples.
The PicoGreen assay can quantitate small DNA volumes and measures DNA directly.
Other techniques can pick up contamination such as RNA and proteins. Illumina
recommends using a spectrofluorometer because fluorometry provides DNA-specific
quantification. Spectrophotometry might also measure RNA and yield values that are too
high.
Estimated Time
Hands-on time: ~20 minutes per plate plus 10 minutes to prepare the PicoGreen
Spectrofluorometer read time: ~5 minutes per plate
Consumables
24
Item
Quantity
Storage
Supplied By
PicoGreen dsDNA quantitation
reagent
See Instructions
2° to 8°C
User
1X TE
See Instructions
Room
temperature
General lab
supplier
Lambda DNA
See Instructions
2° to 8°C
User
96-well 0.65 ml microplate
1 per 96 samples
General lab
supplier
FLUOTRAC 200 96-well flatbottom plate
1 per Standard DNA
plate
1 per Sample DNA
plate
General lab
supplier
Part # 15045738 Rev. A
}
}
}
}
Thaw PicoGreen to room temperature for 60 minutes in a light-impermeable container.
Hand-label the microplate "Standard DNA".
Hand-label one of the FLUOTRAC plates "Standard QDNA".
Hand-label the other FLUOTRAC plate "Sample QDNA". This plate is for the
quantitated DNA.
} In the sample sheet, enter the Sample_Name (optional) and Sample_Plate for each
Sample_Well.
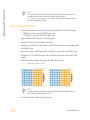
Make a Standard DNA Plate
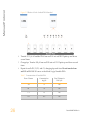
In this process, you create a Standard DNA plate with serial dilutions of stock Lambda
DNA in the wells of column 1.
1
Add stock Lambda DNA to well A1 in the plate labeled "Standard DNA" and dilute it
to 75 ng/μl in a final volume of 233.3 μl. Pipette up and down several times.
a Use the following formula to calculate the amount of stock Lambda DNA to add to
A1:
(233.3 μl) × (75 ng/μl)
=
μl of stock Lambda DNA to add to A1
(stock Lambda DNA
concentration)
b
Dilute the stock DNA in well A1 using the following formula:
μl of 1X TE to add to A1 = 233.3 μl - μl of stock Lambda DNA in well A1
2
Add 66.7 μl 1X TE to well B1.
3
Add 100 μl 1X TE to wells C, D, E, F, G, and H of column 1.
Illumina Infinium HTS Assay Protocol Guide
25
Quantitate DNA (Optional) (Pre-Amp)
Preparation
Manual Protocol
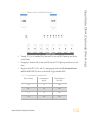
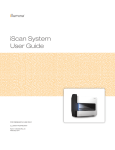
Figure 12 Dilution of Stock Lambda DNA Standard
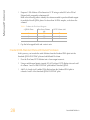
4
Transfer 133.3 μl of Lambda DNA from well A1 into well B1. Pipette up and down
several times.
5
Change tips. Transfer 100 μl from well B1 into well C1. Pipette up and down several
times.
6
Repeat for wells D1, E1, F1, and G1, changing tips each time. Do not transfer from
well G1 to H1. Well H1 serves as the blank 0 ng/μl Lambda DNA.
Table 7 Concentrations of Lambda DNA
26
Row-Column
Concentration
(ng/µl)
Final Volume in
Well (µl)
A1
75
100
B1
50
100
C1
25
100
D1
12.5
100
Part # 15045738 Rev. A
Concentration
(ng/µl)
Final Volume in
Well (µl)
E1
6.25
100
F1
3.125
100
G1
1.5262
200
H1
0
100
Quantitate DNA (Optional) (Pre-Amp)
Row-Column
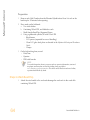
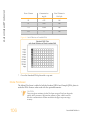
Figure 13 Serial Dilutions of Lambda DNA
7
Cover the Standard DNA plate with a cap mat.
Dilute PicoGreen
The diluted PicoGreen is added to both the Standard QDNA and Sample QDNA plates to
make the DNA fluoresce when read with the spectrofluorometer.
CAUTION
Do not use glass containers for the PicoGreen reagent. PicoGreen degrades
quickly in the presence of light and can adhere to glass, which lowers its
effective concentration in solution and effects the upper response range
accuracy.
Illumina Infinium HTS Assay Protocol Guide
27
Manual Protocol
1
Prepare a 1:200 dilution of PicoGreen into 1X TE using a sealed 100 ml or 250 ml
Nalgene bottle wrapped in aluminum foil.
Refer to the following table to identify the volumes needed to produce diluted reagent
for multiple 96-well QDNA plates. For fewer than 96 DNA samples, scale down the
volumes.
Table 8 Volumes for PicoGreen Reagents
# QDNA Plates
PicoGreen Volume
(µl)
1
115
2
215
3
315
2
1X TE Volume (ml)
23
43
63
Cap the foil-wrapped bottle and vortex to mix.
Create QDNA Standard Plate with Diluted PicoGreen
In this process, you transfer the serial dilutions from the Standard DNA plate into the
Standard QDNA FLUOTRAC plate and add diluted PicoGreen.
28
1
Pour the PicoGreen/1X TE dilution into a clean reagent reservoir.
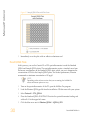
2
Using a multichannel pipette, transfer 195 μl PicoGreen/1X TE dilution into each well
of columns 1 and 2 of the FLUOTRAC plate labeled "Standard QDNA".
3
Add 2 μl of each stock Lambda DNA dilution from the Standard DNA plate to
columns 1 and 2 of the Standard QDNA FLUOTRAC plate.
Part # 15045738 Rev. A
4
Immediately cover the plate with an adhesive aluminum seal.
Prepare QDNA Sample Plate with PicoGreen and DNA
In this process, you create a new Sample QDNA plate that contains DNA sample and
PicoGreen.
1
Using a multichannel pipette, transfer 195 μl PicoGreen/1xTE dilution into each well of
the FLUOTRAC plate labeled "Sample QNT" for each well that will contain sample.
2
Add 2 μl of DNA sample to each well containing PicoGreen/1xTE.
Illumina Infinium HTS Assay Protocol Guide
29
Quantitate DNA (Optional) (Pre-Amp)
Figure 14 Standard QDNA Plate with PicoGreen
Manual Protocol
Figure 15 Sample QDNA Plate with PicoGreen
3
Immediately cover the plate with an adhesive aluminum seal.
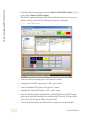
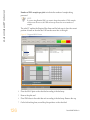
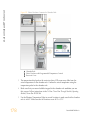
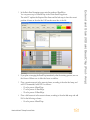
Read QDNA Plate
In this process, you use the Gemini XS or XPS spectrofluorometer to read the Standard
QDNA and Sample QDNA plates. The spectrofluorometer creates a standard curve from
the known concentrations in the Standard QDNA plate, which you use to determine the
concentration of DNA in the Sample QDNA plates. For the best performance, Illumina
recommends a minimum concentration of 50 ng/μl.
NOTE
Depending on the software version that you are running, the SoftMax Pro
screens and menu options can vary.
30
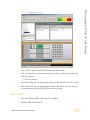
1
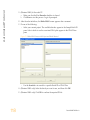
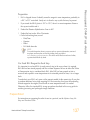
Turn on the spectrofluorometer. At the PC, open the SoftMax Pro program.
2
Load the Illumina QDNA.ppr file from the installation CD that came with your system.
3
Select Protocols | GTS_QDNA.
4
Place the Standard QDNA FLUOTRAC Plate into the spectrofluorometer loading rack
with well A1 in the upper left corner.
5
Click the blue arrow next to Illumina QDNA | SQDNA_STD.
Part # 15045738 Rev. A
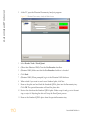
Click Read.
7
When the software finishes reading the data, remove the plate from the drawer.
8
Click the blue arrow next to Standard Curve to view the standard curve graph.
9
If the standard curve is acceptable, continue with the sample plate. Otherwise, click
Standard Curve again.
10 Place the first Sample QDNA plate in the spectrofluorometer with well A1 in the upper
left corner.
11 Click the blue arrow next to SQDNA and click Read.
12 When the software finishes reading the plate, remove the plate from the drawer.
13 Repeat steps 10 through 12 to quantitate all Sample QDNA plates.
14 After all plates have been read, click File | Save to save the output data file (*.pda).
15 When you have saved the *.pda file, click File | Import/Export | Export and export the
file as a *.txt file. You can open the *.txt file in Microsoft Excel for data analysis.
16 Do one of the following:
• Proceed to Amplify DNA (Pre-Amp.
• Store the quantitated DNA at 2°C to 8°C for up to one month.
SAFE STOPPING POINT
Now is a good stopping point in the process.
Illumina Infinium HTS Assay Protocol Guide
31
Quantitate DNA (Optional) (Pre-Amp)
6
Manual Protocol
Amplify DNA (Pre-Amp)
This process creates an MSA3 plate for DNA amplification. MA1 is first added to the
MSA3 plate, followed by the DNA samples. Next, the 0.1N NaOH is added to denature the
DNA samples. The MA2 reagent neutralizes the sample. Lastly, Multi-Sample
Amplification Master Mix (MSM) is added to the plate.
Figure 16 Denaturing and Neutralizing BCD
Estimated Time
Hands-on time:
• 45 minutes for 48 samples
• 60 minutes for 96 samples
Incubation time: 20–24 hours
Consumables
32
Item
Quantity
Storage
Supplied By
MA1
1 tube
(per 96 samples)
-15°C to -25°C
Illumina
MA2
1 tube
(per 96 samples)
-15°C to -25°C
Illumina
Part # 15045738 Rev. A
Quantity
Storage
Supplied By
MSM
1 tube
(per 96 samples)
-15°C to -25°C
Illumina
0.1N NaOH
15 ml
(per 96 samples)
2°C to 8°C
General lab
supplier
96-well 0.8 ml microplate
(MIDI)
1 plate
WG#-DNA plate with 96 DNA
samples (50 ng/μl)
1 plate
General lab
supplier
-15°C to -25°C
User
NOTE
Thaw all reagents completely at room temperature and allow to equilibrate.
After thawed, gently invert each tube several times to mix the reagent
thoroughly. Pulse centrifuge each tube to 280 × g to eliminate bubbles and
collect reagent at the bottom of the tube.
Preparation
} In preparation for the Incubate MSA3 process, preheat the Illumina Hybridization
Oven in the post-amp area to 37°C and allow the temperature to equilibrate.
17 Apply an MSA3 barcode label to a new 0.8 ml microplate (MIDI).
18 Thaw MA1, MA2, and MSM tubes to room temperature. Gently invert at least 10 times
to mix contents.
19 Thaw DNA samples to room temperature.
} In the sample sheet, enter the Sample_Name and Sample_Plate for each Sample_Well.
} On the lab tracking form, record:
• Date/Time
• Operator
• DNA plate barcode
• MSA3 plate barcodes
• MA1 tube barcodes
• MA2 tube barcodes
• MSM tube barcodes
Illumina Infinium HTS Assay Protocol Guide
33
Amplify DNA (Pre-Amp)
Item
Manual Protocol
NOTE
To record information about your assay such as operator information, start and
stop times, and barcodes, use the lab tracking form provided at
www.illumina.com/documentation. This form can be filled out and saved online,
or printed and filled in by hand.
Steps to Make MSA3 Plate
1
If you do not already have a WG#-DNA plate, add DNA into one of the following:
• MIDI plate: 20 μl to each WG#-DNA plate well
• TCY plate: 10 μl to each WG#-DNA plate well
Apply a barcode label to the new WG#-DNA plate.
2
Dispense 20 μl MA1 into the MSA3 plate wells.
3
Transfer 4 μl of the DNA sample from the WG#-DNA plate to the corresponding wells
in the MSA3 plate.
4
Record the location of the original DNA sample ID for each well in the MSA3 plate.
5
Dispense 4 μl 0.1N NaOH into each well of the MSA3 plate that contains MA1 and
sample.
Refer to the following figure throughout the Make MSA3 process.
Figure 17 Distributing Sample to Wells
NOTE
To ensure optimal performance, exchange tips between DNA samples and use
aerosol filter tips when pipetting DNA.
6
34
Seal the MSA3 plate with the 96-well cap mat.
Part # 15045738 Rev. A
7
Vortex the plate at 1600 rpm for 1 minute.
8
Centrifuge to 280 × g for 1 minute.
9
Incubate for 10 minutes at room temperature.
10 Carefully remove the cap mat.
When you remove a cap mat, set it aside, upside down, in a safe location for use later
in the protocol.
11 Dispense 34 μl MA2 into each well of the MSA3 plate containing sample.
NOTE
To ensure optimal performance, place the tips against the top edge of the wells.
Use this technique for all subsequent dispensing steps.
12 Dispense 38 μl MSM into each well of the MSA3 plate containing sample.
13 Seal MSA3 plate with cap mat.
When you place the cap mat back on the plate, be sure to match it to its original plate
and orient it correctly.
14 Vortex the sealed MSA3 plate at 1600 rpm for 1 minute.
15 Pulse centrifuge to 280 × g.
16 Discard unused reagents in accordance with facility standards.
17 Proceed immediately to the next step.
Illumina Infinium HTS Assay Protocol Guide
35
Amplify DNA (Pre-Amp)
CAUTION
Orient the cap mat so that A1 on the cap matches A1 on the plate. To prevent
evaporation and spills, which could lead to assay variability and crosscontamination, make sure that all 96 caps are securely seated.
Manual Protocol
Incubate DNA (Post-Amp)
This process incubates the MSA3 plate for 20–24 hours at 37°C in the Illumina
Hybridization Oven. The process uniformly amplifies the genomic DNA, generating a
sufficient quantity of each individual DNA sample to be used when in the Infinium HTS
assay.
Figure 18 Incubating DNA to Amplify
Estimated Time
Incubation time: 20–24 hours
Steps to Incubate the MSA3 Plate
OVERNIGHT INCUBATION
Incubate MSA3 plate in the Illumina Hybridization Oven for at least 20 hours but no more
than 24 hours at 37°C.
18 Record the start and stop times on the lab tracking form.
NOTE
To record information about your assay such as operator information, start and
stop times, and barcodes, use the lab tracking form provided at
www.illumina.com/documentation. This form can be filled out and saved online,
or printed and filled in by hand.
19 Proceed to the next step.
36
Part # 15045738 Rev. A
Fragment DNA (Post-Amp)
Fragment DNA (Post-Amp)
This process enzymatically fragments the amplified DNA samples. An end-point
fragmentation is used to prevent over-fragmentation.
Figure 19 Fragmenting DNA
Estimated Time
Hands-on time: ~30 minutes for 96 samples
Incubation time: 1 hour
Consumables
Item
Quantity
Storage
Supplied By
FMS
1 tube (per 96
samples)
-15°C to -25°C
Illumina
Preparation
1
Preheat the heat block with the MIDI plate insert to 37°C.
2
Thaw FMS tubes to room temperature.
3
Gently invert the FMS tubes at least 10 times to mix contents.
Pulse centrifuge to 280 × g.
4
Remove the MSA3 plate from the Illumina Hybridization Oven.
5
On the lab tracking form, record:
• Date/Time
Illumina Infinium HTS Assay Protocol Guide
37
Manual Protocol
• Operator
• FMS tube barcodes
NOTE
To record information about your assay such as operator information, start and
stop times, and barcodes, use the lab tracking form provided at
www.illumina.com/documentation. This form can be filled out and saved online,
or printed and filled in by hand.
Steps to Fragment the MSA3 Plate
1
Pulse centrifuge the plate to 50 × g.
2
Carefully remove the cap mat.
3
Add 25 μl FMS to each well containing sample.
4
Seal the MSA3 plate with the 96-well cap mat.
CAUTION
Orient the cap mat so that A1 on the cap matches A1 on the plate. To prevent
evaporation and spills, which could lead to assay variability and crosscontamination, make sure that all 96 caps are securely seated in the wells.
5
Vortex the plate at 1600 rpm for 1 minute.
6
Centrifuge the plate to 50 × g at 22°C for 1 minute.
7
Place the sealed plate on the 37°C heat block for 1 hour.
8
Record the start and stop times on the lab tracking form.
9
Discard unused reagents in accordance with facility standards.
10 Do one of the following:
• Continue to the next step, Precipitate the DNA (Post-Amp). Leave plate in 37°C heat
block until setup is complete. Do not leave the plate in the 37°C heat block for
longer than 2 hours.
• If you do not plan to proceed to the next step immediately, store the sealed WG#DNA plate at -15°C to -25°C.
SAFE STOPPING POINT
Now is a good stopping point in the process.
38
Part # 15045738 Rev. A
Precipitate DNA (Post-Amp)
Precipitate DNA (Post-Amp)
Add PM1 and 2-propanol to the MSA3 plate to precipitate the DNA samples.
Figure 20 Precipitating DNA
Estimated Time
Hands-on time: ~30 minutes for 96 samples
Incubation and dry time: 2 hours
Consumables
Item
Quantity
Storage
Supplied By
PM1
1 tube (per 96 samples)
2°C to 8°C
Illumina
100% 2-propanol
30 ml (per 96 samples)
Room
temperature
General lab
supplier
CAUTION
Pour only the recommended reagent volume needed for the suggested number
of samples listed in the Consumables table of each section. Some reagents are
used later in the protocol.
Preparation
1
Do one of the following:
• If you froze the MSA3 plate after fragmentation, thaw it to room temperature, then
pulse centrifuge to 280 × g.
Illumina Infinium HTS Assay Protocol Guide
39
Manual Protocol
• If you proceeded immediately from Fragment the MSA3 Plate, leave the plate in the
37°C heat block until setup is complete.
2
Preheat heat block to 37°C.
3
Thaw PM1 to room temperature. Centrifuge to 280 × g for 1 minute.
4
Remove the 96-well cap mat.
} On the lab tracking form, record:
• Date/Time
• Operator
• PM1 tube barcodes
• 2-propanol lot number and date opened
NOTE
To record information about your assay such as operator information, start and
stop times, and barcodes, use the lab tracking form provided at
www.illumina.com/documentation. This form can be filled out and saved online,
or printed and filled in by hand.
Steps to Precipitate the MSA3 Plate
1
Add 50 μl PM1 to each MSA3 plate well containing sample.
2
Seal the plate with the cap mat.
3
Vortex the plate at 1600 rpm for 1 minute.
4
Incubate at 37°C for 5 minutes.
5
Pulse centrifuge to 280 × g for 1 minute.
NOTE
Set centrifuge to 4°C in preparation for the next centrifuge step.
6
Carefully remove the cap mat and discard it.
7
Add 155 μl 100% 2-propanol to each well containing sample.
8
Carefully seal the MSA3 plate with a new, dry cap mat, taking care not to shake the
plate in any way until the cap mat is fully seated.
9
Invert the plate at least 10 times to mix contents thoroughly.
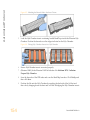
10 Incubate at 4°C for 30 minutes.
40
Part # 15045738 Rev. A
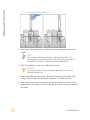
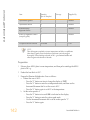
Figure 21 Sealed MSA3 Plate and Plate of Equal Balance in Centrifuge
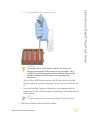
12 Centrifuge to 3,000 × g at 4°C for 20 minutes. Immediately remove the MSA3 plate from
centrifuge.
CAUTION
Perform the next step immediately to avoid dislodging the blue pellet. If any delay
occurs, repeat the 20 minute centrifugation before proceeding.
13 Remove the cap mat and discard it.
14 Quickly invert the MSA3 plate and drain the liquid onto an absorbent pad to decant
the supernatant. Then smack the plate down on a dry area of the pad, avoiding the
liquid that was drained onto the pad.
15 Tap firmly several times for 1 minute or until all wells are devoid of liquid.
CAUTION
Keep plate inverted. To ensure optimal performance, do not allow supernatant in wells
to pour into other wells.
Illumina Infinium HTS Assay Protocol Guide
41
Precipitate DNA (Post-Amp)
11 Place the sealed MSA3 plate in the centrifuge opposite another plate of equal weight.
Manual Protocol
16 Leave the uncovered, inverted plate on the tube rack for 1 hour at room temperature to
air dry the pellet.
At this point, blue pellets should be present at the bottoms of the wells.
Figure 22 Uncovered MSA3 Plate Inverted for Air Drying
CAUTION
Do not over-dry the pellet. Pellets that are over-dried are difficult to resuspend. Poorly
resuspended samples leads to poor data quality.
17 Enter the start and stop times on the lab tracking form.
18 Discard unused reagents in accordance with facility standards.
19 Do one of the following:
• Continue to the next step, Resuspend DNA (Post-Amp).
• If you do not plan to proceed to the next step immediately, seal the MSA3 plate
with a new cap mat and store it at -15°C to -25°C.
SAFE STOPPING POINT
Now is a good stopping point in the process.
42
Part # 15045738 Rev. A
Resuspend DNA (Post-Amp)
Resuspend DNA (Post-Amp)
Add RA1 to the MSA3 plate to resuspend the precipitated DNA samples.
Figure 23 Resuspending DNA
Estimated Time
Hands-on time: ~30 minutes for 96 samples
Incubation time: 1 hour
Consumables
Item
Quantity
Storage
Supplied By
RA1
7 ml per 96 samples
-15°C to -25°C
Illumina
NOTE
Pour out only the recommended volume of RA1 needed for the suggested
number of samples listed in the consumables table. Additional RA1 is used later
in the XStain BeadChip step.
WARNING
This protocol uses an aliphatic amide that is a probable reproductive toxin.
Personal injury can occur through inhalation, ingestion, skin contact, and eye
contact. For more information, consult the material data safety sheet for this
assay at www.illumina.com/msds. Dispose of containers and any unused
contents in accordance with the governmental safety standards for your
region.
Illumina Infinium HTS Assay Protocol Guide
43
Manual Protocol
Preparation
1
If you stored the MSA3 plate at -15°C to -25°C, thaw it to room temperature. Remove
the cap mat and discard it.
2
Preheat the Illumina Hybridization Oven to 48°C.
3
Turn on the heat sealer to preheat. Allow 20 minutes.
4
RA1 is shipped frozen. Gradually warm the reagent to room temperature, preferably in
a 20°C to 25°C water bath. Gently mix to dissolve any crystals that can be present. 5
On
•
•
•
the lab tracking form, record:
Date/Time
Operator
RA1 bottle barcodes
NOTE
To record information about your assay such as operator information, start and
stop times, and barcodes, use the lab tracking form provided at
www.illumina.com/documentation. This form can be filled out and saved online,
or printed and filled in by hand.
Use Fresh RA1 Reagent for Each Step
It is important to use fresh RA1 for each protocol step in the assay where it is required.
RA1 that has been stored properly and has not been dispensed for use in either the XStain
or Resuspension step is considered fresh RA1. After RA1 has been poured out into a
reservoir and exposed to room temperature air for extended periods of time, it is no longer
fresh.
To make best use of RA1, only pour out the amount needed for the current step. If you plan
to perform additional assay steps requiring RA1 that same day, then leave the remaining
thawed reagent in the original, closed bottle at room temperature until it is needed.
Otherwise, follow the standard RA1 storage procedures described in this assay guide for
next-day processing and prolonged storage conditions.
Steps to Resuspend the MSA3 Plate
1
44
Add 23 μl RA1 to each well of the MSA3 plate containing a DNA pellet.
Reserve any leftover reagent for XStain BeadChip.
Part # 15045738 Rev. A
Apply a foil heat seal to the MSA3 plate by firmly and evenly holding the heat sealer
sealing block down for 5 seconds.
3
Place the sealed plate in the Illumina Hybridization Oven and incubate for 1 hour at
48°C.
4
Vortex the plate at 1800 rpm for 1 minute.
5
Pulse centrifuge to 280 × g.
NOTE
If you store the pellets at -15° to -25°C for extended periods of time after the
precipitate process, you might need to repeat the vortexing and centrifugation
in the previous steps until the pellets are completely resuspended.
6
Discard unused reagents in accordance with facility standards.
7
Do one of the following:
• Continue to the next step, Hybridize Multi BeadChip. If you plan to do so
immediately, it is safe to leave the MSA3 plate at room temperature for up to 1
hour.
• If you do not plan to proceed to the next step immediately, store the sealed MSA3
plate at -15°C to -25°C for no more than 24 hours. For more than 24 hours, store at
80°C. Store RA1 at -15°C to -25°C.
SAFE STOPPING POINT
Now is a good stopping point in the process.
Illumina Infinium HTS Assay Protocol Guide
45
Resuspend DNA (Post-Amp)
2
Manual Protocol
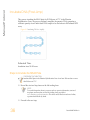
Hybridize to BeadChip (Post-Amp)
In this process, you dispense the fragmented and resuspended DNA samples onto
BeadChips. Place the DNA-loaded BeadChips into the Hyb Chamber inserts, and then
place the inserts into the Hyb Chambers. Incubate the Hyb Chambers in the Illumina
Hybridization Oven for 16–24 hours at 48°C.
Figure 24 Hybridize Multi-BeadChip
Estimated Time
Hands-on time:
• 24x1 HTS BeadChip: ~16 minutes for 4 BeadChips (96 samples)
Incubation time: 16–24 hours
Consumables
Item
Quantity
Storage
Supplied By
Room
temperature
Illumina
(per 96 Samples)
46
PB2
1 tube
BeadChips
4
Illumina
Hyb Chambers
1
Illumina
Hyb Chamber gaskets
1
Illumina
Hyb Chamber inserts
4
Illumina
Part # 15045738 Rev. A
Preparation
1
If frozen, thaw MSA3 plate to room temperature, and then pulse centrifuge the MSA3
plate to 280 × g.
2
Preheat the heat block to 95°C.
3
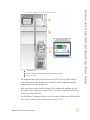
Prepare the Illumina Hybridization Oven as follows:
a Preheat the oven to 48°C:
— Press the "F" button one time to change the display to TSET.
— Press the "S" button to enter the set-temperature mode, and then use the
Increment/Decrement dial to set the oven to 48°C.
— Press the "S" button again to set 48°C as the temperature.
b Set the rocker speed to 5:
— Press the "F" button twice until SPd is indicated on the display.
— Press the "S" button to enter the rocker speed mode.
— Use the Increment/Decrement dial to set the rocker speed to "5".
— Press the "S" button again.
4
Calibrate the Illumina Hybridization Oven with the Full-Scale Plus digital thermometer
supplied with your system.
5
On
•
•
•
the lab tracking form, record:
Date/Time
Operator
PB2 tube lot number
NOTE
To record information about your assay such as operator information, start and
stop times, and barcodes, use the lab tracking form provided at
www.illumina.com/documentation. This form can be filled out and saved online,
or printed and filled in by hand.
Illumina Infinium HTS Assay Protocol Guide
47
Hybridize to BeadChip (Post-Amp)
CAUTION
Pour only the recommended reagent volume needed for the suggested number
of samples listed in the Consumables table of each section. Some reagents are
used later in the protocol.
Manual Protocol
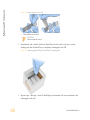
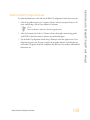
Assemble the Hybridization Chambers
1
Place the resuspended MSA3 plate on the heat block to denature the samples at 95°C
for 20 minutes.
2
Remove the BeadChips from 2°C to 8°C storage, leaving the BeadChips in their plastic
bags and mylar packages until you are ready to begin hybridization.
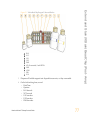
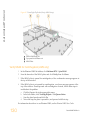
3
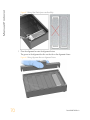
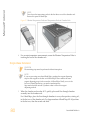
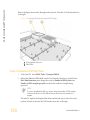
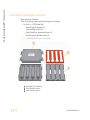
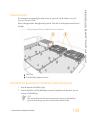
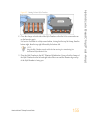
During the 20 minute incubation, prepare the Hyb Chambers.
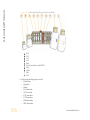
Place the following items on the benchtop for use in this procedure:
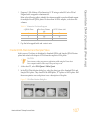
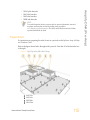
Figure 25 BeadChip Hyb Chamber Components
A
B
C
48
BeadChip Hyb Chambers
Hyb Chamber Gaskets
Hyb Chamber Inserts
Part # 15045738 Rev. A
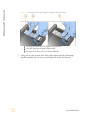
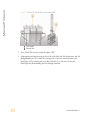
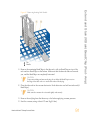
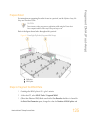
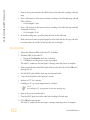
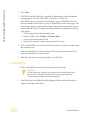
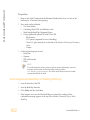
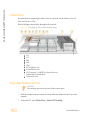
a
Place the BeadChip Hyb Chamber gaskets into the BeadChip Hyb Chambers.
— Match the wider edge of the Hyb Chamber Gasket to the barcode-ridge side of
the Hyb Chamber.
Figure 26 Hyb Chamber and Gasket
A
B
C
D
Reservoirs
Barcode Ridges
Narrower Edges
Wider Edges
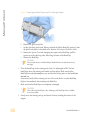
— Lay the gasket into the Hyb Chamber, and then press it down all around.
Illumina Infinium HTS Assay Protocol Guide
49
Hybridize to BeadChip (Post-Amp)
NOTE
To ensure optimal results from Hyb Chambers, keep the Hyb Chamber lids and
bases together. Adopt a labeling convention that keeps each Hyb Chamber base
paired with its original lid. Check Hyb Chamber lid-base pairs regularly to
make sure that the fit remains secure. Check hinges regularly for any signs of
abnormal wear or loose fittings. It is important that the hinges provide
adequate clamping strength to ensure an airtight seal between the lid and the
base. Record the Hyb Chamber that was used for each BeadChip, so that Hyb
Chambers can be investigated and evaluated in the event of sample evaporation
or other lab processing anomalies.
Manual Protocol
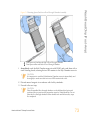
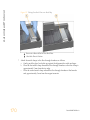
Figure 27 Placing Gasket into Hyb Chamber
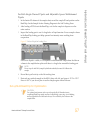
— Make sure the Hyb Chamber gaskets are properly seated.
Figure 28 Hyb Chamber with Gasket in Place
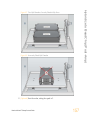
b
50
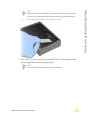
Dispense 400 μl PB2 into the humidifying buffer reservoirs in the Hyb Chambers.
Part # 15045738 Rev. A
Hybridize to BeadChip (Post-Amp)
Figure 29 Dispensing PB2 into Hyb Chamber Reservoir
WARNING
Do not replace PB2 in the Hyb Chamber with RA1. RA1 decreases the
stringency and can negatively affect sample call rates and logRdev. PB2 is
formulated to produce the appropriate amount of humidity within the Hyb
Chamber environment to prevent sample from evaporating during
hybridization.
c
d
After you fill the Hyb Chamber reservoirs with PB2, place the lid on the Hyb
Chamber right away to prevent evaporation. It is not necessary to lock down the
lid.
Leave the closed Hyb Chambers on the bench at room temperature until the
BeadChips are loaded with DNA sample. Load BeadChips into the Hyb Chamber
within one hour.
NOTE
You can also prepare the Hyb Chambers later, during the 30 minute cool down.
Illumina Infinium HTS Assay Protocol Guide
51
Manual Protocol
4
After the 20 minute incubation, remove the MSA3 plate from the heat block and place
it on the benchtop at room temperature for 30 minutes.
5
After the 30 minute cool down, pulse centrifuge the MSA3 plate to 280 × g. Remove the
foil seal.
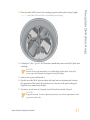
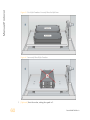
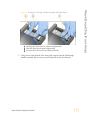
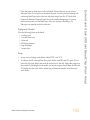
Load BeadChip
1
Just before loading DNA samples, remove all BeadChips from their plastic bags and
mylar packages.
CAUTION
Hold the BeadChip by the ends with your thumb and forefinger (thumb at the
barcode end). Do not hold the BeadChip by the sides near the sample inlets.
Avoid contacting the beadstripe area and sample inlets.
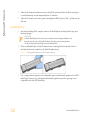
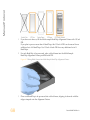
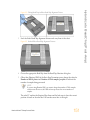
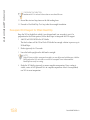
2
Place each BeadChip in a Hyb Chamber insert, orienting the barcode end so that it
matches the barcode symbol on the Hyb Chamber insert.
Figure 30 Placing BeadChips into Hyb Chamber Inserts
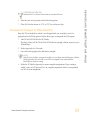
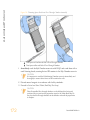
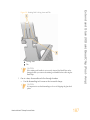
3
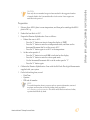
52
Use a single-channel pipette or an adjustable spacer multichannel pipette to load HTS
BeadChips. Do not use a standard multichannel pipette because the spacing is not
compatible with the HTS BeadChip.
Part # 15045738 Rev. A
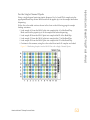
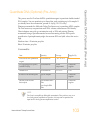
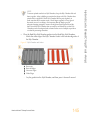
Using a single-channel precision pipette, dispense 14 μl of each DNA sample onto the
appropriate BeadChip section. Make sure that the pipette tip is in the sample inlet before
dispensing.
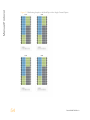
Follow the color-coded sections shown in the chart on the following page for sample
loading assistance.
} Load sample A1 from the MSA3 plate into sample inlet A1 of the BeadChip.
Make sure that the pipette tip is in the sample inlet before dispensing.
} Load sample B1 from the MSA3 plate into sample inlet B1 of the BeadChip.
} Load sample C1 from the MSA3 plate into sample inlet C1 of the BeadChip.
} Load sample D1 from the MSA3 plate into sample inlet D1 of the BeadChip.
} Continue in this manner, using the color-coded chart until all samples are loaded.
Figure 31 Distributing Sample from the MSA3 Plate with a Single-Channel Pipette
Illumina Infinium HTS Assay Protocol Guide
53
Hybridize to BeadChip (Post-Amp)
For the Single-Channel Pipette
Manual Protocol
Figure 32 Distributing Sample to the BeadChips with a Single-Channel Pipette
54
Part # 15045738 Rev. A
Using an adjustable spacer multichannel precision pipette, dispense 14 μl of each DNA
sample onto the appropriate BeadChip section. Make sure that the pipette tip is in the
sample inlet before dispensing.
Follow the color-coded sections shown in the chart on the following page for sample
loading assistance.
} Load samples A1-A6 from the MSA3 plate into sample inlet ports A1-A6, on the left
side of the BeadChip, in every other inlet port.
Make sure that the pipette tip is in the sample inlet before dispensing.
} Load samples B1-B6 from the MSA3 plate into sample inlet ports B1-B6, on the left side
of the BeadChip, in every other inlet port.
} Load samples C1-C6 from the MSA3 plate into sample inlet ports C1-C6, on the right
side of the BeadChip, in every other inlet port.
} Load samples D1-D6 from the MSA3 plate into sample inlet ports D1-D6, on the right
side of the BeadChip, in every other inlet port.
} Continue in this manner, using the color-coded chart until all samples are loaded.
Figure 33 Distributing Sample from the MSA3 Plate with an Adjustable Multi--Channel Pipette
Illumina Infinium HTS Assay Protocol Guide
55
Hybridize to BeadChip (Post-Amp)
For the MultiChannel Pipette
Manual Protocol
Figure 34 Distributing Sample to the BeadChips with an Adjustable Multichannel Pipette
56
Part # 15045738 Rev. A
1
In the Sentrix ID column of the sample sheet, record the sample ID and position on the
BeadChip. See the Sample Section Naming Diagram in the Lab Tracking Form.
2
After loading all DNA onto the BeadChip, wait for the sample to disperse over the
entire surface.
3
Inspect the loading port to see if a large bolus of liquid remains. Excess sample volume
in the BeadChip loading port helps prevent low-intensity areas resulting from
evaporation.
Figure 35 Bolus of Liquid at Loading Port
If no excess liquid is visible, it is acceptable to add additional sample from the leftover
volume in the amplification plate until there is a large bolus around the loading port.
NOTE
Do not top off with RA1 (sample hybridization buffer) because RA1 dilutes the
sample.
4
Record the top-off activity on the lab tracking form.
5
Heat-seal any residual sample in the MSA3 plate with foil, and store at -15°C to -25°C.
Store at -80°C if you do not plan to use the sample again within 24 hours.
Set up Multi BeadChip for Hybridization
CAUTION
For optimal performance, take care to keep the Hyb Chamber inserts
containing BeadChips steady and level when lifting or moving. Avoid shaking
and keep parallel to the lab bench always. Do not hold by the sides near the
sample inlets.
Illumina Infinium HTS Assay Protocol Guide
57
Hybridize to BeadChip (Post-Amp)
For Both Single-Channel Pipette and Adjustable Spacer Multichannel
Pipette
Manual Protocol
1
Load the Hyb Chamber inserts containing BeadChips into the Illumina Hyb Chamber.
Position the barcode end over the ridges indicated on the Hyb Chamber.
WARNING
Keep Hyb Chambers at room temperature when you load the BeadChips.
Do not precondition the Hyb Chambers in the Illumina Hybridization Oven
before loading the BeadChips. If you heat the PB2 and then open the Hyb
Chamber to add BeadChips, some of the PB2 evaporates, leading to a
change in the osmolality of PB2 and an imbalance in the vapor pressure
between PB2 and RA1 (sample hybridization buffer).
Figure 36 Placing Hyb Chamber Inserts into the Hyb Chamber 2
Place the back side of lid onto the Hyb Chamber and then slowly bring down the front
end to avoid dislodging the Hyb Chamber inserts.
Figure 37 Seating Lid onto Hyb Chamber 3
58
Close the clamps on both sides of the Hyb Chamber so that the lid is secure and even
on the base (no gaps). It is best to close the clamps in a kitty-corner fashion, closing
first the top left clamp, then the bottom right, then the top right followed by the bottom
left.
Part # 15045738 Rev. A
4
Place the Hyb Chamber in the 48°C Illumina Hybridization Oven so that the clamps of
the Hyb Chamber face the left and right side of the oven and the Illumina logo on top
of the Hyb Chamber is facing you.
CAUTION
After loading the BeadChips into the Hyb Chambers, place the Hyb Chambers
into the Illumina Hybridization Oven immediately. Do not modify the
hybridization environment by adding additional fixtures or humidifying
elements. Leave the Hyb Chambers in the oven at the correct orientation and
temperature until hybridization is complete. Changes to the hybridization
environment can have unexpected effects on data quality.
Figure 38 Hyb Chamber Correctly Placed in Hyb Oven
NOTE
If you are stacking multiple Hyb Chambers in the Illumina Hybridization Oven,
make sure the feet of the top Hyb Chamber fit into the matching indents on top
of the bottom Hyb Chamber. This holds the Hyb Chambers in place while they
are rocking. You can stack up to 3 Hyb Chambers per row for a maximum of 6
Hyb Chambers total in the Illumina Hybridization Oven.
Illumina Infinium HTS Assay Protocol Guide
59
Hybridize to BeadChip (Post-Amp)
NOTE
Keep the Hyb Chamber steady and level when moving it or transferring it to
the Illumina Hybridization Oven.
Manual Protocol
Figure 39 Two Hyb Chambers Correctly Placed in Hyb Oven
Figure 40 Incorrectly Placed Hyb Chamber
5
60
[Optional] Start the rocker, setting the speed to 5.
Part # 15045738 Rev. A
6
Enter the start and stop times on the lab tracking form.
7
Place RA1 into the freezer at -15°C to -25°C for use the next day.
Resuspend XC4 Reagent for XStain BeadChip
Keep the XC4 in the bottle in which it was shipped until you are ready to use it. In
preparation for the XStain protocol, follow these steps to resuspend the XC4 reagent.
1
Add 330 ml 100% EtOH to the XC4 bottle.
The final volume will be 350 ml. Each XC4 bottle has enough solution to process up to
24 BeadChips.
2
Shake vigorously for 15 seconds.
3
Leave the bottle upright on the lab bench overnight.
NOTE
If the XC4 was not left to resuspend overnight, you can still proceed with the assay. Add the
EtOH and put the XC4 on its side on a rocker to resuspend. Leave it there until the
BeadChips are ready for coating.
4
Shake the XC4 bottle vigorously to ensure complete resuspension. If any coating is
visible, vortex at 1625 rpm until it is in complete suspension. After it is resuspended,
use XC4 at room temperature.
Illumina Infinium HTS Assay Protocol Guide
61
Hybridize to BeadChip (Post-Amp)
OVERNIGHT INCUBATION
Incubate at 48°C for at least 16 hours but no more than 24 hours.
Manual Protocol
Wash BeadChip (Post-Amp)
Remove the cover seals from the BeadChips and wash the BeadChips in two separate PB1
reagent washes. Then, assemble the BeadChips into flow-through chambers under the PB1
buffer.
Figure 41 Washing BeadChip
Estimated Time
• 20 minutes for 4 BeadChips
• 30 minutes for 8 BeadChips
62
Part # 15045738 Rev. A
Item
Quantity
Storage
Supplied By
PB1
550 ml for 1 to 8
BeadChips
700 ml for 9 to 16
BeadChips
850 ml for 17 to 24
BeadChips
Room
temperature
Illumina
Multi-sample BeadChip
alignment fixture
1 (per 8 BeadChips)
Illumina
Te-Flow LCG flow-through
chambers, with black frames,
LCG spacers, LCG glass back
plates, and clamps
1 (per BeadChip)
Illumina
Wash dish
2 (up to 8 BeadChips)
Illumina
Wash rack
1 (up to 8 BeadChips)
Illumina
CAUTION
Pour only the recommended reagent volume needed for the suggested number
of samples listed in the Consumables table of each section. Some reagents are
used later in the protocol.
WARNING
This protocol uses an aliphatic amide that is a probable reproductive toxin.
Personal injury can occur through inhalation, ingestion, skin contact, and eye
contact. For more information, consult the material data safety sheet for this
assay at www.illumina.com/msds. Dispose of containers and any unused
contents in accordance with the governmental safety standards for your
region.
Illumina Infinium HTS Assay Protocol Guide
63
Wash BeadChip (Post-Amp)
Consumables
Manual Protocol
Preparation
1
Remove each Hyb Chamber from the Illumina Hybridization Oven. Let cool on the
benchtop for 30 minutes before opening.
2
Have ready on the lab bench:
a Two wash dishes:
b Containing 200 ml PB1, and labeled as such
c Multi-Sample BeadChip Alignment Fixture
d Using a graduated cylinder, fill with 150 ml PB1
— Black frames
— LCG spacers (separated for ease of handling)
— Clean LCG glass back plates as directed in the Infinium Lab Setup and Procedures
Guide.
— Clamps
3
On
•
•
•
the lab tracking form, record:
Date/Time
Operator
PB1 bottle barcode
NOTE
To record information about your assay such as operator information, start and
stop times, and barcodes, use the lab tracking form provided at
www.illumina.com/documentation. This form can be filled out and saved online,
or printed and filled in by hand.
Steps to Wash BeadChip
1
64
Attach the wire handle to the rack and submerge the wash rack in the wash dish
containing 200 ml PB1.
Part # 15045738 Rev. A
Wash BeadChip (Post-Amp)
Figure 42 Wash Rack in Wash Dish Containing PB1
2
Remove the Hyb Chamber inserts from the Hyb Chambers.
3
Remove BeadChips from the Hyb Chamber inserts one at a time.
4
Remove the cover seal from each BeadChip.
NOTE
To make sure that no solution splatters on you, Illumina recommends removing
the cover seal over an absorbent cloth or paper towels, preferably in a hood.
a
b
Using powder-free gloved hands, hold the BeadChip securely and by the edges in
one hand. Avoid contact with the sample inlets. Make sure that the barcode is
facing up and closest to you, and that the top side of the BeadChip is angled
slightly away from you.
Remove the entire seal in a single, continuous motion. Start with a corner on the
barcode end and pull with a continuous upward motion away from you and
towards the opposite corner on the top side of the BeadChip.
Illumina Infinium HTS Assay Protocol Guide
65
Manual Protocol
Figure 43 Removing the Cover Seal
c
Discard the cover seal.
CAUTION
Do not touch the arrays!
5
Immediately and carefully slide each BeadChip into the wash rack, one at a time,
making sure that the BeadChip is completely submerged in the PB1.
Figure 44 Submerging BeadChips in Wash Dish Containing PB1
6
66
Repeat steps 4 through 5 until all BeadChips (a maximum of 8) are transferred to the
submerged wash rack.
Part # 15045738 Rev. A
7
After all BeadChips are in the wash rack, move the wash rack up and down for
1 minute, breaking the surface of the PB1 with gentle, slow agitation.
8
Move the wash rack to the other wash dish containing clean PB1. Make sure the
BeadChips are completely submerged.
9
Move the wash rack up and down for 1 minute, breaking the surface of the PB1 with
gentle, slow agitation.
10 When you remove the BeadChips from the wash rack, inspect them for remaining
residue.
NOTE
Residue that can adversely affect results is sometimes left on BeadChips after
seals are removed. If there is residue left on the BeadChips after the second PB1
wash, use a 200 μl pipette tip for each BeadChip and slowly and carefully scrape
off the residues outward (away) from the bead-sections under PB1. Use a new
pipette tip for each BeadChip. Then, continue with the protocol.
11 If you are processing more than 8 BeadChips
a Assemble the flow-through chambers for the first 8 BeadChips, as described in the
next section, and place them on the lab bench in a horizontal position.
NOTE
Keep the flow-through chambers in a horizontal position on the lab bench until
all assembled flow-through chambers are ready to be loaded into the chamber
rack. Do not place the flow-through chambers in the chamber rack until all
BeadChips are prepared in flow-through chambers.
b
c
Return to this procedure and follow the steps described above to wash the next set
of 8 BeadChips.
Repeat for each remaining set of 8 BeadChips.
Assemble Flow-Through Chambers
NOTE
Confirm that you are using the correct Infinium LCG glass back plates and
spacers before assembling the flow-through chambers. Refer to the following
image for the correct flow-through chamber components.
Illumina Infinium HTS Assay Protocol Guide
67
Wash BeadChip (Post-Amp)
NOTE
You can use the two 200 ml PB1 wash dishes for up to 24 BeadChips. However, use 150 ml of
fresh PB1 for every 8 BeadChips in the Multi-Sample BeadChip Alignment Fixture.
Manual Protocol
1
If you have not done so, fill the Multi-sample BeadChip Alignment Fixture with 150 ml
PB1.
If you plan to process more than 4 BeadChips, this 150 ml of PB1 can be reused for an
additional set of 4 BeadChips. Use 150 ml of fresh PB1 for every additional set of 8
BeadChips.
2
For each BeadChip to be processed, place a black frame into the Multi-Sample
BeadChip Alignment Fixture pre-filled with PB1.
Figure 45 Placing Black Frames into Multi-Sample BeadChip Alignment Fixture
3
68
Place each BeadChip to be processed into a black frame, aligning its barcode with the
ridges stamped onto the Alignment Fixture.
Part # 15045738 Rev. A
Figure 46 Placing BeadChip into Black Frame on Alignment Fixture
4
Place a clear LCG spacer onto the top of each BeadChip. Use the alignment fixture
grooves to guide the spacers into proper position.
NOTE
Be sure to use the clear plastic spacers, not the white ones.
Illumina Infinium HTS Assay Protocol Guide
69
Wash BeadChip (Post-Amp)
NOTE
Inspect the surface of each BeadChip for residue left by the seal. Use a pipette tip
to remove any residue under buffer and be careful not to scratch the bead area.
Manual Protocol
Figure 47 Placing Clear Plastic Spacer onto BeadChip
5
Place the alignment bar onto the alignment fixture.
The groove in the alignment bar fits over the tab on the alignment fixture.
Figure 48 Placing Alignment Bar onto Alignment Fixture
70
Part # 15045738 Rev. A
Place a clean LCG glass back plate on top of the clear spacer covering each BeadChip.
The plate reservoir is at the barcode end of the BeadChip, facing inward to create a
reservoir against the BeadChip surface.
Figure 49 Placing Glass Back Plate onto BeadChip
A
B
7
Reservoir at Barcode End of Glass Back Plate
Glass Back Plate in Position
Attach the metal clamps to the flow-through chambers as follows:
a Gently push the glass back plate up against the alignment bar with one finger.
b Place the first metal clamp around the flow-through chamber so that the clamp is
approximately 5 mm from the top edge.
c Place the second metal clamp around the flow-through chamber at the barcode
end, approximately 5 mm from the reagent reservoir.
Illumina Infinium HTS Assay Protocol Guide
71
Wash BeadChip (Post-Amp)
6
Manual Protocol
Figure 50 Securing Flow-Through Chamber Assembly with Metal Clamps
A
B
C
8
72
One Stripe Shows Between First Clamp and Alignment Bar
Glass Back Plate Pressed Against Alignment Bar
No Stripes Show Between Second Clamp and Barcode
Using scissors, trim the ends of the clear plastic spacers from the flow-through
chamber assembly. Slip scissors up over the barcode to trim the other end.
Part # 15045738 Rev. A
Wash BeadChip (Post-Amp)
Figure 51 Trimming Spacer Ends from Flow-Through Chamber Assembly
A
B
9
Trim Spacer at Non-Barcode End of Flow-Through Chamber
Trim Spacer at Barcode End of Flow-Through Chamber
Immediately wash the Hyb Chamber reservoirs with DiH2O and scrub them with a
small cleaning brush, ensuring that no PB2 remains in the Hyb Chamber reservoir.
CAUTION
It is important to wash the Hybridization Chamber reservoirs immediately and
thoroughly to make sure that no traces of PB2 remain in the wells.
10 Discard unused reagents in accordance with facility standards.
11 Proceed to the next step.
CAUTION
Place all assembled flow-through chambers on the lab bench in a horizontal
position while you perform the preparation steps for XStain BeadChip. Do not
place the flow-through chambers in the chamber rack until all necessary steps
are completed.
Illumina Infinium HTS Assay Protocol Guide
73
Manual Protocol
Extend and Stain (XStain) BeadChip (Post-Amp)
In this process, you use RA1 reagent to wash away unhybridized and non-specifically
hybridized DNA sample. LX1 and LX2 are added to condition the BeadChip surface for the
extension reaction. Dispense EML reagent into the flow-through chambers to extend the
primers hybridized to DNA on the BeadChip. This reaction incorporates labeled
nucleotides into the extended primers. 95% formamide/1 mM EDTA is added to remove the
hybridized DNA. After neutralization using the XC3 reagent, the labeled extended primers
undergo a multi-layer staining process on the chamber rack. Next, you disassemble the
flow-through chambers and wash the BeadChips in the PB1 reagent, coat them with XC4,
and then dry them.
Figure 52 Extending and Staining BeadChip
Estimated Time
Hands-on time: ~2 hours and 45 minutes for 8 BeadChips
Dry time: 55 minutes
Consumables
74
Item
Quantity
Storage
Supplied By
RA1
10 ml for 1–8
BeadChips
20 ml for 9–16
BeadChips
30 ml for 17–24
BeadChips
-15°C to -25°C
Illumina
Part # 15045738 Rev. A
Quantity
Storage
Supplied By
LX1
2 tubes (per 8
BeadChips)
-15°C to -25°C
Illumina
LX2
2 tubes (per 8
BeadChips)
-15°C to -25°C
Illumina
EML
2 tubes (per 8
BeadChips)
-15°C to -25°C
Illumina
XC3
50 ml for 1–8
BeadChips
100 ml for 9–16
BeadChips
150 ml for 17–24
BeadChips
Room
temperature
Illumina
SML (Make sure that all SML
tubes indicate the same stain
temperature on the label)
2 tubes (per 8
BeadChips)
-15°C to -25°C
Illumina
ATM
2 tubes (per 8
BeadChips)
-15°C to -25°C
Illumina
PB1
310 ml for 1–8
BeadChips
285 ml for 9–24
BeadChips
Room
temperature
Illumina
XC4
310 ml for 1–8
BeadChips
285 ml for 9–24
BeadChips
Room
temperature
Illumina
Alconox Powder Detergent
As needed
Room
temperature
General lab
supplier
EtOH
As needed
Room
temperature
General lab
supplier
95% formamide/1 mM EDTA
15 ml for 1–8
BeadChips
17 ml for 9–16
BeadChips
25 ml for 17–24
BeadChips
-15°C to -25°C
General lab
supplier
Illumina Infinium HTS Assay Protocol Guide
75
Extend and Stain (XStain) BeadChip (Post-Amp)
Item
Manual Protocol
CAUTION
Pour only the recommended reagent volume needed for the suggested number
of samples listed in the Consumables table of each section. Some reagents are
used later in the protocol.
NOTE
It is important to use fresh RA1 for each protocol step in the assay where it is
required. RA1 that has been stored properly and has not been dispensed for use
in either the XStain or Resuspension step is considered fresh RA1. After RA1 has
been poured out into a reservoir and exposed to room temperature air for
extended periods of time, it is no longer fresh.
WARNING
This protocol uses an aliphatic amide that is a probable reproductive toxin.
Personal injury can occur through inhalation, ingestion, skin contact, and eye
contact. For more information, consult the material data safety sheet for this
assay at www.illumina.com/msds. Dispose of containers and any unused
contents in accordance with the governmental safety standards for your
region.
Preparation
76
1
RA1 is shipped and stored at -15C° to -25°C. Gradually warm the reagent to room
temperature, preferably in a 20C° to 25°C water bath. Gently mix to dissolve any
crystals that can present.
2
Place all reagent tubes in a rack in the order you plan to use them. If frozen, allow
them to thaw to room temperature, and then gently invert the reagent tubes at least 10
times to mix contents.
Part # 15045738 Rev. A
Extend and Stain (XStain) BeadChip (Post-Amp)
Figure 53 XStain BeadChip Reagent Tubes and Bottles
A
B
C
D
E
F
G
H
I
J
RA1
XC3
LX1
LX2
EML
95% Formamide / 1mM EDTA
SML
ATM
PB1
XC4
3
Dispense all bottled reagents into disposable reservoirs, as they are needed.
4
On
•
•
•
•
•
•
•
the lab tracking form, record:
Date/Time
Operator
RA1 barcode
XC3 barcode
LX1 barcodes
LX2 barcodes
EML barcodes
Illumina Infinium HTS Assay Protocol Guide
77
Manual Protocol
•
•
•
•
SML barcodes
ATM barcodes
PB1 barcode
XC4 barcodes
NOTE
To record information about your assay such as operator information, start and
stop times, and barcodes, use the lab tracking form provided at
www.illumina.com/documentation. This form can be filled out and saved online,
or printed and filled in by hand.
Set Up Chamber Rack
78
1
Make sure that the water circulator reservoir is filled with water to the appropriate
level. See the VWR Operator Manual, VWR part # 110-229.
2
Turn on the water circulator and set it to a temperature that brings the chamber rack to
44°C at equilibrium.
This temperature can vary depending on facility ambient conditions.
Part # 15045738 Rev. A
A
B
C
Chamber Rack
Water Circulator with Programmable Temperature Controls
Reservoir Cover
3
The temperature displayed on the water circulator LCD screen may differ from the
actual temperature on the chamber rack. Confirm the actual temperature using the
temperature probe for the chamber rack.
4
Make sure that you remove bubbles trapped in the chamber rack each time you run
this process. Follow instructions in the Te-Flow (Tecan Flow-Through Module) Operating
Manual, Tecan Doc ID 391584.
5
Use the Illumina Temperature Probe in several locations to make sure that the chamber
rack is at 44°C. Make sure that all locations are at 44°C ± 0.5°C.
Illumina Infinium HTS Assay Protocol Guide
79
Extend and Stain (XStain) BeadChip (Post-Amp)
Figure 54 Water Circulator Connected to Chamber Rack
Manual Protocol
NOTE
Do not leave the temperature probe in the first three rows of the chamber rack.
Reserve this space for BeadChips.
Figure 55 Illumina Temperature Probe and Temperature Probe in Chamber Rack
6
For accurate temperature measurement, ensure the Illumina Temperature Probe is
touching the base of the chamber rack.
Single-Base Extension
CAUTION
The remaining steps must be performed without interruption.
NOTE
If you are processing more than 8 BeadChips, complete the reagent dispensing
step for each reagent for the first set of 8 BeadChips. Then continue the same
reagent dispensing steps for the second set of 8 BeadChips. Finally, move to the
last set of 8 BeadChips before you start the incubation time.
Steps marked with an asterisk (*) indicate when to follow this reagent
dispensing method.
1
80
When the chamber rack reaches 44°C, quickly place each flow-through chamber
assembly into the chamber rack.
For 4 BeadChips, place the flow-through chambers in every other position, starting at 1,
in the first row of the chamber rack. For larger numbers of BeadChips, fill all positions
in the first row, then the second and third.
Part # 15045738 Rev. A
Make sure that each flow-through chamber is properly seated on its rack to allow
adequate heat exchange between the rack and the chamber.
3
On the lab tracking form, record the chamber rack position for each BeadChip.
4
Shake the XC4 bottle vigorously to ensure complete resuspension. If necessary, vortex
until completely dissolved.
CAUTION
Do not allow pipette tips to contact BeadChip surface. Touch off in the reservoir
of the glass back plate.
5
Into the reservoir of each flow-through chamber, dispense:
a 150 μl RA1. Incubate for 30 seconds. Repeat 5 times.
Figure 56 Dispensing RA1 into Each Flow-Through Chamber
CAUTION
Pipette tip must not contact BeadChip surface.
b
c
d
e
225 μl
225 μl
300 μl
250 μl
LX1. Repeat one time*. Incubate for 10 minutes.
LX2. Repeat one time*. Incubate for 10 minutes.
EML. Incubate for 15 minutes.
95% formamide/1 mM EDTA. Incubate for 1 minute. Repeat twice.
Illumina Infinium HTS Assay Protocol Guide
81
Extend and Stain (XStain) BeadChip (Post-Amp)
2
Manual Protocol
f
g
h
6
Incubate 5 minutes.
Begin ramping the chamber rack temperature to the temperature indicated on the
SML tube.
250 μl XC3. Incubate for 1 minute. Repeat twice*.
Wait until the chamber rack reaches the correct temperature.
Stain BeadChip
NOTE
If you are processing more than 8 BeadChips, complete the reagent dispensing
step for each reagent for the first set of 8 BeadChips. Then continue the same
reagent dispensing steps for the second set of 8 BeadChips. Finally, move to the
last set of 8 BeadChips before you start the incubation time.
Steps marked with an asterisk (*) indicate when to follow this reagent
dispensing method.
1
If you plan to image the BeadChip immediately after the staining process, turn on the
scanner now to allow the lasers to stabilize.
2
Into the reservoir of each flow-through chamber, dispense:
a 250 μl SML. Incubate for 10 minutes.
b 250 μl XC3. Incubate for 1 minute. Repeat twice*. Wait 5
c 250 μl ATM. Incubate for 10 minutes.
d 250 μl XC3. Incubate for 1 minute. Repeat twice*. Wait 5
e 250 μl SML. Incubate for 10 minutes.
f 250 μl XC3. Incubate for 1 minute. Repeat twice*. Wait 5
g 250 μl ATM. Incubate for 10 minutes.
h 250 μl XC3. Incubate for 1 minute. Repeat twice*. Wait 5
i
250 μl SML. Incubate for 10 minutes.
j
250 μl XC3. Incubate for 1 minute. Repeat twice*. Wait 5
3
minutes.
minutes.
minutes.
minutes.
minutes.
Immediately remove the flow-through chambers from the chamber rack and place
horizontally on a lab bench at room temperature.
Wash and Coat 8 BeadChips
Before starting the Wash and Coat process, read these important notes:
} Take the utmost care to minimize the chance of lint or dust entering the wash dishes,
which could transfer to the BeadChips. Place wash dish covers on wash dishes when
82
Part # 15045738 Rev. A
Equipment Needed
Place the following items on the bench:
} 1 staining rack
} 1 vacuum desiccator
} 1 tube rack
} Self-locking tweezers
} Large Kimwipes
} Vacuum hose
Steps
1
Set up two top-loading wash dishes, labeled "PB1" and "XC4".
2
To indicate the fill volume before filling wash dishes with PB1 and XC4, pour 310 ml
water into the wash dishes and mark the water level on the side. Empty the water from
the wash dish. Marking the level enables you to pour reagent directly from the PB1 and
XC4 bottles into the wash dishes, minimizing contaminant transfer from labware to
wash dishes.
Illumina Infinium HTS Assay Protocol Guide
83
Extend and Stain (XStain) BeadChip (Post-Amp)
stored or not in use. Clean wash dishes with low-pressure air to remove particulates
before use.
} In preparation for XC4 BeadChip coating, wash the tube racks and wash dishes
thoroughly before and after use. Rinse with DI water. Immediately following wash,
place racks and wash dishes upside down on a wash rack to dry.
} Place Kimwipes in three layers on the lab bench. Place a tube rack on top of these
Kimwipe layers. Do not place on absorbent lab pads. You will place the staining rack
containing BeadChips on this tube rack after removing it from the XC4 wash dish.
} Prepare an additional clean tube rack that fits the internal dimensions of vacuum
desiccator for removal of the BeadChips. Allow one rack per 8 BeadChips. No
Kimwipes are required under this tube rack.
Manual Protocol
Figure 57 PB1 and XC4 Wash Dishes with Staining Rack
A
B
84
Wash Dishes
Staining Rack
3
Pour 310 ml PB1 into the wash dish labeled “PB1.”
4
Submerge the unloaded staining rack into the wash dish with the locking arms and tab
facing towards you. This orients the staining rack so that you can safely remove the
BeadChips. Let the staining rack sit in the wash dish. You will use it to carry the
BeadChips after disassembling the flow-through chambers.
Part # 15045738 Rev. A
Extend and Stain (XStain) BeadChip (Post-Amp)
Figure 58 Staining Rack Locking Arms and Tab
A
B
Locking Arms
Tab
CAUTION
If the staining rack handle is not correctly oriented, the BeadChips can be
damaged when you remove the staining rack handle before removing the
BeadChips.
5
One at a time, disassemble each flow-through chamber:
a Use the dismantling tool to remove the two metal clamps.
CAUTION
It is important to use the dismantling tool to avoid chipping the glass back
plates.
Illumina Infinium HTS Assay Protocol Guide
85
Manual Protocol
Figure 59 Removing the Metal Clamps from Flow-Through Chamber
b
c
d
e
Remove the glass back plate.
Set the glass back plate aside. When you finish the XStain BeadChip protocol, clean
the glass back plates as described in the Infinium Lab Setup and Procedures Guide.
Remove the spacer. To avoid damaging the stripes on the BeadChip, pull the
spacer out so that the long sides slide along the sides of the BeadChip.
Remove the BeadChip.
CAUTION
Do not touch the face of the BeadChips. Handle them by the barcode end or by
the edges.
6
Place the BeadChips in the staining rack while it is submerged in PB1. Put four
BeadChips above the staining rack handle and four below. Make sure that the
BeadChip barcodes face away from you and that the locking arms on the handle face
towards you.
If necessary, briefly lift the staining rack out of the wash dish to seat the BeadChip.
Replace it immediately after inserting each BeadChip.
7
Make sure that the BeadChips are completely submerged.
CAUTION
Do not allow the BeadChips to dry. Submerge each BeadChip in the wash dish
as soon as possible.
8
86
Slowly move the staining rack up and down 10 times, breaking the surface of the
reagent.
Part # 15045738 Rev. A
Figure 60 Washing BeadChips in PB1
9
Allow the BeadChips to soak for an additional 5 minutes.
CAUTION
Do not leave the BeadChips in the PB1 for more than 30 minutes.
10 Shake the XC4 bottle vigorously to ensure complete resuspension. If necessary, vortex
until completely dissolved.
11 Pour 310 ml XC4 into the dish labeled “XC4,” and cover the dish to prevent any lint or
dust from falling into the solution.
CAUTION
Do not let the XC4 sit for longer than 10 minutes.
12 Remove the staining rack from the PB1 dish and place it directly into the wash dish
containing XC4. For proper handling and coating, The barcode labels on the BeadChips
must face away from you; the locking arms on the handle must face towards you.
Illumina Infinium HTS Assay Protocol Guide
87
Extend and Stain (XStain) BeadChip (Post-Amp)
NOTE
If the top edges of the BeadChips begin to touch during either PB1 or XC4
washes, gently move the staining rack back and forth to separate the slides. It is
important for the solution to circulate freely between all BeadChips.
Manual Protocol
Figure 61 Moving BeadChips from PB1 to XC4
13 Slowly move the staining rack up and down 10 times, breaking the surface of the
reagent.
NOTE
If the top edges of the BeadChips begin to touch during either PB1 or XC4
washes, gently move the staining rack back and forth to separate the slides. It is
important for the solution to circulate freely between all BeadChips.
14 Allow the BeadChips to soak for an additional 5 minutes.
CAUTION
Use XC4 only one time. To process subsequent BeadChips, use a new, clean
wash dish with fresh XC4.
15 Prepare one additional tube rack per 8 BeadChips (Illumina-provided from VWR
catalog # 60916-748) that fits the internal dimensions of vacuum desiccator.
16 Remove the staining rack in one smooth, rapid motion and place it directly on the
prepared tube rack, making sure the barcodes face up, and the locking arms and tabs
face down.
88
Part # 15045738 Rev. A
To ensure uniform coating, place the staining rack on the center of the tube rack,
avoiding the raised edges.
Figure 63 Moving the Staining Rack from XC4 to Tube Rack
17 For each of the top four BeadChips, working top to bottom:
Illumina Infinium HTS Assay Protocol Guide
89
Extend and Stain (XStain) BeadChip (Post-Amp)
Figure 62 Staining Rack in Correct Orientation
Manual Protocol
a
Continuing to hold the staining rack handle, carefully grip each BeadChip at its
barcode end with self-locking tweezers.
NOTE
The XC4 coat is slippery and makes the BeadChips difficult to hold. The selflocking tweezers grip the BeadChip firmly and help prevent damage.
b
Place each BeadChip on a tube rack with the barcode facing up and towards you.
Figure 64 BeadChips on Tube Rack
18 Holding the top of the staining rack in position, gently remove the staining rack handle
by grasping the handle between the thumb and forefinger. Push the tab up with your
thumb and push the handle away from you (unlocking the handle), then pull up the
handle and remove.
90
Part # 15045738 Rev. A
A
B
Tab
Handle
19 Remove the remaining BeadChips to the tube rack, with six BeadChips on top of the
rack and two BeadChips on the bottom. Make sure that the barcode ends are towards
you, and the BeadChips are completely horizontal.
CAUTION
To prevent wicking and uneven drying, do not allow the BeadChips to rest on
the edge of the tube rack or to touch each other while drying.
20 Place the tube rack in the vacuum desiccator. Each desiccator can hold one tube rack (8
BeadChips).
CAUTION
Make sure the vacuum valve is seated tightly and securely.
21 Remove the red plug from the three-way valve before applying vacuum pressure.
22 Start the vacuum, using at least 675 mm Hg (0.9 bar).
Illumina Infinium HTS Assay Protocol Guide
91
Extend and Stain (XStain) BeadChip (Post-Amp)
Figure 65 Removing Staining Rack Handle
Manual Protocol
23 To make sure that the desiccator is properly sealed, gently lift the lid of the vacuum
desiccator. It should not lift off the desiccator base.
Figure 66 Testing Vacuum Seal
24 Dry under vacuum for 50–55 minutes.
Drying times can vary according to room temperature and humidity.
25 Release the vacuum by turning the handle very slowly.
WARNING
Make sure that air enters the desiccator very slowly to avoid disturbing the
contents. Improper use of the vacuum desiccator can result in damage to the
BeadChips, especially if you remove the valve plug while a vacuum is
applied. For detailed vacuum desiccator instructions, see the documentation
included with the desiccator.
26 Store the desiccator with the red valve plug in the three-way valve of the desiccator to
stop accumulation of dust and lint within the valve port.
27 Touch the borders of the chips (do not touch the stripes) to make sure that the etched,
barcoded side of the BeadChips are dry to the touch.
92
Part # 15045738 Rev. A
CAUTION
Do not touch the stripes with the wipe or allow EtOH to drip onto the stripes.
29 Clean the glass back plates. For instructions, see the Infinium Lab Setup and Procedures
Guide.
30 Discard unused reagents in accordance with facility standards.
31 Do one of the following:
• Proceed to Image BeadChip (Post-Amp).
• Store the BeadChips in the Illumina BeadChip Slide Storage Box at room
temperature. Image the BeadChips within 72 hours.
Illumina Infinium HTS Assay Protocol Guide
93
Extend and Stain (XStain) BeadChip (Post-Amp)
28 If the underside feels tacky, manually clean the underside of the BeadChip to remove
any excess XC4. The bottom two BeadChips are most likely to have some excess.
a Hold the BeadChip at a downward angle to prevent excess EtOH from dripping
from the wipe onto the stripes.
b Wipe along the underside of the BeadChip five or six times, until the surface is
clean and smooth.
Manual Protocol
Image BeadChip (Post-Amp)
Follow the instructions in the iScan System User Guide or HiScan System User Guide to scan
your BeadChips. Use the Infinium LCG scan setting for your BeadChip.
94
Part # 15045738 Rev. A
The Illumina GenomeStudio Genotyping Module, included with your Illumina Infinium
Assay system, is an application for extracting genotyping data from intensity data files
(*.idat files) collected from systems such as the Illumina HiScan System.
For feature descriptions and instructions on using the GenomeStudio platform to visualize
and analyze genotyping data, see the GenomeStudio Framework User Guide and the
GenomeStudio User Guide or online help.
Illumina Infinium HTS Assay Protocol Guide
95
Illumina GenomeStudio
Illumina GenomeStudio
96
Part # 15045738 Rev. A
Chapter 3 Automated Protocol
Introduction to Infinium HTS Automated Protocol
Infinium HTS Automated Workflow
Equipment, Materials, and Reagents
Quantitate DNA (Optional) (Pre-Amp)
Amplify DNA (Pre-Amp)
Incubate DNA (Post-Amp)
Fragment DNA (Post-Amp)
Precipitate DNA (Post-Amp)
Resuspend DNA (Post-Amp)
Hybridize to BeadChip (Post-Amp)
Wash BeadChip (Post-Amp)
Extend and Stain (XStain) BeadChip (Post-Amp)
Image BeadChip (Post-Amp)
Illumina GenomeStudio
Illumina Infinium HTS Assay Protocol Guide
98
99
100
103
113
121
123
128
136
141
160
173
196
197
97
Chapter 3
Automated Protocol
Automated Protocol
Introduction to Infinium HTS Automated Protocol
This chapter describes pre- and post-amplification automated laboratory protocols for the
Infinium HTS assay. Follow the protocols in the order shown.
Some of the tasks in this chapter make reference to Illumina LIMS (Laboratory Information
Management System). If you are not running Illumina LIMS, disregard those instructions.
For information about how to use Illumina LIMS, see the Illumina LIMS User Guide.
98
Part # 15045738 Rev. A
The following figure graphically represents the Infinium HTS assay automated workflow
for 4 BeadChips. These protocols describe the procedure for preparing 96 DNA samples.
Figure 67 Illumina Infinium HTS Automated Workflow
Illumina Infinium HTS Assay Protocol Guide
99
Infinium HTS Automated Workflow
Infinium HTS Automated Workflow
Automated Protocol
Equipment, Materials, and Reagents
These materials are specifically required for the automated Illumina Infinium HTS Assay
Protocol Guide. For a list of other equipment, materials, and reagents needed in an Illumina
Infinium HTS Assay Protocol Guide lab, see the Infinium Assay Lab Setup and Procedures
Guide.
User-Supplied Equipment
Table 9 User-Supplied Equipment Infinium HTS Assay, Automated Protocol
100
Item
Suggested Vendor
Vacuum desiccator (1 per 8 BeadChips
processed simultaneously)
VWR, catalog # 24988-197
Vacuum tubing
VWR, catalog # 62995-335
2 Tecan eight-tip robots (one for pre- and one
for post-amplification processes)
LIMS (other than Illumina) customers
• SC-30-401 (110V) - North America and
Japan
• SC-30-402 (220V) - EU and Asia Pacific
(Except Japan)
Illumina LIMS customers
• SC-30-403 (110V) - North America and
Japan
• SC-30-404 (220V) - EU and Asia Pacific
(Except Japan)
Auto-desiccator cabinet (Optional—allows
scanning of BeadChips up to three days after
processing)
VWR, catalog # 74950-342
Part # 15045738 Rev. A
Equipment, Materials, and Reagents
Illumina-Supplied Equipment
Table 10 Illumina-Supplied Materials Infinium HTS Assay, Automated
Item
Catalog or Part #
Multi-Sample BeadChip
alignment fixture
218528
Robot BeadChip Alignment
Fixture (6)
222691
Robot Tip Alignment Guide-G
One-piece: catalog # SE-104-1015, Part# 15044220
User-Supplied Materials
Table 11 User-Supplied Materials Infinium HTSAssay, Automated Protocol
Item
Suggested Vendor
96-well, black, flat-bottom Fluotrac 200 plates
Greiner, catalog # 655076
Forceps
VWR, catalog # 25601-008
Aluminum foil
Foil adhesive seals (Microseal “F”)
MJ Research, catalog # MSF-1001
Reservoir, full, 150 ml
Beckman Coulter, catalog # 372784
Reservoir, half, 75 ml
Beckman Coulter, catalog # 372786
Reservoir, quarter, 40 ml
Beckman Coulter, catalog # 372790
Reservoir frame
Beckman Coulter, catalog # 372795
Tube racks for vacuum desiccator (1 for every 8
BeadChips to be processed simultaneously; must fit
internal dimensions of vacuum desiccator)
VWR, catalog # 66023-526
Vacuum source (greater than 508 mm Hg (0.68 bar)
Vacuum gauge for vacuum desiccator (recommended)
Illumina Infinium HTS Assay Protocol Guide
101
Automated Protocol
Illumina-Supplied Materials
} MSA3 barcode labels
} WG#-QNT barcode labels
Illumina-Supplied Reagents
Table 12 Illumina-Supplied Reagents Infinium HTS Assay, Automated Protocol
102
Item
Part #
ATM—Anti-Stain Two-Color Master Mix
11208317
FMS—Fragmentation solution
11203428
MA1—Multi-Sample Amplification 1 Mix
11202880
MA2—Multi-Sample Amplification 2 Mix
11203401
MSM—Multi-Sample Amplification Master Mix
11203410
PB1—Reagent used to prepare BeadChips for
hybridization
11291245
PB2—Humidifying buffer used during
hybridization
11191130
PM1—Precipitation solution
11292436
RA1—Resuspension, hybridization, and wash
solution
11292441
SML—Superior Two-Color Master Mix
11288046
EML—Two-Color Extension Master Mix
11208309
LX1—XStain BeadChip solution 1
11208288
LX2—XStain BeadChip solution 2
11208296
XC3—XStain BeadChip solution 3
11208392
XC4—XStain BeadChip solution 4
11208430
Part # 15045738 Rev. A
This process uses the PicoGreen dsDNA quantitation reagent to quantitate double-stranded
DNA samples. You can quantitate up to three plates, each containing up to 96 samples. If
you already know the concentration, proceed to Amplify DNA (Pre-Amp).
Illumina recommends the Molecular Probes PicoGreen assay to quantitate dsDNA samples.
The PicoGreen assay can quantitate small DNA volumes, and measures DNA directly.
Other techniques may pick up contamination such as RNA and proteins. Illumina
recommends using a spectrofluorometer because fluorometry provides DNA-specific
quantification. Spectrophotometry might also measure RNA and yield values that are too
high.
Hands-on time: ~20 minutes per plate
Robot: 20 minutes per plate
Consumables
Item
Quantity
Storage
Supplied By
PicoGreen dsDNA quantitation
reagent
See Instructions
-15°C to -25°C
User
1X TE (10 mM Tris-HCl pH8.0,
1 mM EDTA (TE))
See Instructions
Room
temperature
General lab
supplier
Lambda DNA
See Instructions
2°C to 8°C
User
96-well 0.65 ml microtiter plate
1 per 96 samples
General lab
supplier
Fluotrac 200 96-well flatbottom plate
1 per Standard DNA
plate
1 per Sample DNA
plate
General lab
supplier
NOTE
PicoGreen is susceptible to differential contaminants. False positives may occur
for whole-genome amplification. Therefore, it is important to quantitate the
input into the whole-genome amplification reaction.
Illumina Infinium HTS Assay Protocol Guide
103
Quantitate DNA (Optional) (Pre-Amp)
Quantitate DNA (Optional) (Pre-Amp)
Automated Protocol
Preparation
} Thaw PicoGreen to room temperature in a light-impermeable container.
} Follow the instructions for preparing the robot before each use in the Infinium Lab Setup
and Procedures Guide.
} Thaw the sample DNA plates to room temperature.
} Apply a QDNA barcode label to a new Fluotrac plate for each GS#-DNA plate to be
quantified.
} Hand-label the microtiter plate “Standard DNA.”
} Hand-label one of the Fluotrac plates “Standard QDNA.”
} In the sample sheet, enter the Sample_Name (optional) and Sample_Plate for each
Sample_Well.
Make a Standard DNA Plate
In this process, you create a Standard DNA plate with serial dilutions of stock Lambda
DNA in the wells of column 1.
1
Add stock Lambda DNA to well A1 in the plate labeled "Standard DNA" and dilute it
to 75 ng/μl in a final volume of 233.3 μl. Pipette up and down several times.
a Use the following formula to calculate the amount of stock Lambda DNA to add to
A1:
(233.3 μl) × (75 ng/μl)
=
μl of stock Lambda DNA to add to A1
(stock Lambda DNA
concentration)
b
104
Dilute the stock DNA in well A1 using the following formula:
μl of 1X TE to add to A1 = 233.3 μl - μl of stock Lambda DNA in well A1
2
Add 66.7 μl 1X TE to well B1.
3
Add 100 μl 1X TE to wells C, D, E, F, G, and H of column 1.
Part # 15045738 Rev. A
4
Transfer 133.3 μl of Lambda DNA from well A1 into well B1. Pipette up and down
several times.
5
Change tips. Transfer 100 μl from well B1 into well C1. Pipette up and down several
times.
6
Repeat for wells D1, E1, F1, and G1, changing tips each time. Do not transfer from
well G1 to H1. Well H1 serves as the blank 0 ng/μl Lambda DNA.
Table 13 Concentrations of Lambda DNA
Row-Column
Concentration
(ng/µl)
Final Volume in
Well (µl)
A1
75
100
B1
50
100
C1
25
100
D1
12.5
100
Illumina Infinium HTS Assay Protocol Guide
105
Quantitate DNA (Optional) (Pre-Amp)
Figure 68 Dilution of Stock Lambda DNA Standard
Automated Protocol
Row-Column
Concentration
(ng/µl)
Final Volume in
Well (µl)
E1
6.25
100
F1
3.125
100
G1
1.5262
200
H1
0
100
Figure 69 Serial Dilutions of Lambda DNA
7
Cover the Standard DNA plate with a cap mat.
Dilute PicoGreen
The diluted PicoGreen is added to both the Standard QDNA and Sample QDNA plates to
make the DNA fluoresce when read with the spectrofluorometer.
CAUTION
Do not use glass containers for the PicoGreen reagent. PicoGreen degrades
quickly in the presence of light and can adhere to glass, which lowers its
effective concentration in solution and effects the upper response range
accuracy.
106
Part # 15045738 Rev. A
Prepare a 1:200 dilution of PicoGreen into 1X TE using a sealed 100 ml or 250 ml
Nalgene bottle wrapped in aluminum foil.
Refer to the following table to identify the volumes needed to produce diluted reagent
for multiple 96-well QDNA plates. For fewer than 96 DNA samples, scale down the
volumes.
Table 14 Volumes for PicoGreen Reagents
# QDNA Plates
PicoGreen Volume
(µl)
1
115
2
215
3
315
2
1X TE Volume (ml)
23
43
63
Cap the foil-wrapped bottle and vortex to mix.
Create QDNA Standard and Sample Plates
In this process, PicoGreen is distributed to Standard QDNA and Sample QDNA Fluotrac
plates and mixed with aliquots of DNA from the respective DNA plates.
CAUTION
Do not run any other programs or applications while using the Tecan robot.
Your computer and the robot may lock up and stop a run.
1
At the robot PC, select DNA Quant | Make Quant.
2
In the DNA Plate Selection dialog box, select the plate type of the Standard DNA and
Sample DNA plates. They should all be MIDI plates, TCY plates or ABGN plates. Roll
the mouse pointer over each picture to see a description of the plate.
Figure 70 DNA Plate Selection Dialog Box
Illumina Infinium HTS Assay Protocol Guide
107
Quantitate DNA (Optional) (Pre-Amp)
1
Automated Protocol
3
In the Basic Run Parameters pane, enter the Number of DNA/QDNA plates (1, 2, or 3
pairs) and the Number of DNA Samples.
The robot PC updates the Required Run Items and the bed map to show the correct
position of items on the robot bed. All barcodes must face to the right.
Figure 71 Make QDNA Screen
108
4
Vortex the GS#-DNA Sample plate at 1450 rpm for 1 minute.
5
Centrifuge the GS#-DNA Sample plate to 280 × g for 1 minute.
6
Vortex the Standard DNA plate at 1450 rpm for 1 minute.
7
Centrifuge the Standard DNA plate to 280 × g for 1 minute.
8
Place the GS#-DNA Sample, Standard DNA, Standard QDNA, and QDNA Sample
plates on the robot bed according to the robot bed map. Place well A1 at the top-left
corner of its robot bed carrier. Remove any plate seals.
9
Pour the PicoGreen dilution into half reservoir A and place it on the robot bed.
Part # 15045738 Rev. A
11 On the lab tracking form, record the position of the plates on the robot bed.
12 Clear the Use Barcodes checkbox.
13 Click Run. Observe the beginning of the robot run to ensure there are no problems.
The robot transfers 195 μl of diluted PicoGreen to all Fluotrac plates, then transfers 2 μl
aliquots of DNA from Standard DNA plate to Standard QDNA plate and from GS#DNA plate to sample QDNA plates.
The robot PC sounds an alert and opens a message when the process is complete.
14 Click OK in the message box.
15 On
•
•
•
•
•
the lab tracking form, record:
Date/Time
Operator
Robot
The QDNA barcode that corresponds to each GS#-DNA barcode
The Standard QDNA plate that corresponds to each Standard DNA plate
16 After the robot finishes, immediately seal all plates:
a Place foil adhesive seals over Sample QDNA and Standard QDNA plates.
b Place cap mats on GS#-DNA Sample and Standard DNA plates.
17 Discard unused reagents in accordance with facility requirements.
18 Store the GS#-DNA and Standard DNA plates at 2° to 8°C or -15° to -25°C.
19 Centrifuge the Sample QDNA Plate and Standard QDNA plates to 280 × g for 1 minute.
Read the QDNA Plate
In this process, you use the Gemini XS or XPS Spectrofluorometer along with the Illumina
Fluorometry Analysis software to read the Standard QDNA and Sample QDNA plates. You
use the software to create a standard curve based on the quantities of Standard DNA with
PicoGreen. Then you read the Sample QDNA plates to compare their data against the
standard curve to obtain the concentration of sample DNA. For the best performance,
Illumina recommends a minimum concentration of 50 ng/μl.
1
Turn on the spectrofluorometer.
Illumina Infinium HTS Assay Protocol Guide
109
Quantitate DNA (Optional) (Pre-Amp)
10 Make sure that all items are placed properly on the robot bed, that all seals have been
removed, and that all the barcodes face to the right.
Automated Protocol
2
At the PC, open the Illumina Fluorometry Analysis program.
Figure 72 Illumina Fluorometry Analysis Main Screen
3
Select Reader Tasks | Read Quant.
4
(Other than Illumina LIMS) Clear the Use Barcodes checkbox.
5
(Illumina LIMS) Make sure that the Use Barcodes checkbox is checked.
6
Click Read.
7
(Illumina LIMS) When prompted, log in to the Illumina LIMS database.
8
When asked if you want to read a new Standard plate, click Yes.
9
Remove the plate seal and load the Standard QDNA plate into the fluorometry tray.
Click OK. The spectrofluorometer will read the plate data.
10 Review the data from the Standard QDNA plate. Either accept it and go on to the next
step, or reject it. Rejecting the data will stop the Read Quant process.
11 Remove the Standard QDNA place from the spectrofluorometer tray.
110
Part # 15045738 Rev. A
13 When prompted, hand-scan the Sample QDNA plate barcode. Click OK.
14 When prompted, remove the plate seal from the Sample QDNA plate and load it into
the spectrofluorometer tray, with well A1 at the upper left corner. Click OK. The
spectrofluorometer will read the plate data.
15 Remove the Standard QDNA plate from the spectrofluorometer tray.
16 When prompted, click Yes to review the raw Sample QDNA plate data.
Figure 73 Sample QDNA Data
17 Microsoft Excel opens automatically at the same time and displays the quantitation
data for the Sample QDNA plate. There are three tabs in the file:
• SQDNA_STD—Generates the standard curve by plotting the Relative Fluorescence
(RF) values measured in the Standard QDNA plate against assumed
concentrations in the Standard DNA Plate.
• QDNA—Plots the concentration (ng/μl) of each well of the Sample QDNA Plate as
derived from the standard curve.
Illumina Infinium HTS Assay Protocol Guide
111
Quantitate DNA (Optional) (Pre-Amp)
12 When prompted, enter the number of plates you want to read (1, 2, or 3). Do not
include the Standard QDNA plate in this number. Click OK.
Automated Protocol
• Data—A readout of the raw data values for the Standard QDNA plate and the
Sample QDNA Plate.
18 The Illumina Fluorometry Analysis software will prompt you to indicate whether you
wish to save the QDNA data shown in an Excel file. Select the option you prefer:
• Click Yes to save.
(Illumina LIMS only) The data will be sent to Illumina LIMS. In Illumina LIMS,
the QDNA plate moves into the Make Single-Use DNA (SUD) Plate (Pre-PCR) queue.
• Click No to delete the quant data. You can read the same plate for quant data
repeatedly.
19 If you entered more than one Sample QDNA plate to read, repeat steps 13 to 16 for
each additional plate.
20 Discard the QDNA plates and reagents in accordance with facility requirements.
21 Do one of the following:
• Proceed to Amplify DNA (Post-Amp).
• Store the Sample QDNA plate at 2° to 8°C for up to one month.
SAFE STOPPING POINT
Now is a good stopping point in the process.
112
Part # 15045738 Rev. A
This process creates an MSA3 plate for amplification. MA1 is first added to the MSA3
plate, followed by the samples. 0.1N NaOH is added to denature the samples. The MA2
reagent neutralizes the sample. Multi-Sample Amplification Master Mix (MSM) is then
added to the samples.
Figure 74 Denaturing and Neutralizing BCD
Estimated Time
Robot time:
• 30 minutes for 48 samples
• 1 hour or 96 samples
Incubation time: ~20–24 hours
Consumables
Item
Quantity
Storage
Supplied By
MA1
1 tube
(per 96 samples)
Room
temperature
Illumina
Illumina Infinium HTS Assay Protocol Guide
113
Amplify DNA (Pre-Amp)
Amplify DNA (Pre-Amp)
Automated Protocol
Item
Quantity
Storage
Supplied By
MA2
1 tube
(per 96 samples)
-15°C to -25°C
Illumina
MSM
1 tube
(per 96 samples)
-15°C to -25°C
Illumina
0.1N NaOH
15 ml
(per 96 samples)
2°C to 8°C
General lab
supplier
96-well 0.8 ml microplate
(MIDI)
1 plate
WG#DNA plate with 48 or 96
DNA samples (50 ng/μl)
1 plate
General lab
supplier
-15°C to -25°C
User
NOTE
Thaw all reagents completely at room temperature and allow to equilibrate.
After thawed, gently invert each tube several times to mix the reagent
thoroughly. Pulse centrifuge each tube to 280 × g to eliminate bubbles and
collect reagent at the bottom of the tube.
Preparation
1
In preparation for the Incubate DNA process, preheat the Illumina Hybridization Oven
in the post-amp area to 37°C and allow the temperature to equilibrate
2
In the Sample Sheet, enter the Sample_Name and Sample_Plate for each Sample_Well.
3
Apply an MSA3 barcode label to a new MIDI.
4
Thaw MA1, MA2, and MSM tubes to room temperature.
5
114
Thaw DNA samples to room temperature.
} On the Lab Tracking Form, record the following:
• Date/Time
• Operator
• Robot
• Batch number
• Number of samples (48 or 96)
• DNA plate barcodes
Part # 15045738 Rev. A
MSA3 plate barcodes
MA1 tube barcodes
MA2 tube barcodes
MSM tube barcodes
NOTE
To record information about your assay such as operator information, start and
stop times, and barcodes, use the lab tracking form provided at
www.illumina.com/documentation. This form can be filled out and saved online,
or printed and filled in by hand.
Prepare Robot
For instructions on preparing the robot for use in a protocol see the Infinium Assay Lab Setup
and Procedures Guide.
Refer to the figure shown below throughout this protocol. Note that all of the barcodes face
to the right.
Figure 75 Eight-Tip Robot (Make MSA3 Setup)
A
B
C
D
MA1 Tube
MA2 Tube
MSM Tube
MSA3 Plate
Illumina Infinium HTS Assay Protocol Guide
115
Amplify DNA (Pre-Amp)
•
•
•
•
Automated Protocol
E
F
NaOH in Quarter Reservoir
DNA Plate (MIDI)
Steps to Make the MSA3 Plate
1
If you do not already have a WG#-DNA plate, add DNA into one of the following:
• MIDI plate: 20 μl to each WG#-DNA plate well
• TCY plate: 10 μl to each WG#-DNA plate well
Apply a barcode label to the new WG#-DNA plate.
2
At the robot PC, select MSA3 Tasks | Make MSA3.
3
In the Plate Selection dialog box, click on the plate type you wish to use. Roll the mouse
pointer over each picture to see a description of the plate.
Figure 76 Selecting the Plate Type
NOTE
Do not mix plate types on the robot bed.
4
(Other than Illumina LIMS) Make sure that the Use Barcodes checkbox is cleared. In
the Basic Run Parameters pane, enter the Number of DNA samples (48 or 96) that are
in the plate. This value must match the number of DNAs in the plate and the number
of DNAs identified in the DNA manifest.
NOTE
If you are using Illumina LIMS, you cannot change the number of DNA samples
on this screen. However, the Illumina LIMS software processes the correct
number of samples.
You can process up to 96 DNA samples per robot run.
The robot PC updates the Required Run Items and the bed map to show the correct
position of items on the robot bed. All barcodes must face to the right.
116
Part # 15045738 Rev. A
Figure 77 Make MSA3 Screen
5
Remove caps from MA1, MA2, and MSM tubes, then place the tubes in the robot
standoff tube rack according to the bed map.
6
Add 15 ml 0.1 N NaOH to the quarter reservoir, then place the reservoir on the robot
bed according to the bed map.
7
Place the WG#-DNA and MSA3 plates on the robot bed according to the bed map.
8
In the Lab Tracking Form, record the plate positions on the robot bed.
9
Make sure that all items are placed properly on the robot bed, that all caps and seals
have been removed, and that all the barcodes face to the right.
10 (Other than Illumina LIMS) At the robot PC, click Run.
Illumina Infinium HTS Assay Protocol Guide
117
Amplify DNA (Pre-Amp)
NOTE
If you are using Illumina LIMS, then you must click Run and select batches
before the robot bed map displays the correct layout for the WG#-DNA plates.
Automated Protocol
11 (Illumina LIMS) At the robot PC:
a Make sure that the Use Barcodes checkbox is cleared.
b Click Run to start the process. Log in if prompted.
12 After the robot initializes, the Make MSA3 screen appears after a moment.
13 Do one of the following:
• Select your current project. The available batches appear in the Sample Batch ID
pane. Select a batch to see the associated DNA plate appear in the DNA Plates
pane.
Figure 78 Make MSA3 Screen with Project and Batch Selected
• Use the Search box to search for a specific Batch ID or DNA Plate.
14 (Illumina LIMS only) Select the batch you want to run, and then click OK.
15 (Illumina LIMS only) Click OK to confirm the required DNAs.
118
Part # 15045738 Rev. A
16 When prompted, enter the barcode of each WG#-DNA plate. The robot bed map is
updated with the WG#-DNA plate locations.
17 Place the WG#-DNA plates on the robot bed according to the bed map and click OK.
The robot begins running when the plates are in place.
18 Observe the robot run to make sure that there are no problems.
After the robot adds the 0.1N NaOH to the DNA in the MSA3 plate, follow the
instructions at the prompt.
19 Seal the plate with a cap mat.
20 Vortex the sealed MSA3 plate at 1600 rpm for 1 minute.
21 Centrifuge to 280 × g at 22°C for 1 minute.
22 Remove the cap mat.
NOTE
When you remove a cap mat, set it aside, upside down, in a safe location for use
later in the protocol. When you place the cap mat back on the plate, be sure to
match it to its original plate and orient it correctly.
23 Place the MSA3 plate back on the robot bed in its original position, and then click OK.
The Wait for reaction time message appears. The wait time for this reaction is 10
minutes.
The robot PC sounds an alert and opens a message when the process is complete.
24 Click OK in the message box.
25 Remove the MSA3 plate from the robot bed and seal with the 96-well cap mat.
Illumina Infinium HTS Assay Protocol Guide
119
Amplify DNA (Pre-Amp)
Figure 79 Confirm DNAs
Automated Protocol
26 Centrifuge to 280 × g for 1 minute.
27 (Illumina LIMS) In the Illumina LIMS left pane, click Infinium HTS | Incubate MSA3.
28 Scan the barcode of the MSA3 plate, click Verify, and then click Save.
29 Discard unused reagents in accordance with facility standards.
30 Proceed immediately to the next step.
120
Part # 15045738 Rev. A
This process incubates the MSA3 plate for 20–24 hours at 37°C in the Illumina
Hybridization Oven. The process uniformly amplifies the genomic DNA, generating a
sufficient quantity of each individual DNA sample to be used when in the Infinium HTS
assay.
Figure 80 Incubating DNA to Amplify
Estimated Time
Incubation time: 20–24 hours
Verify MSA3 for Incubation (LIMS only)
1
In the Illumina LIMS left sidebar, click Infinium HTS | Incubate MSA3.
2
Scan the barcode of the MSA3 plate, click Verify, and then click Save.
3
If the MSA3 plate is queued for incubation, a blue confirmation message appears at the
top of the window. Proceed to Steps to Incubate the MSA3 Plate.
4
If the MSA3 plate is not queued for incubation, a red error message appears at the top
of the window. Do not proceed with incubation. Instead, follow these steps to
troubleshoot the problem:
a Click the Reports tab in the upper-right corner.
b In the left sidebar, click Tracking Reports | Get Queue Status.
c Scan the plate barcode and click Go.
Illumina Infinium HTS Assay Protocol Guide
121
Incubate DNA (Post-Amp)
Incubate DNA (Post-Amp)
Automated Protocol
d
Note what step the plate is queued for, and proceed with that step.
For information about how to use Illumina LIMS, see the Illumina LIMS User Guide.
Steps to Incubate MSA3 Plate
OVERNIGHT INCUBATION
Incubate MSA3 plate in the Illumina Hybridization Oven for at least 20 hours but no more
than 24 hours at 37°C.
1
Record the start and stop times on the lab tracking form.
NOTE
To record information about your assay such as operator information, start and
stop times, and barcodes, use the lab tracking form provided at
www.illumina.com/documentation. This form can be filled out and saved online,
or printed and filled in by hand.
2
122
Proceed to the next step.
Part # 15045738 Rev. A
Fragment DNA (Post-Amp)
Fragment DNA (Post-Amp)
This process enzymatically fragments the amplified DNA samples. An end-point
fragmentation is used to prevent over-fragmentation.
Figure 81 Fragmenting DNA
Estimated Time
Robot time:
• 5 minutes for 48 samples
• 10 minutes for 96 samples
Incubation time: 1 hour
Consumables
Item
Quantity
Storage
Supplied By
FMS
1 tube (per 96
samples)
-15°C to -25°C
Illumina
NOTE
Thaw all reagents completely at room temperature and allow to equilibrate.
After thawed, gently invert each tube several times to mix the reagent
thoroughly. Pulse centrifuge each tube to 280 × g to eliminate bubbles and
collect reagent at the bottom of the tube.
Illumina Infinium HTS Assay Protocol Guide
123
Automated Protocol
Preparation
1
Preheat the heat block with the MIDI plate insert to 37°C.
2
Thaw FMS tubes to room temperature. Gently invert at least 10 times to mix contents.
3
Pulse centrifuge to 280 × g.
4
Remove the MSA3 plate from the Illumina Hybridization Oven.
5
Remove the cap mat.
6
If you plan to Resuspend the MSA3 plate today, remove the RA1 from the freezer to
thaw.
} On the lab tracking form, record:
• Date/Time
• Operator
• Robot
• FMS tube barcodes
NOTE
To record information about your assay such as operator information, start and
stop times, and barcodes, use the lab tracking form provided at
www.illumina.com/documentation. This form can be filled out and saved online,
or printed and filled in by hand.
124
Part # 15045738 Rev. A
For instructions on preparing the robot for use in a protocol, see the Infinium Assay Lab
Setup and Procedures Guide.
CAUTION
Do not run any other programs or applications while using the Tecan robot.
Your computer and the robot may lock up and stop a run.
Refer to the figure shown below throughout this protocol.
Figure 82 Tecan Eight-Tip Robot (Fragment MSA3 Setup)
A
B
FMS tubes
MSA3 plate
Steps to Fragment the MSA3 Plate
1
Centrifuge the MSA3 plate to 50 × g for 1 minute.
2
At the robot PC, select MSA3 Tasks | Fragment MSA3.
3
(Other than Illumina LIMS) Make sure that the Use Barcodes checkbox is cleared. In
the Basic Run Parameters pane, change the value for Number of MSA3 plates and
Illumina Infinium HTS Assay Protocol Guide
125
Fragment DNA (Post-Amp)
Prepare Robot
Automated Protocol
Number of DNA samples per plate to indicate the number of samples being
processed.
NOTE
If you are using Illumina LIMS, you cannot change the number of DNA samples
on this screen. However, the LIMS software processes the correct number of
samples.
The robot PC updates the Required Run Items and the bed map to show the correct
position of items on the robot bed. All barcodes must face to the right.
Figure 83 Fragment MSA3 Screen
126
4
Place the MSA3 plate on the robot bed according to the bed map.
5
Remove the plate seal.
6
Place FMS tubes in the robot tube rack according to the bed map. Remove the cap.
7
On the lab tracking form, record the plate positions on the robot bed.
Part # 15045738 Rev. A
1
(Other than Illumina LIMS) At the robot PC, click Run.
2
(Illumina LIMS) At the robot PC:
a Make sure the Use Barcodes check box is checked.
b Click Run to start the process. Log in if prompted.
The robot PC sounds an alert and displays a message when the process is done.
3
When the robot finishes, click OK in the message box.
4
Remove the MSA3 plate from the robot bed and seal it with a cap mat.
5
Vortex at 1600 rpm for 1 minute.
6
Centrifuge to 50 × g for 1 minute at 22°C.
7
Place the sealed plate on the 37°C heat block for 1 hour.
8
On the lab tracking form, record the start and stop times.
9
Discard unused reagents in accordance with facility standards.
10 Do one of the following:
• Proceed to Precipitate the MSA3 Plate. Leave plate in 37°C heat block until you have
completed the preparatory steps. Do not leave the plate in the 37°C heat block for
longer than 2 hours.
• If you do not plan to proceed to the next step immediately, store the sealed MSA3
plate at -15°C to -25°C.
SAFE STOPPING POINT
Now is a good stopping point in the process.
Illumina Infinium HTS Assay Protocol Guide
127
Fragment DNA (Post-Amp)
Start the Robot
Automated Protocol
Precipitate DNA (Post-Amp)
PM1 and 2-propanol are added to the MSA3 plate to precipitate the DNA samples.
Figure 84 Precipitating DNA
Estimated Time
Robot time:
• 10 minutes for 48 samples
• 20 minutes for 96 samples
Incubation and dry time: 2 hours
Consumables
Item
Quantity
Storage
Supplied By
PM1
1 tube (per
96 samples)
2°C to 8°C
Illumina
100% 2-propanol
32 ml (per
96 samples)
Room
temperature
General lab
supplier
NOTE
Thaw all reagents completely at room temperature and allow to equilibrate.
After thawed, gently invert each tube several times to mix the reagent
thoroughly. Pulse centrifuge each tube to 280 × g to eliminate bubbles and
collect reagent at the bottom of the tube.
128
Part # 15045738 Rev. A
1
Preheat the heat block to 37°C.
2
If you froze the MSA3 plate, thaw it to room temperature, then pulse centrifuge to 50 ×
g.
3
Thaw PM1 to room temperature. Centrifuge to 280 × g for 1 minute.
} On the lab tracking form, record:
• Date/Time
• Operator
• Robot
• PM1 tube barcodes
• 2-propanol lot number and date opened
NOTE
To record information about your assay such as operator information, start and
stop times, and barcodes, use the lab tracking form provided at
www.illumina.com/documentation. This form can be filled out and saved online,
or printed and filled in by hand.
Prepare Robot
For instructions on preparing the robot for use in a protocol, see the Infinium Assay Lab
Setup and Procedures Guide.
Refer to the figure shown below throughout this protocol. Note that barcodes face to the
right.
Illumina Infinium HTS Assay Protocol Guide
129
Precipitate DNA (Post-Amp)
Preparation
Automated Protocol
Figure 85 Tecan Eight-Tip Robot (Precip MSA3 Setup)
A
B
C
PM1 in Half Reservoir
2-propanol in full Reservoir
MSA3 Plate
Verify MSA3 for Centrifugation (LIMS only)
1
In the Illumina LIMS left sidebar, click Infinium HTS | Spin MSA3.
2
Scan the barcodes of the MSA3 plates and click Verify, then click Save.
3
If the MSA3 plate is queued for centrifugation, a blue confirmation message appears at
the top of the window.
4
If the MSA3 plate is not queued for centrifugation, a red error message appears at the
top of the window. Do not proceed with centrifugation. Instead, follow these steps to
troubleshoot the problem:
a Click the Reports tab in the upper-right corner.
b In the left sidebar, click Tracking Reports | Get Queue Status.
c Scan the plate barcode and click Go.
d Note what step the plate is queued for, and proceed with that step.
For information about how to use Illumina LIMS, see the Illumina LIMS User Guide.
130
Part # 15045738 Rev. A
1
At the robot PC, select MSA3 Tasks | Precip MSA3.
2
(Other than Illumina LIMS) Make sure the Use Barcodes check box is cleared. In the
Basic Run Parameters pane, change the value for Number of MSA3 plates and
Number of DNA samples per plate to indicate the number of samples being
processed.
NOTE
If you are using Illumina LIMS, you cannot change the number of DNA samples
on this screen. However, the LIMS software processes the correct number of
samples.
The robot PC updates the Required Run Items and the bed map to show the correct
position of items on the robot bed. All barcodes must face to the right.
Figure 86 Precip MSA3 Screen
Illumina Infinium HTS Assay Protocol Guide
131
Precipitate DNA (Post-Amp)
Steps to Precipitate the MSA3 Plate
Automated Protocol
3
Remove the cap mat and place the MSA3 plate on the robot bed according to the bed
map.
4
Place a half reservoir in the reservoir frame, according to the robot bed map, and add
PM1 as follows:
• For 96 samples: 1 tube
5
Place a full reservoir in the reservoir frame, according to the robot bed map, and add
2-propanol as follows:
• For 96 samples: 32 ml
6
In the lab tracking form, record the plate positions on the robot bed.
7
Make sure that all items are placed properly on the robot bed, that all caps and seals
have been removed, and that all the barcodes face to the right.
Start the Robot
1
(Other than Illumina LIMS) At the robot PC, click Run.
2
(Illumina LIMS) At the robot PC:
a Ensure the Use Barcodes check box is checked.
b Click Run to start the process. Log in if prompted.
The robot PC sounds an alert and opens a message when the process is complete.
3
When prompted, remove the MSA3 plate from the robot bed. Do not click OK in the
message box yet.
4
Seal the MSA3 plate with the same cap mat removed earlier.
5
Vortex the sealed plate at 1600 rpm for 1 minute.
6
Incubate at 37°C for 5 minutes.
7
Centrifuge to 50 × g at room temperature for 1 minute.
NOTE
Set centrifuge to 4°C in preparation for the next centrifuge step.
8
Remove the cap mat and discard it.
9
Place the MSA3 plate back on the robot bed according to the bed map.
10 Click OK in the message box.
The robot PC sounds an alert and opens a message when the process is complete.
132
Part # 15045738 Rev. A
12 Invert the plate at least 10 times to mix contents thoroughly.
13 Incubate at 4°C for 30 minutes.
14 (Illumina LIMS) In the Illumina LIMS left sidebar, click Infinium HTS | Spin MSA3.
At the robot PC, click Run.
15 Place the sealed MSA3 plate in the centrifuge opposite another plate of equal weight.
Figure 87 Sealed MSA3 Plate and Plate of Equal Balance in Centrifuge
16 Centrifuge to 3,000 × g at 4°C for 20 minutes. Immediately remove the MSA3 plate from
centrifuge.
CAUTION
Perform the next step immediately to avoid dislodging the blue pellet. If any
delay occurs, repeat the 20-minute centrifugation before proceeding.
17 Remove the cap mat and discard it.
Illumina Infinium HTS Assay Protocol Guide
133
Precipitate DNA (Post-Amp)
11 Click OK in the message box. Remove the MSA3 plate from the robot bed and carefully
seal with a new, dry cap mat, taking care not to shake the plate in any way until the
cap mat is fully seated.
Automated Protocol
18 Quickly invert the MSA3 plate and drain the liquid onto an absorbent pad to decant
the supernatant. Then smack the plate down on a dry area of the pad, avoiding the
liquid that was drained onto the pad.
19 Tap firmly several times for 1 minute or until all wells are devoid of liquid.
CAUTION
Keep the plate inverted. To ensure optimal performance, do not allow
supernatant in wells to pour into other wells.
20 Leave the uncovered, inverted plate on the tube rack for 1 hour at room temperature to
air dry the pellet.
At this point, blue pellets should be present at the bottoms of the wells.
Figure 88 Uncovered MSA3 Plate Inverted for Air Drying
CAUTION
Do not over-dry the pellet. Pellets that are over-dried will be difficult to
resuspend. Poorly resuspended samples will lead to poor data quality.
21 Record the start and stop times onthe lab tracking form.
22 Discard unused reagents in accordance with facility standards.
134
Part # 15045738 Rev. A
SAFE STOPPING POINT
Now is a good stopping point in the process.
Illumina Infinium HTS Assay Protocol Guide
135
Precipitate DNA (Post-Amp)
23 Do one of the following:
• Proceed to Resuspend DNA (Post-Amp).
• If you do not plan to proceed to the next step immediately, seal the MSA3 plate
with a new cap mat and store at -15°C to -25°C.
Automated Protocol
Resuspend DNA (Post-Amp)
RA1 is added to the MSA3 plate to resuspend the precipitated DNA samples.
Figure 89 Resuspending DNA
Estimated Time
Robot time:
• 15 minutes for 96 samples
Incubation time: 1 hour
Consumables
Item
Quantity
Storage
Supplied By
RA1
7 ml per 96 samples
-15°C to -25°C
Illumina
NOTE
Pour out only the recommended volume of RA1 needed for the suggested
number of samples listed in the consumables table. Additional RA1 is used later
in the XStain BeadChip step.
WARNING
This protocol uses an aliphatic amide that is a probable reproductive toxin.
Personal injury can occur through inhalation, ingestion, skin contact, and eye
contact. For more information, consult the material data safety sheet for this
assay at www.illumina.com/msds. Dispose of containers and any unused
contents in accordance with the governmental safety standards for your
region.
136
Part # 15045738 Rev. A
1
RA1 is shipped frozen. Gradually warm the reagent to room temperature, preferably in
a 20C° to 25°C water bath. Gently mix to dissolve any crystals that may be present.
1
If you stored the MSA3 plate at -15°C to -25°C, thaw it to room temperature. Remove
the cap mat and discard it.
2
Preheat the Illumina Hybridization Oven to 48°C.
3
Preheat the heat sealer. Allow 20 minutes.
} On the lab tracking form, record:
• Date/Time
• Operator
• Robot
• RA1 bottle barcodes
NOTE
To record information about your assay such as operator information, start and
stop times, and barcodes, use the lab tracking form provided at
www.illumina.com/documentation. This form can be filled out and saved online,
or printed and filled in by hand.
Use Fresh RA1 Reagent for Each Step
It is important to use fresh RA1 for each protocol step in the assay where it is required.
RA1 that has been stored properly and has not been dispensed for use in either the XStain
or Resuspension step is considered fresh RA1. After RA1 has been poured out into a
reservoir and exposed to room temperature air for extended periods of time, it is no longer
fresh.
To make best use of RA1, only pour out the amount needed for the current step. If you plan
to perform additional assay steps requiring RA1 that same day, then leave the remaining
thawed reagent in the original, closed bottle at room temperature until it is needed.
Otherwise, follow the standard RA1 storage procedures described in this assay guide for
next-day processing and prolonged storage conditions.
Prepare Robot
For instructions on preparing the robot for use in a protocol, see the Infinium Assay Lab
Setup and Procedures Guide.
Illumina Infinium HTS Assay Protocol Guide
137
Resuspend DNA (Post-Amp)
Preparation
Automated Protocol
Refer to the figure shown below throughout this protocol. Note that all of the barcodes face
to the right.
Figure 90 Tecan Eight-Tip Robot (Resuspend MSA3 Setup)
A
B
RA1 in Quarter Reservoir
MSA3 Plate
Steps to Resuspend the MSA3 Plate
1
At the robot PC, select MSA3 Tasks | Resuspend MSA3.
2
(Other than Illumina LIMS) Make sure the Use Barcodes check box is cleared. In the
Basic Run Parameters pane, change the value for Number of MSA3 plates and
Number of DNA samples per plate to indicate the number of samples being
processed.
NOTE
If you are using Illumina LIMS, you cannot change the number of DNA samples
on this screen. However, the LIMS software processes the correct number of
samples.
The robot PC updates the Required Run Items and the bed map to show the correct
position of items on the robot bed. All barcodes must face to the right.
138
Part # 15045738 Rev. A
Resuspend DNA (Post-Amp)
Figure 91 Resuspend MSA3 Screen
3
Place the MSA3 plate on the robot bed according to the bed map.
4
Place a quarter reservoir in the reservoir frame, according to the robot bed map, and
add RA1 as follows:
• 7 ml for 96 samples
5
In the lab tracking form, record the plate positions on the robot bed and RA1 barcodes.
6
Make sure that all items are placed properly on the robot bed, that all caps and seals
have been removed, and that all the barcodes face to the right.
Start the Robot
1
(Other than Illumina LIMS) At the robot PC, click Run.
2
(Illumina LIMS) At the robot PC:
Illumina Infinium HTS Assay Protocol Guide
139
Automated Protocol
a Ensure the Use Barcodes check box is checked.
b Click Run to start the process. Log in if prompted.
The robot PC sounds an alert and opens a message when the process is complete.
3
Click OK in the message box. Remove the MSA3 plate from the robot bed.
4
Apply a foil seal to the MSA3 plate by firmly holding the heat sealer block down for 5
full seconds.
5
Place the sealed plate in the Illumina Hybridization Oven and incubate for 1 hour at
48°C.
6
In the lab tracking form, record the start and stop times.
7
Vortex the plate at 1800 rpm for 1 minute.
8
Pulse centrifuge to 280 × g.
NOTE
If you stored the DNA pellets at -15°C to -25°C for more than 72 hours, you
may need to re-vortex and centrifuge until the pellets are completely
resuspended.
9
Discard unused reagents in accordance with facility standards.
10 Do one of the following:
• Proceed to Hybridize to BeadChip (Post-Amp). If you plan to do so immediately, it is
safe to leave the RA1 at room temperature.
• If you do not plan to proceed to the next step immediately, store the sealed MSA3
plate at -15°C to -25°C for no more than 24 hours. Store at -80°C if storing for more
than 24 hours. Store RA1 at -15°C to -25°C.
SAFE STOPPING POINT
Now is a good stopping point in the process.
140
Part # 15045738 Rev. A
In this process, the fragmented and resuspended DNA samples are dispensed onto the
BeadChips. DNA-loaded BeadChips are placed into Hyb Chamber Inserts that are placed
inside the Hyb Chambers.
Once the DNA samples are loaded into the flow-through chambers, incubate the chambers
for 16–24 hours at 48°C in the Illumina Hybridization Oven. Hybridization occurs during
the incubation period. Each sample will be hybridized to an individual section of the
BeadChip.
Figure 92 Hybridizing DNA to BeadChip
Estimated Time
Robot time:
• 24x1 HTS BeadChip: ~25 minutes for 4 BeadChips (96 samples)
Incubation time: 16–24 hours
Consumables
Item
Quantity
Storage
Supplied By
Room
temperature
Illumina
(per 96 Samples)
PB2
1 tube
BeadChips
4
Illumina
Hyb chambers
1
Illumina
Illumina Infinium HTS Assay Protocol Guide
141
Hybridize to BeadChip (Post-Amp)
Hybridize to BeadChip (Post-Amp)
Automated Protocol
Item
Quantity
Storage
Supplied By
(per 96 Samples)
Hyb chamber gaskets
1
Illumina
Hyb chamber inserts
4
Illumina
Robot BeadChip
alignment fixtures
4
2
Illumina
Robot Tip Alignment Guide-G
(one-piece guide)
2
Illumina
1% aqueous Alconox solution
As needed
User
NOTE
Thaw all reagents completely at room temperature and allow to equilibrate.
After thawed, gently invert each tube several times to mix the reagent
thoroughly. Pulse centrifuge each tube to 280 × g to eliminate bubbles and
collect reagent at the bottom of the tube.
Preparation
142
1
If frozen, thaw MSA3 plate to room temperature, and then pulse centrifuge the MSA3
plate to 280 × g.
2
Preheat the heat block to 95°C.
3
Prepare the Illumina Hybridization Oven as follows:
a Preheat the oven to 48°C:
— Press the "F" button one time to change the display to TSET.
— Press the "S" button to enter the set-temperature mode, and then use the
Increment/Decrement dial to set the oven to 48°C.
— Press the "S" button again to set 48°C as the temperature.
b Set the rocker speed to 5:
— Press the "F" button twice until SPd is indicated on the display.
— Press the "S" button to enter the rocker speed mode.
— Use the Increment/Decrement dial to set the rocker speed to "5".
— Press the "S" button again.
Part # 15045738 Rev. A
Calibrate the Illumina Hybridization Oven with the Full-Scale Plus digital thermometer
supplied with your system.
5
On
•
•
•
the lab tracking form, record:
Date/Time
Operator
PB2 tube lot number
NOTE
To record information about your assay such as operator information, start and
stop times, and barcodes, use the lab tracking form provided at
www.illumina.com/documentation. This form can be filled out and saved online,
or printed and filled in by hand.
Prepare the Robot Tip Alignment Guide
1
Make sure that you have the correct Robot Tip Alignment Guide for the Infinium assay
you are running. The barcode says Guide-G.
Figure 93 Guide-G Robot Tip Alignment Guide
2
Wash and dry the entire one-piece Robot Tip Alignment Guide. See Wash Robot Tip
Alignment Guide at the end of the Hybridize Multi-BeadChip steps for washing
instructions.
3
Place the assembled Robot Tip Alignment Guides on the lab bench until it is time to
place them on the robot bed.
Illumina Infinium HTS Assay Protocol Guide
143
Hybridize to BeadChip (Post-Amp)
4
Automated Protocol
Assemble the Hybridization Chambers
1
Prepare the hyb chambers.
Place the following items on the bench top per 96 samples:
• For the 24 x 1 HTS BeadChip:
— BeadChip hyb chambers (1)
— Hyb chamber gaskets (1)
— Robot BeadChip alignment fixtures (2)
— BeadChip hyb chamber inserts (4)
Figure 94 BeadChip Hyb Chamber Components
A
B
C
144
BeadChip Hyb Chambers
Hyb Chamber Gaskets
Hyb Chamber Inserts
Part # 15045738 Rev. A
a
Place the BeadChip Hyb Chamber gaskets into the BeadChip Hyb Chambers.
— Match the wider edge of the Hyb Chamber Gasket to the barcode-ridge side of
the Hyb Chamber.
Figure 95 Hyb Chamber and Gasket
A
B
C
D
Reservoirs
Barcode Ridges
Narrower Edges
Wider Edges
— Lay the gasket into the Hyb Chamber, and then press it down all around.
Illumina Infinium HTS Assay Protocol Guide
145
Hybridize to BeadChip (Post-Amp)
NOTE
To ensure optimal results from Hyb Chambers, keep the Hyb Chamber lids and
bases together. Adopt a labeling convention that keeps each Hyb Chamber base
paired with its original lid. Check Hyb Chamber lid-base pairs regularly to
make sure that the fit remains secure. Check hinges regularly for any signs of
abnormal wear or loose fittings. It is important that the hinges provide
adequate clamping strength to ensure an airtight seal between the lid and the
base. Record the Hyb Chamber that was used for each BeadChip, so that Hyb
Chambers can be investigated and evaluated in the event of sample evaporation
or other lab processing anomalies.
Automated Protocol
Figure 96 Placing Gasket into Hyb Chamber
— Make sure the Hyb Chamber gaskets are properly seated.
Figure 97 Hyb Chamber with Gasket in Place
b
146
Dispense 400 μl PB2 into the humidifying buffer reservoirs in the Hyb Chambers.
Part # 15045738 Rev. A
Hybridize to BeadChip (Post-Amp)
Figure 98 Dispensing PB2 into Hyb Chamber Reservoir
WARNING
Do not replace PB2 in the Hyb Chamber with RA1. RA1 decreases the
stringency and can negatively affect sample call rates and logRdev. PB2 is
formulated to produce the appropriate amount of humidity within the Hyb
Chamber environment to prevent sample from evaporating during
hybridization.
c
d
After you fill the Hyb Chamber reservoirs with PB2, place the lid on the Hyb
Chamber right away to prevent evaporation. It is not necessary to lock down the
lid.
Leave the closed Hyb Chambers on the bench at room temperature until the
BeadChips are loaded with DNA sample. Load BeadChips into the Hyb Chamber
within one hour.
NOTE
You can also prepare the hyb chambers later, during the 30 minute cool down.
2
Place the hyb chamber inserts into the hyb chambers.
Illumina Infinium HTS Assay Protocol Guide
147
Automated Protocol
148
3
Remove the BeadChips from 2°C to 8°C storage but do not unpackage.
4
(Illumina LIMS only) In the Illumina LIMS left sidebar, click Infinium HTS | Confirm
BeadChips for Hyb.
5
Scan the barcode of the MSA3 plate and all the BeadChips you plan to hybridize with
the plate. Click Verify.
6
Place the resuspended MSA3 plate on the heat block to denature the samples at 95°C
for 20 minutes.
7
After the 20 minute incubation, remove the MSA3 plate from the heat block and place
it on the benchtop at room temperature for 30 minutes.
8
After the 30 minute cool down, pulse centrifuge the MSA3 plate to 280 × g.
Part # 15045738 Rev. A
For instructions on preparing the robot for use in a protocol, see the Infinium Assay Lab
Setup and Procedures Guide.
Refer to the figure below throughout this protocol. Note that all of the plate barcodes face to
the right.
Figure 99 Placing Alignment Fixtures and MSA3 Plate onto Robot Bed
A
B
MSA3 Plate
Robot BeadChip Alignment Fixtures
Verify MSA3 and BeadChips for Hybridization (LIMS only)(Optional)
1
Scan the barcode of the MSA3 plate.
2
Scan the barcodes of all the BeadChips you plan to hybridize with the plate. You can
scan up to 24 BeadChips.
NOTE
Only scan BeadChips that have been accessioned into the system. The BeadChip
type must match the type associated with this batch in Illumina LIMS.
Illumina Infinium HTS Assay Protocol Guide
149
Hybridize to BeadChip (Post-Amp)
Prepare the Robot
Automated Protocol
3
Click Verify.
4
If the MSA3 plate and BeadChips are queued for hybridization, a blue confirmation
message appears at the top of the window. Proceed to Load BeadChips.
If the MSA3 plate is not queued for hybridization, if any of the BeadChips have not
been accessioned into the system, or if any of the BeadChips are the wrong type, a red
error message appears at the top of the window. The error message indicates the first
incorrect barcode it finds. Do not proceed with hybridization; complete the following
steps instead:
a Click the Reports tab in the upper-right corner.
b In the left sidebar, click Tracking | Get Queue Status.
c Scan the plate barcode and click Go.
d If the plate is queued for another step, proceed with that step.
5
If one of the BeadChips is not accessioned into the system, accession it and then repeat
the verification step.
6
If one of the BeadChips is not the right type for this batch, accession one that is the
right type and repeat the verification step.
7
When the verification is successful, proceed to Load BeadChips.
Load BeadChips
1
Remove all BeadChips from their plastic bags and mylar packages.
CAUTION
Hold the BeadChip by the ends with your thumb and forefinger (thumb at the
barcode end). Do not hold the BeadChip by the sides near the sample inlets.
Avoid contacting the beadstripe area and sample inlets.
2
150
Place BeadChips into the Robot BeadChip alignment fixtures with the barcode end
aligned to the ridges on the fixture.
Part # 15045738 Rev. A
Hybridize to BeadChip (Post-Amp)
Figure 100 Placing BeadChips in Robot BeadChip Alignment Fixture
3
Stack the Robot BeadChip alignment fixtures and carry them to the robot.
Figure 101 Stacked Robot BeadChip Alignment Fixtures
4
Choose the appropriate BeadChip from the BeadChip Selection dialog box.
5
(Other than Illumina LIMS) In the Basic Run Parameters pane, change the value for
Number of MSA3 plates and Number of DNA samples per plate to indicate the
number of samples being processed.
NOTE
If you are using Illumina LIMS, you cannot change the number of DNA samples
on this screen. However, the LIMS software processes the correct number of
samples.
The robot PC updates the Required Run Items and the bed map to show the correct
position of items on the robot bed. All barcodes must face to the right.
Illumina Infinium HTS Assay Protocol Guide
151
Automated Protocol
6
Place the Robot BeadChip Alignment Fixtures onto the robot bed according to the bed
map.
7
On the lab tracking form, record the plate position on the robot bed, BeadChip serial
numbers, and BeadChip positions.
8
Pulse centrifuge the MSA3 plate to 280 × g.
9
Place the MSA3 plate onto the robot bed according to the bed map. Remove the foil
seal.
Start the Robot
1
(Other than Illumina LIMS) At the robot PC, click Run.
2
(Illumina LIMS) At the robot PC:
a Make sure the Use Barcodes check box is checked.
b Click Run to start the process. Log in if prompted.
The robot scans the barcodes on the BeadChips to confirm the correct BeadChips
are loaded. Once the correct BeadChips are confirmed, the robot pauses.
3
At the robot PC, click OK to confirm you have placed the Robot Tip Alignment Guide
on top of the Robot BeadChip alignment fixture. The robot scans the barcode on the
Robot Tip Alignment Guide to confirm the correct tip guide is being used.
Figure 102 Robot Tip Alignment Guides on Robot Bed
152
Part # 15045738 Rev. A
4
Click OK in the message box.
5
Carefully remove the Robot BeadChip alignment fixtures from the robot bed and
visually inspect all sections of the BeadChips. Make sure DNA sample covers all of the
sections of each bead stripe. Record any sections that are not completely covered.
Set up Multi-BeadChip for Hybridization
1
Make sure the Illumina Hybridization Oven is set to 48°C.
WARNING
Hyb Chambers should be at room temperature when you load the
BeadChips. They should not be preconditioned in the Illumina
Hybridization Oven prior to loading the BeadChips. Heating the PB2 and
then opening the Hyb Chamber to add BeadChips causes some of the PB2 to
evaporate, leading to a change in the osmolality of PB2 and an imbalance in
the vapor pressure between PB2 and RA1 (sample hyb buffer).
CAUTION
Hold the BeadChip by the ends with your thumb and forefinger (thumb at the
barcode end). Do not hold the BeadChip by the sides near the sample inlets.
Avoid contacting the beadstripe area and sample inlets.
2
Carefully remove each BeadChip from the Robot BeadChip alignment fixtures when the
robot finishes.
CAUTION
For optimal performance, take care to keep the Hyb Chamber inserts
containing BeadChips steady and level when lifting or moving. Avoid shaking
and keep parallel to the lab bench at all times. Do not hold by the sides near the
sample inlets.
3
Calibrate the Illumina Hybridization Oven with the Full-Scale Plus digital thermometer
supplied with your system.
4
Carefully place each BeadChip in a Hyb Chamber insert, orienting the barcode end so
that it matches the barcode symbol on the insert.
Illumina Infinium HTS Assay Protocol Guide
153
Hybridize to BeadChip (Post-Amp)
The robot dispenses sample to the BeadChips.
The robot PC sounds an alert and opens a message when the process is complete.
Automated Protocol
Figure 103 Matching the Barcode End to the Insert Fixture
5
Load the Hyb Chamber inserts containing loaded BeadChips inside the Illumina Hyb
Chamber. Position the barcode over the ridges indicated on the Hyb Chamber.
Figure 104 Placing Hyb Chamber Inserts into Hyb Chamber 154
6
Ensure Hyb Chamber inserts are seated properly.
7
(Illumina LIMS) In the Illumina LIMS left sidebar click Infinium HTS | Infinium
Prepare Hyb Chamber.
8
Scan the barcodes of the PB2 tubes and scan the BeadChip barcodes. Click Verify, and
then click Save.
9
Position the lid onto the Hyb Chamber by applying the backside of the lid first and
then slowly bringing down the front end to avoid dislodging the Hyb Chamber inserts.
Part # 15045738 Rev. A
10 Close the clamps on both sides of the Hyb Chamber so that the lid is secure and even
on the base (no gaps).
It is best to close them in a kitty-corner fashion, closing first the top left clamp, then the
bottom right, then the top right followed by the bottom left.
NOTE
Keep the Hyb Chamber steady and level when moving it or transferring it to
the Illumina Hybridization Oven.
11 Place the Hyb Chamber in the 48°C Illumina Hybridization Oven so that the clamps of
the Hyb Chamber face the left and right side of the oven and the Illumina logo on top
of the Hyb Chamber is facing you.
Illumina Infinium HTS Assay Protocol Guide
155
Hybridize to BeadChip (Post-Amp)
Figure 105 Seating Lid onto Hyb Chamber
Automated Protocol
Figure 106 Hyb Chamber Correctly Placed in Hyb Oven
NOTE
If you are stacking multiple Hyb Chambers in the Illumina Hybridization Oven,
make sure the feet of the top Hyb Chamber fit into the matching indents on top
of the bottom Hyb Chamber. This will hold the Hyb Chambers in place while
they are rocking. You can stack up to 3 Hyb Chambers per row for a maximum
of 6 Hyb Chambers total in the Illumina Hybridization Oven.
156
Part # 15045738 Rev. A
Hybridize to BeadChip (Post-Amp)
Figure 107 Two Hyb Chambers Correctly Placed in Hyb Oven
Figure 108 Incorrectly Placed Hyb Chamber
12 [Optional] Start the rocker, setting the speed to 5.
Illumina Infinium HTS Assay Protocol Guide
157
Automated Protocol
OVERNIGHT INCUBATION
Incubate at 48°C for at least 16 hours but no more than 24 hours.
13 Record the start and stop times on the lab tracking form.
14 Proceed to Wash BeadChip (Post-Amp) after the overnight incubation.
Resuspend XC4 Reagent for XStain BeadChip
Keep the XC4 in the bottle in which it was shipped until you are ready to use it. In
preparation for the XStain protocol, follow these steps to resuspend the XC4 reagent.
1
Add 330 ml 100% EtOH to the XC4 bottle.
The final volume will be 350 ml. Each XC4 bottle has enough solution to process up to
24 BeadChips.
2
Shake vigorously for 15 seconds.
3
Leave the bottle upright on the lab bench overnight.
NOTE
If the XC4 was not left to resuspend overnight, you can still proceed with the assay. Add the
EtOH and put the XC4 on its side on a rocker to resuspend. Leave it there until the
BeadChips are ready for coating.
4
158
Shake the XC4 bottle vigorously to ensure complete resuspension. If any coating is
visible, vortex at 1625 rpm until it is in complete suspension. After it is resuspended,
use XC4 at room temperature.
Part # 15045738 Rev. A
For optimal performance, wash and dry the Robot Tip Alignment Guides after every run.
1
Soak the tip guide inserts in a 1% aqueous Alconox solution (one part Alconox to 99
parts water) using a 400 ml Pyrex beaker for 5 minutes.
NOTE
Do not use bleach or ethanol to clean the tip guide inserts.
2
After the 5 minute soak in the 1% Alconox solution, thoroughly rinse the tip guides
with DiH2O at least three times to remove any residual detergent.
3
Dry the Robot Tip Alignment Guide using a Kimwipe or lint-free paper towels. Use a
laboratory air gun to dry. Be sure to inspect the tip guide channels, including the top
and bottom. Tip guides should be completely dry and free of any residual contaminates
before next use.
Illumina Infinium HTS Assay Protocol Guide
159
Hybridize to BeadChip (Post-Amp)
Wash the Robot Tip Alignment Guide
Automated Protocol
Wash BeadChip (Post-Amp)
Remove the cover seals from the BeadChips and wash the BeadChips in two separate PB1
reagent washes. Then, assemble the BeadChips into flow-through chambers under the PB1
buffer.
Figure 109 Washing BeadChip
Estimated Time
• 20 minutes for 4 BeadChips
• 30 minutes for 8 BeadChips
160
Part # 15045738 Rev. A
Item
Quantity
Storage
Supplied By
PB1
550 ml for 1 to 8
BeadChips
700 ml for 9 to 16
BeadChips
850 ml for 17 to 24
BeadChips
Room
temperature
Illumina
Multi-sample BeadChip
alignment fixture
1 (per 8 BeadChips)
Illumina
Te-Flow LCG flow-through
chambers, with black frames,
LCG spacers, LCG glass back
plates, and clamps
1 (per BeadChip)
Illumina
Wash dish
2 (up to 8 BeadChips)
Illumina
Wash rack
1 (up to 8 BeadChips)
Illumina
CAUTION
Pour only the recommended reagent volume needed for the suggested number
of samples listed in the Consumables table of each section. Some reagents are
used later in the protocol.
WARNING
This protocol uses an aliphatic amide that is a probable reproductive toxin.
Personal injury can occur through inhalation, ingestion, skin contact, and eye
contact. For more information, consult the material data safety sheet for this
assay at www.illumina.com/msds. Dispose of containers and any unused
contents in accordance with the governmental safety standards for your
region.
Illumina Infinium HTS Assay Protocol Guide
161
Wash BeadChip (Post-Amp)
Consumables
Automated Protocol
Preparation
1
Remove each Hyb Chamber from the Illumina Hybridization Oven. Let cool on the
benchtop for 30 minutes before opening.
2
Have ready on the lab bench:
a Two wash dishes:
b Containing 200 ml PB1, and labeled as such
c Multi-Sample BeadChip Alignment Fixture
d Using a graduated cylinder, fill with 150 ml PB1
— Black frames
— LCG spacers (separated for ease of handling)
— Clean LCG glass back plates as directed in the Infinium Lab Setup and Procedures
Guide.
— Clamps
3
On
•
•
•
•
the lab tracking form, record:
Date/Time
Operator
PB1 bottle barcode
Robot
NOTE
To record information about your assay such as operator information, start and
stop times, and barcodes, use the lab tracking form provided at
www.illumina.com/documentation. This form can be filled out and saved online,
or printed and filled in by hand.
Verify Reagents and BeadChips for Washing (LIMS only)
162
4
Scan the barcodes of the PB1.
5
Scan the BeadChip barcodes.
6
Click Verify and then click Save.
7
If the reagents are correct and the BeadChips are queued for washing, a blue
confirmation message appears at the top of the window. Proceed to Steps to Wash
BeadChip.
Part # 15045738 Rev. A
If any of the reagents are invalid, check the reagent type before re-scanning. The reagent
name (e.g., PB1) appears at the end of the barcode. Make sure to scan the correct
reagent into each box.
9
If any of the BeadChips are not queued for washing, a red error message appears at the
top of the window. The error message indicates the first incorrect barcode it finds. Do
not proceed with washing. Instead, follow these steps to troubleshoot the problem:
a Click the Reports tab in the upper-right corner.
b In the left sidebar, click Tracking Reports | Get Queue Status.
c Scan the BeadChip barcode that appeared in the error message and click Go.
d Note what step the BeadChip is queued for, and proceed with that step.
For information about how to use Illumina LIMS, see the Illumina LIMS User Guide.
Steps to Wash BeadChip
1
Attach the wire handle to the rack and submerge the wash rack in the wash dish
containing 200 ml PB1.
Figure 110 Wash Rack in Wash Dish Containing PB1
2
Remove the Hyb Chamber inserts from the Hyb Chambers.
3
Remove BeadChips from the Hyb Chamber inserts one at a time.
Illumina Infinium HTS Assay Protocol Guide
163
Wash BeadChip (Post-Amp)
8
Automated Protocol
4
Remove the cover seal from each BeadChip.
NOTE
To make sure that no solution splatters on you, Illumina recommends removing
the cover seal over an absorbent cloth or paper towels, preferably in a hood.
a
b
Using powder-free gloved hands, hold the BeadChip securely and by the edges in
one hand. Avoid contact with the sample inlets. Make sure that the barcode is
facing up and closest to you, and that the top side of the BeadChip is angled
slightly away from you.
Remove the entire seal in a single, continuous motion. Start with a corner on the
barcode end and pull with a continuous upward motion away from you and
towards the opposite corner on the top side of the BeadChip.
Figure 111 Removing the Cover Seal
c
Discard the cover seal.
CAUTION
Do not touch the arrays!
5
164
Immediately and carefully slide each BeadChip into the wash rack, one at a time,
making sure that the BeadChip is completely submerged in the PB1.
Part # 15045738 Rev. A
Wash BeadChip (Post-Amp)
Figure 112 Submerging BeadChips in Wash Dish Containing PB1
6
Repeat steps 4 through 5 until all BeadChips (a maximum of 8) are transferred to the
submerged wash rack.
NOTE
You can use the two 200 ml PB1 wash dishes for up to 24 BeadChips. However, use 150 ml of
fresh PB1 for every 8 BeadChips in the Multi-Sample BeadChip Alignment Fixture.
7
After all BeadChips are in the wash rack, move the wash rack up and down for
1 minute, breaking the surface of the PB1 with gentle, slow agitation.
8
Move the wash rack to the other wash dish containing clean PB1. Make sure the
BeadChips are completely submerged.
9
Move the wash rack up and down for 1 minute, breaking the surface of the PB1 with
gentle, slow agitation.
10 When you remove the BeadChips from the wash rack, inspect them for remaining
residue.
Illumina Infinium HTS Assay Protocol Guide
165
Automated Protocol
NOTE
Residue that can adversely affect results is sometimes left on BeadChips after
seals are removed. If there is residue left on the BeadChips after the second PB1
wash, use a 200 μl pipette tip for each BeadChip and slowly and carefully scrape
off the residues outward (away) from the bead-sections under PB1. Use a new
pipette tip for each BeadChip. Then, continue with the protocol.
11 If you are processing more than 8 BeadChips
a Assemble the flow-through chambers for the first 8 BeadChips, as described in the
next section, and place them on the lab bench in a horizontal position.
NOTE
Keep the flow-through chambers in a horizontal position on the lab bench until
all assembled flow-through chambers are ready to be loaded into the chamber
rack. Do not place the flow-through chambers in the chamber rack until all
BeadChips are prepared in flow-through chambers.
b
c
Return to this procedure and follow the steps described above to wash the next set
of 8 BeadChips.
Repeat for each remaining set of 8 BeadChips.
Assemble Flow-Through Chambers
NOTE
Confirm that you are using the correct Infinium LCG glass back plates and
spacers before assembling the flow-through chambers. Refer to the following
image for the correct flow-through chamber components.
166
Part # 15045738 Rev. A
If you have not done so, fill the Multi-sample BeadChip Alignment Fixture with 150 ml
PB1.
If you plan to process more than 4 BeadChips, this 150 ml of PB1 can be reused for an
additional set of 4 BeadChips. Use 150 ml of fresh PB1 for every additional set of 8
BeadChips.
2
For each BeadChip to be processed, place a black frame into the Multi-Sample
BeadChip Alignment Fixture pre-filled with PB1.
Figure 113 Placing Black Frames into Multi-Sample BeadChip Alignment Fixture
3
Place each BeadChip to be processed into a black frame, aligning its barcode with the
ridges stamped onto the Alignment Fixture.
NOTE
Inspect the surface of each BeadChip for residue left by the seal. Use a pipette tip
to remove any residue under buffer and be careful not to scratch the bead area.
Illumina Infinium HTS Assay Protocol Guide
167
Wash BeadChip (Post-Amp)
1
Automated Protocol
Figure 114 Placing BeadChip into Black Frame on Alignment Fixture
4
Place a clear LCG spacer onto the top of each BeadChip. Use the alignment fixture
grooves to guide the spacers into proper position.
NOTE
Be sure to use the clear plastic spacers, not the white ones.
Figure 115 Placing Clear Plastic Spacer onto BeadChip
168
Part # 15045738 Rev. A
Wash BeadChip (Post-Amp)
5
Place the alignment bar onto the alignment fixture.
The groove in the alignment bar fits over the tab on the alignment fixture.
Figure 116 Placing Alignment Bar onto Alignment Fixture
6
Place a clean LCG glass back plate on top of the clear spacer covering each BeadChip.
The plate reservoir is at the barcode end of the BeadChip, facing inward to create a
reservoir against the BeadChip surface.
Illumina Infinium HTS Assay Protocol Guide
169
Automated Protocol
Figure 117 Placing Glass Back Plate onto BeadChip
A
B
7
170
Reservoir at Barcode End of Glass Back Plate
Glass Back Plate in Position
Attach the metal clamps to the flow-through chambers as follows:
a Gently push the glass back plate up against the alignment bar with one finger.
b Place the first metal clamp around the flow-through chamber so that the clamp is
approximately 5 mm from the top edge.
c Place the second metal clamp around the flow-through chamber at the barcode
end, approximately 5 mm from the reagent reservoir.
Part # 15045738 Rev. A
Wash BeadChip (Post-Amp)
Figure 118 Securing Flow-Through Chamber Assembly with Metal Clamps
A
B
C
8
One Stripe Shows Between First Clamp and Alignment Bar
Glass Back Plate Pressed Against Alignment Bar
No Stripes Show Between Second Clamp and Barcode
Using scissors, trim the ends of the clear plastic spacers from the flow-through
chamber assembly. Slip scissors up over the barcode to trim the other end.
Illumina Infinium HTS Assay Protocol Guide
171
Automated Protocol
Figure 119 Trimming Spacer Ends from Flow-Through Chamber Assembly
A
B
9
Trim Spacer at Non-Barcode End of Flow-Through Chamber
Trim Spacer at Barcode End of Flow-Through Chamber
Immediately wash the Hyb Chamber reservoirs with DiH2O and scrub them with a
small cleaning brush, ensuring that no PB2 remains in the Hyb Chamber reservoir.
CAUTION
It is important to wash the Hybridization Chamber reservoirs immediately and
thoroughly to ensure that no traces of PB2 remain in the wells.
10 Discard unused reagents in accordance with facility standards.
11 Proceed to Extend and Stain (XStain) BeadChip (Post-Amp).
CAUTION
Place all assembled flow-through chambers on the lab bench in a horizontal
position while you perform the preparation steps for the XStain BeadChip. Do
not place the flow-through chambers in the chamber rack until the preparation
is complete.
172
Part # 15045738 Rev. A
In this process, you use RA1 reagent to wash away unhybridized and non-specifically
hybridized DNA sample. LX1 and LX2 are added to condition the BeadChip surface for the
extension reaction. Dispense EML reagent into the flow-through chambers to extend the
primers hybridized to DNA on the BeadChip. This reaction incorporates labeled
nucleotides into the extended primers. 95% formamide/1 mM EDTA is added to remove the
hybridized DNA. After neutralization using the XC3 reagent, the labeled extended primers
undergo a multi-layer staining process on the chamber rack. Next, you disassemble the
flow-through chambers and wash the BeadChips in the PB1 reagent, coat them with XC4,
and then dry them.
Figure 120 Extending and Staining BeadChip
Estimated Time
Robot time:
• ~2 hours and 45 minutes for 8 BeadChips
• ~3 hours for 16 BeadChips
• ~3 hours and 10 minutes for 24 BeadChips
Dry time: 55 minutes
Illumina Infinium HTS Assay Protocol Guide
173
Extend and Stain (XStain) BeadChip (Post-Amp)
Extend and Stain (XStain) BeadChip (Post-Amp)
Automated Protocol
Consumables
174
Item
Quantity
Storage
Supplied By
RA1
10 ml for 1–8
BeadChips
20 ml for 9–16
BeadChips
30 ml for 17–24
BeadChips
-15°C to -25°C
Illumina
LX1
2 tubes (per 8
BeadChips)
-15°C to -25°C
Illumina
LX2
2 tubes (per 8
BeadChips)
-15°C to -25°C
Illumina
EML
2 tubes (per 8
BeadChips)
-15°C to -25°C
Illumina
XC3
50 ml for 1–8
BeadChips
100 ml for 9–16
BeadChips
150 ml for 17–24
BeadChips
Room
temperature
Illumina
SML (Make sure that all SML
tubes indicate the same stain
temperature on the label)
2 tubes (per 8
BeadChips)
-15°C to -25°C
Illumina
ATM
2 tubes (per 8
BeadChips)
-15°C to -25°C
Illumina
PB1
310 ml for 1–8
BeadChips
285 ml for 9–24
BeadChips
Room
temperature
Illumina
XC4
310 ml for 1–8
BeadChips
285 ml for 9–24
BeadChips
Room
temperature
Illumina
Part # 15045738 Rev. A
Quantity
Storage
Supplied By
Alconox Powder Detergent
As needed
Room
temperature
General lab
supplier
EtOH
As needed
Room
temperature
General lab
supplier
95% formamide/1 mM EDTA
15 ml for 1–8
BeadChips
17 ml for 9–16
BeadChips
25 ml for 17–24
BeadChips
-15°C to -25°C
General lab
supplier
CAUTION
Pour out only the recommended reagent volume needed for the suggested
number of beadchips listed in the consumables table of each section. Some of
the reagents are used later in the protocol.
NOTE
It is important to use fresh RA1 for each protocol step in the assay where it is
required. RA1 that has been stored properly and has not been dispensed for use
in either the XStain or Resuspension step is considered fresh RA1. After RA1 has
been poured out into a reservoir and exposed to room temperature air for
extended periods of time, it is no longer fresh.
WARNING
This protocol uses an aliphatic amide that is a probable reproductive toxin.
Personal injury can occur through inhalation, ingestion, skin contact, and eye
contact. For more information, consult the material data safety sheet for this
assay at www.illumina.com/msds. Dispose of containers and any unused
contents in accordance with the governmental safety standards for your
region.
Preparation
} RA1 is shipped frozen. Gradually warm the reagent to room temperature, preferably in
a 20° to 25°C water bath. Gently mix to dissolve any crystals that may be present.
1
Place all reagent tubes in a rack in the order in which they will be used. If frozen, allow
them to thaw to room temperature, and then gently invert the reagent tubes at least 10
times to mix contents.
Illumina Infinium HTS Assay Protocol Guide
175
Extend and Stain (XStain) BeadChip (Post-Amp)
Item
Automated Protocol
Figure 121 XStain BeadChip Reagent Tubes and Bottles
A
B
C
D
E
F
G
H
I
J
} On
•
•
•
•
•
•
•
•
•
176
RA1 XC3
LX1
LX2
EML
95% Formamide / 1mM EDTA
SML
ATM
PB1
XC4
the lab tracking form, record:
Date/Time
Operator
Robot
RA1 barcode
XC3 barcode
LX1 barcodes
LX2 barcodes
EML barcodes
SML barcodes
Part # 15045738 Rev. A
NOTE
To record information about your assay such as operator information, start and
stop times, and barcodes, use the lab tracking form provided at
www.illumina.com/documentation. This form can be filled out and saved online,
or printed and filled in by hand.
Set Up Chamber Rack
1
Make sure that the water circulator reservoir is filled with water to the appropriate
level. See the VWR Operator Manual, VWR part # 110-229.
2
Turn on the water circulator and set it to a temperature that brings the chamber rack to
44°C at equilibrium.
This temperature can vary depending on facility ambient conditions.
Illumina Infinium HTS Assay Protocol Guide
177
Extend and Stain (XStain) BeadChip (Post-Amp)
• ATM barcodes
• PB1 barcode
• XC4 barcodes
Automated Protocol
Figure 122 Water Circulator Connected to Chamber Rack
A
B
C
178
Chamber Rack
Water Circulator with Programmable Temperature Controls
Reservoir Cover
3
The temperature displayed on the water circulator LCD screen may differ from the
actual temperature on the chamber rack. Confirm the actual temperature using the
temperature probe for the chamber rack.
4
Make sure that you remove bubbles trapped in the chamber rack each time you run
this process. Follow instructions in the Te-Flow (Tecan Flow-Through Module) Operating
Manual, Tecan Doc ID 391584.
5
Use the Illumina Temperature Probe in several locations to make sure that the chamber
rack is at 44°C. Make sure that all locations are at 44°C ± 0.5°C.
Part # 15045738 Rev. A
Figure 123 Illumina Temperature Probe and Temperature Probe in Chamber Rack
6
For accurate temperature measurement, ensure the Illumina Temperature Probe is
touching the base of the chamber rack.
Illumina Infinium HTS Assay Protocol Guide
179
Extend and Stain (XStain) BeadChip (Post-Amp)
NOTE
Do not leave the temperature probe in the first three rows of the chamber rack.
Reserve this space for BeadChips.
Automated Protocol
Prepare Robot
For instructions on preparing the robot for use in a protocol, see the Infinium Assay Lab
Setup and Procedures Guide
Refer to the figure shown below throughout this protocol.
Figure 124 Tecan Eight-Tip Robot (XStain BeadChip Setup)
A
B
C
D
E
F
G
H
I
J
LX1
LX2
EML
SML
ATM
XC3 in Full Reservoir
RA1 in Half Reservoir
95% Formamide / 1 mM EDTA in Quarter Reservoir
24 BeadChips in Chamber Rack
Temperature Probe
Single-Base Extension and Stain
CAUTION
The remaining steps must be performed without interruption.
180
1
Slide the chamber rack into column 36 on the robot bed. Make sure that it is seated
properly.
2
At the robot PC, select XStain Tasks | XStain LCG BeadChip.
Part # 15045738 Rev. A
In the Basic Run Parameters pane, enter the number of BeadChips.
You can process up to 24 BeadChips in the XStain BeadChip process.
The robot PC updates the Required Run Items and the bed map to show the correct
position of items on the robot bed. All barcodes must face to the left.
4
If you plan on imaging the BeadChip immediately after the staining process, turn on
the iScan or HiScan now to allow the lasers to stabilize.
5
Place a quarter reservoir in the reservoir frame, according to the robot bed map, and
add 95% formamide/1 mM EDTA as follows:
• 15 ml to process 8 BeadChips
• 17 ml to process 16 BeadChips
• 25 ml to process 24 BeadChips
6
Place a half reservoir in the reservoir frame, according to the robot bed map, and add
RA1 in the following volumes:
• 10 ml to process 8 BeadChips
Illumina Infinium HTS Assay Protocol Guide
181
Extend and Stain (XStain) BeadChip (Post-Amp)
3
Automated Protocol
• 20 ml to process 16 BeadChips
• 30 ml to process 24 BeadChips
7
Place a full reservoir in the reservoir frame, according to the robot bed map, and add
XC3 in the following volumes:
• 50 ml to process 8 BeadChips
• 100 ml to process 16 BeadChips
• 150 ml to process 24 BeadChips
8
Place each reagent tube (LX1, LX2, EML, SML, ATM) in the robot tube rack according
to the bed map, and remove their caps.
9
Make sure that all items are placed properly on the robot bed, that all caps and seals
have been removed, and that all the barcodes face to the right.
Start Robot
1
(Other than Illumina LIMS) At the robot PC, click Run.
2
(Illumina LIMS) At the robot PC:
a Ensure that the Use Barcodes check box is checked.
b In the Basic Run Parameters pane, change the value for Number of BeadChips to
indicate the number of BeadChips being processed.
c Click Run to start the process. Log in if prompted.
3
When prompted, enter the stain temperature indicated on the SML tube.
NOTE
If you are using Illumina LIMS you will not be prompted to enter the staining
temperature. Illumina LIMS will automatically set the correct temperature based on the
SML tube barcodes.
182
4
When the prompt appears, wait for the Chamber Rack to reach 44°C. Do not load the
BeadChips or click OK yet.
5
Once the temperature probe registers 44°C, click OK.
6
When prompted, load the BeadChips and click OK.
7
Place each assembled flow-through chamber in the first row of the chamber rack. Refer
to the robot bed map for the correct layout.
8
Ensure each flow-through chamber is properly seated on its rack to allow adequate
heat exchange between the rack and the chamber.
Part # 15045738 Rev. A
On the lab tracking form, record the chamber rack position associated with each
BeadChip.
10 Click OK. A series of reactions begins, each with a wait time. Message boxes on the
robot PC tell you which reaction is occurring and how long the wait time is.
Table 15 List of Reactions
#
Reagent
Wait Time
1
RA1
3 minutes
2
LX1
10 minutes
3
LX2
10 minutes
4
EML
15 minutes
5
Formamide/EDTA
7 minutes
6
XC3
2 minutes
7
SML
10 minutes
8
XC3
7 minutes
9
ATM
10 minutes
10
XC3
7 minutes
11
SML
10 minutes
12
XC3
7 minutes
13
ATM
10 minutes
14
XC3
7 minutes
15
SML
10 minutes
16
XC3
7 minutes
11 When prompted, remove the BeadChips from the chamber rack immediately and place
them horizontally on the lab bench at room temperature. Click OK in the message box.
Illumina Infinium HTS Assay Protocol Guide
183
Extend and Stain (XStain) BeadChip (Post-Amp)
9
Automated Protocol
12 The robot PC sounds an alert and opens a message when the process is complete. Click
OK to finish the process.
Verify Reagents and BeadChips for Coating (LIMS only)
1
Scan the barcodes of the PB1.
2
Scan the barcodes of the XC4.
3
Scan the BeadChip barcodes.
4
Click Verify and then click Save.
5
If the reagents are correct and the BeadChips are queued for coating, a blue
confirmation message appears at the top of the window. Proceed to Wash and Coat 8
BeadChips.
6
If any of the reagents are invalid, check the reagent type before re-scanning. The reagent
name (e.g., PB1) appears at the end of the barcode. Make sure to scan the correct
reagent into each box.
7
If any of the BeadChips are not queued for coating, a red error message appears at the
top of the window. The error message indicates the first incorrect barcode it finds. Do
not proceed with coating. Instead, follow these steps to troubleshoot the problem:
a Click the Reports tab in the upper-right corner.
b In the left sidebar, click Tracking Reports | Get Queue Status.
c Scan the BeadChip barcode that appeared in the error message and click Go.
d Note what step the BeadChip is queued for, and proceed with that step.
For information about how to use Illumina LIMS, see the Illumina LIMS User Guide.
Wash and Coat 8 BeadChips
Before starting the Wash and Coat process, read these important notes:
} Take the utmost care to minimize the chance of lint or dust entering the wash dishes,
which could transfer to the BeadChips. Place wash dish covers on wash dishes when
stored or not in use. Clean wash dishes with low-pressure air to remove particulates
before use.
} In preparation for XC4 BeadChip coating, wash the tube racks and wash dishes
thoroughly before and after use. Rinse with DI water. Immediately following wash,
place racks and wash dishes upside down on a wash rack to dry.
184
Part # 15045738 Rev. A
Equipment Needed
Place the following items on the bench:
} 1 staining rack
} 1 vacuum desiccator
} 1 tube rack
} Self-locking tweezers
} Large Kimwipes
} Vacuum hose
Steps
1
Set up two top-loading wash dishes, labeled "PB1" and "XC4".
2
To indicate the fill volume before filling wash dishes with PB1 and XC4, pour 310 ml
water into the wash dishes and mark the water level on the side. Empty the water from
the wash dish. Marking the level enables you to pour reagent directly from the PB1 and
XC4 bottles into the wash dishes, minimizing contaminant transfer from labware to
wash dishes.
Illumina Infinium HTS Assay Protocol Guide
185
Extend and Stain (XStain) BeadChip (Post-Amp)
} Place Kimwipes in three layers on the lab bench. Place a tube rack on top of these
Kimwipe layers. Do not place on absorbent lab pads. You will place the staining rack
containing BeadChips on this tube rack after removing it from the XC4 wash dish.
} Prepare an additional clean tube rack that fits the internal dimensions of vacuum
desiccator for removal of the BeadChips. Allow one rack per 8 BeadChips. No
Kimwipes are required under this tube rack.
Automated Protocol
Figure 125 PB1 and XC4 Wash Dishes with Staining Rack
A
B
186
Wash Dishes
Staining Rack
3
Pour 310 ml PB1 into the wash dish labeled “PB1.”
4
Submerge the unloaded staining rack into the wash dish with the locking arms and tab
facing towards you. This orients the staining rack so that you can safely remove the
BeadChips. Let the staining rack sit in the wash dish. You will use it to carry the
BeadChips after disassembling the flow-through chambers.
Part # 15045738 Rev. A
Extend and Stain (XStain) BeadChip (Post-Amp)
Figure 126 Staining Rack Locking Arms and Tab
A
B
Locking Arms
Tab
CAUTION
If the staining rack handle is not correctly oriented, the BeadChips can be
damaged when you remove the staining rack handle before removing the
BeadChips.
5
One at a time, disassemble each flow-through chamber:
a Use the dismantling tool to remove the two metal clamps.
CAUTION
It is important to use the dismantling tool to avoid chipping the glass back
plates.
Illumina Infinium HTS Assay Protocol Guide
187
Automated Protocol
Figure 127 Removing the Metal Clamps from Flow-Through Chamber
b
c
d
e
Remove the glass back plate.
Set the glass back plate aside. When you finish the XStain BeadChip protocol, clean
the glass back plates as described in the Infinium Lab Setup and Procedures Guide.
Remove the spacer. To avoid damaging the stripes on the BeadChip, pull the
spacer out so that the long sides slide along the sides of the BeadChip.
Remove the BeadChip.
CAUTION
Do not touch the face of the BeadChips. Handle them by the barcode end or by
the edges.
6
Place the BeadChips in the staining rack while it is submerged in PB1. Put four
BeadChips above the staining rack handle and four below. Make sure that the
BeadChip barcodes face away from you and that the locking arms on the handle face
towards you.
If necessary, briefly lift the staining rack out of the wash dish to seat the BeadChip.
Replace it immediately after inserting each BeadChip.
7
Make sure that the BeadChips are completely submerged.
CAUTION
Do not allow the BeadChips to dry. Submerge each BeadChip in the wash dish
as soon as possible.
8
188
Slowly move the staining rack up and down 10 times, breaking the surface of the
reagent.
Part # 15045738 Rev. A
Figure 128 Washing BeadChips in PB1
9
Allow the BeadChips to soak for an additional 5 minutes.
CAUTION
Do not leave the BeadChips in the PB1 for more than 30 minutes.
10 Shake the XC4 bottle vigorously to ensure complete resuspension. If necessary, vortex
until completely dissolved.
11 Pour 310 ml XC4 into the dish labeled “XC4,” and cover the dish to prevent any lint or
dust from falling into the solution.
CAUTION
Do not let the XC4 sit for longer than 10 minutes.
12 Remove the staining rack from the PB1 dish and place it directly into the wash dish
containing XC4. For proper handling and coating, The barcode labels on the BeadChips
must face away from you; the locking arms on the handle must face towards you.
Illumina Infinium HTS Assay Protocol Guide
189
Extend and Stain (XStain) BeadChip (Post-Amp)
NOTE
If the top edges of the BeadChips begin to touch during either PB1 or XC4
washes, gently move the staining rack back and forth to separate the slides. It is
important for the solution to circulate freely between all BeadChips.
Automated Protocol
Figure 129 Moving BeadChips from PB1 to XC4
13 Slowly move the staining rack up and down 10 times, breaking the surface of the
reagent.
NOTE
If the top edges of the BeadChips begin to touch during either PB1 or XC4
washes, gently move the staining rack back and forth to separate the slides. It is
important for the solution to circulate freely between all BeadChips.
14 Allow the BeadChips to soak for an additional 5 minutes.
CAUTION
Use XC4 only one time. To process subsequent BeadChips, use a new, clean
wash dish with fresh XC4.
15 Prepare one additional tube rack per 8 BeadChips (Illumina-provided from VWR
catalog # 60916-748) that fits the internal dimensions of vacuum desiccator.
16 Remove the staining rack in one smooth, rapid motion and place it directly on the
prepared tube rack, making sure the barcodes face up, and the locking arms and tabs
face down.
190
Part # 15045738 Rev. A
To ensure uniform coating, place the staining rack on the center of the tube rack,
avoiding the raised edges.
Figure 131 Moving the Staining Rack from XC4 to Tube Rack
17 For each of the top four BeadChips, working top to bottom:
Illumina Infinium HTS Assay Protocol Guide
191
Extend and Stain (XStain) BeadChip (Post-Amp)
Figure 130 Staining Rack in Correct Orientation
Automated Protocol
a
Continuing to hold the staining rack handle, carefully grip each BeadChip at its
barcode end with self-locking tweezers.
NOTE
The XC4 coat is slippery and makes the BeadChips difficult to hold. The selflocking tweezers grip the BeadChip firmly and help prevent damage.
b
Place each BeadChip on a tube rack with the barcode facing up and towards you.
Figure 132 BeadChips on Tube Rack
18 Holding the top of the staining rack in position, gently remove the staining rack handle
by grasping the handle between the thumb and forefinger. Push the tab up with your
thumb and push the handle away from you (unlocking the handle), then pull up the
handle and remove.
192
Part # 15045738 Rev. A
A
B
Tab
Handle
19 Remove the remaining BeadChips to the tube rack, with six BeadChips on top of the
rack and two BeadChips on the bottom. Make sure that the barcode ends are towards
you, and the BeadChips are completely horizontal.
CAUTION
To prevent wicking and uneven drying, do not allow the BeadChips to rest on
the edge of the tube rack or to touch each other while drying.
20 Place the tube rack in the vacuum desiccator. Each desiccator can hold one tube rack (8
BeadChips).
CAUTION
Make sure the vacuum valve is seated tightly and securely.
21 Remove the red plug from the three-way valve before applying vacuum pressure.
22 Start the vacuum, using at least 675 mm Hg (0.9 bar).
Illumina Infinium HTS Assay Protocol Guide
193
Extend and Stain (XStain) BeadChip (Post-Amp)
Figure 133 Removing Staining Rack Handle
Automated Protocol
23 To make sure that the desiccator is properly sealed, gently lift the lid of the vacuum
desiccator. It should not lift off the desiccator base.
Figure 134 Testing Vacuum Seal
24 Dry under vacuum for 50–55 minutes.
Drying times can vary according to room temperature and humidity.
25 Release the vacuum by turning the handle very slowly.
WARNING
Make sure that air enters the desiccator very slowly to avoid disturbing the
contents. Improper use of the vacuum desiccator can result in damage to the
BeadChips, especially if you remove the valve plug while a vacuum is
applied. For detailed vacuum desiccator instructions, see the documentation
included with the desiccator.
26 Store the desiccator with the red valve plug in the three-way valve of the desiccator to
stop accumulation of dust and lint within the valve port.
27 Touch the borders of the chips (do not touch the stripes) to make sure that the etched,
barcoded side of the BeadChips are dry to the touch.
194
Part # 15045738 Rev. A
CAUTION
Do not touch the stripes with the wipe or allow EtOH to drip onto the stripes.
29 Clean the glass back plates. For instructions, see the Infinium Lab Setup and Procedures
Guide.
30 Discard unused reagents in accordance with facility standards.
31 Do one of the following:
• Proceed to Image BeadChip.
• Store the BeadChips in the Illumina BeadChip Slide Storage Box inside a vacuum
desiccator at room temperature. Be sure to image the BeadChips within 72 hours.
Illumina Infinium HTS Assay Protocol Guide
195
Extend and Stain (XStain) BeadChip (Post-Amp)
28 If the underside feels tacky, manually clean the underside of the BeadChip to remove
any excess XC4. The bottom two BeadChips are most likely to have some excess.
a Hold the BeadChip at a downward angle to prevent excess EtOH from dripping
from the wipe onto the stripes.
b Wipe along the underside of the BeadChip five or six times, until the surface is
clean and smooth.
Automated Protocol
Image BeadChip (Post-Amp)
Follow the instructions in the iScan System User Guide or HiScan System User Guide to scan
your BeadChips. Use the Infinium LCG scan setting for your BeadChip.
196
Part # 15045738 Rev. A
The Illumina GenomeStudio Genotyping Module, included with your Illumina Infinium
Assay system, is an application for extracting genotyping data from intensity data files
(*.idat files) collected from systems such as the Illumina HiScan System.
For feature descriptions and instructions on using the GenomeStudio platform to visualize
and analyze genotyping data, see the GenomeStudio Framework User Guide and the
GenomeStudio User Guide or online help.
Illumina Infinium HTS Assay Protocol Guide
197
Illumina GenomeStudio
Illumina GenomeStudio
198
Part # 15045738 Rev. A
A
Index
Index
arrays 9
assay overview 2
AutoLoader features 15
resuspending 6
tracking samples 11
washing away 7
documentation 201
dsDNA 24
B
E
BeadChip
alignment fixtures 144, 149-150
description 9
imaging 8
single-base extension 7
washing 7
Xstain, auto protocol 180
Xstain, manual protocol 80, 82
equipment
auto protocol 100-101
manual protocol 20
experienced user cards 11
C
copy number variation 2, 16
customer support 201
D
data analysis 11, 16, 31, 95, 197
differential analysis 16, 95, 197
DNA 103
amplification bias 4
amplifying 4
annealing 6
captured and used as a template 7
denaturing 4
fragmenting 5
hybridizing 6
incubating 4, 6
input required per sample 2
mapping samples to BeadChips 11
neutralizing 4
precipitating 5
preparing for amplification 4
preparing for staining, extension 7
quantitating dsDNA 24
Illumina Infinium HTS Assay Protocol Guide
F
flourosphore 8
FLUOTRAC plate 28
G
gene analysis 16, 95, 197
GenomeStudio 16, 95, 197
genotype calling for the sample 7
H
help, technical 201
HiScan 15-16, 95, 197
HiScan System 2, 15, 94, 181, 196
I
Infinium HTS assay overview 2
integrated informatics 16, 95, 197
intensity data files 16
iScan System 2, 15, 94, 181, 196
L
lab setup and procedures 10
lab tracking form (LTF) 33
199
Index
M
materials
auto protocol 101-102
manual protocol 20, 22
multiplex 2
P
technical assistance 201
Tip Alignment Guide 143, 152
X
XStain BeadChips
auto protocol 180
manual protocol 80, 82
PicoGreen DNA quantitation kit 24, 103
Q
quantitate dsDNA 24, 103
R
reagents
auto protocol 102
manual protocol 22
Required Run Items 131, 151, 181
RNA 24
robot
BeadChip alignment fixtures 144,
149-150
bed map update 131
dispensing sample 153
preparing 125, 129, 137, 149, 180
Required Run Items 131, 151, 181
resuspend setup 138
scanning the barcode 152
Tip Alignment Guide 143, 152
tube rack 182
XStain BeadChip setup 180
Robot Tip Alignment Guide 143, 159
S
Sample QDNA 27, 106
Sample QDNA plate 25, 29-30, 104
sample sheet 11
SNPs per sample 2
Standard DNA plate 25, 28, 104
Standard QDNA 27, 106
Standard QDNA plate 25, 28, 30, 104
T
Tecan Freedom Evo 14
Tecan GenePaint 14
Tecan Genesis 14
200
Part # 15045738 Rev. A
For technical assistance, contact Illumina Technical Support.
Table 16 Illumina General Contact Information
Illumina Website
Email
www.illumina.com
[email protected]
Table 17 Illumina Customer Support Telephone Numbers
Region
Contact Number
Region
North America
1.800.809.4566
Italy
Austria
0800.296575
Netherlands
Belgium
0800.81102
Norway
Denmark
80882346
Spain
Finland
0800.918363
Sweden
France
0800.911850
Switzerland
Germany
0800.180.8994
United Kingdom
Ireland
1.800.812949
Other countries
Contact Number
800.874909
0800.0223859
800.16836
900.812168
020790181
0800.563118
0800.917.0041
+44.1799.534000
MSDSs
Material safety data sheets (MSDSs) are available on the Illumina website at
www.illumina.com/msds.
Product Documentation
Product documentation in PDF is available for download from the Illumina website. Go
to www.illumina.com/support, select a product, then click Documentation & Literature.
Illumina Infinium HTS Assay Protocol Guide
201
Technical Assistance
Technical Assistance
Illumina
San Diego, California 92122 U.S.A.
+1.800.809.ILMN (4566)
+1.858.202.4566 (outside North America)
[email protected]
www.illumina.com