1
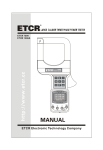
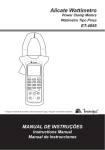
3 PHASE DIGITAL POWER
CLAMP METER
USERS MANUAL
CONTENTS
Safety Precautions
--------------------------- 1
Safety Information
--------------------------- 1
Safety Symbols
-----------------------------
General Description
Feature
2
--------------------------
2
-----------------------------------
2
Meter Layout
------------------------------
4
Using The Selector
--------------------------
5
Using The Buttons
--------------------------
6
-------------------------------
9
-----------------------
11
Lcd Display
Making Measurements
Measuring Ac Voltage
---------------------
Measuring Ac Current
- - - - - - - - - - - - - - - - - - - - - 13
Measuring Single-Phase Circuit
11
- - - - - - - - - - - - - 15
Measuring Three -Phase Four-Wire Circuit - - - - - -
19
Measuring Three -Phase Three-Wire Circuit - - - - -
24
Saving Measurement - - - - - - - - - - - - - - - - - - - - - -
24
-----------------------
24
--------------------
25
-----------------
26
-----------------------
26
Recalling Memory
RS232C Date Interface
Input Voltage And Current
Backlight Display
Sketch Of Safety Holding
------------------
26
Curve Diagram Of Power
------------------
27
Low Voltage Indication - - - - - - - - - - - - - - - - - - - -
28
-------------------------
28
-----------------------------
29
------------------------------
32
Replacing Batteries
Specifications
Accessories
Safety Precautions
· Read these operation instructions thoroughly and completely before
operating your meter. Pay particular attention to WARNING. The
instructions in these warnings must be followed.
· You must be careful when working with voltages above 30V AC. Keep
fingers behind the probe barriers while measuring.
· Never use the meter to measure voltages that might exceed the
maximum allowable input value of any function measurement mode.
· Always inspect your meter and test leads before every use. If any
abnormal conditions exist: broken test leads, cracked cases, LCD not
reading, etc, do not attempt to take any measurement.
· Using the meter with the equipped test leads is only conform to safety
requirements. If you need instead broken test leads, you must replaced
with the same as type and electric specification.
· Never touch a voltage source when the test leads are plugged into a
current jack.
· Do not expose the instrument to direct sunlight, extreme temperature
or moisture.
WARNING
READ THE INSTRUCTIONS BEFORE
USING THE INSTRUMENT
Safety Information
Three-phase digital power clamp meter has been designed according
to IEC1010-1 and IEC1010-2-032 concerning safety requirements for
electrical measuring instruments and handheld clamps with pollution
degree 2, overvoltage category ( 600V CATⅢ).
- 1 –
Safety Symbols
Important safety information, refer to the operating manual
Dangerous voltage may be present.
Earth ground
Double insulation (Protection classⅡ)
Battery
General Description
Three-phase digital power clamp meter is a handheld aptitude meter with
power measurement, it is incorporated current meter and power
measurement instrument. The meter is composed of three channels:
voltage, current, power and single chip Microcontroller. It has powerful
measuring and data processing software, and
complete to measure,
calculate and display of the 8 parameters: Voltage, Current, Active Power,
Power Factor, Apparent Power, Reactive Power, Active Energy,
Frequency. It has Stable capability, easy operation. It is especially
suitable for measurement and overhaul of the electric power equipment
and the power-supply circuit on the spot. The structure of the instrument
is pincers, it is very small, very light and portable, make measurement
easy and fast. To the power measurement user, the digital power clamp
meter which is used completely in three-phase system is one of the best
instrument.
Feature
1.
For power measurement of 3-phase 3-wire circuit, 3-phase 4-wire
circuit, single-phase circuit.
2.
The instrument can complete the true RMS value measurement. If
there is nonsinusoidal AC current input signal, it can accurately
measure the active current.
- 2 -
3.
Using autorange switch circuit and modulus transducer which has 8000
count and high resolution, the instrument has high accuracy and easy
operation.
4.
Minimum current of Active Energy measurement is 0.5A, it can
measure expending energy per hour of general electrical equipment.
Measurement and display five parameters of power: Active Power,
Apparent Power, Power Factor, Reactive Power, Active Energy.
5.
Double display two parameters on each menu and store 28 groups of
measurement parameter.
6.
Measure five power parameters of each phase and total power value in
three-phase measurement mode respectively.
7.
Multifunctional button control, there are double scales analogue bar
graph to display fluctuation of voltage and current.
8.
With PC RS232C interface and special WINDOWS data graphics
software.
9.
Display measurement time and select tested voltage signal be power
supply for the clamp at one time in Active Energy measurement mode,
so the instrument can measure for long .
10. The instrument is a portable clamp meter. It is very light and
convenient to carrying .
- 3 -
Meter Layout
1
MAX
1000A
600kW
MAX
600V
CAT.III
DIGITAL POWER CLAMP
MS2203
P
MR
3
W
7
8
2
HOLD
OFF
EX-
MAX
600V
3~
OPTICAL INTERFACE
RS232
3
2
Ture RMS
AUTO RANGE
1
OFF
kW / PF
kVA
kVAr
kWh
TIME
V / Hz
A
RS232
1
2
3
CLEAR
W W3
DC
AC
6
P
kVA
kWh
CAL
4
RS232
MAX
PF
MIN
Hz
kVAr
h min
FREQ
MEM
MR
Time
0
20 10
MAX
V1
V2
40
20
60
30 80
MIN
V3
40100
SAVE
COM
5
( Figure 1 )
1. Clamp Jaws
Ф50mm
2. HOLD Button
Holds the display reading and “
" symbol is shown in the LCD
display, press this button again, the meter return to normal
measurement mode.
3.
Function Selector Rotary Switch
Rotate the selector to any measurement function.
4.
Function Selector Buttons
To select the measurement object.
– 4 –
5.
Input terminal
V1: The input terminal for the first phase, using the yellow test lead
to connect.
V2: The input terminal for the second phase, using the green test
lead to connect.
V3: The input terminal for the third phase, using the red test lead to
connect.
COM: Common terminal, the earth input terminal for all measure-ment modes, using the black test lead to connect.
6. LCD Display
4 digits display, 7 segment LCD to display function mode, measured
value and symbols.
7. Trigger
Press the lever to open the transformer. When the lever is released,
the jaws will close again.
8. RS232C Data Interface
Your clamp meter can use a serial interface cable to communicate
with a computer. Refer to Figure 18 for complete instructions.
Using the Selector
Turn the meter on by rotating the selector to any function as following .
( Table 1. Introducing The Selector)
ITEM
DESCRIPTION
OFF
POWER OFF. Turn the meter off
EX- P
EXTERNAL POWER SUPPLY. No use battery, select tested
voltage signal be power supply for Active Energy measure-ment for long at one time.
MR
RECALL DATA. Recall saved data in the meter memory.
∑W
TOTAL POWER. For display total power value of three phase
– 5 –
( Table 1. Introducing The Selector )
ITEM
Φ3
DESCRIPTION
THIRD MEASUREMENT CHANNEL. For V3 input terminal
measurement
Φ2
SECOND MEASUREMENT CHANNEL. For V2 input terminal
measurement
Φ1
FIRST MEASUREMENT CHANNEL. For V1 input terminal
measurement
Using the buttons
( Table 2. Function Button)
ITEM
DESCRIPTION
1
kW / PF
2
kV A
kV A r
Active Power, Power Factor Measurement Button.
Apparent Power, Reactive Power Measurement
Button.
3
kW h
T IM E
4
5
6
7
8
Active Energy, Time Measurement Button
Power Summation Button
V / Hz
Voltage, Frequency Measurement Button
A
Current Measurement Button
R S 2 32
Data Transmit Button
CLEAR
Clear Memory Button
9
Backlight Button
MAX
10
Maximum Value Button/ Previous Record Button
M IN
11
12
Minimum Value Button/ Next Record Button
SAVE
Data Save Button
– 6 –
1.
kW / PF
Press
Active Power, Power Factor Measurement Button
kW / PF
button to measure Active Power and Power Factor in
measurement mode. Then the LCD shows Active Power reading in
the primary display and Power Factor reading in the secondary
display.
2.
kVA
kVAr
Press
Apparent power, Reactive Power measurement button
kVA
kVAr
button to measure Apparent Power and Reactive
Power in measurement mode. Then the LCD shows Apparent Power
reading in the primary display and Reactive Power reading in the
secondary display.
3.
kW h
T IM E
Press
Active Energy, Time Measurement Button
kW h
T IM E
button to measure Active Energy in measurement
mode. Then the LCD shows Active Energy reading in the primary
display and measurement time of the Active Energy in the secondary
display.
4.
Power Summation Button
Press
button to sum up the measured value of current one
phase in three phase measurement mode; then measure the second
phase and press the
button to sum up again; press the
button for the third phase after you getting the measured
value of the third phase on the display. So the meter will calculate the
sum in this three phase system automatically, you will rotate the
selector to ∑W at one time, then the display shows the total power
value.
5.
V / Hz
Press
Voltage Measurement Button
V / Hz
button to measure voltage of the circuit and display
the measured value in the LCD display.
– 7 –
6.
A
Current Measurement Button
A
Press
button to measure current of the circuit and display
the measurement value in the LCD display.
7.
R S232
Press
Data Transmit Button
R S232
button to transmit measured data to a computer by
special interface cable, you can record current measured value and
print reports and data trend curve drawing.
Before press the
R S232
button to transmittal measured data, you
must connect RS232C interface cable to the clamp meter and a
computer, the communication function is working.
8.
CLEAR
Press
Clear Memory Button
CLEAR
button for three seconds to erase all measured data
in the meter memory in the measurement mode.
9.
Backlight Button
Press
button to turn the backlight on or off. When the back-
-light turned on over five seconds, it will turn off automatically.
M AX
10.
Maximum Value Measurement Button / Previous Record
Button
M AX
Press
button to measure maximum value in measurement
mode. The display shows current maximum value in the secondary
display.
M AX
When you turn the selector to MR, press
button to recall
previous memory location and display the data on the LCD. Once
pressing this button, the clamp meter recalls a memory location
previous current location.
M IN
11.
Minimum Value Measurement Button / Next Record Button
M IN
Press
button to measure minimum value in measurement
mode, the display shows current minimum value in the secondary
display.
– 8 –
M IN
When you turn the selector to MR, press
button to recall
next memory location and display the data on the LCD. Once
pressing this button, the clamp meter recalls a memory location next
current location.
12.
SAVE
Press
Data Save Button
SAVE
button to save current measured data to the meter in
measured mode. The meter can save 28 groups of measured data
into the meter at most.
Lcd Display
( Figure 2 )
1.
Dangerous voltage symbol
2. Data holding symbol
3. First phase symbol
4.
Second phase symbol
5. Third phase symbol
6. Three phase total power symbol
7.
External power supply symbol
8. Battery symbol
- 9 -
9.
Voltage unit (V), current unit (A), Apparent Power unit (kVA)
( For primary display )
10. Active power unit (kW)、Active Energy unit (kWh)
11. 4 digit display
( For primary display )
12. Frequency unit
13. Voltage unit (V), current unit (A), Apparent Power unit (kVA),
Reactive Power unit (kVAr) ( For secondary display )
14. Time unit : hour(h)、 minute(min)
15. Overflow symbol
16. 100 graduate scale
17. 40 graduate scale
18. Bar graph
19. 4 digit display
( For secondary display )
20. Frequency unit
21. Time symbol
22. Negative sign of scale
23. Number of memory location symbol
24. Recall data symbol
25. Save data symbol
26. Minimum value symbol
27. Power factor symbol
28. Maximum value symbol
29. RS232C interface symbol
30. Calibrate symbol
31. Negative symbol
32. AC symbol
33. DC symbol
- 10 -
Making Measurements
Measuring AC Voltage
1
V
AC
MAX
1000A
600kW
MAX
600V
CAT.I II
Circuit
AC V
Hz
FREQ
MEM
V1
HOLD
0
20
40
60
80
100
OFF
EX -
P
MR
W
3
2
Ture RMS
AUTO RANGE
1
1
kW / PF
V / Hz
V
AC
OFF
kVA
kVAr
kWh
TIME
A
RS232
CLEAR
1
V
AC
Hz
FREQ
Hz
FREQ
MEM
0
10
MAX
MEM
0
10
20
30
V1
40
V2
20
30
MIN
V3
40
SAVE
COM
Black
Yellow
( Figure 3. Voltage Measurements)
1.
Turn the selector to one of Φ1,Φ2,Φ3, refer to Table 3 to connect
the test leads to input terminals: Insert the black test lead into the
COM input terminal and one corresponding color test lead into the
corresponding input terminal.( Figure 3 )
(Table 3 Input Terminal Connections)
SELECTOR INPUT TERMINAL(+)
INPUT TERMINAL(
-)
Phase
Φ1
V1 jack
Yellow lead
COM jack
Black lead
First phase
Φ2
V2 jack
Green lead
COM jack
Black lead
Second phase
Φ3
V3 jack
Red lead
COM jack
Black lead
Third phase
V / Hz
2.
Connect test leads to the load, press
button, voltage
measured value is displayed in the primary display and current
frequency value of voltage is shown in the secondary display.
- 11 -
M AX
3.
In voltage measurement mode, press
button, the LCD
displays “MAX“ symbol, then maximum value(TRMS) is shown in
M AX
the secondary display. Press
button again, the “MAX”
symbol is disappeared, the secondary display return to current
frequency value .
M IN
4.
Press
button, the LCD displays “MIN” symbol, then
minimum value(TRMS) is shown in the secondary display. Press
M IN
button again, the “MIN” symbol is disappeared, the
secondary display return to current frequency value.
5.
For input voltage exceeds 600V, the display will show ”OL” symbol
and the bar graph is full.( Figure 4 )
MAX
1000A
600kW
MAX
600V
CAT.I II
Circuit
AC V
V1
HOLD
OFF
EX -
P
MR
W
3
2
Ture RMS
AUTO RANGE
1
OFF
1
kW / PF
V
AC
V / Hz
kVA
kVAr
kWh
TIME
A
RS232
CLEAR
1
V
AC
Hz
FREQ
Hz
FREQ
MEM
0
MEM
10
MAX
0
20
40
60
80
100
V1
V2
20
30
MIN
V3
40
SAVE
COM
Black
Yellow
( Figure 4. Voltage Exceeds 600V )
6.
For input voltage exceeds 30V, the display will show “
” for
safety.
7.
There are two modes to show the bar graph in the LCD. You can
observe fluctuation range of measured voltage. The first mode is
0-20-40-60-80-100, the second is 0-10-20-30-40.
- 12 -
Measuring AC Current
1
2
Tested conductor
3
MAX
1000A
600kW
MAX
600V
CAT.III
Earth wire
HOLD
OFF
EX -
P
MR
W
3
3
Ture RMS
AUTO RANGE
2
1
OFF
A
AC
kW / PF
kVA
kVAr
V / Hz
A
RS232
kWh
TIME
RS232
CLEAR
3
A
AC
RS232
MEM
MEM
0
10
20
30
0
40
10
MAX
V1
V2
20
30
MIN
V3
40
SAVE
COM
( Figure 5. Current Measurements)
1.
Turn the selector to one of Φ1,Φ2,Φ3.
2.
Press the trigger to hook the clamp jaw around one conductor to
be measured. Press
A
button, the primary display reading is
current value(RMS) of the conductor. ( Figure 5)
MAX
3.
To measure the maximum value of current, press
button,
the maximum value is shown in the secondary display. Press
MAX
button again to cancel maximum value measurement.
( Figure 6)
M IN
4.
To measure the minimum value of current, press
button,
the minimum value is shown in the secondary display. Press
M IN
button again to cancel minimum value measurement.
5.
For current exceeds 1000A(RMS), the display will show “OL”
symbol. ( Figure 7)
- 13 -
6.
There are two modes to show the bar graph. You can observe the
fluctuation range of measured current. The first mode is
0-20-40-60-80-100, the second is 0-10-20-30-40.( Figure 5 and
Figure 6 )
1
2
Tested conductor
3
MAX
1000A
600kW
MAX
600V
CAT.I II
Earth wire
HOLD
OFF
EX-
3
P
MR
W
A
AC
3
2
Ture RMS
AUTO RANGE
1
MAX
A
kW / PF
kVA
kVAr
V / Hz
A
OFF
kWh
TIME
RS232
MEM
CLEAR
3
A
AC
0
20
40
60
80
100
MAX
A
MEM
0
20
40
60
MAX
V1
80
MIN
V2
100
SAVE
COM
V3
( Figure 6. Maximum Value Of Current Measurements )
1
2
Tested conductor
3
MAX
1000A
600kW
MAX
600V
CAT.I II
Earth wire
HOLD
OFF
EX -
3
P
MR
W
A
AC
3
Ture RMS
AUTO RANGE
2
1
kW / PF
kVA
kVAr
V / Hz
A
OFF
kWh
TIME
RS232
CLEAR
3
MEM
A
AC
0
20
40
60
80
100
RS232
MEM
0
20
MAX
V1
V2
40
60
MIN
V3
80
100
SAVE
COM
( Figure7. Current Exceeds 1000A )
- 14 -
Measuring Single-Phase Circuit
Tested conductor
MAX
1000A
600kW
MAX
600V
CAT.I II
Earth wire
HOLD
OFF
EX -
P
MR
W
3
Ture RMS
AUTO RANGE
2
1
OFF
2
AC
kW / PF
kVA
kVAr
kWh
TIME
V / Hz
A
RS232
kW
CLEAR
2
AC
kW
PF
PF
MEM
0
MEM
20
MAX
0
20
40
60
80
100
V1
V2
40
60
MIN
V3
80
100
SAVE
COM
Black
Green
(Figure 8. Single-phase Power Measurements)
1.
Hook the clamp jaws around the conductor of the loading or the
circuit. The clamped conductor is one phase which you want to
test in the three-phase circuit.
2.
Turn the selector to one of Φ1,Φ2,Φ3, and refer to Table 3 to
connect test leads into input terminals which is corresponding to
the position of the selector. ( Figure 8)
3.
After right connection, you can measure five power parameters of
single-phase circuit (Active Power, Power Factor, Apparent Power,
Reactive Power, Active Energy):
( 1. ) Active Power(kW) and Power Factor (PF)
(Figure 8 )
kW / PF
a.
Press
button, the Active Power value is shown in
the primary display and the Power Factor value, “PF”
symbol are shown in the secondary display. When the
Power Factor value is negative, the loading is capacitive.
- 15 -
b.
The maximum measurement range of Active Power is
600kW. For exceeding the maximum value, the “OL”
symbol will be shown in the display. If test voltage
exceeds 600V or the test current exceeds 1000A, the
“OL” symbol will be shown in the display too. And the bar
graph is full.(Figure 9) The minimum input voltage is 20V
and the minimum input current is 5A, if it less than the
minimum input voltage and minimum input current, the
Active Power value is “0.00kW”.
M AX
c.
Press
button, the maximum value of Active
Power is shown in the secondary display.
M IN
d.
Press
button, the minimum value of Active
Power is shown in the secondary display.。
e.
The bar graph “0-20-40-60-80-100” is shown.
Tested conductor
MAX
1000A
600kW
MAX
600V
CAT.I II
Earth wire
HOLD
OFF
EX -
P
MR
W
3
Ture RMS
AUTO RANGE
2
1
OFF
2
AC
kW / PF
kVA
kVAr
kWh
TIME
V / Hz
A
RS232
kW
CLEAR
2
AC
kW
PF
PF
MEM
0
MEM
20
MAX
0
20
40
60
80
100
V1
V2
40
60
MIN
V3
80
100
SAVE
COM
Black
Green
(Figure 9.Current Exceeds 1000A Or Voltage Exceeds 600V)
- 16 -
( 2. )
Apparent Power (kVA)and Reactive Power ( kVAr )
kVA
kVAr
a. Press
button, the Apparent Power value is
shown in the primary display, Reactive Power value and
the bar graph “0-20-40-60-80-100” are shown in the
secondary display.(Figure 10)
Tested conductor
MAX
1000A
600kW
Earth wire
MAX
600V
CAT.III
HOLD
OFF
EX -
P
MR
W
3
Ture RMS
AUTO RANGE
2
1
OFF
3
kVA
AC
kW / PF
kVA
kVAr
kWh
TIME
V / Hz
A
RS232
CLEAR
3
kVA
AC
kVAr
kVAr
MEM
0
MEM
20
MAX
0
20
40
60
80
100
V1
V2
40
60
MIN
V3
80
100
SAVE
COM
Black
Red
(Figure 10.Apparent power measurements)
b.
For input voltage less than 20V and input current less
than 5A, Apparent Power value is “0.00kVA”.
M AX
c. Press
button, the maximum value of Apparent
Power is shown in the secondary display.
M IN
d.
Press
button, the minimum value of Apparent
Power is shown in the secondary display.
e.
Reactive Power is not direct measuring parameter of
power, kVAr2=kVA2-kW2 is a formula to calculate Reactive
Power value. The value is calculated and shown
according to measured voltage, current and Active Power
in software.
- 17 -
(3.)
Active Energy (kWh) and Time(hmin)
a.
In Active Energy measurement mode, voltage signal must
be input into V1 and COM terminal of the clamp meter
(Figure 11), and the selector must be turned to Φ1.So
the Active Energy measurement function is valid,
Tested conductor
MAX
1000A
600kW
Earth wire
MAX
600V
CAT.III
HOLD
OFF
EX-
P
MR
W
3
Ture RMS
AUTO RANGE
2
1
OFF
3
AC
kW / PF
kVA
kVAr
V / Hz
A
kWh
kWh
TIME
RS232
CLEAR
3
AC
kWh
hmin
MEM
0
h min
MEM
20
MAX
0
20
40
60
80
100
V1
V2
40
60
MIN
V3
80
100
SAVE
COM
Black Yellow
( Figure11. Active Energy measurements)
b.
Press
kW h
T IM E
button, starting value of the Active Energy
is “0.000kWh” and is shown in the primary display at first,
Active Energy measured time and the bar graph
“0-20-40-60-80-100” is shown in the secondary display.
For the time is longer, the measured value of Active
Energy is larger. If you need read the Active Energy value
sometime, press the HOLD button, so the measured
value display and the display of the measured time are
locked,
but
the Active Energy measurement is
continuing and timing in the clamp meter. After reading
the display, press HOLD button again to exit date hold
- 18 -
and continue to measure, Active Energy value still add up.
Active energy measurement don’t stop until select other
measurement function.
MAX
c.
The
M IN
button and
button is invalid in
Active Energy measurement mode.
d.
The maximum value of Active Energy is “9999kWh”. If
Active Energy value exceeds the maximum value , the
display will show “OL” symbol.
e.
Active energy measurement is viable in single-phase
circuit because you only measure current of one phase at
one time, so you can not measure three-phase Active
Energy. If you need measure Active Energy for long
during measurement, you are suggested that you can use
EX- P function, the meter will work no using the battery
but test voltage signal as power supply.
NOTE: When you turn the selector to EX- P to measure voltage or
power parameter, the input voltage of V1 jack must less than 250V,
otherwise the fuse will be blown.
Measuring Three –Phase Four-Wire Circuit
Three-phase power parameter means total Active Power, total
Reactive Power, total Apparent Power, total Power Factor. The
clamp meter can not measure three-phase Active Energy. The
measurement method of three-phase power parameter is that
you measure power parameter of each phase conductor
respectively at first, then
calculate three-phase power
parameter in the meter. For a balance load, the measured data
is accurate, if power parameter fluctuates larger, then the error
of total power parameter increases more.
- 19 -
1.
Refer to Table 3, connect yellow test lead, green test lead, red test
lead to every phase live wire of the three-phase circuit and V1 jack,
V2 jack, V3 jack of the meter respectively, connect black test lead
to zero conductor of the circuit and COM jack of the meter.
2.
Turn the selector to Φ1 at first ( to first phase measurement ),
hook the clamp jaw around the first phase conductor of the tested
kW / PF
circuit, press
button to measure Active Power (kW) and
Power Factor (PF). the measured value are shown in the LCD then
press
button to sum power parameter of this phase; press
kVA
kVAr
button again to measure Apparent Power and Reactive
Power, after the result is shown in the LCD, press
button
to sum power parameter of this phase. So power parameter
measurement is completed in the first phase. If you need save the
result, you can press
SAVE
button to do it. ( Figure 12 )
Tested conductor
1
MAX
1000A
600kW
MAX
600V
CAT.III
2
3
1
HOLD
OFF
EX -
AC
P
MR
Earth wire
W
kW
3
2
Ture RMS
AUTO RANGE
1
PF
kW / PF
V / Hz
MEM
0
20
40
60
80
OFF
kVA
kVAr
kWh
TIME
A
RS232
CLEAR
100
1
AC
kW
PF
MEM
0
1
20
MAX
V1
kVA
AC
V2
40
60
MIN
V3
80
100
SAVE
COM
Black Red Green Yellow
kVAr
MEM
0
20
40
60
80
100
( Figure 12.The First Phase Power Measurements )
- 20 -
3. Turn the selector to Φ2(to the second phase measurement), hook
the clamp jaw around the second phase conductor of the tested
kW / PF
circuit, press
kVA
kVAr
button and
button to measure
power parameter respectively, when measured result is shown
every time, you must press
button to sum in turn. The
operation is same as the first phase measurement. (Figure 13)
4. Turn the selector to Φ3( to the third phase measurement),hook the
clamp jaw around the third phase conductor of the tested circuit,
kW / PF
press
kVA
kVAr
button and
button to measure power
parameter respectively, when measured result is shown every time,
you must press
button to sum in turn. The operation is
same as the first phase measurement. ( Figure 14)
1
Tested conductor
2
MAX
1000A
600kW
MAX
600V
CAT.III
3
Earth wire
HOLD
2
OFF
EX -
P
MR
AC
W
kW
3
Ture RMS
AUTO RANGE
2
1
PF
OFF
kW / PF
kVA
kVAr
kWh
TIME
V / Hz
A
RS232
CLEAR
MEM
0
20
40
60
80
2
100
AC
kW
PF
MEM
0
20
MAX
2
V1
kVA
AC
V2
40
60
MIN
V3
80
100
SAVE
COM
Black Red Green Yellow
kVAr
MEM
0
20
40
60
80
100
( Figure 13.The Second Power Measurements )
- 21 -
1
2
Tested conductor
3
MAX
1000A
600kW
MAX
600V
CAT.I II
Earth
HOLD
3
OFF
EX -
P
MR
AC
W
3
kW
Ture RMS
AUTO RANGE
2
1
PF
OFF
kW / PF
kVA
kVAr
kWh
TIME
V / Hz
A
RS232
CLEAR
MEM
0
40
20
60
80
3
100
AC
kW
PF
MEM
0
20
MAX
3
V1
kVA
AC
V2
40
60
MIN
V3
80
100
SAVE
COM
Black Red Green Yellow
kVAr
MEM
0
20
40
60
80
100
( Figure 14. The Third Phase Power Measurements )
5.
After above every phase measurement, turn the selector to ∑W,
then the display shows total Active Power value and Power Factor
value of the three-phase load (Figure 15). After display for three
seconds, the display switches to show total Apparent Power value
and total Reactive Power value automatically(Figure 16). The total
Apparent Power value is in the primary display and the total
Reactive Power value is in the secondary display. The display
switches automatically every three seconds until you turn the
meter to other function.
- 22 -
1
2
Tested conductor
3
MAX
1000A
600kW
MAX
600V
CAT.I II
Earth wire
HOLD
OFF
EX -
P
MR
W
3
2
Ture RMS
AUTO RANGE
1
1
2
OFF
W
3
kW / PF
kVA
kVAr
kWh
TIME
V / Hz
A
RS232
AC
kW
1
2
CLEAR
W
3
AC
kW
PF
PF
MEM
0
20
MEM
40
60
MAX
0
20
40
60
80
100
V1
80
MIN
COM
V3
V2
100
SAVE
Black Red Green Yellow
( Figure15. Total Active Power Of Three-Phase )
1
2
Tested conductor
3
MAX
1000A
600kW
MAX
600V
CAT.III
Earth wire
HOLD
OFF
EX-
P
MR
W
3
Ture RMS
AUTO RANGE
2
1
1
2
3
OFF
W
kVA
kVAr
kW / PF
kVA
AC
kWh
TIME
A
V / Hz
1
2
RS232
3
CLEAR
W
kVA
AC
kVAr
PF
kVAr
MEM
0
MEM
20
MAX
0
20
40
60
80
100
V1
V2
40
60
MIN
V3
80
100
SAVE
COM
Black Red Green Yellow
( Figure16. Total Apparent Power Of Three-Phase )
- 23 -
Measuring Three-Phase Three-Wire Circuit
In three-phase three-wire circuit, the operation of the selector and
function button is same as the operation in three-phase four-wire
circuit except the connection of test leads.(Figure 17)
1
MAX
1000A
600kW
MAX
600V
CAT.III
2
Tested conductor
3
1
HOLD
OFF
EX -
AC
P
MR
W
kW
3
2
Ture RMS
AUTO RANGE
1
PF
MEM
0
20
40
60
80
OFF
kW / PF
kVA
kVAr
kWh
TIME
V / Hz
A
RS232
CLEAR
100
1
AC
kW
PF
MEM
0
20
MAX
V1
V2
40
60
80
MIN
V3
100
SAVE
COM
Red Green Yellow
( Figure 17.Power Measurements Of Three-Phase Three-Wire)
Saving Measurement
In measurement mode, you can press
SAVE
button to save the
present display to a memory location. The meter can store 28 groups
of measurement date.
When the meter has saved 28 groups of date, you press
SAVE
button to save again, the display shows “FUL” symbol to
CLEAR
prompt full memory in the meter now. You must press
button to clear the memory and continue saving new date.
Recalling Memory
If something is saved in the meter memory, use following procedure
to display of a memory location:
1.
Turn the selector to MR.
- 24 -
2. The display shows “MR” and “HOLD” symbol, location number
and date in current memory location.
M AX
3.
Press
M IN
button and
button to cycle through
memory location.
RS232C Data Interface
Connect RS232C interface cable to the clamp meter as shown in
Figure 18, then rotate the interface cable deasil to lock it in the meter.
Connect the other plug of the interface cable to a serial port of a
computer. Then the meter can transmit measured data to computer
by the infrared photoelectricity RS232C interface in real-time mode. If
you want to take out the interface cable from the meter, first you must
rotate the cable widdershins to unlock it, then you can pull out it .
You will install the special data record software into the computer
according to README.TEXT file in SETUP disk. When the meter is
in measurement mode, press
R S232
button, you can record and
print the measured data of the meter in real time mode in the
WINDOWS. The software can record, plot, print data and curve.
MAX
600V
3~
O P T IC A L IN T E R F A C E
R S232
COM PUTER
RS232-C
OPTICAL
INTERFACE
( Figure 18. RS232C Interface Cable Connection )
- 25 -
Input Voltage And Current
When the meter is in power measurement mode, if input voltage
exceeds 600V(TRMS)or current exceeds 1000A (TRMS), the meter
will display “OL” symbol, and bar graph is full. When input voltage
exceeds 30V, the “
” symbol is shown in the display for safety.
Backlight Display
When press
button, backlight of LCD display is on. After
lighting for 4 seconds the backlight is self-off.
Sketch Of Safety Holding
Use the wrist-webbing to prevent a accidentally drop as shown in
Figure 19.
OPEN
WARNING
PLEASEREAD MANUAL FOR SAFETY.TOAVOID
ELECTRICAL SHOCK NEVER CONNECT THETEST
LEADS TOTHE INPUT JACKS WHICH ARENOT
FORRELATED MEASURING AND REMOVE ALL
INPUTS BEFORE OPENINGCASE.
BATTERIES : 4 X 1.5 V SIZE AA
IEC1010-1 IEC1010-2-032
600V CAT.III POLLUTION DEGREE2
( Figure 19 )
- 26 -
Curve Diagram Of Power
2000W
+E
+I
+P
( PF=KW / KVA )
2000W
PEAK VALUE OF POWER
E
MAX
=141V
PEAK VALUE
1000W
-E
-I
-P
ACTIVE POWER
POWER
180°
90°
I
MAX
360°
X
=14A
PEAK VALUE
( Figure 20. PF=1)
+V
+I
+P V
P
MAX
I
MAX
500W
ACTIVE POWER
KW=I R
2
X
45°
-E
-I
-P
90°
180°
270°
225°
θ
PEAK VALUE
45°
360°
θ
45°
( Figure 21 )
+V
+I
+P
P
V
MAX
+V
+i
I
MAX
kW= I R
2
180°
-E
-I
-P
θ
θ
X
-i
360°
-V
( Figure 22 )
- 27 -
Low Voltage Indication
The "
" symbol is shown on the top right of the LCD display,
when the batteries is weak, you need replace new batteries or use
the EX- P function of the meter now. Turn the selector to EX- P ,
the meter use the measured voltage signal as power supply to work.
But the meter only measure single-phase circuit and can not work in
three-phase circuit in this power source mode.
Replacing Batteries
WARNING
To avoid electrical shock , the instrument must be
power off and disconnect the lest leads or any input
signals before replacing the batteries. Never use the
instrument unless the back cover of the instrument is
fastened completely. Replace only with same type or
rating batteries.
Coin
OPEN
O PEN
WARNING
PLEASE READ MANUAL FOR SAFETY.TO AVOID
ELECTRICAL SHOCK NEVER CONNECT THE TEST
LEADS TO THE INPUT JACKS WHICH ARE NOT
FORRELATED MEASURING AND REMOVE ALL
INPUTS BEFORE OPENINGCASE.
WARNING
PLEASE READ MANUAL FOR
ELECTRICAL SHOT
BATTERIES : 4 X 1.5 V SIZE AA
IEC1010-1 IEC1010-2-032
600V CAT.III POLLUTION DEGREE2
( Figure 23. Open The Battery Cover )
- 28 -
When the LCD displays the “
” symbol, the batteries must be
replaced to maintain proper operation. Use the following procedure
to replace the batteries:
1. Disconnect test leads from any signals, turn the rotary function
switch to OFF, and remove the test leads from the input
terminals.
2. Open the battery cover and remove the battery cover. Because
there is a locked design in the battery cover. Don’t force the
battery cover open, otherwise the cover is broken. Refer to
Figure 23 for opening it: Insert a coin into the groove of the
battery cover, press the coin down, then open the cover.
3. Remove batteries and replace with new batteries which is the
same type or rating.
4. Reinstall the battery cover.
SPECIFICATIONS
AC VOLTAGE
RMS
RANGE
ACCURACY
RESOLUTION
100V
±(1.2%+5)
0.1V
300V
±(1.2%+5)
0.1V
600V
±(1.2%+5)
0.1V
Max. Overload Voltage:750V (RMS)
- 29 -
INPUT IMPEDANCE
10 MΩ
(10Pf SHUNT)
AC CURRENT
RMS
RANGE
ACCURACY
RESOLUTION
40A
±(2%+5)
0.1A
100A
±(2%+5)
0.1A
400A
±(2%+5)
0.1A
1000A
±(2%+5)
0.1A
Max. Overload Current:1500A
ACTIVE POWER
(W )
RANGE
ACCURACY
RESOLUTION
4kW
±(3%+5)
0.01kW
10kW
±(3%+5)
0.01kW
40kW
±(3%+5)
0.01kW
100kW
±(3%+5)
0.01kW
600kW
±(3%+5)
0.1kW
Minimum measurement current : 5A
Minimum measurement voltage : 20V
(VA)
APPARENT POWER
RANGE
ACCURACY
RESOLUTION
4kVA
±(3%+5)
0.01kVA
10kVA
±(3%+5)
0.01kVA
40kVA
±(3%+5)
0.01kVA
100kVA
±(3%+5)
0.01kVA
600kVA
±(3%+5)
0.1kVA
Minimum measurement current : 5A
Minimum measurement voltage : 20V
- 30 -
(PF)
POWER FACTOR
RANGE
ACCURACY
RESOLUTION
0.3~1 Capacitive
±(0.02+2)
0.001
0.3~1 Inductive
±(0.02+2)
0.001
Minimum measurement current : 5A
Minimum measurement voltage : 20V
2
2
2
(Var) =(VA) +W
REACTIVE POWER
RANGE
ACCURACY
RESOLUTION
4kVAr
±(4%+5)
0.01kVAr
10kVAr
±(4%+5)
0.01kVAr
40kVAr
±(4%+5)
0.01kVAr
100kVAr
±(4%+5)
0.01kVAr
600kVAr
±(4%+5)
0.1kVAr
Minimum input current : 5A
Minimum input voltage : 20V
Recording Voltage value、current value、Active Power value to calculate
Reactive Power value, The calculating accuracy is 0.01% of the range.
(kWh)
ACTIVE ENERGY
RANGE
ACCURACY
RESOLUTION
1~9999kWh
±(3%+2)
0.001kWh
Minimum measurement current : 0.5A
Minimum measurement voltage : 10V
- 31 -
FREQUENCY
( Hz )
RANGE
ACCURACY
RESOLUTION
20Hz~1kHz
0.5%
0.1Hz
Minimum measurement voltage: 20V
*
Accuracy:% of reading + number of digits
The specification given assume an operating temperature: 18
℃~28℃,humidity up to: 80% , the frequency of voltage and
current is 45Hz~65Hz
* Maximum common made voltage: 600V AC RMS
* Display : LCD 9999
* Range : autorange
* Overrange indication: Figure ”OL” on the display
* Reading Holding: Figure “
* Power supply : 4× 1.5V
” on the display
AA
* Power consume: 250mW
* Storage temperature: -20℃~70℃
* Operating temperature:
0℃~40℃
* Dimension size: 300mm×103mm×51mm
* Weight: approx. 500g ( include battery )
ACCESSORIES
Users manual
Battery
1
1.5V AA
4
Test Leads
(MS3000)
1
Connect test clamp
(MS3102)
1
RS232C interface cable ( MS3403 )
1
PC Data Record graph software
1
Carry Case
1
- 32 -
HYS004924