1
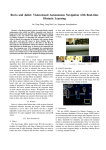
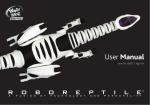
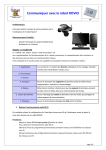
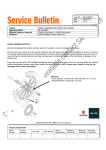
TrueTrack™ Room Beacon Quick start guide
This quick start guide will help you to set up your TrueTrack™ Room Beacon for your
Rovio™.
Assembling the TrueTrack Room Beacon
The TrueTrack Room Beacon should be placed where it will not be disturbed. The
room should have a flat ceiling no higher than about 12 feet (3.6 meters), with a
clear space onto which it can project its infrared beams. Air vents, large light panels
or chandeliers, tall objects or furniture might prevent Rovio from detecting the signal
that is projected onto the ceiling.
Note that the Beacon must be placed in a room adjoining a room that contains either
the Rovio charging dock or another Beacon, otherwise Rovio will not be able to detect
a signal while navigating between the two locations. Verify the strength of the signal
between the two by driving Rovio through the area and noting the navigation signal
strength on the Rovio user interface (refer to page B of this user manual for further
information).
NOTE: In order for Rovio to be able to detect the TrueTrack Room Beacon you must
power it at all times.
To assemble the TrueTrack Room Beacon:
1. Place the Beacon on the floor in the room
in which you want to use it. Plug the power
cable into the port on the back of the
Beacon and then plug the power adapter
into the electrical outlet.
A
2. Two red dots will project light
onto the ceiling. To optimize
the signal, point the red dots at
the center of the ceiling away
from unsmooth surfaces such as
lighting fixtures, fans, air vents
and corners.
8333US01TOP
NOTE: The red dots are a guide to help you set up the Beacon. If the
light turns off while you are positioning the dots, touch the metal rim to
reactivate it. During normal operation the red light will not be lit.
3. Set the Beacon ID selector to the
number you have chosen for that
Beacon, as illustrated.
NOTE: You cannot set two or more
TrueTrack Room Beacons to the same
number or Rovio will not be able to
recognize them accurately.
TrueTrack Room Beacon set to “9”
Locating the TrueTrack Room Beacon on the Rovio
user interface
The Rovio user interface will recognise each individual Beacon according to the
Beacon ID you select. The Navigation signal on the Rovio user interface will indicate
the Beacon to which the Rovio is closest.
NOTE: The Rovio charging dock will always be recognized 0.
Navigation signal indicating the Rovio charging dock.
Navigation signal indicating the TrueTrack Room Beacon set to
position 1.
B
C
Kitchen:
Area 2
Dining Room:
Area 1
NOTE: A single Truetrack Room Beacon can provide coverage for one room or open area no larger than approximately 25 feet
(7.5 meters) in diameter.
Note that the signals from the Beacons overlap and there are no spaces without coverage. This enables Rovio to receive a
continuous signal from the TrueTrack Room Beacons.
The diagram below shows a sample arrangement of the Rovio charging dock and additional TrueTrack Room Beacons. The
charging dock is labelled “0” and the additional Beacons are set to “1” - “5” according to the user’s preference.
This section will help you to understand how the TrueTrack Room Beacons can be laid out.
Sample arrangement
Sample arrangement
Master
Bedroom:
Area 5
Bedroom:
Area 4
Hallway:
Area 3
Living Room:
Area 0
For complete information on how to use Rovio, refer to the Rovio User Manual included in the Rovio package or go to
www.wowwee.com.
D