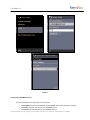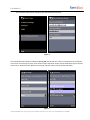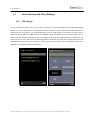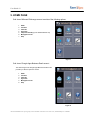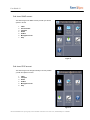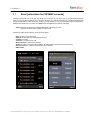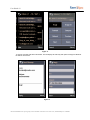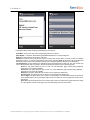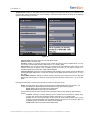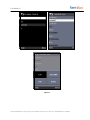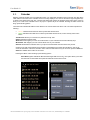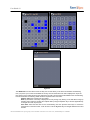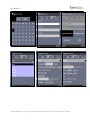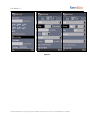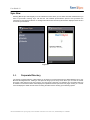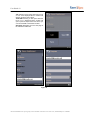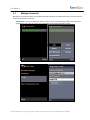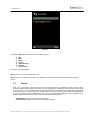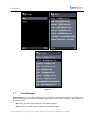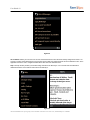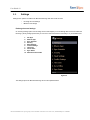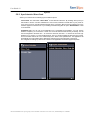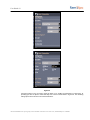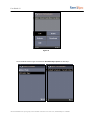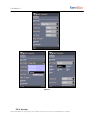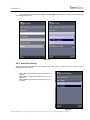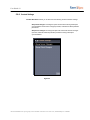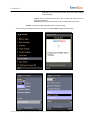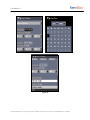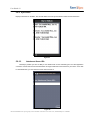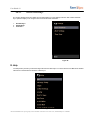
1
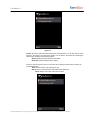
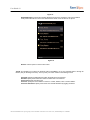
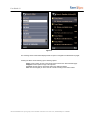
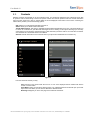
User Manual (ATT Users) Version 1.0 REVISION HISTORY Document Version Revision Date Created by Summary of Change Reviewed By Section/Page Changed 1. PRODUCT DESCRIPTION ...................................................................................... 1 2. 3. 4. USING REMOSYNC ............................................................................................... 2 HANDSET REQUIREMENTS ................................................................................. 3 3.1. Handset Memory Requirements .................................................................... 3 3.2. Handset keys used ........................................................................................ 3 APPLICATION SETUP ............................................................................................ 5 5. 4.1. Setting up RemoSync on your mobile phone ................................................ 5 4.2. Device Security and Policy Settings ............................................................ 11 4.2.1. PIN settings ............................................................................................. 11 4.2.2. Remote Data Wipe .................................................................................. 12 HOME PAGE ......................................................................................................... 14 5.1. Email [called Inbox for POP/IMAP accounts] ......................................................... 16 5.2. Contacts ................................................................................................................. 24 5.3. Calendar ................................................................................................................ 26 Sync Now ...................................................................................................................... 32 5.4. Corporate Directory ................................................................................................ 32 5.5. Manage Accounts .................................................................................................. 34 5.6. Groups ................................................................................................................... 35 5.7. Quick Messages..................................................................................................... 36 5.8. Settings .................................................................................................................. 38 6. 5.8.1. Full Sync: ................................................................................................. 39 5.8.2. What to Sync: .......................................................................................... 39 5.8.3. Sync Schedule /Direct Push : .................................................................. 40 5.8.4. Security: ................................................................................................... 43 5.8.5. Email Filter Settings ................................................................................. 44 5.8.6. Contact Settings ...................................................................................... 45 5.8.7. Time Zone................................................................................................ 46 5.8.8. Out of Office ............................................................................................. 46 5.8.9. Sync Status.............................................................................................. 49 5.8.10. Attachment Server URL: ...................................................................... 49 5.8.11. IMAP Account Settings:........................................................................ 50 Help........................................................................................................................ 50 7. TIPS & TRICKS...................................................................................................... 51 8. FREQUENTLY ASKED QUESTIONS [FAQ] ......................................................... 52 9. TROUBLESHOOTING ........................................................................................... 55 10. DEVELOPER WEBSITE ........................................................................................ 56 11. DISCLAIMER & COPYRIGHT INFORMATION...................................................... 57 User Guide 1.0 R e m o S y n c 1. PRODUCT DESCRIPTION RemoSync is a unique application for Enterprise class businesses that can provide their employees with tools to manage business activities *directly from a non-smartphone device. With mobile access to Email, Calendar and Contacts available for all your employees; your enterprise can provide vital up-to-the minute information, in *real-time to your employees simply and efficiently. With advanced Search and Sync capability users have a virtual window to their Exchange Outlook email, contact, calendar applications, assuring them that all the data available on their desktop, is also available on their mobile non-smartphone device. Using licensed Exchange ActiveSync technology from Microsoft, RemoSync provides a non-smartphone device with a *direct connection to the Microsoft Exchange Servers 2003 SP2, 2007, 2010. This connection eliminates the need for an additional proxy server, or a NOC (Network Operations Center) and preserves the integrity of the Enterprise firewall. Security for the device‟s contents is assured by the Remote Data Wipe feature. This feature can be initiated on the Server either by an Enterprise Administrator remotely. All data transmissions are SSL encrypted. RemoSync also provides access to IMAP and POP accounts by *directly connecting to the IMAP and POP servers. With RemoSync, users can access their business email on the go. *Direct Push/Real-Time syncing may not be available on all devices. In such cases, Scheduled Sync is available. User Guide 1.0 2. USING REMOSYNC Once RemoSync is installed and configured, you will be asked to configure your account. You can configure Microsoft Exchange account Google Apps Business Email account POP account IMAP account You can configure and save up to 3 accounts at any given time. Microsoft Exchange account: After you configure an Microsoft Exchange account you will be prompted to choose the folders that you wish to synchronize (email, contacts, calendar). Every non-smartphone device containing the RemoSync application that wants to synchronize information with the Microsoft Exchange server, must establish a partnership with the Microsoft Exchange server. After an initial device identification and handshake, the device is allowed to synchronize with the server. This partnership is active till the Administrator removes the device from the partnership or as decided by the Device Policy settings administered on the server. Based on your choice of folders to be set up for synchronization, the application will establish a partnership with your Microsoft Exchange® Server or your Google Apps Business Server , start the synchronization and download your Email, Contacts and Calendar (available for Microsoft Exchange only) data on to your non-smartphone device. The first synchronization will bring in all the data (up to a limit as per application settings) from your Microsoft Exchange® Email, Contacts and Calendar on to your non-smartphone device which may take slightly longer based on the amount of information that you may have. Once the initial synchronization is successfully completed, the data on your Microsoft Exchange Server® account and your mobile phone are in sync with each other. All subsequent synchronizations will only bring in the latest changes that may have occurred to your Email, Contacts or Calendar data. RemoSync provides a „*Direct Push‟ technology that allows any new change to your Microsoft Exchange Server® email, contact or calendar to be „Pushed‟ to the phone in *real time. You need not login to your account frequently to check for new Emails, Contact or Calendar information; instead RemoSync will bring in all the latest information to your phone and also provide you with intimation about the Calendar event or Email on your phone. In case you don‟t want to have the „*Direct Push‟ enabled, then you may use the „Scheduled Push‟ option that will allow you to set the time interval at which you want the application to check for new information on the server and then synchronize with the Microsoft Exchange Server® to retrieve that information, saving precious airtime. At the scheduled time the application will launch automatically and start the synchronization. If no changes are detected, RemoSync will sleep until the next schedule is due to be triggered. Using the Back/CLR key anywhere in the application will navigate you back to the previous screen. CLR key will sometimes interrupt a process. Pressing the END key will end the application. *Direct Push/Real-Time syncing may not be available on all devices. In such cases, Scheduled Sync is available. User Guide 1.0 3. HANDSET REQUIREMENTS 3.1. Handset Memory Requirements Free shared memory (also called application memory): Min 2MB Heap memory: Min 2 MB 3.2. Handset keys used This manual makes references to function keys such as the Back and CLR key. While mobile phone manufacturers have attempted to standardize on key definition and location, remains some there variation between handsets. RemoSync uses the following keys to perform the functions: 3.2.1. Power/End Key (usually red) This may be used to exit RemoSync, although it is not the recommended method. 3.2.2. Numbers 0-9 These are generally used to enter numbers and letters though in some cases they are defined as function keys. The number „1‟ key is also used to enter frequently used special characters e.g. ‟@‟, ‟.‟ etc. The number keys also act as short cut keys on some screens that will be displayed on the relevant screen. 3.2.3. Up, Down, Left, Right Keys (Arrow keys) These keys are used to move the cursor or to scroll through options/ menu items. These keys are usually clearly marked with arrowheads on the handset. 3.2.4. Clear Key (C) CLR key is usually a hard key (a labeled key on the phone pad). Used for deletion in text entry mode. CLR key may also be used to cancel action initiated by the user during “RemoSync is working” animation. CLR Key on each of the submenu items like Calendar or Email will navigate back to RemoSync Main menu. *Direct Push/Real-Time syncing may not be available on all devices. In such cases, Scheduled Sync is available. User Guide 1.0 3.2.5. Back Key Back key is usually a soft key (definition on screen). This is used to navigate to the previous screen. On touch screen handsets this is available on the top left corner of the screen 3.2.6. Select/OK Key This is useful on touch-screen phones. This m ay be a hard key (a labeled key on the phone pad) or a soft key (definition on screen). A hard key is usually located in the middle of the arrow keys and identified with unique color and/or symbol. *Direct Push/Real-Time syncing may not be available on all devices. In such cases, Scheduled Sync is available. User Guide 1.0 4. APPLICATION SETUP 4.1. Setting up RemoSync on your mobile phone 1. In the Catalog, find and launch RemoSync. At the Welcome screen, press Ok, to continue. 2. RemoSync will automatically be installed on the Phone 3. Next, you must choose the type of account that you wish to configure on your device from the available choices – Microsoft Exchange account, Google Apps Business Server account and Other Professional email accounts Configuring a Microsoft Exchange account: You can create an account associated with your Microsoft Exchange server by entering the following information: User ID: Enter your Username (as on your Microsoft Exchange Server® account) Password: Enter your password (as on your Microsoft Exchange Server® account) Domain: Enter the domain for your Microsoft Exchange Server® Email Id: Enter the email address of your Microsoft Exchange® account Server Address: Enter the Microsoft Exchange® Server address for e.g. exchange.yourcompany.com SSL: Check the box if your server is SSL enabled Use the Advanced options to set the following fields: What to Sync: Choose the collections – Email, Contacts and Calendar that you wish to synchronize by using the checkbox against the collection. Conflict Settings: Choose the appropriate resolution type from the available two options – „Keep Server changes’ or „Keep Client changes’. Based on the user choice, changes made on the client or changes from server will take precedence during all subsequent synchronizations. Time Zone: Select the appropriate time zone On clicking „Next’, application connects to the server and verifies if the account credentials are correct by logging in and then retrieves the policy information from server and will prompt you for a PIN if required. PIN: Enter a „n‟ digit PIN of your choice, where value „n‟ was set by the Exchange admin policy, this will be used to gain access to the application during subsequent uses. This will prevent unauthorized use of the application. With your account established and your PIN selected, the configuration process is complete. *Direct Push/Real-Time syncing may not be available on all devices. In such cases, Scheduled Sync is available. User Guide 1.0 Congratulations! You‟ve now created a RemoSync account and ready to synchronize with your Microsoft Exchange account. Press Next to begin your first Synchronization. Once the Synchronization is completed successfully, you will be navigated to the Main Menu Note: Ensure that you provide the correct credentials when setting up your account. If you still continue to face problems with setting up your account or if you do not have the required server information, consult your IT department for the same. The following screenshots in Figure 1, from the application will guide you through the account set up process The screenshots below indicate the provider‟s list selection and configuring the exchange account. All the details like User name, Password, Domain, Email address, Server Address and SSL info in a single screen *Direct Push/Real-Time syncing may not be available on all devices. In such cases, Scheduled Sync is available. User Guide 1.0 Figure 1 Configuring a Google Apps Business Email account: You can create an account associated with your Google server by entering the following information: Email Address: Enter your Email Address of the account Password: Enter your password Use the Advanced options to set the following fields: What to Sync: Choose the collections – Email, Contacts and Calendar that you wish to synchronize by using the checkbox against the collection. Conflict Settings: Choose the appropriate resolution type from the available two options – „Keep Server changes’ or „Keep Client changes’. Based on the user choice, changes made on the client or changes from server will take precedence during all subsequent synchronizations. Time Zone: Select the appropriate time zone On clicking „Done’, it navigates to configure Google screen. On clicking „Next‟, application connects to the server and verifies if the account credentials are correct by logging in and then prompt you for a PIN if required. The screenshots below indicate configuring Google Apps Business Email accounts *Direct Push/Real-Time syncing may not be available on all devices. In such cases, Scheduled Sync is available. User Guide 1.0 Figure 2 Configuring a POP/IMAP account: You will be prompted for the following account information: Email address: Enter the email address of the POP/IMAP account that you wish to configure Username: Enter the user name of your POP/IMAP account Password: Enter the password for your POP/IMAP account *Direct Push/Real-Time syncing may not be available on all devices. In such cases, Scheduled Sync is available. User Guide 1.0 Clicking „Next‟ will initiate the auto discovery feature with the server where the required account configuration information is retrieved. If auto discovery fails, then the user is prompted for the following details that are available with your service provider: Incoming server name: Enter Incoming Server Address Incoming Server Port Incoming port. Note: Ensure that you provide the correct credentials when setting up your account. You can verify if the information you provided is correct, by logging into your web account and then checking under the Settings page. Ensure that you have enabled “POP/IMAP forwarding” under the server settings. *Direct Push/Real-Time syncing may not be available on all devices. In such cases, Scheduled Sync is available. User Guide 1.0 The screenshots below indicate configuring other professional email accounts Figure 3 The screenshots below indicate the settings for Security PIN. User should enter a PIN in the required format as prompted on the screen. For Exchange accounts, server sends the policy data which contains security details about length of the PIN and numeric or alphanumeric PIN. Based on the response, app asks user to enter the security PIN details. Figure 4 *Direct Push/Real-Time syncing may not be available on all devices. In such cases, Scheduled Sync is available. User Guide 1.0 4.2. 4.2.1. Device Security and Policy Settings PIN settings Once your account has been set up, you are ready to synchronize your Phone information with the Microsoft Exchange Server®. To ensure that there is no unauthorized access to sensitive Contact, Calendar and Email information or unauthorized use of your Phone, it is recommended that you set up a PIN access on your Phone. To do this, click on „Manage Accounts‟ option on the Main Menu of the application, which will navigate you to the Accounts page. Click on options and select „Security‟ which will open up the PIN settings screen. Enter a PIN (alphanumeric recommended) of your choice and click on „Save‟, after which you will be prompted for confirmation of the PIN. Enter the PIN again and if both entries match, then the PIN that you entered is saved on the Phone and will be used for subsequent access to the application. The navigation screens are shown below. *Direct Push/Real-Time syncing may not be available on all devices. In such cases, Scheduled Sync is available. User Guide 1.0 Figure 6 The PIN entry mode, length, complexity, number of incorrect PIN entry attempts allowed, and Device idle timeout can be controlled by the Microsoft Exchange Server® Administrator. Based on the Device Policy settings from the Server, at the time of synchronization with the Microsoft Exchange Server®, the application will update the Policy settings from the server. If the Policy settings require an Alpha numeric PIN entry and requires a minimum length, then the same would be prompted to the User who must change the PIN settings in accordance with the Device Policy settings on the Server. During subsequent synchronizations the Policy settings are always updated from the server and then imposed on the client. User must enter the PIN in the specified format (in accordance with the Device Policy settings) for access to the application. If the PIN is incorrectly entered for the specified number of times (as specified by the server) then the application will initiate a local data wipe and proceeds to wipe off all Contact, Calendar and Email information from the Phone. Note: Consult your IT department for complete information on the Policy settings on your Microsoft Exchange Server® 4.2.2. Remote Data Wipe Device management is available to users of Microsoft Exchange Server® 2007 whereas for the Microsoft Exchange Server® 2003, this feature is available only to the Microsoft Exchange Server® administrator. To protect your Mobile Phone from unauthorized use and access to sensitive Email, Contact and Calendar information especially when the Phone is lost, Microsoft Exchange provides a Remote Data Wipe feature that allows an Administrator/user to setup a device for data wipe remotely from the Microsoft Exchange Server®. The Administrator/user first identifies the device that must be set up for data wipe on the Administrator console of Microsoft Exchange Server®. Then the Administrator/user chooses the particular device and issues a Remote Data wipe directive. As soon as the Administrator/user issues the Remote Data Wipe directive, the Microsoft Exchange Server® will first remove that device from the partnership, and then modify the Policy settings. During the next synchronization request from the Phone, the Microsoft Exchange Server® will direct the device to update its Policy settings on account of a change since the last *Direct Push/Real-Time syncing may not be available on all devices. In such cases, Scheduled Sync is available. User Guide 1.0 synchronization. The device would then proceed to update the Policy settings during which it encounters a Remote Data wipe directive from the Microsoft Exchange Server®. The RemoSync application would then proceed to ‟‟Wipe Off‟ all the Contacts, Calendar and Email information stored on the Phone. Once the device information has been successfully wiped off, the application will send an acknowledgement to the Microsoft Exchange Server® after which the device will simply terminate the connection with the server. The subsequent synchronizations from a device that has been wiped of all information will continue to fail. The Microsoft Exchange Server® will update the device administration settings with a successful data wipe for the particular device. *Direct Push/Real-Time syncing may not be available on all devices. In such cases, Scheduled Sync is available. User Guide 1.0 5. HOME PAGE Grid view of Microsoft Exchange account consists of the following options 1. 2. 3. 4. 5. 6. 7. Email Contacts Calendar Sync Now Corporate directory (or the Global Address List) Manage Accounts Help Figure 7 Grid view of Google Apps Business Email account The Home Page for the Google Apps Business Email account provides you with the options to access 1. 2. 3. 4. 5. 6. Email Contacts Calendar Sync Now Manage Accounts Help Figure 8 *Direct Push/Real-Time syncing may not be available on all devices. In such cases, Scheduled Sync is available. User Guide 1.0 Grid view of IMAP account The Home Page for the IMAP account provides you with the options to access 1. 2. 3. 4. 5. 6. 7. Inbox Server Folders Compose Drafts Outbox Manage Accounts Help Figure 9 Grid view of POP account The Home Page for the Google ActiveSync account provides you with the options to access 1. 2. 3. 4. 5. 6. Inbox Compose Drafts Outbox Manage Accounts Help Figure 10 *Direct Push/Real-Time syncing may not be available on all devices. In such cases, Scheduled Sync is available. User Guide 1.0 5.1. Email [called Inbox for POP/IMAP accounts] Clicking on the Email icon on the grid view allows you to navigate to your Inbox view of your Microsoft Exchange® server on your handset. RemoSync will synchronize and store up to 100 latest emails from your Microsoft Exchange® mail account(50mails for IMAP accounts). Clicking on Email will take you to your email Inbox page that displays the headers of the emails from your Inbox. The Delete option is displayed at the bottom of the page. Delete: Moves the selected mail to Deleted Mails folder in Exchange Account. Deletes the selected mail if in IMAP or POP Account. Pressing the „Menu’ button will bring up the following options : Reply: to reply to an received mail Reply all: to send replies to all recipients of the mail Forward: to forward Compose: to compose a new mail Mark as Unread: to mark mail as „Unread‟ Folders: Provides a view of the Server folders. All emails within a folder can be viewed from here. Refresh: Refresh the current view and display new email if any. IMAP & POP . *Direct Push/Real-Time syncing may not be available on all devices. In such cases, Scheduled Sync is available. User Guide 1.0 Figure 11 To read the complete mail selects the header. This will display the mail body with options to Reply and Delete at the bottom of the screen. Figure 12 *Direct Push/Real-Time syncing may not be available on all devices. In such cases, Scheduled Sync is available. User Guide 1.0 Pressing the „Menu’ button will bring up the following menu options: Fetch More: to fetch more text of the corresponding mail from the Server. Show Details: to show To, Cc fields along with Date and Time of the corresponding mail. Reply all: to send replies to all recipients of the mail. Forward: to forward a mail. This will open up the Compose mail screen where you have to enter the recipient addresses in the To, Cc and Bcc fields and the body content. Pressing Send will send the mail via the Microsoft Exchange Server® which in turn will attach the body of the original mail before sending it to the destination. List attachments: On User selection the application fetches the Attachments for that mail. The user can first view a list of all attachments that are present in the mail. Selecting LSK will bring up the following options. Zoom in: This option allows the user to zoom into the attachment page currently being displayed. Supports up to 5x zooming capability Zoom Out: This option allow the user to zoom out of the attachment page currently being displayed. . Supports up to 5x zoom out capability Next page: This option allows the user to fetch the next page of the attachment. Previous page: This allows the user to view the previous page of the attachment. Go To Page: This option allows user to jump to a specific page of the attachment where the attachment spans several pages. This is particularly helpful if the user wishes to view only particular sections of the attachment. Read Text: This option allows the user to read the text content of the attachment page wherein the image and other graphic content on the page is removed while leaving the text content alone. *Direct Push/Real-Time syncing may not be available on all devices. In such cases, Scheduled Sync is available. User Guide 1.0 Figure 13 The following options will be visible only if the received mail is a Meeting Invitation :( Exchange Email) Accept: Use this option to accept a Meeting Request Tentative: Use this option if your attendance is tentative or not sure Decline: Use this option to decline the meeting invitation. Reply All: Reply to all recipients in the incoming mail Forward: Forward mail to a destination email address Figure 14 *Direct Push/Real-Time syncing may not be available on all devices. In such cases, Scheduled Sync is available. User Guide 1.0 Compose mail: Clicking on this option will bring up the compose mail screen that allows you to compose a new mail and add recipient addresses to it before sending it. Pressing the Menu button will bring up the following options as shown in Figure 15 below: Figure 15 Save To Drafts: Saves the mail content to local “Drafts” folder. Send: Sends the composed mail. Contacts: Clicking on Contacts will bring up the contacts list from the Phone‟s address book. You may then choose from the listed contacts to add to the To, Cc or the Bcc fields Add Group(s): You can use the group option to send mail to all email addresses listed under a group. Clicking on Groups will display a list of available groups from which you can select and add. If no predefined groups are present, then ‘Empty’ will be displayed. Corporate directory: Clicking on Company Address book will bring up the contacts list from the Microsoft Exchange® Global Address List. You may then choose from the listed contacts to add to the To, Cc or the Bcc fields Search OWA Contacts: Clicking on Outlook Contacts will bring up the contacts list from the Microsoft Exchange® Outlook PIM. You may then choose from the listed contacts to add to the To, Cc or the Bcc fields Pressing the Back button from this screen will take you back to the previous screen. Drafts: The Draft folder can be used to temporarily save the drafted mails that can be sent later. The current view displays the Draft folder items and the „Menu‟ brings up the following options: Delete: Deletes the current mail from the Drafts folder Delete All: Deletes all mails from the Drafts folder. Choose a mail to open the mail in the edit mode. Pressing the „Menu’ button will bring up the following options: Contacts: Clicking on Contacts will bring up the contacts list from the Phone‟s address book. You may then choose from the listed contacts to add to the To, Cc or the Bcc fields Groups: You can use the group option to send mail to all email addresses listed under a group. Clicking on Groups will display a list of available groups from which you can select and add. If no predefined groups are present, then ‘Empty’ will be displayed. Delete: Deletes the current mail from the Drafts folder *Direct Push/Real-Time syncing may not be available on all devices. In such cases, Scheduled Sync is available. User Guide 1.0 Figure 16 Outbox: Stores the mails which failed during the Send operation. You can also edit the mails present in the Outbox. The initial views display a list of items in the Outbox and pressing the „Menu’ button will bring up the following options: Delete: Deletes a particular mail from the Outbox Delete All: Deletes all mails from the Outbox. Choose a mail from the list to open it in the edit mode. Pressing the „Menu’ button will bring up the following options: Send: Use this option to retry sending the mail. Edit: Allows you to edit the mail in the Outbox before being sent Delete: Deletes the current mail from the Outbox *Direct Push/Real-Time syncing may not be available on all devices. In such cases, Scheduled Sync is available. User Guide 1.0 Figure 17 Deleted Messages: Contains the message deleted from the phone. During the next Synchronization mails present here will be moved to the “Deleted items” folder on the server from the phone. Figure 18 Restore: Use this option to restore mail to Inbox. Search: This enables you to search for particular mails in the INBOX or in any one particular folder or through all folders. (Only for Exchange accounts). You may enter your search criteria in the following manner: Start Date: Specify the Start date from which the mails have to be retrieved. End date: Specify the End date from which the mails have to be retrieved. Search Text: Specify the search text. Search In: Specify the Parent folders to search in – Drafts, Outbox, Inbox or Custom folders. Search in Sub folders: Specify if the search must include subfolders by toggling Checkbox. *Direct Push/Real-Time syncing may not be available on all devices. In such cases, Scheduled Sync is available. User Guide 1.0 Figure 19 The matching search results will be displayed with an option to navigate to the Next/Previous pages. Pressing the „Menu’ button will bring up the following options: Reply: Use this option to reply to the sender of the mail from the „Search Results page‟ Reply All: Use this option to reply to all recipients Forward: Use this option to forward the mail to the desired recipients. Next: This will navigate you to the next set of mails according to the search criteria. *Direct Push/Real-Time syncing may not be available on all devices. In such cases, Scheduled Sync is available. User Guide 1.0 5.2. Contacts Selecting Contacts will navigate you to the Contacts function. You will be first navigated to the Contact list screen with an option to enter a search string to search for specific contacts from the list. Options to add new contact information using the „New‟ option and „‟View‟ a contact details in full are displayed at the bottom of the screen. Choosing the „Menu‟ button provides you with the following options: Edit: Allows you to edit contact information and save it. Delete: Allows you to delete contact information Search OWA Contacts: This option is available for Microsoft Exchange® 2007 server only. This option allows you to search for contacts from your Microsoft Exchange® account. Clicking on this option will bring up a text entry screen where you can enter the contact first name or last name that you wish to search. You must enter a minimum of 3 characters for a successful search to be initiated. Refresh: This will refresh the current Contacts view on your phone and downloads new contacts if any. Figure 20 From the searched contacts you may: Call: Pressing on this option while the focus is on one of the displayed Phone numbers will dial the number for that contact: Send SMS: Pressing on this option while the focus is on a displayed Phone number will open up the text input screen from where you can send an SMS to the desired number. Next Page: Navigates you to the next page of the searched contacts list. *Direct Push/Real-Time syncing may not be available on all devices. In such cases, Scheduled Sync is available. User Guide 1.0 Figure 21 *Direct Push/Real-Time syncing may not be available on all devices. In such cases, Scheduled Sync is available. User Guide 1.0 5.3. Calendar Selecting Calendar will take you to the Calendar function. You will be first navigated to the Current Day view with all the Titles and the event times of the Calendar events for the day displayed. You can use the left and right navigation keys to switch to the Next/Previous day view. The New and Select Date options are displayed at the bottom of the screen to allow you to create a new calendar event or to jump to a specific day of the calendar. Pressing the „Menu’ button will bring up the following options: The Events are indicated with different colors based on the current status of the Event. The color codes represent the following: Wheat: indicates Events that have been synchronized with the server Green: indicates Events that have not been synchronized with the server, but are currently saved on the Phone Search Event: Allows you to search for a particular event by „Title‟ Delete: Deletes the selected event Week View: Will navigate you to the current „Week view‟ of your Calendar with events marked by days Month View: Will navigate you to the current „Month view‟ of your Calendar Refresh: Will refresh the Calendar view on your phone and downloads new event data in the process. Clicking on the Title of the Calendar event will open up the details for that event that includes the „Title‟ of the event, the „Schedule‟ of the event, „Duration‟ of the event and „Reminders‟ if any for the event. Options to Edit and Delete are available at the bottom of the screen Pressing the „Menu’ button will bring up the following options: Fetch Notes (option available for Microsoft Exchange® 2007 server only): This option allows you to fetch the notes that are associated with a particular Calendar event from the server. *Direct Push/Real-Time syncing may not be available on all devices. In such cases, Scheduled Sync is available. User Guide 1.0 Figure 22 The Add Event menu item at the end of the „Day view‟ screen allows you to add a new calendar event/meeting from your phone. (If no events are available for the day, then the Add Event menu item is displayed on top of the list). Clicking on the Add Event menu item will present you with a screen where all the details for the event/meeting have to be entered. The following details would be required to add a new event: Subject / Title: Enter a subject for the meeting Date: By default the current day is displayed. You may change it by clicking on the date which brings up the date control and then choosing the required date by using the Up/Down keys. Use the Right/Left keys to navigate to month, day and year Start Time: Select the Start time for the event/meeting. Use the Up/down arrow keys to choose the required time on the time control. Touch an item or use the Right/Left keys to navigate between hours and minutes. *Direct Push/Real-Time syncing may not be available on all devices. In such cases, Scheduled Sync is available. User Guide 1.0 Duration: Select the duration for the event/meeting. Use the Up/down arrow keys to choose the required duration. Touch an item or use the Right/Left keys to navigate between hours and minutes. Reminder: Allows you to set a reminder ahead of the event occurrence. Enter the required duration value and then choose the required units as Minutes, Hours, Days or Weeks Location: Enter the location for the event/meeting Notes: Enter notes if any for the event/meeting Invite attendees : By default displays „No‟. Click on it to toggle between „Yes‟ and „No‟. If you set this value to „Yes‟, then the following options will be visible Required: Clicking on this option will bring up a screen where you can enter the recipient email addresses of the „Required attendees’ list. Pressing the „Menu’ will bring up the following options: Contacts: Clicking on Contacts will bring up the contacts list from the Phone‟s address book. You may then choose from the listed contacts to add to the „Required attendees’ list Groups: You can use the group option to send mail to all email addresses listed under a group. Clicking on Groups will display a list of available groups from which you can select and add. If no predefined groups are present, then ‘Empty’ will be displayed Company address book: Clicking on Company address book will bring up the contacts list from the Microsoft Exchange® Global Address List. You may then choose from the listed contacts to add to the „Required attendees’ list OWA Contacts: Clicking on Outlook Contacts will bring up the contacts list from the Microsoft Exchange® Outlook PIM. You may then choose from the listed contacts to add to the „Required’ field. Optional: Clicking on this option will bring up a screen where you can enter the recipient email addresses of the „Optional attendees’ list. Pressing the „Menn’will bring up the following options: Contacts: Clicking on Contacts will bring up the contacts list from the Phone‟s address book. You may then choose from the listed contacts to add to the „Required attendees’ list Groups: You can use the group option to send mail to all email addresses listed under a group. Clicking on Groups will display a list of available groups from which you can select and add. If no predefined groups are present, then ‘Empty’ will be displayed Company address book: Clicking on Company address book will bring up the contacts list from the Microsoft Exchange® Global Address List. You may then choose from the listed contacts to add to the „Required attendees’ list OWA Contacts: Clicking on Outlook Contacts will bring up the contacts list from the Microsoft Exchange® Outlook PIM. You may then choose from the listed contacts to add to the „Required’ field. Resource: Clicking on this option will bring up a screen where you can enter the recipient email addresses of the „Resource’ list. Pressing the Menu will bring up the following options: Recent Contacts: Brings up the list of recently used contacts to choose from. Contacts: Clicking on Contacts will bring up the contacts list from the Phone‟s address book. You may then choose from the listed contacts to add to the „Required attendees’ list Groups: You can use the group option to send mail to all email addresses listed under a group. Clicking on Groups will display a list of available groups from which you can select and add. If no predefined groups are present, then ‘Empty’ will be displayed Company address book: Clicking on Company address book will bring up the contacts list from the Microsoft Exchange® Global Address List. You may then choose from the listed contacts to add to the „Required attendees’ list OWA Contacts: Clicking on Outlook Contacts will bring up the contacts list from the Microsoft Exchange® Outlook PIM. You may then choose from the listed contacts to add to the „Required’ field. Recurrence : Choosing this option allows setting up a recurrent type of calendar event from your Phone. You can then specify the recurrence type from the following available types: None: Choose this option to create a calendar event that occurs only once. Daily: Choosing this option allows you to set up an event that recurs every day. You must then choose the recurrence pattern for this event from the following options: No End date: Set up an event with no end date End after x occurrences: Set up an event that ends after a fixed number of occurrences. End by: Set up an event that will end on a particular date Weekly: Choose this option to create an event that occurs once every nth week. You will then be required to choose the days of the week that the event must recur before being navigated to the following options: No End date: Set up an event with no end date *Direct Push/Real-Time syncing may not be available on all devices. In such cases, Scheduled Sync is available. User Guide 1.0 End after x occurrences: Set up an event that ends after a fixed number of occurrences. End by: Set up an event that will end on a particular date Monthly: Choose this option to create an event that occurs once every month on a specific date. You must choose from: Select Day: Choose on what day of what month the event must recur. For e.g. event th recurs on „Day 2 of every 4 month‟. Custom: Choose what day of the week and what month the event must recur. For e.g. rd event recurs on „First Sunday of every 3 month‟ You will then be required to choose from the following options: No End date: Set up an event with no end date End after x occurrences: Set up an event that ends after a fixed number of occurrences. End by: Set up an event that will end on a particular date Yearly: Choose this option to create an event that occurs once on nth month of a year on a specific date. You must choose from: Select date: Choose on what day of what month the event must recur. For e.g. event recurs on „Day 1 of January‟. Custom: Choose what day of the week and what month the event must recur. For e.g. event recurs on „First Sunday of January‟ You will then be required to choose the days of the week that the event must recur before being navigated to the following options: No End date: Set up an event with no end date End after x occurrences: Set up an event that ends after a fixed number of occurrences. End by: Set up an event that will end on a particular date Go to Date: Using this option you can navigate to the calendar event of any day/month/year. This option is particularly helpful if you want to jump directly to a particular event/meeting view. Search: Allows you to search for a particular event on the calendar. Week View: Displays the calendar events for the current week by day of week Month view: Displays the calendar events for the current month. Refresh: This will refresh your local calendar view by initiating calendar synchronization and then displays the calendar data along with recently added events/meetings. *Direct Push/Real-Time syncing may not be available on all devices. In such cases, Scheduled Sync is available. User Guide 1.0 *Direct Push/Real-Time syncing may not be available on all devices. In such cases, Scheduled Sync is available. User Guide 1.0 Figure 23 *Direct Push/Real-Time syncing may not be available on all devices. In such cases, Scheduled Sync is available. User Guide 1.0 Sync Now Selecting Manual Sync will navigate you to the „Collections‟ screen where you can select the Folder collections that you wish to synchronize. Pressing „Sync‟ will start the user initiated Synchronization process and synchronize the information for the selected Collection. A message about the number of items synchronized is displayed at the end of a successful synchronization. Figure 30 5.4. Corporate Directory The „Search Corporate Directory‟ option allows you to search for Contact entries from the Global Address List on your Microsoft Exchange® Server. Clicking on this option will bring up a text entry screen where you can enter the contact first name or last name that you wish to search. You must enter a minimum of 3 characters for a successful search to be initiated. The matched contacts will be displayed in alphabetical order spanned across pages. Clicking on a contact name will display the details for that contact. Pressing the „Menu’ button will bring up the following options: *Direct Push/Real-Time syncing may not be available on all devices. In such cases, Scheduled Sync is available. User Guide 1.0 Call: Pressing on this option while the focus is on one of the displayed Phone numbers will dial the number for that contact: Send SMS: Pressing on this option while the focus is on a displayed Phone number will open up the text input screen from where you can send an SMS to the desired number. Next Page: Navigates you to the next page of the searched contacts list. Figure 31 *Direct Push/Real-Time syncing may not be available on all devices. In such cases, Scheduled Sync is available. User Guide 1.0 5.5. Manage Accounts Manage Accounts will show all the account details with Add, Edit buttons and delete option for the accounts. User can create, edit and delete the accounts. Add Account: You may use Add button option to create an account. It fetches the providers list from the server and displays to user. User can choose the provider based on the account he wants to create. *Direct Push/Real-Time syncing may not be available on all devices. In such cases, Scheduled Sync is available. User Guide 1.0 Figure 32 Choosing the „Menu’ button will provide you the following options: 1. 2. 3. 4. 5. 6. 7. Add Edit Delete Groups Quick Messages Settings Set as Default The options are explained below: Edit: Allows the user to edit the selected account. Delete: Allows you to delete the selected account information. This will remove all account information related to that account. 5.6. Groups Allow you to pre-configure and store email ids that you frequently use by grouping them under an Alias. This is particularly helpful during sending a mail, where you can quickly pick up and add one or more groups from the stored groups to the To, Cc , Bcc, Required, Optional or Resource fields before sending the mail or adding and event/meeting. To create a new group, click on „Add Group’, and then enter a name for the group. Proceed to add contacts (Maximum of 10 mail ids) from the Phone‟s address book. Once done, the Groups page will display the list of available Groups. Selecting a group and Pressing the „Menu’ button will bring up the following options: Add Member: Allows you to add a contact to the Group. Remove Member: Allows you to remove a contact from the Group. *Direct Push/Real-Time syncing may not be available on all devices. In such cases, Scheduled Sync is available. User Guide 1.0 Figure 33 5.7. Quick Messages Quick Messages: Up to 50 custom messages can be configured for Quick and Easy Replies. This will help you to quickly add messages from a predefined list without having to type in the message. Pressing the „Menu’ will bring up the following options: Edit: Allows you to edit a quick message from the available templates. Delete: Allows you to delete a quick message from the available templates. *Direct Push/Real-Time syncing may not be available on all devices. In such cases, Scheduled Sync is available. User Guide 1.0 Figure 34 Set as Default: Allows you to choose one account as the Default account from the list of already configured accounts. If no account is chosen as the Default account, then the first account that was configured will be set as the default account. At the application launch the user is navigated to Main Menu Grid view of the default account. Help: The Help section provides you with brief usage instructions for RemoSync. You must refer this User Manual for detailed instructions on the features and functions of RemoSync. Figure 35 *Direct Push/Real-Time syncing may not be available on all devices. In such cases, Scheduled Sync is available. User Guide 1.0 5.8. Settings Settings menu options are different for Microsoft Exchange and other email accounts. o o Exchange Account Settings IMAP Account settings Exchange Account Settings: On choosing Settings option from Exchange account will navigate you to the Settings Sub menu that contains the following 7 primary settings options that you can use to control the behavior of RemoSync on your Mobile Phone. 1. 2. 3. 4. 5. 6. 7. 8. 9. 10. Full Sync What To Sync Sync Schedule Security Email Settings Contact Settings Time Zone Out of Office Sync Status Attachment Server URL Figure 36 The settings options for Microsoft Exchange account are explained below: *Direct Push/Real-Time syncing may not be available on all devices. In such cases, Scheduled Sync is available. User Guide 1.0 5.8.1. Full Sync: Deletes the entire data and re-syncs all collections – Email, Contacts and Calendar each time. Checking the required collection will select or deselect the collection. Choose the „Sync‟ option to save your settings and start synchronization. Figure 42 5.8.2. What to Sync: Allows you to choose the Sync collections – Email, Contacts and Calendar to be synchronized each time. Checking the required collection will select or deselect the collection. Choose the „Sync‟ option to save your settings and start synchronization. *Direct Push/Real-Time syncing may not be available on all devices. In such cases, Scheduled Sync is available. User Guide 1.0 Figure 42 5.8.3. Sync Schedule /*Direct Push : Allows you to select from the following Synchronization options: *Direct Push: This will enable „*Direct Push‟ for the selected collections. By enabling *direct push you will be able to receive *real time notifications of new Contact, Calendar or Email data on your phone as soon as they arrive on the Microsoft Exchange® server. Choosing *Direct Push will navigate you to the Schedule page that contains a list of your existing schedules along with an option „Add Schedule‟ to add a new schedule Scheduled sync: You can set up the application for a scheduled synchronization. You may choose between a frequency of 15 minutes to 2 hours at a 15-minute interval as well as Daily or Weekly. You will then be navigated to the Start time – to choose the start time; End time – to choose the end time (say between 8 a.m. and 8 p.m. on the scheduled days). Then you will be navigated to select the Day of week, and the schedule will be set to the selected day of the week at the specified time. The application will automatically check for updates at the defined day and time and synchronize them to the phone. The navigation for setting up *direct Push is shown in the application screenshots (Figure 35) below: *Direct Push/Real-Time syncing may not be available on all devices. In such cases, Scheduled Sync is available. User Guide 1.0 Figure 35 Choosing Custom on the Sync Days page will allow you to enable synchronization on select days by providing you with an option to select the days from a list as shown below in Figure 36. The remaining setting options are as shown in the screenshots above. *Direct Push/Real-Time syncing may not be available on all devices. In such cases, Scheduled Sync is available. User Guide 1.0 Figure 36 The screenshots below in Figure 37 indicate the Scheduled Sync options for RemoSync *Direct Push/Real-Time syncing may not be available on all devices. In such cases, Scheduled Sync is available. User Guide 1.0 Figure 37 5.8.4. Security: *Direct Push/Real-Time syncing may not be available on all devices. In such cases, Scheduled Sync is available. User Guide 1.0 The screenshots below indicate the settings for Security PIN. User should enter a PIN in the required format as prompted on the screen Figure 38 5.8.5. Email Filter Settings Allows you to filter and synchronize your mails from last 1 day, 3 days or mails from the past 1 week using the following radio button options: Last 1 day: Synchronizes only those emails that are 1 day old Last 3 Days: Synchronizes emails that are up to 3 days old Last 1 week: Synchronizes emails that are up to a week old Figure 39 *Direct Push/Real-Time syncing may not be available on all devices. In such cases, Scheduled Sync is available. User Guide 1.0 5.8.6. Contact Settings Conflict Resolution: Allows you to select from the following Conflict resolution settings: Keep Client changes: Choosing this option will ensure that during subsequent synchronizations all the server changes (Contacts, Calendar and Email) will take precedence. Keep Server changes: Choosing this option will ensure that all server changes (Contacts, Calendar and Email) will take precedence during subsequent synchronizations. Figure 40 *Direct Push/Real-Time syncing may not be available on all devices. In such cases, Scheduled Sync is available. User Guide 1.0 5.8.7. Time Zone This feature allows you to select your preferred time zone. You can choose from the available time zone options and save it. Figure 41 Note: You must ensure that you select the correct time zone setting to ensure that your calendar alerts, reminders etc. work properly. This is especially true when you travel across time zones. 5.8.8. Out of Office This feature allows you to configure the Out-of-office settings to automatically reply to emails you receive when you are not in office. Based on your settings all incoming mails during this period will be auto-replied with a mail containing your custom Reply message. To configure Out of Office settings: Choose Out of Office option from the Settings menu which will navigate you to the out of office settings screen. Choose from the following types: Enable: This will enable Out of Office setting and navigates you further to the Out of Office Types page that contains internal and external settings page. Inside Organization: Choose this option if you would like to send a customized reply message to internal senders i.e. senders from within the organization. You will then be navigated to the External Known: Choose this to reply with your customized response to senders who are from outside your organization, but are listed on your Contacts list - for e.g. business acquaintances. External All: Choose this option will auto-reply to all senders who are Internal and also External senders. No Duration: Choose this option to set Out of Office with no end time Today: Choose this option to enable Out of office only for the current day (12.01 am to 11.59 p.m.) Select Duration: Choose this option to select the duration for which Out of Office must be enabled Start Date: Choose the date from which Out-of-office must be enabled Start time: Choose the start time from which Out-of-office settings must be active. End Date: Choose the end date *Direct Push/Real-Time syncing may not be available on all devices. In such cases, Scheduled Sync is available. User Guide 1.0 End time: Choose the end time after which Out-of-office settings must be disabled. Internal: Edit your response that must be sent for mails from senders who are within the organization External: Edit your response that must be sent for mails from External Users Disable: Choosing this option will disable the out-of-office settings. Save your settings, to update the same on the server. The Out of Office settings are shown below: *Direct Push/Real-Time syncing may not be available on all devices. In such cases, Scheduled Sync is available. User Guide 1.0 Figure 42 *Direct Push/Real-Time syncing may not be available on all devices. In such cases, Scheduled Sync is available. User Guide 1.0 5.8.9. Sync Status Displays information on the Date, Time and the Status of the last synchronization carried out from the Phone. Figure 43 5.8.10. Attachment Server URL: RemoSync provides you with an ability to view attachments of some selected types. The client application connects to a server that converts the attachments to image formats that can be viewed on your Phone. To be able to view attachments, you must enter the server name and save it . Figure 44 *Direct Push/Real-Time syncing may not be available on all devices. In such cases, Scheduled Sync is available. User Guide 1.0 5.8.11. IMAP Account Settings: On choosing Settings option from IMAP account will navigate you to the Settings Sub menu that contains Schedule Sync option that helps you to configure *Direct Push and Periodic Schedules. 1. 2. 3. Schedule Sync Alert Settings Time Zone Figure 45 < 6. Help The Help section provides you with brief usage instructions for RemoSync. You must refer this User Manual for detailed instructions on the features and functions of RemoSync. Figure 46 *Direct Push/Real-Time syncing may not be available on all devices. In such cases, Scheduled Sync is available. User Guide 1.0 7. TIPS & TRICKS The following tips and tricks will help you in optimizing your key presses and make it easier to navigate and use some key features of the application: 1. Shortcut Keys All menu items are numbered from 0 to 9. You may press and hold the number key to quickly activate a particular menu item in the context of the menu instead of navigating to the menu item using the scroll and then clicking on that option to do the same. 2. Quick Messages To quickly send replies to incoming mails, store the most commonly used messages as Quick Messages and later add them quickly to the Subject and Body of your emails to avoid typing long messages. 3. Synchronization schedules Scheduling automatic synchronizations during off peak hours or Night times would go a long way in reducing data usage *Direct Push/Real-Time syncing may not be available on all devices. In such cases, Scheduled Sync is available. User Guide 1.0 8. FREQUENTLY ASKED QUESTIONS [FAQ] 1. What is RemoSync and why would I want it? If you are a corporate user and if you want to stay connected to all the latest Contact, Calendar and Email information on your Microsoft Exchange Server, then, RemoSync is the product for you. Using licensed Exchange ActiveSync technology from Microsoft, RemoSync provides the mobile phone with a *direct connection to the Microsoft Exchange Servers 2003 SP2, 2007, and 2010. 2. How do I get RemoSync? To get RemoSync, you need to download RemoSync to your handset. To find RemoSync Open the J2ME Catalog on your handset Find RemoSync Download it to your phone! 3. What handsets offer RemoSync? To see if your handset offers RemoSync, visit the “supported handsets” page for RemoSync at the www.remoba.com website for an up-to-date list. 4. What additional features does RemoSync 4.5 provide? RemoSync provides new capabilities that allow you to configure your Google account (Contacts, Calendar and Email) as well as your POP and IMAP accounts from the same client. This provides you with a seamless client that allows you to access any mailbox from a single application without having to open up a different client. 5. What types of data can be synchronized by using RemoSync? RemoSync enables you to synchronize your e-mail messages, calendar and contacts lists in your Exchange Server 2003 SP2, 2007, and 2010 from a J2ME Mobile Phone. 6. How do I know if I am using Microsoft Exchange Server 2003 SP2, 2007, or 2010? There is no way to know this from your Phone and you would have to consult your IT Department for this. 7. How do I enable mobile access on the Exchange Server? To enable mobile access on the server requires Server configuration and this configuration varies between Microsoft Exchange Server® 2003 SP2, 2007, and 2010. Consult your IT Department for the same. 8. How do I change the schedule of my automatic synchronizations? To change the schedule of your automatic backups, go to the Accounts page. Click on the Menu option, then choose Sync Schedule. This will display the current Schedule if any. Choose the Edit option to editing the existing schedule. 9. How do I start Synchronizing? To start Synchronizing, open RemoSync on your phone. Choose the folders that you would like to synchronize – Email, Contacts or Calendar and pressing Sync will start the synchronization process. 10. What details are required before I attempt to use RemoSync to synchronize with my Microsoft Exchange® server? You will require the following information for configuring RemoSync to synchronize with your Microsoft Exchange® server: Server Type: The Microsoft Exchange Server® type that you wish to connect to. RemoSync supports Microsoft Exchange® Server 2003 SP2, 2007, and 2010. Server: The Microsoft Exchange® Server address for e.g. exchange.yourcompany.com SSL : Check the box if your server is SSL enabled User ID: Username (as on your Microsoft Exchange Server® account) Password: Password (as on your MICROSOFT Exchange Server® account) Domain: Domain for your MICROSOFT Exchange Server® Email Id: Email address of your MICROSOFT Exchange® account Note: If you are not sure of the server information or continue to face problems, consult your IT Department for the required information. *Direct Push/Real-Time syncing may not be available on all devices. In such cases, Scheduled Sync is available. User Guide 1.0 11. What does "Direct Push" mean? When should I use it? *Direct Push is a feature of RemoSync that allows all new information – Email, Contacts, Calendar, from your MICROSOFT Exchange Server® to be pushed *directly to your Mobile Phone as they arrive on the Server. This will prevent you from having to logging in from your phone manually to check for new emails or calendar events. *Direct Push will enable the application to always be up-to-date with the server. You may use the *Direct Push feature if you want to have the latest information on Contacts, Calendar and Email pushed to your phone instantaneously as they arrive on the server. 12. What does "Scheduled Sync" mean? When should I use it? Scheduled sync provides you with an option of setting up your own schedule of when the device synchronization must be done automatically. For e.g. if you want the synchronization to be done once a day at 8‟o‟ clock every night, you could set this time in the scheduled sync settings and at the appointed hour, the application will start and complete the synchronization with the MICROSOFT Exchange® Server. You may use this feature if you are a light user and don‟t expect a lot of email or calendar events on your server and would like to be notified at set intervals about new items on your Server. 13. What is Corporate directory? What does Search Corporate Directory do? Corporate Directory is a Global Address List maintained on the Corporate Server. If you are a MICROSOFT Exchange Server® user, all your Corporate contacts are organized under one common list called the Global address List. The „Search Corporate Directory‟ feature allows you to search for contacts from the Corporate Directory List and then store that contact information on to your phone. You must specify a minimum of 3 characters for your search to be initiated on the Corporate Directory List. 14. What is conflict resolution and how do I use it? Conflict resolution is a feature that allows you to choose which data must take precedence. Since synchronization will update data on the Phone and the Server, sometimes, it is possible that the same information (Contacts or Calendar) has been updated on both the Phone and the Server. You must specify what data you want kept, by choosing the conflict resolution options – „Keep Server changes’ or „Keep Client changes’; Choosing the former, will ensure that changes on server will be kept these will be downloaded to the Phone. Choosing „Keep Client changes’ will ensure that changes on the Client will be kept and changes from client will be written to the server. 14. What is „Full Sync‟ and when do I use it? Full sync is a full synchronization process wherein all the contact, calendar and email information is erased from the Phone first and then the contacts, calendar and email information from your MICROSOFT Exchange Server® is downloaded to your Phone. Generally the synchronization process only brings in the updates and keeps the server and the phone current. But sometimes you may face some problems during synchronization which may be due to faulty network, or bad responses from your MICROSOFT Exchange® Server. In such cases you may not be able to proceed with the regular synchronizations in which case you have to initialize the „Full Sync‟. 15. How many emails from my MICROSOFT Exchange Server® will be fetched to my Phone during synchronization? RemoSync fetches and stores the latest 100 emails from your MICROSOFT Exchange Server® account and displays them on the Phone. You can view the „Mail Headers‟ first before proceeding to view the complete mail. 16. What does the „What to Sync‟ option do? „What to Sync?‟ option allows you to choose the collections that must be synchronized between the Phone and the server. These elements – Email, Contacts and Calendar are called the Sync Collections. You have to specify what collections have to be synchronized by checking the appropriate box. Only the selected collections will be synchronized with the MICROSOFT Exchange Server® during subsequent synchronizations. 17. How do I disable the "Direct Push" option? To disable the „*Direct Push‟ option, first launch RemoSync and on the Grid view navigate to the Turn Sync Off option. This will disable the „Direct Push‟ option. 18. What is Contact Name Format and how will that be useful to me? All Mobile Phones do not store Contact information in the same way. Some store it in the First Name, Last name format, while some may store it as Last Name, First Name. This may cause some problems on some phones which *Direct Push/Real-Time syncing may not be available on all devices. In such cases, Scheduled Sync is available. User Guide 1.0 may result in contacts being duplicated on your Mobile Phone. Before synchronizing with a advisable to select the supported Name format for your Phone new device it is 19. What is Time Zone setting? Time Zone identifies the time zone that you operate from. This setting is extremely important to ensure that the Reminder and Alert settings as also your Calendar views work as desired. This is especially true if you re traveling across time zones. 20. What is Out of Office and how do I use it? Out of Office setting allows you to send automatic responses to sender emails, with a custom message to indicate that you are away from office for a specific duration. You must specify the date and time between which the Out of Office messages must be sent as replies to incoming mails. You can customize two types of response messages for – 1. Internal i.e. senders from within the organization and 2. External Known – are the senders who are not a part of your organization but are known to you i.e. contacts that are part of your address book 3. External Unknown: are the senders who are not known to you. For e.g. new contacts. You can disable this setting using the Disable option under Out of Office setting. 21. What is Past Reminder Display Duration and how do I use it? This option allows you configure for how long the past reminders must be displayed. Whenever reminders are popped up, for an upcoming event or new mail, some user action is expected (user must dismiss it) to ensure that the reminder has been noticed. But if there is no user feedback, then the reminders will continue to be displayed till the time specified by the „Past Reminder Duration‟. For e.g. A Reminder that is set for 9.00 a.m. for a 9.30 meeting, will fire up at 9.00 a.m. and will stay there until you dismiss it. All subsequent reminders also will pop up at the appointed times and dismissing each one is cumbersome. Using the past reminder duration you can ensure that all the reminders are automatically dismissed after a period of time. 22. What is Display Theme and how is it useful to me? This option allows you choose the display theme for the RemoSync application on your Phone. You may choose from the available themes and notice that the color schemes will change throughout the application. RemoSync supports 2 themes that you may choose from. 23. What is Sync Status? The Sync Status option allows you to view the status of your last synchronization that was performed from the Phone. The information includes the Status of the Last synchronization, time and date information of last synchronization for each collection item – Email, Contact and Calendar 24. What is Unsupported SSL and why do I need it? Some exchange servers allow only secure connections. When accessing the MICROSOFT Exchange server over SSL, the SSL certificate (also called Root certificate) on the device may not match that on the Server after which the server will reject the connection. The device would then have to renegotiate a connection with the server using a temporary certificate. *Direct Push/Real-Time syncing may not be available on all devices. In such cases, Scheduled Sync is available. User Guide 1.0 9. TROUBLESHOOTING 1. Whenever I sync my calendar items, I don‟t see the correct time on the calendar events. Resolution: If you see that your appointments on your Phone are not at the time mentioned on your MICROSOFT Exchange Server® Calendar, then you need to make sure that the time zone you specified is correct. This occurs because all appointments on the RemoSync are stored based on the offset from GMT. 2. The number of contacts on my Exchange account is more than what my Phone can support. What should I do? Resolution: RemoSync places a limit on the number of contacts that can be synched to the Phone due to Address book limitations on the Phone. If a user has more contacts on his MICROSOFT Exchange Server® account than what the phone supports, then the user must create a secondary folder and move those additional contacts (choose contacts which you don‟t want synchronized) to that folder and keep only those contacts that you use regularly and would require to be synchronized in the primary folder. 3. I have mails in my email account on the MICROSOFT Exchange Server®, but I don‟t see any mails in my Inbox on the Phone after synchronization. Resolution: You will have to check the Email filter option and change it appropriately. If this does not resolve the problem, then you can try to do a Manual Sync using the Manual Synchronization option. 4. I get “Outbox/Draft Full” message when trying to save a mail. Resolution: Delete some mails from the Drafts folder or the Outbox folder before proceeding. 5. The „Direct Push‟ feature is turned „OFF‟ even after I have turned the feature „ON‟ Resolution: This could be caused due to persistent Network problem. RemoSync will attempt to connect to the server up to 3 times in case of failure in communicating with the server. If even after 3 times the network problem persists then, the application automatically turns OFF the „*Direct Push‟ to prevent multiple attempts at connecting. You may have to turn it ON again at a later time. 6. I receive an ‘Error_500’ error message when I synchronize my mobile device with MICROSOFT Exchange Server® 2003. Resolution: You will see this error if your Microsoft Exchange Server® 2003 does not have the Service Pack 2 (SP2) installed on it. To resolve this issue, install Microsoft Exchange Server® 2003 Service Pack 2 (SP2) on the server. Contact your IT Department for a resolution. 7. I am facing persistent synchronization problems. Resolution: If you face persistent synchronization problems, then use the Full Synchronization option which will reset the application and start a fresh synchronization. If you continue to face problems, then, deleting the partnership in ActiveSync on your desktop and creating a new partnership resolves some problems. 8. I receive an „Error_1295’ error message whenever I try to synchronize my mobile phone with MICROSOFT Exchange Server® Resolution: You will see this error if the Microsoft Exchange Server® you are connecting to, requires SSL. Turn on the SSL settings to resolve this. 9. I receive an „Error_400 - Bad Request‟ error message whenever I try to synchronize my mobile phone with MICROSOFT Exchange Server® Resolution: You will see this error if the Microsoft Exchange Server® you are connecting to, is unable to resolve the Server Type or the Server address that you have provided in the Account settings. Verify your account details and enter the correct details by contacting your IT department. 10. I receive a „Login Fail’ error message whenever I try to synchronize my mobile phone with Microsoft Exchange Server® Resolution: You will see this error if the account credentials – username and password, that you are using is wrong. Verify your account details and enter the correct details by contacting your IT department. *Direct Push/Real-Time syncing may not be available on all devices. In such cases, Scheduled Sync is available. User Guide 1.0 10. DEVELOPER WEBSITE You can access more information about the Product, its architecture and other associated information by opening your browser and accessing the link: http://www.remoba.com/remosync.html You may also, from a browser, visit: http://www.remoba.com and then navigate to the Products drop down menu and then click on RemoSync to be navigated to the RemoSync product page, where you will find all associated information about the product. *Direct Push/Real-Time syncing may not be available on all devices. In such cases, Scheduled Sync is available. User Guide 1.0 11. DISCLAIMER & COPYRIGHT INFORMATION Warning and Disclaimer Every effort has been made to make this document as complete and accurate as possible, but no warranty is implied. The information provided is on an “as is” basis. We assume neither liability nor person or entity with respect to any loss or damage arising from the use of this responsibility product or the to any information contained in this document. Trademarks Microsoft Exchange is either a registered trademark or trademarks of Microsoft Corporation in the United States or other countries. *Direct Push/Real-Time syncing may not be available on all devices. In such cases, Scheduled Sync is available.