1
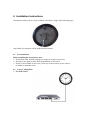
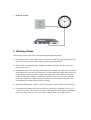
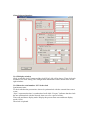
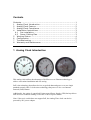
Contents
Contents ....................................................................................
1 Analog Clock Introduction .......................................................
2 Analog Clock Feature..............................................................
3 Analog Clock Compliance ........................................................
4 Installation Instructions ..........................................................
4.1 Pre-installation.................................................................
4.2 Power Cabling Plan ...........................................................
5 Working Status......................................................................
6 Configuration ........................................................................
7 Troubleshooting.....................................................................
8 Warranty and Maintenance .....................................................
1
1
2
2
3
3
3
4
5
7
7
1 Analog Clock Introduction
This analog clock utilizes the advantage of PoE-Power over Ethernet technology to
achieve convenient installation and cost-saving.
PoE is the technology that allows devices to get both data and power over one single
standard network cable. It is the same technology that powers Voice over Internet
Protocol(VoIP) Phones.
Additionally, the option of centralized Uninterrupted Power Supply (UPS) backup allows
PoE devices to continue running even in the event of a power failure.
Note: if the user's switch does not support PoE, the Analog Time clock can also be
powered by DC power adapter.
2 Analog Clock Feature
Standard 12 Hour Faceplate
• Uses external (or your own internal) NTP source for accurate time
• All international time zones
• Daylight saving time – available and configurable for all countries
• Uses standard Ethernet wiring
• PoE (Power over Ethernet)
• Internal crystal
• Two LED Status Indicator
• Standard chassis colors available are black .
• Wi-Fi module option
3 Analog Clock Compliance
4 Installation Instructions
Currently the analog clock is only available with surface, single-sided mounting type.
Any further development will be updated in this manual.
4.1
Pre-installation
Before installing the clock, please note:
• Permissions from facilities managers or property owners is necessary
• Develop a blue print to show desired installation of each clock
• If PoE is not available at user's site, select any location where power outlet is
available to install the clock
4.2 Power Cabling Plan
• For PoE switch:
•
Non PoE switch:
5 Working Status
After being powered, the clock will run through the following status:
1) Positioning status: clock hands will run clockwise to find the original position 12:00
since the system can not tell the where present position should be.
2) Pause status: after positioning is finished, the hands will pause till the system gets
present time source.
3) Adjustment status: after getting present time source, hands will adjust their position to
locate themselves for correct present time. For hour hand and minute hand, two ways
are designed: catching-up and waiting. If the target time falls behind the time that
hands are indicating within several minutes, hands will wait to keep pace with the
target time. Otherwise, hands will move clockwise to catch up the target time. For
second hand, it can only adjust itself by waiting.
4) Normal working status: within certain time accuracy, clocks hands works normally.
5) Unsynchronized status: the clock has failed to synchronize with time server over a
certain time period. The system will indicate this status by instructing second hand to
leap 2s per time when it is at even second, or pause when it is at odd second.
Please note:
•
If the network and all configurations are normal, initially the analog clock will come
to positioning status when power is on, quickly followed by adjustment status after
getting time source from the network. When adjustment is finished, the clock will
work.
•
If the clock is unable to get time source from network due to loose network
connection, or improper configuration, the clock will come to pause status after
positioning is done.
•
During normal working status, if time zone is modified, or DST is entered/exited, the
clock will come to adjustment status before going back to to normal working status.
•
During normal working status, if the clock have failed to get time source from
network for a certain time period, the clock will come to unsync status. When
synchronization is achieved again, the clock will come back to normal status after
adjustment.
•
During normal working status, if time zone is modified, the hour and minute hand
will quickly come to adjustment status till they find the target position.
6 Configuration
Clock configuration is achieved by client software. Some items should be given initial
attention:
•
An IP address so that the clock can communicate on the network
•
A network NTP time server so that the clock knows with which computer it should be
synchronized
•
The local time zone so that the clock can display the correct local time
•
The Daylight Saving Time setting so that the clock can automatically adapt to local
DST
Client Software Interface
No.1 IP display window
Click “search the clock” button and the clock IP in LAN will be shown. Then click each
IP address for clock setting. The configuration information will be shown in the on the
right windows.
No.2 Show the serial number “SN”of the clock
Synchronous state:
To check whether the present time shown is synchronized with the external time source
or not.
“Sync” represents the time is synchronized well while “Unsync” indicates that the clock
has not synchronized with the network time server for a period of time.
Time zone and hours display mode: Display the present time zone and hours display
mode (12/24).
The mode is optional.
No.3 Time server display window
Display the information of time server with which the clock synchronizes.
No.4 The basic network configuration
Show the present IP configuration and MAC address. Either dynamic IP address (DHCP)
or static IP address can be set.
No.5 The daylight saving time configuration
The daylight saving time configuration is available.
7 Troubleshooting
The clock shows incorrect time
1) Verify the Time zone and DST settings are correct
2) Verify the NTP time server is reachable
The Analog clock second hand has stopped moving
The second hand pause when it is at odd second to indicate a failure of time sync from
the time server.
Unable to find the clock on the client software
1) Verify that all network cables, hubs are in proper working status
2) Verify that the network clock in on the same physical network as the computer from
which you are running the client software
3) If you configure DHCP for the network clock, verify that a DHCP server is present on
the network.
Status LED are off
1) Verify the NTP server specified are reachable and communicating.
2) Verify that a gateway/router/firewall has been configured that allows the clock to
communicate outside of its local network.
3) Verify that all network cables, hubs etc. Are in proper working status.
8 Warranty and Maintenance
Warranty
We are provides one-year warranty. The Warranty begins on the date the unit is shipped
from Us
Care and Cleaning
Adherence to regular and proper cleaning procedure is recommended to preserve
appearance. Scratched or otherwise damaged lenses caused by misuse, mishandling,
improper storage, or improper cleaning is not covered under the limited warranty.
Repair and Return
To obtain service sunder this warranty, please use following contact and address for
shipping back.
GFClock Yasa Persada, Jakarta
Please Visit http://masterclock.gfclock.com
Direct Call: +62 818 802045