1
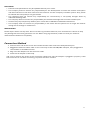
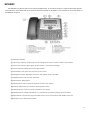
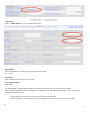
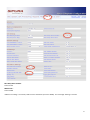
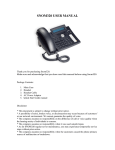
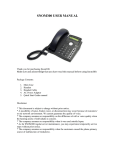
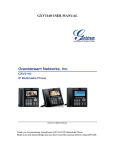
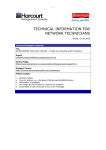
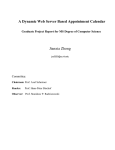
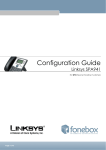
SPA941 User’s Manual Thank you for purchasing the SPA941. Before using the product, please read the manual carefully. After reading, store the manual in an accessible place. Check if all the accessories/attachments are included in the package. • • • • • • SPA941 Main body AC adapter Handset Curl/Handset cord Ethernet Cable Base LINKSYS SPA941 OVERVIEW Stylish and functional in design, the SPA941 VoIP Phone is ideal for a residence or business that uses hosted IP telephony service, an IP PBX, or a large-‐scale IP Centrex deployment. The SPA941 leverages industry leading VoIP technology from Linksys to deliver an upgradeable high quality IP Phone that is unparalleled in features, value, and support. 1 DISCLAIMER • Features and specifications may be updated without prior notice. • The company shall not assume any responsibility for the development of noise and volume interruption and disconnection of calls that arise from the customer and this company’s network system. Also, please be advised that call quality is not guaranteed. • The company shall not assume any responsibility for inconsistency in call quality brought about by individual listening skills. • The company shall not assume any responsibility for the device damage that occurred outside Japan. • Services may stop temporarily without prior notice due to GXP1400’s scheduled maintenance. • The company shall not assume any responsibility in the event that the phone can no longer be used for calling due to damage or malfunction. MAINTENANCE Please wipe it with a soft dry cloth. Do not use wet rag. Volatile chemicals, such as benzene or thinner as they may damage the main body, please do not use. When using rag chemicals, make sure that you read and understand the directions completely. Connection Method 1. Connect the 1 end of the cord to the handset and the other end to the body handset port. 2. Plugged the Ethernet cable “LAN” to the rear body of the GXP 280/285 LAN port, then plugged into the network or broadband router. 3. Plug in the AC adapter into the electrical outlet. 4. Insert the AC adapter to the body. ※ Be sure to observe the order of the connection. Make sure that the adaptor is plugged in properly. It will take some time to call after connecting, so please wait for a moment. 2 SPA941 The SPA941 is a phone that can be used at Agile Phone. It cannot be used as a typical subscriber phone. The customer must subscribe to an Internet Service Provider to be able to use the device. Customer with no broadband router feature must provide a separate broadband router. ① Handset: Handset ② LCD screen: Display. Confirming various settings and contacts’ phone numbers are possible ③ Voice mail indicator light: Lights up when there is a voicemail message. ④ Lines: Used for viewing the account information. ⑤ Soft buttons: Can select the top item on the screen. ⑥ Navigation button: Moving the cursor in the display menu is possible. ⑦ Mailbox button: Use to check voicemail. ⑧ Hold button: Hold button ⑨ Setup button: Use to check information stored in your phone. ⑩ Volume adjustment bar: Used for adjusting the volume ⑪ Headset button: Use to connect a headset to the device. ⑫ Speaker button: Hands-‐free feature. It is possible to call without picking up the handset. ⑬ Mute button: The partner will not be able to hear your voice while at the middle of the call. ⑭ Dial pad: Use to dial phone number. 3 Setup Method 1. Confirm SPA941’s IP address. Press the Setup button on the console; Setup menu is displayed on the LCD screen. Navigation buttons, Select the Network, on the left soft button, Press Select. 2. From a web browser, open the configuration page. SPA941 and PC must be connected to the same network. Start Internet Explorer web browser, etc. Enter IP address following the format below: http://(IP address)/ Example: If the IP address is 192.168.001.002, it should be entered as http://192.168.1.2/ 3. Screen Setting will be displayed in the web browser. Click the Adminlogin found at the top right corner of the screen. Click the Advance tab. 4. Click on the System tab at the top of the screen. Then set the following: Primary NTP Server & Secondary NTP Server: Enter 「 ntp.jst.mfeed.ad.jp」. ⑤ Click on the Regional tab at the top of the screen. Set this by following the screen shot in the next page. 4 Time zone: Select「 GMT +09:00」 or your preferred location. Short Name: Enter the extension number appear on the display screen. Ex.) 200 Extension: Select Disable if the line key is not in use. Voice Mail Number: Enter 999. ※ In the SPA941, using a separate extension number from Line key 1 to Line key 4 is possible. When using a separate extension numbers, in Extension, set the extension number on the previously configured extension line. ß If one extension number is used, set the Line Key 2 to Disabled. At the upper part of the page, click Ext 1. Follow the setup in the screenshot in next page. 5 NAT Keep Alive Enable: Choose YES. Mailbox ID: Choose 999. ※When recording a voicemail, LED function will blink (Function MWI). The message waiting is set ON. 6 Proxy: Enter the VOIP Server. Display Name:& Auth ID:& User ID: Enter Unique (10 digits). Password: After registration, an email that contains password will be sent to you. Enter the password. If the Unique password has been changed in Unique Management page, enter the new password. Use Auth ID: Choose YES. Audio Configuration: Enter and type the settings same as the screen above. Dial Plan: 「 (xx.|*x.|**x.|***x.|*x.*x.|*x.*x.*x.|#x.|#x.*x.|#x.*x.*x.)」 Type (all the character). ※If the input is incorrect, you will not able to connect or make a call. If Line Key2 is enabled, apply the same setting in EXT 2, 3 and 4 tabs. Once done, click Submit all Changes. The device will be restarted and the settings will be applied. 7 Safety Precautions This manual contains precautions to assure user’s safety while using this product. If the precautions are disregarded, the extent of consequences is presented below. This indicates that ignoring or mishandling of this notice might result to death or serious injury to the person. WARNING This indicates that ignoring or mishandling of this notice might result to harm to the person. CAUTION WARNING Immediately unplug the device from the power supply if there is a strange smell and smoke. Don’t use the device and immediately contact the dealer for repair. This may c ause fire or explosion. Do not disassemble or modify. The device may malfunction, cause electric shock and fire. Do not insert metal to the opening or drop the product. If in case a metal is inserted to the device, unplug the device and contact the dealer. The device may malfunction, cause electric shock and fire. Do not pour water or any foreign object inside the device. If in case water or any foreign object is poured or inserted to the device, unplug the device and contact the dealer. Do not touch the device when lightning occurs. This may cause electric shock. Do not use in bathroom or shower room. The device may malfunction, cause electric shock and fire. Don’t place in a damp, dusty or direct sunlight. The device may malfunction, cause electric shock and fire. This device is not waterproof. If in case water entered the device, unplug the device and contact the dealer. CAUTION Do not place near the kitchen table or humidifier, or near oil and moisture. The device may malfunction, cause electric shock and fire. Do not place near direct sunlight. The internal temperature might do up and may cause fire. Do not place in humid and dusty area. The device may malfunction, cause electric shock and fire. Do not place in extremely cold place or place with unstable temperature. It may cause explosion. Do not place in unstable or shaky place. If the device falls it may collapse, it may cause injury or explosion. Use after checking if foreign matters are attached to the speaker of the handset. Thumbtacks, pin, stapler wires and other metallic object may cling to the magnet of the speaker so please be careful. 8 Troubleshooting? Before requesting repair, please check again the following If the problem persists please contact agile shop at: ([email protected]). SYMPTOM General Failure CAUSE No ringer sound TREATMENT Please disconnect and reconnect the power cable. (Please do it a few times). Please wait at least one minute, Until you disconnect and reconnect the power cable. If no improvement above is made, contact the Name of the manufacturer, to: [email protected] Please let us know your number and broadband products. Ethernet cable is disconnected. AC adapter is disconnected. Please check the connection of the Ethernet cable. Please check the connection of the AC adapter. Please adjust the volume on the volume button. Do you want to revert the changed settings, disconnect the Ethernet Did you change the settings on cable (Please reboot). the display? Did you change the settings for volume? Call is interrupted by Are there any abnormalities in Please check your network the noise the network environment? environment to repair the problem. Initialization Method Clears all data initialization process.s Information must be set to initialize the service again. 1. Note the (000B8200XXXX) MAC address located on the bottom of the unit. 2. Press the Console MENU button ↑ ↓ several times press display 'Restore Factory Setting' and in the 'Config'. 3. Enter the MAC address. Check the website FAQ and for more information on the features and settings visit: http : / / www . agile.ne.jp/support / We accept inquiries by telephone and email. mail to: [email protected] Telephone number: 6 3 6 -‐ 5 -‐ 1 5 0 6 0 3 Weekdays: 1 0 : 0 0~ 1 9 : 0 0 9