1
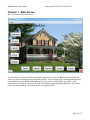
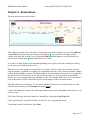
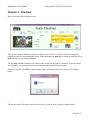
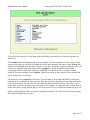
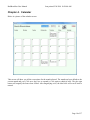
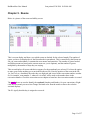
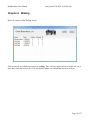
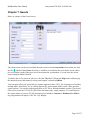
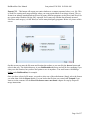
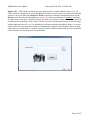
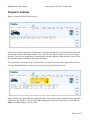
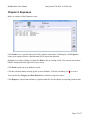
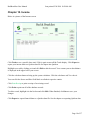
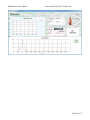
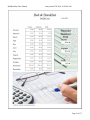
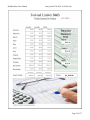
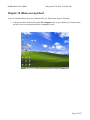
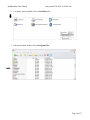
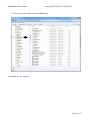
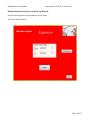
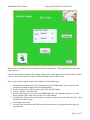
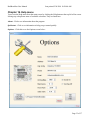
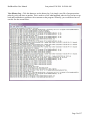
BedBreakfast User Manual Last printed 2/26/2014 10:28:00 AM Page 2 of 37 BedBreakfast User Manual Last printed 2/26/2014 10:28:00 AM Table of Contents Forward ......................................................................................................................... 4 Chapter 1. Main Screen ................................................................................................ 5 Chapter 2. Reservations ................................................................................................ 6 Chapter 3. Checkout ..................................................................................................... 8 Chapter 4. Calendar .................................................................................................... 10 Chapter 5. Rooms ........................................................................................................ 11 Chapter 6. Waiting ...................................................................................................... 12 Chapter 7. Guests ......................................................................................................... 13 Chapter 8. Vehicles ...................................................................................................... 16 Chapter 9. Expenses ..................................................................................................... 17 Chapter 10. Income ...................................................................................................... 18 Chapter 11. Reports...................................................................................................... 19 Chapter 12. Where are my Files? ................................................................................. 23 Chapter 13. Your Opinion ........................................................................................... 26 Chapter 14. Mail Merge .............................................................................................. 27 Chapter 15. Exporting data from BedBreakfast to Quicken ...................................... 29 Chapter 16. Help menu ................................................................................................ 33 Page 3 of 37 BedBreakfast User Manual Last printed 2/26/2014 10:28:00 AM Forward Some of the features that are not visible: You can sort lists by clicking on their headers. To reverse the sort, click it again. Combo drop down boxes can be either selected using the arrow or you can enter the first letter of the word and it will find the first choice that matches. Export financial data to Quicken data files. External backup and restore from within the program. Changeable backgrounds on the main screen. Customizable vehicle pictures. User customizable text files for several screen features, such as How Paid, Extras, Source, Cities and more. Sticky, (retains last used), City and State names in the Guests screen. Page 4 of 37 BedBreakfast User Manual Last printed 2/26/2014 10:28:00 AM Chapter 1. Main Screen Here is a picture of the main screen. To exit, click the red power button on the bottom right of the screen. The B button on the bottom left allows you to step through several background pictures. You can supply your own background pictures by storing them in your BedBreakfast directory as "jpg" pictures named, Bkg?.jpg, where ? is the pictures name. Store however many you wish. They will be stepped through sequentially. The pictures name must start with Bkg. The buttons shown are explained below. Page 5 of 37 BedBreakfast User Manual Last printed 2/26/2014 10:28:00 AM Chapter 2. Reservations The reservations screen looks like this. This is where you make your reservations. If your guest is not in your database you can click Add New on the Find list box that comes up when you click the blue V. You can edit an existing record by clicking on it in the list view box or by clicking the Find button that appears over the Date after you select a guest with the Blue V button under the red Start label. Start and Next labels appear as you step through adding a new guest reservation or editing an existing one to assist you in navigating the screen. Note: The reservation number is created from several items. The first is the reservation date selected using the format, yyyymmdd. Everything else is appended to the date. Next is the room number, number of days, then the number of guests. The room number is the order number of the room as it is supplied in the Rooms.txt file. The first entry is one, the second two, and so on. You can call the rooms Room1, Room2, etc or you can name the rooms anything you like. For example, Bridal Suite. If it is the second entry in Rooms.txt it will be classified as room 2 for the purpose of the reservation number. The Paid option always defaults to "N", but can be changed if necessary. It is automatically set in the Checkout screen when you click Receipt and actually print it. Credit Card numbers are checked for valid, legal numbers with a special algorithm. If not valid, you can accept it or not. The Credit Card types list can be added to or modified by clicking the Card Type label. Card verification info, (expiration month, year and CCV #), is accepted and stored. To print the records in the list box, click Print. Page 6 of 37 BedBreakfast User Manual Last printed 2/26/2014 10:28:00 AM To cancel a reservation, highlight the record or use Find to find it, then click Cancel and then Save. Page 7 of 37 BedBreakfast User Manual Last printed 2/26/2014 10:28:00 AM Chapter 3. Checkout Here is a picture of the checkout screen. This screen is used to checkout your guest when they leave. Red Start and Next labels will appear as needed to assist you in navigating the screen. Please note that you must print a receipt to mark the bill as paid and log it to your income database. The 2 Copies checkbox indicates two copies of the receipt will be printed. Uncheck it if you only want one. Normally, you would print one for the customer and keep one for your records. To preview the bill, click Print. After clicking print, click Yes to the Preview screen. See example below: . The receipt screen will come up and you can review it, close or print it. See the example below: Page 8 of 37 BedBreakfast User Manual Last printed 2/26/2014 10:28:00 AM If you click No, to preview, it will bring up the print dialog screen and you can select the printer you want to use. The calculator button will bring up the system calculator. Click the calculators red X to close it. If any extras are showing you will have to calculate the fee for them manually and enter it in the +Extras box for them to be included in the bill total. Likewise, if you have issued any coupons or discount codes, you will have to manually enter their amount in the -Coupon box. Extras are added to the bill and coupons/discounts are subtracted, when you click Total. To add state sales tax, leave the tax box checked. The tax percentage is set in Options. When un-checked, no tax is applied. The calculated tax can be changed by overwriting it. The room rate is set in Options for all rooms. You can change it for an individual bill by clicking the up/down arrows to adjust it to what you want. The room rate will reflect the basic rate times the number of guests in the room. The sub total will reflect this rate times the number of days. This allows you to charge more or less for the daily room rate as desired. For example, you may not want to charge them as much if they have a young child or baby as one of the guests. It's very flexible and completely up to you. Finally, all the input boxes have tool tips to explain their function. The Gold Credit Card panel contains their credit card info if they use one. Page 9 of 37 BedBreakfast User Manual Last printed 2/26/2014 10:28:00 AM Chapter 4. Calendar Below is a picture of the calendar screen. This screen will show you all the reservations for the month selected. The month and year default to the current month and year. Click on a day's box to expand it. Click again to shrink it back. The plus sign button will magnify the fonts when clicked. After magnifying twice, the third click will reset it back to normal. Page 10 of 37 BedBreakfast User Manual Last printed 2/26/2014 10:28:00 AM Chapter 5. Rooms Below is a picture of the room availability screen. This is a room display and shows you which rooms are booked for the selected month. The number of rooms you have are displayed over the Room header in parenthesis. This is controlled by the Rooms.txt file you create and maintain. It contains the room names and amenities. The number of guests booked and dollar amount are based on the current room rate, (set in Options), and the number of guests multiplied by the number of days they are staying. This screen displays all rooms and their occupancy for the month and year selected. You have the option to name your rooms anything you want in the Rooms.txt file. Note the position of the room in the file, 1st, 2nd, 3rd, etc, determines the order they are displayed and is used in the reservation number creation. So, for example, room number 3, whatever it is called, will be used as the number three in the reservation number. Check the reservation screen chapter to learn how the reservation number is created. The purple boxes are used to identify the weekend, Saturday and Sunday, for your convenience. Right click the screen and you can select Change Weekend color from the menu to choose the color the weekend displays. The X's signify that this day is assigned or reserved. Page 11 of 37 BedBreakfast User Manual Last printed 2/26/2014 10:28:00 AM Chapter 6. Waiting Below is a picture of the Waiting Screen. This screen tells you which reservations are waiting. They will only appear in this list if they are one or more days older than today's date. This list signifies future reservations that haven't arrived yet. Page 12 of 37 BedBreakfast User Manual Last printed 2/26/2014 10:28:00 AM Chapter 7. Guests Below is a picture of the Guests screen. The Guests screen can be accessed from the main screen or in the reservations screen when you click the blue V and then, New Guest. Normally, it would be accessed from the reservations screen when a new reservation is made if they have never been entered in your database. You can leave the drivers license and plate blank if desired. To edit the list of City names in your area, click the City label. Clicking the Map button will bring up the internet browser and connect to a map search engine, selected in Options. You can export all of your guests info to a comma separated value, (CSV), file for purposes of creating mailing labels, form letters, etc, by clicking ExportCSV on the bottom of the screen. (There are three export options.) You can also import guests from a CSV file to facilitate database creation. This would allow you to create the CSV file at will, off line and when ready, simply import it. You could also use the export feature to create a CSV file and import it to Windows Contacts or Windows Live Mail or any program that will import a CSV file. Very helpful! Page 13 of 37 BedBreakfast User Manual Last printed 2/26/2014 10:28:00 AM Export CSV – This button will export your entire database to a comma separated value, (csv), file. This is useful for creating mail merge mailings where you want to print labels or envelopes in mass. The csv format is an industry standard and can be used by many different programs, such as Excel and Word. On my system when I double click the file I exported, Excel comes up with the data all neatly inserted. Excel does mail merges,( via MS Word) as well as many third party programs. Below is a picture of this screen. On this screen you enter the file name and location the textbox or you can click the browse button and select it that way. The default directory is your BedBreakfast directory and will be less confusing if you always use this location, but you have the option to save it anywhere. You could create a MailMerge Folder under BedBreakfast, for example. Once you have selected a file name, you need to select one of the radio buttons. Simply select the format you want, then click the Export button. You can look at the file that was created with Notepad if you want to see the contents. See the Error! Reference source not found. chapter for step-by-step mail merge instructions. Page 14 of 37 BedBreakfast User Manual Last printed 2/26/2014 10:28:00 AM Import CSV – This button will import into your database from a comma separated value, (csv), file. This is useful for saving time in your initial database loading. It may be more convenient and somewhat quicker to use a text editor like Notepad or Excel to input your customers information than to use the Guests screen. Be aware that the Import process does not check your database for duplicate customers like the Guests screen does. Carefully edit your file before you choose to import it, to save yourself a lot of editing and error hunting. If one of the 13 fields is incorrect or missing you will get an error message and the import process will stop. The offending line will be described in parenthesis. Below is a picture of this screen. Also note that each customer is automatically assigned a record number when it is input. This is why you cannot delete a customer entirely from the customer database until you have deleted all related customer records in the reservations database. Page 15 of 37 BedBreakfast User Manual Last printed 2/26/2014 10:28:00 AM Chapter 8. Vehicles Below is a picture of the Vehicles screen. This screen is used to track your vehicle usage, oil changes and gas cost. It's information is reported in the Statistics report in the Reports module. Use it for your own vehicles and/or ones you use for your business. Gas costs are automatically entered into the expenses database when you add a record. Click the Calculator picture to bring up the system calculator. You can closely estimate gas costs if you don't have a receipt, but do know how many miles you drove. Click the Gas Cost button over the gas cost filed to bring up the following screen. Enter you data in the gold panel boxes and click Calc. The amount will be calculated and automatically added to the gas cost box. Click the Gas Cost button again to turn it off. Don't forget to click Save or Add to record the changes in your record. Page 16 of 37 BedBreakfast User Manual Last printed 2/26/2014 10:28:00 AM Chapter 9. Expenses Below is a picture of the Expenses screen. Click Totals to see a specific date total. Click it again to turn off the Totals display. Click Export to export your expenses data to a Quicken data file for import into Quicken. Highlight a record by clicking on it and click Edit to edit an existing record. Your current year-to-date balance is displayed in the upper left of your screen. Click Print to print out your database records. Click the calculator button to bring up the system calculator. Click the calculator's red X to close it. You can click the Category and How Paid labels to edit their respective entries. Click Export to export financial data to a Quicken data file. See the chapter on exporting Quicken data. Page 17 of 37 BedBreakfast User Manual Last printed 2/26/2014 10:28:00 AM Chapter 10. Income Below is a picture of the Income screen. Click Totals to see a specific dates total. Click it again to turn off the Totals display. Click Export to export your income data to a Quicken data file for import into Quicken. Highlight a record by clicking on it and click Edit to edit the record. Your current year-to-date balance is displayed in the upper left of your screen. Click the calculator button to bring up the system calculator. Click the calculators red X to close it. You can click the Source and How Paid labels to edit their respective entries. Click Print Receipt to print a receipt of an existing record. Click Print to print out all of the database records. To edit a record, highlight it in the list box and click Edit. When finished, click Save to save your changes. Click Export to export financial data to a Quicken data file. See the chapter on exporting Quicken data. Page 18 of 37 BedBreakfast User Manual Last printed 2/26/2014 10:28:00 AM Chapter 11. Reports Below is a picture of your Reports screen. There are three reports available. They look like this: Page 19 of 37 BedBreakfast User Manual Last printed 2/26/2014 10:28:00 AM Page 20 of 37 BedBreakfast User Manual Last printed 2/26/2014 10:28:00 AM Page 21 of 37 BedBreakfast User Manual Last printed 2/26/2014 10:28:00 AM Page 22 of 37 BedBreakfast User Manual Last printed 2/26/2014 10:28:00 AM Chapter 12. Where are my Files? If you are confused about where your database files are, follow these steps to find them. 1. Left mouse button, double click on the My Computer icon on your desktop. It’s usually on the top left of your screen and should look something like this: Page 23 of 37 BedBreakfast User Manual 2. Last printed 2/26/2014 10:28:00 AM Left mouse button, double click on Local Disk (C:) 3. Left mouse button, double click on Program Files. Page 24 of 37 BedBreakfast User Manual Last printed 2/26/2014 10:28:00 AM 4. Left mouse button, double click on BedBreakfast. You should now see your files. Page 25 of 37 BedBreakfast User Manual Last printed 2/26/2014 10:28:00 AM Chapter 13. Your Opinion Click the Your Opinion button to bring up your email with a pre-designed form. Simply erase the Y or N to answer each question and click Send. I will get the email and use it to determine the best way to code the program. Page 26 of 37 BedBreakfast User Manual Last printed 2/26/2014 10:28:00 AM Chapter 14. Mail Merge To use it in MS Word 2007 mail merge, follow the steps below. 1. Call up MS Word and select the Mailings tab on top of the ribbon bar, then Start Mail Merge, on the ribbon bar under Insert. 2. Select, Step by Step Mail Merge Wizard, the bottom selection in the drop down list. 3. From the Mail Merge selection panel that pops up on the right side of the screen, under Select document type, click the radio button for Labels. This example is for Labels. 4. Click, Next: Starting document, on the bottom of the Mail Merge panel. Under, Select starting document at the top of the panel, click Change document layout. 5. Click Label Options, highlighted in blue on the right side Mail Merge panel under, Change document layout.. 6. Choose the label format you want and click OK. (typically, 30 to a page 1inch x 2.63 inches) 7. Click Select Recipients on the bottom of the Mail Merge panel. 8. Click the blue Browse… button on the right side of the Mail Merge panel towards the top. 9. Find the CSV file you created and click Open. 10. Click OK on Confirm Data Source. Select comma under, Select text Separator in header and click OK. Select comma again and click OK on the next block that comes up under, Select text separator in data. 11. Verify the list that comes up and click OK. 12. On the bottom right of the Mail Merge pane, click, Next: Arrange your labels. 13. Click Address Block under, Arrange your labels, on the Mail Merge pane. 14. Select your address format and click OK. 15. Click Update All Labels in the middle of the Mail Merge pane under, Replicate Labels. 16. Click preview on the bottom of the Mail Merge pane to verify they are correct before you print them. 17. Click, Complete the merge on the bottom of the pane. 18. Click Print, under Merge in the middle of the pane. Page 27 of 37 BedBreakfast User Manual Last printed 2/26/2014 10:28:00 AM MS Excel 2007, follow the steps below. 1. Follow all MS Word steps to step 9 and select your Excel file. 2. Follow the remaining steps for MS Word. Page 28 of 37 BedBreakfast User Manual Last printed 2/26/2014 10:28:00 AM Chapter 15. Exporting data from BedBreakfast to Quicken BedBreakfast can export Expenses and Income data for Quicken to Import using a Quicken QIF data file. This can be a big time saving process and save you data loss down the road as you will have another copy of your BedBreakfast info in Quicken. Some people prefer to use Quicken as their "Checkbook" program. Of course you can always input your data manually. The Quicken Export process is implemented in the Expenses and Income modules. On the bottom of the task bar on each screen you will see a button saying, "Quicken Export". The expenses version comes up with a red background and income uses a green background to further differentiate between the two modules. (Sometimes, you can forget what module you are in.) The basic process used is, to import the financial information from BedBreakfast into a separate cash account and then move it to your BedBreakfast Quicken checking account. Due to Quickens support of file formats, this process is currently the only way to do it. They change their format every year it seems. Ah, progress! I will list the steps to a BedBreakfast export for Quicken below. There is a brief help screen on the Quicken Export screens that can be printed if desired. I will give an example of a Quicken data file used in this process. It is easily edited using any text editor. (Notepad) !T:Cash D8/18/2012 T-102.95 C* PParamount Mfg Mreinbow reins, english pads LExpense ^ D9/19/2012 T-90.00 C* N1158 PRhett Baker MFeed Flicka, Bende LExpense ^ This file represents two records from BedBreakfast expenses. Format is not discussed here as you will never see it unless you edit the QIF file. The data file layout is available on the internet. This file is pre-named for you when you click Export to help identify what info it contains. A date range selected file will have a name like this: Page 29 of 37 BedBreakfast User Manual Last printed 2/26/2014 10:28:00 AM BedBreakfastQuickenExpensesAug2010-Sep2010.QIF Note the date range has been appended to the file name. The screen looks like this: Page 30 of 37 BedBreakfast User Manual Last printed 2/26/2014 10:28:00 AM Both screens are identical except for background colors and pictures. Click Instructions for help on the export process. Click the date buttons to choose a Date Range. When ready, click Export and you will be asked to select a file to save to. Once the file is chosen, click OK and the records will be saved. Now you are ready to import your data into Quicken. Follow these steps: 1. Open Quicken and select the file of accounts you use for BedBreakfast. Next, select the cash account you created to import data from BedBreakfast. 2. On the top left of your Quicken screen, click File, then File Import. 3. Choose, "QIF file" from the menu. 4. From the QIF import screen, choose the BedBreakfast file you exported your data to. Use the Browse button on the right of the text box if it is not showing. 5. Just below the file box choose the Quicken account to import into, from the drop down list. (This should be the cash account) 6. Click Import, then done. 7. Go back to the account list and click your cash account name to bring up the transactions you just imported. Page 31 of 37 BedBreakfast User Manual Last printed 2/26/2014 10:28:00 AM 8. Highlight all the records you imported and then right click them to bring up the transfer menu. 9. Choose Move Transaction(s). 10. Choose the account to move them to. (your BedBreakfast checking account) 11. Done! Be sure to verify all the transactions you selected were transferred correctly. Page 32 of 37 BedBreakfast User Manual Last printed 2/26/2014 10:28:00 AM Chapter 16. Help menu You access the Help menu from the main screen by clicking the Help button at the top left of the screen. It brings up a drop down menu of available selections. They are listed here. About - Click to see information about the program. Quickstart - Click to see information to help you get started quickly. Options - Click this to see the Options screen below: Page 33 of 37 BedBreakfast User Manual Last printed 2/26/2014 10:28:00 AM Most fields are self explanatory. I will explain the others. Oil Chg Miles - Use the up/down arrows to set the mileage interval between oil changes on your company vehicles. This is used in the Vehicles screen to monitor and predict your next oil change. Max Rooms - This counter is set automatically by the Reservations screen when it is used. The number of rooms in the Rooms.txt file is counted and updated here. You can have a maximum of 24 rooms, more than that and you are running a motel. Room Rate - This is where you set the room rate for your rooms. This applies to all rooms. You do have the ability to change the room rate at Checkout time by adjusting the rate counter on that screen. It only changes the rate for that room at that time. When you exit the screen it defaults back to the basic rate in Options. Sales Tax - Adjust the sales tax rate for your state. If you don't use sales tax, you can un-check the sales tax box on the Checkout screen at checkout and it won't be added to the total. Edit Text Files - Use this button to edit your text files with your information. The text files used by the program are listed below along with the screen they are used in. CityNames.txt CreditCards.txt ExpenseNames.txt Extras.txt HowPaid.txt Places.txt PurposeNames.txt ReadMe.txt Rooms.txt Source.txt TechSupport.txt TestFile.txt VehicleNames.txt - Used in the Guests screen. - Used in the Checkout screen. - Used in the Expenses screen. - Used in the Reservation screen. - Used in the Checkout & Income screen. - Used in the Vehicles screen. - Used in the Vehicles screen. - Used in the BebBreakfast directory for information about the program. - Used in the Reservation screen. - Used in the Income screen. - Used in the TechSupport screen. - Used as a test file in the BedBreakfast directory. - Used in the Vehicle screen. Change Data Files Location - Use this button to change the location of your BedBreakfast data files. If you want to move your program and all it's data files to another drive or folder, use this button. Be SURE to do an external backup before changing the files location. Once changed, do a restore from external backup and your files will all be intact in the new location. Reset - Use this button to restore the default files location of, C:\Program Files\BedBreakfast. Backup/Restore - CLick this to backup your data files to an external drive or folder. See the screen below: Page 34 of 37 BedBreakfast User Manual Last printed 2/26/2014 10:28:00 AM On this screen all you do is choose the external drive to backup to from the Available Backup Drives list, select the File Types to backup and click Backup or Restore. Use the Fast<---->Slow slider to slow down the backup process so you can what files are being copied. Tech Support - Click this button to bring up the Tech Support Screen so you can send me an email with a support question. See the screen below: Page 35 of 37 BedBreakfast User Manual Last printed 2/26/2014 10:28:00 AM View History Log - Click this button to see the history log. It is simply a text file of program actions taken by you at one time or another. This is used to review what happened when in case you have to go back and troubleshoot a problem with a customer or the program. Normally, you would never have to use this. See the screen below: Page 36 of 37 BedBreakfast User Manual Last printed 2/26/2014 10:28:00 AM Page 37 of 37