1
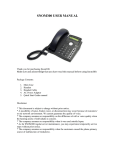
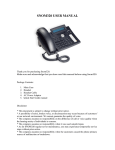
GXV3140 USER MANUAL
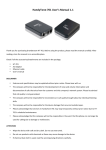
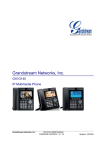
Thank you for purchasing Grandstream GXV3140 IP Multimedia Phone.
Make sure and acknowledge that you have read this manual before using GXV3140. Package Contents:
1.
2.
3.
4.
5.
6.
7.
GXV3140 Phone Main Case
Handset
Phone Cord
Universal Power Supply
Ethernet Cable
Phone Stand
Quick Start Guide
Disclaimer
* This document is subject to change without prior notice.
* A possibility of noise, broken voice, or disconnection may occur because of customers’
or our network environment. We cannot guarantee the quality of voice.
* The company assumes no responsibility on the difference of call or voice quality when
the hearing acuity of individuals is concern.
* The company assumes no responsibility when it was used outside Japan.
* As for GXv3140 regular server maintenance, you may experience temporarily service
stops without prior notice.
* The company assumes no responsibility for the damages of customer caused by the
phone malfunction or breakdown.
Maintenance
Please use soft dry clothes to clean the device.
Don’t use wet clothes.
Don’t use volatile chemicals like benzene, or thinner since they can damage the device.
If you want to use a chemical wipes, please read the cautionary notes before using it.
Connection Method:
1. Connect one end of the cord to the handset and the other end to the body handset port.
2. Plug the Ethernet cable “Network” on the rear body of the Grandstream GXV3140 to
the network or broadband router.
3. Plug in the AC adapter into the electrical outlet.
4. Plug the AC adapter to the body.
* Be sure to observe the proper order of the connection. Make sure that the adaptor is
plugged in properly. It will take some time to call after connecting, so please wait for a
moment.
GXV3140
GXV3140 is a phone device that can be used with Agile Phone. This device cannot be
used a typical phone. The customer must subscribe to an Internet Service Provider to be
able to use the device. Customer with no broadband router feature must provide a
separate broadband router.
GXV3140’S IP ADDRESS CONFIGURATION METHOD
a. If the IP addressed is not shown in the Home screen, pressing F2 key (Switch Screen)
twice will switch into Home screen.
b. On the left side of the Home screen, confirm the IP address: IP: 192.168.XX.XX and
Open Settings page from a web browser.
c. GXV3140 and the PC must be connected to a same network. Launch any web browser
such as Internet Explorer. Enter IP Address observing the format below.
http: // (IP address) / Example: If the IP address is written as http://192.168.001.002 , it should be entered as http://192.168.1.2/ The same page as above will be displayed on the browser. Enter admin for both
Username and Password to login.
*To prevent unauthorized login and for security purposes, please change your password
immediately after logging in. If you request to set up the device before shipping, we will
change and write or paste the new password in its case. If you’re unsure on how to
change the password please contact our customer support service.
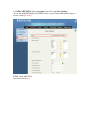
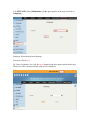
PHONE CONFIGURATION
1. Select [Account 1] and click on [General Settings]
Account Name: Enter any character that you want to appear on display.
SIP Server: Enter Login Server.
SIP User ID: Enter Unique ID.
Authenticate ID: Enter Unique ID.
Voicemail User ID: Enter 999.
Tel URI: Change from “Disable” (default) to “User=Phone”.
Once done click [Save]
2. NETWORK SETTINGS: Select [Account 1] and click on [Network Settings]
NAT Traversal: Change from Auto (default) to Keep-alive.
Once done click [Save]
3. SIP SETTINGS: Select [Account 1] and click on [Network Settings]
Register Expiration: Change to 240.
Once done click [Save]
4. CODEC SETTINGS: Select [Account 1] and click on [Codec Settings]
*If you check [DTMF Inband] for [DTMF mode] on your Unique Management Page on
our site, Check [in-audio].
DTMF: Check [RFC2833]
Once done click [Save]
5. CALL SETTINGS: Select [Account 1] and click on [Call Settings]
Dial Plan: Change to { x+ }
Once done click [Save]
6. CALL FEATURES: Select [Advanced Settings] on the upper portion of the page
and click on [Call Features] on the upper left corner.
Disable Call-Waiting
Check-Free: If there is a call during a call, this will notify the new caller that the
line is being reached.
Check YES: If there is a call during a call, this will notify the new caller that the
line is busy.
Disable Call-Waiting Tone (This will work only when the Disable Call-Waiting is left
unchecked.)
Check-Free: Notifies through tone.
Check YES: No tone notification.
Once done click [Save]
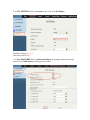
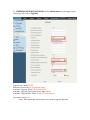
7. VIDEO SETTINGS: Select [Advanced Settings] on the upper portion of the page
and click on [Video Settings] on the upper left corner.
Enable Motion Detection: Put a check on the check box beside YES.
Video Frame Rate: Change to 30 frames/second.
Video Bit Rate: Change to 256 kbps.
Video Rate Control: Select Frame.
Once done click [Save]
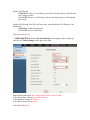
8. TIME SETTINGS: Select [Maintenance] on the upper portion of the page and click
on [Time Settings].
NTP Server: Enter ntp.jst.mfeed.ad.jp
Date Display Format: YY-MM-DD (Year-Month-Day-Time)
Once done click [Save]
9. LANGUAGE: Select [Maintenance] on the upper portion of the page and click on
[Language].
Language: Select the preferred language.
Once done click [Save]
10. Once everything is set, click the Apply button found at the upper portion of the page.
The device will be restarted and the setup will be completed.
11. FIRMWARE UPGRADE (OPTIONAL): Select [Maintenance] on the upper portion
of the page and click on [Upgrade].
Upgrade via: Choose HTTP
Firmware Server Path: fw.ipvideotalk.com/gs
Automatic Upgrade: Select Check Every Week
Automatic Upgrade Check Interval (m): Input 10080
Automatic Upgrade Rule: Select Always Check at boot up
Once done click [Save]
*Note: This step should only be done if you want to upgrade firmware.
GXP3140 Three-Way Conference
1. First, start a two-way video calling.
2. Then default caller must press down the Line button (
) and enable Hold
Status for the first call. Select the available line and call the third person. After calling the
third person, press the Conference button (
). A message, “Do you want to
conference with Line 1?” will be displayed. Then Press down the “Yes” soft key to
activate Three-way calling.
3. End call: If the default caller cut the line, the call will eventually end. Also, after the
Hold button (
partner’s line.
) is pressed down; the call will end by pressing the soft key of the
ADDITIONAL NOTES
Modification can be done by pressing down the Video Display Layout’s Camera
Loopback (
).
During the three-way conference, if the initiator of the conference hangs up, the
conference will end. If users wish to allow the remaining two parties to stay in
conversation after the initiator hangs-up, the conference initiator should set “Transfer on
Conference Hang-up” to “Yes” in the web configuration interface. This would allow the
transfer of call to the remaining party after the initiator exits the conference.
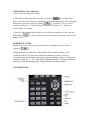
GXV3140 KEYPAD
Safety Precautions
This manual contains precautions to assure user’s safety while using this product. If the
precautions are disregarded, the extent of consequences is presented below.
*This indicates that ignoring or mishandling of this notice might result to
death or serious injury to the person.
*This indicates that ignoring or mishandling of this notice might result to
harm to the person.
*Immediately unplug the device from the power supply if there is a
strange smell and smoke. Don’t use the device and immediately contact
the dealer for repair. This may cause fire or explosion.
*Do not disassemble or modify. The device may malfunction, cause
electric shock and fire.
*Do not insert metal to the opening or drop the product. If in case a metal
is inserted to the device, unplug the device and contact the dealer. The
device may malfunction, cause electric shock and fire.
*Do not pour water or any foreign object inside the device. If in case
water or any foreign object is poured or inserted to the device, unplug the
device and contact the dealer.
*Do not touch the device when lightning occurs. This may cause electric
shock.
*Do not use in bathroom or shower room. The device may malfunction,
cause electric shock and fire.
*Don’t place in a damp, dusty or direct sunlight. The device may
malfunction, cause electric shock and fire.
*This device is not waterproof. If in case water entered the device, unplug
the device and contact the dealer
*Do not place near the kitchen table or humidifier, or near oil and
moisture. The device may malfunction, cause electric shock and fire.
*Do not place in humid and dusty area. The device may malfunction,
cause electric shock and fire.
*Do not place in extremely cold place or place with unstable temperature.
It may cause explosion.
*Do not place in unstable or shaky place. If the device falls it may
collapse, it may cause injury or explosion.
*Use after checking if foreign matters are attached to the speaker of the
handset. Thumbtacks, pin, stapler wires and other metallic object may
cling to the magnet of the speaker so please be careful.
Troubleshooting
Please check the troubleshooting procedure before requesting a repair. If the problem
doesn’t get resolved, please contact us.
Problem
General Failure
Solution
Plug and Unplug from the power source.
(Do this for few times).
Wait for at least one minute before
plugging the device.
If the problem is not resolved after doing
this, please contact our customer support
service.
Please provide your number and broadband
products.
Problem
No Ringer Sound
Call is interrupted by noise
Cause
Ethernet Cable is
disconnected.
Solution
Check the connection of the
Ethernet cable.
AC Adapter is
disconnected.
Check the connection of the
AC Adapter.
Did you change the volume
settings?
Adjust the volume on the
volume button.
Did you change the settings
on the display?
Revert the changed settings.
Disconnect the Ethernet
cable. (Please reboot).
Check your network
environment.
Are there any abnormalities
in the network
environment?