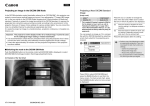
1
DW SERIES-LED
CONTENTS
(UPGRADE VERSION)
CAUTIONS
WASH DOWN
ELECTRONIC WEIGHING SCALE
1. INSTALLATION
2. SPECIFICATIONS
OPERATION MANUAL
3. KEYBOARD LAYOUT AND DESCRIPTION
4. INITIAL SETUP
PLEASE READ THIS MANUAL VERY CAREFULLY BEFORE
ATTEMPT TO OPERATE THE SCALE
5. INSTRUCTION FOR USE
6. TROUBLE SHOOTING
7. DAILY CARE AND MAINTENANCE
JANUARY 2004 REV 1
Specifications subject to change without prior notice
CAUTIONS
8. Always apply the battery cap when not in charging.
1. This unit is legal for trade only when it is sealed
9. Check desiccant underneath the scale periodically.
(and/or stamped) and bearing a serial number. Do not
Should any part of the desiccant turns to pink
attempt to break the seal (or stamp) affixed to this
color, contact your dealer for scale inspection.
scale or remove the serial number. Contact your dealer
for more information and after sales service.
2. For most accurate weighing result, do not use this
scale in where or when the environment condition falls
beyond as those listed on SPECIFICATIONS.
3. Do not attempt to open this unit or conduct any trouble
shootings other than those listed on TROUBLE SHOOTING.
No user serviceable parts inside.
4. Do not submerge scale into water.
5. Do not use pressurized water nozzle for cleaning.
6. Do not use this scale for chemical substances or in
any environments that contains chemical vapor.
7. Precision measuring instrument, handle with care.
1. INSTALLATION
1.1
Check and make sure that the following accessories
are included:
This operation manual
Scale x 1
Plastic platter x 1
Stainless steel cover x 1
Screw x 1
Rubber cap x 1
Power adaptor x 1
FIG 2
Contact your dealer if any item is missing.
1.2
Locks the plastic platter (FIG 1 A) to the platter
holder, with the screw (FIG 1 B) included, and then
apply the screw rubber cap (FIG 1 C).
1.3
Place the stainless steel platter (FIG 1 D) onto
the plastic platter.
1.4
Power on the scale
a. Before charging the scale or power on with the
adaptor supplied. Please make sure the input
voltage listed on the back of the adaptor matches
with the local voltage. If not, do not use it
FIG 1
and contact your dealer immediately.
b. Before first time use, charge the scale for at
least 8 hours to ensure the best performance.
2. SPECIFICATIONS
Model No.
c. After battery is fully charged, remove adaptor
from scale. Apply the battery cap (FIG 2 E) to
seal the DC input jack of scale.
Capacity
(Max)
Readability (e)
Default
High
Resolution
3000g
1g
0.5g
6000g
2g
1g
15kg
0.005kg
0.002kg
30kg
0.01kg
0.005kg
Full Tare Range (Subtractive)
DW-3000E
DW-6000E
DW-15KE
DW-30KE
Tare Range
Power-on
¡Ó0% Max
Zero Range
Zero Range
¡2% Max
Display
LED Display
Power Source By Built-in Rechargeable Battery or AD/DC
Power Adaptor
Operating
0o~40oC (32o~104oF),
Environment Non-condensed. R.H.¡ 95%
Specifications subject to change without notice
NOTE:
Display resolution of avoirdupois weight units (lb/lb
and lb/oz) always = 1/3000
3. KEYBOARD LAYOUT AND DESCRIPTION
5. IN-CHARGE INDICATOR
Red color: Recharging battery
Green color: Charging completed
6. ZERO INDICATOR
This indicator appears to indicate a zero weight status
7. TARE INDICATOR
This indicator appears to indicate the tare function
1. ON/ZERO KEY
is in operation and weight displayed is net weight
Press this key to: (a) turn scale on or reset display
value to zero; (b) move cursor to the right in function
8. LO-BAT INDICATOR
setup
When
this
indicator
appears,
recharge
the
scale
immediately. Failure to do so may cause unrecoverable
2. TARE KEY
damage to the rechargeable battery inside scale
Press this key to: (a) tare off the weight of a container;
(b) decrease value in function setup
9. STANDBY INDICATOR
This indicator appears to indicate scale is in standby
3. MODE KEY
mode (power saving function)
Press this key to: (a) shift among different weight units;
(b) increase value in function setup
10. HI INDICATOR
This indicator appears to indicate the weight detected
4. OFF KEY
Press this key to turn scale off
above the high limit set (Weight check function)
11. OK INDICATOR
4. INITIAL SETUP
This indicator appears to indicate the weight detected
within the high and low limit range (Weight check
4.1 PLACING THE SCALE
function)
In order to obtain an accurate weighing result, the scale
must be placed on a strong and level surface.
12. LO INDICATOR
This indicator appears to indicate the weight detected
If required, adjust the adjustable feet (FIG 2 F)
below the low limit set (Weight check function)
underneath scale to obtain a level position. Refer to
the bubble indicator for leveling condition.
13. AVOIRDUPOIS WEIGHT UNITS INDICATOR
This indicator appears to indicate the weight being is
4.2 INTERNAL SETTING
avoirdupois weight units (lb). Two avoirdupois weight
units are available, i.e. decimal pound (e.g. 5.62 means
4.2.1 Display Segment Check
5.62 lb) and pound/ounce (e.g. 2.15.01 means 2 lb and
User can enter this function to check to see if the display
15.1 ounce).
is functioning properly.
a.
Scale is off
b.
Press and hold TARE, then press ON/ZERO
c.
Scale displays F.1
d.
Press TARE once
e.
Scale displays F.2
f.
Press MODE and all segments will light up to allow
user to check the condition of display
g.
Press TARE for next function setup or ON/ZERO to
restart the scale
4.2.2 Select Auto Power Off Setting
d.
Press TARE four times
The scale is equipped with Auto Power Off Function. The
e.
Scale displays F.5
scale will power off automatically if it is not used
f.
Press MODE to select baud rate of 4800, 9600, 19200,
for 4 minutes. Follow the below steps to enable/disable
Auto Power Off Function.
38400
g.
a. Scale is off
Press and hold MODE
for 2 seconds to enter
transmission protocol setup
b. Press and hold TARE, then press ON/ZERO
h.
Press MODE to select protocol of N81 or E71
c. Scale displays F.1
i.
When the preferred transmission protocol shows on
d. Press TARE three times
display, press ON/ZERO to confirm and restart the
e. Scale displays F.4
scale or TARE for next function setup
f. Press MODE to shift between 0._OFF and 4._OFF
-To enable Auto Power Off Function, press TARE when
NOTE:
4._OFF appears
The default data output format of the scale is
-To disable Auto Power Off Function, press TARE when
Baud Rate = 9600
0._OFF appears
Data Bit = 8
g. Press ON/ZERO to restart the scale or TARE for next
function setup
Stop Bit = 1
Parity = None
4.2.3 Select RS-232 Baud Rate & Protocol
4.2.4 Select Data Transmission Mode
This scale is equipped with 4 RS232C output baud rate
This scale provides 2 types of transmission mode
and 2 transmission protocol settings for user to select.
depending on the requirement and environment.
a.
Scale is off
a.
Scale is off
b.
Press and hold TARE, then press ON/ZERO
b.
Press and hold TARE, then press ON/ZERO
c.
Scale displays F.1
c. Scale displays F.1
d.
Press TARE five times
e.
Scale displays F.9
e.
Scale displays F.7
f.
Press MODE to select between Tr._on or Tr.oFF
f.
Press MODE to select transmission mode of trAn1 or
-To enable Auto Tare Function, press TARE when Tr._on
trAn2
appears
When the preferred data transmission mode shows on
-To disable Auto Tare Function, press TARE when
display, press ON/ZERO to confirm and restart the
Tr.oFF appears
g.
scale or TARE for next function setup
g.
Press ON/ZERO to confirm and restart the scale or
TARE for next function setup
NOTE:
¡trAn1¡¨ is to transmit data continuously after reading
is stabled
¡trAn2¡¨ is to transmit single data only fter reading
is stabled. However, scale will not send any data if
weight detected is less than the minimum load.
4.2.5 Select Auto Tare Function
This scale is equipped with auto tare function which
tares off the initial weight automatically when this
function is engaged. The tare weight is automatically
cleared when everything is removed from platter.
a.
Scale is off
b.
Press and hold TARE, then press ON/ZERO
c.
Scale displays F.1
d.
Press TARE six times
5. INSTRUCTION FOR USE
5.3 SELECT WEIGHT UNIT
Press MODE to shift between metric or avoirdupois weight
5.1 BEFORE WEIGHING
units. The weight unit used before power off would be
Make sure that:
employed when the scale is turned on again.
a.
The plastic platter is screwed firmly and the
stainless steel platter cover is placed on the
NOTE:
plastic platter
To comply with the law of certain countries and certain
b.
The scale is placed on a level and strong surface
approval requirements, the avoirdupois weight units may
c.
The scale is turned on
be disabled. Contact your dealer for more information.
d.
The ZERO INDICATOR is on. If not, press ON/ZERO to
set display to zero
5.4 SMART POWER SAVING FUNCTION
When this function is enable, the displays digits will
5.2 WEIGHING
be turned off when a stable weight is detected and remains
a. Always place an object onto the platter gently.
stable for about 10 seconds. Standby indicator appears
Excessive force applied to platter may cause damages
to indicate scale is now in standby mode.
to sensor inside scale
b. The weight of the object would be displayed
automatically
Display will be automatically turned on again when a
different weight is detected.
c. It is a good practice to remove all loads from platter
after weighing. It would prolong the lifetime of
5.4.1 Select Power Saving Setting
scale
The scale is equipped with smart POWER SAVING FUNCTION.
Default setting = enable. Follow the below step to enable
or disable this function.
a.
Remove all loads from platter
b.
Turn scale on
Refer to 5.2 for weighing procedures. Weight displayed
c.
Scale displays zero weight; if not, press ON/ZERO
under is the net weight of the subject matter. Refer
d.
Press and hold ON/ZERO. Scale displays:
to SPECIFICATIONS for maximum tare range.
-L._oFF = Function enable
-L1._on = Function disable
5.5 SET DISPLAYED VALUE TO ZERO WHEN UNLOADED
5.7 CLEAR THE TARE FUNCTION
a.
Remove all loads from platter
b.
The tare effect will be cancelled:
Press ON/ZERO can eliminate a positive or negative value
-Automatically if automatic tare function is
when scale is not at its zero. After ON/ZERO is pressed,
employed, or
the ZERO INDICATOR appears.
-By pressing TARE
c.
After TARE is pressed, the NET INDICATOR would
disappear
Refer to SPECIFICATIONS for maximum zero range.
5.6 TARE OFF THE WEIGHT OF A CONTAINER
5.8 WEIGHT CHECK FUNCTION
When a container is used, follow the below steps to
This scale is equipped with Weight Check Function. An
manually tare off the weight of container and get the
audio and video signal is generated to reflect the weight
net weight.
check result.
a. Remove all loads away from platter
b. Make sure that the ZERO INDICATOR is on.
5.8.1 Setting the High, Low Weight Limits and Buzzer
Warning
c. Place the container on the platter.
d. Press TARE.
After TARE is pressed, the TARE INDICATOR would appear.
a.
Remove all loads from platter
b.
Turn scale on
c.
Make sure that ZERO INDICATOR is on; if not, press
ON/ZERO
d.
Press and hold ON/ZERO, then press TARE
-bb_H. = buzzer warning when weight detected above
e.
The HI INDICATOR appears and the cursor is flashing,
the high weight limit set.
scale is now in upper weight limit setup
f.
g.
h.
i.
j.
m.
When the require buzzer warning setting is selected,
Utilize MODE, TARE and ON/ZERO to set the required
press and hold ON/ZERO, then press TARE to return
high weight limit
to normal operation status
When the require high weight limit attained, press
NOTE:
and hold ON/ZERO, then press TARE
Weight Check Function will not valid when the weight
The LO INDICATOR appears and the cursor is flashing,
unit engaged (e.g. lb) is different from the original
scale is now in lower weight limit setup
weight unit programmed under (e.g. gram).
Utilize MODE, TARE and ON/ZERO to set the required
Weight Check Function will not valid when the weight
low weight limit
is less than minimum load. Please refer to SPECIFICATION
When the require low weight limit attained, press
for minimum load of each capacity.
and hold ON/ZERO, then press TARE
k.
Scale displays buzzer warning parameter setup
Weight Check Function will not valid when high and low
l.
Press MODE until the desired buzzer output parameter
weight limits are not logical (e.g. value of high weight
appears
limit is less than the value of the weight limit set).
NOTE:
To disable Weight Check Function, simply set the high
-bb_L. = buzzer warning when weight detected
weight limit to zero or set the buzzer warning to bb_no.
below the low weight limit set.
to turn off the warning.
-bb_no = no buzzer warning.
-bb_S. = buzzer warning when weight detected within
5.8.2 Weight Check Transaction
the high and low weight limit set.
Place a subject matter onto the platter. The Weight Check
-bb_H.L. = buzzer warning when weight detected
result is displayed on the display.
below/above the low/high weight limit set.
a.
The HI INDICATOR will appear when weight detected
over the high weight limit preset
b.
c.
6. TROUBLE SHOOTING
The OK INDICATOR will appear when weight detected
within the high upper and low weight limit
Syndrome
Scale cannot be turned on
The LO INDICATOR will appear when weight detected
Check:
Is the scale charged?
under the low weight limit preset
Action:
Recharge the scale for at least 8 hours
before first time use or plug in the power
adaptor before power on the scale.
5.9 RECHARGE THE SCALE
The scale is equipped with a built-in rechargeable
Check
Is the power adaptor inserted properly into
battery. When the LO-BAT INDICATOR appears, recharge
both the electricity outlet and the DC inlet
the scale immediately. Failure to do so may cause
of scale.
unrecoverable damage to the rechargeable battery.
Action:
Secure both ends of the power adaptor and
try again.
Charging is completed when the color of the IN-CHARGE
INDICATOR turns green.
Syndrome
Scale turned off automatically
Check
Is Auto Power Off Function employed?
Action
Refer to 4.2.2 to disable Auto Power Off
Function.
Check
Is the LO-BAT INDICATOR on?
Action
Apply the power adaptor.
Syndrome
Rated capacity cannot be reached
Check
Is the TARE INDICATOR on?
Action:
Turn the scale off. Remove all loads from
platter and turn on again.
Check
Is there anything obstructing the platter?
Action
Remove all obstacles.
7. DAILY CARE AND MAINTENANCE
7.1
Clean the scale with a soft and damp cloth. If
necessary, apply a mild detergent.
Syndrome
Weighing result is not accurate
Check
Is the scale placed in a level condition?
Action
Adjust the adjustable feet to a level
acetone, volatile solvent, thinner or alcohol
condition.
for cleaning.
Check
Is the scale affected by airflow, vibration
7.2
7.3
or RFI?
Do not use any harsh, abrasive material,
Verify the accuracy of scale periodically.
Re-calibrate the scale if necessary.
Action:
Place the scale away from all disturbances.
NOTE: In some countries, calibration is restricted to
Check
Is the scale calibrated correctly?
be done by an authorized/qualified agent only. Contact
Action
Contact your dealer.
your dealer for more information.
Check
Is the correct weight unit employed?
7.4
Action
Refer to 5.3 for weight unit setting and
usage.
It is a good practice to apply the dust cover
when operating the scale.
7.5
The scale must be placed horizontally during
transportation or long time storage.
Syndrome
Display shows 00000 after counting down
Check
Is the scale overloaded?
Action
Remove some loads from platter.
Check
Is the stainless steel platter cover placed
on the platter?
Action
Place the stainless steel platter cover
onto the platter.
7.6
Remove platter from scale before transportation
or long time storage.
7.7
Store scale in a dry and clean place.