1
Digital Solutions
LCDSP_TG V1.60 user manual
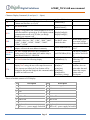
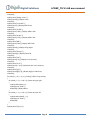
Character Display Command: (B-one byte, B…-Bytes)
Command
CL
CSB
DCB
SBB…
SI2CAB
STCRBB
BBBB
TPBB
TTB…
Description
CLear screen and set the display position to first
Column and first Row (x=0.y=0)
Arduino lib function
note
clearScreen();
enableCursor();
disableCursor();
set CurSor on/off
Display Config on/off, the factory default set is on, so,
when the module is powered up, it will display current
communication mode on LCD, after you design
finished, you can turn it off
Set UART Baud, B are ASCII characters, the
available values are: “300”, “1200”, “2400”,”4800”,
“9600”, “14400”, “19200”, “28800”, “38400”,
“57600”,”115200”
Set I2C Address,the default address is 0x27, the
adapter will store the new address in memory
Set Text Columns and Rows, this command will
config your LCD if other than 1602 and the chip is
other than KS0066U/F / HD44780
displayConfig(0);
displayConfig(1);
Set BAUT when
initial the class
When adapter power
up or reset, always
start with 9600 Baud
Change address to
0x34
The last 4 B should
setLCDColRow(20,4); be“\x80\xC0\x94\xD
4”
This will affect the
set Text Position for following display
setPrintPos(6,1);
following “TT”
command
print(string);
The print function in
display TexT string, the text will wraped in next row
print(int);
Arduino, also can
if the current row fulled, the Text Postion will be
print(char);
print other data and
changed to the last char displyed, this command ended print(float);
format the out put,
by 0x00 or 0x0D received
print(double);
please refer to
drawStr(x,y,string);
Serial.print.
setI2CAddress(0x34);
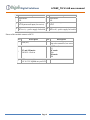
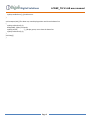
Pinout of module connect to LCD display:
PIN
1
3
5
7
9
11
13
Description
VSS Ground of circuit
V0
R/W
DB0 or D0
DB2 or D2
DB4 or D4
DB6 or D6
16pin mode:
15
BLA or A, + power supply for backlit
PIN
2
4
6
8
10
12
14
Description
VDD Power Supply
RS
E
DB1 or D1
DB3 or D3
DB5 or D5
DB7 or D7
16pin mode:
16
BLK or K, - power supply for backlit
Page 3