1
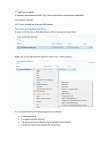
ES Encrypt User Manual Last Updated: 03/29/2015 ES Encrypt User Manual Table of Contents Using this manual ....................................................................................................................................4 Designates a section......................................................................................................................................................4 Designates a sub-section ...........................................................................................................................................4 About.......................................................................................................................................................5 Overview ......................................................................................................................................................................5 Software Architecture ..............................................................................................................................6 Components and Functions ...........................................................................................................................................6 Desktop Version for Windows ...................................................................................................................................6 Desktop Version for Mac OS X ...................................................................................................................................6 Mobile Version for Android and iOS ..........................................................................................................................6 Usage.......................................................................................................................................................7 Encrypting Files on Windows.........................................................................................................................................7 Encrypting via Windows Explorer ..............................................................................................................................7 Encrypting via ES Encrypt Browse Dialog .................................................................................................................12 Encrypting Files on Mac OS X ......................................................................................................................................15 Encrypting via ES Encrypt Browse Dialog .................................................................................................................15 Encrypting Files on Android/iOS ..................................................................................................................................18 Encrypting via Select ...............................................................................................................................................19 Encrypting via Cameraroll........................................................................................................................................23 Encrypting via Cam Picture ......................................................................................................................................23 Encrypting via Record Mic .......................................................................................................................................23 Encrypting via Cam Video ........................................................................................................................................23 Decrypting Files on Windows ......................................................................................................................................24 Decrypting via Windows Explorer ............................................................................................................................24 Decrypting via ES Decrypt Browse Dialog.................................................................................................................28 Decrypting Files on Mac OS X ......................................................................................................................................30 Decrypting via ES Decrypt Browse Dialog.................................................................................................................30 Decrypting Files on Android/iOS..................................................................................................................................32 Decrypting via Select ...............................................................................................................................................33 www.everlastsoftware.com Page 2 of 63 ES Encrypt User Manual Password Manager on Windows and Mac OS X ...........................................................................................................36 Opening Existing Passwords ....................................................................................................................................36 Deleting Existing Passwords.....................................................................................................................................38 Backup Passwords ...................................................................................................................................................39 Restore Passwords ..................................................................................................................................................40 Synchronizing Passwords on Windows and Mac OS X ..................................................................................................41 Uploading Passwords ..............................................................................................................................................41 Downloading Passwords..........................................................................................................................................42 Synchronizing Passwords on Android/iOS....................................................................................................................43 Uploading Passwords ..............................................................................................................................................43 Downloading Passwords..........................................................................................................................................45 Registering ES Encrypt on Windows and Mac OS X ......................................................................................................47 Registering ES Encrypt on Android/iOS ........................................................................................................................48 Electronic Shredding Files on Windows .......................................................................................................................50 Electronic Shredding via Windows Explorer .............................................................................................................50 Electronic Shredding via ES Shred Browse Dialog .....................................................................................................53 Electronic Shredding Files on Mac OS X .......................................................................................................................55 Electronic Shredding via ES Shred Browse Dialog .....................................................................................................55 Electronic Sanitizing on Windows and Max OS X..........................................................................................................57 Secure Texting on Android/iOS....................................................................................................................................60 Encrypting Text .......................................................................................................................................................60 Decrypting Text .......................................................................................................................................................62 www.everlastsoftware.com Page 3 of 63 ES Encrypt User Manual Using this manual This guide contains both the preparation steps and technical guidance needed to configure and use ES Encrypt. Before proceeding with the configuration, please be certain to review the preparation sections outlined within this document. These sections should be followed sequentially, since there are many areas that are dependent upon others. The preparation sections will reduce the time needed to setup the folder/file structure and security permissions and will eliminate rework later. The color scheme and technique used throughout this manual are described below: Designates a section Designates a sub-section ES Encrypt Terms Used for terms and notes which are specific to ES Encrypt. Quick Tips and Shortcuts Used for alternate methods to perform the designated function. www.everlastsoftware.com Page 4 of 63 ES Encrypt User Manual About Overview ES Encrypt is an encryption, password manager, and file security tool . It allows encryption of files/directories using AES 256-bit encryption. A user simply provides a strong password to perform encryption, and this same password must be used to decrypt the same files. It also has a security password manager that encrypts the passwords, accounts, etc. The passwords can even be synchronized across multiple devices. The mobile version allows encryption of text messages/strings. ES Encrypt allows files to be permanently deleted (prevents someone from undeleting and recovering the contents of files). This process is called electronic shredding. Finally, ES Encrypt can also perform electronic sanitizing on drives, which cleans up the “free space” on a given drive. This is useful to ensure files that were already deleted in a normal fashion cannot be undeleted and retrieved. Great for cleaning up temp files that were previously created by the operating system and then later deleted. www.everlastsoftware.com Page 5 of 63 ES Encrypt User Manual Software Architecture Components and Functions ES Encrypt has several components and features related to encryption and security. From an architecture perspective, there are two main products. A desktop version (Java based) and a mobile version (Adobe AIR based). All encryption mechanisms (files, text, and passwords) use AES 256-bits. Desktop Version for Windows The Windows version has the following features: 1) 2) 3) 4) 5) 6) 7) Encryption of files/directories Decryption of files/directories Password manager Synchronization of passwords across multiple devices Electronic shredding Electronic sanitizing Windows Explorer context menu support for encryption, decryption, and shredding Desktop Version for Mac OS X The Mac OS X version has the following features: 1) 2) 3) 4) 5) 6) Encryption of files/directories Decryption of files/directories Password manager Synchronization of passwords across multiple devices Electronic shredding Electronic sanitizing Mobile Version for Android and iOS The Android/iOS version has the following features: 1) 2) 3) 4) 5) 6) Encryption of files/directories Decryption of files/directories Encryption of text for messaging purposes Password manager Synchronization of passwords across multiple devices Electronic shredding www.everlastsoftware.com Page 6 of 63 ES Encrypt User Manual Usage Encrypting Files on Windows There are a few ways to encrypt a file on Windows: 1) Through Windows Explorer’s context menu 2) Through ES Encrypt’s Browse Dialog a. By opening the “ES Encrypt” shortcut b. By opening the “ES Encrypt Options” shortcut and selecting “Encrypt” from there Encrypting via Windows Explorer In order to encrypt files/directories using Windows Explorer’s context menu, first navigate to the directory that contains the files you wish to encrypt: www.everlastsoftware.com Page 7 of 63 ES Encrypt User Manual Next, select the desired files/directories using standard Windows selection (shift and control clicks for multiples): Now, right click the selected items to view the context menu: www.everlastsoftware.com Page 8 of 63 ES Encrypt User Manual Select “ES Encrypt” from the context menu (you will be prompted one at a time for each selected file/directory): Provide the following values: 1) Password – Make sure this is strong, preferably at least 10 characters (15 recommended). A suggestion is to use a phrase, such as “fried green tomatoes”. But instead of spaces, put numbers between the words (maybe birth year, number of jobs you’ve had, etc). Also include a special character randomly in the word. A good example is: “fried73green#5tomatoes”. This password will be immune to dictionary attacks, as well as resistant to brute force attacks by hackers. You must remember the password or your file contents will be permanently lost! 2) Confirm Password – Retype the password to make sure you did it correctly. Otherwise your file may be permanently lost! 3) Extra Scramble Password (Optional) – This is only used if you want to mask the fact that the file is even encrypted to begin with. It is not recommend unless you have a particular need for this. It also is not compatible with the mobile version at this time. 4) Confirm Extra Scramble Password – If using an extra scramble password, confirm. 5) Permanently Delete Original File After Encryption – If checked, the selected file will be electronically shredded once the encrypted version is created. This prevents someone from undeleting the file to retrieve the original unencrypted version. If unchecked, the original file is not deleted. 6) Overwrite Existing Encrypted File – If checked, the encrypted version will be overwritten (if it exists). Otherwise, the encryption process skips this particular file. 7) Process Subfolders – This option is only available if a directory is selected. If checked, all subdirectories (subfolders) will be encrypted as well. www.everlastsoftware.com Page 9 of 63 ES Encrypt User Manual Click ‘Ok’ and your file/directory will be encrypted: Note: The file called “img 982.jpg” has been replaced with a file called “img 982.jpg.esenc”. The added extension of “esenc” means it is now encrypted and protected with ES Encrypt. You will now be presented with the dialog again if more than one file/directory was selected. ES Encrypt is smart enough to remember the password you just typed in case you want to reuse it for the next file/directory. If you want to use a different password, simply type in the new one: www.everlastsoftware.com Page 10 of 63 ES Encrypt User Manual Note: Once encryption is complete, you will noticed all the files have “key” icons as their thumbnails. This indicated the files/directories are encrypted: www.everlastsoftware.com Page 11 of 63 ES Encrypt User Manual Encrypting via ES Encrypt Browse Dialog After launching “ES Encrypt” via the shortcut or the “ES Encrypt Options” shortcut, a dialog will appear. This dialog allows selection of one or more files and directories: www.everlastsoftware.com Page 12 of 63 ES Encrypt User Manual Using choosing the files and directories, use the “Select to Encrypt” button: Note: This method uses the same password for all the selected files and directories, unlike the Windows Explorer context menu option (which prompts individually for each file/directory). Provide the following values: 1) Password – Make sure this is strong, preferably at least 10 characters (15 recommended). A suggestion is to use a phrase, such as “fried green tomatoes”. But instead of spaces, put numbers between the words (maybe birth year, number of jobs you’ve had, etc). Also include a special character randomly in the word. A good example is: “fried73green#5tomatoes”. This password will be immune to dictionary attacks, as well as resistant to brute force attacks by hackers. You must remember the password or your file contents will be permanently lost! 2) Confirm Password – Retype the password to make sure you did it correctly. Otherwise your file may be permanently lost! 3) Extra Scramble Password (Optional) – This is only used if you want to mask the fact that the file is even encrypted to begin with. It is not recommend unless you have a particular need for this. It also is not compatible with the mobile version at this time. 4) Confirm Extra Scramble Password – If using an extra scramble password, confirm. 5) Permanently Delete Original File After Encryption – If checked, the selected file will be electronically shredded once the encrypted version is created. This prevents someone from undeleting the file to retrieve the original unencrypted version. If unchecked, the original file is not deleted. 6) Overwrite Existing Encrypted File – If checked, the encrypted version will be overwritten (if it exists). Otherwise, the encryption process skips this particular file. 7) Process Subfolders – This option is only available if a directory is selected. If checked, all subdirectories (subfolders) will be encrypted as well. www.everlastsoftware.com Page 13 of 63 ES Encrypt User Manual Click ‘Ok’ and your file/directory will be encrypted. You are notified how many files/directories were encrypted (some may be skipped if the “Overwrite Existing Encrypted File” is not checked and were already encrypted): www.everlastsoftware.com Page 14 of 63 ES Encrypt User Manual Encrypting Files on Mac OS X There is only one way to encrypt a file on Mac OS X: 1) Through ES Encrypt’s Browse Dialog via the “ES Encrypt” shortcut Encrypting via ES Encrypt Browse Dialog After launching “ES Encrypt” via the shortcut, click “ES Encrypt” and a dialog will appear. This dialog allows selection of one or more files and directories: www.everlastsoftware.com Page 15 of 63 ES Encrypt User Manual After choosing the files and directories, click the “Select to Encrypt” button: Note: This method uses the same password for all the selected files and directories, unlike the Windows Explorer context menu option (which prompts individually for each file/directory). Provide the following values: 2) Password – Make sure this is strong, preferably at least 10 characters (15 recommended). A suggestion is to use a phrase, such as “fried green tomatoes”. But instead of spaces, put numbers between the words (maybe birth year, number of jobs you’ve had, etc). Also include a special character randomly in the word. A good example is: “fried73green#5tomatoes”. This password will be immune to dictionary attacks, as well as resistant to brute force attacks by hackers. You must remember the password or your file contents will be permanently lost! 3) Confirm Password – Retype the password to make sure you did it correctly. Otherwise your file may be permanently lost! 4) Extra Scramble Password (Optional) – This is only used if you want to mask the fact that the file is even encrypted to begin with. It is not recommend unless you have a particular need for this. It also is not compatible with the mobile version at this time. 5) Confirm Extra Scramble Password – If using an extra scramble password, confirm. 6) Permanently Delete Original File After Encryption – If checked, the selected file will be electronically shredded once the encrypted version is created. This prevents someone from undeleting the file to retrieve the original unencrypted version. If unchecked, the original file is not deleted. 7) Overwrite Existing Encrypted File – If checked, the encrypted version will be overwritten (if it exists). Otherwise, the encryption process skips this particular file. 8) Process Subfolders – This option is only available if a directory is selected. If checked, all subdirectories (subfolders) will be encrypted as well. www.everlastsoftware.com Page 16 of 63 ES Encrypt User Manual Click ‘Ok’ and your files/directories will be encrypted. You are notified how many files/directories were encrypted (some may be skipped if the “Overwrite Existing Encrypted File” is not checked and were already encrypted): www.everlastsoftware.com Page 17 of 63 ES Encrypt User Manual Encrypting Files on Android/iOS The ES Encrypt mobile app allows encryption via the “Encrypt” tab: There are several options in order to pull files in for encryption: 1) 2) 3) 4) 5) The “Select” button The “Cameraroll” button The “Cam Picture” button The “Record Mic” button The “Cam Video” button www.everlastsoftware.com Page 18 of 63 ES Encrypt User Manual Encrypting via Select Use the ‘Select’ button and choose the desired file(s)/directories (the view allows for multi-select). Below is a screenshot of a directory showing subdirectories named with dates: Select the desired file(s)/directories (the ‘Up’ button navigates up the directory hierarchy): www.everlastsoftware.com Page 19 of 63 ES Encrypt User Manual Once you have highlighted the desired file(s)/directories, use the ‘Select’ button and you will see them added to the selection list below the buttons. If you want the selected unencrypted files to be permanently deleted after encrypting, check the “Shred/Delete Selected After Encrypting” box. Once you have selected all the desired files/directories, use the “Encrypt” button and provide a password: www.everlastsoftware.com Page 20 of 63 ES Encrypt User Manual AES 256-bit encryption can take a while, depending on the speed of your device. A message will appear, showing that encryption is taking place: Once encryption is finished, a dialog will be displayed specifying the number of files that were encrypted: www.everlastsoftware.com Page 21 of 63 ES Encrypt User Manual The newly encrypted files will have an extension of ‘esenc’ tacked on the end of the name, to indicate they are encrypted: www.everlastsoftware.com Page 22 of 63 ES Encrypt User Manual Encrypting via Cameraroll Use the ‘Cameraroll’ button and choose the desired images, videos, etc (the view allows for multiselect). Follow the same process using the “Encrypt” button as described in “Encrypting via Select”. Note: Some apps that use the cameraroll will not be able to display or understand the encrypted files. Also, they may cache old versions of your pictures, even if you electronically shred the unencrypted pictures. You may need to use the app and delete the unencrypted pictures from there to force it to remove the cached version. Encrypting via Cam Picture Use the ‘Cam Picture’ button and take a picture with the device. Follow the same process using the “Encrypt” button as described in “Encrypting via Select”. Encrypting via Record Mic Use the ‘Record Mic’ button and record audio with the device. Follow the same process using the “Encrypt” button as described in “Encrypting via Select”. Encrypting via Cam Video Use the ‘Cam Video’ button and record video with the device. Follow the same process using the “Encrypt” button as described in “Encrypting via Select”. www.everlastsoftware.com Page 23 of 63 ES Encrypt User Manual Decrypting Files on Windows There are a few ways to decrypt a file on Windows: 1) Through Windows Explorer’s context menu 2) Through ES Decrypt’s Browse Dialog a. By opening the “ES Decrypt” shortcut b. By opening the “ES Encrypt Options” shortcut and selecting “Decrypt” from there Decrypting via Windows Explorer In order to decrypt files/directories using Windows Explorer’s context menu, first navigate to the directory that contains the files you wish to decrypt (they will have a file extension of “esenc” as well as a “key” icon): www.everlastsoftware.com Page 24 of 63 ES Encrypt User Manual Next, select the desired files/directories using standard Windows selection (shift and control clicks for multiples): Now, right click the selected items to view the context menu: www.everlastsoftware.com Page 25 of 63 ES Encrypt User Manual Select “ES Decrypt” from the context menu (you will be prompted one at a time for each selected file/directory): Provide the following values: 1) Password – Type in the password that was used to encrypt the file(s). 2) Open File After Decryption – If checked, the default program will be used to open the file, based on its file extension. www.everlastsoftware.com Page 26 of 63 ES Encrypt User Manual Click ‘Ok’ and your files/directories will be decrypted: Note: The file called “accounts.txt” has been created. The encrypted “accounts.txt.esenc” file remains as well. If you no longer need the encrypted file, you can simply delete it (or electronically shred via ES Shred). You will now be presented with the dialog again if more than one file/directory was selected. ES Decrypt is smart enough to remember the password you just typed in case you want to reuse it for the next file/directory. If the other file(s)/directories use a different password, simply type in the new one: www.everlastsoftware.com Page 27 of 63 ES Encrypt User Manual Decrypting via ES Decrypt Browse Dialog After launching “ES Decrypt” via the shortcut or the “ES Encrypt Options” shortcut, a dialog will appear. This dialog allows selection of one or more files and directories with the “esenc” extension: www.everlastsoftware.com Page 28 of 63 ES Encrypt User Manual After choosing the files and directories, use the “Select to Decrypt” button: Note: This method uses the same password for all the selected files and directories, unlike the Windows Explorer context menu option (which prompts individually for each file/directory). Provide the following values: 3) Password – Type in the password that was used to encrypt the file(s). 4) Open File After Decryption – If checked, the default program will be used to open the file, based on its file extension. Click ‘Ok’ and your files/directories will be decrypted. You are notified how many files/directories were decrypted: www.everlastsoftware.com Page 29 of 63 ES Encrypt User Manual Decrypting Files on Mac OS X There is only one way to decrypt a file on Mac OS X: 1) Through ES Decrypt’s Browse Dialog via the “ES Encrypt” shortcut Decrypting via ES Decrypt Browse Dialog After launching “ES Decrypt” via the “ES Encrypt” shortcut, a dialog will appear. This dialog allows selection of one or more files and directories with the “esenc” extension: www.everlastsoftware.com Page 30 of 63 ES Encrypt User Manual After choosing the files and directories, use the “Select to Decrypt” button: Provide the following values: 1) Password – Type in the password that was used to encrypt the file(s). 2) Open File After Decryption – If checked, the default program will be used to open the file, based on its file extension. Click ‘Ok’ and your files/directories will be decrypted. You are notified how many files/directories were decrypted: www.everlastsoftware.com Page 31 of 63 ES Encrypt User Manual Decrypting Files on Android/iOS The ES Encrypt mobile app allows encryption via the “Decrypt” tab: www.everlastsoftware.com Page 32 of 63 ES Encrypt User Manual Decrypting via Select Use the ‘Select’ button and choose the desired file(s)/directories (the view allows for multi-select). Below is a screenshot of a directory showing some encrypted files: Once you have highlighted the desired file(s)/directories, use the ‘Select’ button and you will see them added to the selection list below the buttons. If you want the selected encrypted files to be permanently deleted after decrypting, check the “Shred/Delete Selected After Decrypting” box. www.everlastsoftware.com Page 33 of 63 ES Encrypt User Manual Once you have selected all the desired files/directories, use the “Decrypt” button and provide a password: AES 256-bit decryption can take a while, depending on the speed of your device. A message will appear, showing that encryption is taking place: www.everlastsoftware.com Page 34 of 63 ES Encrypt User Manual Once encryption is finished, a dialog will be displayed specifying the number of files that were encrypted: www.everlastsoftware.com Page 35 of 63 ES Encrypt User Manual Password Manager on Windows and Mac OS X The Password Manager can be launched in two different ways: 1) By selecting “Password Manager” from the “ES Encrypt” shortcut on Mac OS X or “ES Encrypt Options” shortcut on Windows 2) From the “ES Password Manager” on Windows Opening Existing Passwords If you have existing passwords, ES Password Manager will automatically prompt for the “master password” to view the passwords. Otherwise, you will go straight into the password list. After providing the correct password, and selecting ‘Ok’, the passwords are displayed for viewing/editing: www.everlastsoftware.com Page 36 of 63 ES Encrypt User Manual Any text phrases surround with tilde (~) characters will be masked with asterisk (*) characters. The intention of this functionality is to prevent someone from looking over your shoulder and grabbing your passwords. In order to show the passwords, either click within the masked phrase: … or temporarily hold down the ‘Shift’ or ‘Control’ button to reveal all masked phrases: If you have made changes to the passwords, click the ‘Save’ button to encrypt the values to disk. Otherwise, click ‘Cancel’. If no changes were made, simply click ‘Ok’. www.everlastsoftware.com Page 37 of 63 ES Encrypt User Manual Note: If you leave the passwords up for 5 minutes without using the dialog, ES Password Manager will automatically close the file for security purposes. If you’ve made changes, it will not automatically close the file. Instead, you will be prompted to avoid losing any desired changes: Deleting Existing Passwords If you have existing passwords, simply click the “Delete Passwords” button to permanently delete them. www.everlastsoftware.com Page 38 of 63 ES Encrypt User Manual Backup Passwords If you have existing passwords, you can back them up to a different location by using the “Backup Passwords” button. Select or type the desired directory name and click “Select Destination Directory”: A dialog appears, notifying when the backup/copy is complete. The filename is called “passmgr.txt”: www.everlastsoftware.com Page 39 of 63 ES Encrypt User Manual Restore Passwords You can restore your password file to ES Password Manager by clicking the “Restore Passwords” button. Select or type the desired file name and click “Select Password File” (by default, the password file will be named ‘passmgr.txt’ unless you changed it): Once the passwords have been restored, a dialog is displayed: www.everlastsoftware.com Page 40 of 63 ES Encrypt User Manual Synchronizing Passwords on Windows and Mac OS X If you have purchased/registered ES Encrypt, you can synchronize your password list across multiple devices. From the main dialog (“ES Encrypt Options” shortcut on Windows or “ES Encrypt” shortcut on Mac OS X), click the ‘Sync Passwords’ button: Uploading Passwords If uploading from this “source” device, enter a strong sync password (different than the master password). You will need to use this password on the other devices that you wish to download the master password list to. The password lists must be synchronized/downloaded within several hours or they are automatically deleted from Everlast Software’s server. If uploading for the first time using the provided sync password (or since the password file expired on the server), you will be presented with this message: If you click “Yes”, the password file will be uploaded to the server: www.everlastsoftware.com Page 41 of 63 ES Encrypt User Manual Downloading Passwords Passwords that have been uploaded from a “source” device can be downloaded to other devices. Provide the sync password that you typed in during the upload synchronization: If you typed in the correct password, and the password file has not yet expired on the server, you will be presented with a message to download: If you click “Yes”, the password file will be downloaded from the server to this device. If you click “No”, you have the option of replacing the already exiting password file with the one from this device: By clicking “Yes”, the server’s password file will be replaced. This is useful if you made a change or realize a different device has more recent passwords on it. You can then begin the “download” synchronization process once more. Clicking “No” leaves the already existing password file on the server. www.everlastsoftware.com Page 42 of 63 ES Encrypt User Manual Synchronizing Passwords on Android/iOS If you have purchased/registered ES Encrypt, you can synchronize your password list across multiple devices. From the “System” tab, use the ‘Sync Passwords’ menu option: Uploading Passwords If uploading from this “source” device, enter a strong sync password (different than the master password). You will need to use this password on the other devices that you wish to download the master password list to. The password lists must be synchronized/downloaded within several hours or they are automatically deleted from Everlast Software’s server. www.everlastsoftware.com Page 43 of 63 ES Encrypt User Manual If uploading for the first time using the provided sync password (or since the password file expired on the server), you will be presented with this message, notifying you the password file was uploaded to the server: www.everlastsoftware.com Page 44 of 63 ES Encrypt User Manual Downloading Passwords Passwords that have been uploaded from a “source” device can be downloaded to other devices. Provide the sync password that you typed in during the upload synchronization: If you typed in the correct password, and the password file has not yet expired on the server, you will be presented with a message to download: www.everlastsoftware.com Page 45 of 63 ES Encrypt User Manual If you click “Yes”, the password file will be downloaded from the server to this device. If you click “No”, you have the option of replacing the already exiting password file with the one from this device: By clicking “Yes”, the server’s password file will be replaced. This is useful if you made a change or realize a different device has more recent passwords on it. You can then begin the “download” synchronization process once more. Clicking “No” leaves the already existing password file on the server. www.everlastsoftware.com Page 46 of 63 ES Encrypt User Manual Registering ES Encrypt on Windows and Mac OS X If you have purchased ES Encrypt, you can register the product in order to synchronize your password list across multiple devices. It also removes any product limitations (number of uses, maximum number of characters, etc). From the main dialog (“ES Encrypt Options” shortcut on Windows or “ES Encrypt” shortcut on Mac OS X), click “Register Product”: Once presented with the “Product Registration” dialog, provide the “Transaction/Registration Id” that you were given after purchase and click “Ok”: You will now be able to synchronize passwords and all product limitations will be removed (if applicable): www.everlastsoftware.com Page 47 of 63 ES Encrypt User Manual Registering ES Encrypt on Android/iOS If you have purchased ES Encrypt, you can register the product in order to synchronize your password list across multiple devices. It also removes any product limitations (number of uses, maximum number of characters, etc). From the “System” tab, select the “Register Product” menu option: Once presented with the “Product Registration” dialog, provide the “Transaction/Registration Id” that you were given after purchase and click “Login”: www.everlastsoftware.com Page 48 of 63 ES Encrypt User Manual You will now be able to synchronize passwords and all product limitations will be removed (if applicable): www.everlastsoftware.com Page 49 of 63 ES Encrypt User Manual Electronic Shredding Files on Windows Electronic Shredding is the process of permanently deleting a file. Normally, when a file is deleted, the operating system just frees up the associated disk space. Sometimes, it’s possible to “undelete” files and recover the original contents. ES Shred uses The Department of Defense’s sanitizing standard DOD 5220.22-M as its guide. There are a few ways to electronically shred a file on Windows: 1) Through Windows Explorer’s context menu 2) Through ES Encrypt’s Browse Dialog a. By opening the “ES Shred” shortcut b. By opening the “ES Encrypt Options” shortcut and selecting “Shred” from there Electronic Shredding via Windows Explorer In order to shred files/directories using Windows Explorer’s context menu, first navigate to the directory that contains the files you wish to permanently delete: www.everlastsoftware.com Page 50 of 63 ES Encrypt User Manual Next, select the desired files/directories using standard Windows selection (shift and control clicks for multiples): Now, right click the selected items to view the context menu: www.everlastsoftware.com Page 51 of 63 ES Encrypt User Manual Select “ES Shred” from the context menu (you will be prompted one at a time for each selected file/directory): Click “Ok” to permanently delete the file/directory. You will be presented with a dialog confirming the shredding occurred: www.everlastsoftware.com Page 52 of 63 ES Encrypt User Manual Electronic Shredding via ES Shred Browse Dialog After launching “ES Shred” via the shortcut or the “ES Encrypt Options” shortcut, a dialog will appear. This dialog allows selection of one or more files and directories: www.everlastsoftware.com Page 53 of 63 ES Encrypt User Manual After choosing the files and directories, use the “Select to Delete/Shred” button. You must confirm the deletion should take place. If the “Process Subfolders (Be Careful!)” checkbox is checked, every folder/file underneath the selected directories will also be electronically shredded. Caution: If there are any symbolic links, NTFS junctions, directory shortcuts, or similar aliases, the process will follow them and deleting everything they are pointing to! If unchecked, only the files in the selected directories will be processed: Click ‘Ok’ and your files/directories will be electronically shredded. You are notified how many files/directories were deleted: www.everlastsoftware.com Page 54 of 63 ES Encrypt User Manual Electronic Shredding Files on Mac OS X Electronic Shredding is the process of permanently deleting a file. Normally, when a file is deleted, the operating system just frees up the associated disk space. Sometimes, it’s possible to “undelete” files and recover the original contents. ES Shred uses The Department of Defense’s sanitizing standard DOD 5220.22-M as its guide. There is only one way to electronically shred a file on Mac OS X: 1) Through ES Shred’s Browse Dialog via the “ES Encrypt” shortcut Electronic Shredding via ES Shred Browse Dialog After launching “ES Encrypt” shortcut, and clicking “Shred”, a dialog will appear. This dialog allows selection of one or more files and directories: www.everlastsoftware.com Page 55 of 63 ES Encrypt User Manual After choosing the files and directories, use the “Select to Delete/Shred” button. You must confirm the deletion should take place. If the “Process Subfolders (Be Careful!)” checkbox is checked, every folder/file underneath the selected directories will also be electronically shredded. Caution: If there are any symbolic links, NTFS junctions, directory shortcuts, or similar aliases, the process will follow them and deleting everything they are pointing to! If unchecked, only the files in the selected directories will be processed: Click ‘Ok’ and your files/directories will be electronically shredded. You are notified how many files/directories were deleted: www.everlastsoftware.com Page 56 of 63 ES Encrypt User Manual Electronic Sanitizing on Windows and Max OS X Electronic Shredding is the process of cleaning up the “free space” on a given drive. It is similar to electronic shredding, except it does it to the free space (files that have been deleted under normal means or through the operating system). This is useful to prevent individuals from undeleting sensitive information created by the operating system that is outside your control. It is also encouraged to use this process before giving a drive to someone else or disposing it. By opening the “ES Encrypt Options” shortcut on Windows, or “ES Encrypt” shortcut on Mac OS X, you can click the ‘Sanitize Free Space’ button as shown in the following dialog: A notice dialog will appear, informing you of the process. Basically the entire drive will be filled with a massive temp file (esclean.tmp) and overwritten using the shredding process. After sanitizing is complete, the temp file will automatically be removed. Simply click “Ok” to begin: www.everlastsoftware.com Page 57 of 63 ES Encrypt User Manual Next, select a folder where the temp file will be created and the cleaning process will begin: A “disk” icon will appear in the System Tray during the sanitizing process. This process uses significant disk access, so while you may use the computer, performance will be reduced: Right clicking on the icon will result in a menu. The menu allows pausing or stopping of the process. Otherwise, simply allow the sanitizing to run until completion. It can take several hours, possibly even days, depending on the size of the drive. You may get “low space” warnings from the operating system as the process nears completion. This is normal, and warning messages should be ignored. The space will be freed up once again when the sanitizing process completes. If a drive has a quota set for the user in which the process executes, the sanitizing process will not be able to clean the entire free space. It will only clean the space that is allocated to the user. The image below shows how the esclean.tmp file will grow very large during the process: www.everlastsoftware.com Page 58 of 63 ES Encrypt User Manual Once the process is complete, a dialog will be presented: www.everlastsoftware.com Page 59 of 63 ES Encrypt User Manual Secure Texting on Android/iOS The mobile version has the ability to encrypt/decrypt text strings that can then be used for texting, emails, etc. On the “Text” tab, simply type in your text message (or use the “Paste” button to paste whatever is on the system clipboard): Encrypting Text Click the “Encrypt” button to be prompted for a password: www.everlastsoftware.com Page 60 of 63 ES Encrypt User Manual Notice the text is now encrypted: The encrypted text can now be copied to the system clipboard so that it can be pasted into another program (such as the default texting app). Click the “Copy” button, followed by “Yes”: www.everlastsoftware.com Page 61 of 63 ES Encrypt User Manual Decrypting Text Click the “Decrypt” button to be prompted for the password: Notice the text is now decrypted: www.everlastsoftware.com Page 62 of 63 ES Encrypt User Manual The decrypted text can now be copied to the system clipboard so that it can be pasted into another program. Click the “Copy” button, followed by “Yes”: www.everlastsoftware.com Page 63 of 63