1
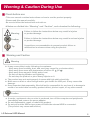
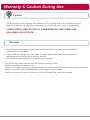
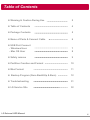
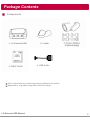
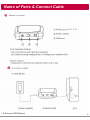
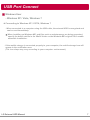
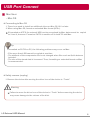
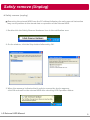
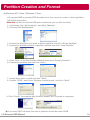
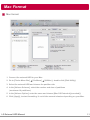
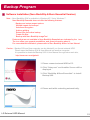
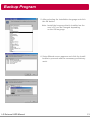
LG External HDD
Hard Disk Drive
XG1
- Thank you for purchasing this product.
- This user manual contains instructions on how to use the product properly.
- Please read this manual carefully.
- Be sure to follow the instructions and notices.
- Backup Program (Nero BackItUp & Burn) and its manual are in the external HDD.
- Appearance of product and components may differ from the image.
- User Manuals and Backup Program can be deleted if you format external HDD.
Please save user manuals and backup program into other computer.
If you delete them, you can download through http://www.nero.com/lgehdd without charge.
(For download method, please refer to the FAQ, page 30)
Warning & Caution During Use
Check before use
- This user manual contains instructions on how to use the product properly.
- Please read this manual carefully.
- Be sure to follow the instructions and notices.
z Notes are divided into “Warning” and “Caution”, each denotes the following:
Warning
Failure to follow the instructions below may result in injuries
or product damage.
Caution
Failure to follow the instructions below may result in serious injuries
or product damage.
Tip
It provides a recommendation to prevent product failure or
malfunction in advance when using the product.
Warning and Caution
Warning
z It may cause defect under following circumstance.
- Keep away from humidity, dust, and soot (may cause fire or electrocution)
- Keep away from areas with temperature of above 35 ℃ (95 ℉)
- Keep away from magnetic fields, water, heat
- Do not use during thunder and lightning.
- Do not drop the product or place heavy objects on it.
z The product may not work properly in areas with high static electricity.
z Make sure no dust or other foreign matter gets inside the USB port. It may cause data
damage.
z Keep important data separately. We shall not be responsible for any loss of or damage to
saved or recorded data caused by product defect, product repair, or any other reason.
Caution
z If smoke, unpleasant odor or noise is produced, turn off the computer and peripherals
immediately and remove the power adapter.
z Do not disassemble, repair or rebuild the product.
z Do not pull out the USB or turn power off while the external HDD is connected.
(The product may cause malfunction.)
LG External HDD Manual
2
Warranty & Caution During Use
Caution
- LG Electronics will replace this product if it is faulty due to a manufacturing or
materials defect, except where damage is caused by your use or negligence.
- LG EXCLUDES LIABILITY FOR ALL CONSEQUENTIAL AND OTHER LOSS,
INCLUDING LOSS OF DATA.
Warranty
1. Any defect found after normal use and during the warranty period shall be
repaired free of charge.
2. Fees shall be charged for the type of repair other than that covered by the
warranty even during the warranty period.
3. Present this warranty when requesting for repair.
The following repair services shall be provided for a fee:
- Defect caused by careless use.
- Defect caused by repair performed at places other than the authorized service centers.
- Defect caused by the disassembly of the device by the user.
- Defect caused by natural disasters such as flood, fire, and earthquake.
Table of Contents
z Warning & Caution During Use
2
z Table of Contents
4
z Package Contents
5
z Name of Parts & Connect Cable
6
z USB Port Connect
- Windows User
- Mac OS User
7
8
z Safely remove
9
z Partition Creation and Format
10
z Mac Format
11
z Backup Program (Nero BackItUp & Burn)
12
z Troubleshooting
31
z LG Service Site
32
LG External HDD Manual
4
Package Contents
Components
5. USB Cable
※ The components are subject to change without prior notice.
※ Appearance of product may differ from the image.
LG External HDD Manual
5
Name of Parts & Connect Cable
(12 V, 2 A)
LG External HDD Manual
6
USB Port Connect
Windows User
- Windows XP / Vista, Windows 7
z Connecting to Windows XP / VISTA, Windows 7
- When connected to a computer using the USB cable, the external HDD is recognized and
can be used immediately.
※ When installing on Windows ME, and files such as usbntmap.sys are being requested,
specify the base2.cab file in the Win9X folder on the Windows ME original CD to enable
automatic installation.
- If the mobile storage is connected properly to your computer, the mobile storage icon will
appear in the notification area.
(The icon shape may vary according to your computer environment.)
LG External HDD Manual
7
USB Port Connect
Mac User
- Mac OS
z Connecting to Mac OS
1. There is no need to install an additional driver on Mac OS 10.0 or later.
2. When using Mac OS, format as extended Mac format (HFS+).
※ If formatted as NTFS, the external HDD can be recognized by Mac; data cannot be copied
to / from it, however. Format as FAT32 to enable use in both PC and Mac.
Tip
If formatted as FAT32 on PC, the following problems may occur on Mac:
- Files more than 4 GB cannot be copied at one time.
- The attribute of the compression file is not changed when files such as Quick data are
included.
- The size of the stored data is increased. Thus, formatting as extended format on Mac
is recommended.
z Safely remove (unplug)
1. Remove the device after moving the driver icon of the device to “Trash.”
Warning
※ Failure to move the driver icon of the device to “Trash” before removing the device
may cause damage to the volume of the disk.
LG External HDD Manual
8
Safely remove (Unplug)
z Safely remove (unplug)
※ Removing the external HDD from the PC without following the safe removal instruction
may cause problem to the stored data or operation of the external HDD.
1. Double-click the Safely Remove Hardware Icon in the notification area.
2. On the window, click the Stop button followed by OK.
3. When the message indicates that is safe to remove the device appears,
click OK and remove the external HDD after checking LED Operation Status.
LG External HDD Manual
9
Partition Creation and Format
z Windows XP / Vista / Windows 7 User
- LG external HDD is already NTFS-formatted, but if you want to create or divide partition,
follow this instruction.
(Attention: all data in external HDD will be deleted if you use this function.)
1. Left button click “My Computer” and Click “Manage”.
2. Click the Disk Management.
3. Choose the Disk Drive you want to delete partition and click “Delete Partition”.
4. Choose the Disk Drive which is partition deleted and click “ New Partition”.
5. Click “Next” at the New Partition Wizard and select “Primary Partition”.
6. Choose the partition size and click “Next”.
7. Assign drive letter or path and click “Next”.
8. Choose “NTFS” and check “Perform a quick format” and click “Next”.
9. Click “Finish” to complete New Partition Wizard. NTFS format is completed.
※ If you want FAT32-Format, the size of partition should be under 32GB.
LG External HDD Manual
10
Mac Format
Mac format
1. Connect the external HDD to your Mac.
2. Go to [Finder Menu Bar] Æ [Go Menu] Æ [Utilities], double click [Disk Utility].
3. Select the external HDD and choose the partition tab.
4. In the [Volume Scheme], select the number and size of partitions
(maximum 16 partitions).
5. In the [Volume Option], enter the name and choose [Mac OS Extended (journaled)].
6. Click [Apply], to start formatting. It could take several minutes depending on your Mac.
LG External HDD Manual
11
Backup Program
Software Installation (Nero BackItUp & Burn Essential Version)
Note – Nero BackItUp S/W is available in Windows XP, Vista, Windows 7.
Nero BackItUp Essential does not offer the following features:
※ Backup and restore expert options
※ Multiple targets for backups
※ Advanced encryption
※ Archive splitting
※ Extract files from drive backup
※ Create file filter
※ Backup with Nero BackItUp ImageTool
Features that are not available in Nero BackItUp Essentials are indicated by the icon.
The icon offers you upgrade possibilities, and gives information about it.
For more detailed information, please refer to Nero BackItUp & Burn’s User Manual
Caution – Backup S/W and User manuals can be deleted if you format external HDD.
Please save the Backup S/W & User Manual into another computer.
It is possible to download Backup S/W & User Manual through below web site;
※ http://www.nero.com/lgehdd
1. Please connect external HDD to PC.
2. Click “Setup.exe” and Installer Screen will be
displayed.
3. Click “BackItUp & Burn Essentials” to install
Backup S/W.
4. Please wait while extracting automatically.
LG External HDD Manual
12
Backup Program
5. After selecting the installation language and click
the OK button.
Note - Install the language that is installed on the
user's PC can be changed depending
on the OS language.
6. Setup Wizard screen appears and click the Install
button to proceed with the necessary preliminary
work.
LG External HDD Manual
13
Backup Program
7. Click "Next" button to proceed to the next step.
8. The serial numbers are entered automatically,
and click "Next" button.
9. Please read the license agreement carefully,
and click “Next” button if you agree.
LG External HDD Manual
14
Backup Program
10. After selecting the type of installation and click
"Next" button.
11. Click “Install” button to begin the installation.
12. After program installation is complete and click
the "Finish" button to finish the installation.
LG External HDD Manual
15
Backup Program
Backup With Nero BackItUp
With Nero BackItUp you can back up data. Click the Backup menu to start the desired
backup task. The following backup tasks are available:
Autobackup
With Nero BackItUp, you can set up and configure Autobackup, the automatic backup feature.
Once it has been set up, Autobackup is available on your computer's system tray and backs
up specified folders in the background.
Setting up Autobackup is particularly useful when you want to carry out regular backups
for the same files. The advantages are, e.g. that all the settings for the backup have already
been configured and that there is no risk of forgetting a backup date or of not carrying out a
backup as scheduled (as long as the computer is on).
File backup
If you choose a file backup, the individual files and folders that you select are backed up.
If you want to back up the same files again later, a backup update makes it easier and saves
resources and other things.
A file backup is useful to protect against data loss that can occur due to hardware damage
or force majeure (fire, etc.). As a result, we recommend frequent backups so that you can
restore data that is as current as possible in case of loss.
Drive backup
If you choose drive backup, entire drives (hard drives and/or partitions) are backed up,
including the programs and the operating system. You can select the drives to be backed up.
In contrast to file backups, drive backups restore programs and operating systems when
restoring. So, a drive backup is useful to set up the whole operating system plus programs
In case of hardware damage.
Verification
Nero BackItUp can be used to verify an existing backup. Nero BackItUp verifies
whether or not the backup can be used for a successful restore process. During this
process, data integrity is checked, and the backed up data is compared to the source
data. If you carry out the verification right after the backup and have not modified any
data in the meantime, you can use the feature to verify whether or not all data was
backed up successfully (data verification).
LG External HDD Manual
16
Backup Program
Autobackup
With Nero BackItUp, you can set up and configure the automatic Autobackup. Once
it has been set up, Autobackup is available on your computer's notification area and
backs up the folders that you specify in the background.
You can choose between two Autobackup options:
1. Activate Autobackup to automatically back up files and folders to local and
external hard drives
2. Activate Autobackup with Nero Online Backup to automatically back up files
and folders online.
The one Autobackup option stores the backup on a hard drive whereas the other
Autobackup option uses the Internet service Nero Online Backup to store the backup
online. When using Autobackup to store on a hard drive, you can define a backup
schedule. The Autobackup that stores online does so automatically every time a
change in the monitored folders takes place.
Caution - Autobackup formats the external or internal hard drive with the NTFS file
system if it is formatted with another file system. In this case, all data on
this drive will be lost.
Storing on Hard Drive With Autobackup
With Nero BackItUp you can set up and configure Autobackup to automatically
back up files and folders to a local or external hard drive.
We recommend the drive to be empty. Once it has been set up, Autobackup is
available in the Windows notification area. Autobackup regularly backs up
all folders on all hard drives in a defined sequence. You can also choose
individual folders and define your own time schedule.
Setting up Autobackup is particularly useful when you want to carry out regular
backups. The advantages are, e.g. that all the settings for the backup have
already been configured and that there is no risk of forgetting a backup date
or of not carrying out a backup as scheduled (as long as the computer is on).
Caution - Use only hard drive with more than 4 GB
If you want to use an external hard drive which is not formatted
with the NTFS file system, make sure that its space has more than
4 GB.
Formatting with the NTFS file system and thus using the Autobackup
feature is not possible for some external hard drives (e.g. flash drive
or USB stick) with a space less than 4 GB due to technical hard ware
restrictions, and may cause serious problems on existing file system.
LG External HDD Manual
17
Backup Program
To set up Autobackup or change the settings, proceed as follows:
1. Connect the external hard drive you want to use as target.
(We recommend it to be empty.)
2. Click the Backup > Autobackup menu.
→ The Autobackup - Options screen is displayed.
3. Select the appropriate Autobackup entry.
→ If Nero BackItUp does not detect an external empty hard drive, a window is
opened which asks you how to proceed. To choose the target by yourself,
click the No, select another target button.
→ The Autobackup - Select the target drive screen is displayed.
LG External HDD Manual
18
Backup Program
4. Select the desired target and click the
button.
→ The drive is formatted with the NTFS system. A progress window is opened
and displays the progress made while formatting.
→ The Autobackup - Autobackup status screen is displayed.
5. If you want to change the default settings regarding time schedule and folders to be
backed up:
5. 1. Click the Edit button in the Settings area.
The Autobackup - Define the settings screen is displayed.
LG External HDD Manual
19
Backup Program
5. 2. Select the Use custom setting for time schedule and backup data option button.
5. 3. Enter the desired values in the Time schedule area. You can always set the values
back to the default settings by clicking the Reset button.
5.4. Select the check boxes in the Backup data area for the folders you want to backup.
5.5. Click the button.
→ The Autobackup - Autobackup status screen is displayed again.
6. If you want to manually start the first backup now, click the Backup Now button in the
Status area.
→ The first full backup for the folders that you have specified is carried out.
You can monitor the progress with the progress bar in the Status area.
7. Click the
button.
→ The final screen is displayed. Autobackup has been set up and carries out the
backup updates automatically due to the specified settings.
※ Turn off Autobackup
If you want to turn off Autobackup, just click the
screen.
button in the Autobackup status
Storing Online With Autobackup
With Nero BackItUp you can set up and configure Autobackup to automatically back
up files and folders online, using the Internet service Nero Online Backup as a
backup location.
Nero Online Backup offers you an online data storage (which is subject to charge).
The costs for the Internet connection and the costs for using the Internet service
Nero Online Backup are the user's responsibility.
For more detail information, please refer to the S/W User Manual.
LG External HDD Manual
20
Backup Program
Backing Up Files
With Nero BackItUp you can carry out file backups. This means that individual files can be
backed up and then restored at a later point in time. In comparison to drive backups, it is not
possible to restore operating systems or programs with this option.
The first step is selecting files and folders to back up.
The next step is to select a target where to save the backup. You can save the backup on your
hard drive or removable data media, burn them to a disc or use an online storage.
At last you can make settings according to your preferences.
To backup files, proceed as follows:
1. Click the Backup > File Backup menu.
→ The File Backup - Select what you want to backup screen is displayed.
2. Select the check box preceding the folder or the file that you want to add to the backup.
Select a folder in the left to show the contained files in the right.
→ The selected files are added to the backup.
3. Click the
button.
→ The File Backup - Please select targets screen is displayed
LG External HDD Manual
21
Backup Program
4. Click the icon that represents your desired target and specify the target in the drop-down
menu.
5. Click the Browse button to specify the chosen target path.
6. If you want to back up to different targets, click the Add target button and repeat the two
previous steps.
7. Click the
button.
→ The File Backup - Configure your backup screen is displayed
LG External HDD Manual
22
Backup Program
8. Enter a name for the backup in the Backup name input field.
9. If you want to schedule this backup or run it on a regular basis:
9.1. Select the backup schedule type in the Time schedule drop-down menu.
9.2. Click the Edit button if you want to specify the schedule.
The Define your time schedule window is opened.
9.3. Select the start date and other time settings that are appropriate to your backup
schedule.
9.4. Select the backup type used for the following backups in the Select backup type drop
-down menu.
10. Configure other settings as desired in the Options area.
11. If necessary, specify additional settings in the Expert Options area.
12. Click the
button.
→ The file backup is carried out and the final screen is displayed.
You can follow the process status in the task bar.
LG External HDD Manual
23
Backup Program
Backing Up Drives
With Nero BackItUp you can carry out drive backups. In contrast to file backups, drive
backups restore programs and operating systems when restoring.
It is not possible to update a drive backup.
The first step is selecting a drive to back up.
The next step is to select a target where to save the backup. You can save the backup on your
hard drive or removable data media, burn them to a disc or use an online storage. When you
back up a drive, the backup file is usually quite large. If you burn the backup to disc, you will
usually require multiple discs. The first backup disc is always a bootable disc. If you do not
burn the backup to disc, it is still quite useful to create a bootable disc so that you can start
the computer (and the drive restore) from CD/DVD in the event of an emergency.
At last you can make settings according to your preferences.
※ Administrator rights
You must have administrator rights in order to back up and restore hard drives and partitions.
1. Click the Backup > Drive Backup menu.
→ The Drive backup - Select drives or partitions screen is displayed.
2. Select the check box preceding the drive or the partition that you want to add to the backup.
Select a folder in the left to show the information in the right.
→ The selected drives or partitions are added to the backup.
3. Click the
button.
→ The Drive Backup - Select targets screen is displayed.
4. Click the icon that represents your desired target and specify the target in the dropdown menu.
5. Click the Browse button to specify the chosen target path.
6. If you want to back up to different targets, click the Add target button and repeat the two
previous steps.
7. Click the
button.
→ The Drive Backup - Configure your backup screen is displayed
8. Select a backup name in the Backup name field.
9. If you want to schedule this backup or run it on a regular basis:
9.1. Select the backup schedule type in the Time schedule drop-down menu.
9.2. Click the Edit button.
The Define your time schedule window is opened.
9.3. Select the start date and other time settings adequate to your backup schedule.
10. Configure other settings as desired in the Options area.
11. If necessary specify additional settings in the Expert Options area.
12. Click the button.
→ The drive backup is carried out and the final screen is displayed.
You can follow the process status in the status bar.
※ For more information about backup setting and backup type, please refer to the Backup
SW User Manual provided in the external HDD.
LG External HDD Manual
24
Backup Program
Restore With Nero BackItUp
Restore File Backup
With Nero BackItUp you can restore file backups. The content of the file backup is restored
during this process. You can exclude individual files from the restore process or select
specific files to be restored. It is even possible to choose a drive backup to restore individual
files. In contrast to a drive backup restore process, a file backup does not allow the restore of
programs or operating systems.
The first step is selecting files and folders to restore.
The next step is to select a path where to restore the backup and to make settings according
to your preferences.
To restore a file backup, proceed as follows:
1. Click the Restore > Restore Files menu.
→ The Restore files and folders - Select files/folders from a backup or searched result to
restore screen is displayed. The executed backups are displayed in the middle pane.
2. Make the backup available:
2. 1. If the backup is located on a disc, insert the disc in a drive.
2.2. If the backup has been saved to hard drive, network drive, or removable medium,
ensure that your computer has access to the respective drive.
LG External HDD Manual
25
Backup Program
3. Select the desired backup.
→ The files and folders of the backup are displayed in the right area.
4. Select the check box preceding the folder or the file that you want to restore.
Select a folder in the left to show the contained files in the right.
5. Click the button.
→ The Restore files and folders - Please select restore options screen is displayed.
6. If you want to restore the backup to the original path, select the Restore to original path
option button.
7. If you want to migrate user specific folders, enable the Migrate user specific folders to
current user check box.
Migrate user specific folders to current user refers to user-specific folders such as
My Documents which will be restored to path of the user who is currently logged in.
If you clear this check box then Nero BackItUp will restore the user-specific folders to the user
path under which the backup was saved.
LG External HDD Manual
26
Backup Program
8. If you want to specify the path on which the backup will be restored yourself:
8.1. Select the Restore to custom path option button.
8.2. Click the Browse button.
The Browse For Folder window is opened.
8.3. Select the desired restore path and click the OK button.
The Browse For Folder window is closed and the selected path is transferred.
8.4. If you want to keep the original directory structure, enable the Preserve original
directory structure check box.
9. Use the How to resolve conflicts option buttons to choose the action to take when a file
to be restored is already (or is still) on the computer.
10. If necessary specify additional settings in the Expert Options area.
11. Click the
button.
→ The restore is carried out and the final screen is displayed. You can follow the process
status in the task bar
Restore Drive Backup
※ Administrator rights
You must have administrator rights in order to back up and restore hard drives and partitions.
Only one single partition or one hard drive with all partitions can be restored during one
restore process.
1. Click the Restore > Restore Drives menu.
→ The Restore a drive - Select your partitions to restore screen is displayed. The executed
backups are displayed in the middle pane.
2. Make the backup available:
2.1. If the backup is located on a disc, insert the disc in a drive.
2.2. If the backup has been saved to hard drive, network drive, or removable medium,
ensure that your computer has access to the respective drive.
3. Select the desired backup.
→ The drives and partitions of the backup are displayed in the right area. Partitions that
were not part of the drive backup are grayed out.
4. Select the option button preceding the drive or partition that you want to restore.
LG External HDD Manual
27
Backup Program
5. Click the
button.
→ The Restore a drive - Select your restore target screen is displayed. The source partition
and your selected target are shown.
6. If you want to restore the backup to the original hard drive, select the Restore to original
hard drive option button.
7. If you want to restore the backup to another hard drive:
7.1. Select the Restore to another hard drive option button.
7.2. Click the icon that represents your desired target and specify the target in the dropdown menu.
8. If necessary specify additional settings in the Expert Options area (see Expert options→ 37).
9. Click the
button.
→ The restore is carried out and the final screen is displayed. You can follow the process
status in the task bar.
Syncing With Nero BackItUp
Syncing Folders
With Nero BackItUp you can sync two folders.
The first step is to select two folders (a left folder and a right folder) for syncing.
The next and final step is to define your preferred settings.
To sync, proceed as follows:
1. Click the Sync > Create New menu.
→ The New Data Synchronization - Please select your left and right folder screen is
displayed.
LG External HDD Manual
28
Backup Program
2. Click the Left folder Browse button to choose the left folder.
3. Click the Right folder Browse button to choose the right folder.
4. Click the
button.
→ The New Data Synchronization - Finalize Settings screen is displayed.
5. Select a sync type in the Select a type drop-down menu. (
6. Enter a name for the sync job in the Type a name input field.
7. If you want to schedule the sync job or to run it on a regular basis:
7.1. Select the sync schedule type in the Time schedule drop-down menu.
7.2. Click the Edit button if you want to specify the schedule.
The Define your time schedule window is opened.
7.3. Select the start date and other time settings that are appropriate to your backup
schedule.
8. Choose your preferred conflict-handling option in the Conflict handling area.
9. Click the
button.
→ The sync job is started and the final screen is displayed.
LG External HDD Manual
29
Backup Program
※ About Sync Types
Nero BackItUp has five sync types:
1. Mirror
The Mirror type synchronizes two folders.
New and updated files are copied from one folder to the other folder. Files that are deleted in
one folder are also deleted in the other folder.
2. Copy
The Copy type copies new and updated files from the left to the right folder.
Files that are deleted in the left folder are also deleted in the right folder.
3. Partial synchronization
The Partial synchronization type copies updated files from the right to the left folder.
This sync type only deals with the same files, new files or deleted files will be ignored.
4. Update
The Update type has the same function as the Copy type with the exception that the Update
type does not delete.
5. Partial mirror
The Partial mirror type has the same function as the Mirror type with the exception that the Par
tial mirror type does not delete.
Note - Nero BackItUp cannot identify changed or renamed files during the first run.
The reason is that sync information is stored in a separate file and changes are
compared to this information.
LG External HDD Manual
30
Troubleshooting
1. Once connected, the external HDD is recognized but not displayed.
Make sure that the mounted external HDD is initialized, partitioned, and formatted.
2. Files larger than 2 GB cannot be copied to the external HDD on Mac.
The partition of the external HDD is FAT 32. Set the partition to extended partition (HFS+) on
Mac OS.
3. During the installation of an external HDD on Windows ME, files such as
usbntmap.sys are requested.
The files are in the base2.cab of the WIN9X folder on the Windows ME original CD. Specify this
folder to complete installation.
4. The formatted external HDD is recognized on Windows 2000 and XP but not on
Windows 98SE and ME.
This is due to the difference in format type. Windows 98SE and ME support FAT 32 only,
whereas Windows 2000 and XP support both FAT 32 and NTFS. Format as FAT 32 to enable
recognition by all Windows systems.
5. Power is insufficient.
[Major symptoms]
Not recognized / Sometimes recognized / Tick sound heard / Data move failed /
Driver disappeared.
[Solution]
Connect directly to the rear of the PC.
6. Data in external HDD is lost.
Data may be lost when running Disk Defragmenter or Scan Disk with “Precise.”
Data may be lost due to shock when the external HDD is operating.
Data opened after a fast format may be lost.
7. The “Hi-Speed USB device is connected to a Non Hi-Speed USB hub” message
is displayed.
This message is displayed when an external HDD is connected to a USB 1.1 host adapter
(12 Mbps max) or if the USB driver is incorrect.
In this case, purchase a USB 2.0 hub or install the driver manually.
8. Check the sequence when the external driver does not work.
- Check whether the USB cable is connected correctly.
- Check the operation of LED.
- Check the driver recognition.
- Check if the internal motor of the external HDD works during operation.
- Check the normal operation of the USB port from the Control Panel in the following sequence:
1) Windows / XP / VISTA, Windows 7
Control Panel Æ System Æ Hardware Æ Device Manager Æ Common Parallel Bus Controller
9. S/W User manual and backup S/W are deleted.
- Download Method for User Manual & Backup S/W :
1. Connect to http://www.nero.com/lgehdd
2. Input the simple information (e-mail and name)
3. Click the Download button
LG External HDD Manual
31
LG Service Site
LG 3.5” External HDD Manual
32
LG Service Site
LG 3.5” External HDD Manual
33