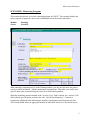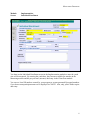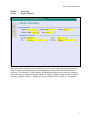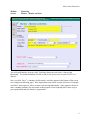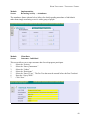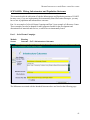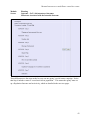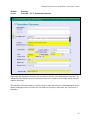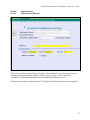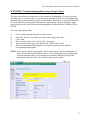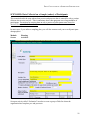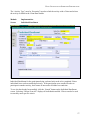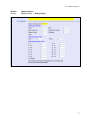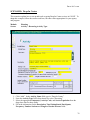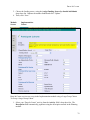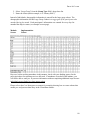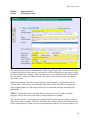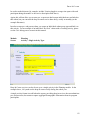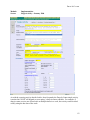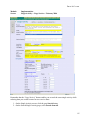
1
COLORADO PREVENTION SYSTEM
CO KIT
SCENARIOS MANUAL
MAY 2006
Prepared by:
OMNI Research & Training, Inc., Denver, CO
ACKNOWLEDGEMENTS
PRIMARY WRITER
OMNI RESEARCH AND
TRAINING
Elizabeth Winter, M.A.
SECONDARY WRITERS
OMNI RESEARCH AND
TRAINING
Mitch Ferguson
Carole Broderick, Ph.D.
Erica Boyce, M.C.J
COLORADO ALCOHOL AND
DRUG ABUSE DIVISION
Mary Vanderwall
Karen Abrahamson
Melody Durso
Terry Rousey
COLORADO DEPARTMENT OF
CRIMINAL JUSTICE
Anna Lopez
Michele Lovejoy
EDITOR
COLORADO DEPARTMENT OF
EDUCATION
Janelle Krueger
OMNI RESEARCH AND
TRAINING
Karin McBride, M.A.
COLORADO STATE UNIVERSITY,
COOPERATIVE EXTENSION
Christine Cerbana
ADDITIONAL READER
SOUTHWEST CENTER FOR
APPLICATION OF PREVENTION
TECHNOLOGIES (SWCAPT)
Joanie Liebman
OMNI RESEARCH AND
TRAINING
Laurie Larson
CO KIT Project Directors
COLORADO DEPARTMENT OF
PUBLIC HEALTH AND
ENVIRONMENT
José Esquibel, Director
Interagency Prevention Systems
OMNI RESEARCH AND
TRAINING
Carole Broderick, Ph.D.
Prevention Research Director
Colorado KIT Steering
Committee
COLORADO DEPARTMENT OF
PUBLIC HEALTH AND
ENVIRONMENT
José Esquibel
Barbara Ritchen
Gina Febbraro
Scott Bates
OMNI RESEARCH AND
TRAINING
Carole Broderick
Laurie Larson
Sharon Liu
Elizabeth Winter
Mitch Ferguson
Karin McBride
FAMILY RESOURCE CENTERS
ASSOCIATION
Bill Michaels
Virginia Howey
GIRLS, INC. OF METRO DENVER
Carol Browar
SUMMIT COUNTY
GOVERNMENT, DEPARTMENT
OF HUMAN SERVICES
Amy Lange
ASIAN PACIFIC DEVELOPMENT
CENTER
Karl Chwe
PEER ASSISTANCE SERVICES,
INC.
Elizabeth Pace
STATE TOBACCO EDUCATION
PREVENTION PARTNERSHIP
(S.T.E.P.P.)
Carsten Bauman
Cindy Crandell
Katy Kupecz
Jill Bednarek
RELATIONSHIP ROOTS
Susan Kay
CITY & COUNTY OF
BROOMFIELD
John Mowery
Debbie Oldenettal
AURORA MENTAL HEALTH
CENTER
Betsy Rogers
PIKES PEAK FAMILY
CONNECTIONS
Rita Wiley
PROJECT PAVE
Myles Mendoza
Amy Stambuck
FULL CIRCLE OF LAKE COUNTY
Alice Pugh
Jill Dzuby
MISSION POSSIBLE
Palmer Johnson
Manny Roldan
Kristiana Huitrón
SUMMIT PREVENTION
ALLIANCE
Jeannie Ringelberg
EAGLE RIVER YOUTH
COALITION
CRISTINA GAIR
METRO DENVER PARTNERS
MaryAnn Burdick
2
CONTENTS
ACKNOWLEDGEMENTS......................................................................................... 2
INTRODUCTION ....................................................................................................... 4
SCENARIOS ............................................................................................................... 5
MENTORING PROGRAM................................................................................... 5
CURRICULUM-BASED RECURRING ACTIVITY ........................................ 12
TUTORING PROGRAM .................................................................................... 22
HOME VISITATION .......................................................................................... 28
HOME VISITATION – TRACKING A FAMILY ............................................. 36
MIXING INFRASTRUCTURE & POPULATION OUTCOMES ..................... 41
PART 1 – SOCIAL NORMS CAMPAIGN ....................................................................... 41
PART 2 – RESOURCE CENTER ................................................................................... 48
TRACKING DEMOGRAPHICS (LARGE GROUP COHORT) ....................... 55
DATA COLLECTED ON A SAMPLE (SUBSET) OF PARTICIPANTS......... 56
MULTIPLE FUNDERS....................................................................................... 61
SAME ACTIVITY FUNDED BY MULTIPLE FUNDERS .................................................. 64
DIFFERENT ACTIVITIES FUNDED BY DIFFERENT FUNDERS ...................................... 66
CASE MANAGEMENT ..................................................................................... 68
DROP-IN CENTER............................................................................................. 78
CREATING IDENTIFIERS FOR MULTIPLE COHORT AGENCIES ............ 87
3
INTRODUCTION
INTRODUCTION
The documents within this Scenarios Manual have been created to ease the sometimes daunting
task of entering information for your programs into CO KIT. The purpose of this manual is to
help you conceptualize your program for the CO KIT system. While we include screen shots,
this manual will not provide step-by-step instructions for recording your data. You should always
use this manual in conjunction with the more comprehensive CO KIT User Manual, which does
provide step-by-step instructions for entering data.
The examples we have included are a sampling of the most common scenarios being implemented by the various providers who use CO KIT. They are intended to be guidelines as you enter
your programs. In some cases, you may find the scenarios are an exact match with the programs
you are entering. In other cases, you may find the scenarios may not match your programs
exactly; but, they may provide valuable direction for your data entry. Either way, you will find
excellent conceptual advice and get many useful tips from colleagues who are administering
similar programs.
Also, remember that your funder is an excellent resource if you are having trouble determining
which scenario applies best to you. They work with many programs and it is likely that they will
be able to recommend a scenario that has worked for another agency.
HELPFUL TERMS TO REMEMBER
Funder: The agency funding the program you are entering into CO KIT.
Program: The collective services and activities provided by an agency for a particular purpose
or intended outcome. For example, a service directed at reducing teenage drinking.
Activities: The processes and procedures put into place to achieve outcomes. CO KIT utilizes
three types of activities: Single (an activity performed only once by a group, such as a guest
speaker), Recurring (activities with a fixed start and a fixed end date, where the same
individuals participate in sessions that build off of earlier sessions. One example would be
parenting classes), and Mentoring (one-to-one activities where an adult is matched with a
youth).
Cohort: Cohorts are the groups assigned to your recurring activities. After individuals are
enrolled in your programs (Implementation module’s Individual Enrollment screen) they may be
assigned to cohorts. For example, you may have 30 individuals total enrolled in your program,
and 15 of them may be participating in a specific activity. This group of 15 is its own cohort.
4
MENTORING PROGRAM
SCENARIO: Mentoring Program
This scenario details how to set up a mentoring program in CO KIT. This example includes the
set up required to capture the one-to-one relationship between the mentor and mentee.
Module:
Screen:
Planning
Activities
When entering a mentoring activity in the Planning module, you only need to enter one generic
activity in which all Mentor - Mentee partnerships can participate. Thereafter, you can be more
specific about what occurred during each activity in the Mentoring module.
When the mentoring option contained in the “Activity Type” field is chosen, the “Activity Code”
field will only give the option to choose the code “One-to-One Mentoring.” Continue to
complete the additional fields indicating the number of participants and anticipated activities.
These fields should reflect an aggregated number of individuals and services for the fiscal year.
5
MENTORING PROGRAM
Module:
Screen:
Implementation
Individual Enrollment
You then use the Individual Enrollment screen in the Implementation module to enter the youth
who will be mentored. By entering the youth here, they become available for matches in the
Mentoring module and the pre-post test (outcome) data entry in the Client Data module.
You can use Local ID numbers created by your program or system-generated Encrypted numbers
if you do not want participant names to be displayed in CO KIT. Also, only yellow fields require
data entry.
6
MENTORING PROGRAM
Module:
Screen:
Mentoring
Register Mentor
While the mentees (youth receiving mentoring services) are set up through the Implementation
module’s Individual Enrollment screen, the Mentoring module is where the adult mentors are
registered. As with other CO KIT modules, the Mentoring module screens are to be completed
in the order they are displayed: Register Mentor Æ Mentor - Mentee Match Æ Mentor - Mentee
Activities Æ Match Closure. Complete the Register Mentor screen for each of your mentors.
7
MENTORING PROGRAM
Module:
Screen:
Mentoring
Mentor - Mentee Match
You can match a Mentor to more than one Mentee, but the matches must be created separately.
1. Click the gray “Add” button and enter the information for the first match, as illustrated in
the screen sample above.
2. Click “Save” when you have entered information for the first match.
3. Click “Add” again, and you can enter information for the second match. Use this
procedure each time you pair a new mentor and mentee.
8
MENTORING PROGRAM
Module:
Screen:
Mentoring
Mentor – Mentee Activities
You will recall that the “Activity Code” field only allows the code choice “One-to-One
Mentoring.” For further definition of fields on this screen, please refer to your CO KIT User
Manual.
Once you click “Save,” a summary of this match’s activities appears at the bottom of the screen
(see example on following page). Each organization may choose to enter activities as frequently
as needed. Some agencies choose to enter each meeting individually. Some agencies choose to
enter a monthly summary for each match in the program. How frequently this is done is up to
your organization and your funder’s requirements.
9
MENTORING PROGRAM
Module:
Screen:
Mentoring
Match Closure
When you get to the Match Closure screen and click “Add,” you will see a box containing a
message reminding you to administer a post-test to the Mentee prior to closing the match. Click
“OK” to proceed to the Match Closure screen.
10
MENTORING PROGRAM
Module:
Screen:
Mentoring
Match Closure
The three “Other” fields are for use by each individual agency. These questions cannot be hardcoded into CO KIT. However, if your organization chooses to make use of these fields, the
information needs to be typed in manually for every match closure entered into the system. If
you choose to use the “Other” fields, make sure all of your program staff are aware of how your
agency decided to define each field. You may also want to document this in your CO KIT User
Manual.
11
CURRICULUM-BASED RECURRING ACTIVITY
SCENARIO: Curriculum-Based Recurring Activity
This scenario is an example of entering a curriculum-based class into CO KIT. While the classes
in this example focus on parenting skills (specifically, the Nurturing Parenting Program), this
scenario can be used as a model for any program containing a series of classes that have set
beginning-ending dates and a fixed group of participants. To adapt this example, follow the
screens used here, but enter values appropriate for your agency and program.
Module:
Screen:
1.
2.
3.
4.
Planning
Funding Source
Click drop-down “Funder Name.” Select “CDPHE.”
Click drop-down “Funding Source.” Select “Colorado Children’s Trust Fund.”
Click “Add Funding Source.”
The funding source “CDPHE - Colorado Children’s Trust Fund” shifts to the box called
“Select Funding Sources.” This screen is now complete for CTF. If you are using CO
KIT for other programs, you will also need to add the appropriate funding sources for
those programs.
NOTE: This information is to be used only as a guideline for entering individual program
information. Descriptions for each program will differ so enter the exact descriptions
and counts for each individual program.
12
CURRICULUM-BASED RECURRING ACTIVITY
Module:
Screen:
1.
2.
3.
4.
Planning
Need Statement
Click “Add” to open the form for data entry. Type information into all yellow fields
(required).
The information to plug into this screen can be found in your grant proposal.
The following fields have character limits of 255: “Need/Issue,” “Contributing Factors,”
“Evidence,” and “Provider Goal.” Summarize or paraphrase the information in the grant
to accommodate these character limits.
Click “Save.”
13
CURRICULUM-BASED RECURRING ACTIVITY
Module:
Screen:
1.
2.
3.
4.
Planning
Program
Click “Add” to open the form for data entry. Type information into all yellow fields
(required).
The information to plug into this screen can be found in your grant proposal.
The following fields have character limits of 255: “Description” and “Rationale.”
Summarize or paraphrase the information in the grant to accommodate these character
limits.
Click “Save.”
14
CURRICULUM-BASED RECURRING ACTIVITY
Module:
Screen:
1.
2.
3.
4.
5.
6.
7.
8.
Planning
Outcome
Once the Outcome screen has been selected, click “Go To Population Outcomes.” Click
“Add.”
The “Funding Source” field is not yellow, but it is REQUIRED. Select “Colorado
Children’s Trust Fund” from the drop-down box.
Select the Program. In the “Intended Outcome” field, only one choice should appear.
Select “Parenting Skills – positive parenting.”
Enter the appropriate values for “Achieve Date,” “Target Population,” and “IOM
Classification.” Please refer to your CO KIT User Manual for Target Population
definitions and IOM Classification categories.
In the “Verb” field, select “Increase.” In the “Measured By” field, select “Mean.”
In the “Change From” field, enter the approximate score you think the parents of your
group will achieve on the pre-test. In the “Change To” field, enter the post-test score you
would like the parents to achieve after participating in your program.
In the field “Measure Tool 1,” select “AAPI-2 Parenting Profile.”
Click “Save.”
15
CURRICULUM-BASED RECURRING ACTIVITY
Module:
Screen:
1.
2.
3.
4.
5.
6.
7.
8.
9.
Planning
Activities
Click “Add.” Type in the name of the activity associated with the Nurturing Parenting
Program in the “Activity Name” field.
For “Activity Type,” select “Recurring.”
The “Outcomes” field is not yellow, but it is REQUIRED. Select the Outcome from the
drop-down box, and it shifts into the larger white box, indicating this activity is linked to
the selected outcome.
Type a general description of the 16-week parenting classes. More specific descriptions
of each session can be added later in the Implementation module.
For the “Activity Code,” select “Parenting/Family Management.”
For the “Service Population,” select “Parents/Families.”
The “Total Unduplicated Participants” should show how many people you think will
attend the program during the fiscal year.
“Activities per year” indicates how many times the entire 16-week program will be held.
“Frequency” indicates how many times individual sessions are held during one month. If
the classes are held weekly, for example, this value will be “4.”
16
CURRICULUM-BASED RECURRING ACTIVITY
Module:
Screen:
10.
11.
12.
13.
Planning
Activities (Continued)
“Number of sessions” should be 16. This reflects the total number of times that the group
will meet.
Enter the value for “Length of Sessions in hours,” which is the time for an individual
session, not all 16 sessions combined.
Choose “Colorado Children’s Trust Fund” from the “Assign Funding Source for funded
individuals” drop-down. Edit the number funded. If CTF pays for the entire Nurturing
Parenting Program, for example, this number will equal your “Total Unduplicated
Participants.” If CTF funds a portion of NPP, the number funded will be “Total
Unduplicated Participants” x “% of Funding” (30 x 1/2 = 15).
Click “Save.”
17
CURRICULUM-BASED RECURRING ACTIVITY
Module:
Screen:
1.
2.
3.
4.
5.
6.
7.
8.
Implementation
Individual Enrollment
Click “Add.”
Enter the “Intake Date” in field at the top right corner of the screen.
Enter the participant’s information in the yellow fields (required).
Choose EITHER to enter the “Birth Date” OR the “Age Range,” NOT both. If you
select an age range, the system assigns a random birth date falling within that range.
For Encryption, please refer to your CO KIT User Manual for definitions of “None,”
“Local ID,” and “Encrypted.”
If you are using a Local ID number, enter that number in the text box AND click the
circular button next to “Local ID.” NOTE: The Local ID will not be the displayed ID if
this button is not selected!
Add information to the white fields as necessary.
Click “Save.” REMEMBER: Once you save, the choice to display the Name, Local ID,
or Encrypted number cannot be edited.
18
CURRICULUM-BASED RECURRING ACTIVITY
Module:
Screen:
Implementation
Cohort
In order to track individual attendance in program activities, a cohort needs to be created and
linked to a particular activity.
1.
2.
3.
4.
5.
6.
Select the “Activity” to which you will link the individuals.
The “Description” and “Number Served” fields automatically populate from the
information entered in the Planning module, Activities screen.
“Group Type” should read “Individual.”
Name the Cohort using the “Group Name” field.
The “Participant List” box displays the individuals available to be added to the cohort.
Select an individual, and then click the center arrow button. This shifts the individual to
the “Client Name/Funder” box on the right side of the screen. TIP: You can select and
move multiple individuals at one time by holding down the “Ctrl” key while you select
the individuals.
If the person’s participation in the activity is funded by the Colorado Children’s Trust
Fund, select this from the drop-down box under “Funder.” If the person’s participation is
not funded by CTF, the “Funder” can remain as “none.”
19
CURRICULUM-BASED RECURRING ACTIVITY
Module:
Screen:
1.
2.
3.
4.
5.
6.
7.
8.
9.
10.
11.
Implementation
Recurring Activity
Click “Add.” Select the “Program,” and the “Program Description” automatically
populates.
Select the “Activity,” and the “Activity Description” automatically populates.
Click on the “Outcome,” and the “Outcome Statement” automatically populates.
Select the “Name of Cohort” for the group that participated in the session.
The “Session Number” automatically generates and cannot be selected on this screen.
Enter the “Service Date” and “Service Location.”
Select the “Activity Code” of “Parenting/Family Management.”
Select “Parents/Families” as the “Service Population.”
Enter the hours and minutes for the “Session Length.” If the session lasts exactly 3
hours, for example, “0” must still be selected in the “Min.” field.
Enter the “Service Description” for that individual session.
Click “Save.”
20
CURRICULUM-BASED RECURRING ACTIVITY
Module:
Screen:
1.
2.
3.
4.
5.
6.
7.
8.
Client Data
Outcomes – Individual
Select the “Activity.”
Select the “Survey Instrument.”
Select the “Cohort.”
Select the “Participant.”
Select the “Survey Type.” The Pre-Test data must be entered before the Post-Test data!
Enter the “Survey Date.”
Click “New.”
Questions regarding the AAPI-2 Parenting Profile Sten Scores will display. Select the
appropriate Sten Score for each question. Click “Done.”
21
TUTORING PROGRAM
SCENARIO: Tutoring Program
This scenario shows one way to conceptualize a tutoring program in CO KIT. However, it can
also be used for other school-based services where a service is provided to multiple groups of
students (e.g., several classrooms, several schools).
Module:
Screen:
Planning
Activities
Select “recurring” as the “Activity Type.” This allows participants to be linked to the activity,
which enables the following features:
•
•
•
Creating a Cohort, or a group of participants, who regularly participate in the activity
Tracking participant attendance at individual tutoring sessions
Entering pre-test and post-test data for participants receiving the service
22
TUTORING PROGRAM
1.
2.
3.
4.
5.
6.
7.
Click “Add.” Type in the name of the activity associated with the Tutoring Program in
the “Activity Name” field.
For “Activity Type,” select “Recurring.”
The “Outcomes” field is not yellow, but it is REQUIRED. Select the Outcome from the
drop-down box, and it shifts into the larger white box, indicating this activity is linked to
the selected outcome.
Type a general description of the tutoring program in the “Description” box. More
specific descriptions of each session can be added later in the Implementation module.
For the “Activity Code,” select “Education Services for Youth.”
For the “Service Population,” select “Elementary School Students.”
Click “Save.”
Module:
Screen:
Implementation
Individual Enrollment
As seen in the above screen sample, enter each child who receives a tutoring service.
23
TUTORING PROGRAM
Module:
Screen:
Implementation
Cohort
The “Participant Cohort” screen allows you to create groups of participants and link those
participants to a specific activity.
As such, in order to track individual attendance in program activities, a cohort needs to be
created and attached to a particular activity. To do this:
1.
2.
4.
5.
6.
7.
Select the “Activity” to which you will link the individuals.
The “Description” and “Number Served” fields automatically populate from the
information entered in the Planning module’s Activities screen. “Group Type” should
read “Individual.”
Type the name of the Cohort into the “Group Name” field.
The “Participant List” box displays the individuals available to be added to the cohort.
Select an individual, and then click the center arrow button. This shifts the individual to
the “Client Name/Funder” box on the right side of the screen. TIP: You can select and
move multiple individuals at one time by holding down the “Ctrl” key while you select
the individuals.
If the person’s participation in the activity is funded by the Colorado Children’s Trust
Fund, select this from the drop-down box under “Funder.” If the person’s participation is
not funded by CTF, the “Funder” can remain as “none.”
Click “Save.”
24
TUTORING PROGRAM
Module:
Screen:
Implementation
Cohort
Cohorts can be created for as many groups as an agency serves. Tutoring programs can serve
multiple grade levels or provide services based on subjects so you can create as many cohorts as
there are tutoring groups. You can even add a child to multiple Cohorts, if needed. To do this:
1.
2.
3.
4.
5.
6.
7.
Select the “Activity” to which you will link the individuals.
The “Description” and “Number Served” fields automatically populate from the
information entered in the Planning module’s Activities screen.
“Group Type” should read “Individual.”
Type the name of the Cohort in the “Group Name” field.
The “Participant List” box displays the individuals available to be added to the cohort.
Select an individual, and then click the center arrow button. This shifts the individual to
the “Client Name/Funder” box on the right side of the screen. TIP: You can select and
move multiple individuals at one time by holding down the “Ctrl” key while you select
the individuals.
If the person’s participation in the activity is funded by a funder participating in CO KIT,
select this from the drop-down box under “Funder.” If the person’s participation is not
funded by someone use CO KIT, the “Funder” can remain as “none.”
Click “Save.”
25
TUTORING PROGRAM
Module:
Screen:
Implementation
Recurring Activity
The Recurring Activity screen records activities that have been conducted. This is the screen
where a Cohort is linked to an implemented Activity, which allows the user to track individual
attendance (as seen on the following page).
1.
2.
3.
4.
5.
6.
7.
8.
9.
10.
11.
Click “Add.” Select the “Program,” and the “Program Description” automatically
populates.
Select the “Activity,” and the “Activity Description” automatically populates.
Click on the “Outcome,” and the “Outcome Statement” automatically populates.
Select the “Name of Cohort” for the group that participated in the session.
The “Session Number” automatically generates and cannot be selected on this screen.
Enter the “Service Date” and “Service Location.”
Select “Tutoring” as the “Activity Code.”
Select “Elementary School Students” as the “Service Population.”
Enter the hours and minutes for the “Session Length.” If the session lasted for 3 hours,
for example, “0” must still be selected in the “Min.” field.
Enter the description for that individual session in the “Service Description” field.
Click “Save.”
26
TUTORING PROGRAM
Module:
Screen:
Implementation
Recurring Activity - Attendance
The attendance feature (shown above) enables you to track, in detail, the attendance of
individuals rather than simply associating a service with a group of people.
27
HOME VISITATION
SCENARIO: Home Visitation
This scenario gives an example of recording home visitations in CO KIT. In this example, the
family members are individually enrolled first, and then grouped as a family.
Module:
Screen:
Planning
Activity
Below is a sample of what your screen may look like when planning a Home Visitation activity:
28
HOME VISITATION
In order to track a family and link members to an activity, the “Activity Type” must be
“Recurring.” Tracking a family may be desirable in a number of cases, for example:
1. Family attendance is expected at every session of the activity
2. You want to track the family unit, rather than tracking only parents or children (the
family members must all be participating in the same activity)
3. You will be collecting outcome data for the parents
The other way to track a family is through the assignment of family-related Local IDs. This
allows you to link each individual to a family without having to link the entire family to the same
activity, such as:
1. Bob Jones – Jones1-01
2. Jane Jones – Jones1-02
3. Jimmy Jones – Jones1-03
29
HOME VISITATION
Module:
Screen:
Implementation
Individual Enrollment
In the Implementation module’s Individual Enrollment screen, enroll every member of the
family who is expected to be present at all sessions:
1.
2.
3.
4.
5.
6.
7.
8.
Click “Add.”
Enter the “Intake Date” in the field at the top right corner of the screen.
Enter the participant’s information in the yellow fields (required).
Choose EITHER to enter the “Birth Date” OR the “Age Range,” NOT both. If you enter
an age range, the system assigns a random birth date that falls within that range.
For Encryption, please refer to your CO KIT User Manual for definitions of “None,”
“Local ID,” and “Encrypted.”
If you are using a Local ID number, enter that number in the text box AND click the
circular button next to “Local ID.” NOTE: The Local ID will not be the displayed ID if
this button is not selected!
Add information to the white fields as necessary.
Click “Save.” REMEMBER: Once you click Save, the choice to display the Name,
Local ID, or Encrypted number cannot be edited.
30
HOME VISITATION
Module:
Screen:
Implementation
Cohort
To create a Cohort containing the family members, make sure the Cohort is linked to the family
Recurring Activity. Because you can link multiple Cohorts to the activity, you can create as
many Cohorts as you have families.
The Cohort Name should be something that is easily linked to the participants. For example:
1. If you are viewing names in CO KIT, the Cohort Name can be the last name of the
family.
a. Family member names are Father Smith, Mother Smith, and Child Smith.
b. Cohort name is “Smith Family.”
2. If you are using Local ID numbers, the Cohort name can contain the numbers of the
family members.
c. Family Local ID numbers range from 101 – 105.
d. Cohort Name is “Family 101 – 105.”
31
HOME VISITATION
Module:
Screen:
Implementation
Recurring Activity
Below is a sample of a Home Visitation activity in the Implementation module:
32
HOME VISITATION
1.
2.
3.
4.
5.
6.
7.
8.
9.
10.
11.
Click “Add.” Select the “Program,” and the “Program Description” automatically
populates.
Select the “Activity,” and the “Activity Description” automatically populates.
Click on the “Outcome,” and the “Outcome Statement” automatically populates.
Select the “Name of Cohort” for the group that participated in the session.
The “Session Number” automatically generates and cannot be selected on this screen.
Enter the “Service Date” and “Service Location.”
For “Activity Code,” select “Home Visitation.”
For “Service Population,” select “Parents/Families.”
Enter the hours and minutes for the “Session Length.” If the session lasted for 3 hours,
for example, “0” must still be selected in the “Min.” field.
Enter the description for that individual session in the “Service Description” field.
Click “Save.”
33
HOME VISITATION
Module:
Screen:
Implementation
Recurring Activity → Attendance
The attendance feature (shown below) allows for detail regarding attendance of individuals
rather than simply associating a service with a group of people.
34
HOME VISITATION
Module:
Screen:
Client Data
Outcomes – Individual
This screen allows you to enter outcome data for each program participant.
1.
2.
3.
4.
5.
6.
7.
Select the “Activity.”
Select the “Survey Instrument.”
Select the “Cohort.”
Select the “Participant.”
Select the “Survey Type.” The Pre-Test data must be entered before the Post-Test data!
Enter the “Survey Date.”
Click “New.”
35
HOME VISITATION – TRACKING A FAMILY
SCENARIO: Home Visitation - Tracking a Family
This scenario gives an example of tracking families in CO KIT. In this example, the family
members are individually enrolled first, and then grouped as a family. This can be used any time
an agency is interested in monitoring the progress of a family through its program.
Module:
Screen:
Planning
Activity
Below is a sample of an activity one may establish for the purpose of tracking a family:
In order to track a family and link members to an activity, the “Activity Type” must be
“Recurring.” Tracking a family may be desirable in a number of cases, for example:
1. Family attendance is expected at every session of the activity
2. You want to track the family unit, rather than tracking only parents or children (the
family members must all be participating in the same activity)
3. You will be collecting outcome data for every member of the family
The other way to track a family is through the assignment of family-related Local IDs. This
allows you to link each individual to a family without having to link the entire family to the same
activity, such as:
1. Bob Jones – Jones1-01
2. Jane Jones – Jones1-02
3. Jimmy Jones – Jones1-03
36
HOME VISITATION – TRACKING A FAMILY
The numbers following the family name (in this case 01, 02 and 03 in the example on the
previous page) represent the individual family members. The “1” following the family name is
to avoid confusion with other families that may have that same last name.
Module:
Screen:
Implementation
Individual Enrollment
In the Implementation module’s Individual Enrollment screen, enroll every member of the
family who is expected to be present at all sessions:
1.
2.
3.
4.
5.
6.
7.
8.
Click “Add.”
Enter the “Intake Date” in the field at the top right corner of the screen.
Enter the participant’s information in the yellow fields (required).
Choose EITHER to enter the “Birth Date” OR the “Age Range,” NOT both. If you enter
an age range, the system assigns a random birth date that falls within that range.
For Encryption, please refer to your CO KIT User Manual for definitions of “None,”
“Local ID,” and “Encrypted.”
If you are using a Local ID number, enter that number in the text box AND click the
circular button next to “Local ID.” NOTE: The Local ID will not be the displayed ID if
this button is not selected!!
Add information to the white fields as necessary.
Click “Save.” REMEMBER: Once you click Save, the choice to display the Name,
Local ID, or Encrypted number cannot be edited.
37
HOME VISITATION – TRACKING A FAMILY
Module:
Screen:
Implementation
Cohort
To create a Cohort containing the family members, make sure the Cohort is linked to the family
Recurring Activity. Because you can link multiple Cohorts to the activity, you can create as
many Cohorts as you have families.
The Cohort Name should be something that is easily linked to the participants. For example:
1. If you are viewing names in CO KIT, the Cohort Name can be the last name of the
family.
a. Family member names are “Father Smith,” “Mother Smith,” and “Child Smith.”
b. The Cohort name is “Smith Family.”
2. If you are using Local ID numbers, the Cohort name can contain the numbers of the
family members.
a. Family Local ID numbers range from 101 – 105.
b. Cohort Name is “Family 101 – 105.”
38
HOME VISITATION – TRACKING A FAMILY
Module:
Screen:
1.
2.
3.
4.
5.
6.
7.
8.
9.
10.
11.
Implementation
Recurring Activity
Click “Add.” Select the “Program,” and the “Program Description” automatically
populates.
Select the “Activity,” and the “Activity Description” automatically populates.
Click on the “Outcome,” and the “Outcome Statement” automatically populates.
Select the “Name of Cohort” for the group that participated in the session.
The “Session Number” automatically generates and cannot be selected on this screen.
Enter the “Service Date” and “Service Location.”
For “Activity Code,” select “Home Visitation.”
For “Service Population,” select “Parents/Families.”
Enter the hours and minutes for the “Session Length.” If the session lasted for 3 hours,
for example, “0” must still be selected in the “Min.” field.
Enter the description for that individual session in the “Service Description” field.
Click “Save.”
39
HOME VISITATION – TRACKING A FAMILY
Module:
Screen:
Implementation
Recurring Activity → Attendance
The attendance feature (shown below) allows for detail regarding attendance of individuals
rather than simply associating a service with a group of people.
Module:
Screen:
Client Data
Outcomes – Individual
This screen allows you to enter outcome data for each program participant.
1.
Select the “Activity.”
2.
Select the “Survey Instrument.”
3.
Select the “Cohort.”
4.
Select the “Participant.”
5.
Select the “Survey Type.” The Pre-Test data must be entered before the Post-Test data!
6.
Enter the “Survey Date.”
7.
Click “New.”
40
MIXING INFRASTRUCTURE & POPULATION OUTCOMES
SCENARIO: Mixing Infrastructure and Population Outcomes
This scenario details the utilization of both the Infrastructure and Population portions of CO KIT.
In many cases, if you are implementing Environmentally-Based Prevention Strategies, you may
have a mix of population and infrastructure outcomes.
Part 1 is an example of a Social Norms Campaign and Part 2 is an example of a Resource Center.
These examples can also be adapted for other programs funded for the development and
dissemination of materials and services, or which are environmentally-based.
Part 1 – Social Norms Campaign
Module:
Screen:
Planning
Outcome – Go To Infrastructure Outcomes
The Milestones associated with the Intended Outcome above are listed on the following page.
41
MIXING INFRASTRUCTURE & POPULATION OUTCOMES
Module:
Screen:
Planning
Outcome – Go To Infrastructure Outcomes
Milestones Associated with the Intended Outcome
These Milestones are the steps needed to carry out one agency’s social norms campaign. Notice
that Step 6 includes a note to “record activities in population.” This means the agency must set
up a Population Outcome and an Activity, which are detailed in the next two pages.
42
MIXING INFRASTRUCTURE & POPULATION OUTCOMES
Module:
Screen:
Planning
Outcome – Go To Population Outcomes
Notice that this Population Outcome title is similar to the title of the Infrastructure Outcome. By
making the titles similar, an association between the two outcomes can be made, which can help
organize data entry.
The Population Outcome must be created in order to track the activity of implementing the social
norms campaign because Activities are only linked to Population Outcomes, not Infrastructure
Outcomes.
43
MIXING INFRASTRUCTURE & POPULATION OUTCOMES
Module:
Screen:
Planning
Activities
The Activity above represents a detailed description of Step 6 in the Milestones leading to the
Intended Outcome of “Reduce ATOD Use Among School-Aged Children” that was created in
the Infrastructure Outcomes section.
Creating this Activity allows us to track it in the Implementation module, and tracking Single
Activities lets us record the demographics of those we target with the Social Norms Campaign.
This information cannot be recorded by using only the Infrastructure Outcome portion in
the Planning Module.
44
MIXING INFRASTRUCTURE & POPULATION OUTCOMES
Module:
Screen:
Implementation
Single Activity
A suggested use for the “Service Date” is the day the posters were first placed in the school.
“Session Length” only allows for the selection of hours and minutes not longer periods of time,
such as days or months. “Session Length” can be used here to record the time needed to place
posters around the school, and the “Service Description” details how long the posters will remain
posted in the school.
The “Count” represents the number of people who will see the posters used for this campaign.
An exact number can be entered for a school, which has a known population. For other methods
of dissemination, such as radio ads, estimated counts are acceptable. Simply check the box next
to “Estimated Count” if the number is estimated.
This screen also allows for data input on the demographics of those individuals who will see the
posters. This portion of the screen is shown on the following page.
45
MIXING INFRASTRUCTURE & POPULATION OUTCOMES
Module:
Screen:
Implementation
Single Activity (Continued)
Demographic information can be exact if that information is available. In the case of estimated
counts, you can also enter estimated demographic information.
46
MIXING INFRASTRUCTURE & POPULATION OUTCOMES
Module:
Screen:
Implementation
Infrastructure Milestone
This screen is used to record milestones that have been completed. Once the activity has been
recorded in the Implementation module’s Single Activity screen, it can be checked as
“Completed” in the Implementation module’s Infrastructure Milestone screen.
Fill in the “Intermediate Completion Date” field only after all Milestones have been completed.
47
MIXING INFRASTRUCTURE & POPULATION OUTCOMES
Part 2 – Resource Center
Module:
Screen:
Planning
Outcome – Go To Infrastructure Outcomes
The Milestones associated with the outcome above are listed on the following page.
48
MIXING INFRASTRUCTURE & POPULATION OUTCOMES
Module:
Screen:
Planning
Outcome – Go To Infrastructure Outcomes
Milestones Associated with the Intended Outcome
The last Milestone on the screen sample above contains a note to remind the user to track the
newsletter dissemination, which will be done as a Single Activity. Therefore, this requires the
creation of a Population Outcome since Activities are linked only to Population Outcomes, not
Infrastructure Outcomes.
49
MIXING INFRASTRUCTURE & POPULATION OUTCOMES
Module:
Screen:
Planning
Outcome – Go To Population Outcomes
This Population Outcome must be created in order to track the activity of sending out the
newsletter because Activities must always be linked to a Population Outcome.
50
MIXING INFRASTRUCTURE & POPULATION OUTCOMES
Module:
Screen:
Planning
Activities
This Activity (above) represents a detailed description of the last Milestone leading to the
Intended Outcome of “Maintain Awareness of Parenting and Kid ATOD Use” created in the
Infrastructure Outcomes section.
Creating this Activity allows us to track it in the Implementation module, and tracking Single
Activities lets us record the demographics of those we target with the Parenting Newsletter
Dissemination. This information cannot be recorded by using only the Infrastructure
Outcome portion in the Planning Module.
51
MIXING INFRASTRUCTURE & POPULATION OUTCOMES
Module:
Screen:
Implementation
Single Activity
This screen also allows for data input on the demographics of those individuals who will receive
the newsletters. To view this portion of the screen, see the following page.
52
MIXING INFRASTRUCTURE & POPULATION OUTCOMES
Module:
Screen:
Implementation
Single Activity (Continued)
53
MIXING INFRASTRUCTURE & POPULATION OUTCOMES
Module:
Screen:
Implementation
Infrastructure Milestone
This screen is used to record milestones that have been completed. Once the activity has been
recorded in the Implementation module’s Single Activity screen, it can be checked as
“Completed” in the Implementation module’s Infrastructure Milestone screen.
Fill in the “Intermediate Completion Date” field only after all Milestones have been completed.
54
TRACKING DEMOGRAPHICS (LARGE GROUP COHORT)
SCENARIO: Tracking Demographics (Large Group Cohort)
The large group cohort was requested as a way to note the demographics of a group of people
receiving services without having to track individuals, particularly in the case of sampling (only
administering pre-post test data to a subset of participants). Remember, if you enroll individuals
in a recurring activity, demographic information is automatically recorded. Therefore, large
group cohorts are only used when tracking demographics on individuals NOT ENROLLED in
CO KIT.
To set up a large group cohort:
1)
2)
3)
4)
5)
6)
Go to the Implementation module’s Cohort screen.
Select the “Activity” for which you want to add a large group cohort.
Click “Add.”
Select “Large Group” in the “Group Type” drop-down.
Enter a name for the large group cohort in the “Cohort Name” field.
Enter the total number of participants receiving the recurring service and their
corresponding demographics.
NOTE: You can only enter the demographics for the “entire group,” not the demographics of
those who attended each individual session. If you are skipping entering implementation data altogether (that is, only entering pre-post data), enter large group cohort
information at the end of the year (when you enter post-test data).
55
DATA COLLECTED ON A SAMPLE OF PARTICIPANTS
SCENARIO: Data Collected on a Sample (subset) of Participants
This scenario details the steps taken when pre-test and post-test data is entered for only a portion
of those who receive services. This is sometimes done when programs serve large numbers of
participants. Permission for entering data on only a portion of participants must always be
obtained from your funder in advance.
In most cases, if you utilize a sampling plan, you will also want to track your overall participant
demographics.
Module:
Screen:
Planning
Activities
Set up an activity called “Evaluation” in order to create a group of kids for whom the
organization has complete pre- and post-tests.
56
DATA COLLECTED ON SAMPLE OF PARTICIPANTS
The “Activity Type” must be “Recurring” in order to link the activity with a Cohort and to have
the activity available in the Client Data module.
Module:
Screen:
Implementation
Individual Enrollment
Individual Enrollment for the participants being evaluated only needs to be completed if these
individuals have not been enrolled previously. If the participants were enrolled in order to
participate in another activity, their names do not need to be added a second time.
To see who has already been enrolled, click the “Search” button on the Individual Enrollment
screen. Selecting “Choose From All” displays all individuals enrolled. Filters can also be used
to search by more specific criteria.
57
DATA COLLECTED ON SAMPLE OF PARTICIPANTS
Module:
Screen:
Implementation
Cohort
Add to the Cohort only those participants for whom the agency has a completed pre-test
AND post-test. This means the Cohort is created after the organization has completed its data
collection process.
1. Select the names from the “Participant List” box.
2. Click the center arrow to shift the individuals from the available “Participant List” into
the Cohort. TIP: You can select multiple individuals by holding down the “Shift” key
and clicking on each name to be added to the Cohort. Click the center arrow to move
multiple people into the Cohort at the same time.
3. Click “Save” once you have added all the individuals to the Cohort.
58
DATA COLLECTED ON SAMPLE OF PARTICIPANTS
Module:
Screen:
Implementation
Recurring Activity
The Evaluation Activity will only be implemented twice: once for a time during pre-test
collection and once for a time during post-test collection. The date entered could represent the
beginning or the end of the collection period. This can be noted in the “Service Description.”
59
DATA COLLECTED ON SAMPLE OF PARTICIPANTS
Module:
Screen:
Client Data
Outcomes – Individual
The Individual Assessment information should be entered only after the participant has
completed the pre-test AND the post-test. By entering only those individuals with complete preand post-test data, the amount of outcome data entry will be reduced to only those used in
calculations.
NOTE: Please also refer to the “Tracking Demographics Only” Scenario, often used when
administering pre-post tests with a smaller sample of participants.
60
MULTIPLE FUNDERS
SCENARIO: Multiple Funders
Often agencies receive funding for services from multiple sources (e.g., ADAD, TGYS, private
foundations). This scenario highlights the areas of CO KIT that are important for such agencies
with blended funding. The example demonstrates how to link outcomes, activities, and
individuals to multiple funding sources.
On occasion, more than one of your funding sources requires the use of CO KIT. In this case,
you have two options for entering data:
1. Allocate participants within activities to various funders. This option works well if
multiple funders pay for the same activity, for example, your mentoring program is being
funded by both ADAD and TGYS.
2. Separate activities by funding source. For example, ADAD pays for mentoring while
TGYS pays for parenting classes.
In other cases, you may want to track all of your agency’s services in CO KIT even though some
of your funders don’t require the use of CO KIT (i.e., private foundation grants).
As you proceed through the following example, you will notice we are working in two modules:
Planning and Implementation. Remember that your evaluation plan must always be set up in the
Planning module before you can enter data. Also, it is important to remember that you must
enter Individual Enrollment data (Implementation module) before you can enter Cohort
information (Implementation module).
61
MULTIPLE FUNDERS
Module:
Screen:
Planning
Funding Source
When setting up your evaluation plan in the Planning module, be sure to select all funding
sources affiliated with your agency that require the use of CO KIT. Throughout the system, each
remaining funding source drop-down will contain all options -- and only those options -- selected
here.
NOTE: Only those funders who require the use of CO KIT will be pre-populated in the “Funder
Name” field.
NOTE: Also, you may return to the Planning Module at any time to add additional funders.
62
MULTIPLE FUNDERS
Module:
Screen:
Planning
Outcome, Go To Population Outcome
If an Outcome is being funded by multiple funding sources, you can select more than one source
from “Funding Source” field’s drop-down. Selecting more than one funding source has the
following implications:
1. The list of Intended Outcomes will only contain those common to the selected funding
sources. This list will usually be shorter than the list available for each funding source
chosen separately.
2. The list of Measure Tools will also only contain those that are common to the multiple
funding sources.
a. Important: If the program is required to use one measure tool for the first funding
source and a different measure tool for the second funding source, it may be
necessary to create two separate outcomes.
b. The same Intended Outcome can be chosen. However, the outcomes can be
distinguished by the Outcome Title.
c. Delinquency for the first funding source could be titled “Decrease Delinquency –
ADAD Program,” and the second delinquency outcome could be titled “Decrease
Delinquency – TGYS Program.”
In the above example, both funders have a common outcome -- “delinquency” -- and a common
measure -- “PMSEI v.3 – 12 & Older.”
63
MULTIPLE FUNDERS
Same Activity Funded by Multiple Funders
Module:
Screen:
Planning
Activities
For an activity funded by multiple funding sources, each funding source can be selected from the
field “Assign Funding Source for funded Individuals” (found at the bottom of this screen shot).
To designate the number of people funded, click the “Edit” button, enter the appropriate number,
and click “Update.”
Activities can also be linked to multiple Outcomes. If it was necessary to set up separate
outcomes for each funding source, simply select more than one outcome from the drop-down list.
This allows you to have an activity linked to more than one outcome, thus, linking the activity to
multiple funders!
64
MULTIPLE FUNDERS
In the example on the previous page, the total number of unduplicated youth receiving the
curriculum was 40. Approximately 60% of the funding for this activity came from ADAD (25
youth), while 40% of the funding for this activity came from TGYS (15 youth).
NOTE: Although “Assign Funding Source for funded Individuals” reads “Choose One,” it
means “Choose All Applicable.”
Module:
Screen:
Implementation
Cohort
The cohort function essentially creates a grouping of individuals from your longer listing of all
program participants (set up in the Individual Enrollment screen). For the system to group these
individuals, they must first be enrolled in order to be grouped into a Cohort. Again, this can be
done in the Implementation module’s Individual Enrollment screen.
NOTE: The Activity list will only show Recurring activities.
Funding can be assigned to each individual in the cohort. In this screen, the following linkages
are represented:
Cohort → Activity → Outcome → Funding Source
65
MULTIPLE FUNDERS
In the Planning module, the Recurring Activity was tied to an Intended Outcome. The Intended
Outcome was, in turn, tied to funding sources.
Thus, the funding sources available on the Cohort screen are the ones that were linked to the
Intended Outcome when it was set up in the Planning module.
If you want to track activities provided by your agency but not funded by sources requiring CO
KIT, leave the funder name as “none” when setting up the cohort.
Different Activities Funded by Different Funders
Module:
Screen:
Planning
Activities
Below is an example of different funders who fund entire activities. In the first example, the
entire recurring activity named “Weekly Meeting” is funded by the Block Grant: EvidencedBased Family-Focused Prevention Programs. Therefore, you can see that all 20 participants are
assigned to this funding source.
66
MULTIPLE FUNDERS
The second activity, in this case a monthly guest speaker, shows a different funding source. This
example uses Formula - Gender Specific Services. Again, all 240 participants are assigned to
this single funding source.
67
MULTIPLE FUNDERS
SCENARIO: Case Management
This scenario details how to set up a case management activity in CO KIT and can be used as a
model for any program containing case management services. To adapt this example, follow the
screens used here, but enter values appropriate for your agency and program.
This example includes the set up required to enter case management as a Recurring or Single
Activity. The Recurring Activity and necessary components are detailed first, followed by the
Single Activity.
Module:
Screen:
Planning
Activities > Recurring Activity Type
68
CASE MANAGEMENT
When entering a case management activity in the Planning module, you only need to enter one
generic activity that can capture all services that fall under case management. More specific
descriptions of each case management session can be entered in the Implementation module.
By setting up case management as a recurring activity, you can track attendance and enter preand post-test data for program participants. Therefore, be sure to set up each participant
receiving case management in Individual Enrollment first (example provided below).
Module:
Screen:
Implementation
Individual Enrollment
In our example, you see that demographic information is also recorded for each participant in
this screen.
69
CASE MANAGEMENT
Module:
Screen:
Implementation
Cohort
Once program participants are set up in Individual Enrollment, the next step is to create a cohort
that contains all enrolled individuals who receive Case Management services (in our example
above: “Service Group”).
70
CASE MANAGEMENT
Module:
Screen:
Implementation
Recurring Activity
How frequently the Case Management activity is tracked in CO KIT will depend on the case
management schedule for the agency. For example, if case management is done weekly, the
activity should be tracked weekly (shown above). If the case management is done monthly, it
should be tracked monthly.
71
CASE MANAGEMENT
Module:
Screen:
Implementation
Recurring Activity → Attendance
The Attendance function captures which clients were available for a case management service or
received that service during the agency’s designated frequency. In this example, case
management is tracked weekly, and we see that Persons One, Two, Three, and Five received a
case management service that week.
The “Completion” column remains “incomplete” until clients complete case management. For
those who discontinue services altogether, “Withdrew” is used (below).
72
CASE MANAGEMENT
Module:
Screen:
Implementation
Cohort
OPTIONAL COHORT SET UP: Agencies experiencing high attrition in their case
management program, and/or that may not track participant attendance, will not have post-tests
to enter into CO KIT for those who discontinue services.
A time-saving way to manage pre-post test data entry in these circumstances is to create a “PrePost Cohort” that includes only the clients who have completed pre- and post-tests (see example
above). Typically, the entry of these pre- and post-tests would be done at the end of the grant
year because that is when you would know who has both a pre- and post test.
This “Pre-Post Cohort” can also be used when case management services are set up as a Single
(see set up later in this scenario), rather than Recurring, activity type and pre-post tests were
administered.
73
CASE MANAGEMENT
Module:
Screen:
Client Data
Outcomes – Individual
By creating the Pre-Post Cohort in Implementation, the drop-down list of participants available
in Client Data > Outcomes-Individual contains only those for whom data entry is necessary.
This shorter list will save time during pre- and post-test data entry because you will not need to
go through files for people who left the program.
NOTE: Before making the decision to enter data only for individuals with a complete set of preand post-tests, check with your funder. The funder may want you to enter all pre-tests regardless
of the number of post-tests.
74
CASE MANAGEMENT
Module:
Screen:
Planning
Activities > Single Activity Type
Setting up case management in the Planning module as a single activity (shown above) only
allows you to capture the aggregate demographic information of those served. Recall that
individuals are not linked to single activities in the CO KIT system. Therefore, you will not be
able to track attendance or pre- and post-test data using a single activity of case management.
If you administer pre-post tests for a single activity of case management, you can enroll
participants in Implementation > Individual Enrollment, create a pre-post test cohort, and enter
the pre-post tests in Client Data.
However, the recommended case management set up is as a recurring activity because you will
enroll people in Individual Enrollment anyway, capturing demographics by individual, you can
track service dates and attendance, and enter the pre-post tests using the cohorts associated with
the recurring activity’s cohorts.
Nevertheless, the single activity set up remains an available option and is detailed on the
following pages.
75
CASE MANAGEMENT
Module:
Screen:
Implementation
Single Activity
As in the example above, a suggested use for the “Service Date” is the last day of each month.
This allows for the data entry to represent the group of participants receiving case management
rather than entering each phone call or contact individually.
The “Session Length” will only allow the selection of hours and minutes not longer periods of
time, such as days or months. This can be used to represent the average amount of time spent on
case management for each participant, however, and the “Service Description” can be used to
make this note.
The “Count” represents the total number of individuals who received case management during
the month.
The Single Activity screen also allows for data entry on the aggregate demographics of those
individuals who received the case management service. This portion of the screen is shown
below.
76
CASE MANAGEMENT
Module:
Screen:
Implementation
Single Activity → Demographics
77
DROP-IN CENTER
SCENARIO: Drop-In Center
This scenario explains how to set up and track on-going Drop-In Center services in CO KIT. To
adapt this example, follow the screens used here, but enter values appropriate for your agency
and program.
Module:
Screen:
Planning
Activity > Recurring Activity Type
1. Click “Add.” In the Activity Name field, type in “Drop-In Center.”
2. From the Activity Type field’s drop-down list, select “Recurring.”
3. Select the appropriate Outcome(s), Activity Code, and Service Population from the
drop-down lists for those fields.
4. Fill in the information for the Description, Total Unduplicated Participants,
Frequency, Number Sessions and Length of Session in hours fields.
78
DROP-IN CENTER
5. Choose the funding source, using the Assign Funding Source for funded individuals
drop-down list. Indicate the number funded and click “Update.”
6. Then, click “Save.”
Module:
Screen:
Implementation
Cohort
Drop-In Center services are set up in the Implementation module using a Large Group Cohort.
To set up a Large Group Cohort:
1. Select your “Drop-In Center” activity from the Activity field’s drop-down list. The
Description field automatically populates using the description entered in the Planning
module.
79
DROP-IN CENTER
2. Select “Large Group” from the Group Type field’s drop-down list.
3. Name the cohort (in this example, it is “January 2006”).
Instead of individuals, demographic information is entered for the large group cohort. The
demographic information for this Large Group Cohort is an aggregate of the participants who
attended during the month. Each participant’s information was counted for every day s/he
attended the drop-in center (see example on next page).
Module:
Screen:
Implementation
Cohort
However, before tracking attendance in this manner, check with your funding agency for the
policy/procedure for reporting services delivered. If attendance is tracked in this manner, you
will not be able to enter pre- or post-test information without completing additional steps because
individuals are not linked to a large group cohort.
Please refer to the Case Management scenario for examples showing how to create cohorts that
enable pre- and post-test data entry in the Client Data module.
80
DROP-IN CENTER
Module:
Screen:
Implementation
Recurring Activity
This recurring activity has been implemented with a Large Group cohort. As noted earlier, how
frequently the Drop-In Center activity is tracked in CO KIT will depend on your agency’s dropin center schedule. For example, if drop-in center services are offered daily, the activity should
be tracked daily. If they are offered weekly, the activity can be tracked weekly using the last
date of the week.
Monthly tracking (as seen in the example above) is also an option. A suggested use for the
“Service Date” is the last day of each month. This allows for the data entry to represent the
group of participants receiving drop-in center services rather than entering each participant
individually.
NOTE: If you decide to track your daily drop-in center services as a weekly or monthly
aggregate, always check with your funder to ensure that this is acceptable.
The “Session Length” will only allow the selection of hours and minutes not longer periods of
time, such as days or months. Therefore, this field can be used to represent the average amount
of time spent on drop-in center services for each participant, and the “Service Description” can
81
DROP-IN CENTER
be used to make this note (for example, include “Session length is average time spent with each
participant during the month” to the service description field above).
Again, this will not allow you to enter pre- or post-test data because individuals are not linked to
this cohort, but you can track the drop-in center service dates daily, weekly or monthly (as the
example illustrates).
In order to enter pre- and post-test data, you create an Individual cohort group type and link it to
this activity. For an example of an individual “Pre-Post” cohort with a recurring activity, please
see the Case Management scenario in this manual.
Module:
Screen:
Planning
Activity > Single Activity Type
Drop-In Center services can also be set up as a single activity in the Planning module. In the
example above, 160 youth use the drop-in center weekly during the school year.
A single activity format is useful when the agency providing drop-in services does not administer
pre- and post-tests, but wants to capture aggregate demographic information about its program
participants.
82
DROP-IN CENTER
Module:
Screen:
Implementation
Single Activity > January 2006
As with the recurring activity detailed earlier, how frequently the Drop-In Center single activity
is tracked in CO KIT will depend on your agency’s drop-in center schedule. For example, if
drop-in center services are offered once or multiple times in a week, the activity can be tracked
weekly using the last date of the week.
83
DROP-IN CENTER
Monthly tracking (as seen in the previous example) is also an option. A suggested use for the
“Service Date” is the last day of each month. This allows for the data entry to represent the
group of participants receiving drop-in center services throughout the month since the activity is
not tied to each participant individually.
NOTE: If you decide to track your daily drop-in center services as a weekly or monthly
aggregate, rather than by each service date, always check with your funder to ensure that this is
acceptable.
Use the “Session Length” field to represent the average amount of time spent on drop-in center
services for each participant, and the “Service Description” can be used to make this note (in our
example: “Session length is average of 4 drop-in sessions this month”).
The “Count” represents the total number of individuals who received drop-in center services
during the month.
The single activity screen also allows for data entry on the aggregate demographics of those
individuals who received the drop-in center service (see example on previous page).
84
DROP-IN CENTER
Module:
Screen:
Implementation
Single Activity > Copy Service > February 2006
Remember that the “Copy Service” button enables you to track the same single activity while
reducing data you would re-enter for new service dates:
1. On the Single Activity screen, click the gray Search button.
2. On the Search Single Activity page, select Search from All.
85
DROP-IN CENTER
3. From the list that displays, choose an existing service date for the drop-in center activity
and click the Select button.
4. When that service date displays, click the Copy Service button at the top of the screen.
5. Now enter the new service date, modify the service description, enter the demographic
information, and click Save.
86
CREATING IDENTIFIERS FOR AGENCIES WITH MULTIPLE COHORTS
SCENARIO: Creating Identifiers for Agencies with Multiple Cohorts
This scenario provides some helpful tips for organizations that are creating multiple cohorts for
the same activity. When a large number of individuals are participating in a program, it can be
challenging to scroll through long lists to find the right names or IDs to build your cohorts.
However, with a couple of extra steps in the Individual Enrollment screen, you can save
yourself these difficulties.
In the following example, the recurring activity Reconnecting Youth has been planned. This
activity will be implemented among three classrooms and each class will be its own cohort. The
cohort name will be the same as the name of the teacher (in our example: Drexler, Kersey,
Porter).
The most important part of simplifying the creation of cohorts comes in the Individual
Enrollment screen. By incorporating the name of the cohort (in this example, the teacher) with
the participant’s display ID, you can group individuals together on the participant list in the
Cohort screen.
There are three ways you can enter participants to accomplish this: 1) First, if you are not using
encryption or local ID and you want the individual’s name to appear, you enter it as you
normally would with one exception:
Module:
Screen:
Implementation
Individual Enrollment
1. Click “Add.”
2. Enter: Intake Date, First Name, Birth Date (or Age Range), Gender and
Race/Ethnicity.
3. In the Last Name field, enter the cohort name followed by a hyphen and the
participant’s last name. In the example shown above, the Cohort name is “Drexler” and
the participant’s last name is “Castillo.”
4. Click “Save.”
87
CREATING IDENTIFIERS FOR AGENCIES WITH MULTIPLE COHORTS
The next two options can be used by organizations that identify their participants in CO KIT by
ID number rather than by first name and last name.
2) In the example below, you create a Local ID. While this option does create some additional
data entry, it enables OMNI to track names with ID numbers on the back end of CO KIT should
you misplace your master list (NOTE: keep in mind it may take OMNI several days to get this
information so it is recommended that you keep your master list in a secure location).
1. Click “Add.”
2. Enter: First Name, Last Name, Race/Ethnicity, Gender, Birth Date (or Age Range).
3. In the Local ID box, type the Cohort name, followed by the identification number (in the
example below, we used the last 6 digits of the participant’s social security number).
4. In the Encryption section, select the circle marked Local ID.
5. Click “Save.”
3) The last option for creating identifiers when your organization uses multiple cohorts for the
same activity involves entering the Cohort name into the Last Name field and the identification
number in the First Name field (remember to leave the Local ID box blank and select “None”
for the Encryption section).
While this option saves time on data entry, make sure to keep a separate record of which ID
corresponds with each individual name! Once an individual is saved using this method, there
is no way to retrieve the name again.
88
CREATING IDENTIFIERS FOR AGENCIES WITH MULTIPLE COHORTS
1. Click “Add.”
2. Enter the Intake Date.
3. In the First Name field, enter the individual’s ID number (in the example above, we’ve
used the last 6 digits of the participant’s social security number).
4. In the Last Name field, enter the Cohort name (in our example: Porter).
5. Enter the Race/Ethnicity, Gender and Birth Date (or Age Range).
6. Click “Save.”
You can now view all of your participants, grouped by cohort:
1. Click “Search.”
2. Select “Choose from All.”
89
CREATING IDENTIFIERS FOR AGENCIES WITH MULTIPLE COHORTS
Now, when you are ready to create your cohorts, the Participant List will also be grouped by
cohort:
Module:
Screen:
Implementation
Cohort
1. Select the activity from the Activity drop-down field.
2. Click “Add.”
3. Enter the name of your cohort in the Cohort Name field.
90
CREATING IDENTIFIERS FOR AGENCIES WITH MULTIPLE COHORTS
Now you can create your cohort:
1. Enter the Cohort Name (the same one you selected earlier – our example above uses the
teacher’s name “Drexler”).
2. In the Participant List box, click the participant you want to add to the cohort (NOTE:
you may select more than one participant by holding down the “Ctrl” button and clicking
on other participants).
3. To move the highlighted participant(s) to the Client Name/Funder box on the right side
of the screen, click the center arrow “>” button.
4. Select the funder for that individual, if appropriate.
5. Click “Save.”
91