1
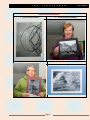
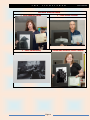
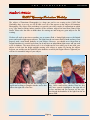
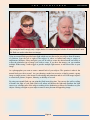
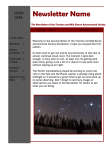
Figure 1 The newsletter of the Central Alberta Photographic Society Issue 3 2014 - 2015 Presidents Perspective Comments from Our President Member’s Article Upcoming Portraiture Workshop Monthly Assignment Silence; Bottles; Frozen; Panning Scotty Roxburgh Page 1 Club Meetings Internet Info When to meet for this season & more T H E V I E W F I N D E R Issue 3 2014-2015 Inside this edition of The View Finder 1. President’s Message Page 3 2. Club Meetings Page 4 3. Executive Meetings Page 4 4. Monthly Assignments Page 4 5. Winter Competition Winner Page 4 i. Novice Colour Page 5 ii. Novice Monochrome Page 6 iii. Intermediate Colour Page 7 iv. Intermediate Monochrome Page 8 v. Advanced Colour Page 9 vi. Advanced Monochrome Page 10 vii. Digital Manipulation Page 11 viii. President’s Choice, “Parallel Lines Never Meet” Page 12 ix. Doug Corrigan “Nature” Page 13 x. Best of Show Page 14 xi. Member’s Articles Upcoming CAPS Portraiture Workshop Page 15 a. Lighting Page 21 b. Camera Settings Page 22 c. Make a Studio Page 22 d. Flash Equipment Page 23 e. Posing Models Page 24 f. Page 24 General Portraiture Information 6. Internet Information Page 26 3 cool Ways to Make Your Photos More Fun 50 Stunning Places Around The World to See Fall Colours Page 26 Page 26 Why is it Okay to Hate Your Old Photographs $6.5 million Sale of “Phantom” Image Smoke Photography Tips Touchable memories; New technology Lets You Feel Your Images Interesting Photo of the Day: First Photo taken from a Comet Page 26 Page 27 Page 27 Page 29 Page 34 Page 2 2014 National Geographic Travel Photos Contest Part II The Motion of Canoes and Kayaks Revealed with LED Lights in Long Exposure Mike Kells: Where Art Meets Architecture How to Create a 2015 Calendar in Lightroom Stunning Time-lapse Want better Portraits? Become a Master of Photography Page 26 Page 26 Page 27 Page 27 Page 28 Page 32 T H E V I E W F I N D E R Issue 3 2014-2015 Message from the President City Photography Project As you will be aware, the City of Red Deer has offered us $2500 in return for them acquiring the rights to a number of photographs depicting activities in the City and its installations. I met with our contact at the City shortly before the December 31 deadline, and she was very pleased with many of the images we submitted. We presented our invoice by the deadline, and now await their final verdict on whether we have done enough to earn the funds offered. The project provided unique opportunities for participants. Under it we were able to photograph within several facilities in which photography is normally not permitted. The club was fortunate to have a number of club members who were willing to take up this challenge and to donate the images they took: Dave Kerby, Dennis Berg, Duane Boone, Jessie Lloyd, Jim McKinley, Leo de Groot, Rick Price, Sally Peddle, and Scotty Roxburgh. We thank you all! Send in Your Winning Competition Photos for the Web Site If one or more of your photos was a winner at the Winter Competition then please submit a digital version of it so that we can put it on the web site for the club world to see. Our web master has created a special button under the heading “Competitions” to facilitate this. Just click on this and the process for the rest is identical to how you normally send in your Monthly Challenge entries. Enjoy Winter Photography! Winter is more than upon us. Some may be inclined to put their cameras away until warmer weather approaches again, but there is much of interest that you can now turn your lens upon. You may find some photo opportunities to your liking which are listed in the web site of the club under the heading “Club Calendar”. For example, there will be an ice sculpture competition at Lake Louise between January 16 and 25, and another in Edmonton from January 23 to February 1. There will be sled dog races on Pigeon Lake on February 15 and 16, and marathon speed skating races at the Red Deer oval on February 28 and March 1l. And winter presents its own beauty for those who stay to enjoy it, such as the spectacular hoar frost that at times adorns our trees and buildings, or our Rocky Mountains bedecked in snow. Then there is the opportunity to shoot wildlife which you will not see at any other time, such as the large number of snowy owls which a number of club members have been photographing productively in a broad area centered on Three Hills east of Highway 2. Even wildlife that is with us year round may be easier to shoot during the winter as they often graze closer to the highways at this time, with Bighorn Sheep and Moose being examples. Modern digital cameras function fine in temperatures well below those quoted in the user manual. Although batteries will not last as long in the cold, and you may thus need a spare, many cameras will shoot below -30 even, although you may find that your LCD screen darkens or ceases at those temperatures until it warms up again. So keep that camera ready to go and get out there! (Just remember to keep your camera in a bag when you bring it in from the cold, so that it does not fog up.) Leo de Groot President Page 3 T H E V I E W F I N D E R Issue 3 2014-2015 Club Meetings Club Meetings will be held on the second Wednesday and the fourth Wednesday of each month as follows: January 14-2015 January 28-2015 February 11-2015 February 25-2015 March 11-2015 March 25-2015 April 8-2015 April 22-2015 May 13-2015 Visiting Photographer Randy Fiedler- retrospective of his work at the Advocate, freelance clients- editorial, commercial, fashion and agriculture. Visiting Photographer Robert Berdan- 1) Aurora photography techniques; 2)Photographing Landscapes and wildlife on the Tundra; 3) 360 vr spherical photography Visiting Photographer Dwight Arthur- Advantages and disadvantages of shooting with a digital SLR compared to a mirrorless system camera Judging of Monthly Assignment for January (Silence) and February (Bottles) Presentation, Time Lapse Photography by Jim McKinley Visiting Photographer Adrian Thyse-Macro Nature Photography- The Joy of Bugs and other small pleasures. Meeting presentation TBA Meeting presentation TBA Annual General Meeting presentation TBA Spring BBQ and Spring Competition Awards Executive Meetings will be held on the first Wednesday of each Month as follows: January 7-2015 March 4-2015 May 4-2015 February 4-2015 April 1-2015 June 3-2015 Monthly Assignments Subject Silence Bottles Frozen Panning Submission Dates on Sundays January 25/15 February 22/15 March 22/15 April 19/14 The Winter Competition The Winter competition and Banquet was held at Davenport Place community Association Hall. 64 individuals showed up for the Pot Luck Dinner and Awards night. 142 images were submitted for the variety of competitions, Colour, Monochrome, Digital Manipulation, Doug Corrigan and President’s Choice. The president’s Choice category was “Parallel Lines Never Meet”. The Honourable Mention through to First place winners are presented below. Page 4 T H E V I E W F I N D E R Issue 3 2014-2015 Novice Colour st 1 Place Duane Boone 2nd Place Duane Boone 3rd Place Doug Swanson Honourable Mention Peter Jenkin Page 5 T H E V I E W F I N D E R Issue 3 2014-2015 Novice Monochrome st 1 Place Duane Boone 2nd Place Kathy Roxburgh 3rd Place Peter Jenkin Honourable Mention Amanda Hilla Page 6 T H E V I E W F I N D E R Issue 3 2014-2015 Intermediate Colour st 1 Place Dave Kerby 2nd Place Dave Kerby 3rd Place Judy Jackson Honourable Mention Judy Jackson Page 7 T H E V I E W F I N D E R Issue 3 2014-2015 Intermediate Monochrome st 1 Place Dave Kerby 2nd Place Judy Jackson 3rd Place Dave Kerby Honourable Mention Rhonda Pigott Page 8 T H E V I E W F I N D E R Issue 3 2014-2015 Advance Colour st 1 Place Scotty Roxburgh 2nd Place Jake Zondag 3rd Place Hank Broomfield Honourable Mention Daniel Pelissier Page 9 T H E V I E W F I N D E R Issue 3 2014-2015 Advance Monochrome st 2nd Place Daniel Pelissier 1 Place Shannon Cason 3rd Place Jim Mckinley Honourable Mention Dawn Traverse Page 10 T H E V I E W F I N D E R Honorable Mention Harvey Brink Digital Manipulation st 2nd Place 1 Place Scotty Roxburgh Image Unavailable Page 11 Issue 3 2014-2015 T H E V I E W F I N D E R 3rd Place Dave Kerby Issue 3 2014-2015 Honourable Mention Linda Ursuliak President’s Choice Monochrome st 2nd Place Dave Kerby 1 Place Jake Zondag Page 12 T H E V I E W F I N D E R 3rd Place Curtis Lund Issue 3 2014-2015 Honourable Mention Linda Ursuliak Doug Corrigan Monochrome st 2nd Place Hank Broomfield 1 Place Shannon Carson Page 13 T H E V I E W F I N D E R 3rd Place Daniel Pelissier Issue 3 2014-2015 Honourable Mention Leo de Groot Best of Show Duane Boone Page 14 T H E V I E W F I N D E R Issue 3 2014-2015 Member’s Articles CAPS Upcoming Portraiture Workshop The subject of Portraiture Photography is a huge one and in our evening at the CAPS Club Workshop, there is no way we will be able cover all of the aspects on the subject of Portraiture Photography. The object of the workshop is to provide you with a couple of workstations at which to try your hand at taking indoor portraits of the volunteer subjects on hand from Dance Edge Studio. Please take the time to thank them for coming out and being our great subjects for the evening. We have all used at one time or another, our on camera flash, a limited light source with limited power and reach to light up our subjects. The light from the on camera flash is harsh and may if not properly used; create harsh shadows on your subject. However, you should never forget that in certain situations it is a useful tool when you do not have an independent light source and you need to fill in shadows. The most effective use is in a bright sun lite area when you do not wish your subject to look into the bright sunlight causing your subject to squint. By having the subject between you and the sun, the flash fills in the shadows created by the bright reflective light and you will have a reasonable image of your subject. Image of Kathy looking into the sun causing her to By turning Kathy 180⁰ and using the camera squint and creating a triangular shadow and a dark flash, I have removed the shadow from her face side to the right side of her face. and I have created a highlight to the right side of her face and hair and you can now see her eyes. Note though the harshness of the light from the on camera flash. Page 15 T H E V I E W F I N D E R Issue 3 2014-2015 The two above images were taken when the sun was low in the sky with a thin layer of clouds as a filter. By turning the heads enough, only a slight shadow is created along the left side of each individual’s nose. No flash was used to take these two images. Using an external flash provides better light which may me directed at your subject from all manner of positions, from the left or right of the subject, to above or behind and using a variety of attachments (diffusers, filters and gels) you will be able to create the desired mood and effect to reflect the particular type of image you wish to create. If you have the money, you can combine multiple flashes using a radio trigger to provide multiple light sources to add extra effect to your image. As a photographer you want to create a natural look of your subject. The question is what is the natural look you wish to create? Are you shooting a model, an executive, a family portrait, a group image or single person, is the image for advertising and promotion and so on? Each image requires a certain look, posture, elegance, maturity, on holiday or at work. By using an external flash you can point the flash in any direction. You can use the wall or ceiling to bounce the light of your flash which will soften and diffuse the light and distribute the light source over a broader area of the subject resulting in less shadowing or removal of shadows on your subject. Having soft light on your subject creates a more pleasant and appealing image. Page 16 T H E V I E W F I N D E R Issue 3 2014-2015 This self-portrait which I admit is no Marilyn Monroe and me messing around with my new gear, was taken using a flash on the camera and a flash with umbrella to the right. The combination has removed shadows on my face. However the camera flash can be seen reflected in the pupil. The use of diffuser materials in a variety of mediums will also assist in distributing the light while removing shadows, resulting in a more professional looking image. The following are things that you should consider when taking portraiture images and are provided as guidelines when considering how you want to create your image. They are not limited to indoor photography but also include situations when working outdoors. Perspective Where to take the image from, above, below or to the side or straight on. Climb up a ladder, look down from a balcony. Shooting down on large individuals gives them a slandering look. Have them climb a ladder or sit on the edge of balcony with you looking up. Use the sky or a clean building as the background to your subject. Don’t have distracting objects popping out of the side of your subject. Consider where the leading lines are in relation to your subject. Do they distract or enhance your subject. Use leading lines to bring your focus into the subject, whether placed in a door frame or back from a door, siting in branches in a tree which draw you into the subject. Consider depth of field; do you want the back ground blurred or do you want the background to form part of the image. Come down to the same level as your subject, such as children, don’t look down on them. Travelling, have the subject in their natural surroundings. Capture the mood and environment that they are working in or playing in. Page 17 T H E V I E W F I N D E R Issue 3 2014-2015 Posture/Posing Look at different ways to have your subject pose. Turn the body sideways, have the eyes look just beside or above the camera lens, never into the lens itself. Have the chin pushed forward to remove the wrinkles in the neck line. Have the subject place their hands on an object in front of them to make them lean forward, or place an elbow on a shelf. Have them sit, stand, lie down on their backs or stomachs. Prop their chin on an open hand or clenched fist; open hand is a more relaxed posture where a clenched fist indicates control. Have them lean against an object, bring a knee up and place a foot against a wall, or place the foot on an object such as a chair or stair and have the subject lean forward resting their chin on their hand and the elbow on their knee. Where to have your subject look Have them look away from the camera to create an air of what is holding the subject’s attention. Have them look inside the frame at an object, another person, giving the feeling of inclusion within the image. Place your subject in other areas within the frame rather than in the centre. Try using the available light. Move the subject around to maximize natural light and create different effects from shadowing using beams of light, window light. Use light to frame your subject. Action Mystery Rather than posing your subject, have them move around, jump in the air, stand or sit on different objects that includes them in the theme. You can have your subject sit on, lie on, stand on a stool and then Photoshop the stool out of the image giving the appearance your subject is suspended in mid-air. Capture them in activities such as sports, interacting with others even shopping. Provide them with something that creates action. Take a series of shots in succession and capture a particular facial expression or body movement. Multiple action shots will lead you through the facial and or body movement allowing you to capture one particular instance which single shot may miss. Slow your shutter speed down to create movement of your subject or objects or people behind them. Consider if a landscape image is better for an action shots allowing for more area to show movement rather than the portrait image which restricts movement. Have them hide part of their body, look from behind trees or from doorways, use clothing, take only part of the body. Place your subject in dark locations and make their image pop out with selective light. Page 18 T H E V I E W F I N D E R Issue 3 2014-2015 Relaxed shots Always try to have your subject look natural, no forced smiles. Always be ready to capture natural looks. Take shots after a posed shot, you will be surprised how relaxed an individual is if they do not realise a shot is going to be taken. Have individuals take deep breathes and slowly let their breath out. The face becomes relaxed as they let a breath out. Tell jokes. Make them feel included. Have them tell you a story and take images as they do this. Play music in the background. Permission to Take Images Always be sensitive to an individual; where practical ask their permission. Be culturally aware of who and where you are. A photo of a group of individuals is normally impractical to obtain permission from every one especially at a public venue. Taking images of children; ask the parent or guardian. (Remember that some people are trying to hide from abusive situations and for their image to go public can be dangerous for them). In poor cultural environments tipping may be acceptable or take small gifts of ball point pens, toys, crayons, badges. The following are a couple of basic simple examples of how to set up lighting for portraiture images indoors. There are more examples below in the videos obtained from the internet. Page 19 T H E V I E W F I N D E R Issue 3 2014-2015 Back Drop Kicker or Hair Light Fill Source, Reflector Board Main Light Source Camera Back Drop Back Drop Light Provides Hallowing effect of subject Main Light Camera Fill Light or Secondary Light Page 20 T H E V I E W F I N D E R Issue 3 2014-2015 Camera Setting In outdoor photography, using a zoom lens, preferably a 50 – 100/135 mm; set your camera to Aperture Priority. Using a wide Aperture of f-4.5 to f-9 allows you to blur the background of the image, removing any distracting material and focusing the observer of the image on the subject. Blurring the background will also help to make your subject pop out in the image. By using Aperture Priority your camera selects the appropriate shutter speed. To ensure that your subject is sharp, ensure that the shutter speed is fast enough to avoid distortion caused by camera shake if you are not using a tripod or distortion if your subject is moving while you are taking images. To increase your shutter speed, raise your ISO up from 200 to 400 or 800 ISO. For indoor photography, use a prime 50 mm lens with an f-stop of f-1.8. Use a wide aperture in Aperture Priority and an ISO of 400 or higher. Remember, to ensure you are not subject to camera shake in your image by ensuring that your shutter speed is as fast as or greater than the focal length of your lens. I.e. for a 50 mm lens the shutter speed should be at least 1/50 sec or faster or 135mm focal length your shutter speed is 1/160 sec. Web Page Information: Rather than me trying to recreate a new manual and you having to read a lot, I have conducted research on the internet and have chosen some appropriate articles and videos that you can chose to look at. Hopefully they will be of assistance and will elaborate further what Rick Price, Jim McKinley, Harvey Brink and I will be demonstrating at our Club Workshop. Lighting and Set Ups Examples of different kinds of lighting set ups This web site provides pictorial images of how to set up different lights to create different lighting on your subjects. There are many different sections within this web link that will provide you with ideas and show you the results of using the lighting used in taking the portrait. https://www.google.ca/search?q=portrait+setups&espv=2&biw=1366&bih=667&tbm=isch&imgil= wXFmpXNI_QUomM%253A%253BMlOV8dpoTA8wxM%253Bhttps%25253A%25252F%25252 Fwww.flickr.com%25252Fphotos%25252Fstefantell%25252F3201199858%25252F&source=iu&p f=m&fir=wXFmpXNI_QUomM%253A%252CMlOV8dpoTA8wxM%252C_&usg=__cpAPjWshe F6px1Re3AUQJFsk9jM%3D&ved=0CDAQyjc&ei=n2qQVKzzHIr1oASAmIL4Ag#facrc=_&imgd ii=_&imgrc=uKqRDSyp9jfyOM%253A%3Beejehdva5oWCM%3Bhttp%253A%252F%252Ftiffinbox.org%252Fwpcontent%252Fuploads%252F2010%252F04%252FOneLight.png%3Bhttp%253A%252F%252Ftiffinbox.org%252Fdramatic-portrait-lighting-forphotographers%252F%3B320%3B416 Master Lighting Guide Master photographer Christopher Grey teaches portrait lighting from start to finish, showing you how to control light effectively for unmatched results. 82 minutes. Amherst Media. https://www.youtube.com/watch?v=K1GHuruKrOA Page 21 T H E V I E W F I N D E R Issue 3 2014-2015 Tony Northrup Setting up different lights and the effect they have on your portrait subject https://www.youtube.com/watch?v=rDIsdTxNKJ4 Butterfly lighting - loop lighting - Rembrandt lighting - split lighting - Broad Lighting - Short Lighting Good descriptions with images and diagrams to show you how to take images with these kinds of lighting http://digital-photography-school.com/6-portrait-lighting-patterns-every-photographer-shouldknow/ Camera Settings How to photograph anything: Best camera settings for outdoor portrait photography Best camera settings for indoor portrait photography Best camera settings for portraits of moving subjects http://www.digitalcameraworld.com/2013/06/03/how-to-photograph-anything-best-camera-settingsfor-perfect-portrait-photography/ 5 Camera Setting Tips for Shooting Great Portraits Filed in Tips by David Peterson These are very basic fundamentals of taking portraiture images. Read this and you’re well on the way to taking portraiture images. http://www.digital-photo-secrets.com/tip/3314/5-camera-setting-tips-for-shooting-great-portraits/ Making a Studio. J. P Morgan How to make a studio out of your bedroom, hang a back drop and make inexpensive soft box lighting. https://www.youtube.com/watch?feature=player_detailpage&v=zHfBd_Y_Vmg Tony Northrup White Background Photography Tutorial: How to Take High-Key Pictures https://www.youtube.com/watch?v=-li99i9d4w8 Cheap Do It Yourself Lighting Set up Video https://www.youtube.com/watch?v=FMtnWs3-KEo Page 22 T H E V I E W F I N D E R Issue 3 2014-2015 Flash Equipment and Lighting Improve Outdoor Portrait Photography with a Diffuser Bryan Peterson A short description of how to use a Diffuser along with video with images to show you the difference between an image taken in the bright midday sunlight and an image with the introduction of a Diffuser http://www.adorama.com/alc/0013910/article/Improve-Outdoor-Portrait-Photography-with-aDiffuser Using a Reflector for Portraits—Adorama TV Bryan Peterson This is a video presentation of the benefits of using a gold reflector on a cloudy day. Comparative images are used to show the difference. http://www.adorama.com/alc/0013323/article/Using-a-Reflector-for-Portraits-Adorama-TV Using Flash Diffusers and Reflectors Short description of a diffuser http://digital-photography-school.com/using-flash-diffusers-and-reflectors/ Photography lights made simple: classic one light portrait setups to try right now This article provides a series of images along with flash and soft box positions to help you understand how light affects the shadows on the subject. http://www.digitalcameraworld.com/2013/10/29/photography-lights-made-simple-classic-one-lightportrait-setups-to-try-right-now/ Easy Two Light Setup: Portrait Photography This is a detailed U-tube video of what they call clam shell lighting, a light above the head and a light below, using a softer light below than above. https://www.youtube.com/watch?v=xcOkzF9igo0 The Basics of a One Light Setup: A Lighting Tutorial https://www.youtube.com/watch?v=lAbSn7VkhmY Three-Point Lighting for Portrait Photography A simple vide demonstrating where to place three lights in relation to your subject https://www.youtube.com/watch?v=YzvHEBm6VZs Tony Northrup Flash Trigger Review: PocketWizard vs. Phottix Odin vs. YongNuo YN-622 vs. Cyber Commander https://www.youtube.com/watch?v=ajwPYxZE8Bs Tony Northrup Off-Camera Flash Tutorial (Wireless Flash/Remote Flash/PocketWizard) https://www.youtube.com/watch?v=SA47SsBqNzA Page 23 T H E V I E W F I N D E R Issue 3 2014-2015 Joe Brady Become the Master of Off-Camera Flash https://www.youtube.com/watch?v=qQhH2GC4DTM Simple Corporate Portraits: A Lighting Tutorial https://www.youtube.com/watch?v=JrHvCH8imQY Make a PVC Light Stand for Under $5 https://www.youtube.com/watch?v=IxN8_0kNJPc How to Make a Cheap Lightbox https://www.youtube.com/watch?v=OCRzCrsnLnw Using two soft boxes Lighting by Karl Taylor https://www.youtube.com/watch?v=B2Mb6poDLvY Posing a Model Chelsea Northrop How to Pose a Model for Headshots: A Five-Minute Portrait Tutorial https://www.youtube.com/watch?v=uf71jvosUrY Tony Northrup How to Photograph Kids, Babies, Children: A Portrait Tutorial https://www.youtube.com/watch?v=xRx5nX6sXqo A series of Portrait Images to Give You Ideas of How to Pose Your Subject https://www.google.ca/search?q=portrait+photography+tips&tbm=isch&tbo=u&source=univ&sa= X&ei=F0SPVOrxIobcoATWvYGACw&ved=0CEMQsAQ&biw=1366&bih=667 General Portrait Photography Information Mike Crave Creative Photography - portrait tutorial https://www.youtube.com/watch?v=NVCglwSB-rQ 10 Ways to Take Stunning Portraits A quick and useful intro to how to take variety of different portrait images http://digital-photography-school.com/10-ways-to-take-stunning-portraits/ Portrait Photography Tips This site provides 22 tips on how to take portrait photos http://digital-photography-school.com/portrait-photography-tips/ Page 24 T H E V I E W F I N D E R Issue 3 2014-2015 10 More Tips for Stunning Portrait Photography Some great and simple tips to follow and use http://digital-photography-school.com/tips-portrait-photography/ 7 Tips Your Camera Manual Never Told You about Portrait Photography by Dani Diamond What to do with Expression, Composition, Light, Settings and Lenses https://fstoppers.com/education/7-tips-your-camera-manual-never-told-you-about-portraitphotography-45422 Howey Mansion Photo Wedding Workshop with Off Camera Flash by Jason Lanier Photography A 25 minute video showing basic trigger lighting in an old home of a girl in a wedding dress. https://www.youtube.com/watch?v=anraXsw6JWc Our thanks have to go out to McBain Camera for their contribution to assisting CAPS in promoting our eight guest speakers, George Webber: Sean Caffrey: Royce Howland and Peter Carroll: Randy Fiedler: Robert Berdan: Dwight Arthur and Adrian Thyse: Also thanks for the generous 15% discount which is being offered to club members on Pro Master supplies and photo development. Be sure to check out McBain Camera for all of your photographic needs. CAPS wishes to thank the City of Red Deer for making Fee for Service Funding available to our club to support the eight guest speakers George Webber: Sean Caffrey: Royce Howland and Peter Carroll: Randy Fiedler: Robert Berdan: Dwight Arthur and Adrian Thyse: making their presentations through the club year. Page 25 T H E V I E W F I N D E R Issue 3 2014-2015 Internet Information This section is a compilation of information that I have found on the internet since the last newsletter. I received several favorable comments from members on this section and so will continue to add the information into the newsletter. Again, the topic heading is provided with a couple of paragraphs of what the web page is about. After the introduction, the web page link is provided to allow you, if the subject is of interest to you, to locate and read the full article on the internet. The articles are in no way a reflection of the opinions of the club and or the executive and are purely added as a means of passing on items that may prove to be of interest to CAPS members. Description of Internet articles by subject matter 3 cool ways to make your photos more fun Abhimanyu Ghoshal, TNN | Nov 2, 2014, Photo Sphere, Hyperlapse, Light field Photography. Provides a short description of these techniques http://timesofindia.indiatimes.com/tech/computing/3-cool-ways-to-make-your-photos-morefun/articleshow/45012177.cms 2014 National Geographic Traveler Photo Contest, Part II A wonderful array of images that we would all love to aspire to. Due to the size of the link itwill take a while to download so be patient it is worth the wait to see the images. http://www.theatlantic.com/infocus/2014/06/2014-national-geographic-traveler-photo-contest-partii/100764/ 50 Stunning Places Around the World to See Fall Color (PHOTOS) By Stephanie Valera Some very inspirational shots of autumnal colours http://www.weather.com/holiday/thanksgiving/news/places-see-fall-color-photos-20140922 The Motions Of Canoers And Kayakers Revealed With LEDs In Long Exposure Photography Great images to look at http://www.boredpanda.com/kayaking-long-exposure-light-painting-photography-stephen-orlando/ Why It Is OK To Hate Your Old Photographs - Refining Your Visual Taste Jason Lau's picture by Jason Lau An explanation as why your old images may not look as good as you thought they did and there is nothing wrong with going back to your original Raw image and making changes. https://fstoppers.com/editorial/why-it-ok-hate-your-old-photographs-refining-your-visual-taste48046 Page 26 T H E V I E W F I N D E R Issue 3 2014-2015 Mike Kelley: Where Art Meets Architecture How to Photograph Real Estate, Architecture and Interiors Tutorial with Mike Kelley If you are looking to get into Architecture Photography and have a few bucks to spare to buy the video and learn about HDR and how to use layers in Photoshop then this article and his video are for you. https://fstoppers.com/product/mike-kelley-where-art-meets-architecture Peter Lik Shatters World Record With $6.5 Million Sale Of “Phantom” See the image that went for $6.5 million. http://pixelpluck.com/peter-lik-shatters-world-record-with-6-5-million-sale-of-phantom/# How to Create a 2015 Calendar in the Lightroom Print Module A step by step explanation of how to create a Calendar using your images. http://digital-photography-school.com/create-2015-calendar-lightroom-print-module/ Smoke Photography Tips Smoke Photography Tips Stunning Timelapse Showcases the Ethereal Beauty of Norway Touchable Memories: New Technology Lets You Feel a Photograph (Video) Want Better Portraits? Become a Master of “Psyphotology” Interesting Photo of the Day: First Ever Photo Taken From a Comet Smoke Photography Tips Posted: 13 Nov 2014 06:00 PM PST When you look at smoke photos, you might think that it is impossible to take such shots yourself, but it’s actually not that hard. You just need to be patient since the ratio of good images to bad ones is pretty low. “Incense Art” captured by Sherry Slabik (Click Image to See More From Sherry Slabik) You will need a proper setup to photograph smoke. This form of photography is done indoors, so it is a good way to kill time when you’re stuck inside. It doesn’t only kill time, it can be pretty fulfilling. Don’t let the setup scare you away because you will only need cheap household products. The only expensive equipment is your camera and flash. In this tutorial we will try to make smoke photography simple for you. There is no correct or incorrect way of photographing smoke. In other words, there is no right or wrong way to photograph a smoke trail. I, myself, try to experiment with my smoke. As I say in most of my articles, the best thing is to grab your camera and experiment. Experimenting will give you that perfect picture, that perfect angle and that perfect lighting. Let’s try with some simple steps. Equipment Camera – You need a camera that allows you to take control of the shooting modes. You want to have control over the shutter speed, aperture, and zoom. Most DSLR cameras allow the user to control these parameters. Flash – You need an off-camera flash. You can either use a wireless flash trigger or a flash cable. Page 27 T H E V I E W F I N D E R Issue 3 2014-2015 Incense Stick – You need a source of smoke. The most commonly used item is an incense stick. Background – You need a dark color background. I personally use and recommend black. Reflector – I recommend using a reflector so that the smoke trail has equal light hitting from every side. Lighter – For lighting the incense stick. Tripod – I use a tripod because it holds my still camera in one place. I don’t want to refocus for every shot. You can also try shooting without a tripod and experiment. Room with ventilation – You want the air to be able to exit the room. Extra smoke in the room will decrease the picture quality. Patience – As mentioned above, it is one of the most important tools in this photo session. “Incense” captured by Issa (Click Image to See More From Issa) Setup You need to make sure that there is no light spilling on the background. Remember, our purpose is to focus on the smoke and to minimize the attention on the background. You also cannot afford any light hitting the lens as it will cause lens flares to appear in the image. Below are some techniques for the setup: 1. Pull out your background sheet and hang it in the back. 2. Place the incense stick 3-5 feet away from the backdrop. 3. Put the wireless flash 2-3 feet away from the incense stick (left or right side). 4. Place the reflector on the opposite side to that of the flash. 5. Set your tripod and camera 2-4 feet from the incense stick facing the black background. Remember that there is no perfect location for the flash, reflector, camera, and background with respect to the source of smoke. All rooms and settings are different. Our main purpose is to avoid any light bouncing off the background or directly hitting the lens. Explore around and try different angles of flash placement to get the best setup for your needs. View your pictures as you go along to see any glare in the images and move around accordingly. Camera & Flash Settings You need to consider some important factors when shooting smoke. Understanding these settings will help you become a better photographer in general so don’t hesitate to take some time and learn. Shutter Speed – Since smoke is constantly moving, you need to have a fast shutter speed to avoid any blur or movement. Aperture – You want a great depth of field to capture details in the smoke trail. I recommend using a small aperture (larger f-stop number). ISO – Since there is very low light, smoke will show up grainy or noisy and a high ISO will only add to this. I recommend using a low ISO for these pictures. Light – I use my flash at full strength because with low ISO, fast shutter speed, and small aperture there is a need for a strong light to get the exposure right. “purple smoke” captured by Morph (Click Image to See More From Morph) To make your life a little easier, I have copied the settings from my last smoke photo shoot below. Camera: Canon 7D Lens: Standard 28-135 mm IS Mode: Manual Page 28 T H E V I E W F I N D E R Issue 3 2014-2015 Shutter Speed: 1/250 seconds Aperture: f/8 – f/16 ISO: 100 Focus: Manual White Balance: Auto Flash output: Almost at full power Don’t limit yourself to the above settings. I’m providing these just to give you an idea. However, every camera is different, so change the settings according to your setup. Taking the Shot Now that you have all of your setup complete, let’s get to the camera. Close all the doors and windows; you don’t want any air blowing. It will create unstable plumes which are hard to capture. Keep things as stable as possible. Light the incense stick. I am a fan of thin smoke trails but if you like thick trails you can place two stick together to get more smoke. You must work in manual focus mode. Turn off the auto focus and take control in your own hands. I recommend focusing on the area 4-5 cm above the stick’s tip. With such fast settings on the camera, I don’t think it matters if the lights in the room are on or off. However, I recommend turning off the lights to avoid any ambient light from interfering. Let’s get to the shutter and see what we can come up with. Try taking some test shots. Your purpose is to under-expose the background and light up the smoke. Try to get the background to be as dark and black as possible. Once you have the exposure right you can get to the creativity and take some great shots. You can try different angles and catch the smooth curves in the trail. You can even take your camera off the tripod to move closer or away from the smoke. Try putting objects in the trail’s way to make things interesting. Spoons are often used to capture smoke and it looks pretty amazing. You can even blow air toward the smoke to change its direction. “Dragon” captured by Peter Emmett (Click image to See More From Peter Emmett) Ventilate the room every 10 minutes. Smoke is not only bad for your health, it is also bad for your photos. The smoke buildup creates a haze in the pictures. You want your images to be as crisp as possible and make your life easy for post processing. Removing haze in Photoshop can be a pain. About the Author: We here at RQ Studios Photography Tips try our best to bring you the simplest of all tutorials to make your life easy. Here is a helpful video on the topic: And finally, be patient and enjoy. Shooting smoke can be frustrating but it is certainly worth the time. For further training: Trick Photography eBook Go to full article: Smoke Photography Tips What are your thoughts on this article? Join the discussion on Facebook or Google+ Article from: PictureCorrect Stunning Timelapse Showcases the Ethereal Beauty of Norway Posted: 13 Nov 2014 04:02 PM PST Norway’s fascinating landscape has long been an inspiration for photographers and cinematographers alike. Its unique location, rugged topography—which at times appears Moon-like—deep fjords, breathtaking northern lights, and picturesque cities make Norway a photographers paradise. This stunning 5-minute video Page 29 T H E V I E W F I N D E R Issue 3 2014-2015 by photographer Morten Rustad, called Norway: A Time-Lapse Adventure, aims to showcase everything that’s Norway: Rustad traveled 15,000 kilometers (almost 10,000 miles) over five months, during which he took tens of thousands of images. If you’re aware of the process of creating a timelapse video you’ll appreciate the time and the sheer effort put into making this video. Timelapse Gear Canon 70D APS-C DSLR Canon 7D APS-C DSLR Tokina 11-16mm f/2.8 lens Canon 17-40mm f/4L lens Canon 50mm f/1.8 lens B+W ND 3.0 filter Syrp Variable ND filter Syrp Ge Syrp Magic Carpet a host of homemade accessories, such as a dolly and rotation unit Rustad’s journey took him through all of the 19 counties of Norway, starting from the extreme south of the country to the extreme northeast, bordering Russia. Further training: The Timelapse Photography Guide Go to full article: Stunning Timelapse Showcases the Ethereal Beauty of Norway What are your thoughts on this article? Join the discussion on Facebook or Google+ Article from: PictureCorrect Touchable Memories: New Technology Lets You Feel a Photograph (Video) Posted: 13 Nov 2014 01:43 PM PST We are the collectors of memories, the keepers of information. As photographers we hold a large and significant job in this world. We create visual recollections of moments, objects, and feelings for ourselves or Page 30 T H E V I E W F I N D E R Issue 3 2014-2015 to pass along to future generations. However, there are those whom photographs have no effect on – the blind. How would they feel if they could ‘touch’ these memories? Many of us may take our memories and our vision for granted. But the idea of being able to remember a special moment is very important, especially to those not able to look back to a photograph. Director Marco Aslan and his creative team captured a wonderful and moving short—from the loss of eyesight, to the importance of memories to the joyous moment of a tangible one. Although, in the end, the video is an advert for a 3D printer, these people’s ecstasy of literally feeling a photograph for the first time and reminiscing details of the event, is very real. They could ‘feel’ the body language, an article of clothing, and the spacial details of a room. They could ‘see’ themselves in the photograph—something they had never been able to do before. Page 31 T H E V I E W F I N D E R Issue 3 2014-2015 This short excites one about the future of visual and printing technologies, and what it will mean for millions around the globe. And as photographers who rely on their eyes, it put things into perspective. “To me, a memory is something that we hold onto, but with time it fades a little. It’s really important to take memories back so we can remember everything that we’ve been through in life.” Go to full article: Touchable Memories: New Technology Lets You Feel a Photograph (Video) What are your thoughts on this article? Join the discussion on Facebook or Google+ Article from: PictureCorrect Want Better Portraits? Become a Master of “Psyphotology” Posted: 13 Nov 2014 11:39 AM PST Do you hate getting your photo taken? When you do, do you look at the image and find a bunch of things you hate—do you see your big nose, double chin, round face? The thing is, you see something in yourself that others don’t. And you need to get past it. You need to find and accept your inner beauty and get over your fear of the camera! And for those of us behind the camera, we can help your models let go of their fear of judgement and criticism to reveal their true selves: Professional portrait photographer Peter Hurley and psychologist Anna Rowley have come up with a way to bridge the gap between the way we see ourselves and the way the world sees us. “Psyphotology” combines psychology and photography and offers a way to overcome your fear of the camera and work toward selfacceptance. (Via PetaPixel) If you change the way you view yourself, you can feel better about yourself. As Rowley says, as human beings, we are both attracted and repelled by our appearance. “The choice we embrace depends upon our level of self-acceptance.” Since the camera shines a light on it, if the gap between who we think we are and who we think we should be is wide, then the worse we are likely to feel in front of a camera. People deal with being in front of a camera differently, we either: 1. Own It. These people are grounded and confident. 2. Pose. They become something other than themselves. 3. Diminish. They become smaller and try to hide from the camera. 4. Avoid. Hurley calls them “runners.” The kicker: how we cope with being in front of a camera is indicative of how we cope with real life. So, what do you do? Do you suffer from PAS (Picture Avoidance Syndrome)? Page 32 T H E V I E W F I N D E R Issue 3 2014-2015 You can reframe the way you think and feel about yourself. The practice of psyphotology, they say, can help you focus on the things about yourself that you honor, cherish and celebrate. Are you resilient? Courageous? Focus on that. If you apply these steps in front of the camera, as well as behind it, you can shift the perception from surface to substance. As photographers, don’t we want to expose the true self? For Further Training on Portrait Photography In addition to communicating with your subjects and helping them relax, knowing how to pose them is an important part of portrait photography. Gina Milicia’s posing guide aims to give you the confidence you need to work with and flatter subjects of all ages. Find it here: Striking the Pose eBook Go to full article: Want Better Portraits? Become a Master of “Psyphotology” What are your thoughts on this article? Join the discussion on Facebook or Google+ Article from: PictureCorrect Page 33 T H E V I E W F I N D E R Issue 3 2014-2015 Interesting Photo of the Day: First Ever Photo Taken From a Comet Posted: 13 Nov 2014 10:06 AM PST Yesterday was a big day in history. The European Space Agency’s Rosetta mission achieved something epic— for the first time ever, a probe successfully landed on a comet. It was a feat ten years in the making; Rosetta was launched on March 2, 2004 and traveled 6.4 billion kilometers to arrive at its destination. Upon touching down, the Philae lander, which has its own Twitter account, took this first-of-its-kind image from Comet 67P/Churyumov–Gerasimenko: “Welcome to a Comet” (Via ESA. Click image to see full size..) “Rosetta’s lander Philae is safely on the surface of Comet 67P/Churyumov-Gerasimenko, as these first two CIVA images confirm. One of the lander’s three feet can be seen in the foreground. The image is a two-image mosaic.” — European Space Agency Go to full article: Interesting Photo of the Day: First Ever Photo Taken From a Comet What are your thoughts on this article? Join the discussion on Facebook or Google+ Article from: PictureCorrect You are subscribed to email updates from PictureCorrect To stop receiving these emails, you may unsubscribe now. Email delivery powered by Google Page 34