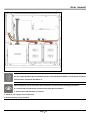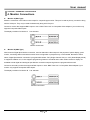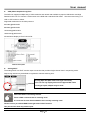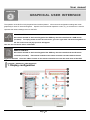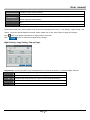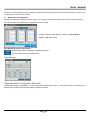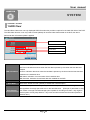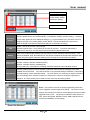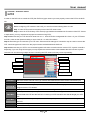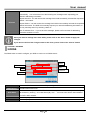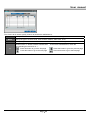
1
DVR16rt-H264 following may contain errors HARDWARE 8 CH H.264 D1 DVR DVR16rt-H264 VIDEO IN / OUT Video Inputs Video Outputs 8 BNC 16 BNC 8 Loop outs 16 Loop outs Main Out (Composite) 1 SVHS Out 1 VGA Out 1 SPOT Out (Composite) AUDIO IN / OUT Audio Input 4 Audio Output 1 ALARM IN / OUT Alarm Input Alarm Output Internal Buzzer 8 TTL 16 TTL 4 TTL + 4 Relay 12 TTL + 4 Relay Yes Yes AUXILIARY IN/OUT RS485 Port 1 ea RS232C Port Yes Network Port 10/100 Ethernet USB Port USB 2.0 (2ea) IR Remote Control port Yes STORAGE up to 4 x internal HDD Primary Storage CD/DVD RW Data Export Medium Yes (Standard) USB (HDD, FlashDrive) Built-in : DVD-RW HDD Interface type SATA f www.allthings.com.au User manual FUNCTION 8 CH H.264 D1 DVR 16 CH H.264 D1 DVR MORNITORING Display Rate Real-Time Display Display Resolution 720 X 480 (N), 720 X 576 (P) Display Mode 1, 4, 3+4, 9, 2+8, 1+12, 16, PIP, SEQ Sequence Yes ( 1~30 sec ) Digital Zoom Live : Linear Digital Zoom x128 Freeze Yes Covert Camera Yes Spot Monitor Yes (Programable) Multi-tasking Pentaplex ( Live / Record / Playback / Backup / Network ) Color Control brightness, contrast, saturation, hue RECORD Video Compression Audio Compression 704×480 (704×576) Recording 704×240 (704×288) Rate 352×240 (352x288) Recording Mode H.264 (Hardware Compression) PCM or G.711 240/200fps 480/400fps 240/200fps 480/400fps 240/200fps 480/400fps Continuous, Motion, Alarm, Continuous + Motion, Panic, Pre-alarm( [email protected] ) Recording Setup Programmable for each Camera Yes Pre-Event Recording Yes ([email protected]) Panic Recording Yes (Each channel programmable) SEARCH & PLAYBACK Playback Rate 704×480 (704×576) 240/200fps 480/400fps 704×480 (704×576) 240/200fps 480/400fps 704×480 (704×576) 240/200fps 480/400fps Search Mode Date/Time, Event, Bookmark Display Mode 1, 4, 3+4, 9, 2+8, 1+12, 16, PIP, SEQ Digital Zoom x2 Concurrent Multi-Channel Playback 8CH Page 6 16CH User manual FUNCTION 8 CH H.264 D1 DVR 16 CH H.264 D1 DVR NETWORK Connection Ethernet Max. Connections 22ea Static IP Yes ADSL Yes DHCP Yes DDNS Yes Max Transmission Rate 240 ips@ D1 480 ips@ D1 Bandwidth Control Yes Remote Monitoring (Live View) Yes Remote Playback Yes Remote Recording Yes Remote Setup Yes Remote PTZ Control Yes Remote Data Export AVI, JPG, BMP Remote Event Notification Yes Two-way Audio Yes Network Time Protocol Yes SYSTEM OPERATE Motion Detection YES, Detection Division : 30x24 External :USB (HDD, FlashDrive) Data Export (With Audio) Multi-Language Operate Internal : CD-RW. DVD-RW (Built-in) More than 10ea (English, French, German etc..) USB MOUSE, Front panel,IR remote control Disk Temperature Check Yes Disk S.M.A.R.T Check Yes Software upgrade USB Flash Drive Setup In/Export Yes ( via USB memory) System Logs Yes Event Logs Yes Page 7 User manual HARDWARE CONFIGURATION CHAPTER 2 CHAPTER 2. HARDWARE CONFIGURATION 1. FRONT Panel Layout 1 DVD-R DRIVE For Backup 2 USB PORT Firmware Updates and USB backup IR Receiver. IR Remote Controller Receiver. POWER LED This LED will illuminate when the system is powered on HDD LED This LED will illuminate when there is activity on the HDD NET LED This LED will illuminate when there is a remote connection BACKUP LED This LED will illuminate when a back up is performed CH1~CH16 This button is used to select a specific channel MODE/PIP Used to change the live view screen division / enable picture in picture SEQ Used to initiate video sequence mode ZOOM Used to digitally zoom into live video BACKUP This button is used to quick backup in AVI format MENU Used to open the "Live View Menu" from the Live View Screen PTZ Used to show the PTZ control K.LOCK This button is used to lock the frontal keypad MONITOR Used to select Monitor A/B controlled by front panel JOG SHUTTLE Used during playback to manipulate playback speed RW Used during playback to rewind video (1x to 1/16x). STOP Used during playback to stop current video being played PAUSE Used during playback to pause the current video being played FF Used during playback to increase playback speed (1x to 16x). 3 4 5 6 7 Page 11 User manual 7 PLAY Used to initiate playback SEARCH This button is used to initiate the search menu DIRECTIONAL 8 KEYPAD ENTER 9 B-MARK PANIC REC Used to navigate through the various system menus Used to confirm any action on the system This button is used during play back to bookmark a section of video. Please refer to the section Book Mark for more details This button is used to activate panic recording (configurable from sys. menu). Page 12 User manual CHAPTER 2. HARDWARE CONFIGURATION 2. Rear Panel Layout 1 ETHERNET The RJ-45 port is used to connect the DVR to a network 2 AUDIO IN 1~4 channel audio input AUDIO OUT You may use any audio output device such as a speaker. MIC IN To connect a microphone for two way audio. 4 RS232 PORT Connection to PC or other DVR control devices. 5 VGA Connection to a VGA monitor or TFT LCD. 6 S-VIDEO Connection to a S-VIDEO monitor. RS-485 For connection to PTZ cameras. ALARM OUT For Relay out and TTL out. ALARM IN 1~4 channel alarm input 3 7 8 9 1~16 CAMERA IN/LOOP OUT Channel 1~16 camera input and loop out. MONA -Main monitor output. 10 MONITOR OUT MONB- Digital spot monitor output SPOT –Analogic spot monitor output MOUSE 11 e-SATA 12 ATX POWER For USB mouse. The external S-ATA port is used to connect external storage devices that support S-ATA format ATX Power supply Page 13 User manual For the single Hard Disk Drive installation please locate the marked SATA 1 or Primary SATA cables and connector and install the HDD to it. Upon completion of your hard disk drive installation, please perform following procedures. It is critical that you follow this procedure after hard disk installation. 1. Perform the Hard Disk Clear procedure 2. Check to see if proper size is allocated 3. Perform factory reset procedure Page 15 User manual CHAPTER 2. HARDWARE CONFIGURATION 4. Monitor Connections z Monitor A (BNC Type) Monitor A connection is the main monitor output for composite type monitor. This port is used as primary connection along with the VGA port. They may be used simultaneously along with VGA port. Connect a monitor that supports BNC Inputs or use a “BNC Twist Lock” to Composite Video adapter if your monitor only supports Composite Video Inputs. The display resolution for Monitor A is at 720x480. Monitor Connection z Monitor B (BNC Type) Also known as Digital Spot Monitor connection, used as alternative video output for the purpose of public display, guard monitor, monitoring stations and other location where configuration or playback may not be needed. Because of these nature, Digital Spot Monitor connection is programmable where “Full” (Single Channel View) or “2X2” (Quad Display Mode) is supported. Addition to it, it also supports programming feature to schedule and to hide certain camera to display. As available to both digital and analogue Spot Monitor connection sequencing times are programmable as well. Connect a secondary monitor that supports BNC Inputs or use a “BNC Twist Lock” to Composite Video adapter if your monitor only supports Composite Video Inputs. The display resolution for Monitor B is at 720x480. Monitor Connection Page 16 User manual z VGA (Video Graphics Array) Port The DVR unit supports multiple array of VGA resolution and refresh rate available to popular LCD Monitor and High Resolution HD LCD TV. Connect a VGA monitor to the DVR with a standard VGA Cable. We recommend using a 17” LCD or CRT monitor or above. Supported resolutions for the VGA ports are: 640x480 @ 60Hz/75Hz 800x600 @ 60Hz/75Hz 1024x768 @ 60Hz/75Hz 1280x1024 @ 60Hz/75Hz All resolutions display at True Color 32 Bit VGA Pin Description z Analog SPOT The analog SPOT is a SPOT monitor output connection that provides single channel view in sequencing mode. Sequencing interval may be defined to regulate the channel switching time. Analog Spot Out (BNC Twist Lock Type Connector) You can use any display device that supports BNC Twist Lock type inputs, adapter may be used. Check this before connecting monitor There is BNC connector that is not being used. It is reserved for later feature addition and currently not being used. Please locate a port below MON-A and right side of SPOT location. This port will not show any video output. Page 17 User manual Sub Main Menu BNC port not being used. CHAPTER 2. HARDWARE CONFIGURATION 5. Camera Connections Connect the cameras to the Video In ports located on the rear panel of the DVR using the proper cables and connectors (BNC Twist Lock). The corresponding video channels can be “looped” out using the “loop out” ports located beneath each video input port. Terminators are not required. DVR will detect the system format (NTSC and PAL) automatically. Please refer to the figure below.. Camera inputs Loop out The loop out ports may be used to display the video signal from each individual channel to any desired display output device such as a monitor or it can be used to provide a video signal to another DVR system. The type of connection of the loop out ports use is BNC Twist Lock type. Video Input Signals Specification 1 Vpp / 75 ohm PAL / NTSC Auto Detect BNC Inputs with Loop Out CHAPTER 2. HARDWARE CONFIGURATION 6. Audio Connections The audio connections of DVR are used for both recording and monitoring purposes. You have the option to disable both audio recording and monitoring functions in the “Audio Setup Menu”. Both 8 and 16 channel models support up to 4 audio input channels and 1 audio output channel, as well as 1 port for microphone input. Connect with RCA/Composite audio compatible cables connectors. Connect using RCA/Composite audio compatible cables with compatible RCA/Composite audio connectors. Page 18 User manual You may use any audio output device such as a speaker system that supports RCA/Composite You may use a microphone that supports RCA/Composite Audio connections. Audio Input Signals Specification Input Signal: Mono RCA, 1Vpp, 10 k ohm Output Signal: Mono RCA, 1Vpp, 10 k ohm CHAPTER 2. HARDWARE CONFIGURATION 7. Alarm/Relay/IO Connections Alarm inputs and outputs are supplied via the switch panel located on the rear of the DVR. The switch terminal simplifies the use of various sensors and relays with our DVR. Connecting the Inputs: Each alarm input can be controlled/switched by a device such as a motion/IR sensor, door contact sensor, and similar devices. Each device can either be wired as N/O or N/C (Normally Open/Normally Closed). This can be configured in the “Alarm” menu as N/O or N/C as well. Alarm Input 10K to +5v Input Voltage Range 5VDC (minimum) to 40VDC (maximum) Specifications [Alarm In] Page 19 User manual [Alarm Out_Relay] [Alarm Out_TTL] CHAPTER 2. HARDWARE CONFIGURATION 8. RS232 Connections The RS-232 COM port is used to connect the DVR to a PC (optional updating procedure) or to connect an external device like a DVR controller (optional). The required settings to use the RS-232 port can be configured in the DVR settings. Specifications Connection Type 9 pole D-Type male connector Maximum Input Voltage +/- 25V Signal Type Pin Number Description DCD In 1 Carrier Detection Signal (not used) Rx 2 RS232 Receive Tx 3 RS232 Transmit N/C 4 No Connection GND 5 System Ground N/C 6 No Connection RTS 7 RS232 Request To Send Signal CTS 8 RS232 Clear To Send Signal N/C No Connection Page 20 User manual CHAPTER 2. HARDWARE CONFIGURATION 9. RS485 Connections The RS-485 ports are used to connect external PTZ cameras to the DVR. However you will not have the ability to control the PTZ cameras remotely if you do so. CHAPTER 2. HARDWARE CONFIGURATION 10. Ethernet Connections The RJ-45 port is used to connect the DVR to a network through a DTE (Data Terminal Equipment) device such as a switch or router with an integrated switch. To connect the system to a network please use a standard RJ-45 cable (patch/straight through) and make sure both ends of the cable are securely connected to the proper ports. Consult your local IT administrator for detailed configuration procedures and setup. The maximum cable length for Category 5e, RJ-45 cable is 100 meter or 300 feet. Ethernet Connection Example Connection 10/100 Base T, IEEE 802.3Differential signal voltage: ± 2.8 V maximum, inputs have transient overvoltage protection Ethernet port details EEE 802.3/802.3u - 100Base-TX/10Base-T physical layer Auto negotiation 10/100, full/half duplex Specifications Cable length 100 meters (100 ohm unshielded twisted pair cable or 150 ohm shielded twisted pair cable, category 5 or higher). Impedance built-in compensation for impedance matching Indicators ACT, 10/100 CAT 5 cable color code for EIA/TIA E568B Configuration Signal Type Pin Number Description LAN Tx + 1 Ethernet Transmit Positive LAN Tx - 2 Ethernet Transmit Negative LAN Rx + 3 Ethernet Receive Positive N/U 4 Not Used N/U 5 Not Used LAN Rx - 6 Ethernet Receive Negative N/U 7 Not Used N/U 8 Not Used Page 21 User manual CHAPTER 2. HARDWARE CONFIGURATION 11. External S-ATA The external S-ATA port is used to connect external storage devices that support S-ATA format. CHAPTER 2. HARDWARE CONFIGURATION 12. USB Connections The USB port is are located on the front side of the DVR. This port may be used for USB memory stick back up procedures and Firmware Updates. CHAPTER 2. HARDWARE CONFIGURATION 13. Power Connections The power is supplied to the DVR by an internal power supply unit, and can be either switched on or off by the toggle switch located on the rear panel of the system. Specifications Input Voltage 100 - 240 VAC ±10% Current 4A - 2A Input Frequency 50/60 Hz WARNING! This is a live electrical outlet. Risk of electrical shock. do not attempt to open the cover of the DVR or the power supply unit. Contact your local service center for repair. Warranty is void if the system is improperly handled Page 22 User manual CHAPTER GRAPHICAL USER INTERFACE 3 The operation of the DVR is GUI (Graphical User Interface) based. All menus and configuration settings are made graphically for ease of use and navigation. Specific icons are used to represent a menu, e.g. a Camera icon is used to represent the camera settings menu for the DVR. MOUSE CONTROL All controls located on the frontal keypad of the DVR may also be controlled via a USB mouse (included). To display and/or access the main menu, you can “right click” the mouse anywhere on the live view screen and pop-up menu will appear. You can now access all menus of the DVR. REMOTE CONTROL All controls located on the frontal keypad of the DVR may also be controlled via the IR remote controller (included). The buttons located on the remote controller correlate with the frontal keypad of the DVR. Press the “Menu” button on the remote controller to access the main menu of the DVR. CHAPTER 3. GRAPHICAL USER INTERFACE 1. Display configuration Page 23 User manual Live display icon 1 Shows current date and time 2 Monitoring popup menu 3 Shows audio channel 4 Overwrite icon. 5 Shows current HDD utilization 6 Shows recording mode 7 Shows Alarm and Motion icons in Live view and indicate such event 8 Display Camera Title for Live and Playback display 9 Quick Screen split mode switch button – (1/4/9/16 & Freeze) CHAPTER 3. GRAPHICAL USER INTERFACE 2. Monitoring Popup Menu z Popup Menus and their components There are many popup menus found on the GUI. Some popup menus are simple type and some have sub menu available for further options. Monitoring popup menu is the first menu that user will encounter. This is the main popup menu that will link to all of the operation and configuration options will be accessible. Right click on mouse or keypad MENU key to open or hide popup menu. Page 24 User manual z Main Setup Menu To access the main menu, press the “Menu” button on the frontal keypad or remote controller, or you can right click the mouse from the live view display and click on “Menu”. VIDEO & AUDIO Camera Setup,Color Adjustment, Motion, Video lose,VGA, Event display, Interval, OSD, Audio SYSTEM HDD clear, Date/Time , User authority, Alarm in, Alarm out, Buzzer, Configuration RECORD & BACKUP Record setup, Schedule, Holiday, Backup, Smart backup EXTERNAL DEVICE RS232, PTZ, Remote control NETWORK Ethernet, DDNS, Server setup, PPPoE, Notification Main Menu Tree OTHER System information Exit setup menu Goto Main menu. Back to previous menu. Exit setup menu Default button will set all settings to default parameters. Use this button to either commit the configuration to save or to cancel. Page 25 User manual CHAPTER VIDEO & AUDIO 4 CHAPTER 4. VIDEO & AUDIO 1.Camera Setup Camera Label Covert Audio Click to initiate on screen keyboard as seen below. Type the desired label and “X” to close the Camera label popup window. On Screen Keyboard popup Covert Camera will not appear on live screen display or remote connection when Covert is enabled. Audio Choose the drop down bar to select the audio channel. This will associate audio to camera. Page 26 User manual CHAPTER 4. VIDEO & AUDIO 2.Color adjustment Select the color settings individually for color adjustment, and use the copy setting to apply the same configuration parameters to other cameras. CHECK THIS FIRST! Make sure the monitor being used is correctly configured to show proper colors. Consult your monitor manual for details in color configuration. Channel Brightness Contrast Saturation Sharpness Hue Copy Settings Color Adjustment Window Channel Brightness Contrast Select the channel of camera you want to configure by clicking on the drop down list bar. To configure camera brightness value. To configure camera contrast value. Saturation To configure camera saturation value. Sharpness To configure picture sharpness value Hue To configure picture hue value. Upon pressing Copy Setting button, Copy Settings popup will appear. In this popup choose the camera you want to copy from at From drop down list field. Copy Settings Choose the parameters such as Brightness, Contrast, Saturation Sharpness, and Hue by checking on the check box. Check on the check box with camera numbers to apply the copy setting to on TO check box selector section. Copy Setting Page 27 User manual CHAPTER 4. VIDEO & AUDIO 3.Motion The motion setup menu is used to configure the various settings for how the DVR will determine what is classified as “motion”. You may specify the sensitivity levels and areas on each camera channel for motion events to be captured. Time Under the “Time Setting” tab, you will notice a “Day Time” setting, and a “Night Time” setting. Setting Once you configure the “Day Time” clock range, the “Night Time” clock range will automatically be updated. To Day Time change the “Day Time” setting please click the button located to the right of each channel setting, and you will see the pop-up menu below to set the time range. TIME RANGE SETTING: After specifying the start and end time range, please click “Ok” to apply the changes, or click “Cancel” to discard them To access the other menu options please click on each corresponding menu tab, e.g. “Day Setting”, “Night Setting”, and “Action”. Once your desired settings have been made, please click on the “Save” button to apply the changes. Click button if you desire to discard the changes made to this menu. Click button to restore the original factory settings. Page 28 User manual [Day Setting] To activate or deactivate each channel, please click on the Ch. Min. Blocks Sensitivity Mask Zone Dwell Time button. Specifies the video channel number Specifies the minimum number of blocks to detect for motion in the zone specified. There are a total of 5 settings for motion sensitivity, with “Highest” being the most sensitive, and “Lowest” being the least sensitive. Specify a zone for motion to be detected for each channel. The area that you specify will be the area where motion will be detected. Specify the post recording duration in seconds (1~99 Seconds) after motion is captured. To access the other menu options please click on each corresponding menu tab, e.g. “Day Setting”, “Night Setting”, and “Action”. Once your desired settings have been made, please click on the “Save” button to apply the changes. Click button if you desire to discard the changes made to this menu. Click button to restore the original factory settings. Pop-Up Menu Cell Setup: Use the mouse cursor to select the starting point of the motion mask. Left click on the mouse to select the first cell. A single click will activate the selected area for motion detection, and click the same cell again will deactivate it. The area for motion detection will be in a darker shade. Block Setup: To select a block of cells, or multiple cells, left click and hold down on the mouse, and drag over the cells you wish to activate. After you let go of the left click button, a pop-up menu will appear giving you multiple options. . Page 29 User manual Pop-Up Menu: Select – Allow you to setup the deactivated area. Delete – Allow you to setup the activated area. Reverse – Allow you to reverse the current setting, If it is activated, the reverse option will deactivate the select area. Once you have finished setting up the motion mask zone, right click on your mouse and select “Ok” from the pop-up menu to apply the changes you have made. Day Setting, Copy Setting, Pop-up Page: Copy Settings: You may choose to copy the settings from one channel to another, or to other multiple channels. This is the source channel to copy the settings from. From These are the attributes you may select to copy from the source channel. Properties To These are the channels that you copy the source channel settings to. Ok Press this button to apply the changes made. Press this button to discard the changes made. Cancel Night Setting: To activate or deactivate each channel, please click on the Page 30 button. User manual Ch. Specifies the video channel number Min. Blocks Sensitivity Mask Zone Dwell Time Specifies the minimum number of blocks to detect for motion in the zone specified. There are a total of 5 settings for motion sensitivity, with “Highest” being the most sensitive, and “Lowest” being the least sensitive. Specify a zone for motion to be detected for each channel. Please refer to Figure 63 on the next page. Specify the post recording duration in seconds (1~99 Seconds) after motion is captured. To access the other menu options please click on each corresponding menu tab, e.g. “Day Setting”, “Night Setting”, and “Action”. Once your desired settings have been made, please click on the “Save” button to apply the changes. Click button if you desire to discard the changes made to this menu. Click button to restore the original factory settings. Night Setting, Copy Setting, Pop-up Page: Copy Setting : You may choose to copy the settings from one channel to another, or to other multiple channels. From Properties This is the source channel to copy the settings from. These are the attributes you may select to copy from the source channel. To These are the channels that you copy the source channel settings to. Ok Press this button to apply the changes made. Cancel Press this button to discard the changes made. Page 31 User manual Action: This represents the “action” number. Ch. Check this box if you wish the DVR to make an audible noise when motion is captured. Beep Alarm-Out Select this option to open the “Alarm-Out” pop-up menu to choose which sensor or relay will be activated when motion is detected. Alarm-Out: To access the other menu options please click on each corresponding menu tab, e.g. “Day Setting”, “Night Setting”, and “Action”. Once your desired settings have been made, please click on the “Save” button to apply the changes. Click button if you desire to discard the changes made to this menu. Click button to restore the original factory settings. Page 32 User manual CHAPTER 4. VIDEO & AUDIO 4.Video Loss No Beep Alarm-Out This represents the “action” number. Check this box if you wish the DVR to make an audible noise when video loss. Select this option to open the “Alarm-Out” pop-up menu to choose which sensor or relay will be activated when motion is detected. Video loss copy Settings, Copy Settings: You may choose to copy the settings from one channel to another, or to other multiple channels. Page 33 User manual CHAPTER 4. VIDEO & AUDIO 5.VGA The DVR unit has one available VGA port. VGA port allows DVR unit to connect to standard computer monitor. Check this first: Your monitor must support below resolution. Resolution rate of 640X480 at 60HZ or 70HZ refresh rate. Resolution rate of 800X600 at 60HZ or 70HZ refresh rate. Resolution rate of 1024X768 at 60HZ or 70HZ refresh rate. Resolution rate of 1280X1024 at 60HZ or 70HZ refresh rate. Check your monitor user’s guide. On this window you may choose Resolution rate of 640X480, 800X600, 1024X768, or 1280X1024 (Normal)1680X1050, 1440X900, 1360X768 (Wide) Frequency of 60Hz or 70Hz (Refresh rate) VGA Configuration Window Default button will set all settings to default parameters. Use Save button to save the configuration. CHAPTER 4. VIDEO & AUDIO 6.Event Display There are two types of Spot Monitor types are available for the DVR units which are Digital Spot and Analog Spot monitor. In this section, we will introduce the difference between these two types of Spot monitors and how they can be configured. Note: Analog Spot Monitor Operation Order Sequencing of Channel 1 to Last Channel of camera with sequence time defined. When event is triggered, the camera with event triggered will display until event stop. Page 34 User manual If events occur simultaneously among Channel 1 and other channels, the DVR unit will wait until the event in Channel 1 is complete before move to next channel. z Monitor Event Configuration Analog Spot Monitor configuration has full screen view switching between given interval time. They may be enabled to react to the Alarm and Motion event configurable by each channel. Enable or disable Event display by selection “Alarm, Motion, A+M” or “Off” radial button. Spot Window with Spot Tab selected Default button will set all settings to default parameters. Use this button to save the configuration. Copy Settings Digital Spot Monitor Configuration (Monitor B) In Digital Spot monitor configuration, you may configure the sequencing in order. You may also have a full channel view sequencing and followed by 2X2 split display of assigned camera. Page 35 User manual Split Selection Channel Add or Delete Schedule item Spot Window with Spot Schedule tab selected Split Selection Choose between “Full” or “2X2” Upon clicking the channel selection button, a popup will appear. Select 1 or up to 4 cameras. (when selected 2X2 in the Split Selection section) Channel Selector Channel Selection Popup Add or Delete Schedule item. To add just press the icon marked “+” to add another line +/- To delete a line first select the line by pressing the check mark and then press icon marked “-” o delete Note: Maximum Digital Spot Entry You may have up to 21 lines of schedule entry for programmed line items and Digital Spot Monitor. There could be 21 different sequencing combinations. To help you understand the configuration of digital spot option we will consider a scenario and configure the Digital Spot to meet the requirement. Possible Scenario: You have a 16 channel DVR unit with 14 cameras enabled in channel 1~16 with Camera 9 and Camera 11 with no video feed. You want to install a Spot Monitor in front lobby to always see camera 1. You want to see full screen view of camera 1 then few seconds later 2X2 screen view with Camera 1, Camera 2, Camera 3 and Camera 4. Few seconds later you want it to sequence to 2X2 view with Camera 1, Camera 5, Camera 6 and Camera 7. You want to repeat until you see all cameras but omit camera 9 and camera 11 because they are not functional at this time. You want to have Camera 4 to popup during any of these sequencing events, when you detect motion to this camera. Page 36 User manual CHAPTER 4. VIDEO & AUDIO 7.Interval Time Switching Interval Setup Time Interval Window Sequence drop down bar depicts the time settings for the sequence interval time for live view sequence when sequence button is pressed. Switching Interval PIP drop down bar depicts the time settings for the sequencing interval time for the Picture in Picture sequencing function. Spot Monitor drop down bar depicts the time settings for the sequence interval time for the both the analogue spot and digital spot out monitor sequencing time. Time Out radial button enables option to turn on or to turn off the Setup Time Out option. Setup Time If Time Out radial button is On then you have selected the option to have setup menu return to live view after time selected on Setup interval time. Default button will set all settings to default parameters. Use this button to save the configuration. Page 37 User manual CHAPTER 4. VIDEO & AUDIO 8.OSD The On Screen Display (OSD) options dictate how label indicators will display for both live display screen and for playback display screen. It is also this section that you will choose system language, viewable margin, and window transparency settings. OSD window may be accessed by using the drop down button located near upper left corner of any configuration window. There are identical check boxes available for Live and Playback section. These check boxes are to choose what display items to appear for live and playback display screen. Time Out selection clears out the OSD display items to clear when there is no input action is performed Select All Check all checkbox items under Live and Playback section (Will enable items 2~5) Camera Title Alarm/Motion Event Percent Bar Channel Status Date/Time Display Camera Title for Live and Playback display Shows Alarm and Motion icons in Live view and indicate such event. Shows current HDD utilization. When chosen,upon video loss it labels the camera channel with “Video loss” indication Shows date and time label for Live and Playback display. Setting has five different settings you choose from.(10%~100%) Transparency These transparency settings are applied for all windows and popup menu items on the DVR system. Section is the location to choose the DVR system language. Language Languages available to the DVR system are, English (default), Korean, Japanese, Chinese, French, German, Italian, Spanish, and other languages. Margin Setup Display Position Margin Setup button will bring up the Margin Setup Popup to control the viewable margin for the live view screen display. Adjust whole screen display position. Page 38 User manual Margin Setup Popup Display Position Popup CHAPTER 4. VIDEO & AUDIO 9.Audio Users are able to configure Microphone and speakers volume in the Audio Menu. MIC Volume Speaker Selectable radial buttons “On” and “Off”. With radial buttons set to “On”, you may adjust the volume for the microphone. Selectable radial buttons “On” and “Off”. With radial buttons set “On”, you may adjust the volumes for the 4 available channels for audio output Page 39 User manual CHAPTER SYSTEM 5 CHAPTER 5. SYSTEM 1.HDD Clear The Hard Drive Clear menu not only displayed HDD information but provides 3 options for the hard disk drive of the DVR. The HDD Clear function is not only used to format (delete) all recorded video data located on the DVR, but also is performed after a firmware update is applied. HDD Information Start Over Write Auto Deletion (active status display for hard disk drive) Start Time: indication that shows when the first data is present by time when the first data was recorded. HDD Information End Time: indication that show when the last data is present by the time when the last data was recorded on the hard disk drive. HDD Status: indication of current status of the hard disk drive. HDD Total Size: indication of total Hard disk size installed for the DVR HDD Clear Start button: initiates hard disk clear option. Over Write Select ON to enable and OFF (default) to disable the overwrite option. Auto Deletion drop down button: you may select set time parameter to start deleting the recorded data regardless of storage space left over on the hard disk drive. (Example: if parameter is 1 day Auto Deletion even if there is enough hard disk storage space capable of recording more than 1 day might be present system will only keep data for 1 day worth and will overwrite the information present in hard disk drive.) Page 40 User manual CHAPTER 5. SYSTEM 1.Date and Time(System Time) In this Date/Time window, you will be able to locate three tab buttons called Sys. Time, DST Time, and NTP. . Time Zone Display Date/Time Format Date/Time Setup To manually configure system time, you must do so in Date/Time window with Sys. Time tab section in this window there are five configurable items. Select appropriate time zone by clicking on the drop down icon button. If your location can not be found, please select the closest city and check the GMT (Greenwich Mean Time) indicated. Display Format Toggle between date and time or time and date position. Choose how the date and time will display. You may choose the either year or month to be Date/Time Format appeared first. in time section, you may choose either 24 hour display or A.M. and P.M. display. Date/Time Setup Manually input current system time by selecting year, month, date, hour, minute, and second. Time Zone CAUTION! You must perform Hard Disk Clear procedure after the time change. Especially, when time setting has been back dated, perform the Hard Disk Clear procedure. There could be duplicate recording events recorded on to the hard disk drive and may corrupt hard disk indexing operation. Before performing the hard disk format, please backup any important data items. Page 41 User manual CHAPTER 5. SYSTEM 2.Date and Time(DST Time) In some regions of the world, DST (Daylight savings time) must be configured in order to display correct time after DST changes. To configure the DST setting, click on DST Time tab button from Date/Time window. Select “On” radial button to enable DST option, and Off” as default. DST Start Time: Choose month, week, day and hour that DST will start. DST End Time: Choose month, week, day and hour that DST will end. Note: Many North American countries: Since 2007, daylight saving time starts on the second Sunday of March and ends on the first Sunday of November, with all time changes taking place at 2:00 a.m. local time. Please check your region’s DST time rules. CHAPTER 5. SYSTEM 3.Date and Time(NTP) Multiple DVR units may have synchronized time by utilizing network time configuration. They could be configured by using NTP settings provided with the DVR. You will be able to locate this page by clicking on NTP tab button found on Date/Time window. NTP On or Off Server IP Server Port Sync. Interval NTP Test Page 42 User manual NTP On or OFF In this section, you may enable NTP by selecting “On” radial button and disable it by selecting “Off” radial button. Provide IP address number for the NTP time server IP address. Server IP In this section, provide Port number for the NTP time server. Server Port In this section, define synchronization interval time by selecting drop down button Sync. Interval In this section, press the “NTP Test” button to test the connection to the time server. Upon successful connection, system will prompt Connection Success message. If connection can not be established NTP Test then, it will prompt Connection Failure message will show. CHAPTER 5. SYSTEM 4.User Authority Administrator user Account There is only one Administrator Account configurable in the DVR system. It is assigned with unchangeable User ID marked as Admin. The default password is blanked out and administrator account has full access to the DVR and its configurable parameters. The Administrator Account also has ability to assign rights to the Manager Accounts and User Accounts. By default, Admin account has NO password. In order to protect the DVR, it is strongly recommended to setup the DVR with administrator password. Password settings will be covered in this chapter r. Manager User Account The Manager user accounts are usually given to users that requires more privileges compared to than Regular User account. Manager accounts also have ability to assign privileges to the Regular User accounts. Limitations will be that Manager Account only may grant user privileges that Manager Account currently possesses. Manager User Account IDs are defaulted with Manager1 ~ Manager 3. Regular User Account The Regular User Accounts are usually given to users that require performing certain task without having the full access of the privileges. They are the simplest type of user account arranged by IDs in range of User 1 ~ User 7. Select User dropdown field Password Authority Auto Logout Auto Login Page 43 User manual Select User Type Select between Admin, Manager 1, Manager 2, Manager 3, and User 1 ~ User 7. Select the user first before continuing with other configuration. Password Setup It will bring up the Popup window called Password. In this popup you will need to provide current button password and input new password. End by confirming the new password and select “OK” button. Upon licking Setup button next to Authority field it will bring up Authority Setup popup window. In this popup window you may select privileges associated with accounts selected in Item 1. Select User Type. In this window you may enable all check boxes by selecting Select All check box. Authority Setup From here you may uncheck any or all user privileges you want to assign to particular selected button user account. Upon completion of selecting appropriate user privileges save by clicking the “OK” button. Cancel by selecting the “Cancel” button. Repeat for other user type by reselecting Item 1. Select User Type and follow the same procedure. Auto Logout selection This section configures the time parameters to auto lock the DVR unit and takes it back to the “Live” display mode. You have to login again to setup or operate the DVR unit Auto Login check With this check box checked,you are not required to provide login when navigating from “Live” box display mode to “Setup” screen. Authority Setup Popup There are 8 different types of User authority that may be assigned to both Manager Accounts and Regular User Accounts 1 VIDEO & AUDIO 5 SYSTEM 2 RECORD & BACKUP 6 EXTERNAL DEVICE 3 NETWORK 7 OTHER 4 PLAYBACK 8 NETWORK ACCESS Page 44 User manual CHAPTER 5. SYSTEM 5.Alarm In This window can be accessed by using the quick navigation drop down list from any configuration window. No. This represents the “action” number. Type Set Alarm in type. Beep Check this box if you wish the DVR to make an audible noise when Alarm trigger. Alarm-Out Dwell Time No. Record Channel Select this option to open the “Alarm-Out” pop-up menu to choose which sensor or relay will be activated when alrem is trigger ed. Set up the alarm out duration. This represents the “Alarm In” number. Check this box if you wish the channel need to record when Alarm trigger. Page 45 User manual CHAPTER 5. SYSTEM 6.Alarm Out Setup the alarm output configuration when events are triggered. No. Type Dwell Time This represents the Alarm out number. Set up Alarm out type. Set up the alarm out duration. No. This represents the Alarm out number. Day Select a day for alarm out schedule. Range Event Alarm-Out To change the “Range” setting please click the button located to the right of each channel setting, and you will see the pop-up menu below to set the time range. Set up Event trigger type. Select this option to open the “Alarm-Out” pop-up menu to choose which sensor or relay will be activated when motion is detected. Page 46 User manual CHAPTER 5. SYSTEM 7.Buzzer In the Buzzer window you have options to configure system buzzer to sound depending on the selectable criteria. Some buzzer will sound for fixed amount of time and some will sound until attention is given to stop the audible alert. On the top to the page you will find two radial buttons “On” and “Off”. With “On” button selected audible beep will be enabled and with “Off” selection it will disable any audible beep. With “Select All” check box checked, all the check boxes below will be checked as well. There are five types of criteria configurable to sound off the audible beep. CHAPTER 5. SYSTEM 8.Import and Export Configuration This window allows user To import and export the DVR units system configuration file. The Select All button enables all check box items to be selected. There are five categories of configuration possibilities listed after check box and they are VIDEO&AUDIO, RECORD&BACKUP,NETWORK,SYSTEM and EXTERNAL DEVICE. They are the same categories of items selectable at Main system menu. Import configuration To import configuration file, click on the button marked “Import” and bring up the Import popup window. Import Popup Window Click on button show on left to define path and file name of file to be imported. Page 47 User manual Export configuration To export configuration file, click on the button marked “Export” and bring up the Export popup window. Export Popup Window Click on button show on left to define path and file name of file to be exported. Note: The DVR unit configuration files could only be imported and exported by using the external USB memory stick. Import and Export functions are not currently supported via the Network transmission. CHAPTER 5. SYSTEM 9.Factory Default It is highly recommended to perform Factory Default Configuration when the DVR unit has upgraded HDD, Software (Firmware), or instructed by technical support agent. There are six categories of configuration which are VIDEO&AUDIO, RECORD&BACKUP,NETWORK,SYSTEM and EXTERNAL DEVICE. They are the same categories of items selectable at Main system menu. To apply the factory default setting first select the categories of settings that needs to apply factory default to. Then simply press the “Default” button on the center of the screen to apply the factory default configuration. Configuration Window with Factory Default button pressed Page 48 User manual CHAPTER RECORD & BACKUP 6 This chapter will cover both record setup and the multiple record schedule options of the DVR. The record setup section details the 4 recording profiles that the DVR supports. You have the option to set Normal, Event, Pre-Alarm, and Panic recording profiles. Record schedules are classified under the Standard Record Schedule type and Holiday Record Schedule type. CHAPTER 6. RECORD & BACKUP 1.Record Setup The record menu is used to configure the setup type for each individual camera channel. You may specify resolution, video quality, and frame rate for recording. You will see four profiles for configuring the record setup: Normal – This profile is used for standard scheduled recording. The settings will be used under normal recording environments. Event – This profile is used for recording triggered by events like motion triggered or alarm triggered recording. The “Event” record settings will override your “Normal” record settings if a motion or alarm triggered event occurs. Pre-Alarm – This profile is used to specify the pre-recording type and duration in seconds when either motion or alarm triggered recording occurs. You may specify dwell time (the recorded time allowed pre motion/alarm event) allowed. As well as the type of event, e.g. motion or alarm. These settings will override both “Event” and “Normal” record settings. Panic – This profile is used to specify the recording type when the “Panic” record button is engaged. The “panic” record button is located on the front panel of the DVR, as well as on the “Live Pop-Up Menu” (accessed by right clicking the live view screen with the mouse). The “panic” record settings will override both “Event” and “Normal” record settings. The “Pre-Alarm” settings will not be affected because these settings are used for the “pre-event” recording only. Recording Resolution & Frame Rate: (Normal/Event/Pre-Alarm/Panic) 704x480 (NTSC) @ 30 Frames Per Second Per Channel (All Channels – 1~16) 704x240 (NTSC) @ 30 Frames Per Second Per Channel (All Channels – 1~16) 352x480 (NTSC) @ 30 Frames Per Second Per Channel (All Channels – 1~16) 352x240 (NTSC) @ 30 Frames Per Second Per Channel (All Channels – 1~16) Configurable Per Channel Video Quality Settings: (Normal/Event/Pre-Alarm/Panic) - Highest / High/ Normal/ Low/ Lowest Configurable Per Channel Frame Rate Settings: (Normal/Event/Pre-Alarm/Panic) Each channel can be configured from 1 through 30 frames per second. Copy Settings: (Normal/Event/Pre-Alarm/Panic) Use this option to copy the current selected setting to the other settings of each channel Page 49 User manual Recording Profiles Frame Rate Setting Video Quality Setting Resolution Setting Copy Setting There are four different recording profile types, Normal, Event, Pre-Alarm, and Panic. Each Recording Profiles recording profile has its’ own record settings, e.g. Resolution, Quality, and FPS setting. However, the Pre-Alarm profile will have additional settings, e.g. Type and Dwell Time, so that the user may configure the type of Pre-Alarm (Motion, Alarm, Motion + Alarm) and Dwell Time (pre-record buffer-the length in seconds the DVR will record prior to the alarm recording). (NTSC: 1,2,5,10,15,30 / PAL:1,2,4,8,12,25) FPS The DVR supports from 1 to 30 frames per second per channel. The frame rate setting is configured by clicking on the drop down menu and selecting desired frame rate. There are four video quality settings you may choose for each individual camera channel. The Quality options are Highest, High, Normal and Low. This option will adjust the image/video sharpness with Highest being the highest sharpness setting, and Low being the lowest sharpness setting. There are four selectable resolution settings per camera channel. These setting options are: Resolution 704x480, 704x240, 352x480, 352x240 (NTSC) 704x576, 704x288, 352x576, 352x288 (PAL) You may select any combination of recording resolution desired for each individual channel. The Copy Setting option is used to replicate a particular camera channel setting(s) to the other available camera channels. You have the option to copy all three settings, Resolution, Frame Rate, Copy Setting and Video Quality or each individual setting. The From option is to select which camera channel to copy the setting(s) from, and the To option is to select which camera channel(s) to replicate the settings to. The Copy Setting can be used for each of the four Recording Profiles. Event – This profile is used for recording triggered by events like motion triggered or alarm triggered recording. The “Event” record settings will override your “Normal” record settings if a motion or alarm triggered event occurs. The options for RESOLUTION, QUALITY, FPS, COPY SETTINGS, DEFAULT, SAVE, AND CANCEL are the same as the NORMAL record settings Event Tab Selected Page 50 User manual Dwell Time Type Pre-Alarm Tab Selected Pre Alarm– This profile is used to specify the pre-recording type and duration in seconds when either motion or alarm triggered recording occurs. You may specify dwell time (the recorded time allowed pre motion/alarm event) allowed. As well as the type of event, e.g. motion or alarm. These settings will override both “Event” and “Normal” record settings. The options for RESOLUTION, QUALITY, FPS, COPY SETTINGS, DEFAULT, SAVE, AND CANCEL are the same as the NORMAL record settings. However the two additional options for this menu are: The DWELL TIME option is used to specify the post recording duration in second(s). This will Type determine how long the recording will run for the specified channel after the PRE-ALARM is triggered. Dwell Time The TYPE option is used to specify which pre-alarm trigger to use, e.g. MOTION OR ALARM. Panic Tab Selected Panic – This profile is used to specify the recording type when the “Panic” record button is engaged. The “panic” record button is located on the front panel of the DVR, as well as on the “Live Pop-Up Menu” (accessed by right clicking the live view screen with the mouse). The “panic” record settings will override both “Event” and “Normal” record settings. The “Pre-Alarm” settings will not be affected because these settings are used for the “pre-event” recording only. The options for RESOLUTION, QUALITY, FPS, COPY SETTINGS, DEFAULT, SAVE AND CANCEL are the same as the NORMAL record settings Page 51 User manual CHAPTER 6. RECORD & BACKUP 2.Standard Record Schedule The record schedule menu is used to configure specific date and times for the DVR to record. You may use multiple schedule configurations in this menu to meet the demands of your recording needs. Individual channels may be configured 1. No. 2. Day 3. Range 4. Mode 5. Channel +/- No. Day Range This represents the schedule entry number. Please check the box on the left side of the No. (number) before choosing to remove the entry. The day option is to set the desired day(s) to enable recording (The “ALL” setting may be used to configure all 7 days of the week). The range option is to set the desired time to enable recording. There are five mode types to choose from; Alarm, Motion, Continue, A + M (Alarm + Motion), Mode and M + C (Motion + Continue). This setting will determine what type of mode to enable for recording. Channel +/- Use this option to select the desired channels for Record Schedule configuration. You may select each individual channel, a group of channels, or all channels to apply the record settings to. Check the desired entry(s) then press – to remove it. If you wish to add an entry(s), press the + key to do so. - :Press this button to go to the first page - : Press this button to go to the next page : Press this button to go to the previous page : Press this button to go to the last page Once your desired settings have been made, please click on the “Save” button to apply the changes. If you desire to discard the changes made to this menu, please click on the “Cancel” button. Time – You can specify the start and end time here. Page 52 User manual Select All Press this button to select all channels. CH 01 ~ CH 16 You can choose individual channels for recording. Ok Cancel Press this button to save the settings. Press this button to discard the changes made. CHAPTER 6. RECORD & BACKUP 2.Holiday schedule The Holiday Schedule is used to specify certain holidays’ throughout the calendar year. This setting may be used to make exceptions to the recording schedule due to holiday hours and days of operation during these times. Once you click on a specified date, a pop-up menu will appear To verify the Holiday schedule, please check the box accordingly. Then press “Ok” to save the setting, or press “Cancel” to discard the changes made. If the changes were successfully the color of the pop-up menu will appear in a different color. Page 53 User manual Year Month Choose this option to delete all holiday schedules for the year. Choose this option to delete all holiday schedules for the month. OK Press this button to confirm the action. Cancel Press this button to discard the action. Select Day of Week – The standard holiday is Sunday, but you may choose what day to specify. Once your desired settings have been made, please click on the “Save” button to apply the changes. If you desire to discard the changes made to this menu, please click on the “Cancel” button. CHAPTER 6. RECORD & BACKUP 3.CD/DVD/USB Backup There are two options for recorded video data back up from the DVR, CD/DVD-RW drive and USB memory stick. A third back up option is available via our CMS (Central Monitoring Software) and Remote Client Software (Network Back Up). The details of our CMS and Remote Client back up will be further discussed in the Remote Client chapter of this manual or CMS manual. CD/DVD-RW Back Up The DVR is compatible with S-ATA (Serial ATA) DVD/RW-CD/RW drives. The media that you may use are 4.7GB DVD-R and 700MB CD-R blank discs or what is determined as compatible with the CD/DVD-RW drive from the manufacturer. Please insert the blank CD-R or DVD-R into the drive before beginning the back-up procedure. USB Back up The DVR supports USB memory stick back up via the USB 2.0 port located on the front side of the DVR. There is one USB port available for back up. Page 54 User manual Start To Backup Size Serch Filename Start 開 Media Media - The media section of this menu will display the disc information of the blank media loaded in the CD/DVD-RW drive. The size available for back up will be noted in this section. If the media fails to load this section will state: Media / “Initializing Media Success”, if it fails it will state, “Initializing Media Failed”. Storage Storage - The storage section of this menu will display the USB media information. The size available for back up will be noted in this section. If the media fails to load this section will state: “Initializing Media Success”, if it fails it will state, “Initializing Media Failed”. The from section is used to select the start date and time for back up. You can specify the year, From month, day, hour, minute, and second by clicking on the drop down arrow located next to each selection. To The to section is used to show the end date and time for back up. It is specified by the backup size File Name You are able to specify the file name for the backup file in this section. Click on the … key to bring up the on screen keyboard. The search button is used to confirm that the specified date range is available for backup. If the Search date and time specified is not available, the closest date and time available to the specified date and time will be selected. This section can be used to specify a maximum back up size. The size will be set in megabytes. Back Up Size After selecting the backup size, the to date and time will be adjusted automatically according to the backup size you specify. *Notice: Minimum backup size is 100MB. The start button will begin the backup process. You may cancel the back-up procedure by clicking on Start cancel. Notice! 1. If there is any time-overlapped data (ex: DST etc.) among the recorded data you want to back up, the window which you can select the one of time-overlapped data will pop up and “Search” will be done according to the selected data. 2. When the DVR is under HDD overwriting mode, back up can be done from the data of more then 1 hour later of “Recorded start time” (Because when the overwriting is on working, the “Recorded start time” is changing continuously) Page 55 User manual CHAPTER 6. RECORD & BACKUP 4.Smart Backup Setup Bitrate Setup up Smart Backup picture quality. Resolution Setup up Smart Backup picture Resolution. Audio Select audio On or off when Smart backup. Page 56 User manual CHAPTER EXTERNAL DEVICE 7 CHAPTER 7. EXTERNAL DEVICE 1.RS232 Through the RS232 port, users can connect the DVR to a PC or other control devices to control the DVR. Users cannot change value in this setting. The baud rate setting is used to determine the speed setting between the DVR and external device using the RS-232C port. The RS-232C port uses two voltage states commonly known as MARK Baud Rate (negative) and SPACE (positive). The baud rate will vary depending on the required settings of the external device used with the RS-232C port. Please refer to the operational manual of the device. Data Bits The data bit setting is used to determine the order of transmission for the least significant bit (LSB) to the most significant bit (MSB). The optional settings are from 5 to 8 bits. The stop bit setting determines the last part of the data frame. These bits are always represented by Stop Bit a negative voltage and will determine when data transmission will cease. The options for the stop bits are 1, 1.5, and 2 bits. The parity bit is used as a simple method of error checking. This option specifies whether the parity Parity of the transmission will be None, Odd, or Even bits. Suppose the parity is chosen to be odd. The transmitter will then set the parity bit in such a way as to make an odd number of 1's among the data bits and the parity bit. Page 57 User manual CHAPTER 7. EXTERNAL DEVICE 2.PTZ In order for the DVR unit to control the PTZ (Pan Tilt Zoom) type camera you must properly connect the PTZ to the DVR unit. DO THIS FIRST Before configuring PTZ camera to the DVR, you must first check following items in order. Step 1. Check PTZ manual to see what protocol the PTZ camera uses. Step 2. Check for PTZ ID. Many PTZs have dip type switches that defines the ID number of the PTZ. If there is duplicate ID, you may experience improper movement among PTZs. Step 3 Make sure that you PTZ device ID starts from 0 or 1. Some PTZs first configurable ID is from 0. If your PTZ starts from ID 0, then set the dipswitch setting to set to have ID 1 or other ID numbers. Step 4 Check the type of connection your PTZ uses. RS-232 and RS-485 type of connection may be used to connect the PTZ. Check the type and connect it to the proper location marked behind the DVR unit. Step 5 Make sure that your PTZ is not connected together with other controller devices such as PTZ Joystick controllers. Especially, if you are using RS-232 type you may experience communication clash between the DVR unit and Joystick controller unit. Avoid having multiple devices controlling the PTZ camera, this may cause inoperability. Channel Protocol Control ID Baud Rate Data Bits Stop Bits Parity Baud PTZ Speed Test PTZ Copy Setting Channel Select the camera channel of the PTZ camera associated with the DVR camera connection input. Protocol Select from drop down list, your PTZ camera’s protocol setting. Control ID Baud Rate This is the section where you input the ID for the PTZ camera. It is very important to have different ID configured to the PTZ cameras. This drop down list shows all the possible baud rate configuration option that could be chosen. In this dropdown list bar you may select from 5 to 8 bits. This the length of the bits used to Data Bits communicate with PTZ and the DVR unit. Consult your PTZ manual to see what bit length your PTZ uses. Stop Bits Parity PTZ Speed In the dropdown list bar you may choose 1 or 2 for stop bit parameters. They are last bit being used by your PTZ. It is check sum bit parameter counted in either 0 or 1. Adjust PTZ move speed. Page 58 User manual Copy Setting Upon selecting the Copy Setting button, the Copy Setting popup will appear. This popup will enable you to select the PTZ camera configured, and enables you to copy. Test PTZ (Pan You may use the directional button here to test if your PTZ connection was successful. Upon and Tilt) successful configuration your PTZ should pan and tilt. CHAPTER 7. EXTERNAL DEVICE 3.PTZ Operation After setting the PTZ configuration you may operate the PTZ via the PTZ popup menu. First you must select the channel in the DVR unit that has PTZ configured and be at Full Screen view. PTZ Control Panel Bar On the frontal key pad press [PTZ] button and you will see PTZ tool bar as seen above. WIDE Used to Zoom In. TELE Used to Zoom Out. NEAR Focus In. FAR Focus out. OPEN Open Lens IRIS. CLOSE Close Lens IRIS. PRESET Open Preset window. EXIT JOYSTICK Exit PTZ Control Panel. Move camera for pan and tilt operation. Page 59 User manual SET Set a preset. CLEAR Clear Preset. GOTO Goto Preset AUTO Run atto pan PRESET POINT Display current present number. PRESET KEYPAD Display Preset number input keypad. EXIT Exit Preset CHAPTER 7. EXTERNAL DEVICE 3.IR Remote Control All controls located on the frontal keypad of the DVR may also be controlled via the IR remote controller (included). The buttons located on the remote controller correlate with the frontal keypad of the DVR. Press the “Menu” button on the remote controller to access the main menu of the DVR. Page 60 User manual CHAPTER NETWORK 8 CHAPTER 8. NETWORK 1.ETHERNET The Ethernet menu is used to configure a remote connection to the DVR via your Local Area Network or the World Wide Web. There are various options in this menu for different networking environments. MODE IP Address Subnet Mask Gateway Standard DNS Server MTU Enable Command Port Stream Port IP Detect There are two options, “Static” or “Dynamic”. A “Static” IP is used when you desire to use the same IP address with the DVR. By choosing this option, you are able to choose the addressing IP MODE information for the “Subnet Mask”, “Gateway”, and “Standard DNS Server”. A “Dynamic IP” address will be given to your DVR by your DHCP server. This is an automated process for IP address configuration. By choosing a “Dynamic IP” you will not be able to select the settings for “Subnet Mask”, “Gateway”, and “Standard DNS Server.” IP Address Subnet Mask Gateway Standard DNS Server You can only specify the “IP Address” if you have chosen “Static IP”. You can only specify the “Subnet Mask” if you have chosen “Static IP”. You can only specify the “Gateway” address if you have chosen “Static IP”. You can only specify the “Standard DNS Gateway” if you have chosen “Static IP”. This setting is recommended when using PPPoE or PPPoA (Minimum 100 Byte ~ Maximum MTU Enable 13312 Byte). To enable this setting, please check the box next to this option. Uncheck this option to disable this feature. If you have a standard Ethernet connection (Standard 8192 Byte), please uncheck this option. This setting is used to specify the remote configuration port when accessing the DVR from a Command Port remote location. (Caution: make sure that the Stream Port and the Command Port uses different port numbers) Stream Port This setting is used to specify the remote connection port for network video upload. Page 61 User manual Click the “Start” button to obtain your network’s addressing information from your DHCP server automatically. You will receive one of the following two messages when requesting your network’s addressing information: Request Success - You will receive this message if the DVR successfully received the requested network information. IP Direct Request Failure – You will receive this message if the DVR unsuccessfully received the requested network information. The DVR will continually request your network’s addressing information, or you may manually enter it by selecting “Static IP”. Static IP Address Error – If you receive this message, please confirm that the IP addressing information entered is correct. Once your desired settings have been made, please click on the “Save” button to apply the changes. If you desire to discard the changes made to this menu, please click on the “Cancel” button. CHAPTER 8. NETWORK 2.DDNS The DDNS menu is used to configure your DVR to connect to our DDNS server. DDNS DDNS Server Host ID Password Request DDNS DDNS Server Choose the DDNS function “On” or “Off” by selecting either value. Indicates DDNS host server. The “Host Name” is your DVR ID. This ID must be unique. You can access your DVR via your Host Name web browser by entering, “Your Host Name (ID)..com”. Your host name will be used instead of your DVR’s MAC address. ID Password You must specify an “ID” for access to our DDNS server. You must specify a “Password” for access to our DDNS server. Page 62 User manual After entering your “Host Name”, “ID”, and “Password”, press start to verify your information with our DDNS Server. You will receive one of the following messages after pressing “Start”: Request - Request in process. DDNS Success – All information have been successfully registered with our DDNS Server. Request DDNS Data Error – There is missing information. DDNS Connection Failure – Unable to connect with our DDNS Server. DDNS Login Information Failed – There is duplicate login information. DDNS Host Already Exists – There is a duplicate Host name. DDNS Unknown Error – Please contact technical support. Once your desired settings have been made, please click on the “Save” button to apply the changes. If you desire to discard the changes made to this menu, please click on the “Cancel” button. CHAPTER 8. NETWORK 3.SERVER SETUP Please click the “Web Server” tab to access the menu. Web Server Port Choose to turn the Web Server Function “On” or “Off”. You may specify the port number for the web server, or you may leave the default port setting of “80”. Please click the “NTP Server” tab to access the menu Page 63 User manual NTP Server Port Choose to turn the Web Server Function “On” or “Off”. Specify the port number for the NTP Server, or you may leave the default port setting of “123”. Once your desired settings have been made, please click on the “Save” button to apply the changes. If you desire to discard the changes made to this menu, please click on the “Cancel” button. To restore the original factory settings, please click on the “Default” button. CHAPTER 8. NETWORK 4.PPPOE The PPoE menu is used to specify the ID and password used with their ADSL Internet Service. PPPoE Choose to turn the PPoE function “On” or “Off”. ID Enter the ID associated with your ADSL service. Password Request Enter the Password associated with your ADSL service. Press the “Start” button to establish a connection with your Internet Service Provider. Retry Count Specify the number of times the DVR will retry to connect with your Internet Service Provider (1~100 Times). Specify how often, in seconds (1~60), your DVR will try to connect with your Internet Service Retry Interval Provider. You will see one of the following messages when trying to connect to your Internet Service Provider: Connection request in progress. Request PPPoE Retry Count – The number of attempts to connect to your Internet Service Provider. PPPoE Connected – Connection is established. PPPoE Disconnect – Connection is terminated. Once your desired settings have been made, please click on the “Save” button to apply the changes. If you desire to discard the changes made to this menu, please click on the “Cancel” button.To restore the original factory settings, please click on the “Default” button. Page 64 User manual CHAPTER 8. NETWORK 5NOTIFICATION Notification: Please choose the events you would like the DVR to notify, e.g. Alarm, Motion Detection, Disk Full, Admin Password Changed, Video Loss, and Power On/Off. Please click on the “Email” tab to access the menu. Once your desired settings have been made, please click on the “Save” button to apply the changes. If you desire to discard the changes made to this menu, please click on the “Cancel” button. To restore the original factory settings, please click on the “Default” button. Email Send Email Choose to turn the Send Email function “On” or “Off”. Send Server Enter your SMTP server address here. Send Port Send Server ID Enter your SMTP server port here. Enter the user ID associated with your SMTP server account. Send Server PW Enter the password associated with your SMTP server account. Sender Enter the sender’s emails address here. Recipient1 Enter the recipients email address here. Recipient2 Enter a second recipient’s email address here (optional). You will receive one of the following two messages when clicking on the “Email Test” button: Request Success – The email notification test was successful. Request Failure – The email notification test failed. Page 65 User manual The “Event” tab is used to specify a server to send event notifications to. IP Address Specify an IP address of the PC that has the installed Event Server Program. Mode Port Specify the type of event to send, such as Alarm, Motion, Video Loss, or All. Specify the port number for the PC that has the installed Event Server Program. Please use the “+” button to add a schedule item. To remove a scheduled item, check the corresponding box and click on “-“. +/- :Press this button to go to the first page : Press this button to go to the previous page : Press this button to go to the next page : Press this button to go to the last page Please click on the “Notification” or “E-Mail” tab to access the menu. Page 66 User manual CHAPTER OTHER 9 CHAPTER 9. OTHER 1.System Information Current software version (also referred to as a firmware) and hardware version is indicated in this section. You may access this window by utilizing the drop down button located on the left hand corner for quick navigation. Make sure that from the drop down list you select System Information. System information with Version tab selected CHAPTER 9. OTHER 2.Firmware(S/W) upgrade Software Version Update 1. To update the software version to newly available software revision, please copy the software file to the removable USB memory stick device. 2. After check for the update file on the USB media device, insert the USB memory stick device to the USB port located on the front of the DVR. Navigate to System Information window and click Update button located on the center of the window. Popup window will appear as shown above, please click start to initiate the software update. Page 67 User manual If the USB memory stick is not present or file is not correct software file, system will prompt error message. You must use caution when updating software to the DVR unit. These conditions are must be kept when upgrading software (firmware) for the DVR unit. 1. Check that software image on USB memory stick has same size as file copied from. 2. Do not power off the system during software (firmware) update. 3. Do not perform software (firmware) update with different product's software image. 4. Be sure to wait for system prompt, turn off DVR unit when told so by the prompt by the DVR unit. 5. After software (firmware) update make sure to perform factory default procedure. CHAPTER 9. OTHER 3.Storage Local HDD Table Quick Access(1) ODD table Media Check Quick Access(2) The Storage tab window displays information about storage devices that are being used as your main location for the video images. Each drive’s name, total size currently allocated with data and wellness of the hard disk drive is indicated in this window. Local HDD table Shows the detailed status information regarding locally installed hard disk drives. ODD table Shows the detailed status information regarding Optical Disk Drive(DVD-R) Quick Access(1) It is a button that enables HDD clear window. It enables quick access to Hard disk clear operation. Quick Access(2) It is a button that enables Backup window. It enables quick access to backup procedure. Media Check Shows how much recorded data is in an inserted DVD media. You may have up to maximum of four hard disk drive internally, or three internal hard disk drive and one extension hard disk drive externally the via E-SATA. In the table under Local HDD No. represents internal hard disk drive ID. In the table under Local HDD Name represents the hard disk name and model is displayed. The Used / Total section indicates current usage for the particular hard disk drive with data written by the DVR unit. Page 68 User manual If you had chosen the option to overwrite then the Used portion will be equal to the Total portion after reaching maximum recording capacity. The overwrite option will start erasing earliest recorded data and replace it with current recording data. If you have multiple hard disk drives installed, then first drive will be written and when data is full then the DVR will start recording to the next available drive until they are all full. When all drives all completely full, then earliest recorded data will be replaced with current recorded data. It is the user’s responsibility to backup critical evidence information. If the evidence worth video is overwritten, there is no option recover such data. On the DVR system health status is represented in % sign, and in () it indicates the temperature of the hard disk drive represented by Celsius. Normal operating temperature of any hard disk drive should be in range of 0~60°C. Recommended optimum temperature range is between 36°C and 47˚C (about 97° Fahrenheit to 117° Fahrenheit). Every hard disk manufacturer may have different range and tolerance, please consult with your hard disk manufacturer for operating temperature range. If hard disk drive is running hotter than recommended temperature provided by the hard disk manufacture, then please check to see if the DVR unit’s ventilation is not blocked and check your room temperature immediately. Failure to do so will damage the DVR and the hard disk drive. Extension HDD table Extension hard disk drive may be mounted on the DVR for alternative increase of the hard disk storage option for the DVR. Utilization of E-SATA standards enables user to mount E-SATA compliant storage devices and external storage solutions. Often times these solutions are used to implement RAID solution and increase hard disk storage capacity. There are certain limitations when using such option and please check below items before deciding to use external E-SATA storage solution. CHECK LIST BEFORE USING EXTERNAL E-SATA STOREAGE SOLUTION 1. There must only be three or less internal hard disk drive present before E-SATA utilization. 2. External E-SATA device must be configured using one volume. You may have multiple drives by utilizing RAID enclosure. However they must be shown as single volume after configuration. (please consult with external hard disk enclosure manufacturer for details) Note: Simple single drive E-SATA enclosures will operate without any compatibility issues, however E-SATA drives must also be one of the drive that are compatible with the DVR system. Please check with your dealer for hard disk compatibility list. Quick Access button The Quick Access button is provided to jump to the HDD Clear window section. It is in this HDD Clear window section that you could clear all data items for the hard disk drives installed for the DVR unit. This button will invoke HDD Clear window. Page 69 User manual CHAPTER SEARCH & PLAYBACK 10 The search and playback menus are used to review the recorded video data on the DVR. There are multiple search options you may use to find the desired video you wish to view. The following are the search queries you may use: CHAPTER 10. PLAYBACK & PLAYBACK 1.Date/Time Search This option allows you to access specific recorded video data by Year, Month, Day, Hour, Minute, and Record Time Year / Month Calendar Date & Time Cancel Search Play Record Time Year / Month The record time section displays the entire recorded video database represented by a time range, from the earliest available recording to the most current available recording. The year and month option is used to display or navigate to the desired calendar date with recorded video data. Select the drop down menu to jump to specify the year and month. The calendar will display the days for the selected year and month. Days with recorded video Calendar data will be shown in bolded red color font. Select the desired day with recorded video data, and then press search. Date and Time Use the date and time option to jump to the desired section of recorded video data. You are able to choose the year, month, day, hour, minute and second. Cancel The cancel button is used to close the search window. Search Search is used to open the hour selection menu. Play The play button will begin playback of the recorded video by the selected date and time. Page 70 User manual Date search Window Hour selection window Chick Recorded Date (Red color number) can open Hour selection window. Select Time Hour Display Cancel Detail Play Select Time The select time will display the date and time specified by the user. The hour display will show the available recorded video data on the DVR for the specified date. The color indicator represents the following: Red – Panic Recording Hour Display Orange/Yellow – Alarm Recording Green – Motion Recording Purple – Pre-Alarm Recording Blue – Continuous Recording Cancel Detail Play The cancel button is used to close the current search window The detail button will open the minute search setting. The minute and search window is used to specify which minute you wish to review for the selected hour. The play button will begin playback of the recorded video by the selected date and time. Page 71 User manual Double Chick Hour (0~23) can open Min selection window Select Time Hour Display Cancel Detail Play Select Time Minute Display Cancel Play The select time will display the date and time specified by the user. The minute display section will show the available recorded video data in minutes. The cancel button will close the current search window. Press the play button to begin playback of the recorded video data by the selected minute of the selected hour. Double Click Min(0~55) can start to play. Page 72 User manual CHAPTER 10. PLAYBACK & PLAYBACK 2.Event Search This option allows you to search specific recorded data by “Event”. “Events” are classified as Panic, Alarm, Motion, Video Loss. “Event Search” allows a faster search method if the user prefers to view only “Event” recordings. Panic Panic recording is a type of recording engaged by pressing the “Panic” button on the frontal keypad of the DVR, or by the OSD (On Screen Display). “Panic” record is also referred to as “Forced Recording”. Alarm Alarm recording is a type of recording that is triggered by sensors connected to the alarm panel of the DVR. Motion, IR, and heat sensors are just a few examples of the possible sensors that can be used to trigger recordings. Motion Motion recording is a type of recording that is triggered by the motion captured events on the DVR. Video Loss Video Loss indicates the moment that a video loss happened Channel Event Type Event Start Event End Cancel Search Channel Use this option to select the desired channels for event playback. You may choose an individual channel, a group of channels, or all channels. The event type option is used to choose what type of events you wish to search for. The options Event Type for the type of events are: Panic / Alarm / Motion / Video loss You may choose an individual event type. Event Start Event End Cancel Search The event start is used to select a start time for the DVR to search for the specified events. You can specify both date and time. The event end is used to select the end time for the DVR to search for the specified events. You can specify both date and time. The cancel button is used to close the current search window. The search button is use to initiate the event search process. By pressing the search button this will open the event search list window below. Page 73 User manual Last play time Event list Page Select Cancel Last play time Event list Cancel The last play time indicates the latest playback time of a bookmark. This list shows date and time at which the event was created. You may choose an event to play. The cancel button is used to close the current search window. Page 74 User manual CHAPTER 10. PLAYBACK & PLAYBACK 3.Bookmark Search Book mark search allows the user to search for recorded video data by the indicators (book marks) placed during playback. While reviewing recorded video data, you are able to place book marks by clicking “b. mark” from the pop-up menu, or by pressing “B. Mark” from the frontal keypad. To access the book mark search function, right click the live view screen with your mouse and choose search than book mark. From the front keypad, press search than choose book mark. The following window will be displayed. Last Play Time Bookmark Date/Time Record Date/Time Play Page Select Remove Cancel Last Play Time The last play time indicates the latest playback time of a bookmark. Play The play button begins the playback function of the selected bookmark. Bookmark This list shows date and time at which the book mark was created. Date/Time Record Date/Time This list shows the actual date and time from which the corresponding bookmark was created. Cancel Page Select Remove This button closes the current search window. This function is used to go to the next page, or you may jump to a specific page by pressing the … button and entering the page number. This option enables you to remove the selected bookmark listed. Make sure to check the box next to the corresponding bookmark on the list before removing it. Page 75 User manual REMOTE CONNECT & CHAPTER 11 BACKUP PLAYER Web Viewer supports for Remote Viewer and Search. Remote Viewer allows user to watch live display by internet connection. Remote Search allows user to watch recorded image by internet connection. CHAPTER 11. REMOTE CONNECT & BACKUP PLAYER 1.Web Remote Viewer Remote Viewer allows user to watch live display by internet connection. User may input IP address of DVR on the address section of web browser. When it runs properly, user may input Port, ID and Password on the Login section. Then click ‘Connect’ allows connecting with DVR. ※ Directly place DDNS server address or DVR IP address on IE address bar for connection. For instance: (1) http://DVR IP : WEB PORT (2) http://DOMAIN.gotoddns.com:WEB PORT IP / PORT ID / PW Connect Disconnect Mode Status Channel PTZ Speaker MIC IP / PORT / ID / PW Enter DVR IP address, port, ID and password manually, or retrieve information from IRS setup. Connect / Disconnect Status PTZ Channel 01~16 Mode Speaker MIC CONNECT- Connect to DVR. DISCONNECT- Stop the connection with DVR. Shows the current connection status. Control PTZ via network. User may choose specific channel Screen division mode. It allows selecting Audio on/off and Audio channel. It allows communicating by Two-Way Audio when Mic function is on. Page 76 User manual CHAPTER 11. REMOTE CONNECT & BACKUP PLAYER 2.Remote Search IP / PORT ID / PW Connect Disconnect Search Bar Status Start / End SAVE/ Save ASF/Print Channel Search function Mode MIC Speaker IP / PORT / ID / PW Enter DVR IP address, port, ID and password manually, or retrieve information from IRS setup. Connect / Disconnect Status Start / End CONNECT- Connect to DVR. DISCONNECT- Stop the connection with DVR. Shows the current connection status. It shows that the start time and end time of the recording Data. Save- Save current selected image by JPEG. Save / Save ASF/print Save ASF- Save the video of selected channel by ASF Print- Print current selected image Channel 01~16 Mode Speaker MIC Search Bar Search function Select the channel number of camera to be displayed. Screen division mode. It allows selecting Audio on/off and Audio channel. It allows communicating by Two-Way Audio when Mic function is on. Enables to search recorded data by using this bar. Play panels-It allows operating all the playback function. (Forward, Backward, fast, pause, etc) Goto Search - User may search detail time and date. Page 77 User manual CHAPTER 11. REMOTE CONNECT & BACKUP PLAYER 3.Backup Player When system backup record data to CD/DVD or USB memory stick it put backup player automatically . Backup file format is : *.HR4 Tool Bar Search Bar Play function Play speed Tool Bar Function for Open,Save,Split mode,Channel1~16 and Audio channel. Search Bar Enables to search recorded data by using this bar. Play Speed Select playback speed(1/6X~16X). Play function Function bar on playback. Page 78