1
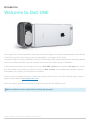
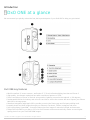
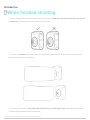
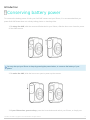
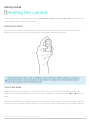
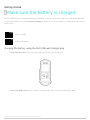
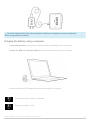
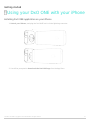
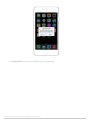
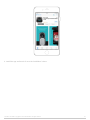
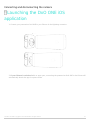
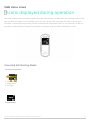
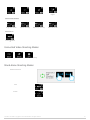
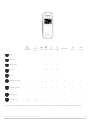
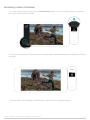
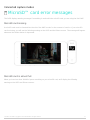
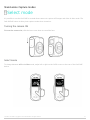
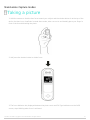
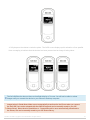
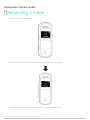
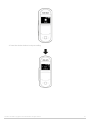
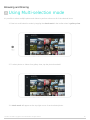
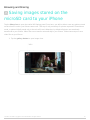
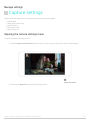
Table of Contents Introduction ........................................................................................................................................... 1 Welcome ........................................................................................................................................ 1 DxO ONE at a glance ...................................................................................................................... 2 What's in the box ........................................................................................................................... 3 Quick start ..................................................................................................................................... 4 When finished shooting .................................................................................................................. 7 Conserving battery power .............................................................................................................. 9 Safety precautions ....................................................................................................................... 11 Certifications ................................................................................................................................ 12 Getting Started ................................................................................................................................... 14 Inserting the microSD card .......................................................................................................... 14 Holding the camera ...................................................................................................................... 16 Make sure the battery is charged ................................................................................................ 18 Using your DxO ONE with your iPhone ......................................................................................... 21 Processing your images with DxO Connect .................................................................................. 25 Formatting the microSD Card ...................................................................................................... 27 Connecting and disconnecting the camera ......................................................................................... 29 Turning the camera On and Off .................................................................................................... 29 Opening the DxO ONE connector ................................................................................................. 30 Connecting the camera to the iPhone .......................................................................................... 31 Closing the DxO ONE connector ................................................................................................... 32 Launching the DxO ONE iOS application ...................................................................................... 34 OLED status screen ............................................................................................................................. 36 Icons displayed during operation ................................................................................................. 36 Connected capture modes .................................................................................................................. 40 DxO ONE App at a glance ............................................................................................................ 40 Taking a picture ........................................................................................................................... 41 Changing the capture mode ......................................................................................................... 46 Using scene modes ...................................................................................................................... 48 Using the advanced modes .......................................................................................................... 51 Video mode .................................................................................................................................. 61 Activating flash ............................................................................................................................ 66 Activating timer mode .................................................................................................................. 67 Selfie mode .................................................................................................................................. 68 Super RAW ................................................................................................................................... 70 MicroSD card error messages ...................................................................................................... 71 Stand-alone Capture modes ................................................................................................................ 73 Select mode ................................................................................................................................. 73 Taking a picture ........................................................................................................................... 75 Recording a video ........................................................................................................................ 77 Browsing and Sharing ......................................................................................................................... 79 Single photo review ..................................................................................................................... 79 Video review ................................................................................................................................ 82 Deleting photos in single image view ........................................................................................... 84 Favorite photos ............................................................................................................................ 86 Gallery view ................................................................................................................................. 87 Using Multi-selection mode .......................................................................................................... 90 DxO ONE - User Guide - Copyright © DxO Labs 1999-2015 - All rights reserved Sharing your photos ..................................................................................................................... 93 Saving images stored on the microSD card to your iPhone ......................................................... 97 Printing your photos ..................................................................................................................... 99 Manage settings ................................................................................................................................ 100 Capture settings ......................................................................................................................... 100 Application Settings ................................................................................................................... 104 Index and Assistance ........................................................................................................................ 106 Optional accessories .................................................................................................................. 106 Firmware Updates ...................................................................................................................... 107 DxO ONE Warranty Card ................................................................................................................... 110 DxO ONE - User Guide - Copyright © DxO Labs 1999-2015 - All rights reserved Introduction Welcome to DxO ONE You are part of a world of people who really care about great images. Your camera was designed in Paris and Sa n Francisco by a team of top image scientists and engineers. It leverages DxO’s worldrenowned image processing capabilities to produce professional quality photographs that are seamlessly transfe rred to your iPhone and iPad so you can instantly share them with friends, family and followers. In this user documentation, we’ll introduce you to the DxO ONE camera, the companion iOS app that controls the camera when connected to your iPhone or iPad, and DxO Connect, the complementary desktop software that enables you to make your best photos even better. If there's a topic or question that isn't covered here, please reach out to us. Our DxO Customer Support team is always ready to help at http://support.dxo.com/. Be sure to capture (and share) your best moments, wherever the DxO ONE takes you. We’ll use iPhone to refer to both iPhone and iPad going forward. DxO ONE - User Guide - Copyright © DxO Labs 1999-2015 - All rights reserved 1 Introduction DxO ONE at a glance We recommend you quickly review the few, but important parts of your DxO ONE to help you get started. DxO ONE key features ● ● ● ● ● ● ● ● World’s smallest 1” sensor camera – well under 3” (7.6 cm) tall and weighing less than an iPhone 6. High quality, six-element aspherical lens with a maximum aperture of f/1.8. Direct connection to iPhone or iPad via an innovative Lightning connector that swivels +/- 60 degrees. Rechargeable lithium-ion battery and microSD card slot to ensure the camera will never impact your iPhone talk time or storage space. Seamless integration with Apple iOS to provide access to the Photos app and 3rd-party editing tools. Instantly share DxO ONE images through your iPhone to Facebook, Twitter, Instagram and more. DxO’s proprietary SuperRAW™ format provides noise-free images in extreme low light environments. Tether the DxO ONE to your Mac or PC to let DxO Connect software automatically render an even higher quality photo from your DxO ONE RAW images. DxO ONE - User Guide - Copyright © DxO Labs 1999-2015 - All rights reserved 2 Introduction What's in the box Before use, make sure the following items are included in the package of your DxO ONE. If anything is missing, please contact your retailer. ● DxO ONE Camera ● Supplied USB Cord and Wall Charger Plug ● ● Cleaning Cloth Getting Started booklet Memory card is not included. DxO ONE - User Guide - Copyright © DxO Labs 1999-2015 - All rights reserved 3 Introduction Quick start 1. Insert a UHS-1 U3 microSD card (not included) 2. Slide the lens cover down to power on the DxO ONE. You’re ready to capture detailed photos and dynamic videos with the ONE in stand-alone mode. 3. Slide the lens cover further down to open the integrated Lightning Connector. DxO ONE - User Guide - Copyright © DxO Labs 1999-2015 - All rights reserved 4 4. You’re now ready to attach the ONE to your iPhone. When first connected, you will be prompted to access and install the DxO ONE app for iOS, which is available from the App Store as a free download. 5. You are now ready to control every aspect of your DxO ONE camera via the iOS app. DxO ONE - User Guide - Copyright © DxO Labs 1999-2015 - All rights reserved 5 DxO ONE - User Guide - Copyright © DxO Labs 1999-2015 - All rights reserved 6 Introduction When finished shooting 1. Before detaching the DxO ONE camera from your iPhone, align the connector with the dots on the circular hub. The black dot should align with the red dot. 2. You can now detach the camera from your iPhone by pulling the two devices apart (do not fold the phone onto the camera to release). 3. To close the connector, slide and hold the lens cover all the way down while gently pushing the connector flat (recessed in the circular hub). DxO ONE - User Guide - Copyright © DxO Labs 1999-2015 - All rights reserved 7 You should not have to force the connector down. If it won’t recess, check again to make sure you’ve aligned the dots on the circular hub, and try again. 4. Slide the lens cover closed to power off the camera. DxO ONE - User Guide - Copyright © DxO Labs 1999-2015 - All rights reserved 8 Introduction Conserving battery power To conserve the battery power of both your DxO ONE camera and your iPhone, it is recommended that you power DxO ONE down when not actively taking photos or shooting video. 1. To sleep the ONE, with the camera still attached to your iPhone, slide the lens cover closed to power off the ONE camera. You may also put your iPhone to sleep by pressing the power button, to conserve the battery of your phone. 2. To wake the ONE, slide the lens cover open to power up the camera. 3. If your iPhone has gone to sleep, press the home button and unlock your iPhone, or simply use DxO ONE - User Guide - Copyright © DxO Labs 1999-2015 - All rights reserved 9 Touch ID if you have this feature. To conserve the battery power of both your DxO ONE camera and your iPhone, it is recommended that you power DxO ONE down when not actively taking photos or video. 4. For brief periods in between actively taking photos, your DxO ONE will automatically switch to Power Saving mode. 5. To wake your DxO ONE from Power Saving mode, simply tap the iPhone display, or press the physical shutter half way. DxO ONE - User Guide - Copyright © DxO Labs 1999-2015 - All rights reserved 10 Introduction Safety precautions Before you use your DxO ONE camera, it is important that you read this safety information and the user guide found on the DxO website: support.dxo.com. Retain this safety information for future reference. Precautions carrying, using, and cleaning your DxO ONE ● ● Built-in battery: The DxO ONE lithium-ion battery cannot be replaced. Don’t attempt to access or replace the built-in lithium-ion battery: you may damage it, which could cause overheating and injury. Be sure to comply with local regulations when disposing of the DxO ONE camera; do not dispose of it as household waste. Water damage: The DxO ONE camera is not waterproof and should not be used in wet conditions or underwater. Avoid contact with water, dust, sand or salt. These could cause a malfunction. Wipe the camera to dry off any rain or water drops. If your DXO ONE camera comes in contact with liquids, this may cause a short circuit, a fire, or an electric shock. If the DxO ONE connector gets wet, do not plug it into your iPhone® or iPad®; this would damage both your camera and your iPhone or iPad. If your iPhone or iPad port is wet or dirty, do not attach your DxO ONE camera. Do not handle the power adapter with wet hands. This can cause an electric shock. USB cable and power adapter: Use the USB cable and power adapter included with your DxO ONE camera. Use of a non-DxO power adapter may pose a risk of fire or serious harm to you or your DxO ONE camera. Using a damaged cable or power adapter can cause fire, electric shock, injury, or damage to DxO ONE camera. Do not attempt to disassemble the USB cable or power adapter, as it may cause personal injury. Camera cleaning: Do not clean the camera with organic solvents such as thinner, alcohol, and benzene. Use the included lens cloth to remove dust accumulated on the lens. Operating environment: Use the camera at ambient temperatures between 0°C (32°F) and 40°C (104°F). Environmental conditions: Do not leave the camera in excessive heat such as in a car in direct light. High temperatures can cause the camera to malfunction. Repairs: Do not attempt to disassemble or make any repairs to your DxO ONE camera. The device contains small parts that may be a choking hazard or otherwise cause bodily injury. Driving: Do not operate your DxO ONE camera while you are driving a vehicle. Such use may be illegal, and may place you and others at greater risk of an accident causing serious injury, death, or property damage. Disposal: Do not dispose of your DxO ONE camera in a fire. This may cause an explosion or result in serious bodily injury, death or damage to property. Using DxO ONE with other Devices: Only use your DxO ONE camera with approved and supported devices. Use of DxO ONE with non approved or unsupported devices may cause damage to your DxO ONE camera and to the other device. ● ● ● ● ● ● ● ● ● ● ● DxO ONE - User Guide - Copyright © DxO Labs 1999-2015 - All rights reserved 11 Introduction Certifications This device complies with Part 15 of the FCC Rules. Operation is subject to the following two conditions: (1) this device may not cause harmful interference, and (2) this device must accept any interference received, including interference that may cause undesired operation. Caution: changes / modifications to this product which are not approved by DxO could void the user’s authority to operate the product. Note: This equipment has been tested and found to comply with the limits for a Class B digital device, pursuant to part 15 of the FCC Rules. These limits are designed to provide reasonable protection against harmful interference in a residential installation. This equipment generates, uses and can radiate radio frequency energy and, if not installed and used in accordance with the instructions, may cause harmful interference to radio communications. However, there is no guarantee that interference will not occur in a particular installation. If this equipment does cause harmful interference to radio or television reception, which can be determined by turning the equipment off and on, the user is encouraged to try to correct the interference by one or more of the following measures: Reorient or relocate the receiving antenna. Increase the separation between the equipment and receiver. Connect the equipment into an outlet on a circuit different from that to which the receiver is connected. Consult the dealer or an experienced radio/TV technician for help. This device is designed and manufactured not to exceed the emission limits for exposure to radio frequency (RF) ● ● ● ● energy set by the Federal Communications Commission for an uncontrolled environment. CE RF Exposure Compliance - This device meets the EU requirements (1999/519/EC) and the International Commission on Non-Ionizing Radiation Protection (ICNIRP) on the limitation of exposure of the general public to electromagnetic fields by way of health protection. This Class B digital apparatus complies with CAN ICES-3 (B)/NMB-3(B). This device complies with Industry Canada license-exempt RSS standard(s). Operation is subject to the following two conditions: this device may not cause interference, and this device must accept any interference, including interference that may cause undesired operation of the device. The device could automatically discontinue transmission in case of absence of information to transmit, or ● ● operational failure. Note that this is not intended to prohibit transmission of control or signaling information or the use of repetitive codes where required by the technology. ● ● The device for operation in the band 5150–5250 MHz is only for indoor use to reduce the potential for harmful interference to co-channel mobile satellite systems; The maximum antenna gain permitted for devices in the bands 5250–5350 MHz and 5470–5725 MHz shall comply with the e.i.r.p. limit; and DxO ONE - User Guide - Copyright © DxO Labs 1999-2015 - All rights reserved 12 The maximum antenna gain permitted for devices in the band 5725–5825 MHz shall comply with the e.i.r.p. limits specified for pointto- point and non point-to-point operation as appropriate. In addition, high-power radars are allocated as primary users (i.e. priority users) of the bands 5250–5350 MHz ● and 5650–5850 MHz and that these radars could cause interference and/or damage to LE-LAN devices. The radiated output power of the Wireless Device is below the Industry Canada (IC) radio frequency exposure limits. The Wireless Device should be used in such a manner such that the potential for human contact during normal operation is minimized. The WEEE symbol on the product and its packaging (crossed out waste bin) indicates that this product must not be disposed of with your other household waste. Instead, it is your responsibility to dispose of your waste equipment by handing it over to a designated collection point for the recycling of waste electrical and electronic equipment. The separate collection and recycling of your waste equipment at the time of disposal will help conserve natural resources and ensure that it is recycled in a manner that protects human health and the environment. For more information about where you can drop off your waste for recycling, please contact your local authority, or where you purchased your product. “Made for iPhone” and “Made for iPad” mean that an electronic accessory has been designed to connect specifically to iPhone or iPad, respectively, and has been certified by the developer to meet Apple performance standards. Apple is not responsible for the operation of this device or its compliance with safety and regulatory standards. Please note that the use of this accessory with iPhone or iPad may affect wireless performance. Only use DxO ONE with the specific models of iPhone and iPad that are identified in your user manual. iPad and iPhone are trademarks of Apple Inc., registered in the U.S. and other countries. iPad Air and iPad mini are trademarks of Apple Inc. Hereby, DxO declares that this camera is in compliance with the essential requirements and other relevant provisions of Directive 1999/5/EC. DxO ONE - User Guide - Copyright © DxO Labs 1999-2015 - All rights reserved 13 Getting Started Inserting the UHS-1 U3 microSD card™ The microSD™ card slot is located behind the door on the back of the DxO ONE device. You’ll find both the microSD™ card slot and the microUSB connector under this door. Check and make sure that microSD™ card is inserted before using your DxO ONE, as it will not operate without a microSD™ card. 1. Open the door by lightly pulling on the latch door. 2. Insert the microSD™ card into the microSD™ card slot with the connector pads facing forward toward the Lightning connector side of the camera, and press down on it to insert it. The card will click firmly into place. DxO ONE - User Guide - Copyright © DxO Labs 1999-2015 - All rights reserved 14 3. To remove the SD card, simply press down on it and it will pop up for removal. Use caution to keep the card aligned while inserting or removing the card. Do not force the microSD card into the slot. If excessive force is required, it is most likely not positioned correctly. DxO ONE - User Guide - Copyright © DxO Labs 1999-2015 - All rights reserved 15 Getting started Holding the camera The DxO ONE camera has two operating modes, Stand-alone mode and Connected mode, and can be used to take still and video images in both modes. Stand-Alone Mode Your DxO ONE is a fully functioning miniature camera, even when not connected to your iPhone. Press the shutter button on top of the ONE to take photos or record videos in stand-alone mode. The DxO ONE does not have a built-in viewfinder, and you will not be able to preview your images, or review them until you connect the camera to your iPhone or computer. The camera operates only in auto mode only when used in Stand-alone mode. Connected Mode When the DxO One is attached to your iPhone, you will be able to access all of the shooting modes of the camera, and use the attached iPhone LCD screen as your viewfinder for previewing and reviewing images and video. Attach the DxO ONE to the lightning connection on your iPhone so that the lens of the camera faces away from you and the LCD of the phone faces toward you. You can use the ONE in either landscape or portrait orientation. DxO ONE - User Guide - Copyright © DxO Labs 1999-2015 - All rights reserved 16 Connected Selfie Mode You’ll also be able to use the DxO ONE in Selfie Mode when it is connected to your iPhone. 1. Connect the DxO ONE to the lightning connection with the lens of the camera facing toward you. 2. The camera will now be in your left hand, and the shutter button at the top. 3. You may use either the physical shutter button, or the soft shutter button on the display to trigger a selfie. DxO ONE - User Guide - Copyright © DxO Labs 1999-2015 - All rights reserved 17 Getting started Make sure the battery is charged The DxO ONE includes an integrated lithium-ion battery. It can be charged by using the provided DxO ONE USB cord and wall charger plug. The amount of charge available in the camera battery is displayed on the camera OLED screen: Battery charged Battery uncharged Charging the battery using the DxO ONE wall charger plug 1. Open the rear door of the camera by pulling the latch door toward you. 2. Insert the USB cord into the USB slot, and attach the other end to the wall charger plug. DxO ONE - User Guide - Copyright © DxO Labs 1999-2015 - All rights reserved 18 The OLED display will first take a few moments to identify the charging source before displaying the charge state of the device. Charging the battery using a computer 1. Open the rear door of the camera by lifting the tab and pulling the door toward you. 2. Insert the USB cord into the USB slot, and attach the other end to your computer. 3. Make sure that the OLED display indicates that charging is in progress: Charging in progress - Battery uncharged Charging in progress - 50% DxO ONE - User Guide - Copyright © DxO Labs 1999-2015 - All rights reserved 19 Charging in progress - Battery charged Charging times vary when using a computer. DxO ONE - User Guide - Copyright © DxO Labs 1999-2015 - All rights reserved 20 Getting started Using your DxO ONE with your iPhone Installing DxO ONE application on your iPhone 1. Unlock your iPhone, and plug the DxO ONE into it via the lightning connector. 2. You will be prompted to download the DxO ONE app from the App Store. DxO ONE - User Guide - Copyright © DxO Labs 1999-2015 - All rights reserved 21 3. Click App Store to open the DxO ONE page in the App Store. DxO ONE - User Guide - Copyright © DxO Labs 1999-2015 - All rights reserved 22 4. Install the app and launch it once the installation is done. DxO ONE - User Guide - Copyright © DxO Labs 1999-2015 - All rights reserved 23 5. You will be prompted to allow DxO ONE to access your location while using the app. 6. An automated instruction booklet will help get you started. DxO ONE - User Guide - Copyright © DxO Labs 1999-2015 - All rights reserved 24 Getting started Processing your images with DxO Connect Apply automated image processing to your best DxO ONE photos to make them look even better. 1. Download DxO Connect from our website. ● ● Windows OS X 2. Plug the DxO ONE into your Mac or PC. 3. DxO Connect will automatically launch and allow you to apply image processing to your selected photos. DxO ONE - User Guide - Copyright © DxO Labs 1999-2015 - All rights reserved 25 4. You may also use DxO Connect to import your DxO ONE photos directly to DxO FilmPack to apply analog film looks to your digital images, or to DxO OpticsPro which allows you to control every aspect of the RAW image. DxO ONE - User Guide - Copyright © DxO Labs 1999-2015 - All rights reserved 26 Getting started Formatting the microSD Card™ 1. Open the DxO ONE app settings panel by tapping the gallery view button at the top left of the toolbar. 2. Tap the App settings button to enter the app settings. DxO ONE - User Guide - Copyright © DxO Labs 1999-2015 - All rights reserved 27 3. Choose Format micro SD Card, and open by tapping. 4. A pop up will appear and ask if you wish to format the microSD card. 5. Tap Format to confirm. All existing data on the microSD card will be lost Do not disconnect the camera during the formatting process. DxO ONE - User Guide - Copyright © DxO Labs 1999-2015 - All rights reserved 28 Connecting and disconnecting the camera Turning the camera On and Off The DxO ONE camera has two operating modes, Stand-alone mode and Connected mode. When the DxO ONE is connected to an iPhone, you have access to the full functionality of the camera and control over shooting modes, aperture, shutter speed, exposure compensation, focus mode and metering modes, ISO and more. In Standalone mode, when not connected to an iPhone, the camera uses the auto settings for still photos and videos. The lens cover, located on the front of the DxO ONE, is also the camera’s On/Off switch. 1. To turn the camera On, slide the lens cover down to reveal the lens. 2. To turn the camera Off, slide the lens cover back over the lens. DxO ONE - User Guide - Copyright © DxO Labs 1999-2015 - All rights reserved 29 Connecting and disconnecting the camera Opening the DxO ONE connector In order to connect the DxO ONE to your iPhone, you will need to open the DxO ONE lightning. 1. Slide the lens cover down to power on the DxO ONE. 2. Slide the lens cover further down to cause the connector to pop out of the circular hub. DxO ONE - User Guide - Copyright © DxO Labs 1999-2015 - All rights reserved 30 Connecting and disconnecting the camera Connecting the camera to the iPhone To connect your DxO ONE to your iPhone, insert the lightning connector on the DxO one into the lightning slot on the bottom of your iPhone. DxO ONE - User Guide - Copyright © DxO Labs 1999-2015 - All rights reserved 31 Connecting and disconnecting the camera Closing the DxO ONE connector 1. Return the DxO ONE lightning connector to the circular hub by first aligning the dots on the ring on the outside of the connector. You will hear a click when the dots align. 2. Once the dots are aligned, the lightning connector can be returned to the circular hub by manually folding it closed while simultaneously sliding the lens cover past the On position. DxO ONE - User Guide - Copyright © DxO Labs 1999-2015 - All rights reserved 32 If the dots are not aligned you will not be able to return the connector to the circular hub. Do not force the connector closed. DxO ONE - User Guide - Copyright © DxO Labs 1999-2015 - All rights reserved 33 Connecting and disconnecting the camera Launching the DxO ONE iOS application 1. Connect your powered-on DxO ONE to your iPhone via the lightning connector. 2. If your iPhone is unlocked with no apps open, connecting the powered-on DxO ONE to the iPhone will automatically launch the app in capture mode. DxO ONE - User Guide - Copyright © DxO Labs 1999-2015 - All rights reserved 34 3. If there is an app running when you connect your DxO ONE to your iPhone, you will need to touch the home button to return to the home screen, then open the DxO ONE app by tapping its icon. If your iPhone is locked, you will need to unlock it, then launch the DxO ONE App by tapping on its icon. DxO ONE - User Guide - Copyright © DxO Labs 1999-2015 - All rights reserved 35 OLED status screen Icons displayed during operation The OLED Display on the DxO ONE provides information about battery charge state, the shooting mode and file type selected, the image count remaining on the microSD card, the file type being recorded as well as error messages if something has gone awry in both connected and stand-alone modes. It also provides you with an easy way to switch between still photos and video mode when using the ONE in Stand Alone mode. Connected Still Shooting Modes Screen Components 1: Capture Mode 2: Image Count 3. File Type Auto Mode Scene Modes DxO ONE - User Guide - Copyright © DxO Labs 1999-2015 - All rights reserved 36 Portrait Landscape Action Speed Priority Aperture Priority Night Advanced Modes Program Mode Manual Mode Autofocus Focus attaine d Connected Video Shooting Modes Auto Slow Motion Video Recording Stand-Alone Shooting Modes Mode Selection Still Video DxO ONE - User Guide - Copyright © DxO Labs 1999-2015 - All rights reserved 37 Battery Status Charging Status Battery Charge Remaining 100% → Battery Empty Shutter Progress 1. Focus achieved 2. Shooting USB Connected Temperature Warnings Camera is hot Warning: Camera is too hot Busy (processing or storing images) DxO ONE - User Guide - Copyright © DxO Labs 1999-2015 - All rights reserved 38 Warning Messages USB Error microSD Card Error microSD Card not inserted Firmware Updates Firmware Update in progress DxO ONE - User Guide - Copyright © DxO Labs 1999-2015 - All rights reserved 39 Connected capture modes DxO ONE App at a glance The DxO ONE App puts all of the controls at your fingertips, controlling the camera from your iPhone screen. The user interface is simple and intuitive, but also very powerful: The app opens in Auto Mode, and shoots in RAW +JPEG by default. The JPEGs are rendered from the RAWs and are instantly available to share. The RAWs can be further processed by DxO’s desktop software to render an even higher quality JPEG. DxO ONE - User Guide - Copyright © DxO Labs 1999-2015 - All rights reserved 40 Connected capture modes Taking a picture AUTO mode The DxO ONE AUTO mode allows you to take great photos without changing camera settings. In AUTO mode, the DxO ONE will choose the optimum aperture, shutter speed and ISO for the scene. While in AUTO mode, you may choose to increase/decrease the exposure by using the EV Bias control which is accessible in the sidebar to the left of the preview. Shutter Buttons There are two shutter button options available to you when your DxO ONE camera is attached to your iPhone. DxO ONE Shutter There is a physical shutter button on the top of the DxO ONE device. 1. To focus the DxO ONE lens, half press the shutter. DxO ONE - User Guide - Copyright © DxO Labs 1999-2015 - All rights reserved 41 2. During the focusing process, a dot on the OLED screen will blink. 3. Once focus is achieved, the dot on the OLED will stop blinking and the iPhone LCD screen will display a green square. DxO ONE - User Guide - Copyright © DxO Labs 1999-2015 - All rights reserved 42 The minimal focus distance is 20 cm. 4. Press the shutter to take the photo 5. A progress bar displays briefly while the photo is being recorded. 6. After the image has been taken, it is displayed on the iPhone for two seconds for review. Note, the display time can be modified in Settings DxO ONE - User Guide - Copyright © DxO Labs 1999-2015 - All rights reserved 43 DxO ONE iOS application Shutter There is also a shutter button displayed on the app, at the bottom left. The iPhone 'tap-to-focus’ function is supported as well. Tap the preview on the iPhone screen to achieve focus. In low light situations, use the shutter button on the iPhone to reduce the risk of camera shake. The two second timer is also very useful in reducing camera shake in low light situations. DxO ONE - User Guide - Copyright © DxO Labs 1999-2015 - All rights reserved 44 Zooming when taking a photo Zoom is controlled by the iPhone, either by a pinch action or by sliding the cursor displayed on the screen. Capture Grid The DxO ONE iOS application has a built in compositional grid to help you compose great photos. The grid divides the viewfinder into 9 quadrants, for easy composition using the rule of thirds. To activate the capture grid, open the app display settings and turn the capture grid on. DxO ONE - User Guide - Copyright © DxO Labs 1999-2015 - All rights reserved 45 Connected capture modes Changing the capture mode 1. The video and still image capture mode button (selector) is displayed on the iPhone screen at the bottom right. 2. Tapping this button will open the display of the different capture modes available to you. 3. Simply tap the mode icon to select the shooting mode that you wish to use: DxO ONE - User Guide - Copyright © DxO Labs 1999-2015 - All rights reserved 46 Auto Mode Sport Mode: For Fast Moving Subjects Portrait Mode: For Close Up Photos of People Landscape Mode: For Scenery Night Mode: For Low Light Photos Program Mode: A controllable AUTO mode Aperture Priority: Choose the Aperture that the camera uses Speed Priority: Choose the shutter speed that the camera uses Manual Mode: Control Aperture, Shutter, and ISO To close the Capture modes display, half press the Shutter button or tap the current selected mode. DxO ONE - User Guide - Copyright © DxO Labs 1999-2015 - All rights reserved 47 Connected capture modes Using scene modes 1. To access the scene modes, tap the capture mode selector displayed on the iPhone screen at the bottom right. 2. Tapping this button will open the display of the different capture modes available to you. 3. Tap the icon that best matches the scene that you want to capture to open that mode. 4. There are four scene modes to choose from: DxO ONE - User Guide - Copyright © DxO Labs 1999-2015 - All rights reserved 48 Sport For use with fast moving subjects. Portrait Use the portrait mode to isolate your subject's face by creating a lovely bokeh. DxO ONE - User Guide - Copyright © DxO Labs 1999-2015 - All rights reserved 49 Landscape To capture photos of distant and wide scenes with maximum sharpness. Night To capture great photos in low light conditions. The DxO ONE app will automatically select the best settings to use for each scene. DxO ONE - User Guide - Copyright © DxO Labs 1999-2015 - All rights reserved 50 Connected capture modes Using the advanced modes The DxO ONE also allows you to choose from four advanced modes that let you creatively control the look of the photo by changing shutter speed, aperture and ISO settings. When an advanced mode is selected, the toolbar on the left expands to reveal the advanced controls: 1. To access the advanced modes, tap the capture mode selector displayed on the iPhone screen at the bottom right. DxO ONE - User Guide - Copyright © DxO Labs 1999-2015 - All rights reserved 51 2. Tapping this button will open the display of the different capture modes available to you. Aperture Priority 1. Select to open Aperture Priority mode. This allows you to control the aperture that you wish to use for your photo. The DxO ONE will pick the corresponding shutter speed to achieve the best exposure based on your chosen aperture. DxO ONE - User Guide - Copyright © DxO Labs 1999-2015 - All rights reserved 52 2. The aperture settings will be active, and tapping the aperture control icon will open the aperture picker. 3. To change the aperture, dial the aperture picker up or down until you find the aperture that you wish to select. 4. The settings are displayed on the OLED screen of the DxO ONE device. DxO ONE - User Guide - Copyright © DxO Labs 1999-2015 - All rights reserved 53 Speed Priority 1. Select to open Speed Priority mode. This allows you to choose the shutter speed that you wish to use for your image while allowing the camera to control the corresponding aperture setting to achieve the best exposure based on your chosen shutter speed. 2. The shutter settings will be active, and tapping the shutter speed icon will open the shutter speed picker. DxO ONE - User Guide - Copyright © DxO Labs 1999-2015 - All rights reserved 54 3. To change shutter speed, dial the picker up or down until you find the speed that you wish to select. 4. The settings will also be displayed on the OLED screen of the DxO ONE device. DxO ONE - User Guide - Copyright © DxO Labs 1999-2015 - All rights reserved 55 Program Mode 1. Select to open Program mode. Program mode allows you to simultaneously adjust both shutter speed and aperture. DxO ONE - User Guide - Copyright © DxO Labs 1999-2015 - All rights reserved 56 2. When using Program mode, the exposure is always preserved. The picker displays 9 steps which represent increments of 1/3rd stop, so you can adjust your aperture plus or minus 3 stops and still maintain proper exposure, as the corresponding shutter speed will shift with the aperture adjustment. 3. The settings will also be displayed on the OLED screen of the DxO ONE device. DxO ONE - User Guide - Copyright © DxO Labs 1999-2015 - All rights reserved 57 Manual Mode When in M Mode, a menu appears on the left hand side of the iPhone screen. Shutter speed, Aperture, ISO, Metering Mode, Autofocus and White balance settings will be active, and tapping each icon in turn will open the associated picker. 1. Select to open Manual. 2. A menu will appear on the left hand side of the iPhone screen. Tapping each icon in turn will open the associated picker. DxO ONE - User Guide - Copyright © DxO Labs 1999-2015 - All rights reserved 58 3. To change each setting, dial the appropriate picker up or down until you find the setting that you wish to select. 4. The settings will also be displayed on the OLED screen of the DxO ONE device. DxO ONE - User Guide - Copyright © DxO Labs 1999-2015 - All rights reserved 59 Aperture Exp. time AF mode AE mode AWB mode x x x x x x x x x x x x x x x x x x x Exp Flash Timer Auto x x x Portrait x x x Landscape x x x Action x x x Night x x x x x x x x x Aperture priority (A) ISO x Shutter priority (S) Manual (M) x x x Program (P) x* x* x x *In Program mode, Aperture and Speed are adjusted in sync with one another to maintain proper exposure. DxO ONE - User Guide - Copyright © DxO Labs 1999-2015 - All rights reserved 60 Connected capture modes Video mode Selecting the Video Mode (Full HD/Slow Motion) 1. To select video mode, switch the on-screen shutter button from the photo icon to the video icon. 2. The on-screen shutter button will switch to video mode. DxO ONE - User Guide - Copyright © DxO Labs 1999-2015 - All rights reserved 61 Recording a Video (All Modes) 1. To start recording video, either tap the shutter button (video icon) on the iPhone display, or depress the shutter button on the DxO ONE. 2. The app shutter button will turn red when recording and the app will display the time elapsed during the recording. 3. The DxO ONE OLED will display a flashing dot to indicate that recording has started. DxO ONE - User Guide - Copyright © DxO Labs 1999-2015 - All rights reserved 62 4. You may capture still photos during Auto video recording only (1080p, 30fps). To capture a still photo while recording video, tap the soft shutter button located above the video record button. Slow Motion Video There are two video modes available to you: Auto (1080p, 30fps) and Slow Motion (702p, 120fps). To switch from Auto video to Slow Motion: 1. Tap on the bottom right of the iPhone display to open the video modes panel. 2. Select the Slow Motion mode by tapping DxO ONE - User Guide - Copyright © DxO Labs 1999-2015 - All rights reserved 63 3. The app shutter button will turn red when recording and the app will display the time elapsed during the recording. 4. The DxO ONE OLED screen will also display the Slow Motion icon. DxO ONE - User Guide - Copyright © DxO Labs 1999-2015 - All rights reserved 64 Auto Video Mode To switch from SLOW MOTION to Auto (1080p, 30fps) video mode: 1. Tap on the bottom right of the iPhone display to open the video modes panel. 2. Select the Auto video mode by tapping DxO ONE - User Guide - Copyright © DxO Labs 1999-2015 - All rights reserved . 65 Connected capture modes Activating flash Tap the flash icon on the right to turn the flash on or off. iPads do not have built-in flash devices, and therefore there is no flash function for the DxO ONE when used with an iPad. The flash is provided by the iPhone. Be sure that you do not cover the flash with your fingers while holding the iPhone. To ensure the light properly illuminates the subject, the DxO ONE should not be rotated (relative to the iPhone) with the flash enabled. DxO ONE - User Guide - Copyright © DxO Labs 1999-2015 - All rights reserved 66 Connected capture modes Activating timer mode The DxO ONE timer allows you to set the camera up to take a photo either 2 or 10 seconds after pressing the shutter. It is useful for reducing camera shake when using the camera in low light situations and for taking group selfies. 1. Tap the timer icon to activate Timer Mode. 2. A countdown begins and is displayed on the iPhone screen. 3. The shutter is released and the photo captured at the end of the countdown. DxO ONE - User Guide - Copyright © DxO Labs 1999-2015 - All rights reserved 67 Connected capture modes Selfie mode 1. Connect the DxO ONE and the iPhone with the lens and screen facing you to activate the Selfie mode. 2. The Selfie icon will be displayed in the lower right corner. 3. Take a photo using the shutter button of the iPhone display. DxO ONE - User Guide - Copyright © DxO Labs 1999-2015 - All rights reserved 68 4. A capture countdown will start and the self portrait ‘softbox’ will be illuminated. 5. Get ready to smile as the app’s 'softbox' naturally illuminates your face. The photo can be taken using either shutter button. Using the shutter button on the DxO ONE will immediately take the image, without the countdown. Using the physical shutter button will illuminate the softbox effect for approximately 4 seconds, before the camera shutter is activated. DxO ONE - User Guide - Copyright © DxO Labs 1999-2015 - All rights reserved 69 Connected capture modes SuperRAW™ The DxO ONE leverages the very latest in advanced noise reduction technology to create beautiful images in very low light. The SuperRAW setting captures four RAW images in quick succession and uses advanced image processing on the desktop to merge them into one dynamic, detailed photo for you. The SuperRAW button in the top right designates DxO's proprietary file format designed to capture beautiful photos in extremely low light. Behind the scenes the camera captures four RAW images in quick succession and, when your camera is connected to your Mac or PC, it leverages both spatial and temporal noise reduction algorithms to merge them into one dynamic, detailed photo. Use SuperRAW in extreme low light situations. Tap the RAW button at the top right to the tap to select the SuperRAW shooting mode. DxO ONE - User Guide - Copyright © DxO Labs 1999-2015 - All rights reserved 70 Connected capture modes MicroSD™ card error messages The OLED displays warning messages if something is amiss with the microSD card you are using the DxO ONE. MicroSD card missing A microSD card must be inserted into the slot of the ONE in order for the camera to function. If your microSD card is missing, you will see the following warning on the OLED and the iPhone screen. The message will appear whenever the shutter button is depressed. MicroSD card is almost full When you have less than 100MB of space remaining on your microSD card, we’ll display the following warning on the OLED and iPhone screens: DxO ONE - User Guide - Copyright © DxO Labs 1999-2015 - All rights reserved 71 MicroSD card is full When your microSD card is full, the following warning will be displayed on the OLED and iPhone screens: DxO ONE - User Guide - Copyright © DxO Labs 1999-2015 - All rights reserved 72 Stand-alone Capture modes Select mode It’s possible to use the DxO ONE as a stand-alone camera to capture still images and video in Auto mode. The DxO ONE will return to Auto photo capture mode when turned on. Turning the camera ON To turn the camera On, slide the lens cover down to reveal the lens. Select mode To change between still and video mode, swipe left or right on the OLED screen on the rear of the DxO ONE device. DxO ONE - User Guide - Copyright © DxO Labs 1999-2015 - All rights reserved 73 Still mode selected Video mode selected DxO ONE - User Guide - Copyright © DxO Labs 1999-2015 - All rights reserved 74 Stand-alone Capture modes Taking a picture 1. Hold the camera so that the lens faces toward your subject and the shutter button is at the top of the device. As there is no viewfinder in stand alone mode, take care not to accidentally place your finger in front of the lens while taking the photo. 2. Half press the shutter button to obtain focus. 3. The focus indicator dot, displayed between the photo count and File Type indicators on the OLED screen, stops blinking when focus is achieved. DxO ONE - User Guide - Copyright © DxO Labs 1999-2015 - All rights reserved 75 4. Fully depress the shutter to take the photo. The OLED screen displays quick animation of two parallel lines converging to indicate that the shutter has been pressed and an image is being taken. The DxO ONE device does not have a viewfinder display of it’s own. You will not be able to review images until you connect the device to your iPhone or desktop computer. Images taken in Stand-Alone Mode are not automatically transferred to the iPhone when you connect the DxO ONE, but can be reviewed with the ONE iOS app and can be manually saved to your iOS Photos library. Video taken in Stand-Alone or Connected mode is never automatically transferred to the iPhone, but can be manually saved to your iOS Photos library. DxO ONE - User Guide - Copyright © DxO Labs 1999-2015 - All rights reserved 76 Stand-alone Capture modes Recording a video 1. Select the video record mode. 2. Press and release the shutter button on the DxO ONE to start recording. 3. A blinking dot on the OLED screen shows that you are recording video. DxO ONE - User Guide - Copyright © DxO Labs 1999-2015 - All rights reserved 77 4. Press the shutter button to stop recording. DxO ONE - User Guide - Copyright © DxO Labs 1999-2015 - All rights reserved 78 Browsing and Sharing Single photo review 1. When in Still capture Mode, tap the gallery button at the top of the toolbar on your iPhone display to open image view. 2. Review photos in full screen mode by tapping on the photo to hide the tool bar. 3. Swipe the screen right and/or left to scroll through and review the photos. DxO ONE - User Guide - Copyright © DxO Labs 1999-2015 - All rights reserved 79 4. Tap the photo again to have the tool bar return. Pinching on the photo itself will also close image view and return you to gallery view. DxO ONE - User Guide - Copyright © DxO Labs 1999-2015 - All rights reserved 80 5. From the toolbar, you will be able to: Return to Capture Mode Share/Save Photos Delete Photos Open Gallery View You can use the iPhone display to review photos that are stored on the microSD card of the DxO ONE (if attached) as well as photos stored on your iPhone. DxO ONE - User Guide - Copyright © DxO Labs 1999-2015 - All rights reserved 81 Browsing and Sharing Video review You’ll be able to watch, share, favorite and delete your videos from the iOS app in single image view. 1.Tap the gallery button at the top of the toolbar on your iPhone display to open image view. 2. Open the video and press the play button displayed on the center of the video. DxO ONE - User Guide - Copyright © DxO Labs 1999-2015 - All rights reserved 82 Videos are recorded to the microSD card of the DxO ONE. They need to temporarily transfer from the card to the iPhone for review. A progress bar indicates when the transfer is complete. 3. If you play a slow motion video, the video player will display the Slow Motion mode icon. Tap the icon to switch between standard playback and slow motion playback modes. DxO ONE - User Guide - Copyright © DxO Labs 1999-2015 - All rights reserved 83 Browsing and Sharing Deleting photos in single image view To delete a photo: 1. Tap the trash button. 2. You will be prompted to allow DxO ONE to delete the photos. 3. Tap Delete to confirm. DxO ONE - User Guide - Copyright © DxO Labs 1999-2015 - All rights reserved 84 Photos are deleted from the microSD card and the iPhone if you’ve chosen to store photos there. If you have iCloud Photo Library enabled, you will be warned that deleting the photo will delete it from all your devices. DxO ONE - User Guide - Copyright © DxO Labs 1999-2015 - All rights reserved 85 Browsing and Sharing Favorite photos Tap the Heart icon on the lower right hand side of the photo to add the photo to your favorites in your iOS Photos library. Photos stored only on the DxO ONE microSD card cannot be flagged as favorites. Video clips also cannot be flagged as favorites. DxO ONE - User Guide - Copyright © DxO Labs 1999-2015 - All rights reserved 86 Browsing and Sharing Gallery view Gallery view provides an overview of photos stored on both the iPhone and the camera. Opening Gallery view To open the gallery view: 1. Tap the gallery button at the top of the toolbar on your iPhone display to open image view. 2. Tap the gallery grid button at the bottom of the toolbar. DxO ONE - User Guide - Copyright © DxO Labs 1999-2015 - All rights reserved 87 3. Scroll through the gallery by swiping vertically on the iPhone screen. When scrolling, the location of the photos in the top row is displayed on the screen header. 4. Tap the camera icon to return to capture mode, or simply depress the shutter button halfway. DxO ONE - User Guide - Copyright © DxO Labs 1999-2015 - All rights reserved 88 Filtering your photo gallery A drop down menu allows you to filter your photo gallery: ● ● ● ● ‘All Photos’ displays all of the photo and video files on the microSD card and the DxO album on your iPhone. 'Favorites' are those photos that you’ve marked as favorite by using the heart symbol. ‘On iPhone’ displays all of the photo and video files in the DxO ONE album stored on your iPhone. ‘On microSD Card’ displays all of the photo and video files stored on the SD card in the camera. Photos are displayed by date, grouped by month. DxO ONE - User Guide - Copyright © DxO Labs 1999-2015 - All rights reserved 89 Browsing and Sharing Using Multi-selection mode It’s possible to select multiple photos and videos to perform actions on all of the selected items. 1. Enter into multi-selection mode by tapping the check mark in the toolbar when in gallery view. 2. To select photos or videos from gallery view, tap the photo thumbnail. 3. A check mark will appear on the top right corner of each selected photo. DxO ONE - User Guide - Copyright © DxO Labs 1999-2015 - All rights reserved 90 4. Tap the share button to share the selected photos 5. Tap the trash button to delete the selected photos. DxO ONE - User Guide - Copyright © DxO Labs 1999-2015 - All rights reserved 91 6. To return to the gallery view, tap the back button, or simply depress the shutter button halfway. DxO ONE - User Guide - Copyright © DxO Labs 1999-2015 - All rights reserved 92 Browsing and Sharing Sharing your photos Single image view To share your photos in single image view: 1. When in Still capture Mode, tap the gallery button to open image view. 2. In single image view mode, tap the Share icon to open the native iOS Sharing panel. DxO ONE - User Guide - Copyright © DxO Labs 1999-2015 - All rights reserved 93 3. You can choose to share photos by Message, Mail or any other sharing service supported by Apple iOS. Multi-section mode To share your photos in multi-section mode: 1. Tap the Select button. DxO ONE - User Guide - Copyright © DxO Labs 1999-2015 - All rights reserved 94 2. Tap to select the photos you want to share. DxO ONE - User Guide - Copyright © DxO Labs 1999-2015 - All rights reserved 95 3. You can choose to share photos by Message, Mail or any other service supported by Apple iOS. DxO ONE - User Guide - Copyright © DxO Labs 1999-2015 - All rights reserved 96 Browsing and Sharing Saving images stored on the microSD card to your iPhone Tap the Share icon to open the native iOS Sharing panel. From here, you will be able to save any photos stored on the microSD card to your iPhone camera roll. This step is only necessary for photos captured in Stand-alone mode, or photos initially saved only to the microSD card. Otherwise, by default all photos are seamlessly transferred to your iPhone. Video files never transfer automatically to your iPhone. Follow these steps to save video files to your iPhone. 1. Tap the gallery button to open image view. DxO ONE - User Guide - Copyright © DxO Labs 1999-2015 - All rights reserved 97 2. In single image view mode, tap the Share/Save icon to open the native iOS Sharing panel. 3. Tap the Save Image button to copy your image to your iOS Photos library. DxO ONE - User Guide - Copyright © DxO Labs 1999-2015 - All rights reserved 98 Browsing and Sharing Printing your photos To print your images: 1. Tap the Share icon to open the native iOS Sharing panel. 2. At the bottom of the share panel, you have the options to print from an AirPrint compatible printer. DxO ONE - User Guide - Copyright © DxO Labs 1999-2015 - All rights reserved 99 Manage settings Capture settings Use the DxO ONE application to manage the following capture settings: ● ● ● ● ● Display grid Show picture after shot Max ISO value Max speed value Store photos on Opening the camera settings menu To open the capture settings menu: 1. Tap the capture mode button at the bottom of the screen to open the capture mode display. 2. Then tap the gear icon to open the settings menu. DxO ONE - User Guide - Copyright © DxO Labs 1999-2015 - All rights reserved 100 Capture settings menu Display Grid ● ● On: a 3x3 grid is displayed on the viewfinder, for use as a composition guide. Off: no grid is displayed on the viewfinder. Show Picture Aftershot ● ● ● 2 seconds: Photo will be displayed for 2 seconds after capture before viewfinder returns to preview. Hold: Photo will be displayed until the display is touched or shutter button depressed. Never: Photos will only be displayed in the gallery. DxO ONE - User Guide - Copyright © DxO Labs 1999-2015 - All rights reserved 101 Max ISO value ● ● Tap to set an ISO value not to be exceeded in Auto ISO mode. Note, manual ISO settings override this value. Max speed value ● ● Tap to set a maximum shutter speed length not be exceeded, e.g., shutter speed will not be longer than 1/50 seconds, when in auto mode, which is great for hand-held photos. Note, manual speed settings override this value. Store Photos On ● ● microSD card and iPhone: Saves a full resolution JPEG file to your iPhone for all photos taken when the DxO ONE is connected to your iPhone. Photos taken in stand-alone mode are not added to your iPhonestorage. microSD card only: JPEG files are not added to your iPhone storage. Video files are always only stored on the microSD card. Format microSD card 1. Choose Format micro SD Card, and open by tapping. DxO ONE - User Guide - Copyright © DxO Labs 1999-2015 - All rights reserved 102 2. A pop up will appear and ask if you wish to format the microSD card. 3. Tap Format to confirm. All existing data on the microSD card will be lost DxO ONE - User Guide - Copyright © DxO Labs 1999-2015 - All rights reserved 103 Manage settings Application Settings Accessing the DxO ONE settings menu To access the DxO ONE settings menu: 1. Tap capture modes. 2. Tap the gear button to open the app settings. DxO ONE - User Guide - Copyright © DxO Labs 1999-2015 - All rights reserved 104 DxO ONE settings menu 1. Tap the Application tab in the Settings display Getting Started & Support Tapping Getting Started & Support will take you out of the ONE app and into iOS Safari, to the DxO ONE support pages. You will be able to view the FAQs, tutorial videos, and during working hours, contact customer support via Chat. User Guide Tapping User Guide will take you out of the ONE app and into iOS Safari, to the DxO ONE user guide. You’ll be able to access the DxO ONE online manual from this section. About 1. Tap to open the About screen. 2. You’ll find the DxO ONE serial number, App and Firmware Version here. Redeem your DxO software licenses. 1. Tap to register your camera 2. After creating a user account (or logging in with your existing user account), you will be sent an email that includes links to download DxO desktop software, as well as activation codes for those apps that require them. To redeem your software licenses the iPhone and ONE must be connected while you have internet access. Legal You’ll be able to access the Application Terms of Use DxO ONE - User Guide - Copyright © DxO Labs 1999-2015 - All rights reserved 105 Index and Assistance Optional accessories 32GB microSD Memory Card for DxO ONE camera 32 GB MEMORY CARD SKU: ACC02-00 64GB microSD Memory Card for DxO ONE camera 64 GB MEMORY CARD SKU: ACC03-00 Universal USB AC Power Adapter for DxO ONE camera UNIVERSAL POWER ADAPTER SKU: ACC01-00 DxO ONE - User Guide - Copyright © DxO Labs 1999-2015 - All rights reserved 106 Index and Assistance Firmware Updates The firmware is the software that is installed on the device itself. Keeping the firmware up-to-date ensures that you are getting the best experience and best image quality from the DxO ONE. It’s important that the firmware be updated for the latest version of the iOS app. 1. You can check the version of firmware installed on your DxO ONE from the About screen in your settings menu. The camera must be connected to your iPhone to display this information. 2. If there is an updated version of firmware available, an Install Now button is displayed. Press that button to start the firmware download process (internet access required for download). As a precaution, ensure your ONE is at least 70% charged before starting a firmware update. DxO ONE - User Guide - Copyright © DxO Labs 1999-2015 - All rights reserved 107 3. A progress bar will be displayed while the download occurs. You will not be able to use the DxO ONE while the firmware update is occurring. 4. Your DxO ONE will automatically reboot when the installation is complete. Do not disconnect the camera from your iPhone or close the app during the update. If you disconnect your iPhone or switch applications at the beginning of the firmware update, the new firmware will not be installed. If you disconnect the camera after reboot, the new firmware will be installed on the camera. Error messages Here are the error messages that will be displayed if/when the firmware update process is failing: DxO ONE - User Guide - Copyright © DxO Labs 1999-2015 - All rights reserved 108 Failure Mode Message Displayed Firmware upgrade failed An unexpected error occurred Firmware upgrade failed because of not enough battery Firmware update failed. Please charge battery first. Firmware upgrade failed because of the SD card that cannot be read microSD card cannot be read Firmware upgrade failed because of the SD card that has been removed microSD card not installed Firmware upgrade failed because the temperature of the camera is too high Excessive temperature. Let DxO ONE cool down before proceeding. Firmware upload failed because the camera has been disconnected You have disconnected your DxO ONE before firmware was fully copied Firmware upload failed because of a SD card issue Check that you have enough free space Firmware upload failed because of a timeout Firmware upload timed out. Please try again Firmware upload failed because of a SD card issue Unexpected error with microSD card DxO ONE - User Guide - Copyright © DxO Labs 1999-2015 - All rights reserved 109 This assistive device is warranted to be specifically fit for the particular needs of you, the buyer. If the device is not specifically fit for your particular needs, it may be returned to the seller within 30 days of the date of actual receipt by you. If you return the device, the seller will either adjust or replace the device or promptly refund the total amount paid. This warranty does not affect the protections and remedies you have under other laws. DxO ONE WARRANTY CARD DxO Labs SA (“DxO”) is under a legal duty to consumers to supply products that are in conformity with your Contract (General Purchase Terms and Conditions) with DxO. If your DxO ONE is or becomes faulty through no fault of your own then you may be entitled to a refund, repair or replacement of your DxO ONE but only in accordance with the express terms of this Warranty Card. DxO’s obligation under this warranty is limited to, at its sole option, repairing, replacing on an exchange basis or refunding the cost of DxO ONE or parts thereof which are delivered with defects in design, materials and workmanship or, within the warranty period of one (1) year from the date of original purchase, develop defects in design, materials and workmanship under normal and proper use in conformance with all instructions. This warranty does not extend to any consumable item. This warranty cannot be transferred by the original purchaser to anyone else, and any attempted transfer is void. If you are a consumer having its residence in EU, you will also benefit from legal rights under EU law in relation to the sale of defective, non-conforming or mis-described products, for a minimum of two (2) years depending on your country of purchase (national laws may give additional rights). These legal rights are not affected by anything else in this Warranty Card. DxO gives no other guarantees or warranties, express or implied, except for the warranty expressly stated herein, or in any extended warranty that you purchase from DxO (if offered). 1. NOTIFICATION OF CLAIMS: WARRANTY SERVICE In the event of the customer becoming aware of a defect in DxO ONE during the warranty period the customer must notify DxO in writing within the warranty period, and such notice shall include details of such defect. All notices shall be sent to DxO following the procedure set on www.dxo.com. Any customer seeking warranty service must use best efforts to provide DxO with all necessary access and all information and particulars required to enable DxO to ascertain and verify the nature and cause of the defect claimed and to carry out any warranty obligations. Upon giving notice to DxO of a defect, the customer shall cease using DxO ONE. Any use of DxO ONE after giving notice shall void this warranty, and DxO shall have no liability to the customer either under this Warranty Card or otherwise in relation to DxO ONE. The customer shall not resume using DxO ONE until DxO notifies customer in writing that DxO ONE can be used. 1. EXCLUSIVE REMEDY: ACCEPTANCE Customer’s exclusive remedy and DxO’s sole obligation is to supply (or pay for) all labor necessary to repair any DxO ONE - User Guide - Copyright © DxO Labs 1999-2015 - All rights reserved 110 DxO ONE found to be defective within the warranty period and to supply, at no extra charge, new or rebuilt replacements for defective parts. If repair or replacement fails to remedy the defect as determined by DxO in its sole discretion, then, and only in such event, shall DxO refund to customer the purchase price for such DxO ONE in exchange for customer returning DxO ONE. Customer’s failure to make a claim as provided in paragraph 1 above or continued use of the DxO ONE shall constitute an unqualified acceptance of such DxO ONE and a waiver by customer of all claims thereto. All determinations made by DxO with respect to the warranty shall be final. 1. EXCEPTIONS TO LIMITED WARRANTY DxO shall be under no obligation whatsoever to repair, replace or make good any loss or damage or defect which results from incorrect installation, alteration without consent, abnormal wear and tear or customer induced damage, accident, abnormal conditions of storage or use or any act, neglect or default of the customer or any third party. Without limiting the preceding sentence, this warranty is void and DxO shall be under no obligation whatsoever to repair, replace or make good any loss or damage or defect if: (a) customer uses DxO ONE with any device other than the approved models of iPhone and iPad, and any other device that later may be approved in writing by DxO; (b) customer or any third party other than DxO (or a representative that DxO approves in writing) attempts to repair, disassemble or modify DxO ONE; (c) customer uses any cords, power adapters or other peripherals with DxO ONE that have not been supplied by DxO or a DxO authorized distributor; or (d) customer or users of the DxO ONE do not follow the guidelines to use the DxO ONE as set in the DxO ONE documentation or general purchasing conditions. DxO is not responsible for any loss or damage or defect to any approved iPhone or iPad model or any other device that DxO later approves in writing for use with DxO ONE. DxO ONE may not function properly if the approved iPhone or iPad model (or any other device that DxO later approves in writing for use with DxO ONE) is defective or not properly maintained by the customer (including, without limitation, if customer fails to properly configure such device). To the extent DxO determines, in its sole judgment, that any malfunction of DxO ONE is solely due to a defect or improper maintenance of another device approved and intended for use with DxO ONE, DxO shall have no obligation under this warranty. Usage of DxO ONE requires customer to download to the approved iPhone or iPad model (or any other device that DxO later approves in writing for use with DxO ONE) the App that is specified in the user manual (and any update to such App) and periodic firmware updates that become available. Customer is solely responsible for obtaining the necessary internet connection to download such App (and any update) and firmware updates. DxO is not responsible under warranty for any malfunction of DxO ONE which results from the failure to download the App (or any update) or any firmware updates. If customer has any difficulty downloading the App (or any update) or firmware updates, the customer should follow the directions in the user guide to resolve such issues. DxO reserves the right at any time after expiration of the warranty period to cease providing updates to the App. DxO ONE is dependent on Apple’s Lightning API and certain Apple iOS libraries to function correctly. DxO ONE shall have no liability under this Warranty Card or otherwise if Apple ceases for any reason to support such API or libraries. DxO ONE - User Guide - Copyright © DxO Labs 1999-2015 - All rights reserved 111 Where any defective DxO ONE is replaced, the provisions of this Warranty Card shall apply to the replacement DxO ONE for the unexpired balance of the warranty period. The customer shall not return DxO ONE to DxO without the DxO’s written consent and DxO shall not be under any liability whatsoever for the DxO ONE returned by the customer without such consent. 1. CUSTOMER DATA Customer shall be solely responsible for maintaining backup data necessary to replace customer data including images lost or damaged from any cause. For more information about your personal data, please refer to the Privacy Policy in the iOS App and on www.dxo.com. 1. PROOF OF PURCHASE The customer’s dated bill of sale must be retained as evidence of the date of purchase and to establish warranty eligibility. DxO may from time to time provide updated information about the warranty or the DxO ONE. To stay better informed, we recommend you register your DxO ONE by visiting the DxO website at www.dxo.com and providing the product and purchase information requested. 1. DISCLAIMER OF WARRANTY The above written warranty is the sole and exclusive warranty given by DxO and is given in lieu of and replaces, excludes and extinguishes all and every condition, warranty or representation whatsoever whether express or implied by statute, common law, trade usage, custom or otherwise in respect of the quality or fitness for purpose, description of the DxO ONE or otherwise. Without limiting the foregoing, DxO disclaims any implied warranty of merchantability and implied warranty of fitness for a particular purpose. The United Nations Convention on Contracts for the International Sale of Goods (CISG) is expressly disclaimed and does not apply to this warranty or the purchase of your DxO ONE. 1. LIMITATION OF LIABILITY This Warranty Card states the full extent of DxO’s obligations and liabilities in respect of the supply of, or failure to supply DxO ONE. DxO is not liable to you (or any other parties) for any indirect, incidental, consequential, punitive or exemplary damages, or for loss of income, profits, bargain, revenue, contracts, goodwill, use, enjoyment, time, data, electronically transmitted orders or other economic advantage (but not to the extent that applicable law prohibits liability exclusions or limitations for intentional torts, gross negligence, damages arising out of product liability or other fault bases). DxO disclaims any warranties and liabilities related to damage to any device attached to the DxO ONE. DxO’s maximum aggregate liability, whether in contract, tort (including negligence) or otherwise, shall in no circumstances exceed the amount payable by you to DxO for the purchase of DxO ONE. For further information and the name of the nearest authorized DxO service facility contact: DxO Labs Corp P.O. Box 410535 San Francisco, CA 94141 DxO ONE - User Guide - Copyright © DxO Labs 1999-2015 - All rights reserved 112