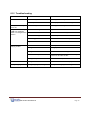
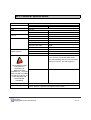
1
User Manual
© 2011 Ematic 1-888-968-1985 http://www.Ematic.us
Windows and Windows Media Player are registered trademarks of Microsoft Corporation
Mac OS X and iTunes are registered trademarks of Apple Inc.
Linux is a registered trademark of Linus Torvalds
YouTube is a registered trademark of Google, Inc.
Table of Contents
1.0
Introduction ......................................................................................................................... 1
1.1
Foreword ................................................................................................................. 1
1.2
Package Contents................................................................................................... 1
1.3
Warnings ................................................................................................................. 1
1.4
Layout of the Player ................................................................................................ 2
Part I: Computer Operations
2.0
3.0
Connecting and Charging the Player ................................................................................. 4
2.1
Connecting and Disconnecting the Player from Your Computer ........................... 4
2.2
Charging the Battery ............................................................................................... 4
Copying Files ...................................................................................................................... 5
3.1
Copying Media Files to your Player........................................................................ 5
Part II: Player Operations
4.0
5.0
6.0
7.0
8.0
Basic Operations............................................................................................................... 7
4.1
Turning the Player On and Off .............................................................................. 7
Listening to Audio.............................................................................................................. 7
5.1
Accessing Audio Mode ......................................................................................... 7
5.2
Audio Play Operations .......................................................................................... 7
5.3
Audio Play Operations .......................................................................................... 7
5.4
Repeat……... ......................................................................................................... 7
5.5
Equalizer ……... ..................................................................................................... 8
5.6
Replay(A-B Repeat) ….......................................................................................... 8
Recording Audio................................................................................................................ 8
6.1
Entering Recorder Mode...................................................................................... 8
6.2
Listening to Recordings…… .................................................................................. 8
Listening to the FM Radio................................................................................................. 9
7.1
Entering Radio Mode ............................................................................................ 9
7.2
Basic Radio Operations ........................................................................................ 9
System Settings ............................................................................................................... 9
8.1
Basic Settings Operations .................................................................................... 9
Miscellaneous
9.0
10.1
11.0
12.0
Formatting the Player ....................................................................................................... 11
9.1
Understanding File Systems................................................................................. 11
9.2
Reformatting Your Player in Windows .................................................................. 11
Help ................................................................................................................................... 12
10.1 For More Help ....................................................................................................... 12
10.2 Troubleshooting .................................................................................................... 13
Technical Specifications.................................................................................................... 14
Limitation of Liability………………………………………………………………………………15
12.1 Links to Third Party Sites ...................................................................................... 15
12.2 Limitation of Liability.............................................................................................. 15
E6 Series User Manual
1.0 Introduction
1.1
Foreword
Thank you for purchasing this player. Please read this manual carefully before
using the product. Specifications and software updates are subject to change
without notice. The player pictured in this manual may differ from yours, but the
information in this manual will still apply.
Please visit our website for more information: www.ematic.us
1.2
Package Contents
Your player comes with the following items:
•
•
•
•
1.3
The Player
A USB Cable
A Cleaning Cloth
One Pair of Stereo Headphones
•
This User Manual
Warnings
•
•
•
•
•
•
Do not use the unit in extreme temperatures, or dusty/wet environments.
Do not leave the unit in direct sunlight.
Do not disconnect the player and USB from your computer without first
ensuring a “safe removal” as this may damage the unit. See “Connecting and
Disconnecting the Player from Your Computer” in this manual.
Do not open or disassemble the unit, as this will void the warranty.
Handle the unit with care to prevent physical damage.
Protect the unit from static discharge.
E6 Series User Manual Page 1 1.5
Layout of the Player
E6 Series User Manual
Page 2
Part I: Computer Operations
E6 Series User Manual
Page 3
2.0 Connecting and Charging the Player
2.1
Connecting and Disconnecting the Player from Your Computer
To connect your player to your computer:
1. Turn the player ON.
2. Insert the small end of the included USB cable into the player.
3. Insert the large end into the computer’s USB port.
The first time you connect the player to your computer; the computer will
automatically detect it and install any necessary drivers.
To safely remove the player from your computer:
1. Click the green arrow in the system tray (the area by the clock on your
task bar).
2. A list of attached USB devices will be displayed. Highlight the player in the
list.
3. If asked, click STOP. Windows will display a message when it is safe to
remove the player.
WARNING: Any USB device that stores data (e.g. flash drives, cameras, and media players) should always be disconnected from your computer using this method to avoid corrupting the stored data. 2.2
Charging the Battery
The player’s battery is recharged while the player is connected to a running
computer.
To charge the battery, please follow these steps:
1. Connect the smaller end of the USB cable into the USB port of the player.
2. Connect the bigger end of the USB cable into an available USB port on
the computer.
3. The computer must be on for most USB ports to charge your battery. You
will not be able to play your device while connected to the computer.
4. To stop charging, simply disconnect the device.
E6 Series User Manual
Page 4
3.0 Copying Files
3.1
Copying Media Files to your Player
WARNING: Make certain your media files are supported by the player. Media from iTunes is NOT supported. To listen to and/or view media on your player, you must first copy whichever files
you want to enjoy from your computer to the player. However, before copying the
files, you must make certain that they are, in fact, supported by the player. See
the full list of supported formats under “Technical Specifications” in this manual.
Follow these steps to copy media files to the player under Windows:
1. Turn the player ON.
2. Connect the player to your computer with the USB cable.
3. Open a window to the player:
a. Double-click My Computer
b. Double-click the drive corresponding to the player. It will
probably be labeled Removable Disk.
4. Disconnect the player from the computer using the safe removal
method in “Connecting and Disconnecting the Player to Your
Computer” in this manual.
E6 Series User Manual
Page 5
Part II: Player Operations
E6 Series User Manual
Page 6
4.0 Basic Operations
4.1
Turning the Player On and Off
The power switch is used to turn on or off the player. Slide the Power switch to
ON position to turn on the player. Slide the Power switch to OFF position to
turn on the player.
By default, if the player is left idle for over three minutes it will automatically
turn itself off. To select a different duration before the player turns off, or to set
it so the player doesn’t turn off automatically, please read “System Settings” in
this manual.
Note: The unit will also turn itself off if the battery charge becomes too low.
5.0 Listening to Audio
5.1
Accessing Audio Mode
Follow these steps to play music:
1.
Select ‘Music’ from Main Menu. Press MODE to enter.
2.
Press NEXT or BACK to select a song.
3.
Press PLAY/PAUSE to begin music playback.
5.2 Adjusting volume
During Play mode, press VOL to activate volume control. Press NEXT or BACK
to adjust sound level. Press PLAY to return to normal display.
5.3
Music options
On Play mode, press MENU to enter Submenu. Use NEXT or BACK to highlight
an option. Press
MENU to select the option. Press PLAY to return to normal display.
5,4 Repeat
There are various repeat play options.
Normal
Repeat One
Repeat All
Play all tracks once.
To repeat the current track (song).
To repeat all tracks.
E6 Series User Manual
Page 7
5.5 Equalizer
Choose desired equalizer setting according to the music you are listening:
5.6
Replay (A-B Repeat)
The Replay function allows you to specify two points (A and B) within a track
that form a loop which is played over and over.
During Play mode, press NEXT to set the loop start point ‘A’. Press NEXT
again to set the loop end point ‘B’. Playback will jump back to the start point
and plays the loop repeatedly until the set Replay times is reached, and then
playback will return to normal.
To cancel Replay function, press PLAY/PAUSE twice.
6.0 Recording Audio
6.1 Entering Recorder Mode
To start voice recording, follow these steps:
1. Select ‘Record’ from Main Menu. Press MODE to enter.
2. Press PLAY/PAUSE to begin or pause recording.
3. Press and hold MENU for 1 second to save the recording.
6.2
Basic Recorder Operations
To listen to your recordings:
1.
Select ‘Voice’ from Main Menu. Press MODE to enter.
2.
Press NEXT or BACK to select a recording.
3.
Press PLAY/PAUSE begin playback.
E6 Series User Manual
Page 8
7.0 Listening to the FM Radio
7.1 Entering Radio Mode
WARNING: The headphones function as an antenna. Therefore, the FM radio
will only work with the headphones connected to the player.
7.2 Basic Radio Operations
To listen to FM radio:
1.
Select ‘FM Radio’ from Main Menu. Press MODE to enter.
2.
Press NEXT or BACK repeatedly to manually adjust frequency.
Press and hold NEXT or BACK for 2 seconds to scan radio stations automatically.
8.0 System Settings
8.1 Basic Settings Operations
The following options are available in the System Settings menu:
•
Language allows you to change the display language. Supported languages are
listed under “Technical Specifications” in this manual.
•
Display allows you to select the Backlight Time, which determines how long the
screen will stay backlit before the display turns off, and the Brightness, which can be
turned down to save battery life. Note that when the backlight turns off, the device is
still on, but the screen turns off to save battery power.
• Pow Off Time allows you to set the length of inactivity before the player turns
E6 Series User Manual
Page 9
Miscellaneous
E6 Series User Manual
Page 10 9.0 Formatting the Player
9.1 Understanding File Systems
Your player is like a small hard drive of data, and like any such storage device, it
has a file system. If you wish to reformat the player's file system, you may use
any standard formatting tools as long as it is formatted with FAT32 file system.
9.2 Reformatting Your Player in Windows
Follow these steps to reformat your player:
1. Connect the player to your computer via
the USB cable.
2. Double-click My Computer.
3. Find the icon representing the player,
which will probably appear as Removable
Disk.
4. Right-click the player's icon and select
Format.
WARNING: Make certain the file system
is FAT32; otherwise the player will not
work!
5. Click Start.
6. When the Warning message appears, click
OK.
WARNING: Once started DO NOT remove the USB cable as this may
damage the player!
7. Once the formatting is complete, you may access the drive through My
Computer.
E6 Series User Manual
Page 11 10.0 Help
10.1 For More Help
•
•
•
•
See the FAQ page on our website for information and how-to videos:
http://www.ematic.us
Check the Updates section of our website.
View how-to videos on our website.
E-mail customer service: [email protected]
You can expect a response within 1-2 business days.
E6 Series User Manual
Page 12 10.2 Troubleshooting
Problem
Unit will not turn on
Unit spontaneously
turns off
Possible Reason
Solution
Weak battery
Recharge the battery for 4 hours
Invalid operation
Switch player off and then on again
Weak battery
Recharge the battery for 4 hours
Player connected by
USB cable damaged
USB, but computer
does not recognize the USB in disabled in the BIOS
device
OS does not support USB
Replace with a new cable
Enable USB functionality in the BIOS
Install or update the OS driver
Wire wrongly connected
Make sure the cable is firmly connected
Any issues of the PC
Reboot PC
Volume is too low
Turn up the volume
Wrong audio out device
Set right parameter
Unsupported file format
Re-encode media in a supported format
The file is corrupted
Re-copy the file to the player. You may
have to re-encode the file
Damaged earphones
Use different earphones
“Save Failure”
Storage full
Delete some files from the player
Wrong language
Wrong language is configured
Change the language in Settings
No sound when
playing media
E6 Series User Manual
Page 13 22.0 Technical Specifications
Dimensions
Display
69.6mm x 28mm x 12.6mm (length x width x thickness)
Physical dimensions
1.1”
Resolution
96x32 pixels
USB
Memory
USB 2.0
Internal file system
Expansion capacity
FAT32
1GB / 2GB / 4GB /8GB(optional)
Format
Length
Compress rate
Frequency response
WAV/MP3
70 Hours (128MB)
32Kbps – 384Kbps
20Hz – 20KHz
Total harmonic distortion
<0.1%
Signal-to-noise ratio
Audio Power
>85dB
8mW – 16mW
CMOS Camera
Frame rate
Color depth
Focus
30fps
24bit
1x to 2x
Supported formats
Audio
MP3, WAV, and unprotected WMA, OGG,
FLAC, and APE. Protected WMA audio
files, and M4A/M4P files (any AAC-encoded
audio) from iTunes® are not supported.
Record
MP3 and WMA
WE AT EMATIC ARE
CONSTANTLY
STRIVING TO
IMPROVE OUR
PRODUCTS. PLEASE
VISIT US ON THE WEB
AT http://www.ematic.us
FOR UPDATES ON
SUPPORTED
FORMATS
Operating temperature
Menu language
-5°C to 40°C
English, Simplified Chinese, Tradition Chinese, Japanese, Korean,
French, German, Spanish, Portuguese, Dutch, Italian.
E6 Series User Manual
Page 14 23.0 Limitation of Liability Statement
23.1 Links to Third Party Sites
The Ematic User Manual may contain links to third-party sites, however, please be
aware that Ematic is not responsible for and cannot control these other sites. Ematic
makes no representations whatsoever about any other website which you may access
through this user manual. When you access a non-Ematic web site, even one that may
contain the Ematic logo, please understand that it is independent from Ematic, and that
Ematic may have no control over the content on that website. In addition, a link to a
non-Ematic website does not mean Ematic endorses or accepts any responsibility for
the content, or the use, of such website. It is up to you to take precautions to ensure
that whatever you select for your use is free of such items as viruses, worms, trojan
horses and other items of a destructive nature.
23.2 Limitation of Liability
To the maximum extent permitted by applicable law, Ematic shall not be liable for any
damages suffered as a result of using, modifying, contributing, copying, distributing, or
downloading the materials. In no event shall Ematic be liable for any indirect,
extraordinary, exemplary, punitive, special, incidental, or consequential damages
(including loss of data, revenue, profits, use or other economic advantage) however
arising, whether for breach or in tort, even if Ematic has been previously advised of the
possibility of such damage. You agree that you have sole responsibility for adequate
protection and backup of data and/or equipment used in connection with the product
and software and will not make a claim of any nature against Ematic for lost data,
inaccurate output, work delays or lost profits resulting from the use of the materials. You
agree to hold Ematic entirely harmless from and you covenant not to sue Ematic, or its
affiliates, successors or assigns, for any claims related to Ematic. Some states do not
allow the exclusion or limitation of incidental or consequential damages, so the above
limitation or exclusion may not apply to you.
E6 Series User Manual Page 15