1
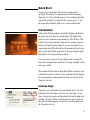
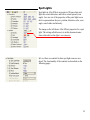
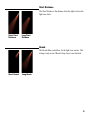
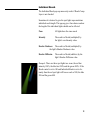
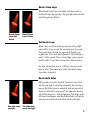
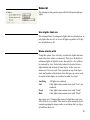
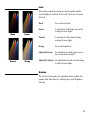
User’s Manual
Contents
Quick Start
3
Spot Lights
8
Introduction
3
License keys
3
Point Lights
4
Point Light Model
Light’s Intensity
Intensity
Softness
Radius
Individual Radius
Source Intensity
Source Radius
4
5
5
5
6
6
7
7
Spot Light Model
Light’s Intensity
Intensity
Start Distance
Reach
Individual Reach
Reach Comp Layer
Set Reach Layer
Reach Both Sides
9
9
9
10
10
11
12
12
12
General
13
Use Lights that are
Name starts with
Look
Gamma
13
13
14
14
©Trapcode 2003. All rights reserved.
2
Quick Start
Create a new composition. Then create a camera and a
spot light. Then create a composition-sized solid and apply
Trapcode Lux. You will right away see Lux rendering the light
cone of the spotlight. Try and orbit the camera (press “c” on
the keyboard) around the light to see it from all directions.
Introduction
Adobe After Effects produces wonderful lighting and shadows
on layers, but what about the actual lights? The lights themselves are not visualized in any manner by After Effects. That
is where Lux comes in handy. Trapcode Lux renders representations of all point and spot lights in a scene. Just apply it to a
composition-sized 2D solid and it will automatically get the position, color and all other properties of all point and spot lights
and render visual representations of them.
Lux can even be set up so the spot lights reach a certain 3D
layer in the composition to make the “on-stage-spotlight” effect
look very realistic.
This manual will describe in high detail all the controls in Lux.
It should be used as a reference when working with the plug-in.
For more hands-on training material, there are tutorials at the
Trapcode web site.
License keys
Trapcode Lux is distributed as an unlockable demo. It is fully
functional, but will render a red cross over the frame. At any
time, a license key can be purchased and fed into the plug-in by
clicking “Options”. When a valid name & key pair is entered,
the red cross will disappear. License keys can be purchased at
the Trapcode web site.
3
Point Lights
Point lights in After Effects are points in 3D space that emit
light uniformly in all directions. Lux uses three of the properties of the point light to render its representation, they are:
position, color and intensity.
In Lux, there are controls for how point lights are rendered.
The controls are:
Point Light Model
The Point Light Model controls what type of visualization is
used; the look of point lights. There are five settings:
Natural
Radius+Source
Off
No visualization of point lights.
Natural
Light falls off with distance squared
(1/R 2). This is the most physically
correct model.
Radius
Constant light up to a certain radius. It
has the look of a volumetric sphere.
Radius+Source
Like above, but adds a smaller sphere in
the center.
Source
Only the smaller center sphere.
Radius
Source
4
Light’s Intensity
The Light’s Intensity check box controls if the intensity values
from the lights should be used. It is on by default, but can be
switched off when desired that all point lights look the same
regardless of their individual intensity setting.
Intensity
Low
Medium
High
This slider acts as a master slider for all point lights’ intensities. By increasing this value all point lights will be visualized
with more intensity by Lux. It however has no effect on the
lights’ own intensity values, only on how they are rendered by
Lux. The top row in the image on the left shows how a light
using the Natural Point Light Model is affected. The bottom
row shows a light using the Radius model.
Softness
The Softness slider sets the softness of the visualization. The
top row in the image on the left shows how a light using the
Natural Point Light Model is affected. The bottom row shows
a light using the Radius model.
Low
Medium
High
5
Radius
The Radius slider only works when Point Light Model is set to
Radius or Radius+Source. It controls the size of the spheres.
Individual Radius
The Individual Radius pop-up menu only works when Point
Light Model is set to Radius or Radius+Source.
Sometimes it is desired to give the point lights representations
individual size. This pop-up gives four choices on how the
radius of the individual lights should can be affected:
None
All lights have the same radius
Intensity
The radius is affected (multiplied) by
the light’s Intensity value.
Shadow Darkness
The radius is affected (multiplied) by
the light’s Shadow Darkness value.
Shadow Diffusion
The radius is affected (additive) by the
light’s Shadow Diffusion value.
Example: There are three lights in a scene, the first has intensity 100%, the second has 200% and the third 400%. If the
Radius control is set to 100 and Individual Radius is set to
Intensity then the first point light will have a radius of 100, the
second 200 and the third 400.
6
Source Intensity
The Source Intensity slider only works when Point Light Model is set to Source or Radius+Source. It controls the intensity
of the inner spheres.
Source Radius
The Source Radius slider only works when Point Light Model
is set to Source or Radius+Source. It controls the size of the
inner spheres.
7
Spot Lights
Spot lights in After Effects are points in 3D space that emit
light in a certain direction, and with a certain spread (cone
angle). Lux uses six of the properties of the point light to render its representation, they are: position, direction, color, cone
angle, cone feather and intensity.
The image on the left shows After Effects properties for a spot
light. The setting called Intensity is in this document sometimes referred to as the light’s own intensity.
In Lux, there are controls for how spot light cones are rendered. The functionality of the controls are described on the
following pages.
8
Spot Light Model
The Spot Light Model controls what type of visualization is
used; the look of spot light cones. There are four settings:
Natural
Distance
Off
No visualization of spot lights.
Natural
Light falls off with distance squared
(1/R 2). This is the most physically
correct model.
Distance
Light falls off with distance (1/R).
Constant
Constant light intensity.
Constant
Light’s Intensity
The Light’s Intensity check box controls if the intensity values
from the lights should be used. It is on by default, but can be
switched off when desired that all spot light cones have the
same intensity, regardless of their own intensity setting.
Intensity
Low
Medium
High
This slider acts as a master slider for all spot lights’ intensities.
By increasing this value all spot lights will be visualized with
more intensity by Lux. It however has no effect on the lights’
own intensity values, only on how they are rendered by Lux.
The image on the left shows how a light using the Natural Spot
Light Model is affected. Notice how the lit area on the layer
below (the “floor”) remains unchanged. In order to also affect
the lit area, the light’s own intensity value should be changed
instead.
9
Start Distance
The Start Distance is the distance from the light to where the
light cone starts.
Short Start
Distance
Long Start
Distance
Reach
The Reach slider control how far the light cone reaches. This
setting is only active if Reach Comp Layer is not checked.
Short Reach
Long Reach
10
Individual Reach
The Individual Reach pop-up menu only works if Reach Comp
Layer is not checked.
Sometimes it is desired to give the spot lights representations
individual reach length. This pop-up gives four choices on how
the length of the individual lights should can be affected:
None
All lights have the same reach
Intensity
The reach is affected (multiplied) by
the light’s own Intensity value.
Shadow Darkness The reach is affected (multiplied) by
the light’s Shadow Darkness value.
Shadow Diffusion
The reach is affected (additive) by the
light’s Shadow Diffusion value.
Example: There are three spot lights in a scene, the red has
intensity 100%, the blue has 200% and the green 400%. If the
Reach control is set to 100 and Individual Reach is set to Intensity then the red spot light will have a reach of 100, the blue
200 and the green 400.
11
Reach Comp Layer
When Reach Comp Layer is activated, a 3D layer can be selected in the layer pop-up below. The spot light cones will then
reach that particular 3D layer.
Reach Comp
Layer not
Active
Reach Comp
Layer Active
Set Reach Layer
When a layer is selected in this pop-up menu, all spot light
cones will be set up to reach that particular layer. As soon as
the layer has been selected, the pop-up will flip back to its
original state, None, and a new light called “Lux Reach[layername]” will be created. This is a locked light, you are not supposed to edit it, it’s just there to keep track of the reach layer.
The layer selected here must be a 3D layer, otherwise it will
have no effect. This control only works when Reach Comp
Layer above is checked.
Reach Both Sides
All layers have two sides. Normally Lux doesn’t care which
side faces the light, it will still get stopped by the reach-layer
anyway. But if this option is unchecked, then only one side of
the layer will be able to stop (cut off) the light cone, the other
side will do the inverse - start the light cone. The image on the
left shows what happens when Reach Both Sides is off and the
reach-layer is rotated so that the other side faces the light.
One side stops
the light.
The other side
starts the light.
12
General
The settings in the general group affects both point and spot
lights.
Use Lights that are
The setting allows for using only lights that are switched on, or
only lights that are off, or to use all lights regardless of if they
are switched on or off.
Name starts with
Using this option, Lux will only visualize the lights that have
names that start with a certain word. This gives flexibility to
add many lights to light the scene, but only let a few of those
be rendered by Lux. It also helps when it is desired to have
lights behind and in front of some layers. In this case two
instances of Lux are used. One is placed on top of the layer
stack and another at the bottom, then this pop-up can be used
to control which lights are rendered in what Lux layer.
Anything
Lux
Front
Back
All lights are rendered
Only lights whose name starts with “Lux” are
rendered
Only lights whose name starts with “Front”
Only lights whose name starts with “Back”
Important note: Changing the name of a light does not force
After Effects to re-render. This must be done manually by for
example purging the image cache or switching the Lux layer
off and then back on.
13
Look
This setting controls how lights are mixed together and the
overall brightness and look of the result. There are six modes
for Look:
Weak
Natural
Weak
An overall weak look.
Linear
A normal look with bright areas in the
overlaps between lights.
Natural
A normal look with natural looking
overlaps between lights.
Strong
An overall bright look.
Adjustable Linear
An adjustable look with bright areas in
the overlaps between lights.
Linear
Strong
Adjustable Natural An adjustable look with natural looking
overlaps between lights.
Gamma
The two last Look modes (the adjustable modes) enables this
gamma slider that allows for adjusting the overall brightness
and look.
14